Working with Menus
The ojMenu component is a themable, WAI-ARIA compliant menu with mouse and keyboard interactions for navigation. After you create the menu, you can add it as a menu option to an ojButton component to create a menu button, or add it as a context menu to an Oracle JET component or HTML5 element.
Topics:
Working with ojMenu
You can create an ojMenu component from any valid markup as long as the elements have a strict parent-child relationship and each menu item has an anchor. Typically, you create the menu from an unordered list, with menu items that contain anchors, which in turn contain the menu item text.
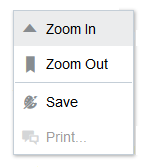
The following code sample shows the markup used to create the basic menu. To handle menu selection, add a select listener.
<ul id="myMenu" style="display:none"
      data-bind="ojComponent: {component: 'ojMenu', select: menuItemSelect}">
    <li id="zoomin">
      <a href="#"><span class="oj-menu-item-icon oj-fwk-icon oj-fwk-icon-arrow-n"></span>Zoom In</a>
    </li>
    <li id="zoomout">
      <a href="#"><span class="oj-menu-item-icon demo-icon-font demo-bookmark-icon-16"></span>Zoom Out</a>
    </li>
    <li id="divider"></li>
    <li id="save">
      <a href="#"><span class="oj-menu-item-icon demo-icon-font demo-palette-icon-24"></span>Save</a>
    </li>
    <li id="print" class="oj-disabled">
      <a href="#"><span class="oj-menu-item-icon demo-icon-font demo-chat-icon-24"></span>Print...</a>
    </li>
  </ul>
<!-- To handle menu item selection, use a select listener as shown above, not a click listener. The markup below displays the selection. -->
<p class="bold">Last selected menu item:
    <span id="results" data-bind='text: selectedMenuItem'></span>
</p>
The following script defines the selection listener.
require(['ojs/ojcore', 'knockout', 'jquery', 'ojs/ojknockout', 'ojs/ojmenu'],
function(oj, ko, $)
{
  function MenuModel() {
    var self = this;
    self.selectedMenuItem = ko.observable("(None selected yet)");
    self.menuItemSelect = function( event, ui ) {
        self.selectedMenuItem(ui.item.children("a").text());
    };
  }
});
For additional information about the ojMenu component's options, events, and methods, see the ojMenu API documentation.
The Oracle JET cookbook includes advanced examples for working with ojMenu, including demos for working with sub-menus and templates. For details, see Menu (Advanced).
Working with Menu Buttons
Menu buttons are ojButton components that display an ojMenu component when the user does one of the following:
-
Clicks on the button.
-
Sets focus on the button and presses the Enter, Spacebar, or Arrow Down key.
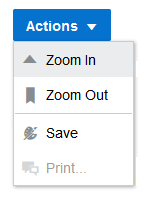
To create the menu button, add the basic ojMenu component as a menu option to an ojButton component configured on button or anchor tags. In the markup, place the ojMenu markup immediately after the ojButton markup.
The following code sample shows the markup for the menu button, with the details for the basic menu omitted.
<div id='menubutton-container'>
  <button id="menuButton"
          data-bind="ojComponent: {component: 'ojButton', label: 'Actions',
                                   menu: '#myMenu'}">
  </button>
  <ul id="myMenu" style="display:none"
      data-bind="ojComponent: {component: 'ojMenu', select: menuItemSelect}">
    <li id="zoomin">
      <a href="#"><span class="oj-menu-item-icon oj-fwk-icon oj-fwk-icon-arrow-n"></span>Zoom In</a>
    ... contents omitted
  </ul>
  <p>
  <p class="bold">Last selected menu item:
    <span id="results" data-bind='text: selectedMenuItem'></span>
  </p>
</div>
The following code sample shows the code that initializes the menu button.
require(['ojs/ojcore', 'knockout', 'jquery', 'ojs/ojknockout', 'ojs/ojbutton', 'ojs/ojmenu'],
function(oj, ko, $)
{

function MenuModel() {
    var self = this;
    self.selectedMenuItem = ko.observable("(None selected yet)");

    self.menuItemSelect = function( event, ui ) {
        self.selectedMenuItem(ui.item.children("a").text());
    };
}

$(function() {
    ko.applyBindings(new MenuModel(), document.getElementById('menubutton-container'));
});

});
The Oracle JET Cookbook includes the complete code sample for the menu button shown in this section. For details, see Menu Buttons.
Working with Context Menus
Context menus are ojMenu components placed on an Oracle JET component or an HTML5 element using the contextmenu attribute. The element on which the context menu binding is placed should be user-focusable, for keyboard accessibility through the Shift+F10 key, since focus is returned to the element when the menu is dismissed.
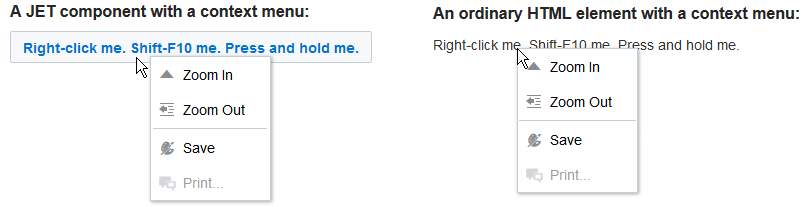
In this example, the ojMenu component is placed on an ojButton component and the HTML anchor element. The code sample below shows the markup for the ojButton component and the HTML anchor element, with the details for the basic menu omitted.
<div id="button-container">
    <h3>A JET component with a context menu:</h3>
    <!-- Use the HTML5 contextmenu attribute for JET components -->
    <button id= "myButton" contextmenu="myMenu"
            data-bind="ojComponent: { component: 'ojButton',
                                      label: 'Right-click me. Shift-F10 me. Press and hold me.' }">
    </button>
    <h3>An ordinary HTML element with a context menu:</h3>
    <!-- Use the ojContextMenu binding for elements that aren't JET components -->
    <a href="#" id="myAnchor" contextmenu="myMenu"
       data-bind="ojContextMenu: {}">Right-click me. Shift-F10 me. Press and hold me.</a>
</div>
<div id='menu-container'>
  <!-- To handle menu item selection, use a select listener as shown,
       not a click listener. -->
  <ul id="myMenu" style="display:none"
      data-bind="ojComponent: {component: 'ojMenu', select: menuItemSelect,
                               beforeOpen: menuOpen}">
    ... contents omitted
  </ul>
<p>
  <p class="bold">Last selected menu item:
    <span id="results" data-bind='text: selectedMenuItem'></span>
  </p>
</div>
When you add a context menu to an Oracle JET component, you apply the ojComponent binding as shown above. If you add the context menu to an HTML5 element, use the ojContextMenu binding, also shown above.
The following code sample shows the code to initialize the context menu.
require(['ojs/ojcore', 'knockout', 'jquery', 'ojs/ojknockout', 'ojs/ojbutton', 'ojs/ojmenu'],
function(oj, ko, $)
{
function MenuModel() {
  var self = this;
  self.selectedMenuItem = ko.observable("(None selected yet)");
  self.menuLauncher= ko.observable("(Not launched yet)");

  self.menuItemSelect = function( event, ui ) {
    self.selectedMenuItem(ui.item.children("a").text());
  };

  self.menuOpen = function( event, ui ) {
    self.menuLauncher(ui.openOptions.launcher.attr("id"));
  };
}

$(function() {
  ko.applyBindings(new MenuModel(), document.getElementById('button-container'));
});
The Oracle JET cookbook contains the complete example, including the CSS for the menu icons, at: Context Menus.