9 Using Plugins in MAF Applications
This chapter includes the following sections:
9.1 Introduction to Using Plugins in MAF Applications
MAF packages a number of Cordova plugins that enable your MAF application to interact with the device on which you deploy the application. We refer to the plugins that MAF provides by default as core plugins. You can view these plugins in the maf-application.xml file's overview editor. Examples include the Email and Contacts plugins that MAF applications use to access email and contact functionality from a device.
MAF includes the following versions of Apache Cordova for MAF applications that use plugins:
-
Apache Cordova 3.7.2 for MAF applications on the Android platform
-
Apache Cordova 3.8.0 for MAF applications on the iOS platform
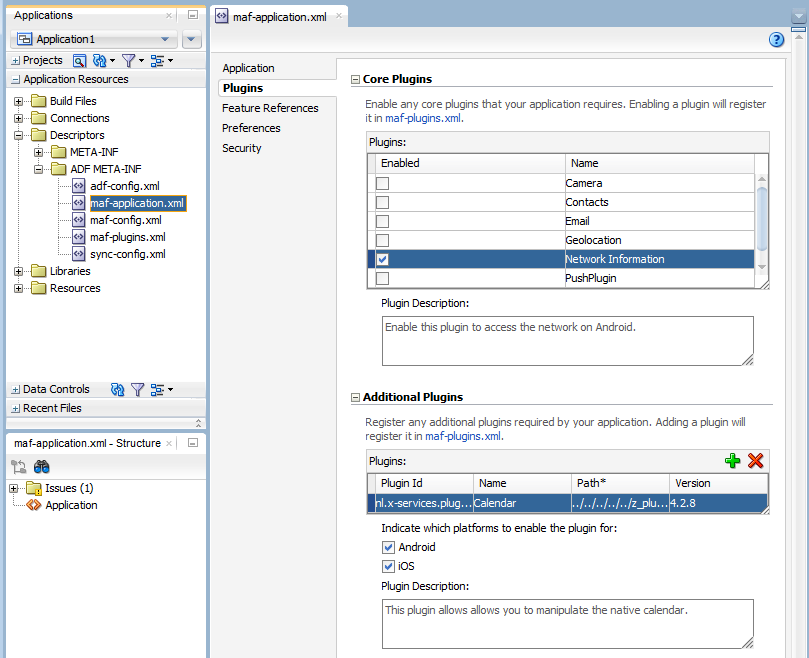
Select a plugin in the Core Plugins list, as shown in Figure 9-1 , to view a description of the individual plugins. By default, a newly-created MAF application enables only one core plugin (Network Information plugin). You enable or disable these core plugins, as described in Enabling a Core Plugin in Your MAF Application.
Note:
All applications on iOS devices have network access by default. You cannot change this behavior. For applications that you intend to deploy on Android devices, disable the Network Information plugin if you do not want the application to have network access on the Android device.
You can register additional plugins that you or others develop if the core plugins that MAF provides by default do not meet your MAF application's requirements. For more information, see “Introduction to custom Cordova plugin development” at http://blogs.oracle.com/mobile/entry/introduction_to_custom_cordova_plugin and Registering Additional Plugins in Your MAF Application. Once you have enabled the core plugin and/or registered any additional plugins you want your MAF application to use, you create content in an application feature that accesses the plugin’s functionality. For more information, see Using a Plugin in a MAF Application.
If your MAF application fails to deploy after you register additional plugins, it may be due to filename conflicts between plugins that your MAF application uses. Alternatively, it may be due to the absence of dependent plugin that additional plugins you registered require in order to function correctly. For more information, see Deploying Plugins with Your MAF Application.
If you want to migrate a MAF application created with an earlier release of MAF, you need to register any plugins your application uses in the maf-plugins.xml file. For more information, see the "Migrating Cordova Plugins from Earlier Releases to MAF 2.2.0" section in Installing Oracle Mobile Application Framework.
Note:
Although you edit the maf-application.xml file to manage plugins in your application, any changes you make result in revisions to the maf-plugins.xml file. You access both files from the ADF-META-INF node of the Application Resources pane, as shown in Figure 9-1 .
Figure 9-1 Plugins in maf-application.xml File's Overview Editor

9.2 Enabling a Core Plugin in Your MAF Application
By default, newly-created MAF applications enables only one core plugin (Network Information plugin). Enable or disable additional core plugins so that your MAF application can access the associated device functionality.
9.2.1 How to Enable a Core Plugin in Your MAF Application
You enable a core plugin using the overview editor for your MAF application's maf-application.xml file.
To enable a core plugin in your MAF application:
9.2.2 What Happens When You Enable a Core Plugin in Your MAF Application
Once you enable a plugin in the overview editor, JDeveloper edits the application's maf-plugins.xml file with entries that identify the enabled plugins in your MAF application. Example 9-1 shows the entries for a MAF application where the Email and Network Information plugins have been enabled. Enabling these plugins is a prerequisite to your MAF application using the device's email client and accessing the internet.
Example 9-1 Enabled Core Plugins in maf-plugins.xml File
<?xml version="1.0" encoding="UTF-8" ?>
<maf-plugins xmlns:xsi="http://www.w3.org/2001/XMLSchema-instance" xmlns="http://xmlns.oracle.com/adf/mf">
  <cordova-plugins>
    <core-cordova-plugin id="c1" pluginId="cordova-plugin-network-information"/>
    <core-cordova-plugin id="c2" pluginId="com.oracle.maf.email"/>
 </cordova-plugins>
</maf-plugins>
9.3 Registering Additional Plugins in Your MAF Application
Register additional plugins in your MAF application when you require functionality in your MAF application not provided by the core plugins that MAF delivers.
9.3.1 How to Register an Additional Plugin
You use the overview editor for your MAF application's maf-application.xml file to register the additional plugin you want your MAF application to use.
Before you begin, make sure to store the plugin that you want to register with your application on the same drive as the application with which you want to register it. If, for example, you store your application in the C: drive on a Windows environment, you must also store the plugin that you want to register with the application on the C: drive. This makes sure that JDeveloper successfully registers the plugin with your application using a relative path.
To register an additional plugin for your MAF application:
- In the Applications window, expand the Application Resources panel.
- In the Application Resources panel, expand Descriptors and then ADF META-INF.
- Double-click the maf-application.xml file and in the overview editor that appears, click the Plugins navigation tab.
- Expand the Additional Plugins section and click the Add icon to display a dialog where you browse to and select the directory that stores the plugin that you want to register with your application.
9.3.2 What Happens When You Register an Additional Plugin for Your MAF Application
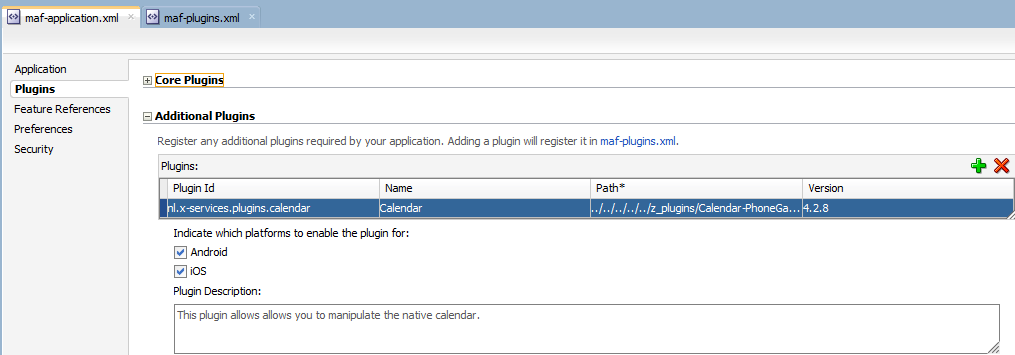
Once you select the source files for the plugin you want your MAF application to use, JDeveloper edits the application's maf-plugins.xml file with entries that identify the enabled plugins in your MAF application. Example 9-2 shows the entries in a maf-plugins.xml file where the Calendar plugin shown in Figure 9-2 has been registered with the MAF application.
Figure 9-2 Additional Plugin in maf-application.xml File's Overview Editor

Example 9-2 Additional Plugin in maf-plugins.xml File
<?xml version="1.0" encoding="UTF-8" ?>
<maf-plugins xmlns:xsi="http://www.w3.org/2001/XMLSchema-instance"
xmlns="http://xmlns.oracle.com/adf/mf">
   <cordova-plugins>
     <core-cordova-plugin id="c1" pluginId="org.apache.cordova.network-information"/>
    <cordova-plugin id="c2" pluginId="nl.x-services.plugins.calendar"
                    path="../../../../../z_plugins/Calendar-PhoneGap-Plugin-master/">
      <platform id="p1" name="android" enabled="true"/>
      <platform id="p2" name="ios" enabled="true"/>
    </cordova-plugin>
   </cordova-plugins>
</maf-plugins>
9.4 Deploying Plugins with Your MAF Application
The deployment of a plugin with your MAF application depends on the deployment method you choose.
Deployment to a FAR
A deployment to a FAR includes a copy of the application's maf-plugins.xml file named jar-maf-plugins.xml. It is identical to the application's maf-plugins.xml file with the exception that the path attribute value of each plugin is an empty string. A FAR deployment does not include the source files for the plugin.
Deployment to a Mobile Application Archive File
A deployment to a Mobile Application Archive File includes a copy of the application's maf-plugins.xml file with all path attributes set to an empty string.
Deployment Using an Android or iOS Deployment Profile
When deploying using an Android or iOS deployment profile, JDeveloper invokes the maf-helper command-line tool to deploy the configured plugins. The maf-helper command-line tool deploys the plugin artifacts from their source location to the Android or iOS deployment folder. Once the command-line tool deploys the plugins, deployment incorporates the plugin(s) into the platform-specific application.
Resolving Naming Conflicts Between Plugins
Deployment can fail due to naming conflicts if more than one plugin used by your MAF application contains resource files with the same name. For example, deployment fails if a MAF application uses two plugins that both have a resource file name arrays.xml.
To resolve these naming conflicts, rename the resource file name in one plugin that conflicts with the resource file name in the second plugin. Update the reference to the resource file in the first plugin's plugin.xml file. In our example, this requires you to rename the first plugin's array.xml resource file name to pluginone_arrays.xml and edit the plugin's plugin.xml file as follows:
<source-file src="src/android/LibraryProject/res/values/pluginone_arrays.xml"
                                                         target-dir="res/values"/>
Adding Missing Dependent Plugins
Deployment can fail if an additional plugin that your MAF application uses does not locate plugins that it requires (dependent plugins). This scenario can arise if you work behind a firewall because, at deployment time, JDeveloper invokes Apache Cordova's tools to manage plugins dependencies. These latter tools may fail to download dependent plugins if their proxy settings are not configured to allow the download of dependent plugins. To workaround this scenario, download the missing dependent plugin and add it to your MAF application. You add the missing dependent plugin the same way as other plugins that you want to add to your MAF application. For more information, see Registering Additional Plugins in Your MAF Application. After you add the dependent plugin, make sure that it appears before the plugin that requires it in the maf-plugins.xml file, as demonstrated in Example 9-3 .
Example 9-3 Adding Dependent Plugins to the MAF Application
<maf-plugins xmlns:xsi="http://www.w3.org/2001/XMLSchema-instance"
xmlns="http://xmlns.oracle.com/adf/mf">
   <cordova-plugins>
     ....
    <cordova-plugin id="c2" pluginId="com.example.dependent.dependentPlugin"
                    path="../../../../../plugins/Dependent-Plugin-Required-By-PluginWithID_c3/">
      ...
    <cordova-plugin id="c3" pluginId="com.example.plugin"
                    path="../../../../../plugins/AdditionalPlugin/">
      ...
   </cordova-plugins>
</maf-plugins>
9.5 Importing Plugins from a Feature Archive File
When you import a FAR that contains a jar-maf-plugins.xml file to your application, the content in the jar-maf-plugins.xml file merges with the consuming application's maf-plugins.xml file. JDeveloper logs information about the merge to its Messages window. If the plugin to import from the FAR exists already in the consumer application's maf-plugins.xml file, JDeveloper logs a message that the plugin exists in the application and will not be merged. If the plugin to import from the FAR does not exist in the consumer application's maf-plugins.xml file, JDeveloper adds the plugin to the application's maf-plugins.xml file. In this scenario, you need to set the path to the newly-imported plugin, as described in Registering Additional Plugins in Your MAF Application.
9.6 Using a Plugin in a MAF Application
Once you register a plugin or enable a core plugin in your MAF application, you can create content in the MAF application that uses the plugin.
See "Integrating a custom Cordova plugin into a MAF app" at http://blogs.oracle.com/mobile/entry/integrating_a_custom_cordova_plugin for information about how you can invoke a plugin from Java, from a MAF AMX page, and from local HTML.
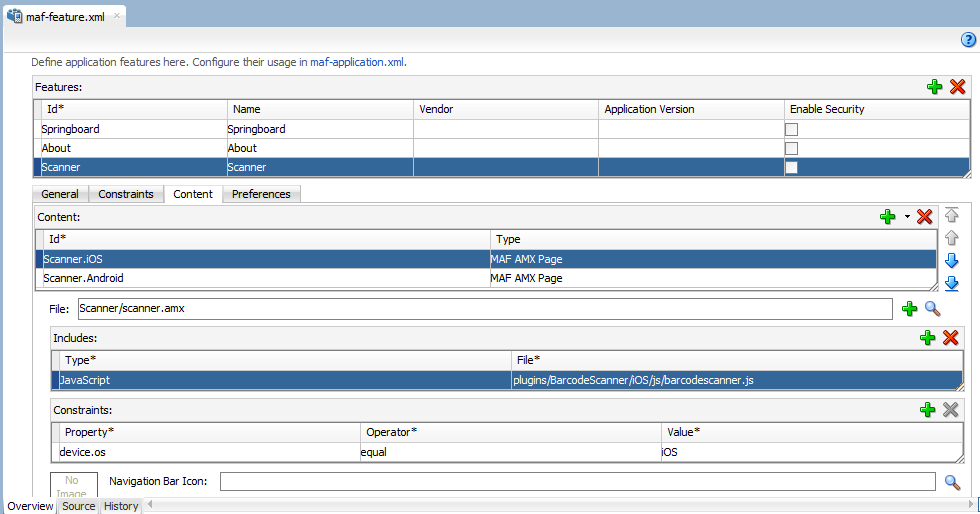
The BarcodeDemo sample application also demonstrates how you can accomplish this task. It creates different content pages for each platform where the application will be used because a plugin uses different files for each platform that the plugin supports. Figure 9-3 shows the Scanner application feature defined in the BarcodeDemo sample application’s maf-feature.xml. The Scanner application feature references two different MAF AMX pages (Scanner.iOS and Scanner.Android). Each MAF AMX page includes the appropriate JavaScript file for its platform and a constraint so that the MAF AMX page only renders on the intended platform.
Figure 9-3 Platform-Specific Content and Constraint To Access a Plugin

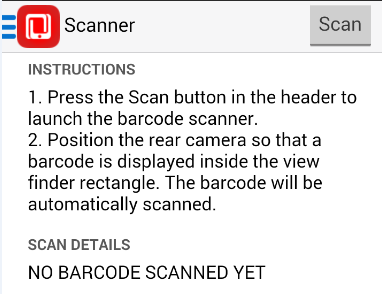
Figure 9-4 shows a button (Scan) in the MAF AMX page that the BarcodeDemo sample application renders on the end user’s device at runtime. This button invokes a managed bean method and the managed bean method invokes a JavaScript function that calls the BarcodeScanner plugin.
Figure 9-4 Command Button Invoking Managed Bean Method to Access Plugin

Example 9-4 shows a number of code extracts from the BarcodeDemo sample application.
Other sample applications, apart from the BarcodeDemo sample application, that demonstrate how to use plugins in MAF applications are BeaconDemo, FakeBeacon, and DatePicker. For information about how to access and use these sample applications, see MAF Sample Applications.
Example 9-4 Using the Barcode Scanner Plugin
<!--  The Scan button invokes the scanBarcode method in the managed bean -->
<amx:commandButton text="Scan" id="cl2" actionListener="#{viewScope.BarcodeBean.scanBarcode}"/>

<!--  The scanBarcode managed bean method invokes a JavaScript function -->
  public void scanBarcode (ActionEvent event)
  {
    // Invokes a JavaScript function named “scanBarcodeFromJavaBean”
    AdfmfContainerUtilities.invokeContainerJavaScriptFunction(AdfmfJavaUtilities.getFeatureId(),
                                                               "scanBarcodeFromJavaBean",
                                                               new Object[] { });
  }

<!--  The JavaScript function accesses the barcode scanner and sets the resulting value in a managed bean field.-->
function scanBarcodeFromJavaBean(options)
        {
            cordova.plugins.barcodeScanner.scan(
              function(result)
              {
                adf.mf.api.setValue( { "name": "#{viewScope.BarcodeBean.barcodeResult}",
                                       "value": "Result = " + result.text + ", Format = " + result.format + ", Cancelled = " + result.cancelled},
                                       function() {},
                                       function() {});
              },
              function(error)
              {
                adf.mf.api.setValue( { "name": "#{viewScope.BarcodeBean.barcodeResult}",
                                        "value": "Error = " + error.text },
                                        function() {},
                                        function() {});
              }
            );
        }