注意:
- 本教程需要访问 Oracle Cloud。要注册免费账户,请参阅开始使用 Oracle Cloud Infrastructure 免费套餐。
- 它使用 Oracle Cloud Infrastructure 身份证明、租户和区间的示例值。完成实验室时,请将这些值替换为特定于云环境的值。
使用 OCI GoldenGate 将本地 MySQL Database 迁移到 Oracle HeatWave MySQL 托管实例
简介
Oracle Cloud Infrastructure GoldenGate (OCI GoldenGate) 是一项完全托管的服务,可帮助数据工程师实时、大规模地将数据从一个或多个数据管理系统迁移到 OCI 数据库。在单一界面中设计、运行、编排和监视数据复制任务,而无需分配或管理任何计算环境。OCI GoldenGate 支持多个源和目标,包括 MySQL 和 Oracle HeatWave MySQL 数据库服务。
在本教程中,我们将指导您如何使用 OCI GoldenGate 将内部部署 MySQL 数据库迁移到 Oracle HeatWave MySQL 托管实例。
目标
- 使用 OCI GoldenGate 将本地 MySQL 数据库迁移到 OCI 上的 Oracle HeatWave MySQL 托管实例。
先决条件
-
源 MySQL 数据库是内部部署数据库,目标 Oracle Heatwave MySQL 托管实例和 OCI 堡垒主机已就位。
-
由于这是单向复制,因此目标版本可能高于源版本。对于双向复制,建议源和目标在同一版本上。
-
必须在源上启用
log_bin(binlog)。 -
源实例和目标实例上的
binlog_expire_logs_second实例参数必须至少设置为 72 小时。 -
必须将源实例和目标实例上的
binlog_row_metadata实例参数设置为完整,才能允许数据定义语言 (Data Definition Language,DDL) 复制。注:在本教程中,源正在运行 MySQL 版本
5.7.44,其中不支持binlog_row_metadata参数。因此,DDL 复制不受支持。 -
如果目标 Oracle Heatwave MySQL 实例具有高可用性 (HA),则全局事务处理标识符 (Global Transaction Identifier,GTID) 模式必须位于源上,否则为可选模式。
-
查看支持的数据类型。有关更多信息,请参见MySQL:Supported Data Types,Objects,and Operations 。
-
查看 DDL 复制限制。有关更多信息,请参见 Using DDL Replication 。
-
应使用以下方法之一提前从源创建目标实例:
- 方法 1:使用 MySQL shell 实用程序(如
util.dumpInstance和util.loadDump)。 - 方法 2:使用 MySQL shell 实用程序(如
util.copyInstance)。 - 方法 3:使用 OCI GoldenGate 进行初始提取和复制以执行初始数据加载。
注:在本教程中,我们将使用
util.copyInstance进行初始加载。 - 方法 1:使用 MySQL shell 实用程序(如
-
OCI Bastion 主机在 OCI 中安装了 MySQL 客户端和 MySQL Shell 实用程序。
-
FastConnect/IPSec/VPN、入站规则和更新的安全列表,允许在内部部署源、目标 Oracle Heatwave MySQL、堡垒和 OCI GoldenGate 之间进行通信。
限制
-
自动递增列问题。
-
如果表有一个列,但该列不是主键或唯一键,则映射将失败,因为该表的所有列的组合在源和目标上是相同的。
-
数据类型、DDL 和其他功能限制。
-
使用主动 - 主动复制时,两个系统上的时区必须相同,以便基于时间戳的冲突解决和检测可以运行。
任务 1:创建源和目标 MySQL 实例
-
源:
-On-premise Hostname: MySQLCI57 OEL 7.9 MySQL version 5.7.44 Intel Hardware Standard.Flex3 with 4 CPUs and 32GB Dedicated VM -
目标:
-OCI Oracle Heatwave MySQL Managed Instance Hostname: MySQLGG1 with HA and no heatwave (4CPU and 32GB) OEL 8 with latest build MySQL version: 8.4.4 Private subnet -
OCI 堡垒主机:
-OCI
Hostname: Bastion
OEL 8 with Intel hardware Standard.Flex3 with 4CPUs and 32GB
任务 2:测试堡垒、内部部署与 Oracle Heatwave MySQL 实例之间的连接
-
在 OCI 堡垒主机上安装 MySQL 客户端和 MySQL Shell 实用程序。
-
测试从 OCI 堡垒到源内部部署 MySQL 实例的连接。
[root@bastion ~]# mysql --host <sourceIP> -uadmin -p mysql: [Warning] Using a password on the command line interface can be insecure. Welcome to the MySQL monitor. Commands end with ; or \g. Your MySQL connection id is 15 Server version: 5.7.44 MySQL Community Server (GPL) Copyright (c) 2000, 2025, Oracle and/or its affiliates. Oracle is a registered trademark of Oracle Corporation and/or its affiliates. Other names may be trademarks of their respective owners. Type 'help;' or '\h' for help. Type '\c' to clear the current input statement. mysql> show databases; +--------------------+ | Database | +--------------------+ | information_schema | | mysql | | performance_schema | | sys | +--------------------+ 4 rows in set (0.00 sec) mysql> select @@version; +-----------+ | @@version | +-----------+ | 5.7.44 | +-----------+ 1 row in set (0.00 sec) -
测试从源内部部署 MySQL 到 Oracle Heatwave MySQL 托管实例的连接。
[root@mysqlci57 ~]# mysql --host <targetIP> -u admin -p
mysql: [Warning] Using a password on the command line interface can be insecure.
Welcome to the MySQL monitor.  Commands end with ; or \g.
Your MySQL connection id is 108
Server version: 8.4.4-u5-cloud MySQL Enterprise - Cloud

Copyright (c) 2000, 2023, Oracle and/or its affiliates.

Oracle is a registered trademark of Oracle Corporation and/or its
affiliates. Other names may be trademarks of their respective
owners.

Type 'help;' or '\h' for help. Type '\c' to clear the current input statement.

mysql> select @@version;
+----------------+
| @@version      |
+----------------+
| 8.4.4-u5-cloud |
+----------------+
1 row in set (0.01 sec)
任务 3:为 OCI 创建用户 GoldenGate
-
源:
create user 'ggsuser_S'@'%' identified by "<password>"; grant all privileges on airportdb.* to 'ggsuser_S'@'%' with grant option; Grant select, process, replication slave, reload, replication client on *.* to 'ggsuser_S'@'%'; -
目标:
create user 'ggsuser_T'@'%' identified by "<password>";
grant all privileges on airportdb.* to 'ggsuser_T'@'%' with grant option;
Grant select,  process, replication slave, replication client on *.* to 'ggsuser_T'@'%';

Create database ggadmin;  -- you create this db on target side to store the checkpoint table.
grant all privileges on ggadmin.* to 'ggsuser_T'@'%' with grant option;
任务 4:在 OCI 的源数据库中设置必需参数 GoldenGate
如果目标是独立的(不是 HA),则不必在源上启用 GTID。但是,如果目标是 HA,则强烈建议在源上打开 GTID。必须启用 binlog 模式。
-
编辑
/etc/my.cnf文件并添加以下行。server-id=1 log-bin=/var/log/mysql/mysql-bin.log max_binlog_size=100M binlog_format=ROW expire_logs_days=10 -- binlog_row_metadata=FULL <-- this is not supported in Version 5.7.44. So DDL replication will not be possible if source is on v5.7.44. gtid_mode=ON enforce_gtid_consistency=ON -
重新启动 MySQL 服务器。
Systemctl stop mysqld Systemctl start mysqld Systemctl status mysqld有关完整列表或参数,请查看事务处理日志设置和要求。有关详细信息,请参阅选项 B:在 OCI 计算上使用您自己的堡垒。
-
运行以下命令可检查二进制日志是否已启用。
mysql> show binary logs; +------------------+-----------+ | Log_name | File_size | +------------------+-----------+ | mysql-bin.000001 | 154 | +------------------+-----------+ 1 row in set (0.00 sec) mysql> show variables like 'bin%'; +--------------------------------------------+--------------+ | Variable_name | Value | +--------------------------------------------+--------------+ | bind_address | * | | binlog_cache_size | 32768 | | binlog_checksum | CRC32 | | binlog_direct_non_transactional_updates | OFF | | binlog_error_action | ABORT_SERVER | | binlog_format | ROW | | binlog_group_commit_sync_delay | 0 | | binlog_group_commit_sync_no_delay_count | 0 | | binlog_gtid_simple_recovery | ON | | binlog_max_flush_queue_time | 0 | | binlog_order_commits | ON | | binlog_row_image | FULL | | binlog_rows_query_log_events | OFF | | binlog_stmt_cache_size | 32768 | | binlog_transaction_dependency_history_size | 25000 | | binlog_transaction_dependency_tracking | COMMIT_ORDER | +--------------------------------------------+--------------+ 16 rows in set (0.01 sec) -
运行以下命令检查 GTID 模式 (
gtid_mode) 是否已打开。mysql> show variables like 'gtid%'; +----------------------------------+-----------+ | Variable_name | Value | +----------------------------------+-----------+ | gtid_executed_compression_period | 1000 | | gtid_mode | ON | <--- it is now showing ON | gtid_next | AUTOMATIC | | gtid_owned | | | gtid_purged | | +----------------------------------+-----------+ 5 rows in set (0.00 sec) mysql> select @@gtid_executed, @@gtid_purged\G *************************** 1. row *************************** @@gtid_executed: @@gtid_purged: 1 row in set, 1 warning (0.00 sec) mysql> select * from mysql.gtid_executed; Empty set (0.00 sec) <--- this is empty because we just turned it ON. As transactions occur this will get populated
注:第一个查询通常显示 GTID 的 NULL 值。这是因为在 MySQL
versions 5.7中,GTID 值仅存储在mysql.gtid_executed表中。
任务 5:在目标数据库中创建 airportdb 方案(仅限元数据)
-
从源数据库提取方案元数据。
[root@bastion airport-db]# mysqldump --host <SourceIP> -u admin -p --no-data --routines --events airportdb > airportdb.sql mysqldump: [Warning] Using a password on the command line interface can be insecure. -- Warning: column statistics not supported by the server. -
将方案元数据导入到目标数据库。
[root@bastion opc]#  mysql --host <TargetIP> -u admin -p
mysql: [Warning] Using a password on the command line interface can be insecure.
Welcome to the MySQL monitor.  Commands end with ; or \g.
Your MySQL connection id is 581
Server version: 8.4.4-u5-cloud MySQL Enterprise - Cloud

Copyright (c) 2000, 2025, Oracle and/or its affiliates.

Oracle is a registered trademark of Oracle Corporation and/or its
affiliates. Other names may be trademarks of their respective
owners.

Type 'help;' or '\h' for help. Type '\c' to clear the current input statement.

mysql> create database airportdb;
Query OK, 1 row affected (0.01 sec)

mysql> use airportdb;
Database changed
mysql> source airportdb.sql
任务 6:设置 OCI GoldenGate 部署和添加连接
关于如何设置 OCI GoldenGate 部署,有几个博客和教程,因此我们将在此处显示几个步骤。
-
登录 OCI 控制台,然后选择 GoldenGate Deployments 。
-
单击创建部署并输入所需的信息,如下图中所示。
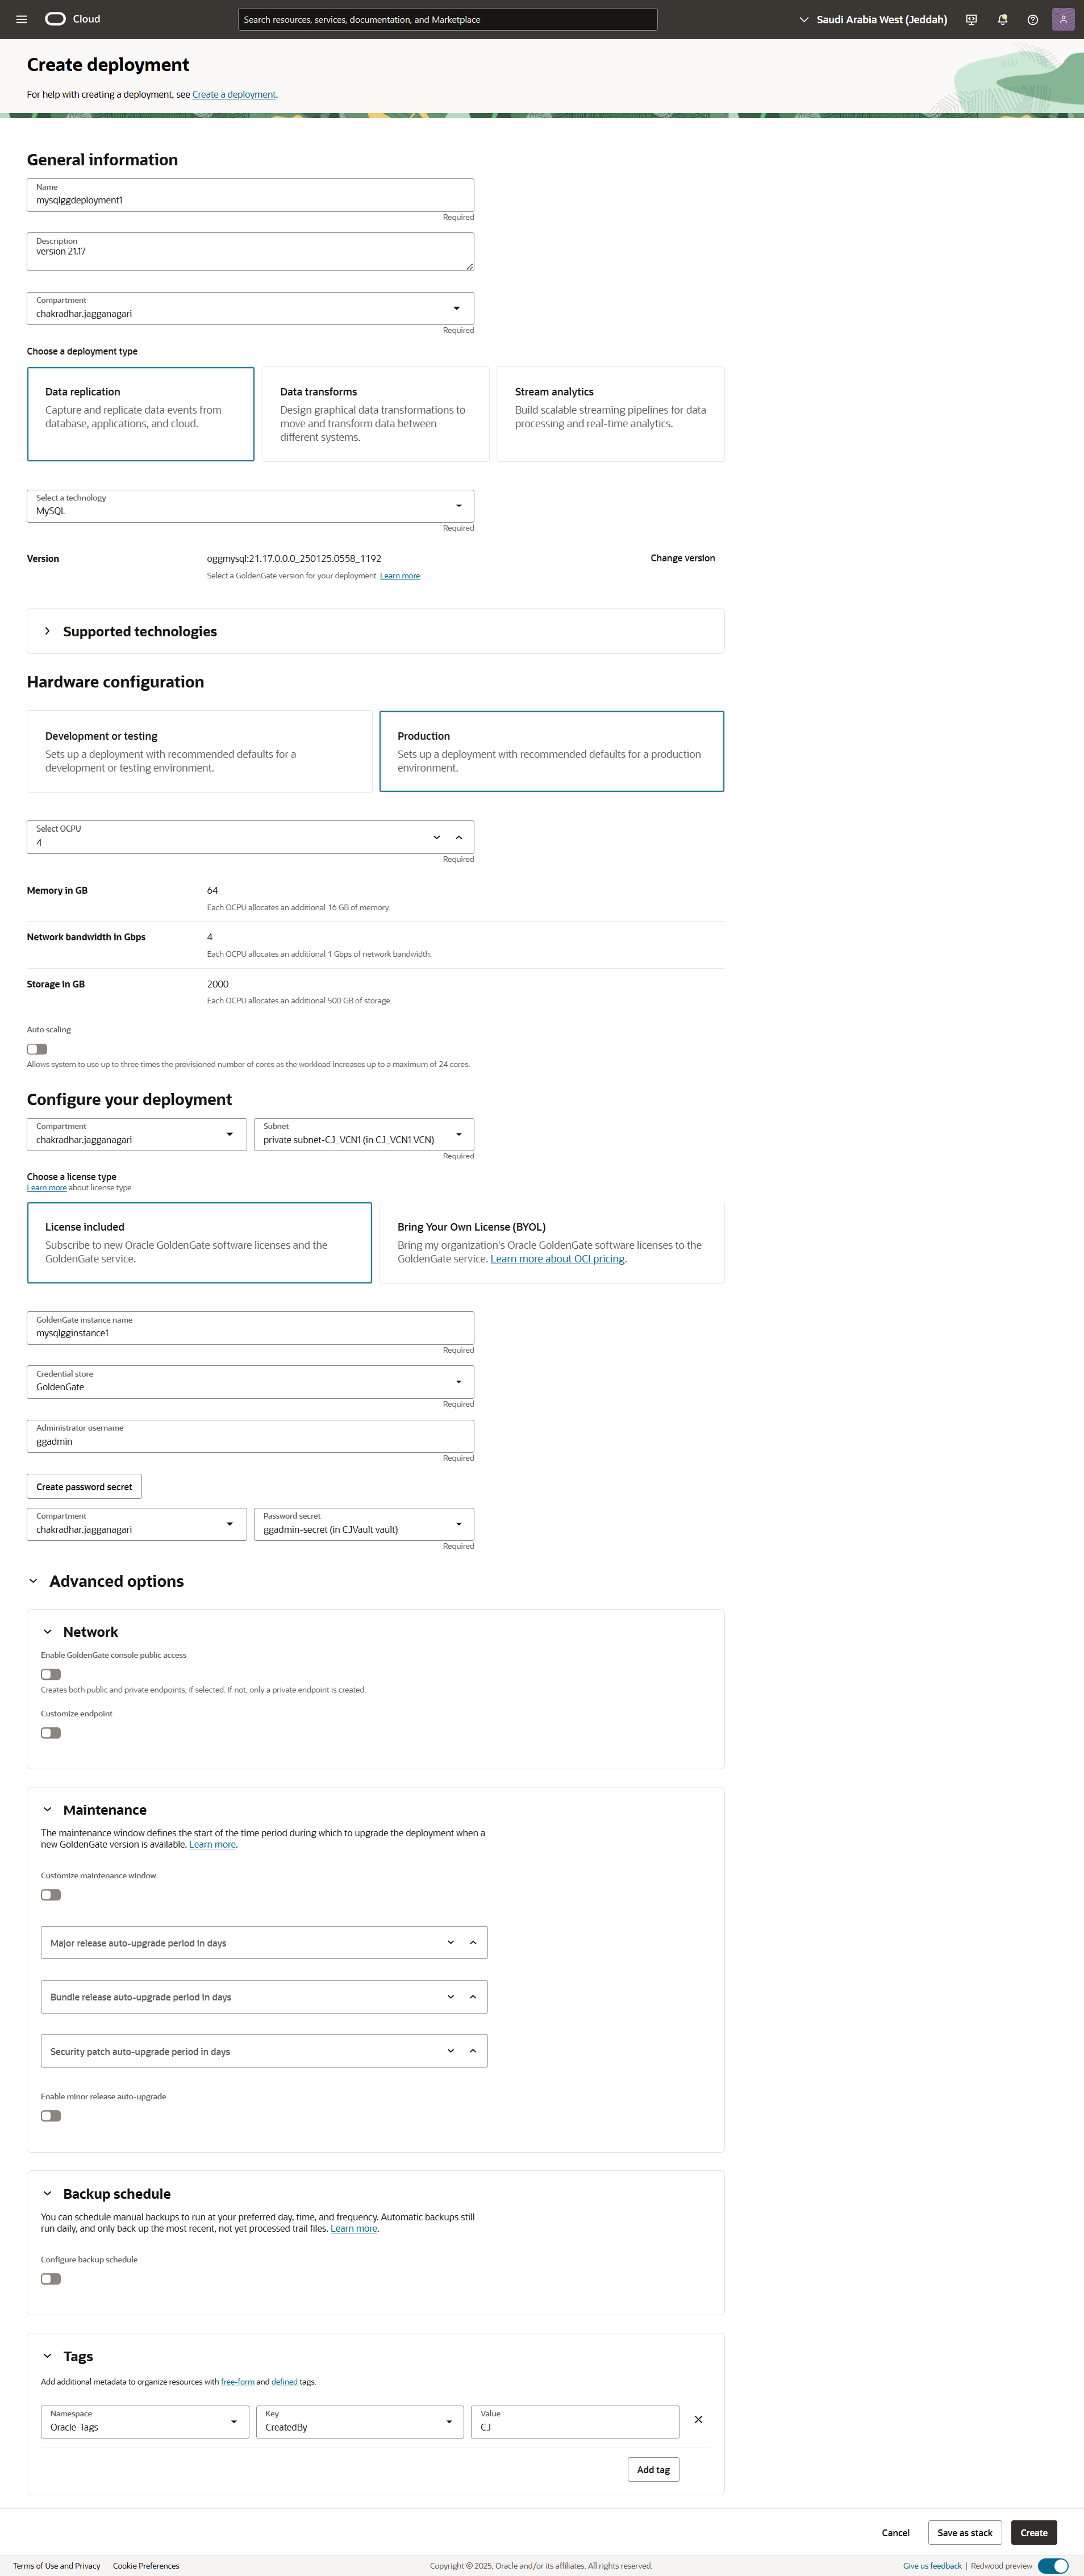
-
在创建部署页上添加源和目标连接详细信息。
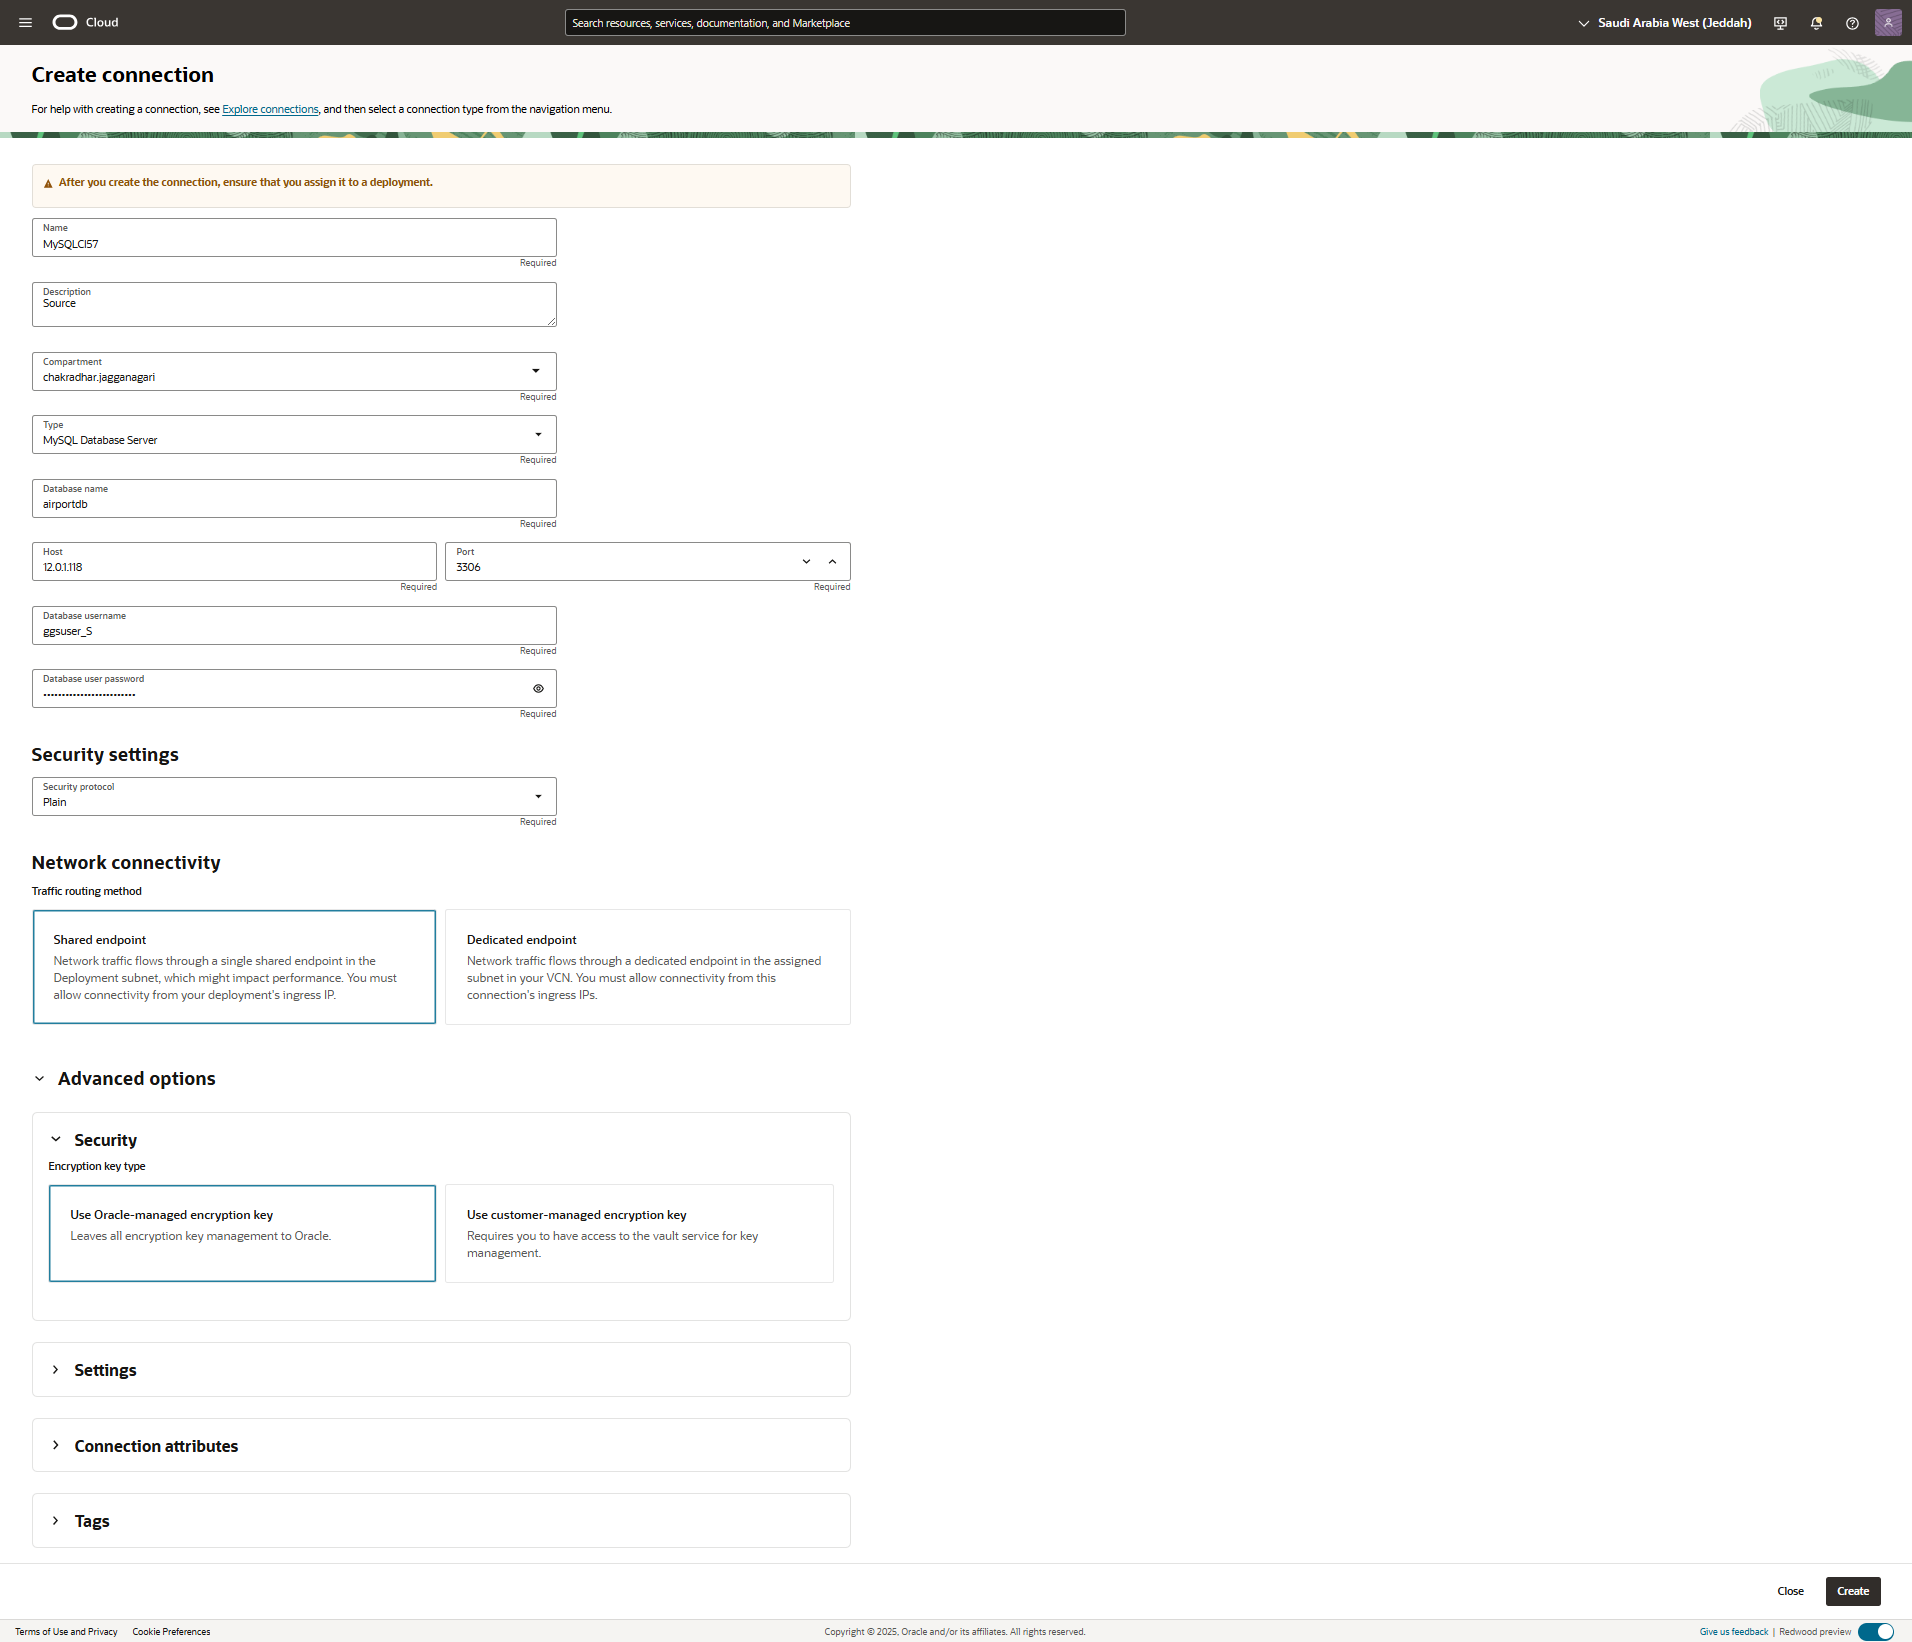
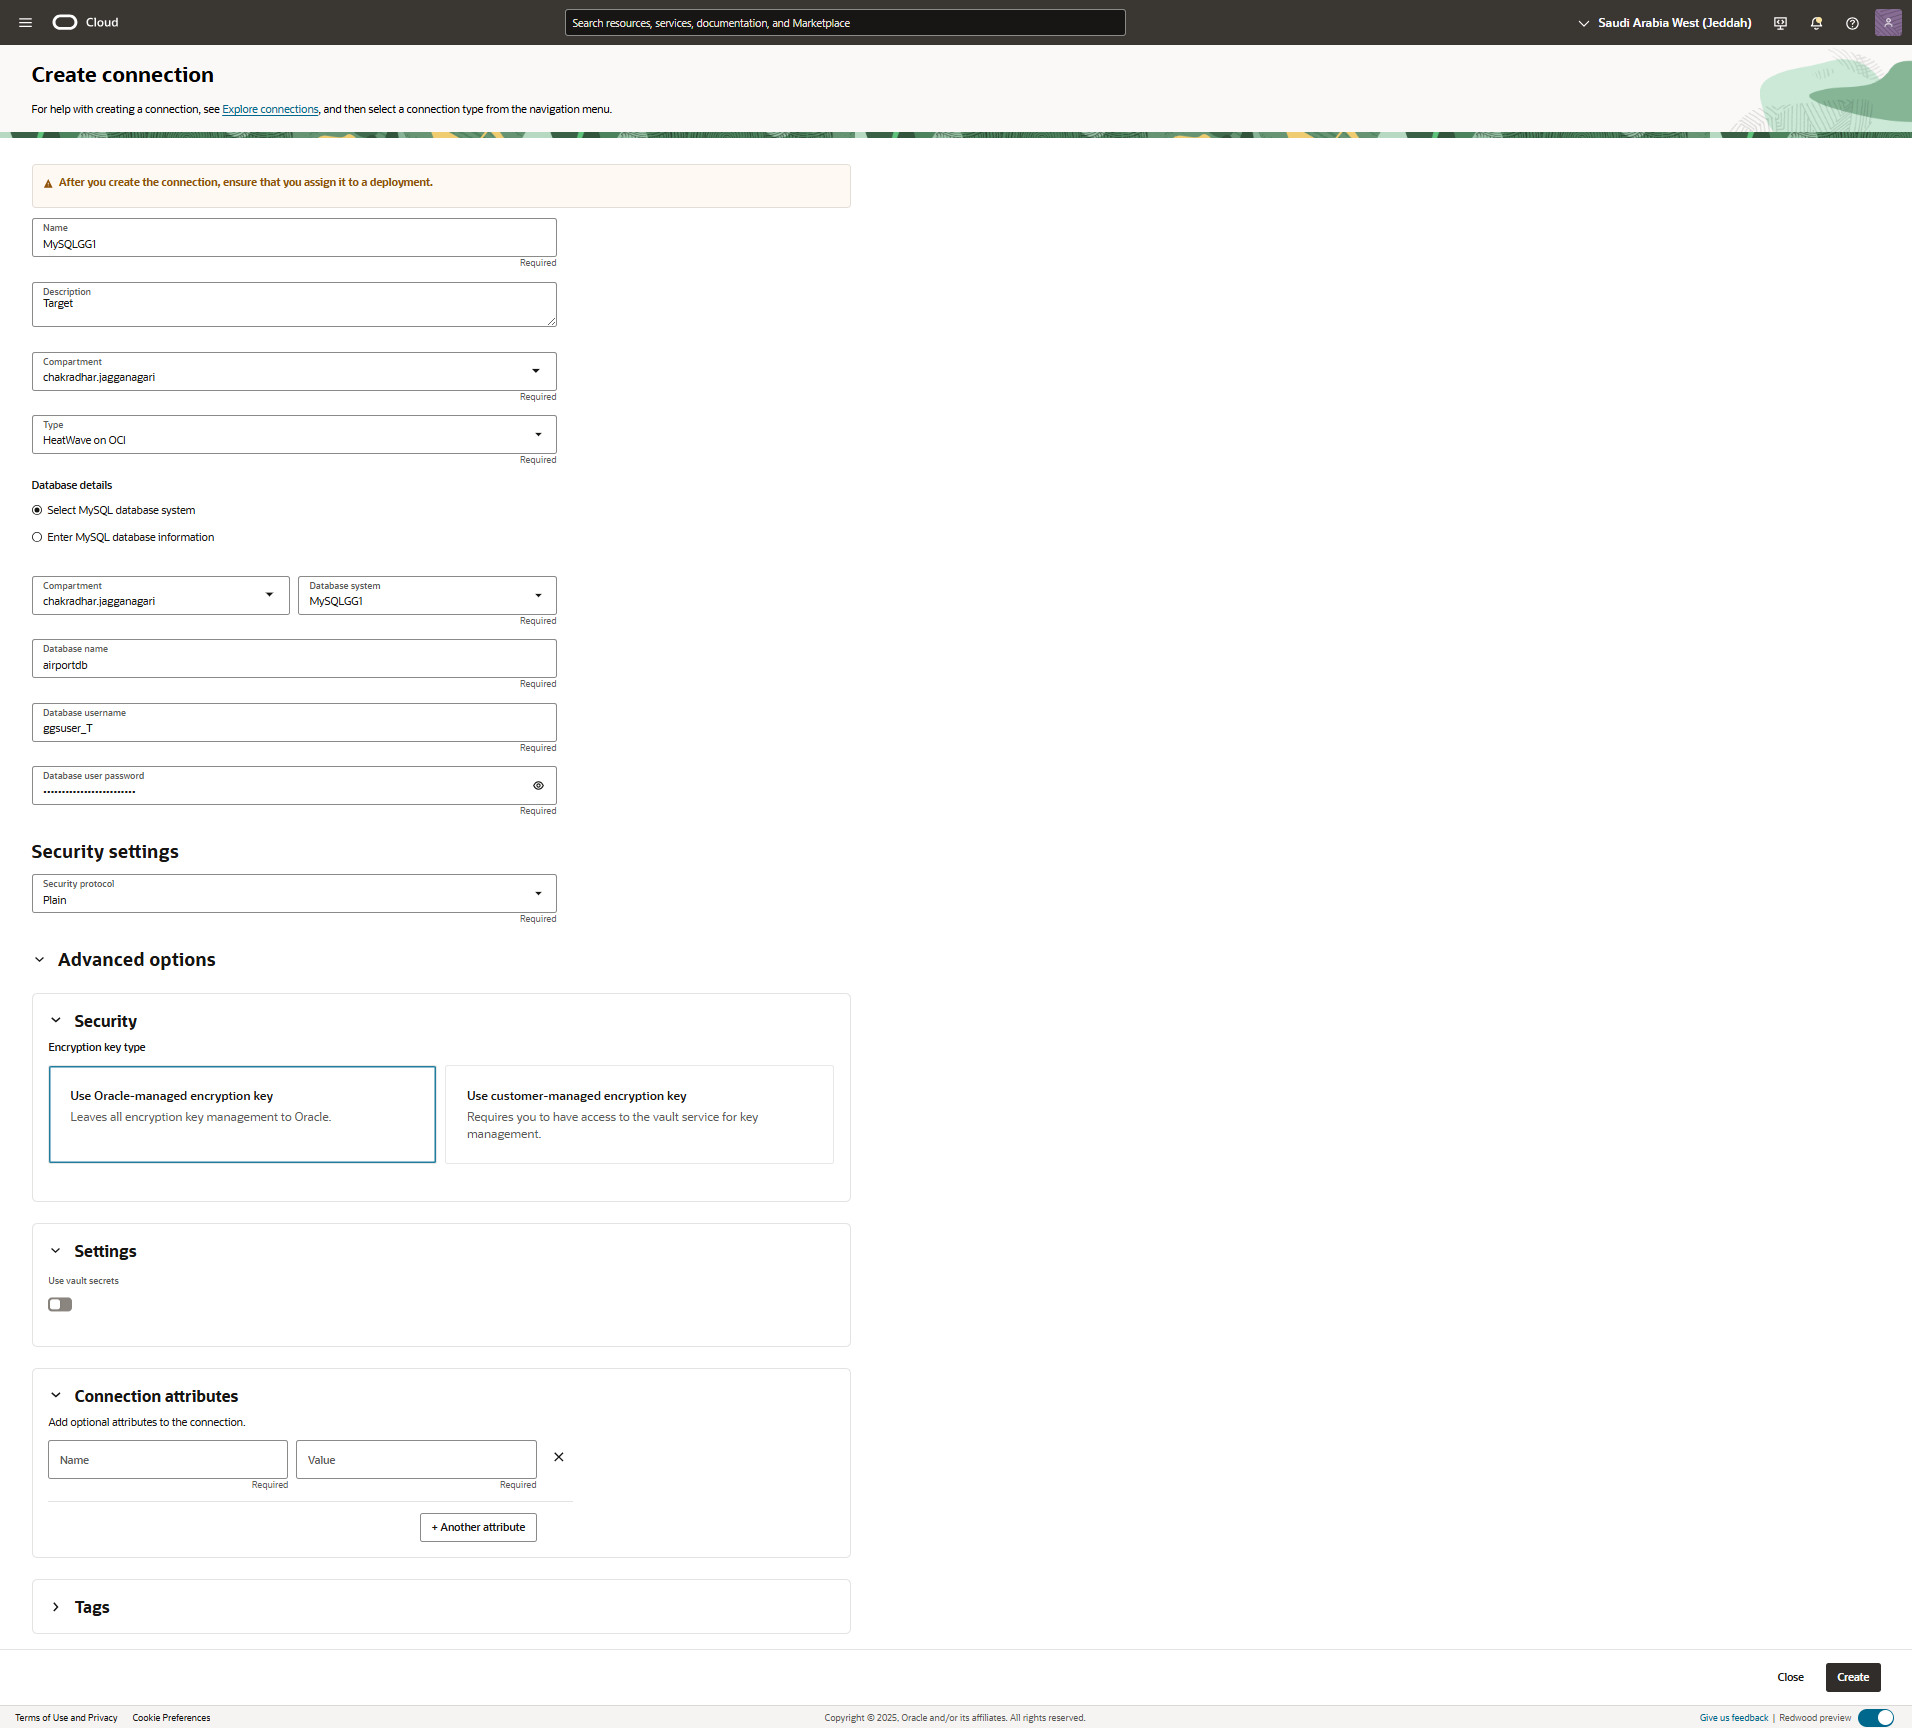

-
将连接分配给 OCI GoldenGate 部署。单击连接名称,然后单击分配部署。
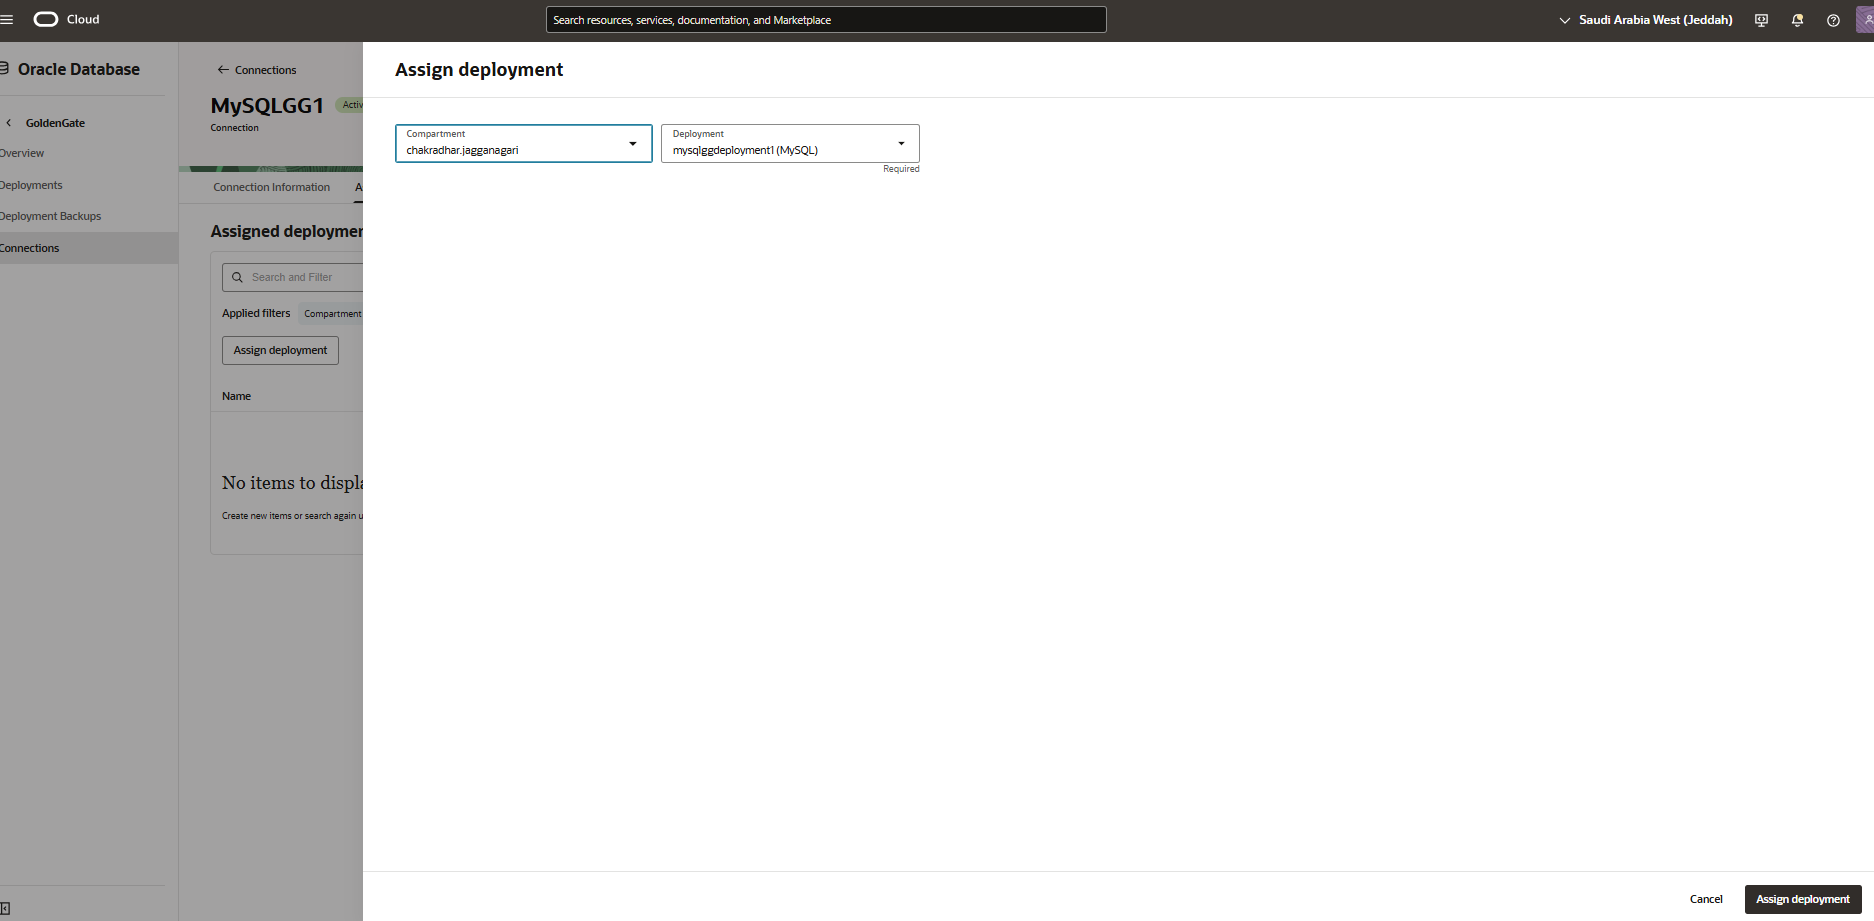


-
使用 OCI 堡垒服务,将端口转发设置为端口
443,然后登录到 OCI GoldenGate 控制台。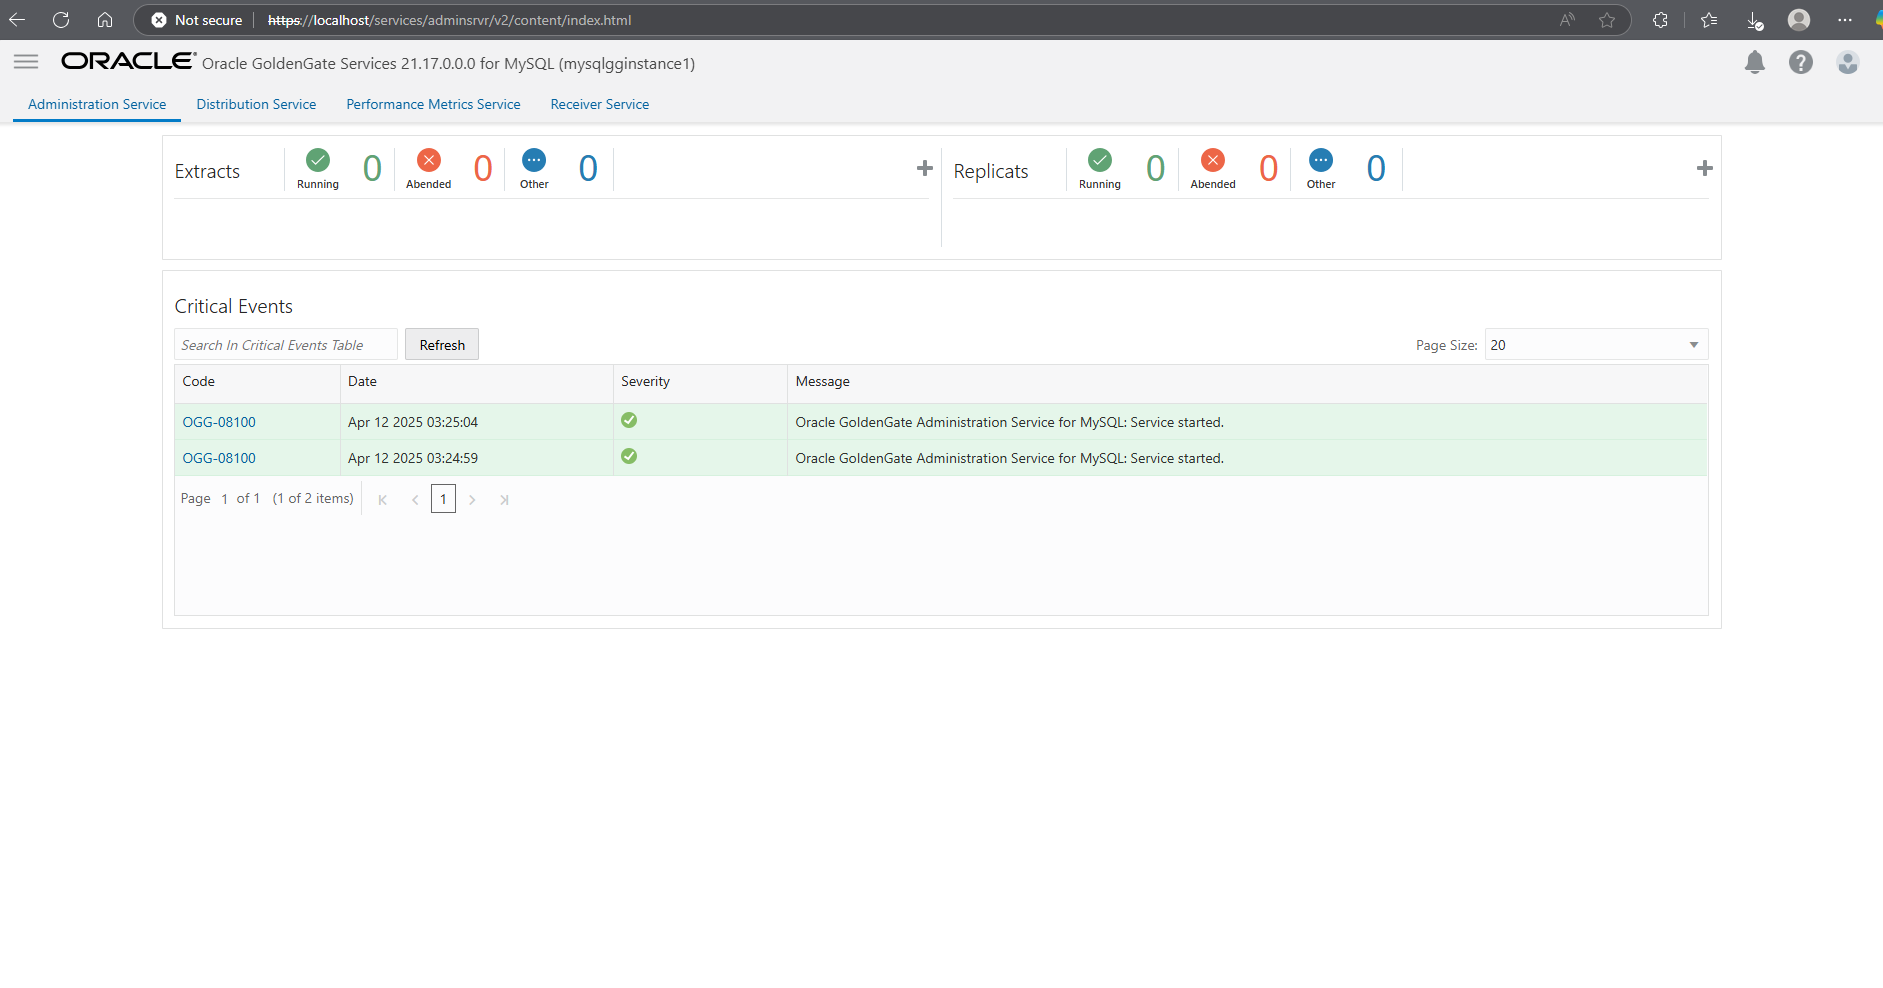
-
从 OCI GoldenGate 控制台验证数据库连接。
-
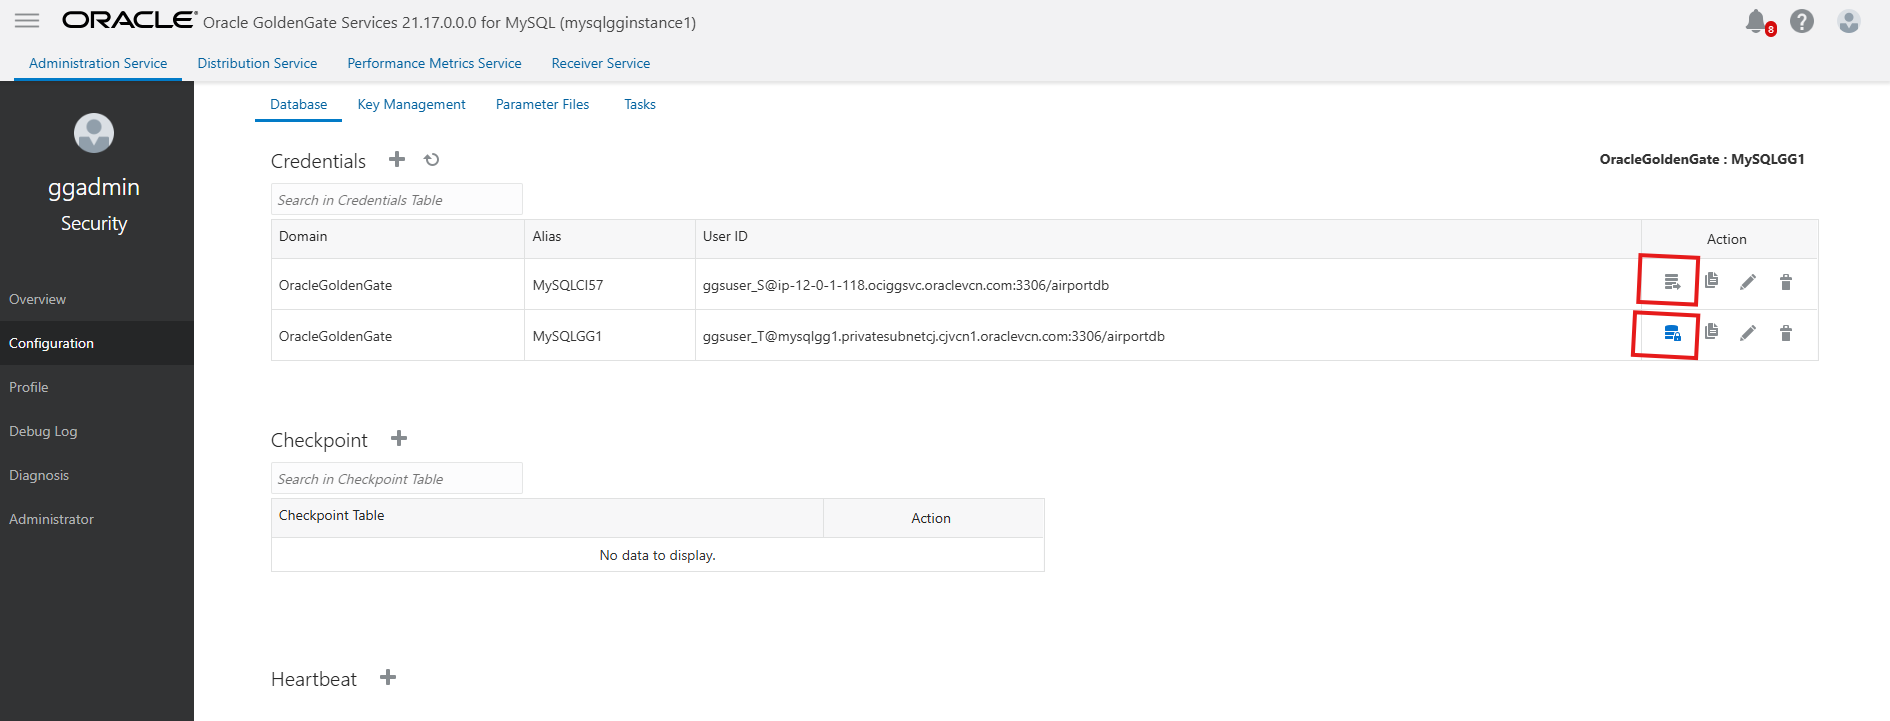
单击“Hamburger(汉堡包)”菜单,您将在任务 6.4 中看到添加到部署的两个连接。
-
单击连接以验证连接。如果连接成功,您将看到通过单击 Checkpoint + 创建检查点表的选项。
强烈建议使用 OCI GoldenGate 部署在 OCI 中添加连接,因为它将自动将 DNS 附加到 IP 地址,如果没有这些 DNS,测试连接将失败。
-
任务 7:创建提取和复制流程
-
在创建提取处理之前,请确保源数据库中的
gtid_mode为 ON ,尤其是在目标为 HA 时。有两种方法可以添加提取:
-
方法 1:您可以在初始加载(复制或转储实例)完成后添加提取并使用精确的实例化方法。有关更多信息,请参见 Precise Instantiation for MySQL to MySQL Using MySQL Shell Utilities and Oracle GoldenGate 。
要添加 Extract 并启动它,请从该特定 GTID 或 binlog 进行数据捕获,如下图中所示。Oracle 建议使用此方法。
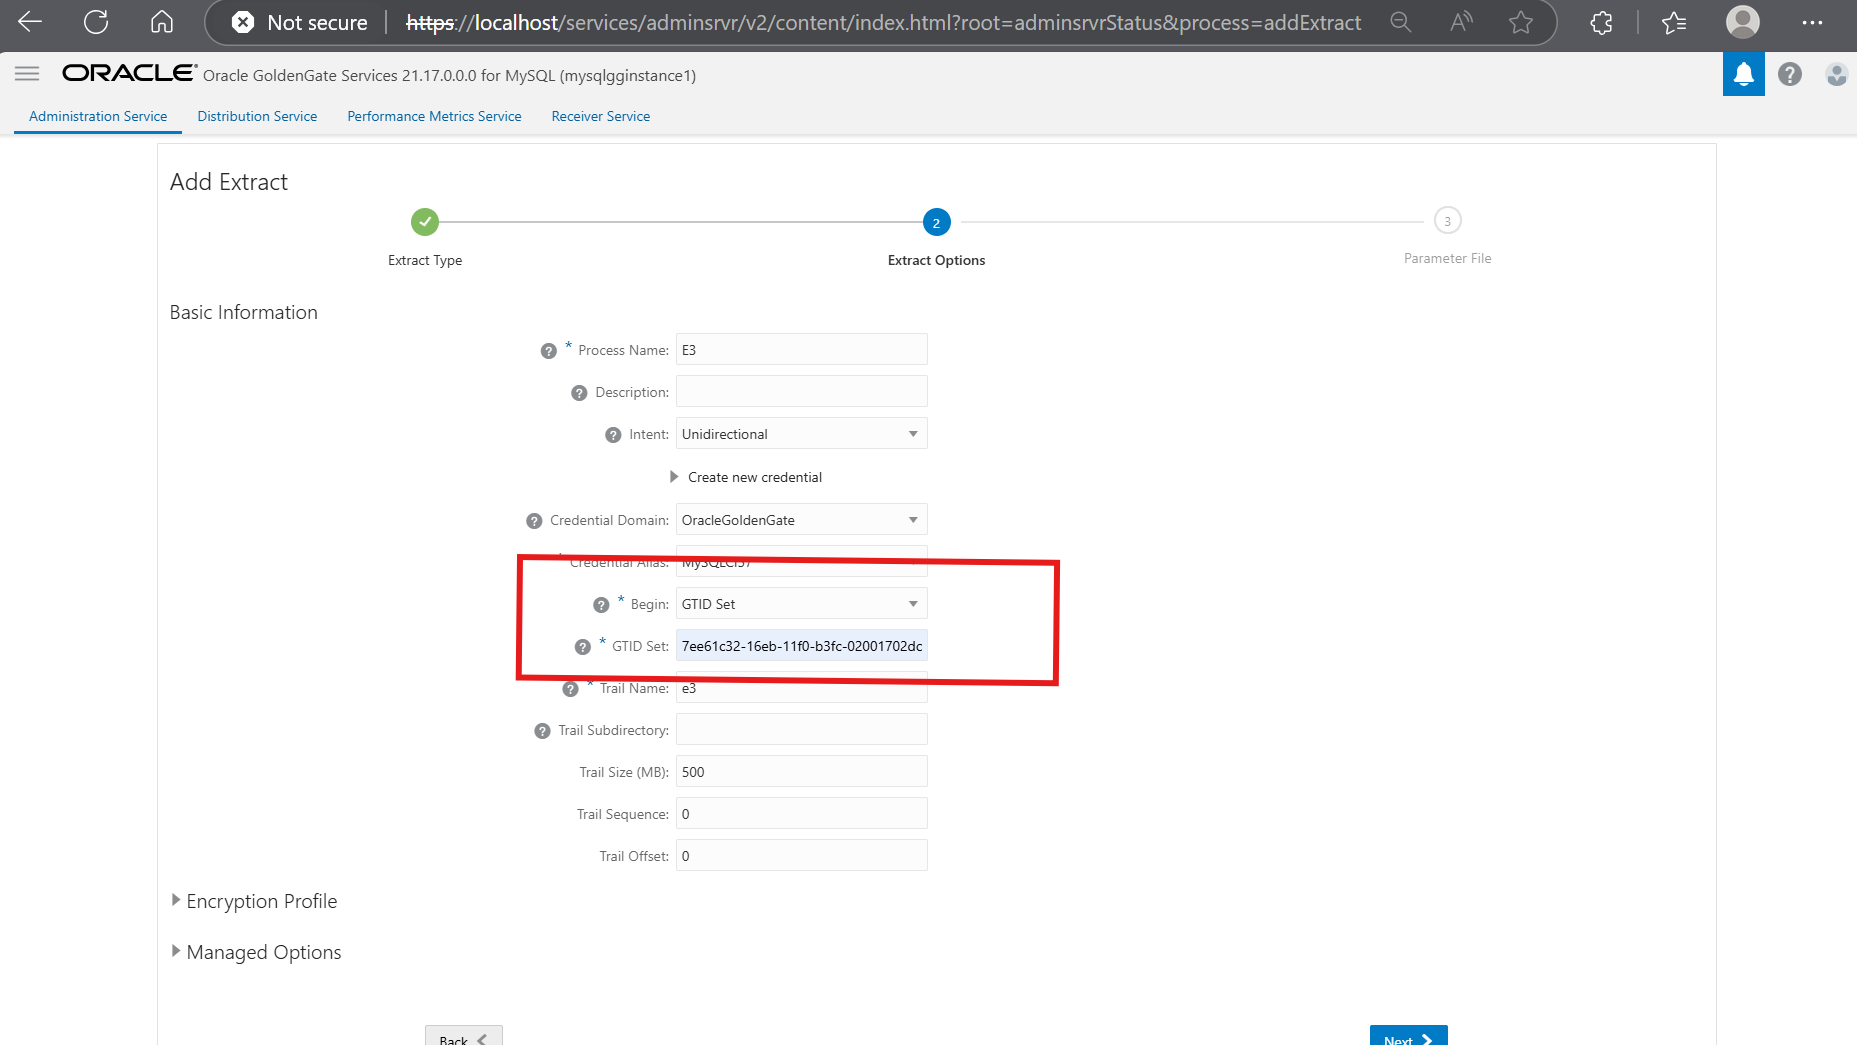
注:此处 GTID 集取自
dumpInstance的 JSON 文件或copyInstance命令的输出。 -
方法 2:您甚至可以在开始初始数据加载之前添加提取,然后更改复制以从
dumpInstance()的 JSON 文件或copyInstance()的输出中显示的特定gtidexecuted/binlog#和 binlog 位置开始。在此方法中使用
HANDLECOLLISION参数以避免出现任何重复的数据问题。注:对于此 POC,使用了方法 2。
编辑提取参数文件:
EXTRACT ext1 USERIDALIAS MySQLCI57, DOMAIN OracleGoldenGate EXTTRAIL e1 --DDL INCLUDE MAPPED (needed for DDL replication, also need to set binlog_row_metadata to FULL in mysql config file on source db). But not supported for MySQL V5.7 TRANLOGOPTIONS FETCHPARTIALJSON (for JSON replication, also need to set binlog_row_value_options to empty string in the mysql config) TABLE airportdb.*;注:如果将
DDL INCLUDE MAPPED添加到“提取”参数文件,则会出现以下错误:MySQLversion 5.7.4不支持 DDL 复制。
-
-
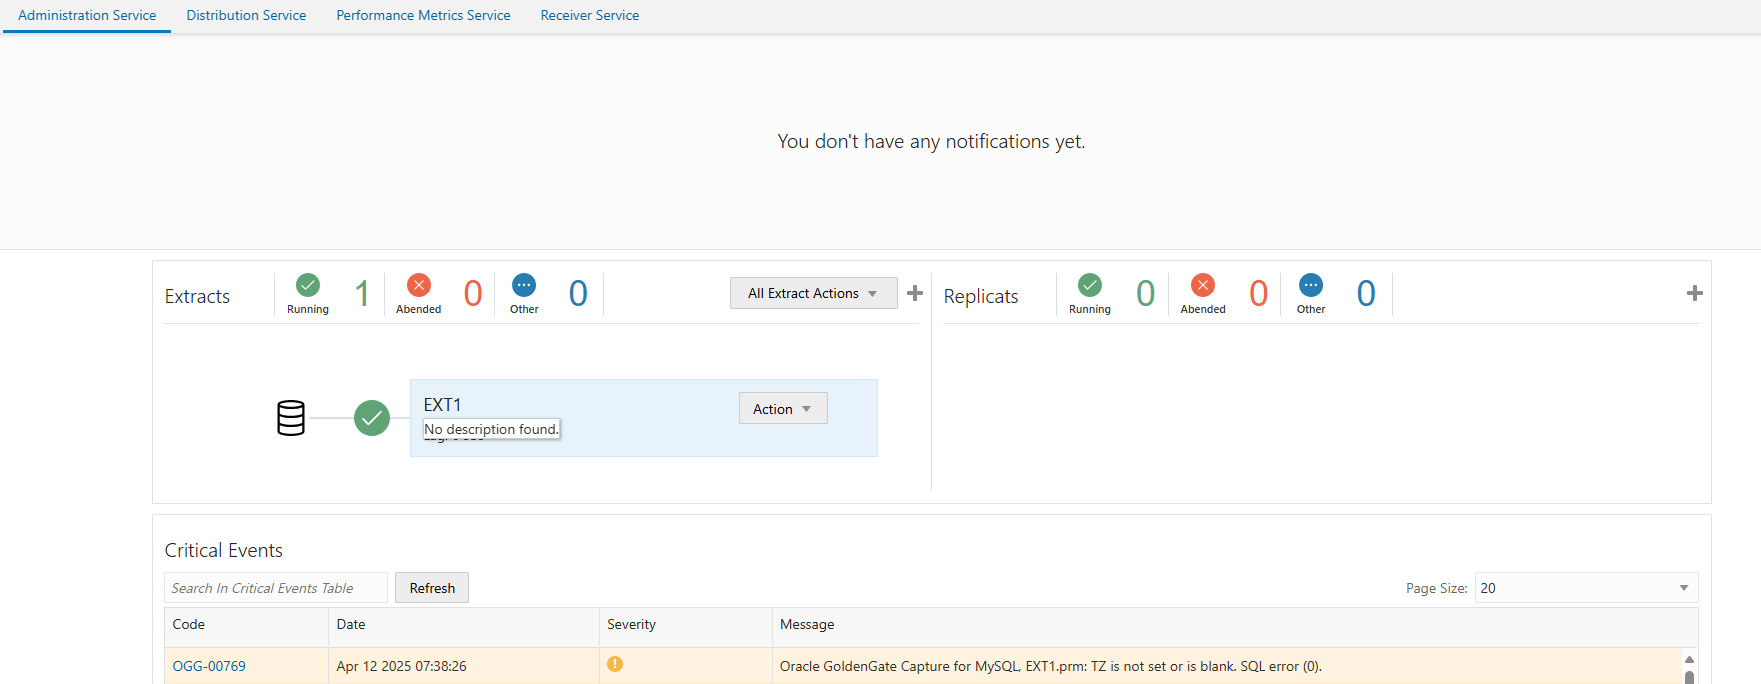
启动“提取”处理。
-
提取正在运行并生成线索文件,现在创建复制。
-
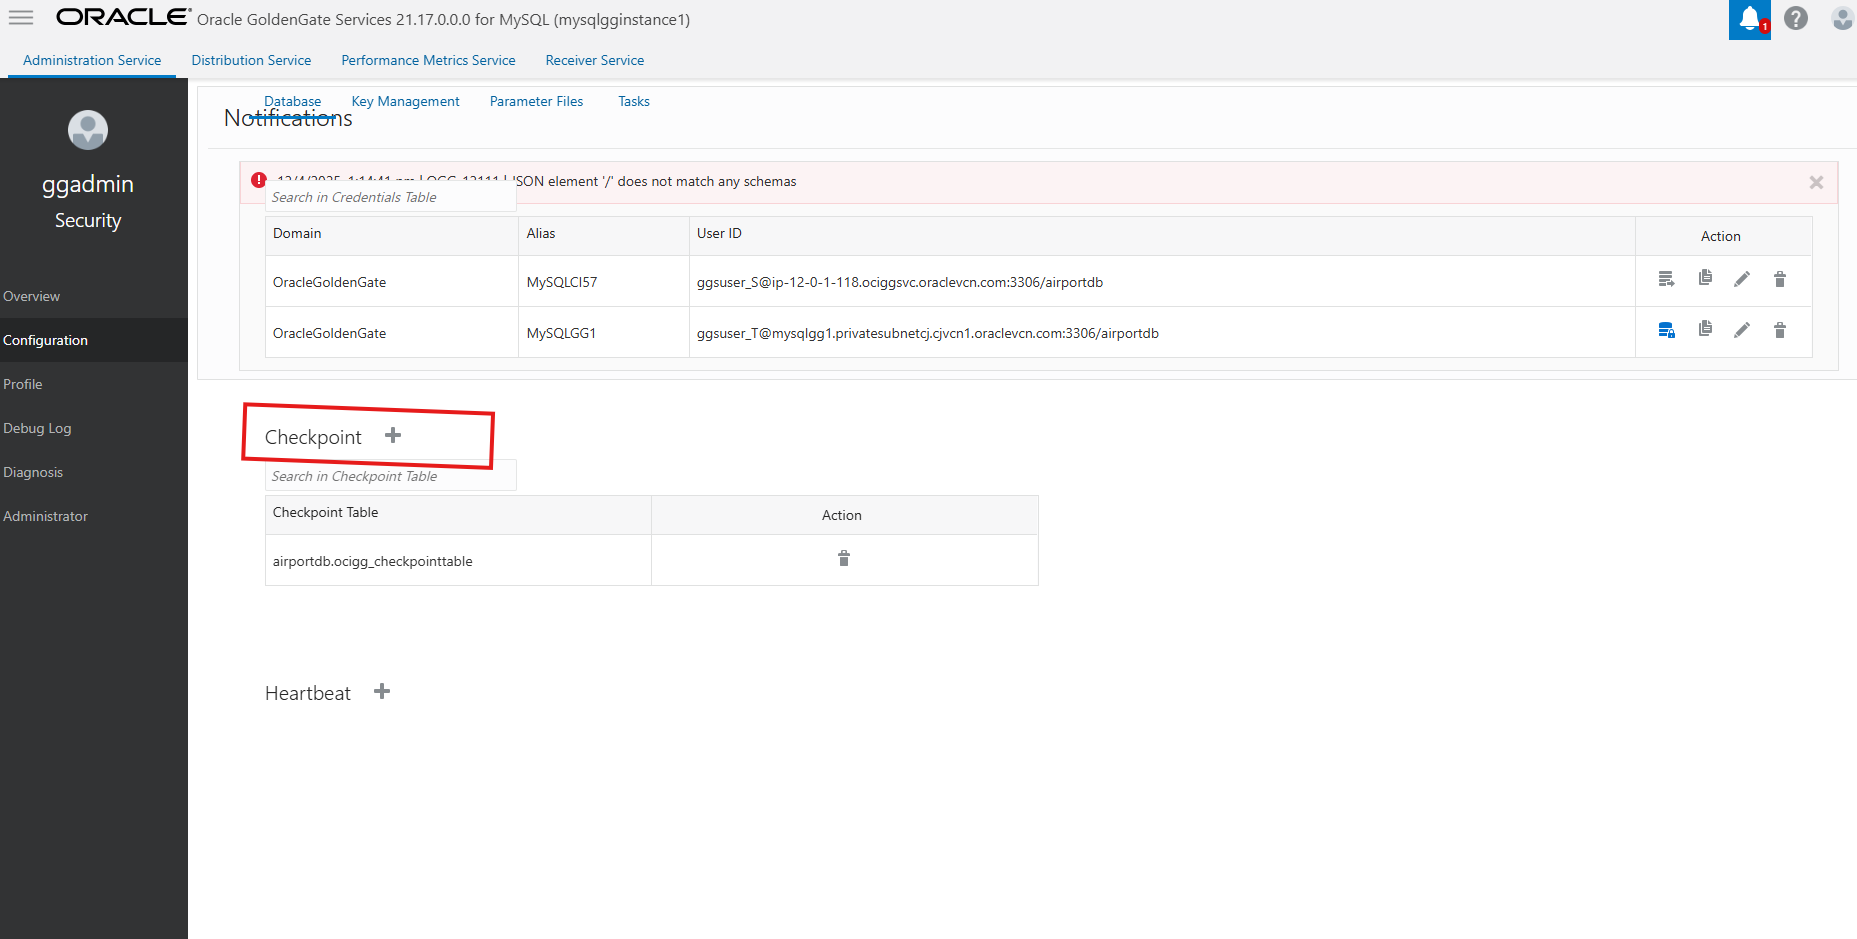
首先创建检查点表。转到 Configuration(配置)部分,选择目标数据库并单击 Checkpoint +(检查点 +)以创建检查点表。
-
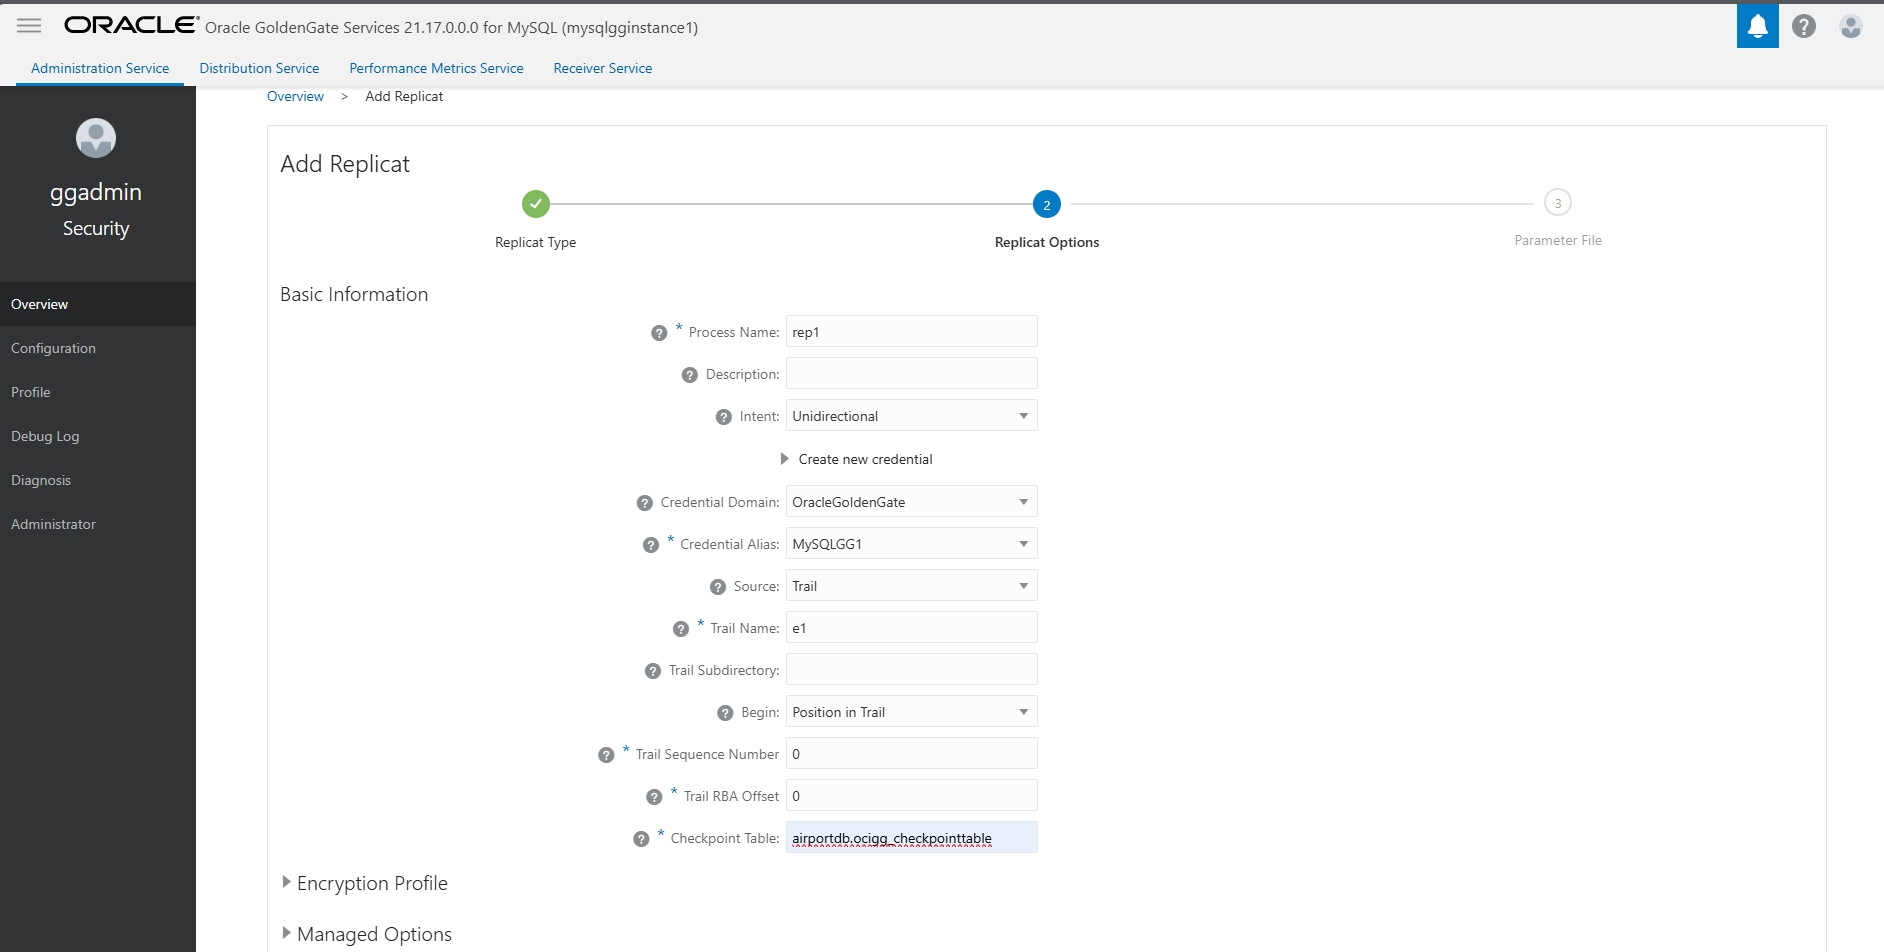
“创建复制”处理。由于这是单向复制,因此我们可以使用并行复制来提高性能。对于双向复制,仅支持经典复制。
请勿启动复制进程,只需创建它。我们将在导入数据后将其启动。
-
编辑参数文件。您还可以添加
PARALLEL参数,或者使用缺省并行。REPLICAT rep1 USERIDALIAS MySQLGG1, DOMAIN OracleGoldenGate MAP airportdb.*, TARGET airportdb.*;
-
任务 8:使用 copyInstance() 将数据从源复制到目标
-
使用
copyInstance()的dryRun:"true"选项执行预运行。Type '\help' or '\?' for help; '\quit' to exit. MySQL SQL > \connect admin@<Source IP> Creating a session to 'admin@<Source IP>' Fetching global names for auto-completion... Press ^C to stop. Your MySQL connection id is 37 Server version: 5.7.44-log MySQL Community Server (GPL) No default schema selected; type \use <schema> to set one. MySQL <Source IP>:3306 ssl SQL > \js Switching to JavaScript mode... MySQL <Source IP>:3306 ssl JS > util.copyInstance('mysql://admin@<Target IP>', {"compatibility":["skip_invalid_accounts","strip_definers","strip_restricted_grants","strip_tablespaces","ignore_wildcard_grants","strip_invalid_grants","create_invisible_pks"], users:"true", threads:2, dryRun:"true"}); Please provide the password for 'admin@<target IP': ******************* Save password for 'admin@<target IP>'? [Y]es/[N]o/Ne[v]er (default No): -
如果没有错误,则删除
dryRun选项并重新运行以执行数据加载。最终输出应如下所示:未报告错误。SRC: Starting data dump 100% (59.50M rows / ~59.36M rows), 142.25K rows/s, 9.68 MB/s SRC: Dump duration: 00:07:50s SRC: Total duration: 00:07:50s SRC: Schemas dumped: 2 SRC: Tables dumped: 15 SRC: Data size: 2.03 GB SRC: Rows written: 59502422 SRC: Bytes written: 2.03 GB SRC: Average throughput: 4.33 MB/s 1 thds indexing \ 100% (2.03 GB / 2.03 GB), 7.47 MB/s (161.06K rows/s), 15 / 15 tables done Building indexes - done Executing common postamble SQL - done TGT: 53 chunks (59.50M rows, 2.03 GB) for 15 tables in 2 schemas were loaded in 7 min 51 sec (avg throughput 4.32 MB/s, 126.29K rows/s) TGT: 17 DDL files were executed in 0 sec. TGT: 0 accounts were loaded, 3 accounts failed to load due to unsupported authentication plugin errors TGT: Data load duration: 7 min 51 sec TGT: 1 indexes were built in 0 sec. TGT: Total duration: 7 min 51 sec TGT: 0 warnings were reported during the load. .. .. Dump_metadata: Binlog_file: mysql-bin.000006 Binlog_position: 626 Executed_GTID_set: 7ee61c32-16eb-11f0-b3fc-02001702dcb5:1-3
注:记下
copyInstance()输出中显示的 GTID,然后使用此 GTID 更改复制。
任务 9:更改复制并启动
使用日志文件编号 000006 和日志位置编号 626,如任务 8 中 copyInstance() 的输出所示。此日志文件和日志位置应采用格式来生成 CSN 000006:000000000000626。
变更复制,然后单击开始以启动。 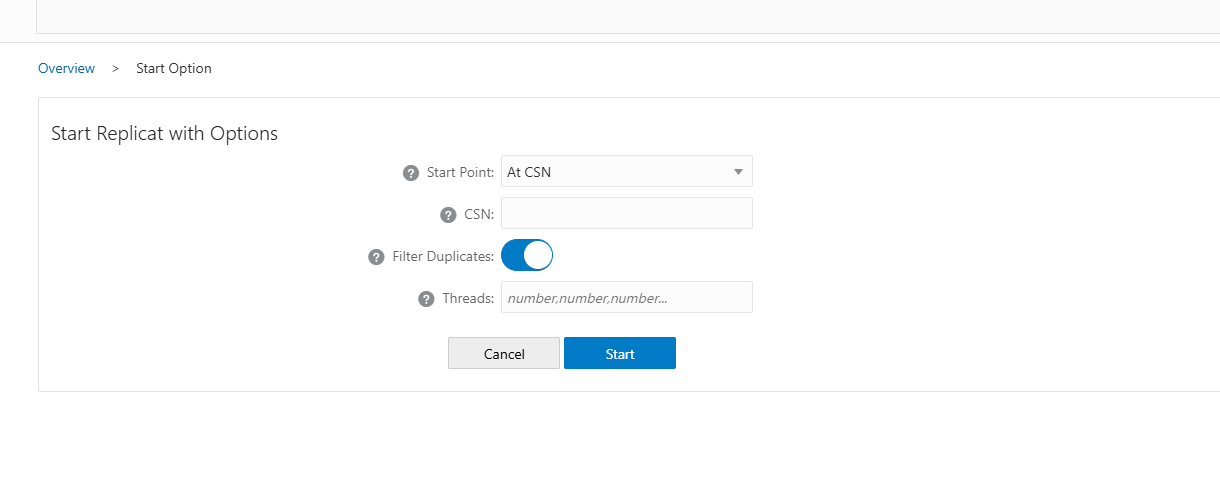
复制状态显示为正在运行。
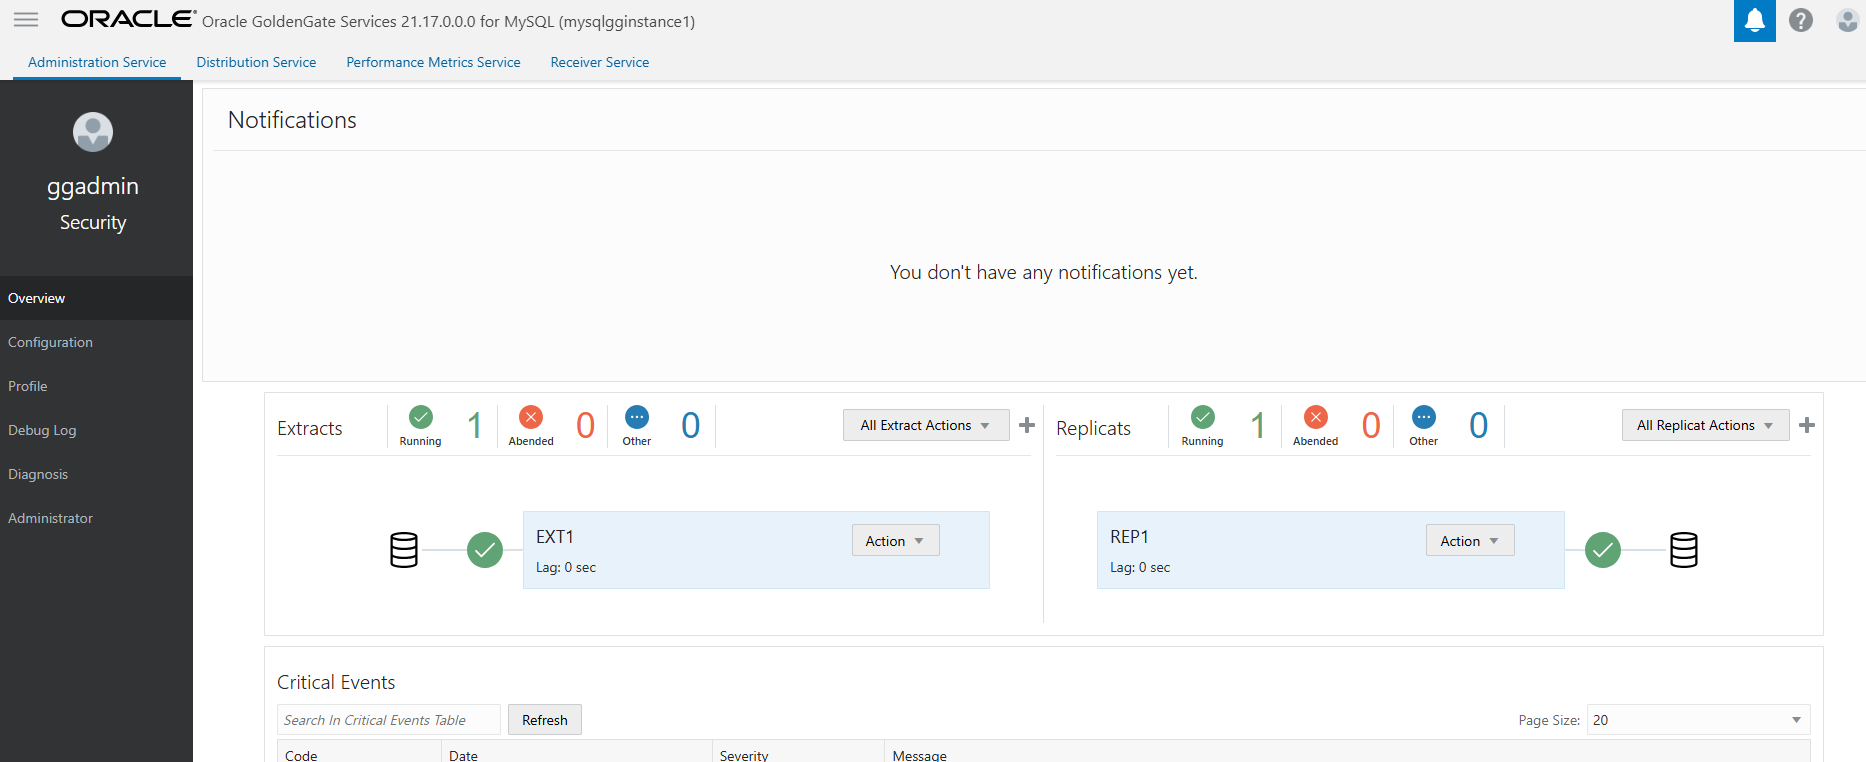
注:如果已使用方法 1 添加提取(如任务 7 中所示),则不需要更改复制。在此 POC 中,我们使用方法 2 添加提取。这两种方法都可以正常工作。
任务 10:运行 DML 测试
通过对源执行 DML 活动来测试复制。
-
源:
mysql> select count(*) from passenger; +----------+ | count(*) | +----------+ | 36095 | +----------+ 1 row in set (0.01 sec) mysql> insert into passenger (passportno,firstname,lastname) values ('Pd89UKL','Timothy','London'); Query OK, 1 row affected (0.00 sec) mysql> commit -> ; Query OK, 0 rows affected (0.00 sec) mysql> select count(*) from passenger; +----------+ | count(*) | +----------+ | 36096 | +----------+ 1 row in set (0.00 sec) mysql> select @@version; +------------+ | @@version | +------------+ | 5.7.44-log | +------------+ 1 row in set (0.00 sec) -
目标:
[root@bastion opc]# mysql --host <target IP> -u admin -p
mysql: [Warning] Using a password on the command line interface can be insecure.
Welcome to the MySQL monitor.  Commands end with ; or \g.
Your MySQL connection id is 1249
Server version: 8.4.4-u5-cloud MySQL Enterprise - Cloud

Copyright (c) 2000, 2025, Oracle and/or its affiliates.

Oracle is a registered trademark of Oracle Corporation and/or its
affiliates. Other names may be trademarks of their respective
owners.

Type 'help;' or '\h' for help. Type '\c' to clear the current input statement.

mysql> use airportdb;
Reading table information for completion of table and column names
You can turn off this feature to get a quicker startup with -A

Database changed
mysql> select count(*) from passenger;
+----------+
| count(*) |
+----------+
|    36096 |
+----------+
1 row in set (0.00 sec)

mysql> select @@version
    -> ;
+----------------+
| @@version      |
+----------------+
| 8.4.4-u5-cloud |
+----------------+
1 row in set (0.00 sec)
相关链接
确认
- 作者 — Chakradhar Jagganagari(提升实施专家—数据库)
更多学习资源
通过 docs.oracle.com/learn 浏览其他实验室,或者通过 Oracle Learning YouTube 频道访问更多免费学习内容。此外,请访问 education.oracle.com/learning-explorer 以成为 Oracle Learning Explorer。
有关产品文档,请访问 Oracle 帮助中心。
Migrate On-Premises MySQL Database to Oracle HeatWave MySQL Managed Instance using OCI GoldenGate
G34896-01
Copyright ©2025, Oracle and/or its affiliates.