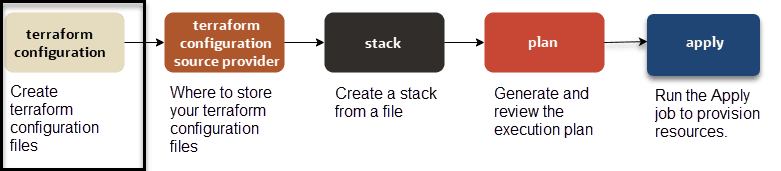
使用 Terraform 和 OCI 資源管理程式部署 Oracle NoSQL 表格
使用 Terraform 和資源管理程式的堆疊,在 OCI (Oracle Cloud Infrastructure) 上輕鬆部署 NDCS 表格。我們將使用 OCI Resource Manager CLI 在 Oracle Cloud 上部署 NDCS 表格。在我們繼續本文之前,假設您瞭解 NoSQL Cloud Service 並瞭解其基本知識與 Terraform。
Terraform 使用提供者連接 Terraform 引擎與支援的雲端平台。Oracle Cloud Infrastructure (OCI) Terraform 提供者是一個元件,可將 Terraform 連線至想要管理的 OCI 服務。您可以使用 OCI Terraform 提供者,包括 Terraform Cloud 和 OCI 資源管理程式。
OCI 資源管理程式是以 Terraform 為基礎的 Oracle 管理的服務,使用 Terraform 組態檔將 OCI Terraform 提供者支援之 OCI 資源的部署和作業自動化。「資源管理程式」可讓您跨多個團隊和平台共用及管理基礎架構組態和狀態檔案。

-
若要在 OCI 中建立資源,我們必須設定 terraform。建立 terraform 提供者定義、NoSQL 資源定義、認證以及輸入變數的基本 terraform 組態檔。
-
決定儲存 terraform 組態檔的位置。您可以將這些檔案儲存在不同的來源中,例如本機資料夾或 zip、物件儲存的儲存桶,以及來源控制系統 (例如 GitHub 或 GitLab)。
-
執行「資源管理程式 CLI」命令可執行下列作業:
-
建立堆疊。
-
產生並複查執行計畫。
-
執行「套用」工作以佈建 NoSQL 資源。
-
視需要複查記錄檔。
-
注意: 我們將使用 Oracle Cloud Infrastructure (OCI) Resource Manager 命令行介面 (CLI),並使用主控台在 Cloud Shell 中執行這些命令。這表示您需要一些關於雲端租用戶和其他項目的資訊,例如公用或私密金鑰組。若要在您的本機機器上設定 OCI CLI,請參閱此文件。
本文包含下列主題:
必備條件
-
Terraform 的基本瞭解。點選此處閱讀簡介。
-
Oracle Cloud 帳戶和 Oracle NoSQL Database Cloud Service 訂閱。如果您還沒有 Oracle Cloud 帳戶,可以從此處開始。
步驟 1:建立 NDCS 表格或索引的 Terraform 組態檔
子步驟 1.1:建立 OCI Terraform 提供者組態
建立一個名為 " provider.tf " 的新檔案,其中包含 OCI Terraform 提供者定義,以及關聯的變數定義。OCI Terraform 提供者僅需要 region 引數。
不過,您可能必須根據認證方法,使用 OCI 帳戶的認證證明資料來設定其他引數。OCI Terraform 提供者支援三種認證方法:
-
API 金鑰認證
-
執行處理主要授權
-
安全權杖認證
region 引數指定在其中建立提供者資源的地理區域。若要在單一組態中鎖定多個區域,只需為每個區域建立一個提供者定義,然後使用提供者別名加以區別,如下列範例所示。請注意,僅定義一個名為 "oci" 的提供者,但為 us-phoenix-1 區域輸入兩次 OCI 提供者定義 (別名為 "phx"),並為區域 us-ashburn-1 輸入一次 (別名為 "iad")。
provider "oci" {
region = "us-phoenix-1"
   alias = "phx"
}
provider "oci" {
region = "us-ashburn-1"
alias = "iad"
}在下面的範例中,OCI Terraform 提供者需要 region 引數。API 金鑰認證需要 tenancy_ocid、user_ocid、private_key_path 和 fingerprint 引數。您可以提供 region 和 API 金鑰認證金鑰 (tenancy_ocid、user_ocid、private_key_path 和 fingerprint) 的值作為「環境變數」,或在 Terraform 組態變數中提供 (如子步驟 1.3:載入 Terraform 組態變數中所述)。
variable "tenancy_ocid" {
}
variable "user_ocid" {
}
variable "fingerprint" {
}
variable "private_key_path" {
}
variable "region" {
}

provider "oci" {
   region = var.region
   tenancy_ocid = var.tenancy_ocid
   user_ocid = var.user_ocid
   fingerprint = var.fingerprint
   private_key_path = var.private_key_path
}
執行處理主體授權可讓您的提供者從 OCI 運算執行處理進行 API 呼叫,而不需要您提供者定義中的 tenancy_ocid、user_ocid、private_key_path 及 fingerprint 屬性。
注意:執行處理主體授權僅適用於在 Oracle Cloud Infrastructure 中執行的執行處理。
在下面的範例中,OCI Terraform 提供者需要 region 引數,實例主要授權需要 auth 引數。您可以提供 region 引數值作為「環境變數」,或在 Terraform 組態變數內提供 (如子步驟 1.3:載入 Terraform 組態變數中所述)。
variable "region" {
}
provider "oci" {
   auth = "InstancePrincipal"
   region = var.region
}
安全權杖認證可讓您使用使用 CLI 的權杖型驗證所產生的權杖來執行 Terraform。
注意:此權杖會在 1 小時後到期。佈建資源需要超過 1 小時的時間時,請避免使用此認證方法。請參閱重新整理記號以瞭解詳細資訊。
在下面的範例中,OCI Terraform 提供者需要引數 region。「安全記號」認證需要 auth 和 config_file_profile 引數。
variable "region" {
}
variable "config_file_profile" {
}
provider "oci" {
auth = "SecurityToken"
  config_file_profile = var.config_file_profile
   region = var.region
}
子步驟 1.2:建立 NoSQL Terraform 組態
建立一個名為 "nosql.tf" 的新檔案,其中包含用於建立 NoSQL Database Cloud Service 表格或索引的 NoSQL 地形組態資源。如需有關 NoSQL 資料庫資源和資料來源的詳細資訊,請參閱 oci_nosql_table 。
在下面的範例中,我們正在建立 2 個 NoSQL 表格。NoSQL 資料庫資源 (例如表格和索引) 需要 compartment_ocid 引數。您可以提供 compartment_ocid 作為「環境變數」或 Terraform 組態變數的值 (如子步驟 1.3:載入 Terraform 組態變數中所述)。
variable "compartment_ocid" {
}

resource "oci_nosql_table" "nosql_demo" {
    compartment_id = var.compartment_ocid
    ddl_statement = "CREATE TABLE if not exists demo (ticketNo INTEGER, fullName STRING, contactPhone STRING, confNo STRING, gender STRING, bagInfo JSON, PRIMARY KEY (ticketNo))"
    name = "demo"
    table_limits {
        max_read_units = var.table_table_limits_max_read_units
        max_storage_in_gbs = var.table_table_limits_max_storage_in_gbs
        max_write_units = var.table_table_limits_max_write_units
    }
}

resource "oci_nosql_table" "nosql_demoKeyVal" {

    compartment_id = var.compartment_ocid
    ddl_statement = "CREATE TABLE if not exists demoKeyVal (key INTEGER GENERATED ALWAYS AS IDENTITY (START WITH 1 INCREMENT BY 1 NO CYCLE), value JSON, PRIMARY KEY (key))"
    name = "demoKeyVal"
    table_limits {
       max_read_units = var.table_table_limits_max_read_units
        max_storage_in_gbs = var.table_table_limits_max_storage_in_gbs
        max_write_units = var.table_table_limits_max_write_units
    }
}
子步驟 1.3:載入 Terraform 組態變數
下一步是建立名為 "terraform.tfvars" 的檔案,並根據認證方法提供必要的 OCI Terraform 提供者引數值。
提供 IAM 存取和秘密金鑰的值 (tenancy_ocid、user_ocid、private_key_path 和 fingerprint)、region 和 compartment_ocid 引數)。您應已有具備 NoSQL Database Cloud Service 權限之加密密碼和存取金鑰的 OCI IAM 使用者。取得這些金鑰並將它們儲存在檔案中 。
舉例而言:
tenancy_ocid = "ocid1.tenancy.oc1..aaaaaaaaqljdu37xcfoqvyj47pf5dqutpxu4twoqc7hukwgpbavpdwkqxc6q"
user_ocid = "ocid1.user.oc1..aaaaaaaafxz473ypsc6oqiespihan6yi6obse3o4e4t5zmpm6rdln6fnkurq"
fingerprint = "2c:9b:ed:12:81:8d:e6:18:fe:1f:0d:c7:66:cc:03:3c"
private_key_path = "~/NoSQLLabPrivateKey.pem"
compartment_ocid = "ocid1.compartment.oc1..aaaaaaaawrmvqjzoegxbsixp5k3b5554vlv2kxukobw3drjho3f7nf5ca3ya"
region = "us-phoenix-1"
提供 region 和 compartment_ocid 引數的值。
舉例而言:
region = "us-phoenix-1"
compartment_ocid = "ocid1.compartment.oc1..aaaaaaaawrmvqjzoegxbsixp5k3b5554vlv2kxukobw3drjho3f7nf5ca3ya"
提供 region、compartment_ocid 和 config_file_profile 引數的值。
舉例而言:
region = "us-phoenix-1"
compartment_ocid = "ocid1.compartment.oc1..aaaaaaaawrmvqjzoegxbsixp5k3b5554vlv2kxukobw3drjho3f7nf5ca3ya"
config_file_profile = "PROFILE"
子步驟 1.4:宣告輸入變數
最後一個步驟是建立 "variables.tf",並將值指派給其中輸入變數。按一下此處以參閱 Terraform 文件,檢查適用於 NoSQL 資料庫的有效引數或特性。在範例中,NoSQL 表格的讀取、寫入和儲存單位預設值分別設為 10、10 和 1。
variable "table_table_limits_max_read_units" {
default = 10
}
variable "table_table_limits_max_write_units" {
default = 10
}
variable "table_table_limits_max_storage_in_gbs" {
default = 1
}
透過主控台的 Cloud Shell,我們已為提供者定義、NoSQL 資料庫資源、認證值和輸入變數建立所有必要的 terraform 組態檔。

步驟 2:儲存 Terraform 組態的位置
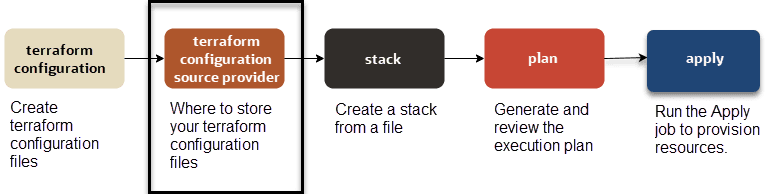
使用「資源管理程式」建立堆疊時,您可以從下列來源選取您的 Terraform 組態。
-
本機 .zip 檔案
-
本機檔案夾
-
物件儲存的儲存桶
在關聯堆疊上執行的任何工作都會自動使用儲存桶的最新內容。
-
在關聯的堆疊上執行的任何工作都會自動使用最新版本的組態。
-
現有區間 ( 尋找資源 )
子步驟 2.1:建立遠端 Terraform 組態的組態來源提供者
如果您想要使用由來源控制系統 (例如 GitHub 和 GitLab) 代管的遠端 terraform 組態,就必須建立來源組態提供者。
如需如何為遠端 Terraform 組態建立組態來源提供者的詳細資訊,請參閱管理組態來源提供者。
步驟 3:從檔案建立堆疊

使用與您的檔案位置相關的命令。如需「資源管理程式」支援的 Terraform 組態來源,請參閱儲存 Terraform 組態的位置。
本教學課程將使用本機 terraform 組態壓縮檔 terraform.zip 的「執行處理主體」認證方法建立堆疊。terraform.zip 檔案包含下列檔案:
-
provider.tf -
nosql.tf -
terraform.tfvars -
variables.tf
注意:在此教學課程中,我們使用 OCI Resource Manager CLI 命令來建立堆疊。您可以使用「OCI 資源管理程式主控台」執行相同的作業。
從原始程式碼控制系統 (例如 GitHub 和 GitLab) 代管的檔案建立堆疊。
oci resource-manager stack create-from-git-provider
--compartment-id ocid
1.tenancy.oc1..uniqueid
--config-source-configuration-source-provider-id ocid.ormconfigsourceprovider.oc1..uniqueid
--config-source-repository-url https://github.com/user/repo.git
--config-source-branch-name mybranch
--display-name "My Stack from Git"
--description "Create NoSQL Table"
--variables file://variables.json
--working-directory ""
從物件儲存的儲存桶中的 Terraform 組態建立堆疊。
oci resource-manager stack create-from-object-storage
--compartment-id ocid1.tenancy.oc1..uniqueid
--config-source-namespace MyNamespace
--config-source-bucket-name MyBucket
--config-source-region PHX
--display-name "My Stack from Object Storage"
--description "Create NoSQL Table"
--variables file://variables.json
從上傳的組態檔 (.zip) 建立堆疊
oci resource-manager stack create
--compartment-id ocid1.tenancy.oc1..uniqueid
--config-source vcn.zip
--variables file://variables.json
--display-name "My Example Stack"
--description "Create NoSQL Table"
--working-directory ""
其中,
-
--compartment-id是您要在其中建立堆疊的區間 OCID。 -
--config-source是包含一或多個 Terraform 組態檔的 .zip 檔案名稱。 -
(選用)
--variables是為資源指定輸入變數的檔案路徑。在本機執行 Terraform 時,Oracle Cloud Infrastructure Terraform 提供者需要額外的參數 (除非您使用執行處理主體)。如需有關在 Terraform 中使用變數的詳細資訊,請參閱輸入變數。另請參閱輸入變數組態。
-
(選擇性)
--display-name是新堆疊的易記名稱。 -
(選擇性)
--description是新堆疊的說明。 -
(可選擇)
--working-directory是目錄中的根配置檔案。如果未指定,或如本範例中為空值,則服務會假設目錄中的最上層檔案是根組態檔。
舉例而言:
oci resource-manager stack create
--compartment-id ocid1.compartment.oc1..aaaaaaaawrmvqjzoegxbsixp5k3b5554vlv2kxukobw3drjho3f7nf5ca3ya
--config-source terraform.zip
回應範例:
{
  "data": {
    "compartment-id": "ocid1.compartment.oc1..aaaaaaaawrmvqjzoegxbsixp5k3b5554vlv2kxukobw3drjho3f7nf5ca3ya",
    "config-source": {
      "config-source-type": "ZIP_UPLOAD",
      "working-directory": null
    },
    "defined-tags": {},
    "description": null,
    "display-name": "ormstack20220117104810",
    "freeform-tags": {},
    "id": "ocid1.ormstack.oc1.phx.aaaaaaaa7jrci2s5iav5tdxpl6ucwo2dwazzrdkfhs6bxiohgcpkscmr57bq",
    "lifecycle-state": "ACTIVE",
    "stack-drift-status": "NOT_CHECKED",
    "terraform-version": "1.0.x",
    "time-created": "2022-01-17T10:48:10.878000+00:00",
    "time-drift-last-checked": null,
    "variables": {}
  },
  "etag": "dd62ace0b9e9d825d825c05d4588b73fede061e55b75de6436b84fb2bb794185"
}
我們已從 terraform 組態檔建立堆疊,並產生一個堆疊 ID。在下一個步驟中,此堆疊 ID 是用來產生部署 NoSQL 表格的執行計畫。
"id": "ocid1.ormstack.oc1.phx.aaaaaaaa7jrci2s5iav5tdxpl6ucwo2dwazzrdkfhs6bxiohgcpkscmr57bq"步驟 4:產生執行計畫
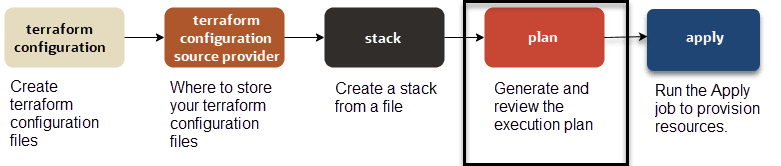
注意:在此教學課程中,我們使用 OCI Resource Manager CLI 命令來產生執行計畫。您可以使用「OCI 資源管理程式主控台」執行相同的作業。
如果要產生執行計畫,請執行下列命令:
oci resource-manager job create-plan-job
--stack-id <*`stack_OCID`*>
--display-name "<*`friendly_name`*>"
舉例而言:
oci resource-manager job create-plan-job
--stack-id ocid1.ormstack.oc1.phx.aaaaaaaa7jrci2s5iav5tdxpl6ucwo2dwazzrdkfhs6bxiohgcpkscmr57bq
回應範例:
{
  "data": {
    "apply-job-plan-resolution": null,
    "cancellation-details": {
      "is-forced": false
    },
    "compartment-id": "ocid1.compartment.oc1..aaaaaaaawrmvqjzoegxbsixp5k3b5554vlv2kxukobw3drjho3f7nf5ca3ya",
    "config-source": {
      "config-source-record-type": "ZIP_UPLOAD"
    },
    "defined-tags": {},
    "display-name": "ormjob20220117104856",
    "failure-details": null,
    "freeform-tags": {},
    "id": "ocid1.ormjob.oc1.phx.aaaaaaaacrylnpglae4yvwo4q2r2tk5z5x5v6bwjsoxgn26moyg3eqwnt2aq",
    "job-operation-details": {
      "operation": "PLAN",
      "terraform-advanced-options": {
        "detailed-log-level": null,
        "is-refresh-required": true,
        "parallelism": 10
      }
    },
    "lifecycle-state": "ACCEPTED",
    "operation": "PLAN",
    "resolved-plan-job-id": null,
    "stack-id": "ocid1.ormstack.oc1.phx.aaaaaaaa7jrci2s5iav5tdxpl6ucwo2dwazzrdkfhs6bxiohgcpkscmr57bq",
    "time-created": "2022-01-17T10:48:56.324000+00:00",
    "time-finished": null,
    "variables": {},
    "working-directory": null
  },
  "etag": "a6f75ec1e205cd9105705fd7c8d65bf262159a7e733b27148049e70ce6fc14fe"
}
我們已從堆疊產生執行計畫。資源管理程式會使用與此執行計畫對應的唯一 ID 來建立工作。之後可以使用此計畫工作 ID 複查執行計畫詳細資訊,再執行套用作業在 OCI 雲端部署 NoSQL 資料庫資源。
"id": "ocid1.ormjob.oc1.phx.aaaaaaaacrylnpglae4yvwo4q2r2tk5z5x5v6bwjsoxgn26moyg3eqwnt2aq",
"job-operation-details": {
      "operation": "PLAN"
      ...
}
子步驟 4.1:複查執行計畫
如果要複查執行計畫,請執行下列命令:
oci resource-manager job get-job-logs
--job-id <*`plan_job_OCID`*>
舉例而言:
oci resource-manager job get-job-logs
--job-id ocid1.ormjob.oc1.phx.aaaaaaaacrylnpglae4yvwo4q2r2tk5z5x5v6bwjsoxgn26moyg3eqwnt2aq
回應範例:
...
    {
      "level": "INFO",
      "message": "Terraform used the selected providers to generate the following execution",
      "timestamp": "2022-01-17T10:49:21.634000+00:00",
      "type": "TERRAFORM_CONSOLE"
    },
    {
      "level": "INFO",
      "message": "plan. Resource actions are indicated with the following symbols:",
      "timestamp": "2022-01-17T10:49:21.635000+00:00",
      "type": "TERRAFORM_CONSOLE"
    },
    {
      "level": "INFO",
      "message": "  + create",
      "timestamp": "2022-01-17T10:49:21.635000+00:00",
      "type": "TERRAFORM_CONSOLE"
    },
    {
      "level": "INFO",
      "message": "Terraform will perform the following actions:",
      "timestamp": "2022-01-17T10:49:21.635000+00:00",
      "type": "TERRAFORM_CONSOLE"
    },
    {
      "level": "INFO",
      "message": "  # oci_nosql_table.nosql_demo will be created",
      "timestamp": "2022-01-17T10:49:21.635000+00:00",
      "type": "TERRAFORM_CONSOLE"
    },
    {
      "level": "INFO",
      "message": "  + resource "oci_nosql_table" "nosql_demo" {",
      "timestamp": "2022-01-17T10:49:21.635000+00:00",
      "type": "TERRAFORM_CONSOLE"
    },
    {
      "level": "INFO",
      "message": "      + compartment_id      = "ocid1.compartment.oc1..aaaaaaaawrmvqjzoegxbsixp5k3b5554vlv2kxukobw3drjho3f7nf5ca3ya"",
      "timestamp": "2022-01-17T10:49:21.635000+00:00",
      "type": "TERRAFORM_CONSOLE"
    },
    {
      "level": "INFO",
      "message": "      + ddl_statement       = "CREATE TABLE if not exists demo (ticketNo INTEGER, fullName STRING, contactPhone STRING, confNo STRING, gender STRING, bagInfo JSON, PRIMARY KEY (ticketNo))"",
      "timestamp": "2022-01-17T10:49:21.635000+00:00",
      "type": "TERRAFORM_CONSOLE"
    },
    {
      "level": "INFO",
      "message": "      + is_auto_reclaimable = true",
      "timestamp": "2022-01-17T10:49:21.635000+00:00",
      "type": "TERRAFORM_CONSOLE"
    },
    {
      "level": "INFO",
      "message": "      + name                = "demo"",
      "timestamp": "2022-01-17T10:49:21.635000+00:00",
      "type": "TERRAFORM_CONSOLE"
    },
    {
      "level": "INFO",
      "message": "      + table_limits {",
      "timestamp": "2022-01-17T10:49:21.635000+00:00",
      "type": "TERRAFORM_CONSOLE"
    },
    {
      "level": "INFO",
      "message": "          + max_read_units     = 10",
      "timestamp": "2022-01-17T10:49:21.635000+00:00",
      "type": "TERRAFORM_CONSOLE"
    },
    {
      "level": "INFO",
      "message": "          + max_storage_in_gbs = 1",
      "timestamp": "2022-01-17T10:49:21.635000+00:00",
      "type": "TERRAFORM_CONSOLE"
    },
    {
      "level": "INFO",
      "message": "          + max_write_units    = 10",
      "timestamp": "2022-01-17T10:49:21.635000+00:00",
      "type": "TERRAFORM_CONSOLE"
    },
    {
      "level": "INFO",
      "message": "  # oci_nosql_table.nosql_demoKeyVal will be created",
      "timestamp": "2022-01-17T10:49:21.635000+00:00",
      "type": "TERRAFORM_CONSOLE"
    },
    {
      "level": "INFO",
      "message": "  + resource "oci_nosql_table" "nosql_demoKeyVal" {",
      "timestamp": "2022-01-17T10:49:21.635000+00:00",
      "type": "TERRAFORM_CONSOLE"
    },
    {
      "level": "INFO",
      "message": "      + compartment_id      = "ocid1.compartment.oc1..aaaaaaaawrmvqjzoegxbsixp5k3b5554vlv2kxukobw3drjho3f7nf5ca3ya"",
      "timestamp": "2022-01-17T10:49:21.635000+00:00",
      "type": "TERRAFORM_CONSOLE"
    },
    {
      "level": "INFO",
      "message": "      + ddl_statement       = "CREATE TABLE if not exists demoKeyVal (key INTEGER GENERATED ALWAYS AS IDENTITY (START WITH 1 INCREMENT BY 1 NO CYCLE), value JSON, PRIMARY KEY (key))"",
      "timestamp": "2022-01-17T10:49:21.635000+00:00",
      "type": "TERRAFORM_CONSOLE"
    },
    {
      "level": "INFO",
      "message": "      + is_auto_reclaimable = true",
      "timestamp": "2022-01-17T10:49:21.635000+00:00",
      "type": "TERRAFORM_CONSOLE"
    },
    {
      "level": "INFO",
      "message": "      + name                = "demoKeyVal"",
      "timestamp": "2022-01-17T10:49:21.635000+00:00",
      "type": "TERRAFORM_CONSOLE"
    },
    {
      "level": "INFO",
      "message": "      + table_limits {",
      "timestamp": "2022-01-17T10:49:21.635000+00:00",
      "type": "TERRAFORM_CONSOLE"
    },
    {
      "level": "INFO",
      "message": "          + max_read_units     = 10",
      "timestamp": "2022-01-17T10:49:21.635000+00:00",
      "type": "TERRAFORM_CONSOLE"
    },
    {
      "level": "INFO",
      "message": "          + max_storage_in_gbs = 1",
      "timestamp": "2022-01-17T10:49:21.635000+00:00",
      "type": "TERRAFORM_CONSOLE"
    },
    {
      "level": "INFO",
      "message": "          + max_write_units    = 10",
      "timestamp": "2022-01-17T10:49:21.636000+00:00",
      "type": "TERRAFORM_CONSOLE"
    },
    {
      "level": "INFO",
      "message": "Plan: 2 to add, 0 to change, 0 to destroy.",
      "timestamp": "2022-01-17T10:49:21.636000+00:00",
      "type": "TERRAFORM_CONSOLE"
    },
...
此步驟非常重要,因為它會驗證堆疊程式碼是否包含任何語法錯誤,以及正在新增、更新或銷毀多少 OCI 資源。在教學課程中,我們正在部署兩個 NoSQL 表格:demo 和 demoKeyVal。
{
...
"message": "Plan: 2 to add, 0 to change, 0 to destroy.",
...
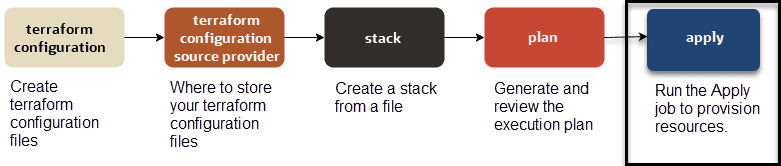
}步驟 5:執行套用工作
-
若要指定計畫工作 (套用執行計畫),請使用
FROM_PLAN_JOB_ID:oci resource-manager job create-apply-job --stack-id <*`stack_OCID`*> --execution-plan-strategy FROM_PLAN_JOB_ID --execution-plan-job-id <*`plan_job_OCID`*> --display-name "Example Apply Job" -
若要自動核准套用工作 (未指定計畫工作),請使用
AUTO_APPROVED:oci resource-manager job create-apply-job --stack-id <*`stack_OCID`*> --execution-plan-strategy AUTO_APPROVED --display-name "Example Apply Job"
舉例而言:
oci resource-manager job create-apply-job
--stack-id ocid1.ormstack.oc1.phx.aaaaaaaa7jrci2s5iav5tdxpl6ucwo2dwazzrdkfhs6bxiohgcpkscmr57bq
--execution-plan-strategy AUTO_APPROVED
--display-name "Create NoSQL Tables Using Terraform"
回應範例:
{
  "data": {
    "apply-job-plan-resolution": {
      "is-auto-approved": true,
      "is-use-latest-job-id": null,
      "plan-job-id": null
    },
    "cancellation-details": {
      "is-forced": false
    },
    "compartment-id": "ocid1.compartment.oc1..aaaaaaaawrmvqjzoegxbsixp5k3b5554vlv2kxukobw3drjho3f7nf5ca3ya",
    "config-source": {
      "config-source-record-type": "ZIP_UPLOAD"
    },
    "defined-tags": {},
    "display-name": "Create NoSQL Tables Using Terraform",
    "failure-details": null,
    "freeform-tags": {},
    "id": "ocid1.ormjob.oc1.phx.aaaaaaaaqn4nsnfgi3th4rxolwqn3kftzzdpsw52pnfeyphi5dsxd6fhescq",
    "job-operation-details": {
      "execution-plan-job-id": null,
      "execution-plan-strategy": "AUTO_APPROVED",
      "operation": "APPLY",
      "terraform-advanced-options": {
        "detailed-log-level": null,
        "is-refresh-required": true,
        "parallelism": 10
      }
    },
    "lifecycle-state": "ACCEPTED",
    "operation": "APPLY",
    "resolved-plan-job-id": null,
    "stack-id": "ocid1.ormstack.oc1.phx.aaaaaaaa7jrci2s5iav5tdxpl6ucwo2dwazzrdkfhs6bxiohgcpkscmr57bq",
    "time-created": "2022-01-17T10:54:46.346000+00:00",
    "time-finished": null,
    "variables": {},
    "working-directory": null
  },
  "etag": "4042a300e8f678dd6da0f49ffeccefed66902b51331ebfbb559da8077a728126"
}
我們已從堆疊對執行計畫執行套用作業。「資源管理程式」會建立一個具有唯一 ID 的工作,以執行套用作業。此套用工作 ID 之後可以用來複查在 OCI 雲端上部署 NoSQL 資料庫表格時所產生的日誌。
"id": "ocid1.ormjob.oc1.phx.aaaaaaaaqn4nsnfgi3th4rxolwqn3kftzzdpsw52pnfeyphi5dsxd6fhescq",
"job-operation-details": {
      "operation": "APPLY"
      ...
}注意:如果您使用專用主機環境,請先設定環境變數 CLIENT_HOST_OVERRIDES 來指定自訂端點,再執行工作。
範例:
export CLIENT_HOST_OVERRIDES=<oci_nosql.NosqlClient=https://ndcs.us-ashburn-1.oci.oc-test.com>第 5.1 步:驗證工作狀態
若要驗證工作的狀態,請執行下列命令:
oci resource-manager job get
--job-id <*`job_OCID`*>
舉例而言:
oci resource-manager job get
--job-id ocid1.ormjob.oc1.phx.aaaaaaaaqn4nsnfgi3th4rxolwqn3kftzzdpsw52pnfeyphi5dsxd6fhescq
回應範例:
{
  "data": {
    "apply-job-plan-resolution": {
      "is-auto-approved": true,
      "is-use-latest-job-id": null,
      "plan-job-id": null
    },
    "cancellation-details": {
      "is-forced": false
    },
    "compartment-id": "ocid1.compartment.oc1..aaaaaaaawrmvqjzoegxbsixp5k3b5554vlv2kxukobw3drjho3f7nf5ca3ya",
    "config-source": {
      "config-source-record-type": "ZIP_UPLOAD"
    },
    "defined-tags": {},
    "display-name": "Create NoSQL Tables Using Terraform",
    "failure-details": null,
    "freeform-tags": {},
    "id": "ocid1.ormjob.oc1.phx.aaaaaaaaqn4nsnfgi3th4rxolwqn3kftzzdpsw52pnfeyphi5dsxd6fhescq",
    "job-operation-details": {
      "execution-plan-job-id": null,
      "execution-plan-strategy": "AUTO_APPROVED",
      "operation": "APPLY",
      "terraform-advanced-options": {
        "detailed-log-level": null,
        "is-refresh-required": true,
        "parallelism": 10
      }
    },
    "lifecycle-state": "SUCCEEDED",
    "operation": "APPLY",
    "resolved-plan-job-id": null,
    "stack-id": "ocid1.ormstack.oc1.phx.aaaaaaaa7jrci2s5iav5tdxpl6ucwo2dwazzrdkfhs6bxiohgcpkscmr57bq",
    "time-created": "2022-01-17T10:54:46.346000+00:00",
    "time-finished": "2022-01-17T10:55:28.853000+00:00",
    "variables": {},
    "working-directory": null
  },
  "etag": "9e9f524b87e3c47b3f3ea3bbb4c1f956172a48e4c2311a44840c8b96e318bcaf--gzip"
}
您可以檢查您的應徵工作狀態,以確認該工作是否為 SUCCESSFUL 或 FAILED。
{
...
      "lifecycle-state": "SUCCEEDED",
...
}
子步驟 5.2:檢視工作的日誌
若要檢視工作的日誌,請執行下列命令:
oci resource-manager job get-job-logs-content
--job-id <*`job_OCID`*>
舉例而言:
oci resource-manager job get-job-logs-content
--job-id ocid1.ormjob.oc1.phx.aaaaaaaaqn4nsnfgi3th4rxolwqn3kftzzdpsw52pnfeyphi5dsxd6fhescq
回應範例:
...
    {
      "level": "INFO",
      "message": "Terraform will perform the following actions:",
      "timestamp": "2022-01-17T10:55:05.580000+00:00",
      "type": "TERRAFORM_CONSOLE"
    },
    {
      "level": "INFO",
      "message": "",
      "timestamp": "2022-01-17T10:55:05.580000+00:00",
      "type": "TERRAFORM_CONSOLE"
    },
    {
      "level": "INFO",
      "message": "  # oci_nosql_table.nosql_demo will be created",
      "timestamp": "2022-01-17T10:55:05.580000+00:00",
      "type": "TERRAFORM_CONSOLE"
    },
    {
      "level": "INFO",
      "message": "  + resource "oci_nosql_table" "nosql_demo" {",
      "timestamp": "2022-01-17T10:55:05.581000+00:00",
      "type": "TERRAFORM_CONSOLE"
    },
    {
      "level": "INFO",
      "message": "      + compartment_id      = "ocid1.compartment.oc1..aaaaaaaawrmvqjzoegxbsixp5k3b5554vlv2kxukobw3drjho3f7nf5ca3ya"",
      "timestamp": "2022-01-17T10:55:05.581000+00:00",
      "type": "TERRAFORM_CONSOLE"
    },
    {
      "level": "INFO",
      "message": "      + ddl_statement       = "CREATE TABLE if not exists demo (ticketNo INTEGER, fullName STRING, contactPhone STRING, confNo STRING, gender STRING, bagInfo JSON, PRIMARY KEY (ticketNo))"",
      "timestamp": "2022-01-17T10:55:05.581000+00:00",
      "type": "TERRAFORM_CONSOLE"
    },
    {
      "level": "INFO",
      "message": "      + is_auto_reclaimable = true",
      "timestamp": "2022-01-17T10:55:05.581000+00:00",
      "type": "TERRAFORM_CONSOLE"
    },
    {
      "level": "INFO",
      "message": "      + name                = "demo"",
      "timestamp": "2022-01-17T10:55:05.581000+00:00",
      "type": "TERRAFORM_CONSOLE"
    },
    {
      "level": "INFO",
      "message": "      + table_limits {",
      "timestamp": "2022-01-17T10:55:05.581000+00:00",
      "type": "TERRAFORM_CONSOLE"
    },
    {
      "level": "INFO",
      "message": "          + max_read_units     = 10",
      "timestamp": "2022-01-17T10:55:05.581000+00:00",
      "type": "TERRAFORM_CONSOLE"
    },
    {
      "level": "INFO",
      "message": "          + max_storage_in_gbs = 1",
      "timestamp": "2022-01-17T10:55:05.581000+00:00",
      "type": "TERRAFORM_CONSOLE"
    },
    {
      "level": "INFO",
      "message": "          + max_write_units    = 10",
      "timestamp": "2022-01-17T10:55:05.581000+00:00",
      "type": "TERRAFORM_CONSOLE"
    },
    {
      "level": "INFO",
      "message": "  # oci_nosql_table.nosql_demoKeyVal will be created",
      "timestamp": "2022-01-17T10:55:05.581000+00:00",
      "type": "TERRAFORM_CONSOLE"
    },
    {
      "level": "INFO",
      "message": "  + resource "oci_nosql_table" "nosql_demoKeyVal" {",
      "timestamp": "2022-01-17T10:55:05.581000+00:00",
      "type": "TERRAFORM_CONSOLE"
    },
    {
      "level": "INFO",
      "message": "      + compartment_id      = "ocid1.compartment.oc1..aaaaaaaawrmvqjzoegxbsixp5k3b5554vlv2kxukobw3drjho3f7nf5ca3ya"",
      "timestamp": "2022-01-17T10:55:05.581000+00:00",
      "type": "TERRAFORM_CONSOLE"
    },
    {
      "level": "INFO",
      "message": "      + ddl_statement       = "CREATE TABLE if not exists demoKeyVal (key INTEGER GENERATED ALWAYS AS IDENTITY (START WITH 1 INCREMENT BY 1 NO CYCLE), value JSON, PRIMARY KEY (key))"",
      "timestamp": "2022-01-17T10:55:05.581000+00:00",
      "type": "TERRAFORM_CONSOLE"
    },
    {
      "level": "INFO",
      "message": "      + is_auto_reclaimable = true",
      "timestamp": "2022-01-17T10:55:05.581000+00:00",
      "type": "TERRAFORM_CONSOLE"
    },
    {
      "level": "INFO",
      "message": "      + name                = "demoKeyVal"",
      "timestamp": "2022-01-17T10:55:05.581000+00:00",
      "type": "TERRAFORM_CONSOLE"
    },
    {
      "level": "INFO",
      "message": "      + table_limits {",
      "timestamp": "2022-01-17T10:55:05.581000+00:00",
      "type": "TERRAFORM_CONSOLE"
    },
    {
      "level": "INFO",
      "message": "          + max_read_units     = 10",
      "timestamp": "2022-01-17T10:55:05.581000+00:00",
      "type": "TERRAFORM_CONSOLE"
    },
    {
      "level": "INFO",
      "message": "          + max_storage_in_gbs = 1",
      "timestamp": "2022-01-17T10:55:05.581000+00:00",
      "type": "TERRAFORM_CONSOLE"
    },
    {
      "level": "INFO",
      "message": "          + max_write_units    = 10",
      "timestamp": "2022-01-17T10:55:05.581000+00:00",
      "type": "TERRAFORM_CONSOLE"
    },
    {
      "level": "INFO",
      "message": "Plan: 2 to add, 0 to change, 0 to destroy.",
      "timestamp": "2022-01-17T10:55:05.581000+00:00",
      "type": "TERRAFORM_CONSOLE"
    },
    {
      "level": "INFO",
      "message": "oci_nosql_table.nosql_demoKeyVal: Creating...",
      "timestamp": "2022-01-17T10:55:06.581000+00:00",
      "type": "TERRAFORM_CONSOLE"
    },
    {
      "level": "INFO",
      "message": "oci_nosql_table.nosql_demo: Creating...",
      "timestamp": "2022-01-17T10:55:06.582000+00:00",
      "type": "TERRAFORM_CONSOLE"
    },
    {
      "level": "INFO",
      "message": "oci_nosql_table.nosql_demoKeyVal: Creation complete after 6s [id=ocid1.nosqltable.oc1.phx.amaaaaaau7x7rfyaqgpbjucp3s6jjzpnar4lg5yudxhwlqrlbd54l3wdo7hq]",
      "timestamp": "2022-01-17T10:55:12.582000+00:00",
      "type": "TERRAFORM_CONSOLE"
    },
    {
      "level": "INFO",
      "message": "oci_nosql_table.nosql_demo: Creation complete after 9s [id=ocid1.nosqltable.oc1.phx.amaaaaaau7x7rfyasvdkoclhgryulgzox3nvlxb2bqtlxxsrvrc4zxr6lo4a]",
      "timestamp": "2022-01-17T10:55:15.583000+00:00",
      "type": "TERRAFORM_CONSOLE"
    },
    {
      "level": "INFO",
      "message": "Apply complete! Resources: 2 added, 0 changed, 0 destroyed.",
      "timestamp": "2022-01-17T10:55:15.583000+00:00",
      "type": "TERRAFORM_CONSOLE"
    },
...
此步驟非常重要,因為它確認新增、更新或銷毀了多少 OCI 資源。在教學課程中,我們已順利部署兩個 NoSQL 表格:demo 和 demoKeyVal。
{
 ...
      "message": "Apply complete! Resources: 2 added, 0 changed, 0 destroyed.",
 ...
}
我們在此教學課程中涵蓋了許多詳細資訊。我們在 OCI 雲端上建立部署 NoSQL 資料庫表格所需的 terraform 組態檔,然後設定這些檔案的來源位置。接著,我們會使用 OCI Resource Manager CLI 建立堆疊、產生執行計畫,以及在執行計畫上執行套用工作。