Oracle Assets System Setup
This section contains a brief overview of each task you need to complete to set up Oracle Assets. Before you set up Oracle Assets, you should:
Multiple Reporting Currencies
If you plan to use Multiple Reporting Currencies (MRC) with Oracle Assets, additional setup steps are required.
See: Multiple Reporting Currencies in Oracle Applications.
Oracle Applications Implementation Wizard
If you are implementing more than one Oracle Applications product, you may want to use the Oracle Applications Implementation Wizard to coordinate your setup activities. The Implementation Wizard guides you through the setup steps for the applications you have installed, suggesting a logical sequence that satisfies cross-product implementation dependencies and reduces redundant setup steps. The Wizard also identifies steps that can be completed independently--by several teams working in parallel--to help you manage your implementation process most efficiently.
You can use the Implementation Wizard as a resource center to see a graphical overview of setup steps, read online help for a setup activity, and open the appropriate setup window. You can also document your implementation, for further reference and review, by using the Wizard to record comments for each step.
For more information, see: Implementation Wizard Documentation
You must set up underlying Oracle Applications Technology
The setup steps in this chapter tell you how to implement the parts of Oracle Applications specific to Oracle Assets.
The Implementation Wizard guides you through the entire Oracle Applications setup, including system administration. However, if you do not use the Wizard, you need to complete several other setup steps, including:
- performing system-wide setup tasks such as configuring concurrent managers and printers
- managing data security, which includes setting up responsibilities to allow access to a specific set of business data and complete a specific set of transactions, and assigning individual users to one or more of these responsibilities
For more information, see: System administration documentation
Also, if your product uses Oracle Workflow to, for example, manage the approval of business documents or to derive Accounting Flexfield values via the Account Generator, you need to set up Oracle Workflow.
For more information, see: Oracle Workflow documentation
Setup Flowchart
While you can set up Oracle Assets in many different ways, and defer optional set up steps until you are ready to use the corresponding functionality, the order suggested in the following flowchart is recommended:
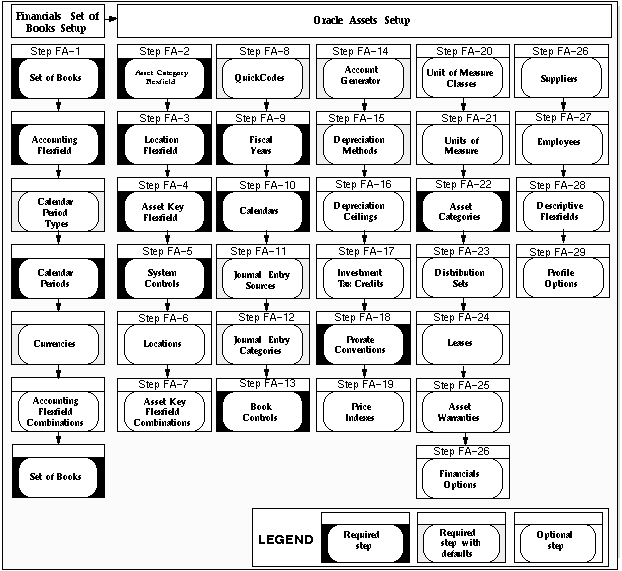
Setup Steps
Step 1 - Define Your Set of Books
You need to define at least one set of books before you can implement and use Oracle Assets. A set of books includes an accounting calendar, a functional currency, and an Account structure.
The Account defines the structure of your general ledger accounts. If you have not defined your Account while setting up a Set of Books, you need to set the Account to match your accounting structure and provide valid values for expense, cash, and accounts payable liability accounts.
If you previously defined your set of books while setting up a different Oracle Financials product, proceed to the next step.
If you have not defined your set of books, you must complete the following steps:
- Define a set of books and assign it a calendar, functional currency and account structure. See: Defining Sets of Books.
- Have your system administrator assign your set of books to a responsibility
Step 2 - Define Your Asset Category Flexfield
The asset category flexfield allows you to define asset categories and subcategories. For example, you can create an asset category for your computer equipment. You can then create subcategories for personal computers, terminals, printers, and software. You must assign the major category segment qualifier to one segment of your category flexfield. The major category segment facilitates capital budgeting. All other segments are optional. You use the same setup windows to create your asset category flexfield as you do for your other key flexfields. See: Category Flexfield
Step 3 - Define Your Location Flexfield
The location flexfield allows you to specify and track the exact location of your assets. You must assign the state segment qualifier to one segment of your location flexfield. The state segment facilitates property tax reporting. All other segments are optional. You use the same setup windows to create your location flexfield as you do for your other key flexfields. See: Location Flexfield
Step 4 - Define Your Asset Key Flexfield
The asset key flexfield allows you to define asset keys that let you name and group your assets so you do not need an asset number to find them. The asset key is similar to the asset category in that it allows you to group assets. However, the asset key has no financial impact.
This flexfield lets you assign the same name to many assets so you can find similar assets. You can provide additional descriptive data to group assets by project or other functional group. You can use this flexfield to track your CIP assets. You use the same setup windows to create your asset key flexfield as you do for your other key flexfields. See: Asset Key Flexfield.
Step 5 - Define Your System Controls
Set up your system controls. You specify your enterprise name, asset numbering scheme, and key flexfield structures in the System Controls window. You also specify the oldest date placed in service of your assets. See: Specifying System Controls.
Step 6 - Define Your Locations (Optional)
Define valid locations. Your location flexfield combinations tell Oracle Assets what locations are valid for your company. Oracle Assets uses location for tracking assets and for property tax reporting.
If your location flexfield has dynamic insertion turned off, this is the only place you can define valid combinations. If dynamic insertion is turned on, Oracle Assets automatically updates the Locations window with the values you enter in the Assignments window. See: Defining Locations.
Step 7 - Define Your Asset Keys (Optional)
Define valid asset keys. You can use the list of values to choose these combinations for your assets when you enter them.
If dynamic insertion is disabled for your asset key flexfield, Asset Keys is the only window where you can define valid combinations. If dynamic insertion is enabled, Oracle Assets automatically updates the Define Asset Keys window with the values you enter when you add assets. See: Defining Asset Keys.
Step 8 - Define Your Standard Asset Descriptions and Other QuickCode Values (Optional)
QuickCode values are values that you can choose from a list of values when you enter and maintain assets. You can define the QuickCode values that you want for the following items:
- Standard Asset Descriptions
- Mass Additions Queue Names
See: Entering QuickCodes.
Step 9 - Define Your Fiscal Years
Use the Fiscal Years window to define the beginning and end of each fiscal year since the start of your company.
Your fiscal year groups your accounting periods. You must define the start and end date of each fiscal year since the oldest date placed in service. If you are using a 4-4-5 calendar, your start and end dates change every year. When you run the depreciation program for the last period in your fiscal year, Oracle Assets automatically generates the dates for your next fiscal year. See: Creating Fiscal Years.
Step 10 - Define Your Calendars
Use the Calendars window to set up as many depreciation and prorate calendars as you need. Calendars break down your fiscal year into accounting periods. Define your calendars with as many periods as you need.
Define a prorate calendar and a depreciation calendar for each depreciation book. Depreciation books can share a calendar, and you can use the same calendar for your depreciation calendar and prorate calendar if appropriate.
| Depreciation Calendar
| Determines, with the divide depreciation flag, what fraction of the annual depreciation amount to take each period.
|
| Prorate Calendar
| Determines, with the date placed in service, which depreciation rate to select from the rate table.
|
You can set up different calendars for each depreciation book. For example, you might set up a monthly calendar for financial reporting and a quarterly calendar for tax reporting. See: Specifying Dates for Calendar Periods.
Step 11 - Define Additional Journal Entry Sources (Optional)
If you do not install Oracle General Ledger, use the Journal Entry Sources window in Oracle Assets to define additional journal entry sources. Journal entry sources are used to identify the origin of your journal entry transactions. See: Defining Journal Sources.
If you previously defined your journal entry sources while setting up Oracle General Ledger, proceed to the next step.
Step 12 - Define Additional Journal Entry Categories (Optional)
If you do not install Oracle General Ledger, use the Journal Entry Categories window in Oracle Assets to define additional journal entry categories. Journal entry categories describe the purpose or type of your journal entries. See: Defining Journal Categories.
If you previously defined your journal entry categories while setting up Oracle General Ledger, proceed to the next step.
Step 13 - Define Your Book Controls
Use the Book Controls window to set up your depreciation books. You can set up an unlimited number of independent depreciation books. Each book has its own set of accounting rules and accounts so you can organize and implement your fixed assets accounting policies.
When you define a tax book, you must specify an associated corporate book. You can mass copy assets and transactions from the source book into your tax book. You specify the current open period, and Initial Mass Copy copies each asset into the tax book from the corporate book as of the end of that fiscal year in the corporate book. See: Defining Depreciation Books.
Step 14 - Decide How to Use the Account Generator
Oracle Assets uses the Account Generator to generate accounting flexfield combinations for journal entries. You must review the default process that Oracle Assets uses to see if it meets your accounting requirements. You can optionally customize the Account Generator for each set of books that you have defined. See: Using the Account Generator in Oracle Assets. Note that you must set up Oracle Workflow in order to use the Account Generator.
Step 15 - Define Additional Depreciation Methods and Rates (Optional)
Depreciation methods specify how to spread the asset cost. Oracle Assets includes many standard depreciation methods, and you can define additional methods in the Methods window, if necessary.
| Life-Based Depreciation Method
| Oracle Assets includes standard life-based depreciation methods and rates. However, you can define additional life-based methods.
|
| Flat-Rate Depreciation Method
| You can define additional flat-rate methods, such as Diminishing Value. You can define your methods to calculate depreciation using either the net book value or the cost of the asset.
|
| Bonus Depreciation Rules
| Use the Bonus Depreciation Rules window to enter bonus rates for your flat-rate depreciation methods. Bonus rules allow you to take additional depreciation in the early years of an asset's life.
|
| Units Of Production
| You can define a units of production method so you can calculate depreciation for an asset based on actual production or use for the period.
|
See: Defining Additional Depreciation Methods and Defining Bonus Depreciation Rules.
Step 16 - Define Your Depreciation Ceilings (Optional)
Depreciation ceilings limit the depreciation expense you can take for an asset. Set up depreciation expense ceilings to limit the annual amount of depreciation expense you can take on an asset. Or set up depreciation cost ceilings to limit the recoverable cost of an asset.
| Depreciation Expense Ceilings
| Use the Ceilings window to define your depreciation expense ceilings. If you are subject to United States tax law, you must set up depreciation ceilings for luxury automobiles.
|
| Depreciation Cost Ceilings
| If you do business in a country which requires cost ceilings, such as Australia, you can limit the cost Oracle Assets uses to calculate depreciation. When you use a cost ceiling, Oracle Assets bases depreciation expense on the lesser of the cost ceiling and the asset cost.
|
See: Setting Up Depreciation Ceilings.
Step 17 - Define Your Investment Tax Credits (Optional)
Set up your Investment Tax Credit (ITC) rates, recapture rates, and ceilings. Investment tax credits (ITC) allow you to reduce the recoverable cost of an asset.
| ITC Rates
| Oracle Assets allows you to set up ITC rates for assets that are eligible for Investment Tax Credit. ITC rates determine the amount of ITC for an asset.
|
| ITC Recapture Rates
| Oracle Assets allows you to set up ITC recapture rates for assets with Investment Tax Credits. ITC recapture rates determine the portion of the investment tax credit that must be recaptured if you retire the asset prematurely.
|
See: Defining Investment Tax Credit Rates.
| ITC Ceilings
| Oracle Assets allows you to define Investment Tax Credit (ITC) ceilings. ITC ceilings limit the amount of ITC for an asset. If you are subject to United States tax law, you must set up ITC ceilings for luxury automobiles.
|
See: Setting Up Depreciation Ceilings.
Step 18 - Define Your Prorate and Retirement Conventions
Use the Prorate Conventions window to set up your prorate and retirement conventions. Prorate and retirement conventions determine how much depreciation expense to take in the first and last year of life, based on when you place the asset in service. Oracle Assets lets you set up as many prorate and retirement conventions as you need.
| Prorate Conventions
| Determines how much depreciation expense to take in the first year of life.
|
| Retirement Conventions
| If you do business in a country that requires you to use a different prorate convention for retirements than for additions, set up retirement conventions to determine how much depreciation to take in the last year of life, based on the retirement date.
|
You must set up your prorate conventions for the entire year. When you run the depreciation program for the last period in your fiscal year, Oracle Assets automatically generates the dates for your next fiscal year. See: Specifying Dates for Prorate Conventions.
Step 19 - Define Your Price Indexes (Optional)
A price index lets you calculate gains and losses for retirements using current value rather than historical cost. If you do business in a country that requires you to base gains and losses on current value rather than historical cost, Oracle Assets lets you set up price indexes to calculate the gains and losses for your asset upon retirement. When you retire an asset assigned to a category and book for which you have defined a price index, you can run the Revalued Asset Retirements Report which uses the revalued asset cost in calculating gains and losses.
You can use a different index for each asset category or the same index for all categories. You associate an index with an asset category by entering the name of the price index in the Price Index field on the Asset Categories window. See: Defining Price Indexes.
Step 20 - Define Your Unit of Measure Classes (Optional)
If you do not install Oracle Inventory or Oracle Purchasing, use the Unit of Measure Classes window in Oracle Assets to define your unit of measure classes. You can define classes for the units you use to measure production for your units of production assets. See: Defining Units of Measure Classes.
If you previously defined your unit of measure classes while setting up a different Oracle Applications product, proceed to the next step.
Attention: You must set up an Organization before you can define units of measure classes. See: Creating an Organization.
Attention: You must define the profile option HR:User Type before you can set up an Organization. See: Setting User Profile Options
Step 21 - Define Your Units of Measure (Optional)
If you do not install Oracle Inventory or Oracle Purchasing, use the Units of Measure window in Oracle Assets to define your units of measure. You can define the units you use to measure production for your units of production assets.
Attention: You must set up an Organization before you can define units of measure. See: Creating an Organization
Attention: You must define the profile option HR:User Type before you can set up an Organization. See: Setting User Profile Options.
If you previously defined your units of measure while setting up a different Oracle Applications product, proceed to the next step.
Step 22 - Define Your Asset Categories
Asset categories let you define information that is common to all assets in a category, such as depreciation method and prorate convention. Oracle Assets uses this information to provide default values to help speed asset entry. See: Setting Up Asset Categories.
Step 23 - Define Distribution Sets (Optional)
Distribution sets let you automatically assign distributions to a new asset or mass addition quickly and accurately by using a predefined distribution set. Default distribution sets appear in the Distribution Set poplist in the Assignments window. See: Defining Distribution Sets.
Step 24 - Enter Leases (Optional)
Define leases in the Lease Details window. You can assign leases to one or more assets in the Asset Details window. You can also test your leases in accordance with generally accepted accounting principles in the Lease Details window, and you can analyze alternate leasing strategies using the Lease Payments window. See: Entering Leases and Lease Analysis.
Step 25 - Define Warranties
Define and track descriptive information on manufacturer and vendor warranties. You define the warranty information in the Asset Warranties window. You can then assign assets to these previously defined warranties in the Asset Details window. You can assign any number of assets to the same warranty. See: Defining Asset Warranties.
Step 26 - Define Your Supplier and Employee Numbering Schemes (Optional)
If you do not install Oracle Purchasing or Oracle Payables, use the Financials Options window in Oracle Assets to define your supplier and employee numbering schemes. You need to specify how to number your suppliers and employees before you can enter suppliers or employees. See: Defining Financials Options.
If you previously defined your supplier and employee numbering schemes while setting up a different Oracle Applications product, proceed to the next step.
Step 27 - Define Your Suppliers (Optional)
If you do not install Oracle Purchasing or Oracle Payables, use the Suppliers window in Oracle Assets to define your suppliers. You must enter a supplier before you can enter assets or bring over mass additions purchased from that supplier. Oracle Assets only uses the supplier name, number, and inactive date. See: Entering Suppliers.
If you previously defined your suppliers while setting up a different Oracle Applications product, proceed to the next step.
Step 28 - Define Your Employees (Optional)
If you do not install Oracle Personnel, Oracle Payroll, Oracle Purchasing, or Oracle Payables, use the Enter Person window in Oracle Assets to define employees. You must enter an employee before you can assign an asset to the employee. Oracle Assets only uses the employee name, number, and termination date. See: Entering a New Employee.
If you previously defined your employees while setting up a different Oracle Applications product, proceed to the next step.
Step 29 - Define Your Descriptive Flexfields (Optional)
You can set up descriptive flexfields to track additional information. For example, you can set up a descriptive flexfield for each asset category to collect information relevant to your business. For example, you might want to track the license number for cars, but the square footage for buildings. Then, when you assign a new asset to a category, you can enter the additional information.
There are many other descriptive flexfields in Oracle Assets. For example, you can set up a descriptive flexfield to store additional information about your transactions. See: Defining Descriptive Flexfields.
Note: To set up the Leases GUI descriptive flexfield or the Retirements GUI descriptive flexfield, see: Defining Descriptive Flexfield Structures.
Step 30 - Set Profile Options
Profile options specify how Oracle Assets controls access to and processes data. In general, profile options can be set at one or more of the following levels: site, application, responsibility, and user.
Oracle Assets users use the Personal Profile Values window to set profile options only at the user level. System administrators use the Update System Profile Options window to set profile options at the site, application, responsibility, and user levels.
You can set or view the following profile options in Oracle Assets. The table also includes profile options from other applications that are used by Oracle Assets. See Overview of User Profiles and Setting User Profile Options.
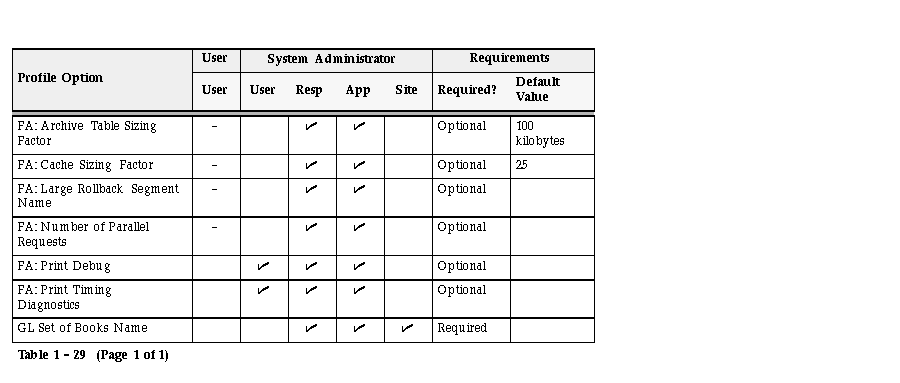
| Key
|

| You can update the profile option.
|
| -
| You can view the profile option value but you cannot change it.
|
See Also
Key Flexfields by Owning Application
Using the Account Generator in Oracle Assets
User Profiles in Oracle Assets
Oracle Assets With Multiple Set of Books