4.3 Security Groups, Roles, and Permissions
This section covers the following topics:
4.3.1 Introduction to Security Groups
A security group is a set of files grouped under a unique name. Every file in the Content Server repository belongs to a security group. Access to security groups is controlled by the permissions, which are assigned to roles on Content Server. Roles are assigned to users where they are managed on Oracle WebLogic Server.
Users are assigned groups in Oracle WebLogic Server. When a user logs in to Content Server, the user's groups are mapped to Content Server roles. Oracle WebLogic Server user groups that start with a @ ("at") symbol are mapped to Content Server accounts.
For Oracle WebLogic Server groups to be recognized in Content Server, roles with the exact same names must be created in Content Server and assigned to security groups. If this is not done, the Oracle WebLogic Server groups assigned to users has no impact on users' privileges in Content Server.
Security groups enable you to organize content files into distinct groups that can be accessed only by specific users. For example, files could be assigned to a security group with the name HRDocs, which could represent documents under the Human Resources designation, and could be accessed only by people who worked in the Human Resources department. There are two predefined security groups:
-
Public: By default, any user can view documents in the Public group without logging in.
-
Secure: System files are stored in the Secure group and are available only to the system administrator.
4.3.1.1 Best Practices for Working with Security Groups
Keep these considerations in mind when you define security groups:
-
Define security groups before anyone checks in files that must be secure.
-
The number of security groups should be kept at a minimum to provide optimum search performance and user administration performance. If your security model requires more than 50 security classifications, you should enable accounts and use them to control user permissions. This number varies depending on Search Performance and User Admin Performance.
-
Put all files that share the same access into one security group.
-
Set up a logical naming convention for your security groups. For example, use department names if you are setting up an intranet, and use levels of security (internal, classified, and so forth) if you are setting up an extranet.
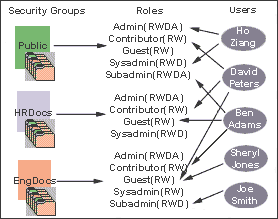
For example, Figure 4-2 shows three defined security groups (Public, HRDocs, and EngDocs). They are associated with five users assigned different roles (Admin, Contributor, Guest, Sysadmin, Subadmin) and specific sets of permissions (Read, Write, Delete, All).
Figure 4-2 Example of Defining Security Groups

Description of "Figure 4-2 Example of Defining Security Groups"
4.3.1.2 Performance Considerations
Your user access choices for security groups and roles can affect the following system performance areas:
4.3.1.2.1 Search Performance
Search performance is affected by the number of security groups a user has permission to access. To return only content that a user has permission to view, the database WHERE clause includes a list of security groups. The WHERE clause either includes all of the security groups the user has permission to access, or it includes all of the security groups the user does not have permission to access. Which approach is taken depends on whether the user has permission to more than 50% or fewer than 50% of the defined security groups.
For example, if 100 security groups are defined, and a user has permission to 10 security groups, the 10 security groups will be included in the WHERE clause. In contrast, for a user with permission to access 90 security groups, the WHERE clause includes the 10 security groups the user does not have permission to access.
Therefore, if a user has permission to almost 50% of the security groups, the search performance is less efficient. If a user has permission to all or none of the security groups, the search performance is more efficient.
4.3.1.2.2 User Admin Performance
The total number of security groups multiplied by the total number of roles determines the number of rows in the RoleDefinition database table, which affects the performance of the User Admin application for operations involving local users. To determine the approximate time required to perform an operation in the User Admin application, such as adding a security group or changing permission for a role, use the following formula:
(# of security groups) X (# of roles) / 1000 = Time of operation in seconds
For example, using a PC with a 400 MHz processor, 128 MB of RAM, it took approximately 10 seconds to add a security group, or role, or both, using the User Admin application when the RoleDefinition table has 10,000 rows.
As the number of security groups increases, administration performance is affected more than consumer search performance.
4.3.2 Managing Groups on Content Server
The following tasks are used to manage security groups using Content Server.
For information on managing groups, see Oracle WebLogic Server Admin Console Help.
4.3.2.1 Adding a Security Group on Content Server
To create a security group and assign permissions:
-
From the User Admin Screen, select Security, and then Permissions by Group.
The Permissions By Group Screen is displayed.
-
Click Add Group to display the Add New Group Screen.
-
Enter a group name and description.
-
Click OK.
-
Set permissions for the security group:
-
Select the security group.
-
Select the role to edit.
-
Click Edit Permissions.
-
After enabling the permissions that you want the role to have for the group, click OK to close the Permissions by Group screen.
-
4.3.2.2 Deleting a Security Group on Content Server
To delete a security group:
-
Make sure that no content items are assigned to the security group you want to delete. You cannot delete a security group if content still exists in that security group.
-
From the User Admin Screen, select Security, and then Permissions by Group.
The Permissions By Group Screen is displayed.
-
Select the group you want to delete.
-
Click Delete Group.
A confirmation screen is displayed.
-
Click Yes.
The security group is deleted.
-
After you have deleted the security group, click OK to close the Permissions by Group screen.
4.3.3 Introduction to Roles and Permissions
A role is a set of permissions (Read, Write, Delete, Admin) for each security group. You can think of a role as a user's job. Users can have different jobs for various security groups. Users can also have different jobs to identify the different teams in which they participate. You can:
-
Define roles.
-
Assign multiple roles to a user.
-
Set up multiple users to share a role.
-
Set the role's permissions to multiple security groups.
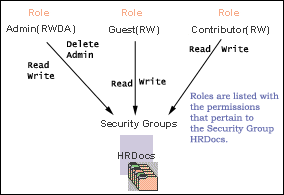
For example, Figure 4-3 shows three roles and the permissions those roles have to the same security group.
Figure 4-3 Example of Roles and Their Permissions

Description of "Figure 4-3 Example of Roles and Their Permissions"
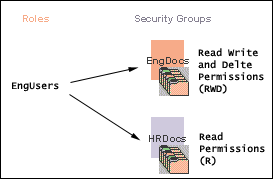
Roles are assigned to one or more users by the system administrator to provide access to the security groups. Figure 4-4 shows the EngUsers role with only Read permission to the HRDocs security group. However, this role provides Read, Write, and Delete permissions to the EngDocs security group. This provides an added measure of security, ensuring that only users who need access to certain documents can modify them.
Figure 4-4 Example of Roles and Security Group Access

Description of "Figure 4-4 Example of Roles and Security Group Access"
4.3.3.1 Predefined Roles
The following roles are predefined on Content Server:
4.3.3.2 About Permissions
Each role allows the following permissions for each security group: Read (R), Write (W), Delete (D), or Admin (A). The permission that a user has to access the files in a security group is the highest permission defined by any of the user's roles. If a user has the guest and contributor roles, where guest is given Read permission and contributor is given Write permission to the Public security group, the user will have Write permission to content in the Public security group.
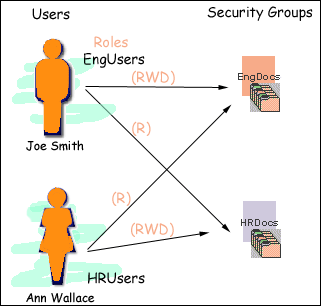
As shown in Figure 4-5, Joe Smith and Ann Wallace have permissions to two security groups:
-
Joe Smith has Read, Write, and Delete permission to the EngDocs security group, but only Read permission to the HRDocs security group. As a member of the EngUsers role, he has been given Read, Write, and Delete access to Engineering Documents, but only Read access to Human Resource documents.
-
Ann Wallace has Read, Write, and Delete permission to the HRDocs security group, but only Read permission to the EngDocs security group. As a member of the HRUsers role, she has been given Read, Write, and Delete access to Human Resource documents, but only Read access to Engineering documents.
Figure 4-5 Example of Assigned Permissions

Description of "Figure 4-5 Example of Assigned Permissions"
4.3.3.3 Predefined Permissions
Each role allows the following permissions to be assigned for each security group:
4.3.4 Managing Roles and Permissions on Content Server
Roles and permissions are defined and managed on Content Server. Roles are assigned to user logins which are managed on Oracle WebLogic Server.
The following tasks are used to manage user roles.
4.3.4.1 Creating a Role on Content Server
To create a role and configure permissions:
-
From the User Admin Screen, select Security, and then Permissions by Role.
The Permissions By Role Screen is displayed.
-
Click Add New Role.
The Add New Role Screen is displayed.
-
Enter a Role Name.
-
Set permissions for the role:
-
Select the role.
-
Select the security group to edit.
-
Click Edit Permissions.
-
Edit the permissions.
-
Click OK and close the Permissions By Role Screen.
-
4.3.4.2 Deleting a Role on Content Server
To delete a role:
-
Make sure that no users are assigned to the role to delete. (You can not delete a role if any users are assigned to it.)
-
From the User Admin Screen, select Security, and then Permissions by Role.
The Permissions By Role Screen is displayed.
-
Select the role to delete.
-
Click Delete Role.
A confirmation screen is displayed.
-
Click Yes.
4.3.4.3 Assigning Roles to a User on Oracle WebLogic Server
To assign roles to a user for a Content Server instance, use the Oracle WebLogic Server Administration Console. While roles are defined on Content Server, they must be assigned to users on Oracle WebLogic Server.
4.3.4.4 Assigning Roles to Create Similar Users on Oracle WebLogic Server
To assign roles to create similar users, use the Oracle WebLogic Server Administration Console. While roles are defined on Content Server, they must be assigned to users on Oracle WebLogic Server.
4.3.4.5 Adding and Editing Permissions on Content Server
To add permissions to a role or edit existing permissions, follow this procedure in Content Server:
-
From the User Admin Screen, select Security, and then Permissions by Role.
The Permissions By Role Screen is displayed.
-
Either select an existing role, or add a new role.
The permissions associated with the security groups are displayed.
-
Select an item in the Groups/Rights column.
-
Click Edit Permissions.
The Edit Permissions Screen is displayed.
-
Specify the permissions to associate with this role and security group. See "Predefined Permissions".
-
Click OK.