5 Entering Supplier Information
This chapter contains the following topics:
-
Section 5.5, "Setting Up Multiple Bank Accounts for Suppliers"
-
Section 5.6, "Assigning Payment Instrument and GL Account Relationships"
-
Section 5.7, "Updating the Approver and Category Code 7 Fields"
|
Note: Country-specific supplier information exists for Argentina, China, Japan, the Czech Republic, and Taiwan. |
5.1 Understanding Supplier Master Information
Before you enter a voucher and issue payment to a supplier, you must create a supplier master record for that supplier. The supplier master record is the central storage place for all supplier information. When you create a supplier record, you set up address book and mailing information, as well as information about how the system processes vouchers and payments for that supplier. You use the Address Book Revisions program (P01012) and the Supplier Master (P04012) program to create a supplier record.
The information that you enter in a supplier record is stored in these tables:
| Table Name | Stored Information |
|---|---|
| Address Book Master (F0101) | Alpha name and factor/special payee |
| Address Book- Who's Who (F0111) | Mailing name |
| Supplier Master (F0401) | Supplier information |
| Address Book - Contact Phone Numbers (F0115) | Telephone number |
| Address by Date (F0116) | Mailing address information |
| Bank Transit Master (F0030) | Bank account information |
You need to maintain only one address book number for each supplier throughout the various systems. For example, if you use the Supplier Ledger Inquiry form to review information or if you run reports such as A/R and A/P Netting, the system uses the same address book number.
You can create a supplier record from either of these forms:
-
Work With Addresses
-
Note:
The Supplier Master program contains a processing option that enables you to specify a version of the Address Book Revisions program to use when creating supplier master records using the Supplier Master program. Be sure the version that you specify in the Supplier Master processing option is the same as the versions of the JD Edwards EnterpriseOne Address Book program that you use to enter new address book information.
This graphic shows the information that you enter in the Address Book Revision program and the Supplier Master program:
Figure 5-1 Address Book and Supplier Master information

Description of "Figure 5-1 Address Book and Supplier Master information"
You can generate a report to show supplier balance information.
5.2 Common Fields Used in This Chapter
- Bank Account Number
-
Enter the number assigned by a bank to identify the account for a company, customer, or supplier.
(DNK, FIN, NOR, and SWE) Enter your bank, Bankgiro, or Postgiro account number.
- Bank Country Code
-
Enter a value from the Country Codes (00/CN) UDC table that identifies a country. The country code has no effect on currency conversion.
The JD Edwards EnterpriseOne Address Book system uses the country code for data selection and address formatting.
- Bank Transit Number
-
Enter the number assigned to a particular bank by the Federal Reserve to facilitate the clearing of funds.
- Checking or Savings Account
-
Enter the code that specifies the type of bank account. This code is used during bank tape processing for automatic payments. The code that you specify must exist in UDC H00/CK.
- Control Digit
-
Enter the number that represents a check digit for a bank account number. This number is optional, and is not part of the key to the Bank Transit Master table (F0030).
(DNK, FIN, NOR and SWE) This field is not used for Nordic electronic payments.
- IBAN (International Bank Account Number)
-
Enter the IBAN in its electronic format. The electronic format consists of the country code, the check digits, and the basic bank account number, and does not include any spaces or country-specific characters.
- Pre-Note Code
-
Select to specify that a supplier is in a setup status for electronic funds transfer. Clear the check box to specify that a supplier is at cycle complete status.
- Reference/Roll Number
-
Enter the recipient's reference number. This is not used by all banks or in all countries. These countries use this field for specific purposes:
- SWIFT Code
-
Enter the Society for Worldwide Interbank Financial Telecommunications (SWIFT) code of the beneficiary's bank.
5.3 Entering Supplier Master Information
This section provides overviews of supplier master information, the Pre-note Code check box, and setting up suppliers for withholding; and discusses how to:
-
Set processing options for Supplier Master Information (P04012).
-
Set processing options for Supplier Master MBF - PO (P0100043).
-
Enter supplier master records.
-
Assign bank accounts to suppliers.
5.3.1 Understanding Supplier Master Information
Each supplier master record is uniquely identified in the system by a number called the address book number. An address book record for your supplier must exist in the system before you can create a supplier record. You can create an address book record directly using the Supplier Master Information program or you can use the Address Book Revisions program (P01012).
Verify that an address book record does not exist for the supplier before you create it. No mechanism exists for merging address book records and their corresponding transactions.
After you enter supplier address book information and supplier master information, you can assign bank accounts to suppliers. Businesses that transmit payments electronically must assign bank accounts to their suppliers. The system uses this information to identify the supplier's bank account when you pay vouchers by electronic funds transfer.
Information about setting up purchase and item information for suppliers is described in "Setting Up Supplier Information" in the JD Edwards EnterpriseOne Applications Procurement Management Implementation Guide.
5.3.1.1 Revising Supplier Master Information
You can revise supplier master information at any time. Use either the Supplier Master Information program or the Address Book Revisions program to revise supplier master information.
With the exception of the supplier number, you can change any field on the Supplier Master Revision form. However, if you make changes to a supplier master record, existing vouchers for that supplier will not reflect those changes. The only changes that are recognized are changes to the address book master record for the supplier. For example, if you enter vouchers for a supplier, and then change the payment instrument on the supplier master record and the mailing address on the address book master record, only the change to the mailing address is reflected in the payment. In this situation, use the Speed Status Change program (P0411S) to update the payment instrument.
|
Note: If you change the value specified in the Approver Number field or the Category Code 7 field, you can run a program to update the value in these fields in the F0411 table. |
See Updating the Approver and Category Code 7 Fields.
If you are concerned about the potential for fraud that could result from users changing the address book information for suppliers, you can activate a process called Payee Control. If you activate this process and a user changes information for a supplier in fields such as the Alpha Name or Factor/Special Payee, the system does not allow vouchers for this supplier to be paid until a designated person approves the change.
5.3.1.2 Deleting Supplier Master Records
When you delete a supplier master record, the system verifies that no transactions exist for that supplier in these tables:
| Table | Description |
|---|---|
| F0411 | Accounts Payable Ledger |
| F0413 | Accounts Payable - Matching Document |
| F0414 | Accounts Payable Matching Document Detail |
| F0911 | Account Ledger |
| F0902 | Account Balances (if the address book number is used as a subledger) |
If a transaction for the supplier exists in any of the tables identified, you cannot delete the supplier master record until you delete the record from the other tables.
If posted vouchers or payments exist that prevent you from deleting a supplier, you can prevent the creation of any new transactions for the supplier by entering 1 in the Hold Payment field on the Supplier Master Revision form. A value of 1 indicates that no vouchers or payments can be entered for the supplier.
5.3.2 Understanding the Pre-Note Code Check Box on the Supplier Master Revision Form
A prenote code indicates whether a supplier is in a setup or complete status for electronic funds transfer (EFT). The setup cycle is called prenote setup status, in which EFT information is being created or verified with a bank. After the EFT information is verified, the system changes the supplier's prenote status to complete.
When you process bank tape payments, the system performs prenote editing if the GL (payor) bank account is set up to do so. When you run a bank tape, all the new suppliers that are at a prenote setup status receive printed payments while test records are written to the bank tape. The system stores the prenote status assigned to payees in the Supplier Master table (F0401). When the bank tape arrives at the bank, the bank partially processes the test records through its system to verify that the account information is correct.
|
Note: In the G/L Bank Accounts program (P0030G), the Revise Bank Information form includes the Override Supplier Pre-Note Code check box. If this check box is selected, prenote editing is not performed during the processing of bank tape payments for the GL bank account on the form. |
When you set up a user-defined bank account for a supplier, the system creates a record with a prenote setup status. This is a separate record in the Multiple Vendor Bank Account Status table (F0401M). When the system performs prenote editing for user-defined record types, the supplier's prenote status is retrieved from the Multiple Vendor Bank Account Status table. If the supplier does not have a bank account record for the user-defined record type, or the default value for the hard-coded vendor (V) type account is used, the supplier's prenote status is retrieved from the F0401 table.
5.3.3 Understanding How to Set Up Suppliers for Withholding
If you are required to withhold a percentage of each payment to a particular supplier, you must set up that supplier for withholding. For example, you might need to withhold taxes and pay the Internal Revenue Service directly if you do not have a tax ID for a person with whom you contract services. The system deducts the percentage that you specify from each voucher that you enter. It also makes that percentage payable to the tax authority that you specify.
To set up suppliers for withholding, enter withholding information on the Tax Information tab of the Supplier Master Revision form. To stop withholding taxes for a supplier, remove the information from the Withholding Percent and Tax Authority fields.
When you enter vouchers for suppliers that have been set up for withholding, the system assigns the voucher a pay status of %, indicating that withholding applies.
If you set up withholding information for a supplier after you have already entered vouchers for that supplier, you must manually change the pay status for the vouchers to % so that the system can calculate withholding.
See Using Speed Status Change to Review and Revise Vouchers.
Country-specific information for setting up withholding for suppliers exists for many countries.
|
See Also: |
5.3.4 Forms Used to Enter Supplier Master Records
5.3.5 Setting Processing Options for Supplier Master Revision (P04012)
Processing options enable you to specify the default processing for programs and reports.
5.3.5.1 Entry
- 1. Tax ID
-
Leave this process option blank to display the Tax ID field on the Supplier Master Revision form. Enter 1 to hide the Tax ID field. Enter 2 to display and disable the Tax ID field. When you disable a field the user cannot enter data in it.
5.3.5.2 Defaults
- 1. Search Type
-
Specify the default value that is used in the Search Type field on the Work with Supplier Master form. Enter a value that exists in the Search Type (01/ST) UDC table. If you leave this processing option blank, the system uses V (Suppliers) as the default value.
- 2. Amount Currency Code
-
Specify the default currency code for the A/B Amount Code field. If you leave this processing option blank and the A/B Amount Code field on the Supplier Master Revision form is blank, the system uses the currency code of the company assigned to the Business Unit field on the Address Book Revision form.
The A/B Amount Code field appears on the Supplier Master Revision form only if multicurrency is activated in the General Accounting Constants program.
5.3.5.3 Versions
- 1. Supplier Master MBF (P0100043) Version
-
Specify the version for the Supplier Master MBF (Master Business Function). If you leave this processing option blank, the system uses the default version ZJDE0001.
- 2. Address Book (P01012) Version
-
Specify the version of the Address Book program (P01012) the system will use. If you leave this processing option blank, the system uses the default version, ZJDE0001.
5.3.6 Setting Processing Options for Supplier Master MBF - PO (P0100043)
Processing options enable you to specify the default processing for programs and reports.
5.3.6.1 Outbound
- 1. Transaction Type
-
Enter a value that exists in the Transaction Type (00/TT) UDC table when using the interoperability feature. If you leave this processing option blank, the system does not perform outbound interoperability processing.
- 2. Change Transaction Image
-
Enter 1 to specify that the system writes a before and after image for a change transaction. The before image is the record before the change. The After Image is the record after the change.
Leave this processing option blank to write only the after image.
|
Note: If you create a new version of P0100043, you must create a version with the same name for Address Book MBF (P0100041). Otherwise, the system displays an error message when you add or edit a Supplier Master record from the Supplier Master Revision program (P04012). |
5.3.7 Entering Supplier Master Records
Access the Supplier Master Revision form.
|
Note: Fields on the Purchasing 1 and Purchasing 2 tabs are discussed in the JD Edwards EnterpriseOne Procurement Implementation Guide. |
5.3.7.1 Vouchers
- Supplier Number
-
The system displays the name of the supplier next to this field. When you click the supplier name, the system displays the Address Book Revision form for the supplier.
- Credit Message
-
Enter a value that exists in the Address Book Credit Messages (00/CM) UDC that indicates the credit status of a customer or supplier. Examples are:
1: Over credit limit
2: Requires purchase order
3: Not on contract maintenance agreement
The credit message displays on inquiry and transaction entry forms in the JD Edwards EnterpriseOne Accounts Payable, JD Edwards EnterpriseOne Sales Order Management, and JD Edwards EnterpriseOne Procurement systems. The system displays the temporary credit message in the JD Edwards EnterpriseOne Accounts Receivable system.
- Factor/Special Payee
-
Enter a number from the address book that identifies a special payment address for accounts payable.
This number must exist in the F0101 table for validation purposes. If you leave this processing option blank on an entry form, the system supplies the primary address from the Address Number field.
- Parent Number
-
Enter the address book number of the parent company. The system uses this number to associate a particular address with a parent company or location. Any value that you enter in this processing option updates the Address Organizational Structure Master table (F0150) for the blank structure type. This address number must exist in the F0101 table for validation purposes. Examples of address book records that would have a parent number include:
-
Subsidiaries with parent companies.
-
Branches with a home office.
-
Job sites with a general contractor.
The parent/child relationship that is created by entering a value in this field is used for reporting purposes only in the JD Edwards EnterpriseOne Accounts Payable system. Voucher and payment processing do not use the parent number field or a parent/child relationship.
-
- Approver Number
-
Enter the address number of the individual who is authorized to approve voucher logging transactions. This address number must exist in the F0101 table for validation purposes.
- Default Code
-
Enter the code that indicates the currency that is used by the supplier. The system uses this code as the default currency when you enter vouchers for the supplier. You can override the default currency when you enter a voucher. If you leave this field blank, you can either assign the currency code when you enter a voucher or let the system assign the currency code of the voucher company.
- A/B Amount Code (address book amount code)
-
Enter the currency in which amounts are stored in the address book record. For example, enter the currency for amounts for the credit limit, amounts invoiced this year, amounts invoiced prior year, and so on. The currency that you specify is used to record and store transaction history.
- Hold Payment
-
Enter the code that specifies whether to hold payment of outstanding vouchers and prevent entry of new vouchers for the supplier. The hold code applies only to the supplier on a voucher. The hold code does not apply when the supplier is a payee on a different supplier's account. Values are:
1 or Y: Hold payment of outstanding vouchers and prevent entry of new vouchers for this supplier.
2: Hold payment of outstanding vouchers, but enable entry of new vouchers for this supplier.
N: Enable payment and voucher entry. This is the default value.
To hold payment of an individual voucher, rather than all outstanding vouchers, use a payment status code of H when entering the voucher.
- Float Days
-
Enter the number of days between the check date and the bank deposit date for checks written to a supplier. The value is manually entered and is informational only; the system does not calculate the value.
- By Supplier, By Pay Item, By Voucher, By Contract
-
Select an option to specify whether the system prints checks by supplier, pay item, voucher, or contract.
5.3.7.2 G/L Distribution
- Model JE Doc Type/No/Co
-
Enter the type of model journal entry to use for a particular supplier.
- Default Expense Account
-
Enter the account to which the expense will be coded when you enter a voucher for the supplier. If you leave this field blank, you must enter the expense distribution on the supplier's vouchers.
5.3.7.3 Tax Information
- Tax Expl Code (tax explanation code)
-
Enter a value that exists in the Tax Explanation Codes (00/EX) UDC table to specify the type of tax applied to the supplier.
- Tax Rate / Area
-
Enter a value that exists in the F4008 table to specify the tax rate and tax area that applies to the supplier.
- Person/Corporation
-
Enter the code that designates the type of taxpayer. For 1099 reporting for U.S. suppliers and foreign suppliers, the system selects only records with a code of P or N. Values for U.S. entities:
Blank or C: Corporate entity (the Tax ID prints as 12-3456789).
P: Individual (the Tax ID prints as 123-45-6789).
N: Noncorporate entity (the Tax ID prints as 12-3456789).
Values for non-U.S. entities:
1: Individual.
2: Corporate entity.
3: Both an individual and a corporate entity.
4: Noncorporate entity.
5: Customs authority.
- Add'l Ind Tax ID (additional individual tax ID)
-
Enter the identification number assigned by a tax authority to the individual, in addition to the primary Tax ID number (TX1).
(FIN) Enter the payee business code. This code is required only for domestic payments in Finland.
- Tax Authority
-
Specify the government agency for which you withhold taxes from supplier payments. The value that you enter must be a valid address book number.
- Withholding Percent
-
Enter the amount to withhold from payments to the supplier. Enter the amount in percentage format.
5.3.8 Assigning Bank Accounts to Suppliers
Access the Set Up Bank Accounts by Address form.
Figure 5-2 Set Up Bank Accounts by Address form
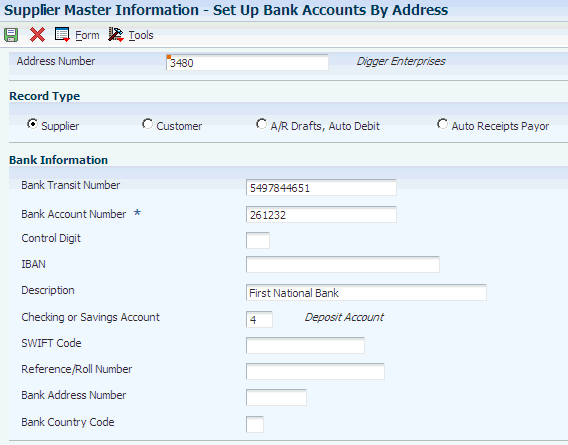
Description of "Figure 5-2 Set Up Bank Accounts by Address form"
- Bank Address Number
-
Enter the address book number of the bank.
- Record Type section
-
Select one of these options to specify the type of account you establish:
-
Supplier
-
Customer
-
A/R Drafts, Auto Debit
-
Auto Receipts Payor
-
5.4 Using the Supplier Self Service Program
This section provides an overview of the Supplier Self Service program (P04012SS) and discusses how to:
-
Set processing options for Supplier Self Service.
-
Use the Supplier Self Service program.
5.4.1 Understanding the Supplier Self Service Program
Using the Supplier Self Service program, suppliers can review and update various purchase instruction information. Suppliers can update this information:
-
Minimum order value
-
Unit of Measure – Weight
-
Unit of Measure – Volume
-
Freight Handling
-
Maximum Order Value
-
Delivery Instructions
Suppliers can also update address book information, using the Address Book Self Service program (P01012SS). The Address Self Service program enables suppliers to change information such as their mailing address, contact information, phone numbers and electronic addresses, and tax information.
5.4.2 Form Used to Update Supplier Information Using Supplier Self Service
| Form Name | FormID | Navigation | Usage |
|---|---|---|---|
| Supplier Self Service | W4012SSA | Self Service Applications menu (4/G01101), Supplier Self Service | Update supplier master information. |
5.4.3 Setting Processing Options for Supplier Self Service (P04012SS)
This processing option specifies the default version of the Supplier Master MBF.
5.4.3.1 Versions
- 1. Supplier Master MBF (P0100043) Version
-
Specify the version for the Supplier Master MBF (Master Business Function). If you leave this processing option blank, the system uses the default version ZJDE0001. The Supplier Master MBF provides information for processing supplier master records using outbound electronic data interchange (EDI).
See Setting Processing Options for Supplier Master MBF - PO (P0100043).
5.4.4 Using the Supplier Self Service Program
Access the Supplier Self Service form.
Figure 5-3 Supplier Self Service form (1 of 2)
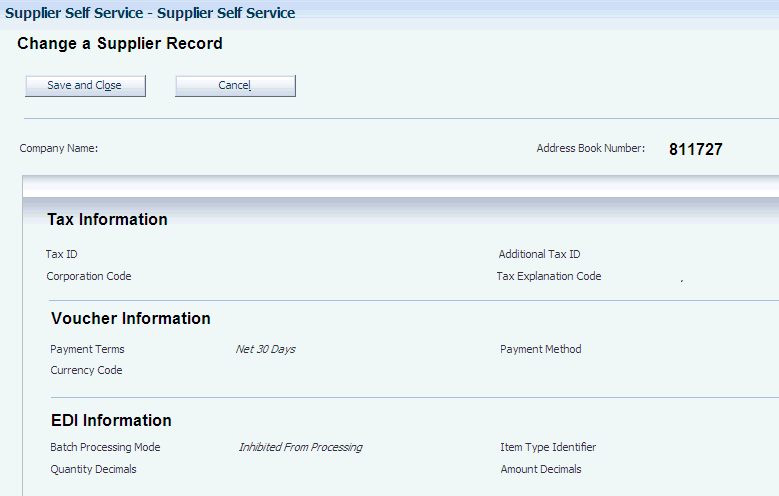
Description of "Figure 5-3 Supplier Self Service form (1 of 2)"
Figure 5-4 Supplier Self Service form (2 of 2)

Description of "Figure 5-4 Supplier Self Service form (2 of 2)"
The fields that appear on the Supplier Self Service form for you to change are the same as those that appear on the Purchasing 1 and Purchasing 2 tabs of the Supplier Master Revision form.
5.5 Setting Up Multiple Bank Accounts for Suppliers
This section provides overviews of setting up multiple bank accounts for suppliers and activating a bank account as a vendor record type, and discusses how to set up multiple bank accounts for suppliers.
5.5.1 Understanding the Process for Setting Up Multiple Bank Accounts for Suppliers
If your business uses bank tape processing to transmit payments electronically, you can assign multiple bank accounts to your suppliers. After multiple bank accounts are set up, you can direct payment to any one of your suppliers' accounts. One advantage of assigning multiple bank accounts is that bank fees are often reduced if the payor and the payee use the same bank.
When you set up multiple bank accounts for a supplier, you can either assign the same user-defined record type to all bank accounts, or assign a unique user-defined record type to each bank account. To assign the same user-defined record type to all bank accounts, assign the same value from the Bank Type Code (00/BT) UDC table. Your choice of setup methods depends on how you intend to select a bank account for payment.
|
Note: You can assign a record type of V (vendor) to only one bank account for a supplier. |
If you want to manually activate a bank account for payment, you can assign the same user-defined record type to all bank accounts. To select a specific bank account for payment, activate the record as the vendor (V) record type account.
Or, if you want the system to select a bank account based on a relationship set up between the user-defined record type, the payment instrument, and your GL account, assign each bank account its own user-defined record type. If your system will select the bank account for payment, review the prenote status of user-defined record types to ensure proper payment.
If you assign the same user-defined record type to all bank accounts, you must activate a bank account as a vendor record type, but you will not need to assign a relationship between the GL account or payment instrument and the record type, or review the prenote status of a user-defined record type. To activate a bank account as a vendor record types, assign the value V from the 00/BT UDC table to the account.
If you assign each bank account its own user-defined record type, you need to assign a relationship between a payment instrument or GL account and a user-defined record type and review the prenote status of the record type. You do not need to activate a bank account as a vendor record type.
Information about multiple bank accounts for suppliers is stored in these tables:
| Table | Stored Information |
|---|---|
| Bank Transit Number Master (F0030) | Supplier bank-account information. |
| Multiple Vendor Bank Account Types (F0417M) | Bank-account type information that specifies the relationship linking user-defined record types to a payment instrument and, optionally, to a GL bank account. |
| Multiple Vendor Bank Account Status (F0401M) | Status information of supplier bank accounts for user-defined bank types. |
5.5.2 Understanding How to Activate a Bank Account as a Vendor Record Type
Activate a bank account as a vendor record type when:
-
Suppliers have the same user-defined record type assigned to multiple bank accounts.
-
A payment instrument and GL bank account relationship are not established for the user-defined record type.
You can set up multiple bank accounts for a supplier and assign them all the same user-defined record type. For example, you can set up five different bank accounts for a supplier and assign them all as record type Z.
If you assign the same user-defined record type to multiple bank accounts, you must manually activate the account to which you send your electronic payments. Otherwise, the program uses the first account that it finds that meets the default search criteria. For example, if you assign five bank accounts the record type Z and attempt to send an electronic payment, the system sends the electronic payment to the first Z record type account that it finds for the supplier. Rather than have the system perform this selection automatically, you can specify which account the system uses each time you run the bank tape process.
For example, you could select one of the five Z type accounts that you assigned, and activate it as a vendor (V) type account. The system then exchanges the record types of the Z type account that you selected and the V type account. After you activate a specific record type and make it a V record type, you run standard bank tape processing that uses a V record type for a supplier.
Also, you can activate any bank account as a draft (D) record type. The process is nearly identical to activating a vendor (V) record type.
5.5.3 Forms Used to Set Up Multiple Bank Accounts for Suppliers
| Form Name | FormID | Navigation | Usage |
|---|---|---|---|
| Work With Bank Accounts by Address | W0030AD | Automatic Payment Setup (G04411), Bank Account Cross-Reference | Select the supplier bank account for which the supplier number for which you want to set up multiple bank accounts.
You can also activate a bank account as a vendor record type by selecting a bank account and selecting Activate As Vendor from the Row menu. |
| Set Up Multiple Vendor Bank Accounts | W0030AC | On the Work With Bank Accounts by Address form, select Multiple Accounts from the Form menu. | Enter information for one of the supplier's bank accounts. |
| Revise Foreign RDFI Bank Information | W0030AA | On the Work With Bank Accounts by Address form, select Foreign RDFI from the Row menu. | Enter the foreign Receiving Depository Financial Institution (RDFI) bank information.
The Work with Bank Accounts by Address form does not display the Foreign ODFI records. |
5.5.4 Setting Up Multiple Bank Accounts for Suppliers
Access the Set Up Multiple Vendor Bank Accounts form.
- Record Type
-
Enter a value that exists in the Bank Type Codes (00/BT) table to specify the type of bank account.
5.6 Assigning Payment Instrument and GL Account Relationships
This section provides an overview of assigning payment instrument and GL account relationships and discusses how to assign payment instrument and GL account relationships.
5.6.1 Understanding the Process for Assigning Payment Instrument and GL Account Relationships
This task is not necessary if you are manually activating a user-defined record type account as the vendor (V) type account.
When you assign a payment instrument to a record type or to a record type and a GL bank account, you are setting up rules that enable the system to select which bank account to use during automatic payment processing. The system automatically select the correct bank account based on the relationships that you set up.
To send a payment to one of the bank accounts that you set up for a supplier, set up one of two possible record-type relationship options:
-
Set up a relationship between the record type that you created for Bank Type Codes (00/BT) and a payment instrument. In this case, a payment instrument is associated with a specific record type.
For example, if you specify payment instrument T with user-defined record type Z, you process a payment instrument of T for any bank account that you have not specifically defined. The system uses record type Z to retrieve the payee's bank account information. If bank information for record type Z is not set up for a payee, the system uses the hard-coded record type V as the default value for that payee.
-
Set up a relationship between the user-defined record type that you created for Bank Type Codes (00/BT) and a GL bank account and payment instrument. In this case, both a GL bank account and a payment instrument are associated with a specific user-defined record type.
For example, if you specify GL bank account 1.1110 and payment instrument T with user-defined record type Y, you process a payment instrument of T for bank account 1.1110. The system uses record type Y to retrieve the payee's bank account information. If bank information for record type Y is not set up for a payee, the system uses the hard-coded record type V as the default value for that payee.
5.6.2 Form Used to Assign Payment Instrument and GL Account Relationships
| Form Name | FormID | Navigation | Usage |
|---|---|---|---|
| Set Up Multiple Vendor Bank Account Types | W0417MB | Automatic Payment Setup (G04411), Multiple Vendor Bank Account Types
Click Add on the Work With Multiple Vendor Bank Account Types form. |
Assign payment instrument and GL account relationships to record types. |
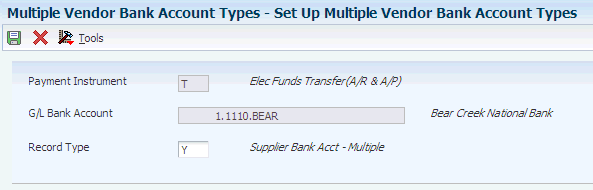
5.6.3 Assigning Payment Instrument and GL Account Relationships
Access the Set Up Multiple Vendor Bank Account Types form.
Figure 5-5 Set Up Multiple Vendor Bank Account Types form
Description of "Figure 5-5 Set Up Multiple Vendor Bank Account Types form"
- Record Type
-
Enter a value that exists in the Bank Type Code (00/BT) UDC table to distinguish external bank accounts from internal bank accounts. Values are:
B: Valid bank transit numbers.
C: Customer bank accounts.
D: Default bank account for Accounts Receivable drafts and auto debits.
G: Internal general ledger bank accounts.
H: Dutch bank accounts.
M: General ledger bank account and business unit that is used to define print information in Accounts Payable payments.
P: Auto receipts payor.
V: Supplier bank account for payment using the bank tape.
X: Alternate bank account for a supplier.
Y: Multiple bank accounts for a supplier.
Note:
When you use bank type B, no other bank types are allowed. When you use bank type V, no other V bank types are allowed. When you use bank type D, no other D bank types are allowed.
5.7 Updating the Approver and Category Code 7 Fields
This section provides an overview of updating the Approver and Category Code 7 fields and discusses how to:
-
Run the Update Approver/Cat Code 7 report.
-
Set processing options for the Update Approver/Cat Code 7 report.
5.7.1 Understanding the Update Approver Cat Code 7 Report
To ensure that you are working with current information, you should update the Accounts Payable Ledger (F0411) table. This is necessary whenever you change either of these values:
-
An approver number when you enter logged vouchers.
-
Category code 7 when you enter vouchers with 1099 information.
When you change the approver number or category code 7 in the supplier record, the system does not automatically change existing transactions in the F0411 table. You must update the Accounts Payable Ledger table with your changes.
5.7.1.1 Example of Approver Number and Category Code 7 Update
The following example illustrates an issue that you might encounter if you do not update the Accounts Payable Ledger table.
You set up Dominique Abbott (address book number 4002) as the approver for A & D Parts (supplier number 4005) vouchers. On June 1, you enter two vouchers for A & D Parts using Voucher Logging Entry. The Supplier Master Information for A & D Parts shows Dominique Abbott is the approver for these vouchers. On June 2, Dominique Abbott leaves the company without redistributing the vouchers that you entered.
Dominique Abbott is replaced by Melvyn Easter (address book number 6000). On Supplier Master Information, you change the approver number for vouchers for A & D Parts from 4002 (Dominique Abbott) to 6000 (Melvyn Easter). On June 10, you enter another voucher for A & D Parts. Melvyn Easter is the approver for this voucher.
On June 15, Melvyn Easter is ready to redistribute the logged vouchers. This table illustrates the information in the Accounts Payable Ledger table.
| Date | Transaction Records | Approver Number |
|---|---|---|
| 06/01/98 | PV 3285 | 4002 Dominique Abbott |
| 06/01/98 | PV 4267 | 4002 Dominique Abbott |
| 06/10/98 | PV 5342 | 6000 Melvyn Easter |
Melvyn Easter enters his approver number (6000) on the Work With Voucher J. E. Redistribution form. The system displays vouchers that have Melvyn Easter (number 6000) as approver as follows:
-
If you do not update approver and category code 7 information, the Work With Voucher J. E. Redistribution form displays only PV 5342 because this is the only voucher that has Melvyn Easter (number 6000) as approver. PV 3285 and PV 4267 still have Dominique Abbott as approver.
-
If you update approver and category code 7 information, the Work With Voucher J. E. Redistribution form displays all three vouchers because the program has read the supplier record for A & D Parts and changed the approver for all open vouchers to 6000 (Melvyn Easter).
Note:
Run this update program during off-peak hours and ensure there no users are on the system.
5.7.2 Running the Update Approver/Cat Code 7 Report
Select A/P Advanced & Technical Operations (G0431), Update Approver/Cat Code 7.
5.7.3 Setting Processing Options for Update Approver/Cat Code 7 (R04802)
Processing options enable you to specify the default processing for programs and reports.
5.7.3.1 Process
- 1. Category Code 07
-
Specify whether to update the Category Code 07 (AC07) field in the F0411 table. If you leave this processing option blank, the system updates the Category Code 07 field with the value in the F0101 table. Values are:
Blank: Update the Category Code 07 field.
1: Do not update the Category Code 07 field.
5.8 Verifying YTD Voucher Amounts
This section provides an overview of year-to-date (YTD) voucher amounts and discusses how to:
-
Run the Update YTD Voucher Amount (R04820A) program.
-
Set processing options for Update YTD Voucher Amount (R04820A).
5.8.1 Understanding YTD Voucher Amounts
As part of your cash management procedures, review the total vouchered amount for your suppliers. Although the vouchered year-to-date (YTD) amount field is updated interactively as vouchers are entered, you should run the update to ensure accurate totals. To see accurate totals, you must make any necessary corrections and then update the supplier's YTD voucher amounts. Generally, you do this either monthly or at the end of a calendar or fiscal year as part of your system-wide annual close.
Correct any errors with your supplier records before you update their voucher amounts for the year-to-date. To locate these errors, run the annual close program in proof mode. The system sends any workflow messages to the Work Center program (P012501). It lists each supplier that is in error, with an error message and a corresponding document number. You must correct these errors before you update YTD voucher amounts.
Continue to rerun the update program in proof mode until you have corrected all errors. When you rerun the program in proof mode, use data selection to select only those suppliers that were previously in error to verify that they are no longer in error.
5.8.1.1 Updating YTD Voucher Amounts
Typically, you update YTD voucher amounts soon after you close the year for AP activity as part of your annual close procedures. The YTD voucher amount is based on the gross amount of the voucher. When you update YTD amounts, the system does the following for all suppliers across all companies, based on the beginning and ending date you specify in the Date Options processing options:
-
Calculates total voucher amounts from the F0411 table.
-
Updates these in the F0401 table:
-
Prior year-end voucher amounts.
-
Year-to-date voucher amounts.
When you update these voucher amounts, the system removes the amounts from the YTD total so that it will reflect only the current year's activity.
-
If the system finds errors when you update YTD voucher amounts, it sends an error message to the Workflow Management system.
If you purge your AP records more than once a year, remember to update your supplier YTD voucher amounts each time you do so.
5.8.2 Understanding Computation Methods
You can update the F0401 table by using a computation method you specify in the Computation processing option in the Update YTD Voucher Amount program.
5.8.2.1 Computation Method 1
This method uses the dates you specify in the Date Options processing options to calculate the prior-year vouchered amounts and to update the Amount Vouchered PYE field. Therefore, it is critical that AP transactions from the prior year exist in your environment. Any transaction with GL dates after those entered in the Date Options processing options will have amounts updated in the Vouchered YTD field.
For example, if the current year is 2008 and you want to calculate vouchered year-to-date amounts (based on a calendar year), enter January, 01, 2007 as the from date and December 31, 2007 as the through date. These dates identify the prior year, so all transactions after December 31, 2007 are updated for the current year. If you enter dates beginning with January 01, 2008 and ending with December 31, 2008, the Amount Vouchered PYE field will be updated and any transactions after December 31, 2008 will be updated in the Amount Vouchered YTD field.
Run this process as often as necessary, but it will be accurate only if AP vouchers between the beginning date and the current date have not been purged from the F0411 table.
5.8.2.2 Computation Method 2
This method assumes that transactions from the prior year have been purged or are missing from your records. You still enter the dates of the prior fiscal year as in computation method 1, but the program uses the information differently. Because no records exist for the prior year, the program calculates the vouchered YTD amount by adding the amounts of vouchers with a GL date after the through date that you specify in the Date Options processing options. Next, the program subtracts this total from the existing amount vouchered YTD total. The result is updated in the Amount Vouchered PYE field. The Amount Vouchered YTD field is replaced with the newly calculated year-to-date amount.
For example, if the current year is 2008 and you want to calculate vouchered year-to-date amounts (based on a calendar year), enter January 01, 2007 as the from date and December 31, 2007 as the through date. The total of all vouchers with a GL date after December 31, 2006 equals the new year-to-date amount. The new prior year amount is calculated by subtracting the new year-to-date amount from the previous amount vouchered YTD total.
|
Important: If you run this process more than once for computation method 2, the Amount Vouchered PYE field displays zero. |
5.8.3 Running the Update YTD Voucher Amount (R04820A) Program
Select A/P Advanced & Technical Operations (G0431), Update YTD Voucher Amount.
5.8.4 Setting Processing Options for Update YTD Voucher Amount (R04820A)
Processing options enable you to specify the default processing for programs and reports.
5.8.4.1 Date Options
The system uses the amount calculated for the date range to update the prior year-end voucher amounts in the supplier master. It uses the amount calculated for the dates after the date designated in the Date Thru processing option to update the year-to-date voucher amount in the supplier master.
- Date From
-
Enter the beginning of the range of dates that the system uses for the close.
- Date Thru
-
Enter the end of the range of dates that the system uses for the close.
5.8.4.2 Processing
- 1. Prior Vouchered
-
Specify the method used by system when computing the prior vouchered amount. Values are:
1: Computation Method 1. Use the date range specified in the From Date and Thru Date processing options.
2: Computation Method 2. Use the existing YTD vouchered amount less the computed YTD vouchered amount; use the date specified in the Thru Date processing option only.
- 2. Update Supplier Master
-
Enter 1 to update the F0401 table when you run the program in final mode. If you leave this processing option blank, the system does not update the F0401 table.
Note:
It is recommended that you leave this processing option blank if you use computation method 2.
5.8.4.3 Currency
- Currency Code - A/B Amounts
-
Enter the currency that the system updates in the F0401 table when you run the program in final mode using computation method 1. If you leave this processing option blank, the system does not update the F0401 table.