4 Setting Up Employee Information
This chapter contains the following topics:
-
Section 4.6, "Setting Up Employee History and Turnover Tracking"
-
Section 4.8, "Setting Up Earnings Information for Employees"
4.1 Understanding Employee Information Setup
Before you begin adding employee records to the system, you should set up employee information. If you need to track information that is unique to your organization or your industry, you can define category codes. To allow users to enter future changes for specific types of information, you can choose fields for future data revisions.
In organizations where more than one person might enter employee information into the system simultaneously, you might want to implement record reservation (record locking) settings that result in a warning when a conflict occurs.
4.2 Prerequisite
Set up the user-defined codes for the JD Edwards EnterpriseOne Human Capital Management Foundation.
See User-Defined Codes for Human Capital Management Foundation
4.3 Reserving Employee Records
This section provides an overview of record reservation and discusses how to:
-
Activate record reservation.
-
Release a record reservation.
4.3.1 Understanding Record Reservation
To prevent loss of data when two users simultaneously attempt to update the same record in the database, you can activate record reservation. When you activate record reservation for a particular program, only one user at a time can access a record in the table that the program uses for data storage. For example, assume that record reservation has been activated for the employee master group of programs (P0801). User 1 is updating salary information for an employee in the Employee Basic Compensation program (P0801CMP). At the same time, User 2 opens the Basic Compensation program and attempts to access the same employee record. User 2 receives an error message indicating that the employee record is reserved. The system prevents User 2 from gaining access to the record. The record remains reserved until User 1 saves any changes and closes the program.
|
Note: Two significant limitations to record reservation exist: you can activate record reservation only for those programs that are designed to use it and programs that do not use record reservation can update reserved records. |
Only programs that are designed for record reservation can use this feature. In JD Edwards EnterpriseOne Human Capital Management software, these programs include:
-
Employee/Personal (P0801EMP)
-
Employee Organizational Assignments (P0801ORG)
-
Employee Basic Compensation (P0801CMP)
-
Employee Eligibility, NDT, and Participation (P0801ELI)
-
Employee Payroll (P0801PRL)
-
Employee National and Fiscal Data - Australia (P75A0801)
-
Employee National and Fiscal Data - Canada (P0801CA)
-
National/Fiscal Data - Regional Information (P76M0801)
-
Employee National and Fiscal Data - USA (P0801US)
If you activate record reservation for any of the programs in the employee master group, you activate it for all the programs.
4.3.1.1 Record Reservation Releases
When a program that uses record reservation is interrupted, orphaned reservation records might remain in the Business Object Reservation table (F00095). This can occur, for example, when technicians are working with a server, or when a workstation shuts down without warning. If an interruption stops one of the programs in the Employee Master group (P0801) before it releases the reservations that it creates, other users cannot update the records until the orphaned reservations are removed.
You can use the Remove Business Object Reservation program (P00095) to release unwanted record reservations. This program stores reservation information in the Business Object Reservation table (F00095).
4.3.2 Form Used to Release a Record Reservation
4.3.3 Activating Record Reservation
To activate record reservation for these programs you need to create a new record in UDC 00/RR and use these values:
| Codes | Description 01 | Special Handing | Hard Coded |
|---|---|---|---|
| P0801 | Employee Master | 1 | Y |
4.3.4 Releasing a Record Reservation
Access the Business Object Reservations form.
- Object Name
-
Enter the name that identifies a system object. JD Edwards EnterpriseOne architecture is object-based. Discrete software objects are the building blocks for all applications, and developers can reuse the objects in multiple applications. The Object Librarian tracks each object.
Examples of system objects include:
Batch Applications (such as reports).
Interactive Applications.
Business Views.
Business Functions.
Business Functions Data Structures.
Event Rules.
Media Object Data Structures.
To help find the specific records that are orphaned, and to help avoid accidentally removing active reservations from the table, you can use QBE values to limit your search.
- User ID
-
Enter the code that identifies a user profile.
To release a record reservation, select a row and then click Delete.
The system automatically displays a confirm delete dialog.
4.4 Defining Category Codes
This section provides an overview of category code definition and discusses how to define category codes.
4.4.1 Understanding Category Code Definition
You might need to track information that is unique to your organization or your industry. For example, you might need to track the employees who are participating in the company stock purchase plan. Category codes are provided so that you can define to track any type of additional information that your organization needs.
Category codes are a type of user-defined code that you use to classify employees for tracking and reporting. You can define up to 20 category codes to meet the specific requirements of your organization.
4.4.2 Form Used to Define Category Codes
4.5 Choosing Fields for Future Data Revisions
Choosing fields for future data revisions activates data items in the Employee Master Information table (F060116) so that they can be updated using the future data forms. For example, you activate the Marital Status field so that, in the event of marriage, you can change the employee's marital status in the Employee Master Information table using a future data form.
|
Note: Some fields have default activation values that you cannot change. |
This section discusses how to choose fields for future data revisions.
4.5.1 Form Used to Choose Fields for Future Data Revisions
4.5.2 Choosing Fields for Future Data Revisions
Access the Work With Future Data Fields form.
To choose a field for future data revisions:
-
To indicate that you want to allow future data revisions for a data item, select a data item that has N in the Y N field, and then click Select.
-
On the Change Verification form, click Yes to accept the change.
4.6 Setting Up Employee History and Turnover Tracking
This section provides an overview of employee history and turnover tracking setup, lists a prerequisite, and discusses how to:
-
Choose data for history tracking.
-
Initialize history and turnover tracking.
-
Set processing options for Initialize Employee History and Turnover (R050810).
4.6.1 Understanding Employee History and Turnover Tracking Setup
To help you manage employee information, you can set up the system to store historical records of employee information. If you do this, the system creates a historical record of the old information when you enter or update employee information. For example, when an employee receives a promotion or changes marital status, you can update the employee's current information to reflect the change and store the previous information in historical records.
You can also set up the system to store turnover records. Turnover records show employee movement within your organization, such as when an employee changes jobs, as well as movement resulting from new hires and terminations.
You can use history and turnover information to:
-
Review the employee's job progression since you began tracking history.
-
Review salary increases given at the same time that a job change was made.
-
Analyze historical changes to employee information.
-
Monitor employee movement within your company.
When you initialize history and turnover tracking, the system creates initial history records for all employee records in the Employee Master Information table (F060116). Furthermore, the system tracks history only for specific fields that you choose to track before you initialize. The history records are dated so that you can determine when you began tracking history and turnover.
You can track history and turnover for any fields that the system stores in the Employee Master Information table. Choosing these fields before initializing is important to eliminate cluttering the HR History table (F08042) with unneeded history information.
Setting up history and turnover tracking also includes enabling your history and turnover tracking options in HRM System Options (P05001S), and entering all employee records in the database. Whether you need to initialize history and turnover tracking depends on the order in which you complete these tasks and your history record specifications. This table explains when you might or might not initialize history:
| Order of Tasks | Initialize History and Turnover Tracking? | Usage |
|---|---|---|
|
No | In this case, you might not want to initialize history. The system creates initial history records for all employees as they are entered into the system.
This option is preferable if you want history records for every employee on the date that they are entered into the system. However, you do not get the chance to verify the employee information before creating history records. |
|
Yes. | This option allows you to verify your employee records before creating initial history records.
This process is preferable if you want to avoid adding and then deleting incorrect history records from the history table. The system creates history records beginning with the date that you set in the Effective Date processing option for the Initialize Employee History and Turnover program (R050810). |
4.6.1.1 Data Selection for History Tracking Purposes
You choose the data items for which you want to track history before you initialize history and turnover tracking. Limiting the data items for which you track history makes it easier to locate information when you review history records. For example, you might choose to track history for data items such as Employment Status, Salary, and Pay Status; but not for items that rarely change, such as Gender and Tax ID.
If you do not choose data for history tracking purposes before you initialize, the system automatically tracks history for every item in the Employee Master Information table (F060116).
After initializing, you can deactivate certain Employee Master Information table data items if you do not want to track certain history items anymore.
4.6.1.2 History and Turnover Tracking Initialization
After choosing data for history tracking, you initialize history and turnover tracking (R050810). The system activates history tracking for your chosen fields on the Employee Master Information table (F060116). You can review which fields are in the Employee Master Information table when you choose data for history tracking purposes.
If you set up the system options for history and turnover tracking before you begin entering employee records, you do not need to initialize history and turnover tracking. In this case, the system automatically creates history and turnover records when you add new employee records.
You need to run this program only if you begin using the history and turnover features after you have been using the system for a while. You can use these initial history and turnover records to determine when you began tracking history and turnover. After initializing, the system continues to create history and turnover records each time you change employee information fields that update the Employee Master Information table.
4.6.1.3 Forms Used to Choose Data for History Tracking Purposes
4.6.2 Choosing Data for History Tracking
Access the Work With History Data Items form.
To choose a field for history tracking:
-
To indicate that you want include a data item in history tracking, select a data item that has N in the Y N field, and then click Select.
The program automatically puts a Y in the Y N field for Address Number (data item AN8) because the address number must be tracked with history.
-
On the Change Verification form, click Yes to accept the change.
Note:
If the code is changed from N to Y, history tracking begins at that point in time. Previous information cannot be retrieved.
4.6.3 Initializing History and Turnover Tracking
Select Employee History Setup (G05BH4), Initialize History & Turnover .
4.6.4 Setting Processing Options for Initialize Employee History and Turnover (R050810)
Processing options enable you to specify the default processing for programs and reports.
4.6.4.1 Initialize
Although processing options are set up during JD Edwards EnterpriseOne implementation, you can change processing options each time you run a program.
- 1) Enter a date to be used as the Effective Date for all history records. Blank will default the date when each employee record was last changed.
-
Specify a future date when all changes will take effect or the date when the changes went into effect. If you do not enter a date in this processing option, the system uses the current date as the effective date.
We recommend that you enter an effective date for this processing option. The effective date should be a day prior to the date of your first date for reporting turnover. The system considers employees active as of the initialize effective date.
- 2) Choose what files to initialize given the following choices:
-
Specify the files that the system initializes. Values are:
H: Initialize History file only (default).
T: Initialize Turnover file only.
B: Initialize both History and Turnover files.
- 3) To clear records from the indicated file(s) before initialization, enter one of the following values:
-
Specify which files are cleared before initialization. Values are:
1: Clear the entire selected file(s).
2: Clear History/Turnover records for the selected employees only.
Blank: Do not clear records. (Default)
- 4) Enter a change reason for initial turnover and history records. A blank will default a change reason of '001'.
-
Specify a code from UDC 06/T to indicate the reason for changing an active employee record, terminating an employee, or recommending a change in salary or rate.
If you are reactivating an employee, the code must be numeric. The code for new hires is the default reason code.
4.7 Setting Up Job Information for Employees
This section provides an overview of job information for employees, lists prerequisites, and discusses how to:
-
Set up job classification constants.
-
Cross reference business units and jobs.
-
Set up union local cross-references.
4.7.1 Understanding Job Information for Employees
When you define a job, you can enter a benefit group, union code, and workers compensation information for it. Entering this information at the job level simplifies the process of entering employee information because it eliminates the need to enter that information for each employee who is assigned to the job. You can override this default job information for individual employees, if necessary.
4.7.1.1 Job Classification Constants
You set up job-classification constants to maintain various classifications of jobs related to job type, job step, union, and business unit.
For payroll, you can identify combinations of job types and job steps that you want to print on the Certified Payroll Register report (R07371) to meet taxing authority regulations.
4.7.1.2 Business Unit and Job Cross-References
In some cases, you might need to override default job information for all of the employees who work in a specific business unit. In this case, you can set up a cross-reference table for the job ID and business unit. For example, assume this scenario:
-
Your organization has 5000 machinists.
-
Of those machinists, 4,500 work in business unit 5, union 1000, and benefit group 100.
-
The remaining 500 machinists work in business unit 6, union 1100, and benefit group 200.
To streamline the process of entering job information for employees, you can enter union 1000 and benefit group 100 when you define the job machinist, and then set up a cross-reference table for the machinists in business unit 6.
When you enter an employee record for a machinist who is in a business unit other than business unit 6, the system applies the union and benefit group from the job information. When you enter an employee record for a machinist who is in business unit 6, the system uses the information in the cross-reference table to apply the correct union, benefit group, and workers compensation information to that employee record.
4.7.1.3 Union Local and Job Cross-References
You set up union local and job cross-references to cross-reference parent unions with local unions. You use these tables when a parent union has members working for a local union and those members must be paid the local union's wage rate and receive the corresponding benefits. By cross-referencing one union's (local or parent) job to another union, you ensure that the system uses the correct rates and benefits to calculate payroll.
The cross-reference tables are specific to business units and jobs and provide for the retrieval of hourly rates and group DBAs. If you define these tables, you do not have to change an employee's union information during time entry. The system substitutes the employee's union and obtains the related local union.
You can also set up cross-references between local units of the union.
4.7.2 Prerequisites
Before you complete the tasks in this section:
-
Set up the user-defined codes for jobs.
-
Review the pay range and step information that you have set up in the system options.
-
Define both the parent and local unions in the system.
See User-Defined Codes for Human Capital Management Foundation
-
Define the pay rates and group DBAs for the local union that has the job.
4.7.3 Forms Used to Set Up Job Information for Employees
4.7.4 Setting Up Job Classification Constants
Access the Job Classification Constant Revisions form.
- Business Unit
-
Enter an alphanumeric code that identifies a separate entity within a business for which you want to track costs. For example, a business unit might be a warehouse location, job, project, work center, branch, or plant.
You can assign a business unit to a document, entity, or person for purposes of responsibility reporting. For example, the system provides reports of open accounts payable and accounts receivable by business unit to track equipment by responsible department.
Business unit security might prevent you from viewing information about business units for which you have no authority.
- Alt.Job Type (alternate job type)
-
Enter a code from UDC 06/ G that identifies a job classification that will replace the job type code on certain reports. A value here replaces the value in the Job Type field.
- Alt.Job Step (alternate job step)
-
Enter a code from UDC 06/ GS that identifies a step within the job classification that will replace the job step code on certain reports. A value here replaces the value in the Job Step field.
- Hourly Rate Lower
-
Enter the minimum hourly rate that an employee can be paid.
- Hourly Rate Upper
-
Enter the maximum hourly rate that an employee can be paid.
- EEO Job (equal employment opportunity job)
-
Enter a code from UDC 06/J that specifies classifications established by the U.S. Equal Employment Opportunity Commission (EEOC) or the Canadian Employment Equity Occupational Group (EEOG) for use in reporting levels of minority employment. Do not change any of the codes provided by the JD Edwards EnterpriseOne system. You can add codes if needed.
- Rpt. Cls. (report classification)
-
Enter a code from UDC 07/RU that identifies the type of information an employee with the specified job type and job step can access. Values are:
N: Employees at the job type/job step do not have access to any information for reporting purposes. This is the default.
H: Employees at this job type/job step have access to all hours amounts related to those job type/job step codes which have a lower classification than the employee's classification.
D: Employees at this job type/job step have access to all dollar amounts related to those job type/job step codes which have a lower classification than the employee's classification.
Y: Employees at this job type/job step have access to all information related to those job type/job step codes which have a lower classification than the employee's classification.
- Cert Flg. (certified edit flag)
-
Enter a code from UDC 07/CF that specifies the type of information to be printed on the Certified Payroll Register for the Job Type and Job Step. The codes are:
N: Do not print any information related to this Job Type/Job Step on the Certified Payroll Register.
Y: Print all information related to this Job Type/Job Step on the Certified Payroll Register.
H: Print Hours Only for this Job Type/Job Step on the Certified Payroll Register.
4.7.5 Cross Reference Business Units and Jobs
Access the Business Unit/Job ID Cross Reference form.
- Benefit Group
-
Enter the benefit group from UDC 06/BG to which the employee is assigned. Benefit groups facilitate employee enrollment by categorizing benefit plans and allowing enrollment rules for those categories. For example, assigning an employee to an executive (EXEC) benefit group automatically links the employee to the benefits available to executives in your organization.
- WCI Code (workers' compensation insurance code)
-
Enter a code from UDC 00/W that represents a workers' compensation insurance (WCI) code. This code should correspond to the classifications on your periodic workers' compensation insurance reports.
- S C (special circumstances)
-
Enter a code from UDC 07/WH that specifies any special circumstances associated with the workers compensation insurance (WCI) code, resulting in multiple rates for the same WCI code due to location or risk, for example. The subclass should remain blank if multiple rates do not exist. Values are:
Blank: No special circumstances.
F: Special circumstances.
4.7.6 Setting Up Union Local Cross-References
Access the Union Local Cross Reference Maintenance Revisions form.
- Union Local
-
Enter a code from UDC 06/U2 that represents a local unit of a union.
- Job Typ (job type)
-
Enter a code from UDC 06/G that associates pay and benefit information with a job type when you define jobs on Job Entry and Evaluation (P08001). When you are adding a new employee to the database using the Employee Entry forms, the system uses certain pay and benefit information that you associate with a job type as default information.
4.8 Setting Up Earnings Information for Employees
This section provides an overview of earnings information setup and discusses how to:
-
Set up shift-rate differentials.
-
Set up occupational pay rates.
-
Set up pay type cross-reference tables.
-
Run the Synchronize Employee Master Rates with Union Rates report.
4.8.1 Understanding Earnings Information Setup
You set up earnings information to define the types of pay that your employees receive. Earnings information consists of these rates and tables:
| Item | Description |
|---|---|
| Shift rate differentials | You set up shift rate differentials to add a flat dollar or percentage amount to an employee's hourly rate when the employee works a shift that receives an additional amount of pay per hour. |
| Occupational pay rates | You set up occupational pay rates for employees who perform various job types and have different hourly rates for each job type. |
| Pay type cross-reference tables | You set up pay type cross-reference tables to indicate valid pay types by job type and job step. |
4.8.1.1 Shift-Rate Differentials
A shift rate differential is a flat dollar or percentage amount added to an employee's hourly rate. You set up shift rate differential codes to assign them to employees who receive additional compensation for shift work.
You assign shift differentials to UDC (user-defined code) 06/SH. You can also assign business units and union codes to shift differentials. When you define a shift differential, you must set effective dates for the table. The system compares the effective dates to the work dates you that enter in time entry.
A shift rate differential can be either a flat dollar amount or a percentage of the employee's hourly rate. The system calculates the pay using a flat dollar amount or a percentage shift differential with one of these methods:
-
Hourly rate plus the shift differential, multiplied by the pay type multiplier and then multiplied by the hours worked.
-
Hourly rate multiplied by the pay type multiplier plus the shift differential and then multiplied by the hours worked.
The difference between the two methods is significant only when a multiplier other than 1 is entered.
These methods are associated with the shift code that you set up. You can also associate these methods with pay types when you set up pay types.
If you want the system use the shift differential method associated with the pay type when you enter a timecard, you must set up shift codes and leave the shift differential method blank. When a shift code is entered on a time entry form, the system uses the shift differential method associated with the pay type from the Payroll Transaction Constants table (F069116) if it finds a blank shift differential method in the Shift Differential Table (F069246). The system also uses the shift differential method associated with the pay type when you don't enter a shift code.
Use shift code information to ensure that an employee is paid the correct amount for working on a shift with a rate differential. Use these guidelines for using shift code information:
-
If an employee always works a shift for which a shift rate differential is applicable, include the shift code in the Employee Master Information table (F060116).
-
If an employee occasionally works a different shift, you can override the information on the applicable timecard.
4.8.1.2 Occupational Pay Rates
You set up occupational pay rates for employees who perform various job types and have different hourly rates for each job type. Pay rates are specific to an employee. They can be specific to a business unit and union for that employee.
To use the occupational pay rate in time entry, you must enter the associated job type from the Employees Pay Rate File table (F060146) on the timecard.
4.8.1.3 Pay Type Cross-References
You set up pay type cross-reference tables to indicate valid pay types by job type and job step. For example, use these tables to prevent a salaried person from receiving overtime pay or a temporary employee from receiving holiday pay.
To verify pay types against the pay type cross-reference tables, you must set the appropriate processing options in the time entry programs.
4.8.1.4 Synchronize Employee Master Rates with Union Rates
A system administrator can use this program to update the Employee Master Information table (F060116) after the union rates have changed. Processing options can be used to set an effective date for the changes and to limit the update to only those records with a change. You can also set a processing option for the Union Rates Master Revisions program (P059121) that automatically sends a message when changes are entered into the Union Rates File table (F069126). This message might trigger the decision to run the Synchronize Employee Master with Union Rates report (R059122).
|
See Also: |
4.8.2 Form Used to Set Up Earnings Information
4.8.3 Setting Up Shift-Rate Differentials
Access the Shift Rate Differentials Revision form.
Figure 4-1 Shift Rate Differentials Revision form
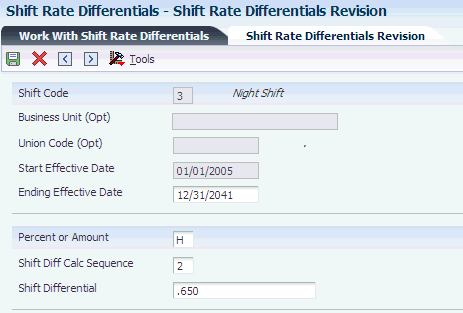
Description of ''Figure 4-1 Shift Rate Differentials Revision form''
- Shift Code
-
Enter a code from UDC 00/SH that identifies daily work shifts.
In payroll systems, you can use a shift code to add a percentage or amount to the hourly rate on a timecard.
For payroll and time entry: If an employee always works a shift for which a shift rate differential is applicable, enter that shift code on the employee's master record. When you enter the shift on the employee's master record, you do not need to enter the code on the timecard when you enter time. If an employee occasionally works a different shift, you enter the shift code on each applicable timecard to override the default value.
- Start Effective Date
-
Enter the date on which an address, item, transaction, or table record becomes active. The meaning of this field differs, depending on the program.
For example, the effective date can represent any of these:
-
The date on which a change of address becomes effective.
-
The date on which a lease becomes effective.
-
The date on which a price becomes effective.
-
The date on which the currency exchange rate becomes effective.
-
The date on which a tax rate becomes effective.
-
- Percent or Amount
-
Enter a code that specifies whether the Shift Differential field contains an hourly rate or a percentage. Values are:
H: The system adds the amount in the Shift Differential field to the hourly rate.
%: The amount in the Shift Differential field is a percentage of the hourly rate that the system adds to the hourly rate.
- Shift Diff Calc Sequence (shift differential calculation sequence)
-
Enter a code that specifies how the system calculates shift differential information. Values are:
1: Applies the pay type multiplier to the shift differential.
Gross = (rate + shift differential) x (multiplier) x hours.
2: Applies the pay type multiplier only to the hourly rate and does not include the shift differential.
Gross = (rate x multiplier) + (shift differential) x hours.
Blank: The system follows the shift differential method that is associated with the pay type from the Payroll Transaction Constants table (F059116).
The multiplier is the pay rate multiplier from the Payroll Transaction Constants table.
When the pay rate is derived from the Union Rate table, the multiplier is assumed to be 1. In this case, all methods produce the same result.
When you complete the Shift Code field on a timecard, the system provides values for the Shift Differential Method and the Shift Differential Amount fields from the Shift Differential Table (F069246). If the shift differential method was set up in the Shift Rate Differentials program (P059241) as blank for the entered shift code, the system retrieves the shift differential method from the Pay Type table (F069116) based on the specified pay type, as set up in the PDBA Setup program (P059241).
- Shift Differential
-
Enter an additional rate, expressed in dollars or percent, added to an employee's hourly rate, depending on the shift worked. This rate can be applied in one of two ways, as defined by the Shift Differential Calculation Sequence field.
- Business Unit (Opt) (business unit (optional))
-
Enter an alphanumeric code that identifies a separate entity within a business for which you want to track costs. For example, a business unit might be a warehouse location, job, project, work center, branch, or plant.
You can assign a business unit to a document, entity, or person for purposes of responsibility reporting. For example, the system provides reports of open accounts payable and accounts receivable by business unit to track equipment by responsible department.
Business unit security might prevent you from viewing information about business units for which you have no authority.
4.8.4 Setting Up Occupational Pay Rates
Access the Single Revisions Occupational Pay Rate form.
Figure 4-2 Single Revisions Occupational Pay Rates form
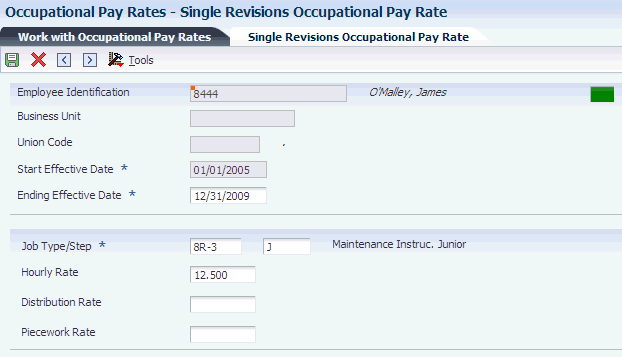
Description of ''Figure 4-2 Single Revisions Occupational Pay Rates form''
- Employee Identification
-
Enter the employee number, tax ID, or alternate number, depending on the employee number mode that is set up in the Payroll Constants for company 00000.
- From Date
-
Enter the date on which the pay rate becomes active.
- Thru Date
-
Enter the date on which the pay rate becomes inactive.
- Hourly Rate
-
Enter the employee's hourly rate, which is retrieved during time entry. This rate can override the rate in the Employee Master table.
Note:
If you change the number of the data display decimal digits for this field, you must also change fields Rate - Base Hourly (BHRT) and Rate - Hourly (SHRT) so that they have exactly the same number of data display decimal digits. - Distribution Rate
-
Enter a number that specifies the rate that the system uses to bill for labor services. This rate is often referred to as the billing or recharge rate. The system charges the resulting amount, based on this rate, to the primary distribution account for the timecard. The system also enters an offset to an account that is derived from automatic accounting instructions. This rate does not affect employee payroll.
To allow billing rates in time entry, the employee record type must be set to 2 (payroll and recharge processing) or 3 (recharge processing only) in the Employee Payroll program (P0801PRL).
- Piecework Rate
-
Enter the rate paid for the type of component (piece) produced. If you enter a rate in this field, this rate overrides the rate in the Employee Master table.
4.8.5 Setting Up Pay Type Cross-Reference Tables
Access the Classification/Pay Cross Reference Revisions form.
Figure 4-3 Classification/Pay Cross Reference Revisions form
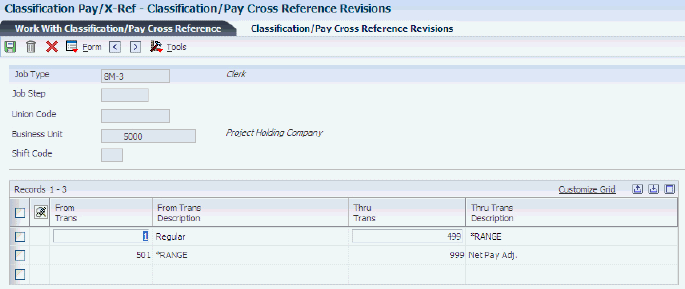
Description of ''Figure 4-3 Classification/Pay Cross Reference Revisions form''
- Shift Code
-
Enter a code from UDC 00/SH that identifies daily work shifts.
In payroll systems, you can use a shift code to add a percentage or amount to the hourly rate on a timecard.
- From Trans (from transaction)
-
Enter the number and description of the PDBA that is valid for the specified job type and step. This number is the beginning number in the range.
- Thru Trans (through transaction)
-
Enter the number and description of the PDBA that is valid for the specified job type and step. This number is the ending number in the range.
4.8.6 Running Synchronize Employee Master with Union Rates (R059122)
Select Rate Derivation Setup (G05BRD4), Synchronize Employee Master with Union Rates.
4.8.7 Setting Processing Options for Synchronize Employee Master with Union Rates (R059122)
Processing options enable you to specify the default processing for programs and reports.
4.8.7.1 Date
Use this processing option to specify the date that the system uses for retrieving historical information.
- 1. Effective Date for Rates and History
-
Specify the date that the system uses to look up rates in the Union Rates File table (F069126). The system also uses this date to update employee history records when rates are changed in the Employee Master Information table (F060116).
4.8.7.2 Employee History
Use this processing option to record the reason that rates are updated.
- 1. Change Reason for Employee History
-
Specify the change reason code for employee history. When you change a rate in the Employee Master Information table (F060116), the system also uses this code to update employee history information.
4.8.7.3 Process
Use these processing options to specify the default processes that the system uses.
- 1. Changes Only or All Rates
-
Specify whether the system processes all records or only rate records that have changed since the last time that the program was run. Values are:
0: Process only records in the Union Rates File table (F069126) that have changed since the date of the last update.
1: Process all of the rates in the Union Rates File table and update the Employee Master Information table (F060116).
- 2. Proof or Final Mode
-
Specify whether the system runs the report in proof mode or final mode. When you specify proof mode, the system produces a report of all changes, but does not update permanent files such as the Employee Master Information table (F060116). When you specify final mode, the system produces the report and records the changes in final files. Values are:
0: Proof mode
1: Final mode
- 3. Full Report or Exceptions Only
-
Specify the type of records that appear on the report. Values are:
0: All employee records appear on the report.
1: Only employee records with errors appear on the report.