6 Setting Up Manager Self Service
This chapter contains the following topics:
6.1 Understanding Manager Self-Service Setup
You can set up self-service programs that assist supervisors in managing the hiring and reviews of employees. Managers can access each of the programs in the Managers Workbench program (P08712).
6.2 Setting Up Upcoming Reviews by Supervisor
This section provides an overview of setting up the Upcoming Reviews by Supervisor program and discusses how to set the processing options.
6.2.1 Understanding Upcoming Reviews by Supervisor Setup
Employees in a managerial or supervisory position can use the Upcoming Reviews by Supervisor program (P052200). Supervisors can log onto the self-service site to see all employees whom they are responsible to review soon.
The Upcoming Reviews By Supervisor program can be run to report employees with upcoming reviews by supervisor and to add Enterprise Workflow Management functionality to the process. If the processing options for this report are set up correctly, the system automatically reports employees with upcoming reviews, reminds each supervisor of upcoming reviews by sending an email, and automatically updates the Upcoming Reviews By Supervisor program.
When a supervisor logs into the program, the system recognizes the employee number and displays the records for employees who have upcoming reviews. You can set processing options so that supervisors can select options from the row menu to view employee information on these forms: Work With Organizational Assignments, Personal, and Work With Basic Compensation (Employee Master program P0801), and Supplemental Data Inquiry (Supplemental DB Inquiry program (P050200). You can select whether you want to set up security to permit access to these forms by certain individuals only.
This program updates supervisors and eliminates the time that they would spend researching upcoming reviews for their employees.
You can also set a processing option to have the report run automatically on a certain date.
Processing options are also available to run versions that report past due reviews and reviews for all employees without specified dates. Neither of these versions include Workflow.
Upcoming Reviews By Supervisor (P052200) is an inquiry-only program. The information presented by the program is from the F060116 table.
6.2.2 Prerequisite
Set up the common settings for self service.
6.2.3 Setting Processing Options for Upcoming Reviews by Supervisor (P052200)
Processing options enable you to specify the default processing for programs and reports.
6.2.3.1 Process
Use these processing options to define the defaults that will determine the options available when using this program.
- 1. Enable Select Button To Basic Compensation
-
Values are:
Blank: Disable row exit.
1: Enable row exit.
- 2. Enable Organizational Assignment Row Exit
-
Values are:
Blank: Disable row exit.
1: Enable row exit.
- 3. Enable Employment Information Row Exit
-
Values are:
Blank: Disable row exit.
1: Enable row exit.
- 4. Enable Employee Profile Row Exit
-
Values are:
Blank: Disable row exit.
1: Enable row exit.
- 5. Enable Supplemental Data Row Exit
-
Values are:
Blank: Disable row exit.
1: Enable row exit.
- 6. Enable Create Performance Appraisal
-
Values are:
0 or Blank: Disable Row Exit
1: Enable Row Exit
6.2.3.2 Defaults
Use this processing option to define whether the program will provide the opportunity to enter a supervisor data item.
- 1. Enable Supervisor Number Entry
-
Values are:
1: Enable supervisor data item to be entered.
0: Disable data item. The supervisor data item will be either passed to the application or supplied from the user address book number.
6.2.3.3 Version
Use this processing option to define the defaults that will determine the options available when using this program.
- 1. Employee Compensation
-
Specify the version for Employee Compensation. The default version is ZJDE0001.
- 2. Employee Organizational Assignment
-
Specify the version for Organizational Assignment. The default version is ZJDE0001.
- 3. Create Performance Appraisal
-
Specify which version of the Create Performance Appraisal program to run. If this option is left Blank, the system uses the default version, ZJDE0001.
6.3 Setting Up the Employee Setup Process
This section provides an overview of setting up the Employee Setup Process and discusses how to set the processing options.
6.3.1 Understanding the Employee Setup Process
After hiring an employee, a manager can use self service to add an employee record and initiate an employee setup process. Workflow then sends task approval messages and reminders about equipment setup to certain people.
You can define default setup tasks that can be automatically implemented each time a new employee is hired. Default tasks can be tasks that every new employee needs. For example, if your company provides a phone and a computer for most employees, you might want to set up default tasks for installing a phone, computer, and a network connection. Managers can add to or change these tasks unless you enter a lock code for tasks when you set them up. When you set up a default task, always associate it with a job type and step. Information entered as a default task updates the F087101 table.
You also set up a task list by location. You enter every possible setup task for every location. For every task in the task list, you can specify an approver, a task recipient, and other task details. Managers can select tasks from the task list and assign them to a new employee's setup record.
You can set up each task to do one or more of these activities: run a report, send an email message, create a work order, or start a Workflow process. You must first customize a report, set up a work order, or set up an additional Workflow process if you are planning to attach these activities to a task.
You can also require an approval for each task that you set up. If you require an approval, Workflow sends an email approval form to the address book number of the person that you designated in the Approver field. You must also set your processing options to determine whether Workflow should obtain a process approval for the entire employee setup process for every new employee record.
The system determines the date to begin the approval process from the values that you enter in these three fields on the Work With Setup Tasks Details form:
-
Based On Date
-
Duration
-
Offset Days
To determine the date to begin each task, the system performs this sequence of actions:
-
Retrieves the date from the Based On Date field (for instance, the arrival date of the employee)
-
Adds the number of days from the Duration field (the number of days needed to complete the task)
-
Adds the number of days from the Offset Days field (the number of days, when added to the Duration values, that determine the day by which the task must be completed)
The information that you enter in the header area of the setup forms updates the F087102 table. The information that you enter in the detail area of the setup forms updates the F087103 table.
To process employee setup tasks, two workflow processes must be functioning. You can use the Object Management Workbench (OMW) to ensure that these workflow processes are activated.
| Workflow Process | Explanation |
|---|---|
| EESETUP01-Employee Setup Approval | The workflow process that sends an approval form for the entire employee setup process to the address book number of the approver. After workflow obtains an approval, it sends approval forms for each setup task that requires an approval. If you want your system to obtain an approval for this process, you must set a processing option. |
| EESUTSK01-Employee Task Setup | This workflow process is started for each setup task assigned to the employee. This process will first check to see if there is sufficient location information to process the setup task. If not it will notify the originator and wait for the information to be entered. If the activation date has not yet arrived the process will sit in waiting state until that time. When the previous two conditions are met the process activates the task. by setting the status of the F08711 record to A and then depending on how the task is setup will: send an email message to the task recipient, run a report, create a work order, or start a new workflow process. |
6.3.2 Prerequisites
Before you complete the tasks in this section:
-
You must set up numerous user defined codes for the employee setup process, including location codes 08/L1 through 08/L0.
-
Set up the common settings for self service.
-
Set up your processing options to require a process approval and to specify an ending status for the process approval.
-
Verify that the workflow processes are activated.
6.3.3 Forms Used to Set Up the Employee Setup Process
| Form Name | FormID | Navigation | Usage |
|---|---|---|---|
| Work With Default Setup Tasks | W087101B | Manager's Employee Setup Options (G05BMSS4), Default Setup Tasks
Click Add. |
Review existing tasks. |
| Edit Default Setup Tasks | W087101C | Click OK. | Create a list of setup tasks for a particular job. |
| Work With Setup Tasks | W087102B | Manager's Employee Setup Options (G05BMSS4), Setup Task List
Click Add. |
Review existing tasks. |
| Work With Setup Tasks Details | W087102F | Click OK. | Set up all of the details for each task in an employee setup list of tasks. |
6.3.4 Setting Up Default Tasks
Access the Work With Default Setup Tasks form.
To set up default tasks:
-
On Work With Default Setup Tasks, click Add.
-
On Edit Default Setup Tasks, complete these fields:
-
Job Type
-
Job Step
-
Task Type
-
-
Complete these optional Sub Class and Lock Code fields and then click OK.
-
Lock Code
Enter a code that specifies whether the hiring manager can change the selected default setup task. When Y is placed in this column you are not allowed to assign a task with the same task type but different sub class if that task has a hire ranking. For example if a computer desktop task has a ranking of 5 and computer laptop has a ranking of 8. If you lock the computer desktop task (by placing Y in the column) then employees with this job type/step will not be allowed to receive a computer laptop. Ranking of tasks is set on the Employee Setup Tasks application P087102).
-
6.3.5 Setting Up Tasks by Location
Access the Work With Setup Tasks Details form.
Figure 6-1 Work With Setup Tasks Details form
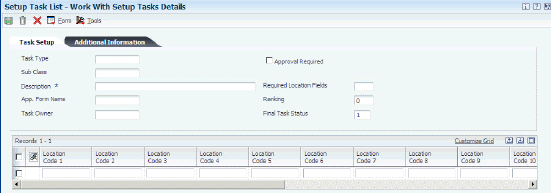
Description of ''Figure 6-1 Work With Setup Tasks Details form''
To set up tasks by location:
-
On Work With Setup Tasks Details, complete these fields in the header area:
-
Task Type
Enter a code that represents the primary category or classification of an employee setup task. Define the valid values in user defined code list 08/T1.
-
Sub Class
Enter a code that represents the classification of the current task. The system uses this code to further define the task.
-
Description
Enter an alphanumeric description of the employee setup task.
-
Required Location Fields
Enter a value that represents the number of location category codes that you need to know to accomplish the current setup task. For example, to install a telephone you might need to know the first four location codes (state, city, building, and office number). To set up a computer account, you might need to know only the first two location codes (state and city).
-
Ranking
Enter a code that specifies the rank of tasks within a task type. You rank tasks to restrict users from changing the subclass of a task to a subclass with a higher rank.
-
Final Task Status
Enter a code that represents the status that the task will be set to when it is completed. Numeric status codes are reserved for competed tasks.
-
-
Select the Approval Required option in the header area, if applicable:
-
Approval Required
Enter a code that specifies whether an approval is required for this task. Values are:
Y: An approval is required for this task.
N: An approval is not required for this task.
-
-
Enter your address book number or the address book number of the person responsible for monitoring this task in the Task Owner field. This field is information only this person will not receive any messages or approvals.
-
Task Owner
Enter the address book number of the owner of the setup task. This person is responsible for the task and will receive approval messages in the event that a task approver has not been entered on a task that requires an approval or the task approver has not responded to an approval request.
This is an optional field.
-
-
Complete the optional Application Form Name field if you have an additional form set up to enter additional task information.
Note:
This application is accessed from the approval application or the Employee Setup Entry form. However it will only work on a Windows client and not on the web.-
Application Form Name
Enter the name of the application associated with a task. This application will provide a place for the user to enter specific information necessary to complete the setup task.
This is an optional field.
-
-
Complete the Task Recipient field in the detail area.
The task recipient receives any email, work order, or report that you attach to this task.
-
Task Recipient
Enter the address book number of the person who is assigned to the current employee setup task.
This is an optional field.
-
-
To identify the employee work space, complete as many of the Location Code fields that are required.
-
Location Code 1–10
Enter a user defined category code that defines the location of an employee. You set up this code to meet the needs of your organization. For example, you can set up a category code to represent country, city, state, campus, building, office, or other location.
The Human Resources system provides this code to enable you to define a custom setup process for new employees based on the location where the employee will work.
-
-
To define the number of required fields, you can set the required value in the Required Location Fields field.
The system displays an error if fewer than the required number of fields are completed.
-
Required Location Fields
Enter a value that represents the number of location category codes you need to know to accomplish the current setup task. For example, to install a telephone you might need to know the first four location codes (state, city, building, and office number). To set up a computer account, you might need to know only the first two location codes (state and city).
-
-
If you select the Approval Required option, complete the Approver field.
-
Approval Required
Enter a code that specifies whether an approval is required for this task. Values are:
Y: An approval is required for this task.
N: An approval is not required for this task.
-
Approver
Enter the address book number of the person who approves any given work. The system verifies this number against the F0101 table.
-
-
If you set up a customized report for this task, complete the Report Name and Version fields:
-
Report Name
Enter the name that identifies an Enterprise One report that will be sent to the task recipient when the task is processed.
-
Report Name
-
Version
-
-
If you set up an additional workflow process for this task, complete the Process ID field.
-
Process ID
Enter the process name of the workflow process you want to assign to this task. This process will get started when the task is processed.
-
-
To send an email message to the task recipient, complete the Send Email field. The text of the email message comes from media object attached to this task. The hiring manager is given the opportunity to update the contents of this media object on the Employee Setup Task Entry form. This is a way to send task specific information to the person assigned to work on the task.
If your organizational procedures are set up for work orders, you might want to create a work order for this task.
-
If you create a work order, complete the Order Number field.
-
Complete these fields so that the system can determine the start date of the task:
-
Offset Days
Enter the number of days, plus or minus, to adjust the actual start date (or the date work will begin on the task). The start date is calculated by taking the Base on Date and subtracting the number of days in the Duration field and then adding the days in the Offset Days field. For example, if you want the phone installation to be completed one day prior to the employee arriving at his or her desk and it takes 3 days to install a phone, then you would enter the these values:
Arrival Date: Based on Date
3: Duration
–1: Offset
These settings cause the phone installation process to start four days prior to the arrival date.
-
Duration
Enter a value that specifies how long the setup task will take. The system also uses this value to calculate the task start date.
-
Based on Date
Enter a user defined code (08/BO) that will specify which date you use to calculate the completion date of the setup task. Predefined values are Arrival Date, Creation Date or Start Date. Arrival Date is entered by the hiring manager when creating the setup process. Creation Date is the date the setup process was created and the Start Date is the DateEmployementStart (DST) in the Employee Master record (F060116)
-
-
Repeat these steps to enter different locations for the task.
-
When you are finished, click OK.
6.4 Setting Up Employee Status Change
This section provides an overview of setting up the Employee Status Change program and discusses how to:
-
Set up the processing options for Employee Status Change Setup program.
-
Set up employee status change.
6.4.1 Understanding Employee Status Change Setup
Employee Status Change Setup (P08730) is one of the suite of programs that a manager can use from Manager's Workbench (P08712). Managers can use Employee Status Change Setup to perform any of these changes:
-
Promotion
-
Job status
-
Location
-
Leave of absence
-
Department or supervisor
Managers can save time and effort by using the five default tasks to perform the most frequent types of employee changes. For example, when an employee changes jobs, the supervisor can initiate the change using the Manager's Workbench. Workflow can route the status change to human resources for the appropriate approvals. Once the change request has been approved, the change will automatically be updated in the system.
Your software has been supplied with a default version that contains options, approval requirements, and data items that are common to a large cross-section of organizations. As a result, little or no change might be required for this application to meet your needs. If you want to add data items to any of the existing change forms, you will find that the majority of the fields from the F060116 table are currently available.
If you want to change the default workflow process, the best approach is to make a copy of the existing version, rename the new version appropriately, and make changes only to the new version. Because any new version must maintain the same data structure (input parameters), this approach will result in less effort and fewer errors. You use the Employee Status Change Setup program to customize the setup of the Employee Status Change program (P08720).
The Select Employee Status Change Request form contains an option to select a user defined status change. To add user defined change types, you must first create a corresponding UDC record in the 08/S4 UDC table.
Normally, you will use the existing processing option settings for Employee Status Change Setup. These settings are:
-
Business Function Name
-
Hide Status Change Initialization Function Name
The Business Function Name refers to the function that will be used to initiate the workflow process. If you have a business need to change this function make sure that the new function has the same data structure as the default function. If you don't intended to change this function, then put a 1 in the Hide Status Change Initialization Function Name processing option and this field will be hidden on the setup form.
6.4.2 Prerequisite
Verify that workflow process EESTSCHG-Employee Status Change is activated in the Object Management Workbench (OMW).
6.4.3 Form Used to Set Up the Employee Status Change Program
| Form Name | FormID | Navigation | Usage |
|---|---|---|---|
| Employee Status Change Setup | W08730A | Self Service Setup (G05BESS4), Status Change Setup
Click OK. |
Enter a Change Type and review currently selected data items. |
6.4.4 Setting Processing Options for Employee Status Change Setup (P08730)
Processing options enable you to specify the default processing for programs and reports.
6.4.4.1 Defaults
Use this processing option to specify the defaults that the system will apply when you initiate the status change process.
- 1. Business Function Name
-
Specify the business function you want to use to initiate the status change workflow process. This business function must also handle the other workflow processes such as aborting, escalating, restarting, and approving.
The default function is Initiate Status Change. The source module is N0800206.
- 2. Hide Status Change Initialization Business Function
-
Specify whether you want to allow the user to see the Status Change business function driver used to initiate the Status Change process. It is recommended that you set this value to 1. Values are:
0: No
1: Yes
6.4.5 Setting Up the Employee Status Change Program
Access the Employee Status Change Setup form.
To set up employee status change:
From the Self Service Setup menu (G05BESS4), select Status Change Setup.
-
On Employee Status Change Setup, complete the Change Type field and click Find.
A check mark in the row header indicates that the data item is selected and appears as an available choice in the Employee Status Change program (P08720). If a lightening bolt symbol appears in the row header, the field is a required field and is marked with an asterisk in Employee Status Change.
-
To change the status of a selected field to a required field, double-click the row-header (the field with the check mark) so that the lightening bolt symbol appears. Alternatively, you can highlight the row and press the Select button.
-
To completely deselect a field, double-click the row-header again so that no symbol appears.
-
To add a new field, click the All display option:
-
All
Display all possible data items from which to select. The All option displays all of the enabled data items from the F060116 table from which you can select.
-
-
Double-click the row-header of the data item(s) that you want to add and click OK.
-
Change Type
Enter a code that specifies the type of status change. The status change type is validated against UDC 08/S4.
An example of a status change type is PROMO for Promotion. To define a new type of status change, you must first add the change type to the UDC table.
-
Approval Type
Enter a value form the UDC table 05/AP. The approval type selected will determine who will receive an approval message. The approval types are setup using the Approval Hierarchy application (P05844).
-
6.5 Setting Up Manager Reports
This section provides an overview of setting up manager reports and discusses how to set up the Manager's Report Setup form.
6.5.1 Understanding Manager Reports setup
Managers and their delegates can use the Managers Reports program (P08740), to automate required reporting procedures and save time. System administrators use the Managers Reports Setup program (P08741) to set up the reports that are run in the Managers Reports program.
The Managers Reports Setup program includes a list of categories that are defined in UDC 08/RP. You can modify this list to meet organizational needs and then attach reports to each category as desired. To automatically run a category of reports from the Managers Reports program, managers can create a user defined list that contains all or some of the reports in a particular category. The list can even contains reports from multiple categories. Once the list is created, the manager can submit the entire list. Managers retain the option of changing the sequence in which the system runs a list of reports and can also run individual reports instead of an entire list.
You can also set up report versions in the Managers Reports Setup program. Creating report versions allows you to set up lists of reports to meet a wide range of needs. You could create a different version for each category.
The Manage Reports process has been designed to take advantage or reports that can be run for a particular employee and have the employee's Address Number in the report data structure. When adding reports that fit this criteria to a report category, press the Map Report Data Structure row exit. This enables you to map a data item from the Employee Master to the data items in the report data structure. To run a report for a specific employee you would want to map AN8 from F060116 to the Address Number field in the report data structure.
6.5.2 Prerequisites
Before you complete the tasks in this section:
-
To set up new category codes to which you can assign a new selection of reports.
-
To create a new category for human resources reports, use 08 in the Product Code field and RP in the User Defined Codes field.
6.5.3 Forms Required to Set Up Manager Reports
| Form Name | FormID | Navigation | Usage |
|---|---|---|---|
| Manager's Report Setup | W08741A | Self Service Setup menu (G05BESS4), Managers Reports Setup | Review existing report names that might be currently assigned to categories.
Assign desired reports to individual categories. |
6.5.4 Setting Up Manager Reports
Access the Manager's Report Setup form.

To set up manager reports:
-
On Manager's Report Setup, complete the Category field and click Find to display the report names that are currently assigned.
-
Category
Enter the name of a report category. Each report is associated with a category to make creating and maintaining lists of reports easier and to enable you to view or submit just the reports that belong to a particular category.
-
-
To assign a report to a category, complete the Report ID field and enter the version.
-
Report ID
Enter the name that identifies a system object. JD Edwards EnterpriseOne architecture is object-based. Discrete software objects are the building blocks for all applications, and developers can reuse the objects in multiple applications. The Object Librarian tracks each object. Examples of system objects include:
-
Batch Applications (such as reports)
-
Interactive Applications
-
Business Views
-
Business Functions
-
Business Functions Data Structures
-
Event Rules
-
Media Object Data Structure
-
-
-
After you have added the necessary reports, click OK.
-
DS Template
Display only. Specifies whether the report has a data structure for passing in runtime parameters. When a report has a data structure the Map Report Data Structure row exit will be enabled. Pressing this button will display the Work With Data Structure Mapping form (P08770). This form will enable you to setup a mapping between items in the Employee Master (F060116) and items in the data structure. This mapping enables you to run reports for a specific employee.
-
6.6 Setting Up Organizational Charts for the Web
This section provides an overview of setting up organizational charts for the web and discusses how to set up the Generate Graphic Organization program.
6.6.1 Understanding Organizational Charts for the Web
You can use the Generate Graphic Organization Chart program (P08713W) to customize the appearance of your organizational charts. If you choose to complete none of the setup options, managers can still enter an employee ID and then click the Display Chart option to produce a chart.
You can use the Profile option on the Form menu to review Address Book and Employee Master Information for the person who is listed in the Employee field.
6.6.2 Forms Used to Set Up Organizational Charts for the Web
| Form Name | FormID | Navigation | Usage |
|---|---|---|---|
| Generate Graphic Organizational Chart | W08713WB | Manager Self Service (G05BMSS1), Generate Graphic Organizational Chart
Select Display Options on the Form menu. |
Use search and select form to move to the Organization Chart Display Options form. |
| Organization Chart Display Options | W08713WC | Click OK. | Set up options for identification, color, chart layout, and pictures. |
6.6.3 Setting Processing Options for Generate Graphic Organizational Chart (P08713W)
Processing options enable you to specify the default processing for programs and reports.
6.6.3.1 Default
- 1. Location of Employee Images
-
Specify a fully qualified path to a directory where the employee.jpg images are stored. This path must be available over the internet. An example of a fully qualified path is:
http://ServerName:83/jde/owportal/images/
6.6.4 Organizational Charts Setup
Access the Organization Chart program.
To set up organizational charts for the Web:
From the Manager Self Service menu (G05BMSS1), select Generate Graphic Organizational Chart.
-
On Organization Chart, select Display Options from the Form menu.
-
On Organization Chart Display Options, select these optional options to display on a chart:
-
Address Number
Place a check in this field if you want the employee's address number to appear on the chart.
-
Job Title
Place a check in this field if you want the employee's job title to appear on the chart.
-
-
Enter a color value for each of these chart options:
-
Level 1–3, Background
Enter an RGB color or valid HTML named color or use the visual assist to pick a color from list.
-
-
To define chart layout options, complete these fields:
-
Cell Height
Enter a value for the height of each node.
-
Cell Width
Enter a value for the width of each node.
-
Font Size
Enter a number for the font size.
-
Columns/Page
Enter the number of columns to print on each page. This is only used if the Page Layout box is check on the Organization Chart form. If the chart is too wide to fit on a page then this option enables the chart to be split on to multiple pages for printing.
-
Rows/Page
Enter the number of rows to appear on each page. This is only used if the Page Layout box is check on the Organization Chart form. If the chart contains more rows than can fit on a page then this option enables the chart to be split on to multiple pages for printing.
-
Chart Height
Enter a value that changes the height of the frame that displays the chart.
-
Chart Width
Enter a value that changes the width of the frame that displays the chart.
-
Line Wrap
Check this box to enable text within each node to wrap on to multiple lines.
-
Show Page Number
Check this box if you want to display the page number on each page of the chart.
-
Repeat top level manager on each page
Check this box if you want to redisplay the top level employee on each page of the chart.
-
Show Terminated
Check this box if you would like to display terminated employees on the chart. Terminate employees will be displayed with a red background and strike through font.
-
-
To display employee pictures on charts, enter a fully qualified directory path where the .jpg files are stored in the Image Location field:
-
Image Location
Enter the file location on the Web server where employee pictures are stored. To display a picture of the employee on the Profile form the name of the image must be the employees address book number followed by .jpg. For example the picture of Cathy McDougle would be 7500.jpg.
-
-
To save your choices, click OK.
6.7 Setting Up Delegates for Managers Workbench
This section provides an overview of setting up manager delegates for Managers Workbench and discusses how to perform the setup function.
6.7.1 Understanding Delegates Setup for Managers Workbench
Managers can set up subordinates to perform functions on their behalf in the Managers Workbench program (P08712). You can use the Manager Delegates program (P08750) to set up delegates to perform review and approval functions for:
-
Accessing the Managers Workbench program.
-
Viewing records of a manager's subordinates.
-
Processing employee status changes.
-
Processing performance appraisals.
-
Running managers reports.
When you set up manager delegates, you can assign an authorization level to each delegate. The authorization level specifies how many organizational levels below the manager that the delegate can view. For example, if the level is set to 1, then the delegate can view only records for employees who report directly to the manager. At level 2, the delegate can view records for employees who report to the manager and for employees who report to the manager's direct reports.
You can also assign effective dates to delegate records. For example, if a manager is on vacation for two weeks, you might set up a delegate that has review and approval authority during the time that the manager is unavailable. After the ending date that is assigned to the delegate record is reached, the delegate no longer has authorization to review and approve employee timecards.
6.7.2 Form Used to Set Up Delegates for Managers Workbench
| Form Name | FormID | Navigation | Usage |
|---|---|---|---|
| Work With Delegates | W08750A | Manager Self Service (G05BMSS1), Managers Delegates | Set up manager delegates. |
6.7.3 Setting Processing Options for Manager Delegates Setup (P08750)
Processing options enable you to specify the default processing for programs and reports.
6.7.3.1 Defaults
Use these processing options to specify whether the Manager field is accessible and the address book value can be changed. When the value is set to the default value of1 or is blank, the system automatically detects the address book number of the employee who is currently signed onto the system, disables the field, and displays only delegates who are subordinate to the displayed manager. When the value is set to 2, the system activates the Manager field, does not automatically detect an address book number, and displays the subordinate delegates for any manager whose address book number is entered.
- 1. User Level
-
Specify whether to display delegates for different managers or to display the delegates for only one manager. Values are:
1:Manager field is disabled. (default value)
2:Manager field is enabled.
6.8 Setting Up Manager Delegates for Time Entry
This section provides an overview of setting up manager delegates for time entry and discusses how to perform the setup function.
6.8.1 Understanding Manager Delegates Setup for Time Entry
After employees enter timecards in the system, managers can review and approve, change, or reject those timecards. Occasionally, managers are not available to review and approve timecards. In these circumstances, you can use the Manager Delegates Setup program (P051126) to set up delegates to perform certain review and approval functions on behalf of the manager.
When you set up manager delegates, you can assign an authorization level to each delegate. The authorization level specifies how much authority the delegate has during the timecard review and approval process. Delegates with an authorization level of 2 are only able to approve or reject timecards, and delegates with an authorization level of 1 are able to approve, change, delete, and reject timecards on behalf of the manager.
You can also assign effective dates to delegate records. For example, if a manager is on vacation for two weeks, you might set up a delegate that has review and approval authority during the time that the manager is unavailable. After the ending date that is assigned to the delegate record is reached, the delegate no longer has authorization to review and approve employee timecards (Release 9.1 Update).
6.8.2 Form Used to Set Up Manager Delegates for Time Entry
| Form Name | FormID | Navigation | Usage |
|---|---|---|---|
| Work With Manager Delegates Setup | W051126B | Time Entry Self Service Setup (G05BESS41), Manager Delegate Setup | Review existing information and enter new values to set up desired delegates for a manager. |
6.8.3 Setting Processing Options for Manager Delegates Setup (P051126)
Processing options enable you to specify the default processing for programs and reports.
6.8.3.1 Defaults
Use this processing option to specify whether the Manager field is accessible and the address book value can be changed. When the value is set to the default value 0, the system automatically detects the address book number of the manager who is currently signed onto the system, disables the field, and displays only delegates who are subordinate to the displayed manager. When the value is set to 1, the system activates the Manager field, does not automatically detect an address book number, and displays the subordinate delegates for any manager whose address book number is entered.
- 1. User Level
-
Specify whether to display delegates for different managers or to display the delegates for only one manager. Values are:
0: Display only one manager's delegates. (default value)
1: Display delegates for a selected manager.
6.8.4 Setting Up Manager Delegates for Time Entry
Access the Work With Manager Delegates Setup form.
- Delegate Number
-
Enter a number that identifies an entry in the JD Edwards EnterpriseOne Address Book system, such as employee, applicant, participant, customer, supplier, tenant, or location.
- Authorization Type
-
Enter a code that specifies the type of authorization that a manager can specify for a delegate. Values are:
1: Change/delete/approve/reject
2: Only approve/reject