5 Managing Contracts
This chapter contains the following topics:
5.1 Understanding Contracts
This section lists common fields and discusses contract types.
5.1.1 Common Fields Used in This Chapter
You should be familiar with these terms and concepts as they relate to Contract Management:
- Amortization
-
For service contracts, a method of moving long-term revenue to short-term revenue, and then short-term revenue to recognized revenue. Long-term revenue is contracted for more than a 12-month period. Short-term revenue is contracted within a 12-month period. Recognized revenue is contracted from the beginning of the contract through the end of the amortization period.
- Base Warranty
-
Enter a code that specifies whether the contract line entered is a base warranty contract.
This field is a common, single-character entry field for a yes or no response on certain screens.
A warranty that is associated with the equipment, typically included in the purchase price of the equipment.
- Blanket Contract
-
Enter a code that specifies whether the contract line entered is a blanket contract.
A contract that covers all items at a specified price. The pricing is usually by the contract, not by detail lines.
- Contract Coverage
-
For service contracts, the days of the week and hours of the day. For example, the coverage term 5 X 8 refers to a contract that covers equipment five days a week, Monday through Friday, for eight hours each day.
- Coverage Group
-
Enter a user-defined code that specifies the Coverage Group. The Coverage Group consists of unlimited cost codes and the percentage covered for each cost code.
For supplier contracts, the percent at which the parts and labor (and any other expenses such as travel) are covered. For example, in the supplier contract, the supplier might reimburse the manufacturer for 50 percent of the parts cost used to fix or replace a part and 50 percent of the labor cost used to fix or replace a part.
- Covered G/L Code (covered general ledger code)
-
Enter a value from user-defined code (UDC) table 41/9 (G/L Posting Category) that identifies the GL Offset to use when the system is searching for the account to which it will post the covered portion (by warranty or contract) of the accounting transaction. If you do not want to specify a GL Offset, you can enter four asterisks in this field or you can leave this field blank. If you leave this field blank, the system uses the GL Offset from Inventory.
The Covered G/L Code and Non-Covered G/L Code fields are used by work orders and cases for recording billing or costs for this type of service. This process enables accounting to direct covered or non-covered costs and revenue to different accounts.
- Extended Warranty
-
An optional warranty that can be purchased by the customer to cover the performance of the equipment beyond the terms of the base warranty.
- Free Contract
-
Enter a code that specifies whether the contract line entered is a free contract. For service contracts, a contract that is issued at no cost to the customer.
- Line Type
-
Enter a code that controls how the system processes lines on a transaction. It controls the systems with which the transaction interfaces, such as General Ledger, Job Cost, Accounts Payable, Accounts Receivable, and Inventory Management. It also specifies the conditions under which a line prints on reports, and it is included in calculations. These codes are included:
S: Stock item
J: Job cost
N: Nonstock item
F: Freight
T: Text information
M: Miscellaneous charges and credits
W: Work order
- Non-Covered G/L Code (non-covered general ledger code)
-
Enter a value from UDC 41/9 (G/L Posting Category) that identifies the GL Offset to use when the system is searching for the account to which it will post the non-covered portion of the accounting transaction. If you do not want to specify a GL Offset, you can enter four asterisks in this field or you can leave this field blank. If you leave the field blank, the system uses the GL Offset from Inventory.
The Covered G/L Code and Non-Covered G/L Code fields are used by work orders and cases for recording billing or costs for this type of service. This process enables accounting to direct covered or non-covered costs and revenue to different accounts.
- Preventive Maintenance Contract
-
For service contracts, a contract used when regularly scheduled maintenance should be completed for the equipment.
- Service Type
-
The various services that you perform. For example, you can set up different codes to differentiate between an on-site repair and a depot repair.
Enter a value from UDC 00/TY (Work Order/ECO Type) that indicates the classification of a work order or engineering change order.
You can use work order type as a selection criterion for work order approvals.
5.1.2 Contract Types
Contract Management provides you with a way to record and manage these types of contracts:
-
Service Contract
-
Supplier Contract
A service contract is a written agreement between a customer and a provider (contractor). The customer requests a service. The contractor bills the customer for the services provided under the contract. The agreement can be changed to include extra services. Service packages are used to define the services extended by a company to their customer as outlined in the contract.
A supplier contract is a written agreement between a manufacturer and a supplier. It is a nonbillable contract that does not require an end date. The supplier contract indicates the type of coverage for parts that are purchased from the supplier, and the type of coverage that is included in a product that is manufactured or sold by the manufacturer. If the part fails and the manufacturer fixes or replaces it, the manufacturer can return the part to the supplier for a credit or a refund.
For service contracts, you are also able to support this pricing flexibility:
-
Advanced pricing
-
Discounts
-
Price overrides
5.2 Setting Up Contracts
This section provides an overview of contract setup and discusses how to:
-
Set up contract constants.
-
Set up customer service line types.
-
Set up billing frequency.
-
Set up tax rates.
-
Set processing options for the Tax Rate/Areas program (P4008).
-
Set up daylight savings rules.
-
Enter contract coverage information.
-
Set processing options for the Work With Contract Coverage program (P1724).
-
Enter service type information.
-
Set up cost type percentages.
-
Enter service package information.
-
Set up entitlement dates.
-
Set up contract duration ranges.
-
Set up MailMerge documents for contract renewals.
5.2.1 Understanding Contract Setup
Before you can use any of the features of Contract Management, you need to define the critical information that the system uses for processing. You also need to specify information that is used when you enter data throughout the system, as well as set up UDCs for Contract Management.
5.2.1.1 Line Types
Each contract that you enter must contain details about the services which are included. For each service, you must enter a line of detail information that describes the contract. The system processes the detail line based on a line type. The line type for a detail line also determines the cycle through which the system processes the line.
5.2.1.2 Contract Coverage
Contract coverage information enables you to define the days of the week and hours of each day. For example, the coverage term 5 x 8 refers to a contract that covers equipment five days a week, Monday through Friday, for eight hours each day.
You can use contract coverage information with the Work Day Calendar to create contracts that display the days that the contract covers. For example, you might set up contracts that cover only Monday through Friday and do not cover weekends or holidays.
5.2.1.3 Service Types
To charge customers for services, you need to set up service types. Service types enable you to define the various services that you perform. For example, you can set up different codes to differentiate between an on-site repair and an exchange. You also can select a default pricing method (time and material or flat rate).
5.2.1.4 Cost Type Percentages
You set up the cost type percentage table to define the percent that is covered for each cost type within a coverage group. This entire coverage group can then be attached to a service package. It is used when billing and costing is done for work orders and cases that are entitled to service under a contract. When you perform billing and costing for work orders and cases, the system retrieves the percentage that is covered from this table, based on the coverage group that is covering the service and the type of item (such as parts, labor, or freight) that you are billing or costing. If a coverage group is not specified for a service package but the service is covered under a contract, the system treats the case or work order as 100 percent covered.
5.2.1.5 Service Packages
You enter service package information to define the services that are extended by a company to their customer as outlined in the contract. Within the service package, you can specify:
-
Type of service, such as on-site repair, exchange, repair and return, support, or installation of the product.
-
Contract coverage support, such as eight hours a day Monday through Friday, or 24 hours a day seven days a week (to indicate a 24-hour day, enter 00:00:00 through 23:59:59).
-
Turnaround repair times.
For each service package that you set up, you can have multiple contract coverage types and service types.
5.2.1.6 Duration Ranges
You use contract duration ranges to prorate contracts. For example, when you set up prices in advanced pricing, you might enter a duration of 12 (for 12 months) as follows:
-
From Billing Duration = 1.
-
Thru Billing Duration = 12.
-
Billing Duration = 12.
For a six-month contract, the program determines that six is within the duration range of one to 12. The program retrieves a 12-month price from advanced pricing, divides that price by 12, and then multiplies it by six. The result is a prorated price for the six-month contract.
5.2.1.7 MailMerge Workbench for Contract Renewal Letters
When contracts are due to expire, you can generate renewal letters for customers that are based on existing contract information. You use the MailMerge Workbench to set up the contract renewal documents. The MailMerge Workbench is an application that merges Microsoft Word 6.0 (or higher) word processing documents with JD Edwards JD Edwards EnterpriseOne records to automatically print business documents such as contract renewal letters. The MailMerge Workbench enables you to add or change text in the contract renewal letter, to create new documents, and to delete documents.
5.2.2 Forms Used to Set Up Contracts
| Form Name | FormID | Navigation | Usage |
|---|---|---|---|
| SWM System Constants Revisions | W17001C | Service & Warranty Setup (G1740), Service & Warranty Constants. | Set up contract constants. |
| Line Type Constants Revisions | W40205B | Contract Setup (G1744), Line Type Revisions.
Click Add on the Work With Line Types form. |
Set up customer service line types. |
| S/WM Line Type Constants Revisions | W1793B | Select SWM Attributes from the Form menu on the Line Type Constants Revisions form. | Set up customer service line types. |
| Billing Frequency Code Revisions | W15019B | Contract Setup (G1744), Billing Frequency Codes.
Click Add on the Work with Billing Frequency Codes form. |
Set up billing frequency. |
| Work With Tax Rate/Areas | W4008A | Contract Setup (G1744), Tax/Rate Areas. | Locate and review tax rate areas. |
| Tax Rate/Area Revisions | W4008B | Click Add on the Work With Tax Rate/Areas form. | Set up tax rates. |
| Work with Batch Versions | W98305A | Select Tax Area Report from the Report menu on the Work With Tax Rate Areas form. | Set up tax rates. |
| Add Daylight Savings Rule | W00085B | Contract Setup (G1744), Daylight Savings Rules.
Click Add on the Work With Daylight Savings Rules form. |
Set up daylight savings rules. |
| Revise Contract Coverage | W1724A | Contract Setup (G1744), Contract Coverage Entry.
Click Add on the Work With Contract Coverage form. |
Enter contract coverage information. |
| Revise Contract Services | W1725B | Contract Setup (G1744), Service Type Entry.
Click Add on the Work With Contract Services form. |
Enter service type information. |
| Cost Type Percentages Revisions | W1792A | Contract Setup (G1744), Cost Type Percentages Revisions.
Click Add on the Work With Cost Type Percentages form. |
Set up cost type percentages. |
| Revise Contract Service Package | W1729C | Contract Setup (G1744), Service Package Entry.
Click Add on the Work With Contract Service Package form. |
Enter service package information. |
| Work with Entitlement Date | W1791B | Contract Setup (G1744), Entitlement Date Revisions. | Set up entitlement dates. |
| Entitlement Date Revisions | W1791D | Click Add on the Work with Entitlement Date form. | Set up entitlement dates. |
| Entitlement Rules Sequence | W1791A | Select Entitlement Rules from the Form menu on the Work with Entitlement Date form | Set up entitlement dates. |
| Contract Duration Ranges | W1726A | Contract Setup (G1744), Contract Duration Ranges. | Set up contract duration ranges. |
| Work With MailMerge Templates | W05WMMWBA | Contract Setup (G1744), MailMerge Template. | Set up MailMerge Template for contract renewals. |
| Web Mail Merge Template Details | W05WMMWBB | Contract Setup (G1744), MailMerge Template.
Click Add on the Work With Web MailMerge Templates form. |
Set up MailMerge templates for contract renewals. |
5.2.3 Setting Up Contract Constants
To define default information for the entire system, you set up system constants. Constants control the types of information that you track and the rules that the system uses to perform certain calculations.
Access the Contracts tab of the S/WM System Constants Revisions form.
Figure 5-1 S/WM System Constants Revisions form, Contracts tab
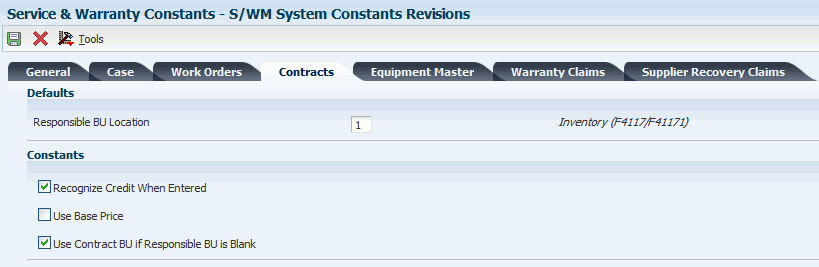
Description of ''Figure 5-1 S/WM System Constants Revisions form, Contracts tab''
- Recognize Credit When Entered
-
Select this option to move the credit amount to recognized revenue. If you disable this option, the credit amount is recognized over the life of the contract.
- Use Base Price
-
Select this option to specify whether the system uses the base price for pricing a contract for this form.
- Use Contract BU if Responsible BU is Blank
-
Select this option to specify where the system retrieves the responsible business unit for this form. If the responsible business unit is blank in the location indicated by the Responsible BU Location constant, and if you enable this option, the system uses the responsible business unit from the contract. Otherwise, the system uses the responsible business unit from the location in the constant. If the responsible business unit is not set up for the location indicated by the constant, the system displays an error message.
5.2.4 Setting Up Customer Service Line Types
Access the Line Type Constants Revisions form.
Figure 5-2 Line Type Constants Revisions form
Description of ''Figure 5-2 Line Type Constants Revisions form''
- G/L Offset (general ledger offset)
-
Enter a value from UDC 41/9 (G/L Posting Category) that identifies the GL offset that the system uses when it searches for the account to which it posts the transaction. If you do not want to specify a class code, enter **** (four asterisks) in this field. The G/L Offset field is required, but the Service Management system does not use the value entered.
You can use automatic accounting instructions (AAIs) to predefine classes of automatic offset accounts for the Inventory Management, Procurement, and Sales Order Management systems. You might assign these GL class codes:
IN20 Direct Ship Orders
IN60 Transfer Orders
IN80 Stock Sales
The system can generate accounting entries based upon a single transaction. For example, a single sale of a stock item can trigger the generation of accounting entries similar to these:
Sales-Stock (Debit) xxxxx.xx
AR Stock Sales (Credit) xxxxx.xx
Posting Category: IN80
Stock Inventory (Debit) xxxxx.xx
Stock COGS (Credit) xxxxx.xx
The system uses the class code and the document type to find the AAI.
- S/WM Interface
-
Enter a code that indicates whether this order line appears on the second document in a series of four documents that relate to this order to indicate that this line type interfaces with the Service Management system. For example, it might be necessary to include receiving information in a purchase order that provides instructions about the desired disposition of goods. Although this information is vital to the proper handling of the order, it should not appear on the purchase order that is delivered to the supplier.
Access the S/WM Line Type Constants Revisions form.
Select the Contracts tab.
Figure 5-3 S/WM Line Type Constants Revisions form, Contracts tab
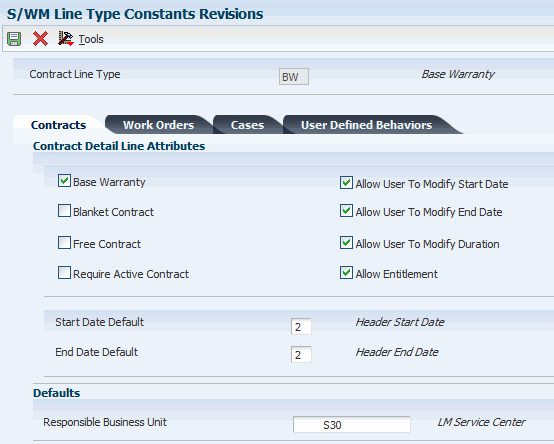
Description of ''Figure 5-3 S/WM Line Type Constants Revisions form, Contracts tab''
- Require Active Contract
-
Indicates that the piece of equipment is required to have an active contract on it before a new contract can be added.
- Allow User To Modify Start Date and Allow User To Modify End Date
-
Indicates that the contract detail line Start Date or the contract detail line End Date can be modified once it has been entered.
- Allow User To Modify Duration
-
Indicates that the contract detail line Billable and Non-Billable Duration can be modified once it has been entered.
- Allow Entitlement
-
Enter a code that specifies whether to use a line type in entitlement checking.
- Start Date Default
-
Enter a hard-coded value from UDC 17/L1 (Contract Line Start Date) that indicates from where the system retrieves the default value for the Contract Line Start Date field. Values are:
1: Last contracted end date (for equipment) + 1.
The system finds the newest contract for this piece of equipment, and adds one day to the detail end date to calculate the new start date. If the system does not find a contract for the piece of equipment (serial, unit) number, the system produces an error if the user cannot modify the start date.
2: Contract header start date.
The system enters the contract header start date as the default value.
3: Base Warranty Start Date
The system enters the detail start date from the first active base warranty (line type) contract for this equipment as the default value. If the system does not find an active base warranty contract for the piece of equipment (serial, unit) number, the system produces an error if the user cannot modify the start date.
4: System date.
The system enters the system date as the default value.
5: None.
The system does not enter a default value. The user is required to enter the detail start date.
- End Date Default
-
Enter a hard-coded value from UDC 17/L2 (Contract Line End Date) that indicates from where the system retrieves the default value for the Contract Line End Date field.
Values are:
1: (Contract Line Start Date field value) + (total duration [billable + nonbillable duration]).
Add the value from the Contract Line Start Date field to billable and nonbillable duration.
2: Contract header end date.
The system enters the contract header end date as the default value.
3: Base Warranty End Date.
The system enters the detail end date from the most recent active base warranty (line type) contract for this equipment as the default value. If the system does not find an active base warranty contract for the piece of equipment (serial, unit) number, the system produces an error if the user cannot modify the end date.
4: System date.
The system enters the system date as the default value.
5: None.
The system does not enter a default value. The user is required to enter the detail end date.
- Responsible Business Unit
-
If you have set up the system constants for contracts to retrieve the Responsible Business Unit based on Line Type, then complete this field.
5.2.5 Setting Up Billing Frequency
The Contract Management module integrates with the Property Management system to set up billing frequencies. The system enables you to define the periods that you want to bill at a particular billing frequency.
Access the Billing Frequency Code Revisions form.
Figure 5-4 Billing Frequency Code Revisions form
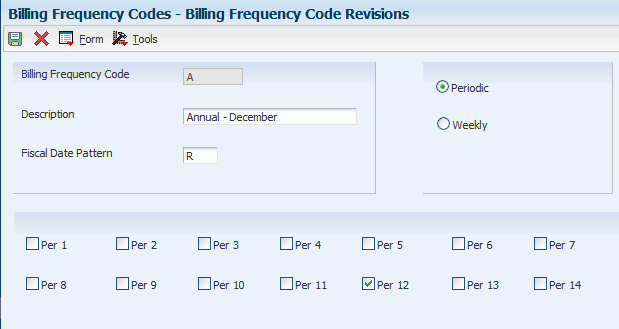
Description of ''Figure 5-4 Billing Frequency Code Revisions form''
- Billing Frequency Code
-
Enter a code that specifies when (how often) to generate billing records. The code that you enter must exist in the Billing Frequency Master table (F15019).
- Fiscal Date Pattern
-
Enter the code to define the date pattern. You can use one of 15 codes. You must set up special codes (letters A through N) for 4-4-5, 13-period accounting, or any other date pattern unique to the environment. An R, the default value, identifies a regular calendar pattern.
- Periodic
-
Select the Periodic option to define a periodic pattern. Contract Entry does not allow a 52-period billing feature.
You can select periods 1 through 14 as applicable, depending on how you want to bill the customer.
5.2.6 Setting Up Tax Rates
You set up tax rate areas to accurately calculate taxes for customers, based on their geographic locations. When you set up a tax rate area, you can apply the tax code to customer's master record. You can run a report to review all of the tax areas that have been set up and applied to a customer's record.
Access the Tax Rate/Area Revisions form.
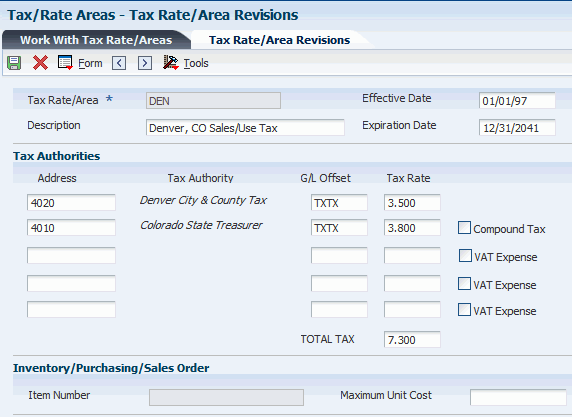
- Tax Rate/Area
-
Enter a code to calculate taxes for a geographic area. This code identifies a tax or geographic area that has common tax rates and tax authorities. The system validates the code you enter against the Tax Areas table (F4008). The system uses the tax rate area in conjunction with the tax explanation code and tax rules to calculate tax and GL distribution amounts when you create an invoice or voucher.
- Effective Date
-
Enter the date when a transaction, contract, obligation, preference, or policy rule becomes effective.
- Expiration Date
-
Enter the date when a transaction, contract, obligation, preference, or policy rule ceases to be in effect.
- Tax Auth (tax authority)
-
Enter the address number of the tax authority for the area. You pay and report sales, use, or VAT taxes to this agency. Examples include states, counties, cities, transportation districts, provinces, and so on. You can specify up to five tax authorities for a single tax area.
You can enter up to five tax authorities.
- G/L Offset (general ledger offset)
-
Enter a code that indicates how to locate the tax account for general ledger entries. This field points to automatic accounting instructions (AAIs) that, in turn, point to the tax account.
Examples are:
PTyyyy - for AP (VAT only)
RTyyyy - for AR (VAT only)
GTyyyy - for GL (VAT only)
4320 - for Sales Orders
4400 and 4410 - for Purchase Orders
When setting up VAT and Canadian GST, PTyyyy, RTyyyy, and GTyyyy are the only values. For the AP system, a second GL Offset (PT_ _ _ _) is required when the tax setup involves VAT plus use taxes (tax explanation code B). Use AAI PT_ _ _ _ to designate the use tax portion of the setup.
For sales taxes, the Accounts Payable and Accounts Receivable systems ignore the values in this field. However, the Sales Order Management and Procurement systems require values in this field.
- Tax Rate 1
-
Enter the percentage for the tax rate in the area. This number identifies the percentage of tax that should be assessed or paid to the corresponding tax authority, based on the tax area.
Enter the percentage as a whole number and not as the decimal equivalent. For example, to specify seven percent, enter 7, not .07.
- Compound Tax
-
For Canadian companies, click this option to calculate PST tax after GST has been added to the product value.
For example, suppose that you have a tax area set up with seven percent GST and eight percent PST, and you select the option to calculate tax on tax. If you enter a voucher for a taxable amount of 1000 CAD, the system calculates the GST as 70 CAD, adds it to the taxable amount, and multiplies the PST by that result (1070 CAD). If you do not use compound taxes, the system calculates PST on the taxable amount only.
Note:
This option is valid only for tax explanation codes that begin with the letters B and C. To calculate compound taxes for tax explanation code V, use tax explanation code V+.This code is available only for the second tax authority (line 2 in the list on this form) and must identify a non-GST tax authority.
- VAT Expense
-
For Canadian companies, select this option to indicate the percent of VAT that is not recoverable. You enter the nonrecoverable percentage in the Tax Rate field to the left of this option. The system multiplies the percentage that you specify by the total tax amount and reduces the amount of VAT that is recoverable from the first tax authority.
Note:
This option is valid only with tax explanation codes that begin with the letters C, B, and V.This code is available only for the third, fourth, fifth tax authorities (lines 3 through 5).
- Item Number
-
Enter the number of the item or item grouping to which the tax applies for inventory and sales order information.
Values for item groupings are 3 through 8.
If you specify a value for an item grouping, you must ensure that the processing option to validate item numbers, which appears on the Edit tab, is set to 0 (off). If this processing option is not set correctly, the system attempts to validate the item grouping number as an actual item number.
- Maximum Unit Cost
-
Enter a number that identifies the maximum amount that an item can be taxed. If the unit cost of an item is more than the amount that you specify in this field, the maximum unit cost becomes taxable.
Note:
This field is used for processing sales and purchase orders only. This field is required for processing taxes in the state of Tennessee.
To run the tax report, select Tax Area Report from the Report menu on Work With Tax Rate Areas.
On Work with Batch Versions, select the version that you want to print and click Select.
5.2.7 Setting Processing Options for the Tax Rate/Area Program (P4008)
Use these processing options to set default values for the Tax Rate/Area program.
5.2.7.1 Display
This processing option specifies whether certain fields appear.
- Enter a value to either show or hide the Item Number and Maximum Unit Cost fields.
-
Specify a value to either show or hide the Item Number and Maximum Unit Cost fields. Values are:
1: Show
0: Hide
5.2.7.2 Edits
This processing option specifies whether to validate item numbers.
- Enter a value to validate Item Numbers
-
Specify whether to validate item numbers. Values are:
1: Validate.
0: Do not validate.
5.2.8 Setting Up Daylight Savings Rules
Set up daylight savings rules to define when to convert to the daylight savings rule. Use this criteria:
-
Month
-
Day of the week
-
Hour
Calculations are based on the daylight savings rule setup that is used with the time zone. You define the start and end dates of the daylight savings rule (for example, enter the first Sunday of April at 02:00:00).
Access the Add Daylight Savings Rule form.
- Rule Name
-
Enter a unique name identifying a daylight savings rule. Use daylight savings rules to adjust time for a geographic and political locale.
- By Day of Week Instance
-
Select this option to indicate the method that is used to determine a daylight savings rule.
By Day of Week Instance indicates that daylight savings starts and stops on a certain day of the week for a certain month, such as the first Sunday of April to the first Sunday of October.
- By Day of the month
-
Select this option to indicate the method that is used to determine a daylight savings rule.
By Day of the month indicates that daylight savings starts and stops on a certain day of a certain month, such as April 3 to October 10.
5.2.9 Entering Contract Coverage Information
Access the Revise Contract Coverage form.
Figure 5-6 Revise Contract Coverage form

Description of ''Figure 5-6 Revise Contract Coverage form''
Enter the beginning times and the ending times that the coverage includes for days of the week and holidays.
- Coverage Type
-
Enter the type of contract coverage.
- Rule Name
-
Enter a unique name identifying a daylight savings rule. Use daylight savings rules to adjust time for a geographic and political locale.
5.2.10 Setting Processing Options for the Work with Contract Coverage Program (P1724)
Use these processing options to specify the default values for the Work with Contract Coverage program.
5.2.10.1 Defaults
Specify the contract coverage start and end times.
- 1. Default Coverage Start Time Monday through Friday and 2. Default Coverage End Time Monday through Friday
-
Specify the coverage start time or the coverage end time for service contracts that are covered from Monday through Friday.
- 3. Default Coverage Start Time Saturday, Sunday, and Holidays and 4. Default Coverage End Time Saturday, Sunday, and Holidays
-
Specify the coverage start time or the coverage end time for service contracts that are covered for Saturday, Sunday, and holidays.
- 5. Time Zone
-
Specify a default time zone.
5.2.11 Entering Service Type Information
Access the Revise Contract Services form.
Figure 5-7 Revise Contract Services form
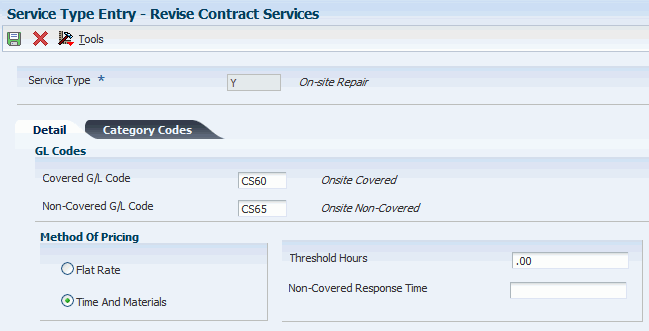
Description of ''Figure 5-7 Revise Contract Services form''
- Flat Rate and Time And Materials
-
Click this option to determine if this type of service should be priced based on a flat rate or based on actual time and materials. Values are:
F: Charges for labor are based on one flat rate. Charges for parts are already included in the flat rate.
T: Charges for labor are based on actual labor hours. Charges for parts are based on actual parts used.
Blank: A blank value is only valid when defining the Method of Pricing for a service provider. It is used to indicate that the service provider is an internal service provider and should not be paid.
- Threshold Hours
-
Enter a value that represents hours. For a case or work order, the system uses the threshold hours and the time of day to calculate the commitment date and time.
For example, a covered day is set up from eight until five, and you set up a threshold at two hours. If you receive a call at four, the call is received within the two-hour threshold of the end of the covered day, and completion of the call for that day is not required since the work day ends in an hour. The commitment time then starts to calculate the response time at the beginning of the next covered day.
5.2.12 Setting Up Cost Type Percentages
Access the Cost Type Percentages Revisions form.
Figure 5-8 Cost Type Percentages Revisions form
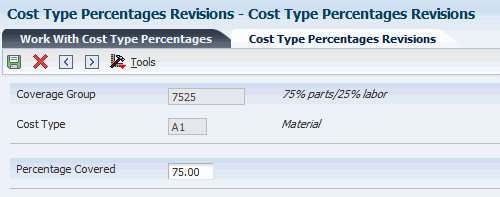
Description of ''Figure 5-8 Cost Type Percentages Revisions form''
- Cost Type
-
Enter a code that designates each element of cost for an item. Examples of the cost object types are:
A1: Purchased raw material
B1: Direct labor routing rollup
B2: Setup labor routing rollup
C1: Variable burden routing rollup
C2: Fixed burden routing rollup
Dx: Outside operation routing rollup
Xx: Extra add-ons, such as electricity and water
The optional add-on computations usually operate with the type Xx extra add-ons. This cost structure enables you to use an unlimited number of cost components to calculate alternative cost rollups. The system then associates these cost components with one of six user-defined summary cost buckets.
The work order connects the cost type to the coverage group.
- Percentage Covered
-
Enter the percentage covered under warranty or contract. This is used to calculate the amount to bill or the amount to cost for the line item being processed on the service order or call.
5.2.13 Entering Service Package Information
Access the Revise Contract Service Package form.
Figure 5-9 Revise Contract Service Package form
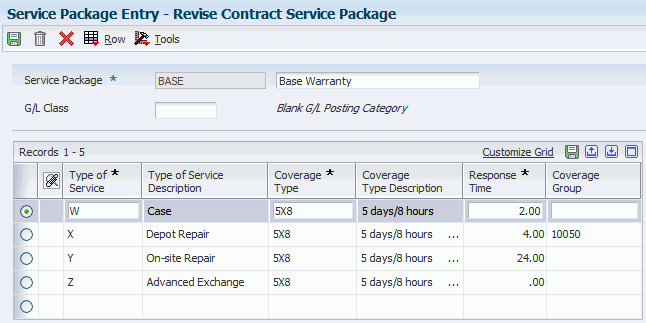
Description of ''Figure 5-9 Revise Contract Service Package form''
- Type of Service
-
Enter a value from UDC 00/TY (Work Order/ECO Type) that indicates the classification of a work order or engineering change order.
You can use work order type as a selection criterion for work order approvals.
- Coverage Type
-
Enter the type of contract coverage (this defines the days of coverage and the times of day).
- Response Time
-
Enter the guaranteed time during which service will be completed, as provided by a service contract, from the time that a provider logs a case or work order. This unit of time relates to the service type in the Service Contract Services table (F1725). Enter the response time in hours.
The system adds the value in the Response Time field to the start time and date to create the commit time. The commit time is the time, displayed in hours and minutes, that you are required to respond to the customer. The commit date and time override any date and time that the Case program might have calculated.
- G/L Class (general ledger class)
-
Enter a value from UDC 41/9 (G/L Posting Category) that identifies the GL offset that system uses when it searches for the account to which it posts the transaction. If you do not want to specify a class code, you can enter **** (four asterisks) in this field.
You can use AAIs to predefine classes of automatic offset accounts for the Inventory Management, Procurement, and Sales Order Management systems. You might assign these GL class codes:
IN20 Direct Ship Orders
IN60 Transfer Orders
IN80 Stock Sales
The system can generate accounting entries based upon a single transaction. For example, a single sale of a stock item can trigger the generation of accounting entries similar to these:
Sales-Stock (Debit) xxxxx.xx
AR Stock Sales (Credit) xxxxx.xx
Posting Category: IN80
Stock Inventory (Debit) xxxxx.xx
Stock COGS (Credit) xxxxx.xx
The system uses the class code and the document type to find the AAI.
If this field is left blank, the system uses the GL code from the Inventory Item Number when you bill contracts. You use this field only when you bill contracts.
5.2.14 Setting Up Entitlement Dates
Access the Entitlement Date Revisions form.
You set up entitlement dates to specify the date to begin verifying for each transaction if something is entitled. Any transactions before that date are assumed to be entitled.
You can enter and update entitlement dates for a combination of:
-
Product family
-
Product model
-
Inventory item number
-
Branch/Plant
-
Customer number
-
Country
To set up entitlement dates:
-
Complete these fields and click OK:
-
Customer Number
-
Country
-
Branch/Plant
-
Inventory Item Number
-
Product Model
-
Product Family
-
Entitlement Start Date
-
-
The system searches for a date based on rules that you specify. To review or revise these rules, from Work With Entitlement Date, select Entitlement Rules from the Form menu.
-
Define the order that the system uses to search for a date on Entitlement Rules Sequence. The system uses a hierarchical search method, from most specific to most general. To include or exclude fields in the hierarchical search, complete these fields with a Y or N:
-
Sequence Number
-
Customer Number
-
Country
-
Branch/Plant
-
Inv. Item Number
-
Prod. Model
-
Prod. Family
-
- Country
-
Enter a value from UDC 00/CN (Country Codes) that identifies a country. The country code has no effect on currency conversion.
The Address Book system uses the country code for data selection and address formatting.
- Entitlement Start Date
-
Enter the date on which an address, item, transaction, or table record becomes active. The meaning of this field differs, depending on the program.
For example, the effective date can represent any of these dates:
The date on which a change of address becomes effective.
The date on which a lease becomes effective.
The date on which a price becomes effective.
The date on which the currency exchange rate becomes effective.
The date on which a tax rate becomes effective.
5.2.15 Setting Up Contract Duration Ranges
Access the Contract Duration Ranges form.
Figure 5-10 Contract Duration Ranges form
Description of ''Figure 5-10 Contract Duration Ranges form''
|
Note: You should ensure that the data does not have a break in the duration. The first row in the form should be from.01 through 12.00. The second row should be 12.01 through 24.00. |
- From Billing Duration
-
The From Billing Duration when specifying a billing duration range in the Contract Billing Duration Range table.
- Thru Billing Duration
-
The Thru Billing Duration when specifying a billing duration range in the Contract Billing Duration Range table.
- Billing Duration
-
The billing duration to be used by Advanced Pricing when specifying a billing duration range in the Contract Billing Duration Range table.
5.2.16 Setting Up MailMerge Documents for Contract Renewals
Access the Web Mail Merge Template Details form.
Figure 5-11 Web Mail Merge Template Details form
Description of ''Figure 5-11 Web Mail Merge Template Details form''
MailMerge uses the template to identify the fields that you use in the MailMerge document. The data structure that you designate for the document determines what fields are available.
To set up MailMerge templates for contract renewals:
-
Complete these fields:
-
Template Name
-
Data Structure Name
Note:
If the data structure does not exist in this environment, you need to use a Form exit to Generate DS. This function can generate a data structure from JD Edwards JD Edwards EnterpriseOne into this environment. -
Address Book Field
-
Use Sort Key
-
Output Queue
-
Start Delimiter
-
End Delimiter
-
-
Click the Set Default Delimiters button if you want to reset the start and end delimiters to the default values.
Note:
The system displays the location of the output queue in the Document Location field. The first time you add a mailmerge document, the system displays a message that the file does not exist. -
Select Gen and then Doc File from the Form menu.
The system creates the template, which you can view.
-
Click Cancel, then click Edit Template Doc.
A Microsoft Word template appears. MailMerge uses the template to identify the fields that you use in the MailMerge document. The data structure that you designated for the document determines what fields are available.
-
Type the letter. Cut and paste the delimiter fields that you want to use into the letter. Be sure to paste the complete field with the delimiter symbols, such as «szAlphaName».
-
Select Save As from the File menu. Save the template as a Web Page (.htm) document, then close the template.
-
Select View Doc File from the Form menu. You can view and print the template that you created, and then click Cancel.
-
Click OK on the Web Mail Merge Template Details form.
- Template Name
-
Enter the name that you want for the MailMerge document, which must be 10 or fewer characters long.
- Data Structure Name
-
For Contract Renewal Letters, use the data structure D1701010A. If you do not use this data structure, enter the name of the data structure that you want to use with the MailMerge document. The data structure contains all of the possible fields that you can use in the MailMerge document.
Note:
If the data structure does not exist in this environment, you need to use a Form exit to Generate DS. This function can generate a data structure from JD Edwards JD Edwards EnterpriseOne into this environment. - Address Book Field
-
Use this field to specify the position in the data structure where the Address Book Number (AN8) data item exists. For example, if Address Book Number occupies the third field in the mail merge data structure, then this field should display a 3. If this field contains a 0, then the Sort Key (MMSK) in the F980014D record will be used to email and attach letters.
- Use Sort Key
-
Select this option for the system to set the Address Book field value to 0, which means that the Sort Key (MMSK) in the F980014D record is used to email and attach letters.
- Output Queue
-
Enter the name of the folder on the enterprise server that the program has the ability to access. This entry is the location where the MailMerge documents will be stored.
- Start Delimiter and End Delimiter
-
Accept the default delimiter, unless you want to change it.
- Set Default Delimiters
-
Click this button if you want to reset the Start and End Delimiters to the default values.
- Document Location
-
Displays the location of the output queue. The first time you add a mailmerge document, the system displays a message that the file does not exist.
|
Note: For this new MailMerge document to work with the contract renewal letters, you must specify the new document in the R1731 processing options. |
See JD Edwards EnterpriseOne Tools Data Structure Design Guide.
5.3 Managing Contracts
This section provides an overview of contract management, lists prerequisites, and discusses how to:
-
Enter supplier contract header information.
-
Enter supplier contract detail information.
-
Enter service contract header information.
-
Enter service contract detail information.
-
Review service contract information.
-
Renew a service contract.
-
Copy a service contract.
-
Set processing options for the Contract Revisions program (P1721).
-
Set processing options for the Work With Contracts program (P1720).
-
Define the entitlement rules sequence for service contracts.
-
Define the entitlement rules sequence for supplier contracts.
-
Review entitlement information for service contracts.
-
Review entitlement information for supplier contracts.
-
Cancel contracts.
-
Suspend contracts.
-
Cancel and suspend contract detail lines.
-
Credit contract detail lines.
-
Create contract prepayment transactions.
-
Generate contract renewal letters
-
Review contract renewal letters.
-
Set processing options for the Contract Renewal Letters program (R1731).
5.3.1 Understanding Contract Management
The programs to manage contracts enable you to create and track contracts for customers and suppliers.
5.3.1.1 Service Contracts
A service contract is a written agreement between a customer and a provider. For service contracts, you can make changes to a contract if the terms of the contract change or if the service package changes, as long as the contract has not been billed. You can also track contract dates and specify the lead times that are necessary to prepare renewal letters and contracts.
When you enter a service contract, you are accessing the starting point of the service contract programs. You can enter detailed information about the contract such as service packages, item numbers, and billing information. You also can copy or renew existing contracts.
You can enter and update service contracts through either the contract header or the detail forms. On the header form, you can select whether to view all detail lines of a contract on the detail form.
A version number is associated with each service contract. When you renew a contract, you can create a new version of the existing contract rather than create a new contract.
|
Note: The system default values now appear after each row entry instead of after each field entry. |
5.3.1.2 Supplier Contracts
A supplier contract is a written agreement between a manufacturer and a supplier. Supplier contracts are nonbillable, non-renewable, and do not require an end-date.
When you enter a supplier contract, you can enter detailed information about the contract such as supplier number, inventory item number, and coverage group. You can also copy existing contracts.
You can enter and update supplier contracts through either the contract header or detail forms. On the Work With Supplier Contracts form, you can select whether to view all detail lines of a contract on the detail form.
5.3.1.3 Entitlements
The entitlement rules sequence defines priorities when you assign entitlement rules to contract detail lines. The hierarchy determines the order that the system uses to search for a match between the contract and the entitlement rules. Set up the hierarchy from specific to general. To ensure the best performance, you should set up only necessary sequences.
You can review entitlement information and make any changes that are necessary when entitlement details for the contract change.
For a service contract, you can use this form to review the customer's entitlement and exit to the service package that the customer has purchased. For example, if a customer purchases a computer from you with the service package that has the most benefits, the customer might be entitled to having a repair person visit the site as opposed to sending the computer to you for repair.
For a supplier contract, you can review the entitlement details between the supplier and the manufacturer.
5.3.1.4 Payment Tracking
To track payments that are prepaid by customers, you can use prepayment processing. Customers can prepay by using cash, check, or credit card. If a customer has already paid for a service contract, the invoice reflects that the contract has been prepaid.
Only one type of payment is allowed per contract. The prepayment must also be set up as a one-time billing. The bill from and through dates must be in the same period and year.
5.3.1.5 Contract Cancels, Suspensions, and Renewals
You might need to cancel a contract or an individual detail line if you set it up incorrectly or if the customer no longer wants to cover an item that is under contract. You also might need to suspend a contract for a period of time and later reactivate it.
When service contracts are about to expire, you can generate renewal letters to customers. Based on contract information and processing options, the system automatically generates letters for contracts that are expiring.
The letters that you generate using Contract Renewal Letters (R1731) can be viewed and printed from View Letters (P05WEBMM).
5.3.1.6 Alternate Tax Rate/Area Assignments for Service Contracts (Release 9.1 Update)
You can set up and use the alternate tax rate/area assignment functionality to assign a specific tax rate/area when the countries of the entities involved in a transaction are in the European Union (EU). For service contracts, the entities are the business unit and the site. When you set up your system to use the alternate tax rate/area assignment functionally, you set up an alternate tax rate/area assignment company constant and alternate tax rate/area definitions. In the company constant, you specify whether the system displays an error or warning message, or displays no message, when the tax ID or an alternate tax rate/area definition does not exist for the entities involved in a transaction.
The system uses the company of the business unit on a contract to determine if the alternate tax rate/area assignment functionality is enabled in the alternate tax rate/area assignment company constant. If the functionality is enabled, the system retrieves the alternate tax rate/area for the header of service contracts if these conditions apply:
-
An alternate tax rate/area definition is set up for the business unit and site of the contract.
-
No errors in retrieving information, such as the Tax ID is missing.
-
You do not manually enter a tax rate/area.
You can set a processing option in the Contract Revision program (P1721) to specify whether the system displays the header or detail form for contracts first. You can also specify how the system retrieves the tax rate/area when you copy contracts. This table describes how the system retrieves the alternate tax rate/area based on processing option values and user actions:
| Processing Option or Action | Result |
|---|---|
| Display Header or Detail First processing option (set to Header) | When you set this processing option to display the header first, the system displays the Service Contract Header form. You can enter or modify the business unit and the site number. You cannot enter or modify the company; the system retrieves the company from the value in the Business Unit field. If you change the business unit or site, the system deletes the existing value for the tax rate/area. You can manually enter a tax rate/area, or click OK to have the system retrieve the default tax rate/area. If the alternate tax rate/area assignment functionality is enabled for the company, when you click OK, the system retrieves the alternate tax rate/area if the site and business unit are associated with counties in the EU, and no errors occur. If the site or business unit is not in the EU, or an warning occurs due to the validation of the alternate tax rate/area, then the system retrieves the tax rate/area based on the site. If you set up the alternate tax rate/area assignment functionality to return an error when validations fail, then the system does not retrieve a tax rate/area.
The system retrieves the company for the contract based on the business unit. If you change the business unit, you might change the company on which the retrieval of the alternate tax rate/area is based. If the company changes and the new company has the functionality enabled, the system retrieves the alternate tax rate/area based on how you set up the company and the error handling in the Alternate Tax Rate/Area Assignment Constant program (P001001). If the new company does not have the alternate tax rate/area assignment functionality enabled, the system retrieves the tax rate/area based on the site. |
| Display Header or Detail First processing option (set to Detail) | When you set this processing option to display the header first, the system displays the Contract Revisions form first. If you change the Site in a detail line, the system clears the tax rate/area and retrieves the tax rate/area for the new site when you exit the line. If the alternate tax rate/area assignment functionality is enabled for the company of the business unit, then the system retrieves the alternate tax rate/area according to the error handling that you set up. If the setup enables the company to proceed when an error occurs, then the system retrieves the tax rate/area based on the site.
If you change the site in a detail line to the site in the header, the system:
If you change the site in a detail line to the site that is different from the site in the header, the system:
|
| Tax Information = 1 (retrieve tax rate/area based on Site) | After you copy a contract, you can change values in the header and detail lines. If the alternate tax rate/area assignment functionality is enabled for the company of the business unit, and you change the business unit, then the system uses the alternate tax rate/area based on the functionality setup. If the company of the business unit does not have the alternate tax rate/area assignment functionality enabled, then the system retrieves the tax rate/area based on the site. |
If you manually enter a tax rate/area in the header or detail lines, the system does not overwrite the value that you enter even if you change the business unit or site after manually entering a tax rate/area.
5.3.2 Prerequisites
Before you enter service contracts, you must:
-
Create an address book record for customers for whom you want to create a contract.
The system creates an extension table (F1797) to the address book that stores additional SWM address book information.
-
Set up the document types used for supplier and service contracts.
-
Set up the line types used for supplier and service contracts.
-
Add accounts receivable information to the customer record.
-
To price contracts, set up advanced pricing information.
Before you create contract prepayment transactions, you must:
-
Set up the Payment Instrument UDC (00/PY).
-
Set the prepayment processing option on Contract Revisions (P1721) to prepay.
Before you can generate contract renewal letters, you must set up the MailMerge template.
5.3.3 Forms Used to Manage Contracts
| Form Name | FormID | Navigation | Usage |
|---|---|---|---|
| Supplier Contract Header | W17201B | Daily Contract Processing (G1714), Supplier Contract Entry.
Click Add on the Work with Supplier Contracts form. |
Enter supplier contract header information.
Enter the document type in the second field next to the Contract field. |
| Supplier Contract Revisions | W17201C | Daily Contract Processing (G1714), Supplier Contract Detail.
Select a contract on the Work with Supplier Contracts form, and click Select. |
Enter supplier contract detail information. |
| Service Contract Header | W1721L | Daily Contract Processing (G1714), Service Contract Entry.
Click Add on the Work With Contracts form. |
Enter service contract header information. |
| Contract Revisions | W1721A | Daily Contract Processing (G1714), Service Contract Detail.
Select a contract on the Work With Contracts form, and click Select. |
Enter service contract detail information. |
| Contract Detail | W1721J | Select a contract on the Contract Revisions form, and select Contract Detail from the Row menu. | Review service contract information. |
| Work With Contracts | W1720A | Daily Contract Processing (G1714), Service Contract Entry.
Alternatively: Daily Contract Processing (G1714), Service Contract Detail. |
Search for existing service contracts. Also copy existing contracts. |
| Contract Entitlement Rules Sequence | W1720B | Contract Setup (G1744), Entitlement Date Revisions
Select Entitlement Rules from the Form menu on the Work with Entitlement Date form. |
Define the entitlement rules sequence for service contracts. |
| Supplier Entitlement Sequence Rules | W17201D | Daily Contract Processing (G1714), Supplier Contract Entry.
Alternatively: Daily Contract Processing (G1714), Supplier Contract Detail. Select Rules Sequence from the Form menu on the Work with Supplier Contracts form. |
Define the entitlement rules sequence for supplier contracts. |
| Work With Entitlement Inquiry | W1723D | Daily Contract Processing (G1714), Service Entitlement Inquiry. | Search for and review entitlement information for service contracts. |
| Work with Supplier Contracts | W17201A | Daily Contract Processing (G1714), Supplier Entitlement Inquiry. | Search for and review entitlement information for supplier contracts. |
| Cancel Contract | W1721C | Select Cancel Contract from the Form menu on the Contract Revisions form. | Cancel contracts. |
| Suspend Contract | W1721B | Select Suspend Contract from the Form menu on the Contract Revisions form. | Suspend contracts. |
| Cancel/Suspend Contract Line | W1721F | Select the row that you are canceling or suspending on the Contract Revisions form, and then select Cancel/Suspend from the Row menu. | Cancel and suspend contract detail lines. |
| Credit Contract Line | W1721K | Select the detail line that you want to credit on the Contract Revisions form, and then select Credit Line from the Row menu. | Credit contract detail lines. |
| Enter Prepayment Information | W004201B | Select Prepayments from the Form menu on the Contract Revisions form. | Create contract prepayment transactions. |
| Available Versions | W98305WA | Periodic Contract Processing (G1724), Contract Renewal Letters. | Generate versions of contract renewal letters. |
5.3.4 Entering Supplier Contract Header Information
Access the Supplier Contract Header form.
Figure 5-12 Supplier Contract Header form
Description of ''Figure 5-12 Supplier Contract Header form''
- Contract Type
-
Enter a value from UDC 17/TY (Contract Type) that specifies the types of available contracts.
- Contract Status
-
Enter a value from UDC 17/CO (Contract Status) that defines the contract status. For example, the contract status might indicate whether the customer has accepted the contract.
- Start Date
-
Enter the date you actually start work on the contract.
- End Date
-
Enter the date you actually completed work on the contract.
To further categorize this contract, complete any of the category code fields on the Category Codes tab.
The system uses Next Numbers to assign a contract number in the Contract field and then displays the Supplier Contract Revisions form, where you can add contract detail.
5.3.5 Entering Supplier Contract Detail Information
Access the Supplier Contract Revisions form.
Figure 5-13 Supplier Contract Revisions form
Description of ''Figure 5-13 Supplier Contract Revisions form''
- Lot Number
-
Enter a number that identifies a lot or a serial number. A lot is a group of items with similar characteristics.
The lot number is required if the inventory option for lot number required is set to Y.
- Meter Reading 1
-
Enter the meter reading balance of meter 1.
If applicable, enter meter reading balances in the Meter Reading 2 and Meter Reading 3 fields.
- Service Adjustment Schedule
-
Enter a value from UDC 40/AS (Schedule Name) that identifies a price and adjustment schedule. A price and adjustment schedule contains one or more adjustment types for which a customer or an item might be eligible. The system applies the adjustments in the sequence that you specify in the schedule.
You link customers to a price and adjustment schedule through the customer billing instructions. When you enter a sales order, the system copies the schedule attached to the sold to address into the order header. You can override this schedule at the detail line level.
5.3.6 Entering Service Contract Header Information
Access the Service Contract Header form.
Figure 5-14 Service Contract Header form
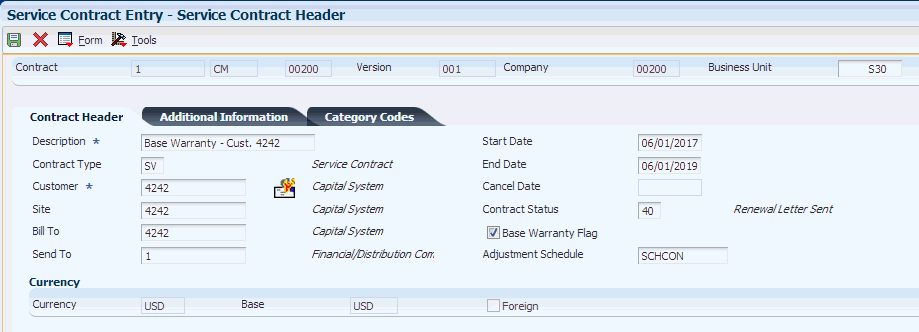
Description of ''Figure 5-14 Service Contract Header form''
5.3.6.1 Contract Header
If you are using multicurrency, review the values in the Currency, Base, and Foreign fields and override them if necessary.
- Start Date
-
Enter the date you actually start work on the contract.
- End Date
-
Enter the date you actually completed work on the contract.
- Contract Status
-
Enter a value from UDC 17/CO (Contract Status) that defines the contract status. For example, the contract status might indicate whether the customer has accepted the contract.
The default value for the Status field is set in the processing options.
- Base Warranty Flag
-
Click the Base Warranty Flag to include the base warranty under this contract when running the Equipment Master Update from Ship Confirm program.
Only one contract per customer can have the base warranty option enabled.
- Adjustment Schedule
-
Enter a value from UDC 40/AS (Schedule Name) that identifies a price and adjustment schedule. A price and adjustment schedule contains one or more adjustment types for which a customer or an item might be eligible. The system applies the adjustments in the sequence that you specify in the schedule.
You link customers to a price and adjustment schedule through the customer billing instructions. When you enter a sales order, the system copies the schedule attached to the sold to address into the order header. You can override this schedule at the detail line level.
5.3.6.2 Additional Information
- Payment Terms
-
Enter a code that specifies the terms of payment, including the percentage of discount available if the invoice is paid by the discount due date. Use a blank code to indicate the most frequently-used payment term. You define each type of payment term on the Payment Terms Revisions form. This code prints on customer invoices.
Examples of payment terms include:
Blank: Net 15.
001: 1/10 net 30.
002: 2/10 net 30.
003: Due on the 10th day of every month.
006: Due upon receipt.
- Payment Instrument
-
Enter a value from UDC 00/PY (Payment Instrument) that specifies how payments are made by the customer. For example:
C: Check
D: Draft
T: Electronic funds transfer
If this contract is being prepaid, enter a value in the Payment Instrument field to indicate the type of prepayment.
- Renewal Flag
-
Enter a value from UDC 17/YN (Valid Values) that specifies whether the contract detail line is included in the data selection for contract renewals. Regardless of the value that you enter, this code does not prevent the system from renewing a contract.
- Proforma Invoice
-
Enter an alphanumeric UDC that identifies different versions of the same invoice format. For example, you might use the codes D and F to differentiate draft formats from final invoice formats.
- Tax Expl Code (tax explanation code)
-
Select a hard-coded value from UDC 00/EX (Tax Explanation Codes) that controls the algorithm that the system uses to calculate tax and GL distribution amounts. The system uses the tax explanation code in conjunction with the tax rate area and tax rules to determine how the tax is calculated. Each transaction pay item can be defined with a different tax explanation code.
- Tax Rate/Area
-
Enter a code that identifies a tax or geographic area that has common tax rates and tax authorities. The system validates the code you enter against the Tax Areas table (F4008). The system uses the tax rate area in conjunction with the tax explanation code and tax rules to calculate tax and GL distribution amounts when you create an invoice or voucher.
(Release 9.1 Update) The system determines whether the company of the business unit is set up to use the alternate tax rate/area. If the alternate tax rate/area assignment functionality is enabled, the system retrieves the alternate tax rate/area. If you change the business unit or site, the system retrieves the alternate tax rate/area for the new combination of business unit and site.
If the alternate tax rate/area functionality is not enabled, then the system retrieves the tax rate/area from the default site setup.
See Section 5.3.1.6, "Alternate Tax Rate/Area Assignments for Service Contracts (Release 9.1 Update)"
- Parent Contract Number
-
Enter the parent contract number to which this particular contract is attached.
- Parent Contract Type
-
Displays the parent contract type to which this particular contract is attached.
- Parent Contract Company
-
Displays the parent contract document company.
- Exchange Rate
-
Enter a number (exchange rate) that the system uses to multiply a foreign currency amount by to calculate a domestic currency amount. The number in this field can have a maximum of seven decimal positions. If more are entered, the system adjusts to the nearest seven decimal positions.
- Cancellation Notice Period
-
Enter the cancellation period associated with a contract.
- Factor Type
-
Enter a code that indicates whether the factor value is a multiplier (%) or an additional/deductible cash amount ($) when applied to an order's price.
- Cancel Fee
-
The fee billed to a customer when cancelling a contract.
To further categorize this contract, complete any of the category code fields on the Category Codes tab.
The system uses next numbers to enter a default contract number in the Contract field and then displays the Contract Revisions form.
5.3.7 Entering Service Contract Detail Information
Access the Contract Revisions form.
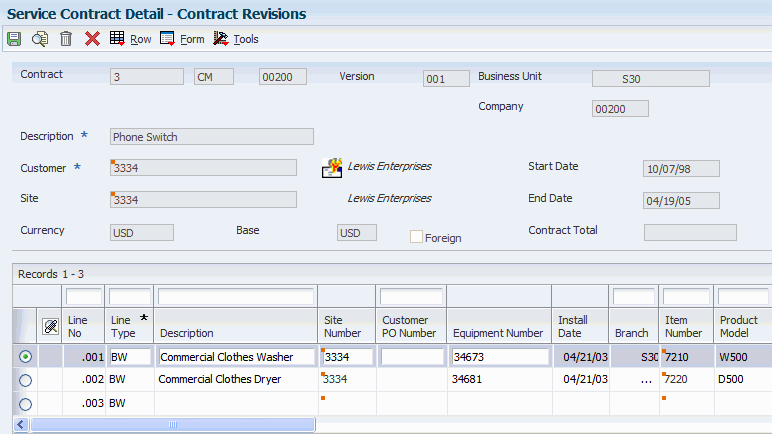
- Customer PO Number (customer purchase order number)
-
Enter an alphanumeric customer PO number. You can modify this field after the contract is billed, if necessary.
- Install Date
-
Enter the date that the contract for the asset became effective.
The install date updates the equipment record date and warranty and enables the Proof of Purchase parameter.
If the Proof of Purchase parameter is already enabled, the Install Date field is disabled.
- Meter Reading 1
-
Enter the meter reading balance for meter 1.
If applicable, enter meter readings for meters 2 and 3.
- Billable Duration
-
Enter the billing duration associated with a contract.
- Non-Billable Duration
-
Enter the nonbillable duration associated with a contract.
- Duration Unit of Measure
-
Enter a value from UDC 00/UM (Unit of Measure) that identifies the unit of measurement for an amount or quantity as it was billed. For example, it can represent a barrel, box, cubic year, gallon, an hour, and so on.
- Unit of Measure
-
Enter a value from UDC 00/UM (Unit of Measure) that identifies the unit of measurement for an amount or quantity. For example, it can represent a barrel, box, cubic meter, liter, hour, and so on.
The system retrieves the unit of measure from inventory; you can override this value if necessary.
- Contract Line Start Date
-
Enter the date you actually start work on the contract.
- Contract Line End Date
-
Enter the date you actually completed work on the contract.
- Bill From
-
Enter the from date used to determine if a transaction is billed. The transaction is billed if the general ledger date falls between the from date and the through date.
- Bill Through
-
Enter the through date for billing transactions.
This field is used in the Recurring Billing module as part of a date-oriented billing method, as opposed to period-oriented billing. This field contains the latest date for which billings have been generated for the associated billing line.
If the values in the Bill From and Bill Through fields are in the same period and year, this means a one-time billing. Otherwise, you must enter a value in the Bill Code Frequency field. The system then calculates a recurring billing amount.
- Bill Code Frequency
-
Enter a code that specifies how often to generate billing records. The code that you enter must exist in the Billing Frequency Master table (F15019).
- Price Effective Date
-
Enter the date that the price becomes effective. The system uses the Price Effective Date to determine the base price and all advanced price adjustments. The value loaded in this date is stored in the System Constants File (F4009).
- Exchange Rate
-
Enter a number (exchange rate) that a foreign currency amount is multiplied by or divided by to calculate a domestic currency amount.
The number in this field can have a maximum of seven decimal positions. If more are entered, the system adjusts to the nearest seven decimal positions.
- Advance Pricing
-
Enter 0 or N to specify that advance pricing was not used. Enter 1 or Y to specify advance pricing was used.
- Price By Address
-
Enter a user-defined name or number that identifies an address book record.
The system uses this field for advanced pricing from the Address Book number.
- Adjustment Schedule
-
Enter a value from UDC 40/AS (Schedule Name) that identifies a price and adjustment schedule. A price and adjustment schedule contains one or more adjustment types for which a customer or an item might be eligible. The system applies the adjustments in the sequence that you specify in the schedule.
You link customers to an adjustment schedule through the SWM additional information from Address Book. When you enter a service contract, the system copies the schedule attached to the customer into the service contract header. You can override this schedule at the detail line level.
- Unit Price
-
Enter the list or base price you charge for one primary or pricing unit of this item.
You cannot enter a value in the Unit Price field with advanced pricing.
- Discount Type D/P
-
Indicates whether the system uses a discount percent or an amount.
- Discount Percent
-
Enter the Takeoff Pricing file discount percentage.
- Discount Amount
-
Enter the total amount of the discount.
- Line Total
-
Total dollars is a factor used to calculate average days to pay. The amount is equal to the sum of cash received against valid accounts receivable invoices.
The system updates the Total Dollars amount at the same time that the Weighted Days total is updated.
- Recurring Billing Amount
-
Enter a fixed amount you want to bill with each recurring frequency.
When you are billing for a specified amount over a period of time, the system calculates and enters the value in the Recurring Billing Amount field.
- Billing In Advance/Arrears
-
Enter a code to determine how a contract should be billed.
The Billing Day of Month and the Billing In Advance/Arrears fields are only used for data selection. Use the Bill From Date and the Bill Through Date fields for period and frequency.
- Taxable Y/N (taxable yes/no)
-
Enter a code that indicates whether the item is subject to sales tax when you sell it. The system calculates tax on the item only if the customer is also taxable.
- Tax Explanation
-
Enter a hard-coded value from UDC 00/EX (Tax Explanation Code) that controls the algorithm that the system uses to calculate tax and GL distribution amounts. The system uses the tax explanation code in conjunction with the tax rate area and tax rules to determine how the tax is calculated. Each transaction pay item can be defined with a different tax explanation code.
- Tax Rate/Area
-
Enter a code that identifies a tax or geographic area that has common tax rates and tax authorities. The system validates the code you enter against the Tax Areas table (F4008). The system uses the tax rate area in conjunction with the tax explanation code and tax rules to calculate tax and GL distribution amounts when you create an invoice or voucher.
The system retrieves tax area information from the site number in the customer address book record as the default value.
(Release 9.1 Update) The system determines whether the company of the business unit is set up to use the alternate tax rate/area. If the alternate tax rate/area assignment functionality is enabled, the system retrieves the alternate tax rate/area. If you change the business unit or site, the system retrieves the alternate tax rate/area for the new combination of business unit and site.
If the alternate tax rate/area functionality is not enabled, then the system retrieves the tax rate/area from the default site setup.
- No of Days In Contract
-
Displays the number of days in the contract based on the contract start date and the contract end date.
- Daily Amortization Amount
-
Displays the daily amortization amount. This amount is the contract amount divided by the number of days in the contract.
- Renewal Date
-
Enter a date prior to the contract end date that enables the end user to prepare a renewal notice before the contract end date.
- Cancel Date
-
Enter the date that the order should be canceled if the goods have not been sent to the customer or the goods have not been received from the supplier. This is a memo-only field and does not cause the system to perform any type of automatic processing.
- Cancel Reason
-
Enter a value from UDC 17/CN (Cancellation Reason Code) for defining reasons a contract was canceled.
- Suspend Date
-
Enter the date when a recurring order is no longer to be processed.
If the contract has been suspended, the system displays the suspend date. The system retrieves the suspend date from the Suspend Contract form.
- Cancel Amount
-
Enter the monetary amount that has been canceled. The monetary amount is expressed in the currency that is set up for the company initiating the transaction.
- Credit Amount
-
Enter the monetary amount the customer has been credited for this order. The monetary amount is expressed in the currency that is set up for the company initiating the transaction.
- Price Cap Percentage
-
For future use.
The price cap percentage associated with a contract.
- Service Adjustment Schedule
-
Enter a value from UDC 40/AS (Schedule Name) identifies a price and adjustment schedule. A price and adjustment schedule contains one or more adjustment types for which a customer or an item might be eligible. The system applies the adjustments in the sequence that you specify in the schedule.
You link customers to an adjustment schedule through the SWM additional information from Address Book. When you enter a service contract, the system copies the schedule attached to the advance pricing schedule for work orders from the customers SWM additional information to the detail line on the contract. You can override this schedule on each detail line.
5.3.8 Reviewing Service Contract Information
Access the Contract Detail form.
Review the information on these tabs, which contain inquiry-only fields:
-
Equipment Data
-
Customer Data
-
Contract Dates
-
Category Codes
-
Pricing Data
-
Billing Data
5.3.9 Renewing a Service Contract
From the Periodic Contract Processing menu (G1724), select Service Contract Renewal.
When you run the Contract Renewal program, the system generates a report identifying those contracts that expire soon and that require renewal contracts and letters. You can set processing options for price markup by percentage, renewal pricing, and leadtime for contract expiration.
The Contract Renewal program uses the MailMerge function to generate renewal letters and contracts.
5.3.10 Copying a Service Contract
Access the Work With Contracts form.
-
Locate the contract that you want to copy.
-
Select the contract and click Copy.
-
Modify the information as needed for the new contract on Contract Revisions.
-
Click OK.
The system assigns a new contract number in the Contract field.
5.3.11 Setting Processing Options for the Contract Revisions Program (P1721)
Use these processing options to specify the default values for the Contract Revisions program.
5.3.11.1 Defaults
These processing options specify the default values that the system uses when you enter contracts. Although you can override these values for a single contract, you can specify default values (for information such as document type, business unit, company, line type, description, status, duration and quantity unit of measure) that are standard to most contracts that you enter in this version of Contract Revisions.
- 1. Contract Document Type
-
Enter a value from UDC 00/DT (Document Type - All Documents) that also indicates the nature of the transaction. Specify the document type to use as the default value when you enter a contract.
- 2. Contract Key Company
-
Specify which contract key company the system uses as a default value when you enter a service contract. A contract key company is a number that, along with order number and order type, uniquely identifies an order document (such as a purchase order, a contract, or a sales order).
- 3. Copy Contract Information
-
Specify how the system assigns the contract number when you copy contract information. Values are:
0: Create a new contract number.
1: Keep the original contract number and advance the version number.
- 4. Contract Line Type
-
Specify the default line type that the system uses when you enter a contract detail line. The line type is a code that controls how the system processes lines on a transaction. When you enter a line type for a detail line on a service contract, the system verifies the line type characteristics in the S/WM Line Type Constants table (F1793).
- 5. Line Increment
-
Specify the increment by which the system numbers the order lines.
- 6. Contract Status
-
Enter a value from UDC 17/CO (Contract Status) that specifies the default contract status that the system uses when you enter a service contract. The contract status is a code that provides status information about a contract.
- 7. Contract Type
-
Enter a value from UDC 17/TY (Contract Type) that specifies the contract type for service contracts.
- 8. Contract Description
-
Specify the detail line description that the system uses as a default value when you enter a contract. Values are:
Blank: Contract header
1: Item number
2: Line type
3: Product model
4: Product family
- 9. Duration Unit of Measure
-
Enter a value from UDC 00/UM (Unit of Measure) that identifies the unit of measure to use in the document. Specify the duration unit of measure that the system uses as a default value when you enter a contract.
- 10. Quantity Unit of Measure
-
Enter a value from UDC 00/UM (Unit of Measure) that identifies the unit of an amount or quantity. Specify the unit of measure that the system uses as a default value when you enter a contract.
- 11. Business Unit
-
Specify the default business unit that the system uses when you enter a contract. If you leave this processing option blank, the system uses the value from Default Locations & Printers, which is based on either the terminal or user ID.
5.3.11.2 Process
These processing options define the system processing for this version of Contract Revisions.
- 1. Customer Number Update
-
Specify whether the system verifies the customer number in the contract against the customer number for an equipment record on a case, a contract, or a work order. Customer number checking occurs if you change the customer number in the contract. If an inconsistency exists, this processing option also specifies whether the system updates the equipment master. Values are:
Blank: Do not verify the customer number.
1: Prompt the user to change the customer number that is associated with the equipment master.
2: Automatically update the equipment master.
- 2. Site Number Update
-
Specify whether the system updates the equipment master when you change the site number for an equipment record on a case, a contract, or a work order. Values are:
Blank: Do not update the equipment master.
1: Prompt the user to change the site number that is associated with the equipment master.
2: Automatically update the equipment master.
- 3. Asset Number Checking
-
Specify whether the system verifies if the Asset Number (Equipment/Serial/Unit) that you entered on a contract detail line exists on another contract detail line. Values are:
Blank: Bypass checking asset numbers.
1: Checks assets numbers on contract detail lines.
- 4. Subledger Default for credit processing
-
Specify what the system uses as a default value in the subledger field when you enter a credit or cancellation in a contract. Values are:
Blank: Do not use a default value in the subledger field.
1: Use the contract number.
2: Use the customer number.
3: Use the site number.
4: Use the short item number.
When you create a credit or cancel a contract detail line and the cancellation results in a credit for the contract detail line, the system creates an entry in the Service Billing Workfile (F4812) using the specified value as the subledger entry.
- 5. Reprice Detail Line
-
Specify whether the system automatically updates the order price if the contract has not been billed. If you change a value in a contract field that is used for pricing, the system updates the price based on the new value.
This processing option is not related to the Basket or Order Reprice function in the Advanced Pricing system. Values are:
Blank: Do not automatically reprice.
1: Automatically reprice.
- 6. Advance Price Flag
-
Specify whether to activate Advance Pricing. Values are:
Blank: Do not activate.
1: Activate.
5.3.11.3 Edits
This processing option defines the editing process that the system performs for this version of Contract Revisions. When you enter quantities, the system verifies whether the item is a serialized item and whether you allow multiple quantities for serialized items.
- 1. Multiple Quantities for Serialized Items
-
Specify whether you can enter multiple quantities (quantities that are greater than one) for a serialized item. Values are:
Blank: Do not allow multiple quantities.
1: Allow multiple quantities.
If you enter a serial number on the contract detail line, the quantity of the item must be 1. If you enter an item number on the contract detail line, the system verifies the serial number requirements in the Item Branch/Plant table (F4102) and then looks at the value in this processing option before you are allowed to enter multiple quantities for a serialized item.
5.3.11.4 Line Type Rule
This processing option defines the line type processing that the system performs for this version of Contract Revisions.
- 1. Days Unit of Measure
-
Enter a value from UDC 00/UM (Unit of Measure) that identifies the unit of an amount or quantity. Specify the unit of measure that the system uses as a default value when you enter a contract.
5.3.11.5 Prepayment
These processing options define the prepayment processing that the system performs for this version of Contract Revisions. You use prepayment processing if you are billing for contracts that the customer pays before invoicing. If you activate prepayment processing, you can select whether this version performs authorizations or settlements, or both.
Prepayment takes place when a seller receives a form of payment from the customer at the time of order entry. Customers can use many types of prepayments, such as cash, check, and credit card. When you make any type of prepayment, the system records transaction information and indicates the payment on the invoice.
- 1. Prepayment Processing
-
Specify whether to activate prepayment processing. Values are:
Blank: The system does not update prepayment processing files.
1: The system performs prepayment processing and updates the prepayment processing tables.
If you leave this option blank, the system does not display a Form exit to the Prepayment window.
If you select a value of 1, the system updates the prepayment processing tables and enables you to access the Prepayment form.
- 2. Authorization Process
-
Specify the method of authorization processing. Values are:
Blank: The system does not perform authorization processing.
1: The system processes the authorization interactively.
2: The system processes the authorization in batch or subsystem mode, based on the version.
- 3. Settlement Process
-
Specify the settlement processing method. Values are:
Blank: The system does not perform settlement processing.
1: The system processes the settlement interactively.
2: The system processes settlements in batch or subsystem mode, based on the version.
- 4. Authorize Prepayment Transaction (R004201) version.
-
Specify the version of Authorize Prepayment Transactions (R004201) to use. If you leave this processing option blank, the system uses XJDE0001.
- 5. Settle Prepayment Transaction (R004202) version.
-
Specify the version of Settle Prepayment Transactions (R004202) to use. If you leave this processing option blank, the system uses XJDE0001.
5.3.11.6 Versions
Specify the version of programs to launch from the Contract Revisions form.
- 1. Work With Equipment Master (P1701) Version, 2. Equipment Master Revisions (P1702) Version, 3. Price History (P4074) Version, 4. A/B Modifications (P01012) Version, and 5. Quick Customer Add (P01015) Version
-
If you leave these processing options blank, the system uses ZJDE0001.
5.3.11.7 Copy Defaults
These processing options specify the default values that the system uses when you copy contracts.
- 1. Media Objects
-
Specify whether the system copies media objects to a new contract. Values are:
Blank: Do not copy.
1: Copy the header media objects.
2: Copy the detail media objects.
3: Copy both the header and the detail media objects.
- 2. Specific Media Object
-
Specify how the system copies specific media objects to new contracts. Values are:
Blank: Copy both internal and external comments.
1: Copy internal comments.
2: Copy external comments.
- 3. Tax Information
-
Specify how the system generates tax information for a new contract. Values are:
Blank: Copy the tax information from the original contract to the new contract.
1: Retrieve the tax information from the site number.
See Alternate Tax Rate/Area Assignments for Service Contracts (Release 9.1 Update)
- 4. Discount Information
-
Specify whether the system copies the discount information to a new contract. Values are:
Blank: Copy.
1: Do not copy.
- 5. Currency Code
-
Specify how the system generates the customer currency. Values are:
Blank: Use the customer currency from the original contract.
1: Use the customer currency from the customer master.
- 6. Document Type
-
Specify how the system generates the document type for a new contract. Values are:
Blank: Copy the document type of the original contract to the new contract.
1: Use the default document type specified in the processing options for the Contract Revisions program (P1721).
- 7. Key Company
-
Specify how the system generates the key company for a new contract. Values are:
Blank: Copy the key company from the original contract to the new contract.
1: Use the key company specified in the processing options for the Contract Revisions program (P1721).
- 8. Header Business Unit
-
Specify how the system generates the header business unit for a new contract. Values are:
Blank: Copy the header business unit from the original contract to the new contract.
1: Use the header business unit specified in the processing options for the Contract Revisions program (P1721).
- 9. Line Description
-
Specify how the system generates the line description for a new contract. Values are:
Blank: Copy the line description from the original contract to a new contract.
1: Use the line description specified in the processing options for the Contract Revisions program (P1721).
5.3.12 Setting Processing Options for the Work With Contracts Program (P1720)
Use thee processing options to specify the default values for the Work With Contracts program.
5.3.12.1 Defaults
These processing options supply default values for reviewing contracts.
- 1. Default Contract Document Type (Required)
-
Enter a value from UDC 00/DT (Document Types - All Documents) that specifies the default document type that appears on the Work with Contracts form.
- 2. Default Key Company
-
Specify the default key company number. Along with order number and order type, a key company is a number that uniquely identifies an order document (such as a purchase order, a contract, or a sales order).
5.3.12.2 Versions
Specifies the versions of programs to launch from the Work With Contracts form. When you add a new contract or you review the details of an existing contract, the system uses a version of Contract Revisions (P1721) that you specify in these processing options. You can locate the processing options for P1721 on the Interactive Versions form.
- 1. Service Contract Revisions (P1721) version
-
Specify the version of Contract Revisions (P1721) that the system uses when you add or copy a contract. If you leave this option blank, the system uses ZJDE0001.
- 2. Contract Print (R1733) version
-
Specify the version of the Contract Print program (R1733) that the system uses to print contracts from the Work With Contracts form. If you leave this processing option blank, the system uses XJDE0001.
5.3.12.3 Process
This processing option specifies the order in which you want to display the contract header and detail forms.
- 1. Display Header or Detail first
-
Specify whether the system first displays the header revisions form or the detail revisions form when you add or inquire on a service contract. Values are:
Blank: Display the Contract Revisions form (detail) first.
1: Display the Service Contract Header form first.
If you display the detail form first, the system creates a contract header record based on the branch/plant and customer or site information that you enter in the detail form. You can then access the header form to override default information as necessary.
If you display the header form first, you can enter header information before detail information. You can edit the default values that affect the contract as well as add or review additional header information, such as billing instructions or payment terms.
5.3.13 Defining the Entitlement Rules Sequence for Service Contracts
Access the Entitlement Rules Sequence form.
Figure 5-17 Entitlement Rules Sequence form
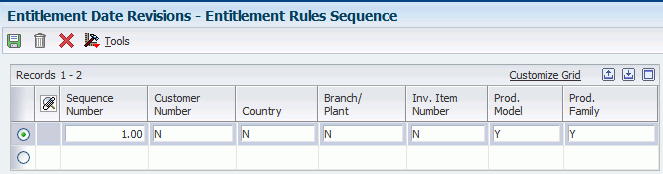
Description of ''Figure 5-17 Entitlement Rules Sequence form''
Enter Y or N in these fields:
-
Product Model
-
Product Family
-
Equipment Number
-
Branch/Plant
-
Inventory Item Number
5.3.14 Defining the Entitlement Rules Sequence for Supplier Contracts
Access the Supplier Entitlement Sequence Rules form.
Enter Y or N in these fields:
-
Product Model
-
Product Family
-
Equipment Number
-
Branch/Plant
-
Inventory Item Number
5.3.15 Reviewing Entitlement Information for Service Contracts
Access the Work With Entitlement Inquiry form.
- Include Customer Children
-
Select this option if you want to display all contracts based on a child of the customer number.
- Include Equipment Children
-
Select this option if you want to display all contracts based on a child of the equipment number.
- Include Canceled
-
Select this option if you want to display canceled contracts in the detail area of the form.
- Include Suspended
-
Select this option if you want to display suspended contract lines in the detail area of the form.
- Include Expired
-
Select this option if you want to display expired contract lines in the detail area of the form. An expired contract is one that has an end date less than today's date.
5.3.16 Reviewing Entitlement Information for Supplier Contracts
Access the Work with Supplier Contracts form.
Complete any of the fields on the tabs to define the search criteria, and click Find.
5.3.17 Canceling Contracts
Access the Cancel Contract form.
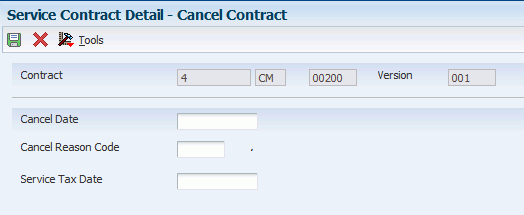
- Cancel Date
-
Enter the date that the order should be canceled if the goods have not been sent to the customer or the goods have not been received from the supplier. This is a memo-only field and does not cause the system to perform any type of automatic processing.
- Cancel Reason Code
-
Enter a value from UDC 17/CN (Cancellation Reason Code) that defines the reason a contract was canceled.
- Service Tax Date
-
Enter the date that the system uses when calculating taxes during service contract cancellation. If you leave this field blank, the system will use the value in the Price Effective Date field in the service contract detail line.
The system calculates any paid amounts that should be credited as a result of canceling the contract.
5.3.18 Suspending Contracts
Access the Suspend Contract form.
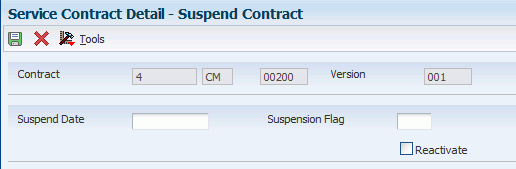
When you suspend a contract, the system still displays the contract as entitled. However, the system does not create billing records until the contract is no longer suspended.
To reactivate a suspended contract, click the Reactivate option. When you reactivate a suspended contract, the system resumes contract billing.
5.3.19 Canceling and Suspending Contract Detail Lines
Access the Cancel/Suspend Contract Line form.
Figure 5-20 Cancel/Suspend Contract Line form
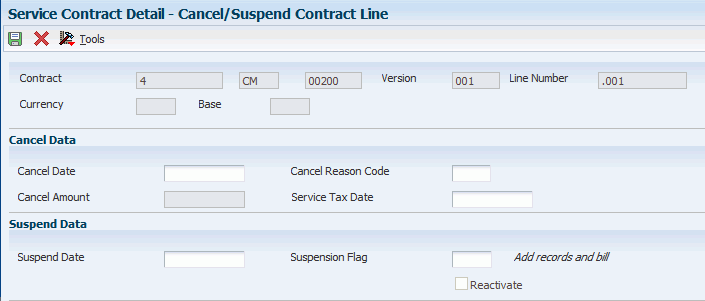
Description of ''Figure 5-20 Cancel/Suspend Contract Line form''
5.3.20 Crediting Contract Detail Lines
Access the Credit Contract Line form.
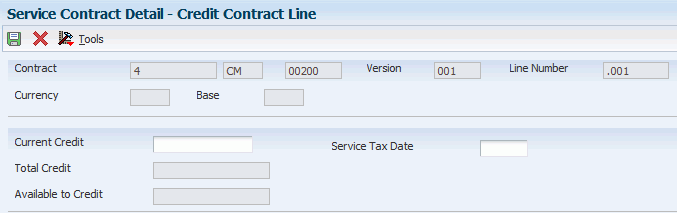
You can credit a detail line on a contract.
Complete the Current Credit field. The credit amount must be equal or less than the billed amount.
5.3.21 Creating Contract Prepayment Transactions
Access the Service Contract Header form.
Click the Additional Information tab.
Figure 5-22 Service Contract Header form, Additional Information tab

Description of ''Figure 5-22 Service Contract Header form, Additional Information tab''
To create contract prepayment transactions:
-
Click the Additional Information tab.
-
Change the value in the Payment Instrument field to indicate that this is a prepayment. The special handling code for the payment instrument (UDC 00/PY) must equal one of these values:
-
11: Cash
-
12: Check
-
13: Credit Card
After you click the visual assist, the special handling code appears when you click Revisions on the Select User Defined Code form.
Note:
You cannot make this change if the contract has already been billed.
-
-
Click OK twice.
-
Select Prepayments from the Form menu on Contract Revisions.
You can only enter prepayment information for the contract after you have entered the contract detail lines.
-
Review and update the appropriate information on Enter Prepayment Information.
-
Click OK.
Note:
The contract cannot be billed yet to create a transaction.
Depending on processing option setup, the system authorizes or settles transactions after you create prepayments.
5.3.22 Generating Contract Renewal Letters
After you set up Mail Merge templates for contract renewals, you can generate renewal letters.
Select Periodic Contract Processing (G1724), Contract Renewal Letters.
Select the version of the letter that you want to generate.
5.3.23 Reviewing Contract Renewal Letters
Select Periodic Contract Processing (G1724), View Letters.
Select the contract renewal letter that you want to review.
- Letter Name
-
Enter the name of a web mail merge letter, if you want to search on the name.
- Letter Description
-
Enter the description for a web mail merge letter, if you want to search on the description.
5.3.24 Setting Processing Options for the Contract Renewal Letters Program (R1731)
Do not modify JD Edwards JD Edwards EnterpriseOne demo versions, which are identified by ZJDE or XJDE prefixes. Copy these versions or create new versions to change any values, including the version number, version title, prompting options, security, and processing options.
5.3.24.1 Defaults
These processing options specify the default values that the system uses when you create contract renewal letters.
- 1. Mailing Date
-
Specify the mailing date that the system prints on renewal letters. If you leave this processing option blank, the system prints the current date.
- 2. Mailing Address Book Information
-
Specify the Address Book number that the system prints on renewal letters. Values are:
Blank: Customer number
1: Site number
2: Bill-to number
3: Send-to number
- 3. Contract Status
-
Enter a value from UDC 17/CO (Contract Status) that specifies the status that the system assigns to the contract after the system generates a renewal letter.
- 4. Number of Days
-
Specify the number of days to use when you print renewal letters. Values are 1 through 999.
5.3.24.2 Process
These processing options specify the default values that the system uses when you process contract renewal letters.
- 1. Renewal Letter Document (REQUIRED)
-
Specify which Renewal Letter document the system uses from the MailMerge (P05MMS) application.
5.4 Billing for Contracts
This section provides overviews of the billing process, AAIs for contracts setup, contract billing for service management, and contract workfile generation; lists prerequisites; and discusses how to:
-
Set processing options for the Service Contract Workfile Generation program (R1732).
-
Review contract billing information.
5.4.1 Understanding the Billing Process
The typical billing process includes accumulating contracts to bill, creating and printing invoices, and recording journal entries for income and receivables.
Service Management is integrated with the Accounts Receivable and General Accounting products. The billing process is the same whether billing for contracts or for work orders. Once you set up the billing details in Service Management, the system runs the billing process and updates Accounts Receivable with invoice information and General Accounting with revenue information.
Invoices are based on billable contracts. The first step in the billing process is to accumulate billable contracts. When you run SWM Contract Workfile Generation, the system gathers the contracts that are eligible for billing from the Contract Detail table (F1721), and creates Billing Detail Workfile records (F4812).
You can review billing information for contracts by running the Service Contract Workfile Generation program (R1732) in proof mode and looking at the edit report. After you run proof and final mode, you review billing information in two ways:
-
Billing/Amortization Control Inquiry.
-
Work with Billing Details form.
You cannot change records after you have run the Contract Workfile Generation program in final mode. The system updates the Contract Detail table (F1721) to reflect billed records. If the records are not processed through the Service Billing program, the accounts receivable records will not match the Service Management records.
5.4.2 Understanding AAIs for Contracts Setup
To bill contracts, you must identify information about the account structure and specific account values to process business transactions properly. You define the account structure and specific account values by using AAIs. The system stores the AAI values in the Automatic Accounting Instructions table (F06904). Whenever a program performs an accounting function, it accesses the Automatic Accounting Instructions table.
Distribution AAIs define the rules by which Service Management and the general ledger interact. Accounting AAIs define the rules by which Service Management and Accounts Receivable interact. When you define AAIs, you establish how the systems process transactions for various programs.
Contract-related distribution AAIs consist of:
-
1750, Contract Revenue.
-
1751, Contract Short-Term Revenue.
-
1752, Contract Long-Term Revenue.
-
1753, Contract Cancel Fees.
Based on key fields, the system retrieves the GL account to use when creating an entry in the Billing Detail Workfile table (F4812). The key fields are:
-
Company
-
Doc Type
-
G/L Category Code
Based on these key fields, the system creates journal entries using:
-
Branch/Plant
-
Object Account
-
Subsidiary
The system retrieves the document type and company from the contract, and identifies the appropriate GL class code according to a search hierarchy.
5.4.2.1 Hierarchy for GL Class Codes for Contracts
This hierarchy applies to the GL class codes for contracts:
-
Based on the service package on the contract detail line, the system looks up the GL class code in the Service Contract Service Package table (F1729). If the GL class code is not blank, then the system uses this value to retrieve the GL account from the distribution AAIs.
-
If the GL class code in the Service Contract Service package table is blank, then the system uses the branch/plant and the item number on the contract detail line to retrieve the GL class code from the Item Branch File table (F4102). If the GL class code is not blank, then the system uses this value to retrieve the GL account from the distribution AAIs.
-
If the GL class code in the Item Branch File table is blank, then the system uses the item number on the contract detail line to retrieve the GL class code from the Item Master table (F4101). If the GL class code is not blank, then this is the GL class code used to retrieve the GL account from the distribution AAIs.
-
If the GL class code on the Item Master table is blank, the system uses the line type on the contract detail line to retrieve the GL class code from the Line Type Control Constants File table (F40205). If the GL class code is not blank, then this is the GL class code.
-
If the GL class code in the Line Type Control Constants File table is blank, then the system uses a blank value to retrieve the GL account from the distribution AAIs.
After the system finds an entry in the Distribution AAIs for company, document type, and GL class code, the system determines the responsible business unit (branch/plant), based on the search hierarchy for responsible business unit for service contracts.
5.4.2.2 Hierarchy for Responsible Business Unit
If the business unit of AAI is blank, the system locates the responsible business unit based on the value that is specified in the Responsible Business Unit field, which is located on the Contracts tab in the SWM Constants.
In the SWM Constants, you can select one of these options for the system to use to locate the responsible business unit:
| Option | Description |
|---|---|
| Item Branch Master - Service/Warranty Extension (F41171) or Item Master - Service/Warranty Extension (F4117) | The system uses the branch/plant and item number on the contract detail line to find the responsible business unit in the Item Branch Master - Service/Warranty Extension (F41171).
If the branch/plant is blank, the system uses the item number on the contract detail line to find the responsible business unit in the Item Master - Service/Warranty Extension (F4117). If the business unit exists in table F41171 or F4117, the system uses this business unit in the resulting accounting journal entry. |
| Product Family/Model Master (F1790) | The system uses the product model on the contract detail line to find the responsible business unit in the Product Family/Model Master table (F1790).
If the business unit exists in table F1790, the system uses this business unit in the resulting accounting journal entry. |
| Asset Master File (F1201) | The system uses the equipment number on the contract detail line to find the responsible business unit in the Asset Master File (F1201).
If the business unit exists in table F1201, the system uses this business unit in the resulting accounting journal entry. |
| Address Book Master (F0101) | The system uses the customer number on the contract detail line to find the responsible business unit in the Address Book Master table (F0101).
If the business unit for the customer exists in table F0101, the system uses this business unit in the resulting accounting journal entry. |
| SWM Line Type Constants (F1793) - only used for contracts | The system uses the line type on the contract detail line to find the responsible business unit in the SWM Line Type Constants table (F1793).
If the business unit exists in table F1793, the system uses this business unit in the resulting accounting journal entry. |
|
Note: If you assign a project business unit to the responsible business unit in the Business Unit Master table (F0006), the system uses the project business unit as the business unit for the account. |
5.4.3 Understanding Contract Billing for Service Management
The typical billing process includes accumulating contracts to bill, creating and printing invoices, and recording journal entries for income and receivables.
When you generate the contract workfile, the system gathers the contracts that are eligible for billing from the Contract Detail table (F1721) and creates records in the Billing Detail Workfile (F4812). After you generate the billing workfile, you must continue the standard service billing process.
To group workfile transactions and assign invoice numbers, you run the Invoice Processing program, which summarizes one or more workfile transactions into pay item records. Pay items are the billing lines that are the total amount of a specific invoice.
The system stores pay item information in the Invoice Summary Work File table (F4822) and updates the workfile transaction records with the new invoice information, and the sequence and summarization key information.
After you run the Invoice Processing Program, you can print invoices for customers.
To complete the billing process, you must create AR and GL entries. You first create preliminary AR and GL entries using the Invoice Journal Generation program (R48131). You then can review the resulting reports, which are the Billing Journal Register and the Invoice Journal Generation Report, to determine whether the entries were generated with errors.
After you ensure that no errors are within the batch, you can create the final AR entries using the Create A/R Entries program (R48199). Then you can post the invoices to the general ledger.
5.4.4 Understanding Contract Workfile Generation
From the Periodic Contract Processing menu (G1724), select Service Contract Workfile Generation.
When you run the Service Contract Workfile Generation program (R1732), the system processes records in the Contract Detail table (F1721) and creates billing records in the Billing Detail Workfile table (F4812).
The system gathers records based on processing options, user data selections, company, fiscal date patterns, and the billing frequencies and dates from the Contract Detail table. When you run the generation program in final mode, the system creates records in the Service Billing workfile. Then the Service Billing system creates workfile transactions that are the basis for the Accounts Receivable and General Accounting systems. To bill and invoice a contract detail line, you must run the generation program in final mode. The system calculates the taxes during the workfile generation.
|
Important: When you have billed a contract detail line in final mode, you cannot change it. |
After you generate the contract workfile, you must continue the standard billing process, which includes:
-
Generating the invoice workfile using the Service Billing Invoice Generation program (P48121).
-
Printing invoices.
-
Generating the Invoice Journal using the Journal Generation program (R48131).
-
Creating AR and GL entries using the Create A/R Entries program (R48199).
-
Posting the AR and GL entries using the standard General Ledger Post Report program (R09801).
5.4.5 Prerequisite
Set up distribution AAIs.
5.4.6 Forms Used to Bill for Contracts
| Form Name | FormID | Navigation | Usage |
|---|---|---|---|
| Available Versions | W98305WA | Periodic Contract Processing (G1724), Service Contract Workfile Generation. | Create billing records. |
| Billing/Amortization Control Inquiry | W1794A | Periodic Contract Processing (G1724), Billing/Amortization Inquiry. | Review contract billing information. |
5.4.7 Setting Processing Options for the Service Contract Workfile Generation Program (R1732)
Use these processing options to specify the default values for the Service Contract Workfile Generation program.
5.4.7.1 Defaults
These processing options supply default values for billing service contracts.
- 1. Date to bill through.
-
Specify the bill-through date for service contracts. If you leave this processing option blank, the system uses the current date.
- 2. Do catch-up billing.
-
Specify whether the system performs catch-up billing, which is billing for time periods that are before the current billing period. Values are:
Blank: Do not perform.
1: Perform.
- 3. Subledger Field Default
-
Specify the default value of the subledger field. Values are:
Blank: No default subledger
1: Contract number
2: Customer number
3: Site number
4: Short item number
- 4. Address Book Number To Display
-
Specify which address book number the system displays on the billing report. Values are:
Blank: Customer number
1: Site number
2: Bill-to number
5.4.7.2 Process
These processing options specify default information for reports and error recording.
- 1. Proof or Final Mode
-
Specify whether the system processes the Workfile Generation report in proof or final mode. Values are:
Blank: Proof mode.
1: Final mode.
- 2. Work Center Or Report
-
Specify where the system records errors. Values are:
Blank: Record errors to the Work Center.
1: Record errors on the report.
5.4.7.3 Vertex
These processing options specify tax default information.
- 1. Service Contract Tax Type
-
Specify how to tax service contracts. This processing option only pertains if you are implementing the Vertex Quantum sales and use tax software (third-party tax software). Values are:
LEASE: Lease Tax
PURCH: Purchase Tax
RENTAL: Rental Tax
SALE: Sales Tax
SERVIC: Service Tax
- 2. Use Site GeoCode if no Business Unit GeoCode
-
Specify whether the Site GeoCode will be used for Ship From and Order Acceptance if the Business Unit does not have a valid GeoCode defined. If left blank, an error will occur if the Business Unit does not have a valid GeoCode. Values are:
Blank: Do NOT use.
1: Use.
|
Note: These processing options only pertain if Vertex's Quantum Sales and Use Tax Software (3rd party tax software) has been implemented. |
5.4.8 Reviewing Contract Billing Information
Access the Billing/Amortization Control Inquiry form.
Figure 5-23 Billing/Amortization Control Inquiry form
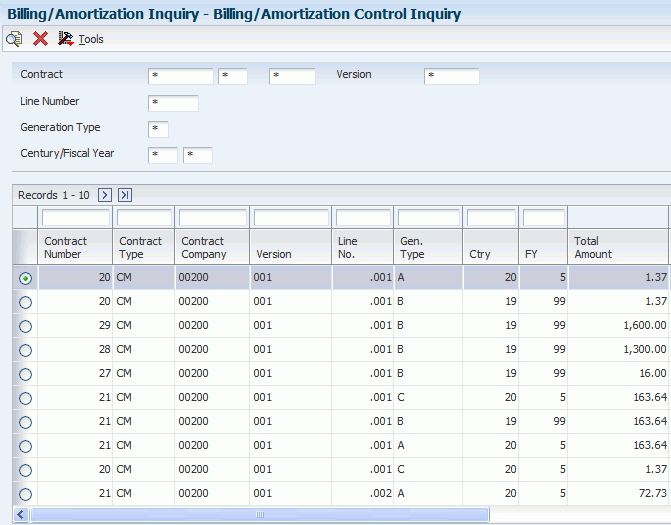
Description of ''Figure 5-23 Billing/Amortization Control Inquiry form''
- Contract Type
-
Enter a value from UDC 00/DT (Document Type - All Documents) that identifies the type of document. The document types for service contracts are defined in the Document Type Master table (F40039) from the Document Type Maintenance program (P40040).
- Contract Company
-
Enter a number that, along with order number and order type, uniquely identifies an order document (such as a purchase order, a contract, a sales order, and so on).
If you use the Next Numbers by Company/Fiscal Year facility, the Automatic Next Numbers program uses the order company to retrieve the correct next number for that company. If two or more order documents have the same order number and order type, the order company lets you locate the desired document.
If you use the regular Next Numbers facility, the order company is not used to assign a next number. In this case, you probably would not use the order company to locate the document.
- Version
-
Enter the change number of the contract. The change order number of the base contract is always initialized to 000. Each time you enter a change order for a contract, the system automatically increases the change order number by one.
For example, the base contract is the change order number 000, the first change order is 001, the second is 002, and so on.
- Line No. (line number)
-
Displays a number that identifies multiple occurrences, such as line numbers on a purchase order or other document. Generally, the system assigns this number, but in some cases you can override it.
- Gen. Type (generation type)
-
Enter a code that identifies the type of billing transaction. Examples are:
A: Recognized Revenue
B: Long Term Revenue (billing creates)
C: Short Term Revenue
D: Foreign Recognized
E: Foreign Long Term
F: Foreign Short Term
G: Credit Recognized Revenue
H: Credit Long Term Revenue
I: Credit Short Term Revenue
J: Foreign Credit Recognized
K: Foreign Credit Long Term
L: Foreign Credit Short Term
- Ctry (century)
-
Enter the calendar century associated with the year. Enter is the first two digits of the year. For example, 19 indicates any year beginning with 19 (1998, 1999), 20 indicates any year beginning with 20 (2000, 2001), and so on.
- FY (fiscal year)
-
Enter a number that identifies the fiscal year. Generally, you can either enter a number in this field or leave it blank to indicate the current fiscal year (as defined on the Company Setup form).
Specify the year at the end of the first period rather than the year at the end of the fiscal period. For example, a fiscal year begins October 1, and ends September 30. The end of the first period is October 31. Specify the year for the October period.
- Total Amount
-
Displays the total of the amount billed or amortized for that specific record.
5.5 Working with the Amortization Process
This section provides overviews of amortization and amortization workfile generation, lists prerequisites, and discusses how to:
-
Set processing options for the Amortization Workfile Generation program (R17321).
-
Review amortization records.
5.5.1 Understanding Amortization
Amortization enables you to manage revenue by moving long-term revenue to short-term revenue, and then to earned or recognized revenue. This system only amortizes billed revenue.
When billing, the system moves the entire billed amount to long-term revenue. When you use amortization, the system moves anything from today's date plus twelve months to short-term revenue. The system moves anything from the beginning of the contract through the end of the amortization period to recognized revenue.
5.5.2 Understanding Amortization Workfile Generation
From the Periodic Contract Processing menu (G1724), select Svc. Contract Amort. Generation.
Use the Amortization Generation program to amortize revenue for contracts. You can run the program in proof or final mode, but the system only updates affected tables when you run it in final mode.
The program performs these functions:
-
Moves long-term to short-term revenue, if applicable.
-
Moves short-term to recognized revenue, if applicable.
When you run the Amortization Workfile Generation program (R17321), the system retrieves records from the Contract Detail table (F1721), based on the dates that you define. For each contract detail line processed, the system verifies that the long-term and short-term amounts are current, based on the start and end dates, and the Amortization Date in the processing option plus one year. For contract detail lines that fall within the dates specified, the system verifies that the detail lines have been amortized by using the Billing/Amort Control Master table (F1794). The system creates records in the Account Ledger table (F0911) and updates the Billing/Amort Control Master table whenever a contract detail line has been amortized for a given time period.
5.5.3 Prerequisites
Before you complete the tasks in this section:
-
Verify that you have purchased and installed these systems. You must have installed these systems to be able to use amortization for contracts:
-
General Accounting, Accounts Receivable, and Accounts Payable.
-
Address Book.
-
Service Billing.
-
-
Set up fiscal date patterns.
-
Set up company information.
-
Set up manufacturing AAIs information.
5.5.4 Form Used to Work with the Amortization Process
| Form Name | FormID | Navigation | Usage |
|---|---|---|---|
| Billing/Amortization Control Inquiry | W1794A | Periodic Contract Processing (G1724), Billing/Amortization Inquiry. | Review amortization records. |
5.5.5 Setting Processing Options for the Amortization Workfile Generation Program (R17321)
Use these processing options to set default values for the Amortization Workfile Generation program.
5.5.5.1 Process
Specify whether the system generates the amortization workfile in proof or final mode, the amortization period or year, and subledger information.
- 1. Proof or Final Mode
-
Specify whether to run the workfile generation program in proof or final mode. Values are:
Blank: Proof mode.
1: Final mode.
If you run the generation program in proof mode, the system does not update any tables. You can review the report to review amortization information and correct any errors, based on processing options.
If you run the generation program in final mode, the system updates the Billing/Amortization Control Master table (F1794) and writes journal entries to the Transaction Ledger table (F0911).
- 2. Fiscal Period - Amortize Through
-
Specify the fiscal period for amortization. If you leave this option blank, the system uses the current fiscal period.
- 3. Fiscal Year - Amortize Through
-
Specify the fiscal year for amortization. If you leave this option blank, the system uses the current fiscal year.
- 4. Subledger Default
-
Specify whether the system retrieves a value for the subledger field. Values are:
Blank: No subledger value.
1: Contract number.
2: Customer number.
3: Site number.
4: Item number.
5.5.5.2 Print
Specify the values that the system uses when you generate amortization workfiles. For example, you can select the address book information that prints on the report, and whether you print errors on the report or send errors to the Work Center.
- 1. Work Center Or Report
-
Specify where the system writes errors. Values are:
Blank: Write errors to the Work Center.
1: Print errors on the report.
- 2. Address Number
-
Specify which address number appears on the report. Values are:
Blank: Customer Number
1: Site Number
2: Bill To Number
5.5.5.3 Versions
Specify the version of the GL Post program that the system uses when you generate amortization records.
- 1. G/L Post Version (general ledger post version)
-
If you leave this option blank, the system uses ZJDE0001.
5.5.6 Reviewing Amortization Records
Access the Billing/Amortization Control Inquiry form.
You can view the periods and amounts that have been billed and view the periods and amounts that have been amortized on a contract. You can review whether a contract has been amortized for a specific processing period.
5.6 Printing Contracts
This section discusses how to:
-
Print contracts.
-
Set processing options for the Print Contracts Report program (R1733).
5.6.1 Printing Contracts
From the Periodic Contract Processing menu (G1724), select Contract Print.
Use the Print Contracts program (R1733) to create printed copies of contracts for suppliers and service providers. The contract information includes equipment number, service package, start and end dates, and total amount.
5.6.2 Setting Processing Options for the Print Contracts Report Program (R1733)
Use these processing options to set default values for printing contracts.
5.6.2.1 Print
Specify the information to print on contracts.
- 1. Print detail media object.
-
Specify which media objects the system prints for contract detail lines on the report. Values are:
Blank: Do not print media objects.
1: Print external media objects.
2: Print internal media objects.
3: Print both internal and external media objects.
- 2. Print header media object.
-
Specify whether the system prints media objects for the contract header on the report. Values are:
Blank: Do not print header media objects.
1: Print external media objects.
2: Print internal media objects.
3: Print both the internal and external media objects.
- 3. Print detail prices.
-
Specify whether the system prints prices on the detail lines of contracts. Values are:
Blank: Do not print, unless the summarization option is chosen in processing option #4.
1: Print.
- 4. Summarize detail.
-
Specify how the system summarizes detail lines. Values are:
Blank: Do not summarize.
1: Product model.
2: Product family.
3: Contract.
5.7 Reviewing Contract Reports
This section provides an overview of contract reports and discusses how to:
-
Review the contract report.
-
Set processing options for the Contract Report program (R1734).
-
Review the service contract renewal report.
-
Review the service contract detail renewal report.
-
Review the service contract cancel report.
-
Set processing options for the Service Contract Cancel program (R1736).
5.7.1 Understanding Contract Reports
Review contract reports to determine the status of contracts. For example, you can review them to determine whether they are expiring soon and whether you need to renew those contracts that are expiring.
5.7.2 Reviewing the Contract Report
From the Periodic Contract Processing menu (G1724), select Contract Report.
Run the Contract Report (R1734) to identify contracts and to find any pertinent information. You can set the data selection to define the type of report that you need to review.
5.7.3 Setting Processing Options for the Contract Report Program (R1734)
Use these processing options to set the default values for the Contract Report.
5.7.3.1 Print
Use this processing option to print header or detail information.
- Print header or detail
-
Specify whether the system prints header or detail information on the report. Values are:
Blank: Header information.
1: Detail information.
5.7.4 Reviewing the Service Contract Renewal Report
This section provides overviews of the Service Contract Renewal report and the Alternate Tax Rate/Area for the Service Contract Renewal report; and discusses how to:
-
Run the Service Contract Renewal report program.
-
Set processing options for Service Contract Renewal (R1730).
5.7.4.1 Understanding the Service Contract Renewal Report
You can run the Service Contract Renewal report to identify contracts that require you to generate renewal contracts and letters. You can set up the processing options to include markup by percentage, to select the pricing to use for the renewal, and to set the leadtime for contract expiration.
You can use this report to create a new contract or to advance the version number of the current contract if the renewal contract will be a duplicate of the customer's existing contract.
5.7.4.2 Understanding Alternate Tax Rate/Area Assignments for the Service Contract Renewal Report (Release 9.1 Update)
The values that you specify in the Tax Information processing option and the Header Business Unit processing option determine whether the system retrieves the alternate tax rate /area assignment if the functionality is set up for the company of the business unit.
If errors occur during processing, the error or warning message is sent to the Work Center or included in a section of the report, determined by the value in the Work Center or Report processing option.
This table describes how the system determines the tax rate/area to use based on the values in the processing options:
| Value in Tax information Processing Option | Value in Header Business Unit Processing Option | New Company Has Alternate Tax Rate/Area Enabled | Tax Rate/Area |
|---|---|---|---|
| Blank (Copy information) | Blank (copy from original) | Not applicable | From original contract for header and detail lines |
| Blank | 1 (From P1721) | Either enabled and disabled | From original contract for header and detail lines |
| 1 (retrieve from Site number) | Blank | Disabled | Tax rate/area from the site on header and detail lines. |
| 1 | Blank | Enabled | Retrieve the alternate tax rate/area based on the entity values for the header and detail lines. For the header area, the company, business unit, and site are the entities. For the detail lines, the company, business unit, and the site are from the copied lines. |
| 1 | 1 | Disabled | The tax rate/area is retrieved based on the site for the header and detail lines. |
| 1 | 1 | Enabled | Retrieve the alternate tax rate/area based on the entity values for the header and detail lines. For the header area, the business unit is based on the value in the Header Business Unit processing option, the company is the company associated with the business unit, and the and the site is from the contract header. For the detail lines, the company is the company associated with the business unit specified in the Header Business Unit processing option, and the business unit and site are from the detail lines copied. |
5.7.4.3 Running the Service Contract Renewal Report
From the Periodic Contract Processing menu (G1724), select Service Contract Renewal.
5.7.4.4 Setting Processing Options for the Service Contract Renewal Program (R1730)
Use these processing options to set the default values for the Service Contract Renewal process.
5.7.4.4.1 Report Option
- 1. Renewal Options
-
Specify how the system renews a contract. Values are:
Blank: Do not renew the contract.
1: Create a new contract number.
2: Use the same contract number, and advance the contract change number.
- 2. Pricing Options
-
Specify the pricing method that the system uses for pricing renewed contracts. Values are:
1: Base the pricing for renewed contracts on existing contracts.
2: Use advanced pricing to obtain new prices for renewed contracts.
3: Use mark-up percentages to obtain new prices for renewed contracts.
- 3. Markup Percentage.
-
Specify the percentage that the system uses for mark-ups when you are determining new prices for renewal contracts. For example, enter 50.0 to specify a 50 percent mark-up.
Note:
Only use this processing option if you entered 3 (percentage-based mark-up) in processing option 2. - 4. Lead days for contract expiration
-
Specify the number of days between the current date and a target date for contract expiration. Contracts that expire within the number of days entered are eligible for renewal.
- 5. Date to use for Lead Days
-
Specify the date to use with lead days. If you leave this processing option blank, the system uses the current date.
- 6. Contract renewal status for old contract
-
Enter a value from UDC 17/CO (Contract Status) that specifies the status for contracts after you renew them.
- 7. Contract renewal status for the renewal
-
Enter a value from UDC 17/CO (Contract Status) that specifies the status for new contracts.
5.7.4.4.2 Versions
- 1. Work With Contracts (P1720) Version
-
If you leave this processing option blank, the system uses ZJDE0001.
5.7.4.4.3 Process
- 1. Proof or Final Process
-
Specify whether the system processes the Contract Renewal report in proof or final mode. Values are:
Blank: Proof mode.
1: Final mode.
- 2. Work Center or Report
-
Specify where the system records errors. Values are:
Blank: Record errors to the Work Center.
1: Record errors on the report.
5.7.4.4.4 Defaults
- 1. Bill From Date
-
Specify the bill-from date, which is the date that billing begins for the service contract. If you leave this processing option blank, the system uses the date from the former contract detail line. Values are:
1: Use the bill-from date from the former contract detail line.
2: Use the bill-from date from the first detail line of the contract.
3: Use the start date from the new contract detail line as the bill-from date.
4: Enter a bill-from date.
- 2. Specify the Bill From Date if '4' is on above.
-
Specify a specific Bill From Date for the renewed contract.
- 3. Bill Through Date
-
Specify the bill-through date, which is the date that billing ends for the service contract. If you leave this processing option blank, the system uses the date from the former contract detail line. Values are:
1: Use the bill-through date from the former contract detail line.
2: Use the bill-through date from the first detail line of the contract.
3: Use the end date from the new contract detail line as the bill-through date.
4: Enter a bill-through date.
- 4. Specify Bill Through Date if '4' is on above.
-
Specify a specific Bill Through Date for the renewed contract.
- 5. Billing Frequency Code
-
Specify the Billing Frequency that indicates the billing cycle for the renewed contract.
5.7.4.4.5 Base Warranty
|
Note: All of these entries will be applied to every Base Warranty that is renewed. |
- 1. Renew Base Warranty Contract
-
Specify whether the system includes base warranty contracts in the contract renewal process. Values are:
Blank: Do not renew base warranty contracts.
1: Renew base warranty contracts.
- 2. Company to be used for the renewed contract
-
Specify the company that will be used for the renewed contract.
- 3. Contract Document Type
-
Specify the Contract Document Type for the renewed contract.
- 4. Renewed Contract Line Type
-
Specify the Line Type for the renewed contract.
- 5. Contract Status for the renewed contract
-
Enter a value from UDC 17/CO (Contract Status) that specifies the status of the new contract. If you leave this processing option blank, the system uses the status that is specified on the Report Option tab.
- 6. Contract Type
-
Enter a value from UDC 17/TY (Contract Type) that specifies the contract type for the new contract. If you leave this processing option blank, the system uses the contract type from the processing options for P1721 (Contract Revisions).
- 7. Customer address number
-
Specify the Customer Address Number for the renewed contract.
- 8. Site address number.
-
Specify the Site Address Number for the renewed contract.
- 9. Bill To address number.
-
Specify the Bill To Address Number for the renewed contract.
- 10. Send To address number.
-
Specify the Send To Address Number for the renewed contract.
- 11. Number of days in contract.
-
Specify the number of days in the renewed contract.
- 12. Advanced Pricing Adjustment Schedule
-
Enter a value from UDC 40/AS (Schedule Name) that specifies the Advanced Pricing Adjustment Schedule for the renewed contract.
- 13. Billable Duration.
-
Specify the Billable Duration for the renewed contract.
- 14. Non-billable Duration.
-
Specify the Non-Billable Duration for the renewed contract.
- 15. Billable/Non-billable duration Unit of Measure.
-
Enter a value from UDC 00/UM (Unit of Measure) that identifies the unit of measurement for an amount or quantity as it was billed. Specify the Billable/Non-Billable Duration Unit of Measure.
- 16. Price By Address
-
Specify the Price By Address number for the renewed contract lines. If the processing option is left blank, the Customer Number is used.
- 17. Business Unit
-
Specify the Business Unit for the renewed contract header. If this processing option is left blank, the Original Business Unit is used.
5.7.4.4.6 Copy Defaults
- 1. Media Objects
-
Specify whether the system copies media objects to renewed contracts. Values are:
Blank: Do not copy media objects.
1: Copy the header media objects.
2: Copy the detail media objects.
3: Copy both the header and the detail media objects.
- 2. Specific Media Object
-
Specify which media objects the system copies to renewed contracts. Values are:
Blank: Copy both internal and external comments.
1: Copy internal comments.
2: Copy external comments.
- 3. Tax Information
-
Specify how the system generates tax information for renewed contracts. Values are:
Blank: Copy tax information from the original contract to the renewed contract.
1: Retrieve the tax rate and area from the site; retrieve the explanation code from the customer.
(Release 9.1 Update)
Based on the business unit, the system checks the alternate tax rate/area assignment company constant for the corresponding company. If the functionality is enabled, the system retrieves the alternate tax rate/area based on the business unit and site country information. Otherwise, the system retrieves the tax rate/area from the default site setup.
For further information about alternate tax rate/area assignments, please refer to "Setting Up Alternate Tax Rate/Area Assignment Functionality" in the JD Edwards EnterpriseOne Applications Tax Processing Implementation Guide.
- 4. Discount Information
-
Specify whether the system copies discount information to renewed contracts. Values are:
Blank: Copy.
1: Do not copy.
- 5. Customer Currency
-
Specify how the system generates the customer currency for renewed contracts. Values are:
Blank: Copy the customer currency from the original contract.
1: Use the customer currency specified in the customer master.
- 6. Document Type
-
Specify how the system generates the document type for renewed contracts. Values are:
Blank: Copy the document type from the original contract.
1: Use the document type specified in the processing options for the Contract Revisions program (P1721).
- 7. Key Company
-
Specify how the system generates the key company for renewed contracts. Values are:
Blank: Copy the key company from the original contract.
1: Use the key company specified in the processing options for the Contract Revisions program (P1721).
- 8. Header Business Unit
-
Specify how the system generates the header business unit on renewed contracts. Values are:
Blank: Copy the header business unit from the original contract.
1: Use the header business unit specified in the processing options for the Contract Revisions program (P1721).
- 9. Line Description
-
Specify how the system generates line descriptions on renewed contracts. Values are:
Blank: Copy the original contract line description.
1: Retrieve the line description from the processing options for P1721 (Contract Revisions).
5.7.5 Reviewing the Service Contract Detail Renewal Report
From the Periodic Contract Processing menu (G1724), select Service Contract Detail Renewal.
You can use this report to review detail line information for a contract. You can renew contract information by detail line as well as determine if new detail lines need to be added to the latest version of the contract.
5.7.6 Setting Processing Options for the Service Contract Detail Renewal Program (R1735)
Use these processing options supply the default values for Service Contract Detail Renewal.
5.7.6.1 Report Option
Specify the various options to use for contract detail renewals.
- 1. Renewal Options
-
Specify how the system renews a contract. Values are:
1: Create a new contract for the detail lines.
2: Create a new version for the contract
3: Add new lines to the contract that is being renewed.
4: Add detail lines to the latest version of the contract that is being renewed.
5: Add detail lines to a specific contract number and version number.
- 2. Contract number if renewing to a specific contract number.
-
Specify the contract number to use for the renewal.
- 3. Version number if renewing to a specific contract number.
-
Specify a version of the specific contract number used with the renewed contract.
- 3. Pricing Options
-
Specify how the system prices renewed contracts. Values are:
1: Use existing prices.
2: Use advanced pricing to obtain new prices.
3: Use markup percentages to obtain new prices.
- 4. Markup Percentage.
-
Specify the percentage to use for mark-ups. For example, to specify a mark-up of 50 percent, enter 50.0. Mark-ups determine the new prices for renewal contracts.
Note:
Use this processing option only if you entered the value 3 in processing option 5. - 5. Contract renewal status for old contract
-
Enter a value from UDC 17/CO (Contract Status) that specifies the status that the system assigns to the contract after you renew it.
- 6. Contract renewal status for the renewal
-
Enter a value from UDC 17/CO (Contract Status) that specifies the status of the new contract.
5.7.6.2 Versions
Specify the version of the program to launch from Service Contract Detail Renewal.
- 1. Work With Contracts (P1720) Version
-
If blank yo leave this processing option blank, the system uses ZJDE0001.
5.7.6.3 Process
Specify proof or final mode processing, and where the system records errors.
- 1. Proof or Final Process
-
Specify whether the system runs the Detail Contract Renewal report in proof or final mode. Values are:
Blank: Proof mode.
1: Final mode.
- 2. Work Center Or Report
-
Specify where the system records errors. Values are:
Blank: Record errors to the Work Center.
1: Record errors on the report.
5.7.6.4 Base Warranty
Specify renewal options for base warranty contract renewals.
- 1. Renew Base Warranty records to Billable.
-
Specify whether the system includes base warranty records in the contract renewal process. Values are:
Blank: Do not renew base warranty records.
1: Renew base warranty records.
- 2. Line Type for Billable lines.
-
Specify the Line Type for Billable Lines. If you leave this processing option blank, the system uses the line type from the P1721 processing option.
- 3. Billable Duration
-
Specify the Billable Duration for the renewed contract.
- 4. Non-Billable Duration
-
Specify the Non-Billable Duration for the renewed contract.
- 5. Billable/Non-Billable Duration Unit of Measure
-
Specify the Billable/Non-Billable Unit of Measure. If you leave this processing option blank, the system uses the Duration Unit of Measure from the P1721 processing option.
- 6. Price By Address
-
Specify the Price By Address number for the renewed contract. If you leave this processing option blank, the system uses the customer number.
- 7. Advanced Pricing Adjustment Schedule
-
Specify the Advanced Pricing Adjustment Schedule for the renewed contract. If you leave this processing option blank, the system uses the value based on the Price By Address Number.
5.7.6.5 Defaults
Specify billing default values.
- 1. Bill From Date.
-
Specify the bill-from date, which is the date that billing begins for the detail line on the contract. Values are:
1: Use the bill-from date from the former contract detail line.
2: Use the bill-from date from the first detail line of the former contract.
3: Use the start date from the new contract.
4: Enter a bill-from date.
- 2. Specify Bill From date if '4' is on above.
-
Specify a specific Bill From Date for the renewed contract. If you leave this processing option blank, the system uses the current date.
- 3. Bill Through Date.
-
Specify the bill-through date, which is the date that billing ends for the detail line on the contract. Values are:
1: Use the bill-through date from the former contract detail line.
2: Use the bill-through date from the first detail line of the former contract.
3: Use the end date from the new contract.
4: Enter a bill-through date.
- 4. Specify Bill Through date if '4' is on above.
-
Specify a specific Bill Through Date for the renewed contract. If you leave this processing option blank, the system uses the current date.
- 5. Billing Frequency Code
-
Specify the Billing Frequency Code for the renewed contract.
5.7.6.6 Copy Defaults
Specify the options the system uses to copy to renewed contracts.
- 1. Copy Media Objects
-
Specify whether the system copies media objects to renewed contracts. The system copies the header media objects only if you are creating a new contract or a new version when renewing a contract. Values are:
Blank: Do not copy media objects.
1: Copy the header media objects.
2: Copy the detail media objects.
3: Copy both the header and the detail media objects.
- 2. Specific Media Object
-
Specify which media objects the system copies to renewed contracts. Values are:
Blank: Copy both internal and external comments.
1: Copy internal comments.
2: Copy external comments.
- 3. Tax Information
-
Specify how the system generates tax information for renewed contracts. If the renewal option is a value other than 12, the header tax information remains the same. Values are:
Blank: Copy tax information from the original contract to the renewed contract.
1: Retrieve the tax rate and area from the site; retrieve the explanation code from the customer.
(Release 9.1 Update)
Based on the business unit, the system checks the alternate tax rate/area assignment company constant for the corresponding company. If the functionality is enabled, the system retrieves the alternate tax rate/area based on the business unit and site country information. Otherwise, the system retrieves the tax rate/area from the default site setup.
For further information about alternate tax rate/area assignments, please refer to "Setting Up Alternate Tax Rate/Area Assignment Functionality" in the JD Edwards EnterpriseOne Applications Tax Processing Implementation Guide.
- 4. Discount Information
-
Specify whether the system copies discount information to renewed contracts. Values are:
Blank: Copy.
1: Do not copy.
- 5. Customer Currency
-
Specify how the system generates the customer currency for renewed contracts. Values are:
Blank: Copy the customer currency from the original contract.
1: Use the customer currency specified in the customer master.
- 6. Document Type
-
Specify how the system generates the document type for renewed contracts. If the renewal option is a value other than 1 or 2, the header document type remains unchanged. Values are:
Blank: Copy the document type from the original contract.
1: Use the document type specified in the processing options for the Contract Revisions program (P1721).
- 7. Key Company
-
Specify how the system generates the key company for renewed contracts. If the renewal option is a value other than 1 or 2, the header key company remains unchanged. Values are:
Blank: Copy the key company from the original contract.
1: Use the key company specified in the processing options for the Contract Revisions program (P1721).
- 8. Header Business Unit
-
Specify how the system generates the header business unit on renewed contracts. If the renewal option is a value other than 1 or 2, the header business unit remains unchanged. Values are:
Blank: Copy the header business unit from the original contract.
1: Use the header business unit specified in the processing options for the Contract Revisions program (P1721).
- 9. Line Description
-
Specify how the system generates line descriptions on renewed contracts. Values are:
Blank: Copy the original contract line description.
1: Retrieve the line description from the processing options for P1721 (Contract Revisions).
5.7.7 Reviewing the Service Contract Cancel Report
From the Periodic Contract Processing menu (G1724), select Service Contract Cancel.
Use this option to cancel single or multiple contracts. The system creates a report when you run this program in either proof or final mode. However, only final mode updates the system.
5.7.8 Setting Processing Options for the Service Contract Cancel Program (R1736)
Use these processing options to supply the default values for the Service Contract Cancel program.
5.7.8.1 Defaults
- 1. Cancellation Reason Code (Required)
-
Enter a value from UDC 17/CN (Cancellation Reason Code) that specifies the reason code for cancelling a contract. You must enter a value for this processing option.
- 2. Cancellation date
-
Specify the date for cancelling a contract. If you leave this processing option blank, the system uses the current date.
- 3. Tax Date for Contract Cancellations
-
Specify the date for tax calculation when cancelling a contract. If you leave this processing option blank, the system will use the value in the Price Effective Date field in the service contract detail line.
5.7.8.2 Process
Specify proof or final mode processing, where the system records errors, and the subledger default value for credit processing.
- 1. Proof or Final Mode
-
Specify whether to run the Contract Cancel Report in proof or final mode. Values are:
Blank: Proof mode. Do not update the tables.
1: Final mode. Update the tables.
- 2. Work Center Or Report
-
Specify where the system records errors. Values are:
Blank: Record errors to the Work Center.
1: Record errors on the report.
- 3. Subledger Default for credit processing.
-
Specify a default value for the subledger field. Values are:
Blank: No default value
1: Contract number
2: Customer number
3: Site number
4: Short item number