6 Managing Work Orders
This chapter contains the following topics:
-
Section 6.2, "Understanding Work Order Mass Updates for Service Work Orders"
-
Section 6.5, "Creating Work Orders Using the Service Management Workbench Program (P90CD020)"
-
Section 6.6, "Creating Work Orders Using the Work Order Entry Programs (P48201/P17714)"
6.1 Understanding Work Order Management
You can create work orders for customer requests that cannot be resolved with a phone call. You enter work orders to request work at the customer site or at a repair depot. Work orders provide the central database for all service and repair information and the events associated with an equipment record, inventory item number, or product model. Work orders track requests for depot repairs, and they track shipments of replacement parts. The majority of service calls are initiated through the Case module, but the repair depot might also create them.
A work order enables you to track all of the necessary phases of the work to resolve the customer's issue, from scheduling the technician to the technician's arrival and successful completion of the work.
You can also use work orders to manage the workflow of service tasks and other projects. You can manage all aspects of a service task or project, including:
-
Creating work orders for preventive and corrective maintenance.
-
Committing inventory to a work order.
-
Scheduling multiple tasks, such as mechanical, electrical, and so on, in a work order.
-
Tracking the progress of a work order by status.
-
Tracking work order costs, such as labor, materials, and so on.
-
Recording unlimited detailed information about a work order.
-
Completing and closing a work order.
6.1.1 Work Order Management Process Flow
The steps through which a work order must pass to accurately communicate the progress of the tasks that it represents are the life cycle of the work order. You can select to display the Status Change form each time the work order advances through a step in the life cycle. This flowchart illustrates the flow of a work order through a typical work order life cycle:
Figure 6-1 Example of Work Order Management process flow

Description of ''Figure 6-1 Example of Work Order Management process flow''
6.1.2 Terms and Concepts
These Work Order Management terms and concepts are used in this chapter:
- Base Warranty
-
The warranty that is associated with the equipment. Base warranties are typically included in the purchase price of the equipment and are nonbillable.
- Extended Warranty
-
An optional warranty that can be purchased to cover the performance of the equipment over and above the criteria set forth in the base warranty. This type of warranty is billable.
- Mean Time Between Failure (MTBF)
-
The average time, distance, or events between breakdowns.
- Mean Time to Repair
-
The average time it takes to repair a failed item.
- Returned Material Authorization (RMA)
-
An authorization from the supplier for the customer to return inventory for credit, replacement, or repair. The system creates an authorization number for the supplier to track the return of the inventory. This is also known as Returned Goods Authorization (RGA).
- Serial Number
-
The numbers or letters that uniquely identify an item. The serial number is stored in the Asset Master File table (F1201).
- Service Package
-
The combination of service type and contract coverage that specifies the service support to which the customer is contractually entitled. Service packages also specify warranty types, such as base or extended.
- Service Address Number
-
The Address Book number of the site where a piece of equipment is located. The site number can be the same as the customer number, but it might differ if the customer has multiple sites.
|
See Also: |
6.1.3 Mobile Applications for Work Orders (Release 9.1 Update)
The following mobile applications are available, and can be used to manage work orders, and enter and update time entry for service work orders on a mobile device:
-
Service WO (Tablet)
-
Review Team Work Orders (Smartphone and Tablet)
-
Service Order Time Entry (Smartphone and Tablet)
-
Manage My Service Orders (Smartphone and Tablet)
These applications require system administrator configuration before they are available to individual users. Contact your system administrator to determine whether these applications are available for use.
Additionally, see the following topics in the JD Edwards EnterpriseOne Applications Mobile Enterprise Applications Implementation Guide:
6.2 Understanding Work Order Mass Updates for Service Work Orders
The work order mass update process enables you to select and modify multiple work orders at the same time. You can use the mass update process for service work orders that have a work order type of 05 (service) from the Order Type (48/OT) UDC table.
You use the Search for Work Orders program (P48022) to search for and select the work orders that you want to modify, and then use the Work Order Mass Update program (P48714) to enter the new values that you want to apply to the selected work orders. Alternatively, you can set up templates in the Work Order Mass Update Template program (P48710) to specify default values for the fields that you want to update. After you enter the new values, you run the Work Order Mass Update batch program (R48714) in draft mode, verify the changes that you want to make, and then run the R48714 program in final mode to commit the changes to the database.
6.2.1 Accessing the Work Order Mass Update Programs
Links to the Work Order Mass Update Template program and the Search for Work Orders program appear on the Periodic Work Order Processing menu (G1722). You access the Work Order Mass Update interactive program from the Search for Work Orders program, and access the Work Order Mass Update batch program from the Work Order Mass Update interactive program.
You can also access the Search for Work Orders program using these access points:
-
An option in the Form menu in the CRM Service Order Revisions program (P90CD020).
The system launches the version of the Search for Work Orders program that you specify in the Work Order Mass Update (P48022) Version processing option in the CRM Service Order Revisions program.
See Setting Processing Options for CRM - Manage Service Orders (P90CD002).
-
An option on the Form menu in the Work With Work Orders program (P48201).
The system launches the version of the Search for Work Orders program that you specify in the Work Order Mass Update (P48022) Version processing option in the Work With Work Orders program.
6.2.2 Setting Up Your Environment to Use the Work Order Mass Update Process for Service Work Orders
Before you use the work order mass update process, you should set up versions and processing options for the programs used by the process. In addition to the processing options for the Search for Work Orders and Work Order Mass Update programs, the system uses some of the processing options from the versions of service work order management programs that you specify.
This table lists the programs for which you should set up processing options.
|
Note: This table lists only the programs that have processing options that affect how work orders are processed in the work order mass update process. You will set up and specify versions of other applications if you do not want to use default versions. You specify the versions to use in the processing options of the Search for Work Orders program. |
| Program | Processing Options |
|---|---|
| Search for Work Orders (P48022) | You specify the version of this program to use in processing options in the Work With Work Orders (P48201) and CRM - Manage Service Orders (P90CD020) programs.
The Search for Work Orders program includes processing options in which you specify the versions of the programs to use when you use Form and Row menu options. You will need to set up versions of those programs if you choose to use a version other than the default version noted in the processing option description. |
| Work Order Mass Update (P48714) | You specify the version of this program to use in the Search for Work Orders program. |
| CRM - Manage Service Orders (P90CD002) | To use a specific version of the CRM - Manage Service Orders (P90CD002) program), in the processing options for the Search for Work Orders program:
|
| Work Order Revisions (P17714) | To use a specific version of the Work Order Revisions program (P17714), in the processing options for the Search for Work Orders program:
|
| Work With Work Orders (P48201) | You can access the work order mass update programs from an option on the Form menu in the Work With Work Orders program.
Set the Work Order Mass Update (P48022) Version processing option in the Work With Work Orders program to use the appropriate version. |
| Planning Workbench (P13700) | You can access the work order mass update programs from an option on the Form menu in the Planning Workbench program.
Set the Work Order Mass Update (P48022) Version processing option in the Planning Workbench program to use the appropriate version. |
6.2.3 Service-Specific Work Order Mass Update Functions
You can use the work order mass update process to update manufacturing, tenant, service, and equipment work orders. When working with work orders for service, you should note that:
-
Some of the options available in the work order mass update process are available for only specific work order types.
-
Some actions that you can perform when working with individual service work orders are not supported when you work with multiple service work orders.
-
Some of the processing options that you set up in the version of the Work Order Revisions program (P17714) and CRM - Manage Service Orders program (P90CD002) that you use when working with work order mass updates affect the processing of the work order mass updates.
This table lists the functions that are specific to working with service work orders, the functions that are not supported when you work with multiple service work orders, and the processing logic in the Work Order Revisions (P17714) and CRM - Manage Service Orders (P90CD002) programs that affect work order mass updates for service work orders.
| Function | Description |
|---|---|
| Craft | When you perform a search using a value in the Craft field, the system populates the grid in the Search for Work Orders program for only the work orders that have labor lines with a work center value that matches the value for the Craft field. |
| Prepayments | Mass updates for work orders for which prepayment processing is enabled is not supported. |
| Component change-out | The component change-out function is not supported when you work with mass updates for equipment work orders. |
| Entitlement checking | Entitlement checking is not supported when you work with mass updates for service work orders. When you set up the processing options for the Search for Work Orders program you must specify versions of these programs that do not have entitlement checking enabled:
If you use entitlement checking, the system assumes that the Service Order Entitlement Trigger field in the S/WM System Constants is set to 3 (customer), 6 (branch/plant) or 7 (site number). The work order mass update process verifies that entitlement checking is disabled only when the Service Order Entitlement Trigger field is set to one of these values. Changing the customer, site, or branch for a work order record can also trigger entitlements and require that labor and parts for the work order also be changed. If a work order has associated labor or parts records, you cannot change the customer, site or branch. |
| Field updates | Some fields that appear in service work orders are not editable when you work with multiple work orders. |
| Default Date and Time for Status processing option | If you set this processing option to 1 to use the current system date and time on status change, the system will use the current system date and time will to update the completed date and time on the work order when you process work order mass updates. |
| Create Labor Detail processing option | If you set this processing option to 1 to create labor detail, the system creates the labor detail if the Lead Craft field is populated with an update value and no labor detail lines exist for the work order. |
| Email Manager/Crew processing option | If you set this processing option to 1 to send emails, the system sends a message to the manager if you change the value in the Manager field on the Service Work Order Mass Update form. |
| Create Individual Resource Assignments processing option | If you set this processing option to 1 to create assignments, the system creates resource assignments when you change the value in the Assigned To field on the Service Work Order Mass Update form. |
| Status Window on Update processing option | If you set this processing option to 1, status related fields are not displayed on Service Work Order Mass Update form. Leave this processing option blank to display and enable status update fields. |
| Field-level validations | The system uses the same field-level validations for work order mass updates as it uses when you update single work orders. For example, the system validates the currency code when you change the branch or customer number, and validates the tax rate area and tax explanation code when you change the site number.
The values that you enter in these fields on the Service Work Order Mass Update form take precedence over the logic used in the field-level validations:
|
6.3 Common Fields Used in This Chapter
- Act. Payable Rate (actual payable rate)
-
Enter the actual payable rate associated with a transaction.
- Bill Y/N (bill yes/no)
-
Enter a value that specifies whether a general ledger account should be billed. Values are:
Y: Yes, the account should be billed.
N: No, it should not be billed.
1: It is eligible only for invoicing.
2: It is eligible only for revenue recognition.
4: It is eligible only for cost.
Note:
Codes 1, 2, and 4 relate only to the Service Billing system. - Capacity UOM (capacity unit of measure)
-
Enter a unit of measure that you use to express the capacity of a production line. Examples of units of measure include hours, number of stampings, coats of paint, and so on.
This item is used for repetitive processing only.
- Competency Code
-
Enter a code that specifies a competency within a competency type. For example, a competency for the competency type Skill might be programming in the C computer language or driving a forklift.
- Competency Level From
-
This value set the lowest value to be included in the rule criteria range for a competency level range selection.
- Competency Level To
-
This value set the highest value to be included in the rule criteria range for a competency level range selection.
- Competency Type
-
Enter a code that identifies a competency table or category for which you can track employee competencies. Values are:
01: Training
02: Skill
03: Accomplishment
04: Certification
05: Degree
06: Language
Values are stored in UDC 05/CY (Competency Type), but are hard-coded and cannot be changed. Therefore, each of the competencies that you track must pertain to one of these competency types. Adding additional values to this list requires system customization.
- Cost Type
-
Enter a code that designates each element of cost for an item. Examples of the cost object types are:
A1: Purchased raw material.
B1: Direct labor routing roll-up.
B2: Setup labor routing roll-up.
C1: Variable burden routing roll-up.
C2: Fixed burden routing roll-up.
Dx: Outside operation routing roll-up.
Xx: Extra add-ons, such as electricity and water.
The optional add-on computations usually operate with the type Xx extra add-ons. This cost structure enables you to use an unlimited number of cost components to calculate alternative cost roll-ups. The system then associates these cost components with one of six user-defined summary cost buckets.
- Coverage Group
-
Enter a user-defined code that specifies the coverage group. The coverage group consists of unlimited cost codes and the percentage covered for each cost code.
- Entitlement Check
-
Enter a value from UDC 17/ER (Entitlement Check) that indicates the results of an entitlement check.
Values are:
0: Not entitled.
1: Transaction entitled.
2: Contract found, but no existing service type.
3: Contract found, but no day and date assigned.
4: Covered under default warranty.
- Est. Billable Rate (estimated billable rate)
-
Enter the estimated billable rate associated with a service.
- Est. Payable Rate (estimated payable rate)
-
The estimated payable rate associated with a transaction.
- Estimated Payment Amount
-
The estimated payment amount used in service billing.
- Flat Rate
-
Enter a code used to determine whether a particular type of service is priced based on a flat rate or based on actual time and materials. Values are:
F: Charges for labor are based on one flat rate. Charges for parts are already included in the flat rate.
T: Charges for labor are based on actual labor hours. Charges for parts are based on actual parts used.
Blank: A blank value is only valid when defining the method of pricing for a service provider. It is used to indicate that the service provider is an internal service provider and is not paid for the service.
If you use flat rate as the pricing method, you must associate one labor step with the work order.
- Match Rule
-
Indicates whether the resource must satisfy the requirements that define the rule criteria. Values are:
1: The resource must meet the rule criteria.
0: The rule criteria are optional.
- Message No (message number)
-
Enter a generic rates and message code (48/SN) that is assigned to a standard note, message, or general narrative explanation. You can use this code to add instructional information to a work order. You set up codes for this field on the Generic Message/Rate Types table (F00191).
- Op St (operational step)
-
Enter a value from UDC 31/OS (Operation Status) that identifies the current status of a work order or engineering change order as the operation steps in the routing are completed.
- Oper Seq# (operational sequence number)
-
Enter a number used to indicate an order of succession.
In routing instructions, a number that sequences the fabrication or assembly steps in the manufacture of an item. You can track costs and charge time by operation.
In bills of material, a number that designates the routing step in the fabrication or assembly process that requires a specified component part. You define the operation sequence after you create the routing instructions for the item. The Shop Floor Management system uses this number in the backflush/preflush by operation process.
In engineering change orders, a number that sequences the assembly steps for the engineering change.
For repetitive manufacturing, a number that identifies the sequence in which an item is scheduled to be produced.
Skip To fields enable you to enter an operation sequence that you want to begin the display of information.
You can use decimals to add steps between existing steps. For example, use 12.5 to add a step between steps 12 and 13.
- Pay Price Method
-
Enter a code used to determine if a particular type of service is priced based on a flat rate or based on actual time and materials.
Values are:
F: Flat rate. Charges for labor are based on one flat rate. Charges for parts are already included in the flat rate.
T: Time and materials. Charges for labor are based on actual labor hours. Charges for parts are based on actual parts used.
Blank: None. A blank value is only valid when defining the Method of Pricing for a service provider. It is used to indicate that the service provider is an internal service provider and should not be paid.
- Payable Adj Schedule (payable adjustment schedule)
-
Enter a value from UDC 40/AS (Schedule Name) that identifies a price and adjustment schedule. A price and adjustment schedule contains adjustment types for which a customer or an item might be eligible. The system applies the adjustments in the sequence that you specify in the schedule. You link customers to a price and adjustment schedule through the customer billing instructions. When you enter a sales order, the system copies the schedule attached to the sold to address into the order header. You can override this schedule at the detail line level.
- Payable Y/N (payable yes/no)
-
Enter a value that specifies whether a general ledger account should be paid. Values are:
Y: Should be paid.
N: Should not be paid.
- Percent of Overlap
-
Enter a number that indicates the percentage that successive operations can overlap.
The actual overlap percentage entered for the operation sequence is the percent by which that operation overlaps the prior operation. For example, if you enter 80 percent, this indicates that work can begin on the overlapped operation when 20 percent of the prior operation is completed.
Note:
Overlapping has no effect on move and queue calculations. The percentage entered must be less than or equal to 100 percent.Enter percentages as whole numbers; for example, enter five percent as 5.00.
- Percentage Covered
-
Enter the percentage covered under warranty or contract. This is used to calculate the amount to bill or the amount to cost for the line item being processed on the service order or call.
- Piecework Rate
-
The rate to be paid for the type of component (piece) being produced.
- Run Machine
-
Enter the standard machine hours that you expect to incur in the normal production of this item.
- Setup Crew
-
Enter the number of people who work in the specified work center or routing operation.
The system multiplies the Run Labor value in the Routing Master table (F3003) by crew size during costing to generate total labor amounts.
If the Prime Load Code is L or B, the system uses the total labor hours for back scheduling. If the Prime Load Code is C or M, the system uses the total machine hours for back scheduling without modification by crew size.
- Subsidiary
-
Enter a subset of an object account. Subsidiary accounts include detailed records of the accounting activity for an object account.
Note:
If you are using a flexible chart of accounts and the object account is set to six digits, you must use all six digits. For example, entering 000456 is not the same as entering 456 because, if you enter 456, the system enters three blank spaces to fill a six-digit object. - Time and Materials
-
Enter a code used to determine if this type of service should be priced based on a flat rate or based on actual time and materials. Values are:
F: Charges for labor are based on one flat rate. Charges for parts are already included in the flat rate.
T: Charges for labor are based on actual labor hours. Charges for parts are based on actual parts used.
Blank: A blank value is only valid when defining the method of pricing for a service provider. It is used to indicate that the service provider is an internal service provider and is not paid.
If you use time and materials to price, both parts and labor are priced.
The values for the Flat Rate and Time and Materials fields come from the service contract's service package, based on the type of service on the work order.
The system retrieves tax rate and area information based on the service address number. Tax rate and area information is based on where the work is completed, not on the location of the customer.
6.4 Setting Up Work Orders
This section provides overviews of work-order related automatic accounting instructions (AAIs) and work order setup, lists prerequisites, and discusses how to:
-
Set up work order constants.
-
Set up work order history.
-
Set processing options for the Work With Work Order History program (P17715).
-
Attach activity rules to work orders.
To enter and review work orders on the web, you must activate Customer Self-Service functionality in the processing options for all applications that are part of the web environment.
6.4.1 Understanding Work Order-Related AAIs
To bill and pay for work orders and process business transactions correctly, you must identify information about the account structure and specific account values. You define the account structure and values by using AAIs. The system stores the AAI values in the Distribution/Manufacturing - AAI Values table (F4095). Whenever a program performs an accounting function, it accesses this table.
When you define AAIs, you establish how the system processes transactions for various programs. Distribution and Manufacturing AAIs define the rules by which Service Management interacts with the General Ledger system. Accounting AAIs define the rules by which Service Management interacts with the Accounts Receivable system.
The work order-related distribution AAIs are:
-
1742: Work Orders (Billing).
-
1782: Work Order Claims (Paying).
Based on key fields, the system retrieves the general ledger account to use when creating an entry in the Billing Detail Workfile (F4812). The key fields are:
-
Company
-
Doc Type
-
GL Class Code
-
Cost Type
Based on these key fields, the system creates journal entries by using this information:
-
Branch/Plant
-
Object Account
-
Subsidiary
The system retrieves the company, document type, GL class code, and cost type from the work order. If you enter four asterisks (****) in the Distribution AAIs for the GL class code, the system ignores the GL class code and uses the company, document type, and cost type.
If the business unit for the AAI is blank, the system locates the responsible business unit, based on the value that is specified in the Responsible Business Unit field, which is located on the Work Orders tab in the Service and Warranty Management (SWM) constants.
6.4.1.1 Hierarchy for GL Class Codes for Work Orders
The system identifies the proper GL category codes according to this hierarchy:
-
Based on the service type on the work order, the system looks up the covered GL code and noncovered GL code in the Service Contract Services table (F1725).
-
The covered GL code is used to locate the appropriate distribution AAIs for amounts that are covered by contract.
-
The noncovered GL code is used to locate the appropriate distribution AAI for amounts that are not covered by contract.
-
If GL codes (both covered and noncovered) in the Service Contract Services table are blank, then the system uses the AAIs that are set up with the four-asterisk wildcard (****).
Based on the company, document type, GL code, and cost type, the system retrieves the revenue or expense account to use when creating an entry in the Billing Detail Workfile table (F4812).
If the four-asterisk wildcard is entered in the distribution AAIs for the GL class code, then the system ignores the GL class code and uses the company, document type, and cost type.
6.4.1.2 Hierarchy for the Responsible Business Unit for Work Orders
If the business unit for the AAI is blank, the system locates the responsible business unit based on the value that is specified in the Responsible Business Unit field, which is located on the Work Orders tab in the SWM constants.
In the SWM constants, you can select one of these options for the system to locate the responsible business unit:
| Option | Description |
|---|---|
| Item Branch Master - Service/Warranty Extension (F41171) | The system uses the branch/plant and item number on the work order to look up the responsible business unit in the Item Branch Master -Service/Warranty Extension table (F41171).
If the business unit exists in the table, the system uses this business unit in the resulting accounting journal entry. |
| Item Master - Service/Warranty Extension (F4117) | The system uses the item number on the work order to look up the responsible business unit in the Item Master - Service/Warranty Extension table (F4117).
If the business unit exists in the table, the system uses this business unit in the resulting accounting journal entry. |
| Product Family/Model Master (F1790) | The system uses the product model on the work order detail line to look up the responsible business unit in the Product Family/Model Master table (F1790).
If the business unit exists in the table, the system uses this business unit in the resulting accounting journal entry. |
| Asset Master File (F1201) | The system uses the equipment number on the work order detail line to look up the responsible business unit in the Asset Master File table (F1201).
If the business unit exists in the table, the system uses this business unit in the resulting accounting journal entry. |
| Customer Master (F0301) | The system uses the customer number on the work order detail line to look up the responsible business unit in the Customer Master table (F0301).
If the business unit exists for the customer in the table, the system uses this business unit in the resulting accounting journal entry. |
|
Note: If you assign a project business unit to the responsible business unit in the Business Unit Master table (F0006), the system uses the project business unit as the business unit for the account. |
See Setting Up AAIs.
6.4.2 Understanding Work Order Setup
Before you can use any of the features of Work Order Management, you need to define the critical information that the system needs for processing. You also specify the information you will use when you enter data throughout the system.
You also need to set up UDCs for Work Order Management.
6.4.2.1 Work Order Constants
To define default information that applies to the entire system, you set up system constants. Constants control the types of information that you track and the rules that the system uses to perform certain calculations.
6.4.2.2 Work Order History
Set up work order history to track work order status information by customer and by equipment. You can also set up the history so that a work order is not created for referenced equipment. These programs control the display of links within the work order entry program to indicate previous customer or product cases.
Default dates and status codes are defined by processing options. You can override default information by entering new dates and statuses. Links appear at the top of the work order entry forms to alert you to existing customer or product history. Click the links to see detailed information.
You access the processing options for the Work Order History - Customer (or Equipment) program (P17715) to specify how to set up work order history.
6.4.2.3 Work Order Activity Rules
You can set up rules that specify the statuses or steps through which a work order must pass. In addition, you can specify that certain statuses initiate events in the work order life cycle, such as:
-
Updating the maintenance status.
-
Locking the work order.
-
Completing the Subledger Inactive Code field for the work order.
You can attach work order activity rules to define the status flow and indicate the next step as determined by the status. Before the system can continue to the next step, you must enter the next status in the Next Status field. If you do not include the next status, the work order is considered complete. If you attach an open status code to the complete status revisions line, you can reopen the work order.
6.4.3 Prerequisites
Before you complete the tasks in this section:
-
Set up work order document types in the Document Type Maintenance program (P40040) from the Work Order Setup menu (G1742).
-
For each document type, enter 1 in the Work Order field.
The system uses this for splitting billing and costing amounts to different accounts, based on the service contract.
6.4.4 Forms Used to Set Up Work Orders for Service Management
| Form Name | FormID | Navigation | Usage |
|---|---|---|---|
| S/WM System Constants Revisions form | W17001C | Service & Warranty Setup menu (G1740), Service & Warranty Constants.
Select the Work Orders tab. |
Set up work order constants. |
| Customer (or Equipment) - Work With Work Order History | W17715A | Work Order Setup (G1742), Work Order History - Customer (or Work Order History - Equipment). | Locate work orders by customer or equipment and review history. |
| Work Order Activity Rules | W4826D | Daily Work Order Processing menu (G1712), Work Order Entry
Locate and select the work order to which you are attaching activity rules on the Work With Work Orders form. Select Supplemental, and then WO Activity Rules from the Row menu. |
Attach activity rules to work orders. |
6.4.5 Setting Up Work Order Constants
Access the S/WM System Constants Revisions form.
Figure 6-2 S/WM System Constants Revisions form: Work Orders tab
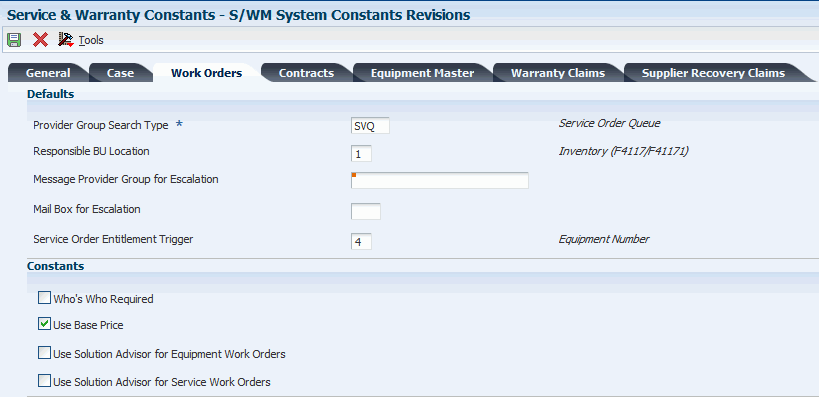
Description of ''Figure 6-2 S/WM System Constants Revisions form: Work Orders tab''
- Provider Group Search Type
-
Enter a value from UDC 01/ST (Search Type) that identifies the kind of Address Book record that the system selects when you search for a name or message, such as suppliers, customers, or employees.
- Responsible BU Location (responsible business unit location)
-
Enter a code that specifies from which tables the system retrieves the responsible business unit (that is, the business unit to which work orders are billed).
When adding a work order, the default value for the business unit is based on the constant value. For example, if the default value of the business unit is based on the equipment number, the system retrieves the value for the responsible business unit from the Equipment Master Extension table (F1217).
The default value is 1. Values are:
1: Item Master-Service/Warranty Extension table (F4117) and the Item Branch Master-Service/Warranty Extension table (F41171)
2: Product Family/Model Master table (F1790)
3: Equipment Master Extension table (F1217)
4: Address Book Master table (F0101)
5: S/WM Line Type Constants table (F1793)
6: S/WM Customer Number (F1797)
- Mail Box for Escalation
-
Enter a value from UDC 02/MB (Electronic Mail Boxes) that specifies the provider group mailbox that the system uses to deliver the message.
- Service Order Entitlement Trigger
-
Enter a value from UDC 17/ET (Entitlement Check Trigger) that specifies which field should trigger entitlement checking when you enter a work order.
- Who's Who Required
-
Enter an option that specifies whether the work order customer must have Who's Who records. If this option is enabled, you cannot add the work order unless the work order customer and all additional contacts reside in the Address Book-Who's Who table (F0111).
You must select a customer number from the window. The system returns the short identifier that is associated with the Who's Who record.
- Use Base Price
-
Select this option to specify whether to use the base price when pricing a work order from advanced pricing. If you enable this option, the system uses the base price.
- Use Solution Advisor for Equipment Work Orders
-
Applies to the CAM - Manage Equipment Work Orders program (P13714). P17714 does not reference this constant.
- Use Solution Advisor for Service Work Orders
-
Select this option to specify whether the system uses JD Edwards JD Edwards EnterpriseOne Solution Advisor to search for and maintain solutions to problems for service work orders. If you do not enable this option, the system uses Failure Analysis.
Applies to the Service Management Workbench program (P90CD020). P17714 does not reference this constant.
6.4.6 Setting Up Work Order History
Access the P17715 processing options using one of these navigations:
-
Select Work Order Setup (G1742), Work Order History - Equipment.
-
Select Work Order Setup (G1742), Work Order History - Customer.
6.4.7 Setting Processing Options for the Work With Work Order History Program (P17715)
Use these processing options to supply the default values for the Work With Work Order History program.
The values that you enter for these processing options determine whether the system displays a link when existing work orders are associated with the inventory item number, product model, equipment number, or customer number, if applicable.
You must first enter the status of the work orders that define the selection range criteria. Then define the number of days of history that you want to view. For example, if you enter 30 days, the program displays the product or customer link if a work order falls within the status range and was entered 30 days before the system date.
6.4.7.1 Process
Specify the default values for work order history.
- 1. Beginning Status for History
-
Specify the beginning status in the range of work order statuses that the system displays.
- 2. Ending Status for History
-
Specify the ending status in the range of work order statuses that the system displays.
- 3. Number of Days of History to Display
-
Specify the range of work order creation dates to display. The system uses this option to calculate the value in the Creation Date From field.
- 4. Work Order Type
-
Enter a value from UDC 00/TY (Work Order/ECO Type) that specifies the type of work orders to display.
- 5. Repair Date From
-
Specify the From repair date for the range of work order repair dates.
- 6. Repair Date Through
-
Specify the To repair date for the range of work order repair dates.
6.4.8 Attaching Activity Rules to Work Orders
Access the Work Order Activity Rules form.
Figure 6-3 Work Order Activity Rules form
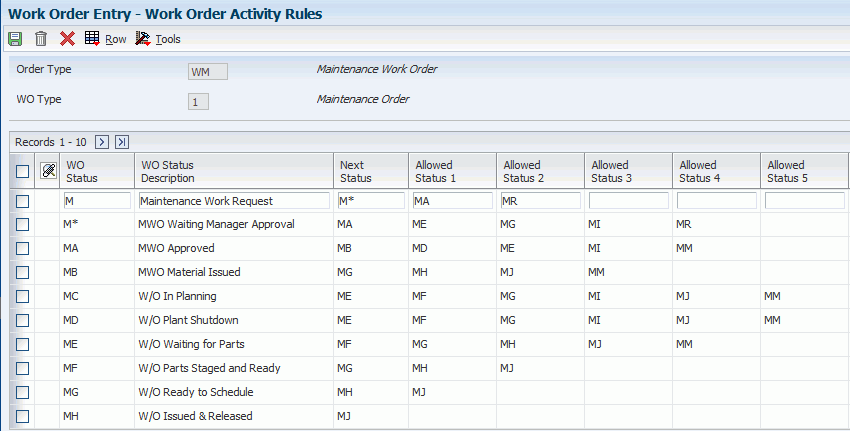
Description of ''Figure 6-3 Work Order Activity Rules form''
- WO Status (work order status)
-
Enter a value from UDC 00/SS (Work Order Status) that describes the status of a work order, rate schedule, or engineering change order. Any status change from 90 through 99 triggers the system to automatically update the completion date.
- WO Status Description (work order status description)
-
Enter a user-defined name or remark.
- Next Status
-
Displays the next status for a work order, according to the work order activity rules, as the work order moves through the approval route.
You must define a status code as a work order status in the Work Order Activity Rules table before you can use it as a next status.
- Allowed Status 1
-
(Optional) Indicates a status that can be assigned as the next step in the order process. Although this is not the preferred or expected next step, this status is an allowed override. The system does not allow you to initiate an order line step or status that is not defined as either the expected next status or an allowed status. Other allowed status codes enable you to bypass processing steps. In processing options, these codes are often referred to as override next status codes.
You must define a status code as a work order status in the Work Order Activity Rules table before you can use it as a next status or another allowed status.
- Maint. Status (maintenance status)
-
Enter a value from UDC 12/MS (Maintenance Status) that indicates the maintenance status of a piece of equipment, such as 50 for maintenance due or 60 for waiting for parts.
Note:
Status code 98 is reserved for canceled maintenance. Status code 99 is reserved for completed maintenance. Status code 01 (default) is reserved for initial maintenance setup. - Subledger Inactive
-
Select this option to indicate that a specific subledger is inactive. Examples of inactive subledgers are jobs that are closed, employees who have been terminated, or assets that have been disposed.
Select this option to indicate that a subledger is inactive. If a subledger becomes active again, clear this option.
If you want to use subledger information in the tables for reports, but you want to prevent transactions from posting to the record in the Account Balances table (F0902), select this option.
- Lock Flag
-
Enter a code that determines whether a work order can be changed at a particular status. The lock applies to records in both the Work Order Master table (F4801) and the Work Order Instruction table (F4802). Values are:
Blank: Do not lock the work order.
1: Lock the work order.
2: Lock the work order with a completion date.
3: Do not lock the work order with a completion date.
4: Lock the work order, the parts list, and the routings.
5: Lock the work order, the parts list, and the routings with a completion date.
6: Lock the order type and the work order type only.
6.5 Creating Work Orders Using the Service Management Workbench Program (P90CD020)
This section provides an overview of work orders and the service management workbench, list prerequisites, and discusses how to:
-
Enter work orders using the workbench.
-
Set processing options for the Service Management Workbench program (P90CD020).
-
Set processing options for the CRM - Manage Service Orders program (P90CD002).
6.5.1 Understanding Work Orders
You create work orders to formally request and schedule corrective maintenance, such as emergency repairs, and to record and communicate information about all of the details pertaining to the maintenance task. Circumstances for which you create a work order include:
-
You need to bill for the parts and labor that are required to fix a piece of equipment.
-
You need to send a technician to the site to repair the problem.
-
You use a service provider to resolve the problem and you need to create a voucher for payment.
You can create work orders for equipment covered by warranties. When you create a work order for a piece of equipment that is under warranty, a message appears to alert you that a warranty is in effect. You indicate a piece of equipment is under warranty by creating preventive maintenance (PM) service types for the warranty.
Work orders contain basic information such as the work order number, description, and the business unit to which the work order is charged. You can enter additional information, such as category codes, to further identify the work order. You can assign record types to work orders and then enter descriptive information into each record type, to communicate important information about a task to others who are involved. For example, you might want to include special instructions and information about the parts and tools that are needed to complete the task.
In addition, you can copy parts from a standard parts list or assign nonstandard parts to a work order. You can also assign detailed labor routing instructions to a work order. For example, you can:
-
Identify each work center that is needed to perform tasks.
-
Specify the sequence in which the tasks are performed.
-
Indicate the estimated duration of each task.
You can delete any work order from the system unless it has any of these characteristics:
-
It is used as a parent work order.
-
It has any account ledger transactions associated with it.
-
It has a parts list or a routing attached.
When you enter a work order, the system creates a record in the Work Order Master File table (F4801) and creates an extension table to store information that is pertinent to Service Management work orders, the Work Order Master Tag File table (F4801T).
6.5.2 Understanding the Service Management Workbench
The Service Management Workbench provides an interface that improves usability and navigation. You can add and revise service orders, as well as parts and labor, without having to access the programs separately using Row menus. Instead, programs are available from tabs and detail links from the Service Work Order - Manage {work order description} form.
If the organization is using Scripting, use the Script Runtime program (P90CF180) to guide you through a script that enables you to find a solution to a work order. A script is a predefined set of questions or statements that are joined in a particular order and used to gather information from respondents.
6.5.3 Prerequisites
Before entering work orders, complete these tasks:
-
Create a branch/plant.
-
Set up Address Book SWM service provider information for the person entering work orders.
-
Set up work order activity rules.
6.5.4 Forms Used to Enter Work Orders (P90CD020)
| Form Name | FormID | Navigation | Usage |
|---|---|---|---|
| Search For Service Work Orders | W90CD020B | Daily Work Order Processing (G1712), Service Management Workbench. | Search for or add work orders. |
| Add Work Order | W90CD002A | Click Add on the Search for Service Work Orders form to create a work order. | Add service work orders. |
| Service Work Order - Manage [work order description]. | W90CD002B | Do one of these options:
Click Save and Continue on the Add Work Order form, to continue with the work order and make additional changes or start to add the parts and labor. Click Save and Exit on the Add Work Order form, to save the work order and return to the Search for Service Work Orders form. Select a work order on the Search for Service Work Orders form, and click Select to view or revise work order information |
Enter, view, or revise work orders.
Select the Order Detail, Planning, Classification, Accounting, or Attachment tabs. |
| Service Work Order - Related Links for [work order description]. | W90CD002C | Select the Related Links detail link on the Service Work Order - Manage [work order description] form. | Maintain or view the work order information as enabled by these links:
|
| Work With Work Order History | W17715A | Select the Equipment History detail link on the Service Work Order - Manage [work order description] form. | View or revise equipment history for work orders. |
| Service Work Order Parts - Manage [work order description]. | W90CD015A | Select the Parts tab on the Service Work Order - Manage [work order description] form. | View or revise parts detail for work orders. |
| Service Work Order Labor - Manage [work order description]. | W90CD018A | Select the Labor tab on the Service Work Order - Manage [work order description] form. | View or revise labor detail for work orders. |
| Service Work Order Solution - Manage [work order description], Attempted Solutions. | W90CD017A | Select the Solution tab on the Service Work Order - Manage [work order description] form. | View, revise, or assign solutions for work orders.
Note: These Solution items are only applicable if you are using Solution Advisor. Otherwise, access is not available. |
| Service Work Order Solution - Manage [work order description], Frequently Used. | W90CD017B | Select the Frequently Used link on the Service Work Order - Manage [work order description] form. | Find frequently used solutions for work orders and assign a solution to a work order if applicable. |
| Service Work Order Solution - Manage [work order description], Search. | W90CD017C | Select the Search link on the Service Work Order - Manage [work order description] form. | Search for similar solutions for work orders. |
| Service Work Order Solution - Manage [work order description], Create New. | W90CD017D | Select the Create New link on the Service Work Order - Manage [work order description] form. | Create new work order solutions and add them to the solution database. |
| Service Work Order Status History - Manage [work order description]. | W90CD003B | Select the Status History tab on the Service Work Order - Manage [work order description] form. | View status history for work orders. |
| Service Work Order Related Actions - Manage [work order description]. | W90CD019A | Select the Related Actions tab on the Service Work Order - Manage [work order description] form. | Associate a script with a work order. |
6.5.5 Entering Work Orders Using the Workbench
Access the Service Work Order - Manage [work order description] form.
Figure 6-4 Service Work Order - Manage [work order description] form
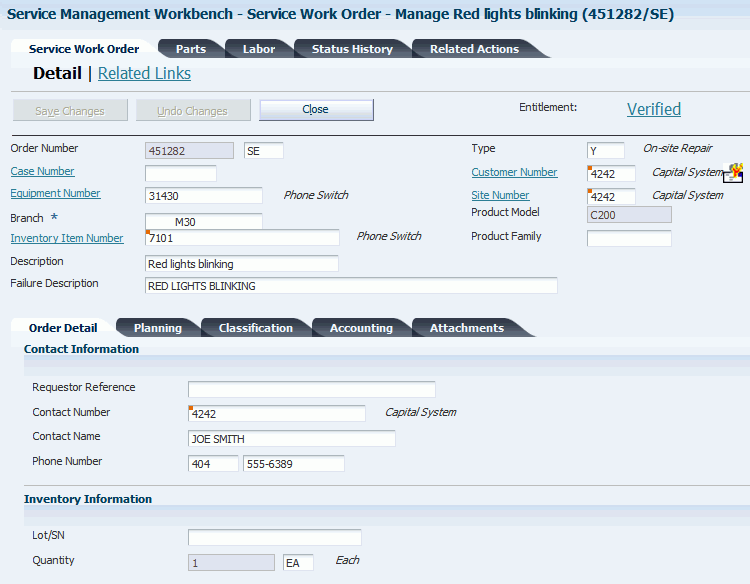
Description of ''Figure 6-4 Service Work Order - Manage [work order description] form''
You enter additional information on this form after you enter basic work order information on the Service Management Workbench - Add Work Order form.
6.5.6 Setting Processing Options for Service Management Workbench (P90CD020)
Use these processing options to set default values for the Service Management Workbench program.
6.5.6.1 Defaults
Specify the default values for service work orders.
- 1. Originator
-
Specify the Address Book number of the person who originated the change request. The system verifies this number against the Address Book.
- 2. Assigned To
-
Specify the Address Book number of the person assigned to do the work.
- 3. Categories - Work Order 01
-
Enter a value from UDC 00/W1 (Phase/System Codes) that indicates the current stage or phase of development for a work order. You can assign a work order to only one phase code at a time.
Note:
Some forms contain a processing option that enables you to enter a default value for this field. If you enter a default value on a form for which you have set this processing option, the system displays the value in the appropriate fields on any work orders that you create. The system also displays the value on the Project Setup form. You can either accept or override the default value. - 4. Categories - Work Order 02 and 5. Categories - Work Order 03
-
Enter a value from UDC 00/W2 (Work Order Category Code 2) or 00/W3 (Work Order Category Code 3) that indicates the type or category of a work order.
- 6. Priority
-
Enter a value from UDC 00/PR (Work Order Priority) that indicates the relative priority of a work order or engineering change order in relation to other orders.
- 7. Order Type
-
Enter a value from UDC 00/DT (Document Type - All documents) that identifies the type of document. This code also indicates the origin of the transaction. JD Edwards has reserved document type codes for vouchers, invoices, receipts, and time sheets, which create automatic offset entries during the post program. (These entries are not self-balancing when you originally enter them.) These document types should not be changed:
P: Accounts payable.
R: Accounts receivable.
T: Payroll.
I: Inventory.
O: Purchase order processing.
J: General accounting/joint interest billing.
S: Sales order processing.
- 8. Type - W.O. (type work order)
-
Enter a value from UDC 00/TY (Work Order/ECO Type) that indicates the classification of a work order or engineering change order. You can use work order type as a selection criterion for work order approvals.
- 9. Status Code (From) and 10. Status Code (To)
-
Enter a value from UDC 00/SS (Work Order Status) that identifies the status of a work order, rate schedule, or engineering change order. Any status change from 90 through 99 triggers the system to automatically update the completion date.
- 11. Requested Date (From) and 12. Requested Date (To)
-
Specify the date that an item is scheduled to arrive or that an action is scheduled for completion.
- 13. Start Date (From) and 14. Start Date (To)
-
Specify the start date for the order. You can enter this date manually, or have the system calculate it using a backscheduling routine. The routine starts with the required date and offsets the total lead time to calculate the appropriate start date.
- 15. Completed Date (From) and 16. Completed Date (To)
-
Specify the date that the work order or engineering change order is completed or canceled.
6.5.6.2 Versions
Specify the version of the Service Work Order Revisions program.
- 1. Service Work Order Revisions (P90CD002) Version.
-
If you leave this processing option blank, the system uses ZJDE0001.
- 2. Work Order Mass Update (P48022) Version
-
Specify the version of the Work Order Mass Udpate program that the system uses when you work with mass updates. If you leave this processing option blank, the system uses version ZJDE0002.
6.5.7 Setting Processing Options for CRM - Manage Service Orders (P90CD002)
Use these processing options to set default values for the CRM - Manage Service Orders program.
6.5.7.1 Defaults
Specify the default values that the system uses when you revise or enter work orders on the Work Order Revisions form.
- 1. Work Order Document Type
-
Specify the default document type that the system uses when you enter a work order; enter a value from UDC 00/DT (Document Type - All Documents). This code also indicates the origin of the transaction.
- 2. Work Order Type
-
Specify the type classification of a work order or engineering change order; enter a value from UDC 00/TY (Work Order Type. You can use work order type as a selection criterion for work order approvals.
- 3. Work Order Priority
-
Enter a value from UDC 00/PR (Work Order Priority) that indicates the priority of a work order or engineering change order in relation to other orders.
- 4. Customer
-
Specify an Address Book number for employees, applicants, participants, customers, suppliers, tenants, and any other address book members that the system uses as a default value. An Address Book number is a number that identifies an entry in the Address Book system.
- 5. Manager
-
Specify the Address Book number of a manager or a planner that the system uses as a default value when you enter a work order.
- 6. Supervisor
-
Specify the Address Book number of the supervisor that the system uses as a default value when you enter a work order.
- 7. Assigned To
-
Specify the Address Book number of a person that the system assigns to do the work when you enter a work order.
- 8. Inspector
-
Specify the Address Book number of an inspector that the system uses as a default value when you enter a work order.
- 9. Type Bill of Material
-
Enter a value from UDC 40/TB (Bill Type) that the system uses as a default value. The system reads the bill of material type code on the work order header to know which bill of material to use to create the work order parts list.
- 10. Type of Routing
-
Enter a value from UDC 40/TR (Routing Type) that the system uses as a default value. The system reads the routing type code on the work order header to determine which routing to use to create the work order labor instructions.
- 11. Failure Description
-
Specify the information type that the system retrieves for the failure description when you enter a work order. Values are:
Blank: Do not enter a failure description.
1: Use the default service type description.
2: Use the entitlement description.
3: Use the default method of pricing.
4: Use the default Work Order description
- 12. Supplier Recovery
-
Specify whether the system displays the supplier recovery fields. Values are:
Blank: Do not display.
1: Display.
- 13. Supplier Recovery Vendor
-
Specify which supplier or vendor the system uses when it creates a supplier recovery claim from a work order or a warranty claim.
- 14. Default Date and Time for Status
-
Specify whether the system displays the Actual Finish Date and Time or the system date and time. Values are:
-
Blank: The system displays the Actual Finish Date and Time. If there are no values in the Actual Finish Date and Time fields on the work order, the system displays the current system date and time on the Status Change form.
-
1: The system displays the current system date and time.
-
6.5.7.2 Edits
These processing options define which information is required when you enter a work order. When you activate these processing options, the system verifies that you have entered the appropriate information in the corresponding fields before it creates a work order. If you have activated any of these processing options and you do not have a value in a corresponding field, the system generates a hard error and does not allow you to enter a work order.
- 1. Required Equipment Number
-
Specify whether you are required to enter an equipment number when you create a work order. Values are:
Blank: Do not require.
1: Require. If you do not enter an equipment number, the system generates an error and stops processing until the error is corrected.
- 2. Warn if Business Unit does not match BU associated with the Equipment Number
-
Specify whether the system issues a warning if the responsible business unit does not match the business unit that is associated with the equipment number. Values are:
Blank: Do not issue.
1: Issue.
- 3. Tax Rate/Area Edit
-
Specify whether the system allows a blank value for the Tax Rate/Area field. Values are:
Blank: Do not allow.
1: Allow.
- 4. Start Date Default
-
Specify whether to use the current date as the default if you leave the Start Date field blank. Values are:
Blank: Do not use.
1: Use.
- 5. Date Edits
-
Specify whether the system verifies dates when you enter or change a work order. Values are:
Blank: Do not verify dates.
1: Verify dates. If the system detects date errors, it generates a warning but does not stop processing.
2: Verify dates. If the system detects date errors, it generates an error and stops processing until the error is corrected.
- 6. Required Caller Number
-
Specify whether the system requires you to enter the Address Book number for a caller when you are entering an order. Values are:
Blank: Not required.
1: Required.
- 7. Update Pricing Method
-
Specify whether you want to prevent the system from updating the pricing method. Values are:
Blank: Update.
1: Do not update.
- 8. Required Phone Number
-
Specify whether to require an area code and phone number when you create a work order. Values are:
Blank: Do not require.
1: Require.
- 9. Edit Case Number
-
Specify whether the system verifies that the request number on the work order exists in the Case table (F1755). Values are:
Blank: Do not verify.
1: Verify.
6.5.7.3 Process
Specify whether the system retrieves default information that is based on the information that you enter for a work order. You can perform additional processing, such as creating parts list and routings, entitlement checking, and approval processing.
- 1. Default Manager
-
Specify the default values for manager and supervisor addresses on the work order. Values are:
Blank: The system does not supply default values for the manager and supervisor addresses.
1: The system uses default values for the manager and supervisor addresses based on this hierarchy:
Specify the default values for manager and supervisor addresses on the work order. Values are:
First: The system uses the values for the manager and supervisor from processing options.
Second: The system uses the manager value from the SWM Address Book extension record for the customer.
Third: The system uses the manager value from the equipment record.
Fourth: The system uses the values for the manager and supervisor from the Work Order Default Coding File table (F48001), based on category codes 1, 2, and 3 from the work order.
Note:
The system uses the assigned-to address value from processing options first and information from the equipment record second. - 2. Recalculate Dates
-
Specify whether the system automatically recalculates the start date (STRT) and the request date (DRQJ) for the labor detail, and the request date (DRQJ) for the parts detail. Values are:
Blank: Do not recalculate.
1: Automatically recalculate.
- 3. Work Order Approval Type
-
Enter a value from UDC 48/AP (Approval Type) that the system uses for the work order approval process. The approval type indicates the type of approval path that a work order follows.
- 4. Work Order Cross Reference
-
Specify the work order cross-reference, which the system uses to determine the default parent equipment number. Values are:
Blank: The equipment's immediate parent.
1: The top-level parent.
2: The value from the parent work order.
- 5. Entitlement Checking
-
Specify whether the system performs entitlement checking and the preferred method. Values are:
Blank: Bypass entitlement checking.
1: Check entitlements using the Entitlement Dates table (F1791).
2: Check entitlements without using the Entitlement Dates table.
- 6. Failure Analysis
-
Specify whether the system requires you to perform failure analysis when you enter a work order. Values are:
Blank: Do not perform.
1: Perform.
- 7. Display Entitlement Inquiry
-
Specify whether the system displays the Entitlement Inquiry form following an entitlement check. Values are:
Blank: Do not display.
1: Display.
- 8. Create Labor Detail
-
Specify whether the system creates labor detail when you create a work order. Values are:
Blank: Do not create.
1: Create.
- 9. Create Parts Detail
-
Specify whether the system automatically creates a parts list when you add a work order. Values are:
Blank: Do not automatically.
1: Automatically create.
- 10. Display Who's Who Search
-
Specify whether the system displays the Who's Who Search & Select form when you continue beyond the Customer Number field and the Caller Name field is blank. Values are:
Blank: Do not display.
1: Display.
- 11. Work Order Status Window
-
Specify whether the system automatically displays the work order status window when you add a work order. Values are:
Blank: Do not automatically display.
1: Automatically display.
- 12. E-mail Service Provider
-
Specify whether the system sends an email message to the primary service provider when you create a work order. Values are:
Blank: Do not send.
1: Send.
- 13. Create Individual Resource Assignments
-
Specify whether to automatically create individual resource assignments based on the assigned-to (ANP) Address Book number on the form. The system validates the address book number against the Resource Master table (F48310). Values are:
Blank: Do not create.
1: Create.
- 14. Status Window on Update
-
Specify whether the system displays the Status Change form when you update a work order. Values are:
-
Blank: The system displays the Status Change form each time a work order is updated.
-
1: The system hides the Status Change form when a work order is updated.
If the Status Window on Update processing option is set to hide the Status Change form, and you update the work order status, the system writes a history record to the F1307 table with the date and time specified in the Default Date and Time for Status processing option on the Defaults tab.
-
6.5.7.4 Equipment Master
These processing options define whether the system updates information in a corresponding equipment record to match the information in a work order.
- 1. Customer Number Update and 2. Site Number Update
-
Specify how the system updates the Equipment Master when you change the customer number or site for an equipment record on a call, a contract, or a work order. Values are:
Blank: Do not update.
1: Display a prompt to update.
2: Automatically update.
6.5.7.5 Versions
Specify the versions of other programs that the system uses when you require additional information about the work orders.
- 1. Work Order Parts (P90CD015) Version, and 2. Work Order Labor (P90CD018) Version
-
If you leave these processing options blank, the system uses ZJDE0001.
- 3. Work Order Print (R17714) Version
-
If you leave this processing option blank, the system uses XJDE0001.
- 4. Work Order Status History (P90CD003) Version, and 5. Product Repair History (P17715) Version
-
If you leave these processing options blank, the system uses ZJDE0001.
- 6. Customer Repair History (P17715) Version
-
Specify the version of the Work with Work Order History program (P17715) that the system uses for customer repair history. If you leave this processing option blank, the system uses ZJDE0002.
- 7. Equipment Repair History (P17715) Version
-
Specify the version of Service Order History (P17715) that the system uses for equipment repair history. If you leave this processing option blank, the system uses ZJDE0003.
- 8. Work with RMA (P40051) Version, 9. RMA Revision (P400511) Version, and 10. Work With Contracts (P1720) Version
-
If you leave these processing options blank, the system uses ZJDE0001.
- 11. CRP/RCCP Regeneration (R3382) Version
-
Specify the version of the CRP Regeneration (R3382) to use. If you leave this processing option blank, the system uses XJDE0001.
- 12. Manager Address Book (P01012) Version, 13. Failure Analysis (P17767) Version, 14. Work with Failure Analysis (P17766) Version, 15. Failure Analysis Tree Search and Select (P17763S), 16. Failure Analysis Search and Select (P17768) Version, 17. Equipment Master Revisions (P90CD001 Version, 18. Equipment PM Schedule (P1207) Version
-
If you leave this processing option blank, the system uses ZJDE0001.
- 19. Equipment Status History (P1307) Version, 20. Credit Check (P42050) Version, 21. Quick Customer/Contact Add (P01015) Version, 22. Site Address Book (P01012) Version, 23. Equipment Search/Select (P17012S) Version, 24. Work With Work Order History (P17715) Version
-
If you leave these processing options blank, the system uses ZJDE0001.
- 25. Work Order Quote (P17717) Version
-
Specify the version of the Online Work Order Quote Inquiry program (P17717) that the system uses after you enter the work order.
- 26. Resource Assignment Workbench (P48331) Version, 27. Component Changeout (P17STAT) Version, 28. Status Change (P17714) Version, 29. Customer Detail (P90CA080) Version, 30. Item Detail (P90CA100) Version, and 31. Case Update (P90CG501) Version
-
If you leave these processing options blank, the system uses version ZJDE0001.
- 32. Work with Labor Master (P3003) Version and 33. Bill of Material Revisions (P3002) Version
-
Specify the version of the Work with Routing Master program (P3003) and the Bill of Material Revisions program (P3002) that the system uses for model work orders.
6.5.7.6 Category Codes
Specify the default category code values.
- 1. Category Code 1 through 10. Category Code 10
-
Enter the value for category codes 1 through 10 that the system uses as a default value. These category codes indicate the current stage or phase of development for a work order. You can assign a work order to only one phase code at a time. You must enter a value that has been defined in UDC 00/W1 through 00/W0.
- 11. Category Code 11 through20. Category Code 20
-
Enter the value for category codes 11 through 20 that the system uses as a default value. You must enter a value that has been defined in UDC 00/X1 through 00/X0.
6.5.7.7 Prepayment
These processing options control whether you can record payment information for work orders.
Prepayment of a work order takes place when a seller receives a form of payment from the customer at the time of order entry. Many types of prepayments exist that a customer can use, such as cash, check, and credit card. When a prepayment takes place, the system records transaction information and indicates the payment on the invoice.
- 1. Prepayment Processing
-
Specify whether to activate Prepayment Processing. Values are:
Blank: The system does not update prepayment processing files.
1: The system updates prepayment processing files.
- 2. Authorization Processing
-
Specify the method of processing. Values are:
Blank: The system does not process.
1: Interactively.
2: Batch or subsystem mode, based on the version.
- 3. Settlement Processing
-
Specify the settlement processing method. Values are:
Blank: The system does not process.
1: Interactively.
2: Batch or subsystem mode, based on the version.
- 4. Authorize Prepayment Transaction (R004201) version
-
Specify the version to be used for the Authorize Prepayment Transaction UBE (R004201). If you leave this processing option blank, the system uses XJDE0001.
- 5. Settle Prepayment Transaction (R004202) version
-
Specify the version to be used for the Settle Prepayment Transaction (R004202). If you leave this processing option blank, the system uses XJDE0001.
6.6 Creating Work Orders Using the Work Order Entry Programs (P48201/P17714)
This section provides an overview of work order entry, lists prerequisites, and discusses how to:
-
Enter work orders (P48201/P17714).
-
Set processing options for the Work Order Revisions program (P17714).
6.6.1 Understanding Work Order Entry
When you set processing options for Work With Work Orders (P48201), enter an Address Book number in the Originator field on the Defaults 3 tab. The system uses this address book number to search for work orders entered by a user. To display all of the work orders when you click Find on Work With Work Orders, type 0 in this field.
For the Service Management system, you can enter the document type that you want the system to use for work orders on the Defaults 2 tab. This document type can be overridden if the work order is entitled by a contract.
6.6.2 Prerequisites
The prerequisites for the Work Order Entry programs are the same as for the Service Management Workbench.
6.6.3 Forms Used to Enter Work Orders (P48201/P17714)
| Form Name | FormID | Navigation | Usage |
|---|---|---|---|
| Work With Work Orders | W48201F | Daily Work Order Processing (G1712), Work Order Entry | Locate or add work orders. |
| Work Order Revisions | W17714A | Click Add on the Work With Work Orders form. | Enter a work order. |
6.6.4 Entering Work Orders (P48201/P17714)
Access the Work Order Revisions form. Select the Order Detail, Planning, Classification, and Accounting tabs.
- Branch
-
Enter a code that represents a high-level business unit. Use this code to refer to a branch or plant that might have departments or jobs, which represent lower-level business units, subordinate to it. For example:
Branch/Plant (MMCU)
Dept A (MCU)
Dept B (MCU)
Job 123 (MCU)
Business unit security is based on the higher-level business unit.
The branch default value is derived from the equipment record and defines the branch/plant from which inventory is issued.
- Failure Description
-
Enter a description of the customer issue.
If you are accessing this form from the Case or Failure Analysis modules, the system enters information from the equipment record as default information when you enter a work order. The system also checks entitlement for the customer.
- Actual Finish Date
-
Enter the date that the work order or engineering change order is completed or canceled. If the status of the work order is at a complete status, the system uses the current date as the default value.
- Assigned To
-
Enter the address book number of the person assigned to do the work. For Service Management, the assigned-to person represents the primary technician.
- Category 02 and Category 03
-
Enter a value from user-defined code (UDC) table 00/W2 (Work Order Category Code 2) or UDC 00/W3 (Work Order Category Code 3) that indicates the type or category of a work order.
Note:
A processing option for some forms lets you enter a default value for this field. The system enters the default value automatically in the appropriate fields on any work orders that you create on those forms and on the Project Setup form. You can either accept or override the default value. - Category 04, Category 05 and Category 10
-
Enter values from UDCs 00/W4 (Work Order Category Code 4), 00/W5 (Work Order Category Code 5), or 00/W0 (Work Order Category Code 10) that indicate the type or category of the work order.
- Covered G/L Category
-
Enter a value from UDC 41/9 (G/L Posting Category) that identifies the general ledger offset to use when the system is searching for the account to which it posts the covered portion (by warranty or contract) of the accounting transaction. If you do not want to specify a general ledger offset, you can enter four asterisks in this field or you can leave this field blank. If you leave this field blank, the system uses the general ledger offset from Inventory.
- Est. Hours or Estimated Hours
-
Enter the standard hours of labor that you expect to incur in the normal production of the item or for the work order
The run labor hours in the Routing Master table (F3003) are the total hours that it takes the specified crew size to complete the operation. The hours are multiplied by the crew size during shop floor release and product costing.
- Est. Labor (estimated labor)
-
This is the estimated labor cost of a work order.
- Est. Material (estimated material)
-
This is the estimated material cost of a work order.
- Est. Other (estimated other)
-
Amount - Estimated Other.
If you associate routings with a work order, the system retrieves default values for the Labor Hours and Labor Amount fields. If you associate a parts list with a work order, the system retrieves default values for the Material Amount field. When you add a routing list, a parts list, or both, the program updates the cost to the work order header.
Alternatively, to update the actual costs of a work order, you can run a batch program called Update W.O. Actual Amounts (R13800). This program summarizes transactions for labor and material, and updates the actual cost fields of the work order.
- Estimated Downtime Hours
-
The estimated duration of a work order. It defines how long the piece of equipment might be out of service to complete the work order. This is different than total estimated hours.
- Experience Level
-
Enter a value from UDC 00/W9 (PS Consulting Experience Lvl) that indicates the type or category of the work order.
- Geographic Region
-
Enter the geographic region of the customer.
- Inspector
-
Enter the Address Book number of the inspector. For Service Management, the inspector represents the secondary technician.
- Language
-
Enter a value from UDC 01/LP (Language) that specifies the language to use on forms and printed reports. Before you specify a language, a code for that language must exist either at the system level or in the user preferences.
- Manager
-
For Service Management, the manager represents the primary service provider.
- Non-Covered G/L Category
-
Enter a value from UDC 41/9 (G/L Posting Category) that identifies the general ledger (GL) offset to use when the system is searching for the account to which it posts the noncovered portion of the accounting transaction. If you do not want to specify a general ledger offset, you can enter four asterisks (****) in this field, or you can leave the field blank. If you leave the field blank, the system uses the general ledger offset from Inventory.
The values for the Covered G/L Category and Non-Covered G/L Category fields come from the service contract's service package, based on the type of service on the work order.
- Originator
-
Enter the Address Book number of the person who originated the change request. The system verifies this number against the Address Book.
- Parent W.O. No (parent work order number)
-
Identifies the parent work order. You can use this number to:
Enter default values for new work orders, such as type, priority, status, and manager.
Group work orders for project setup and reporting.
- Payment Amount
-
In the Accounts Payable system, the amount of the payment.
In the Accounts Receivable system, the amount of the receipt. This amount must balance to the total amount applied to the invoice pay items.
- Phase
-
Enter a value from UDC 00/W1 (Phase/System Codes) that indicates the current stage or phase of development for a work order. You can assign a work order to only one phase code at a time.
Note:
Certain forms contain a processing option that enables you to enter a default value for this field. If you enter a default value on a form for which you have set this processing option, the system displays the value in the appropriate fields on any work orders that you create. The system also displays the value on the Project Setup form. You can either accept or override the default value. - Priority
-
Enter a value from UDC 00/PR (Work Order Priority) that indicates the relative priority of a work order or engineering change order in relation to other orders.
A processing option for some forms lets you enter a default value for this field. The value then appears automatically in the appropriate fields on any work order you create on those forms and on the Project Setup form. You can either accept or override the default value.
- Reference
-
Enter an alphanumeric value used as a cross-reference or secondary reference number. Typically, this is the customer number, supplier number, or job number.
- Requested Finish Date
-
Enter the date that the work order or engineering change order is planned to be completed.
This date can be calculated based on contract coverage.
- Skill Type
-
Enter a value from UDC 00/W8 (Country Code) that indicates the type or category of the work order.
- Status
-
Enter a value from UDC 00/SS (Work Order Status) that describes the status of a work order, rate schedule, or engineering change order. Any status change from 90 through 99 triggers the system to automatically update the completion date.
- Status
-
Enter a value from UDC 00/W6 (Consulting Status) that indicates the status of the work order.
- Status Comment
-
Enter a brief description to explain the status of the work order.
- Supervisor
-
Enter the Address Book number of the supervisor. For Service Management, the supervisor represent the secondary service provider.
- Type Bill of Material
-
Enter a value from UDC 40/TB (Bill Type) that designates the type of bill of material. You can define different types of bills of material for different uses. For example:
M: Standard manufacturing bill
RWK: Rework bill
SPR: Spare parts bill
The system enters bill type M in the work order header when you create a work order, unless you specify another bill type. The system reads the bill type code on the work order header to know which bill of material to use to create the work order parts list. MRP uses the bill type code to identify the bill of material to use when it attaches MRP messages. Batch bills of material must be type M for shop floor management, product costing, and MRP processing.
- Type of Routing
-
Enter a value from UDC 40/TR (Routing Type) that indicates the type of routing. You can define different types of routing instructions for different uses. For example:
M: Standard manufacturing routing
RWK: Rework routing
RSH: Rush routing
You define the routing type on the work order header. The system then uses the specific type of routing that you define in the work order routing.
Product Costing and Capacity Planning systems use only M type routings.
- W.O. Flash Message (work order flash message)
-
Enter a value from UDC 00/WM (Work Order Flash Message) that indicates a change in the status of a work order. The system indicates a changed work order with an asterisk in the appropriate report or inquiry form field. The system highlights the flash message in the Description field of the work order.
6.6.5 Setting Processing Options for the Work Order Revisions Program (P17714)
Use these processing options to supply default values for the Work Order Revisions program. The processing options for Work Order Revisions are the same as the CRM - Manage Service Orders program (P90CD002) except where noted.
See Setting Processing Options for CRM - Manage Service Orders (P90CD002).
6.6.5.1 Defaults
These processing options are identical to CRM - Manage Service Orders program (P90CD002).
6.6.5.2 Edits
- 2. Require Customer Address Number
-
Specify whether to require a customer address number when you enter a work order. Values are:
Blank: Do not require.
1: Require.
6.6.5.3 Process
These processing options define the processing that the system performs for this version of the Work Order Revisions program (P17714).
- 12. Create Work Order Tag files (future)
-
Specify whether the system creates the interoperability table (F4801Z). Values are:
Blank: Do not create.
1: Create.
- 14. Hide Scheduling Tab, 15. Hide Classification Tab, 16. Hide Accounting Tab, and 17. Hide Attachment Tab
-
Specify whether to hide the Scheduling, Classification, Accounting, or Attachment tab on the Work Order Revisions form. Values are:
Blank: Do not hide.
1: Hide.
6.6.5.4 Equipment Master
These processing options are identical to CRM - Manage Service Orders program (P90CD002).
6.6.5.5 Versions
These processing options specify the versions of other programs that the system uses when you require additional information about the work orders. You can access these programs from Form and Row menu selections on the Work Order Revisions form.
- 1. Work Order Parts Detail (P17730) version and 2. Work Order Labor Detail (P17732) version
-
If you leave these processing options blank, the system uses ZJDE0001.
- 4. Equipment Work Order Report (R48425) version
-
If you leave this processing option blank, the system uses XJDE0001.
- 5. Work Order Status History (P1307) version
-
If you leave this processing option blank, the system uses ZJDE0002.
- 12. Work With Labor Master (P3003) version and 13. Bill of Material Revisions (P3002) version
-
If you leave these processing options blank, the system uses ZJDE0001.
6.6.5.6 Category Codes
These processing options are identical to CRM - Manage Service Orders program (P90CD002).
6.6.5.7 Prepayment
- 6. Override Next Status for Authorized Transactions (future)
-
Specify the override next status code for authorized transactions. The override status is another enabled step in the process.
- 7. Override Next Status for Settled Transactions (future)
-
Specify the next status code for settled transactions. The override status is another enabled step in the process.
6.6.5.8 Self Service
Specify the default values for working with self-service processing on the web.
- 1. Default Responsible Business Unit
-
Specify the default responsible business unit that system uses when you enter a customer self-service work order.
- 2. Default Branch
-
Specify the default branch that the system uses when you enter a customer self-service work order.
- 3. Enable Customer Number Field
-
Specify whether the system enables the customer number field on the Customer Self Service form. Values are:
Blank: Do not enable.
1: Enable.
- 4. Default Customer Number
-
Specify whether to use the user address book number as the default customer when you create a work order for Customer Self Service. Values are:
Blank: Do not use a default customer.
1: Use the user address book number as the default customer.
6.6.5.9 Rentals (Release 9.1 Update)
This processing option works with the JD Edwards EnterpriseOne Rental Management system.
- 1. Status after Contract Line Cancel
-
Specify the status that the system assigns to rental contract work orders when you cancel a rental contract that has associated work orders. The value that you enter must exist in the Work Order Status UDC table (00/SS).
6.7 Assigning Parts to a Work Order
This section provides an overview of parts assignment, lists prerequisites, lists the forms used to assign parts to a work order, and discusses how to:
-
Set processing options for the CRM - Manage Work Order Parts program (P90CD015).
-
Set processing options for the Work Order Parts Detail program (P17730).
6.7.1 Understanding Parts Assignment
You can assign parts to a work order to satisfy parts requirements for maintenance tasks. Depending on how you set up the system, you can indicate how and when it commits inventory to satisfy a work order's parts requirements. For example, you can use Workflow Management to direct the system to commit inventory to a work order only at a particular work order status.
You can assign parts from a standard parts list that you enter when you create the work order. In addition, you can assign inventory parts that do not appear on a standard parts list, such as when you are creating a work order for an unanticipated emergency repair. You can also assign parts for which you do not maintain an inventory master, such as special order parts that you rarely need.
You can also assign parts to a work order from a standard parts list. This action is especially useful when you create work orders for routine maintenance tasks that require identical parts.
|
Note: You can access the processing options for the CRM - Manage Work Order Parts and Work Order Parts Detail program by entering P90CD015 and P17730 in the Interactive Versions application. |
6.7.2 Prerequisites
Verify that you have purchased and installed these systems. You must have installed these JD Edwards JD Edwards EnterpriseOne systems to use work order parts lists:
-
System 30: Product Data Management.
-
System 31: Shop Floor Management.
-
System 40: Inventory Base and Order Processing.
-
System 41: Inventory Management.
-
System 43: Procurement.
Verify that standard parts lists are set up.
6.7.3 Forms Used to Assign Parts to a Work Order
| Form Name | FormID | Navigation | Usage |
|---|---|---|---|
| Service Work Order Parts - Manage [work order description] | W90CD015A | Daily Work Order Processing (G1712), Service Management Workbench.
Select the work order record on the Search for Service Work Orders form. Select the Parts tab on the Service Work Order - Manage [work order description] form. |
Assign parts to a work order. |
| Work With Work Orders | W48201F | Daily Work Order Processing (G1712), Work Order Entry. | Locate work orders. |
| Work Order Parts List Revisions | W17730A | Select a record on the Work With Work Orders form, and then select Parts Detail from the Row menu. | Assign parts from a standard parts list. Accept the values or enter different values for parts lists. |
| Copy Screen | W17730D | Select the Copy BOM link on the Service Work Order - Manage [work order description] form.
Select the Copy BOM link on the Work Order Parts List Revisions form. |
Copy bill of material information. |
6.7.4 Setting Processing Options for the CRM - Manage Work Order Parts Program (P90CD015)
Use these processing options to supply the default values for the CRM - Manage Work Order Parts program.
6.7.4.1 Display
Specify whether to display certain fields.
- 1. Billable Amounts Fields, 2. Payable Amounts Fields, and 3. Supplier Recovery
-
Specify whether to hide the billable-related fields, payable-related fields, or the fields related to supplier recovery information in the parts detail area. Values are:
Blank: Hide.
1: Display.
6.7.4.2 Process
Specify the default values for processing work order parts detail.
- 1. Labor Details
-
Specify whether the system creates labor detail records when you create parts detail lines for a work order. Values are:
Blank: Do not create.
1: Create.
- 2. Substitute Processing Method
-
Specify the substitute processing method that the system uses when attaching parts detail information to a work order. Values are:
Blank: Do not use substitutes for shortages.
1: Use substitutes for shortages.
2: Display the Substitute Availability form when the substitute quantity can cover the shortage.
- 3. Commitment Processing
-
Specify whether the system generates component commitments when the parts detail is attached to the work order.
This feature is based on the commitment control settings that are stored in the Job Shop Manufacturing Constants table (F3009). Values are:
Blank: Use the commitment control settings in the Job Shop Manufacturing Constants table.
1: Do not use commitment processing.
- 4. Component's generic text
-
Specify whether to copy the text attachment for a component line item to the work order parts detail. Values are:
Blank: Do not copy.
1: Copy.
- 5. Prior Revision Levels
-
Specify whether to allow the attachment of prior revision levels. Values are:
Blank: Do not allow.
1: Allow.
- 6. Inventory search form exit
-
Specify which form the system accesses when you select the Form exit to search for inventory. Values are:
Blank: Item Search by Branch
1: Item Search by Supplier / Item
- 7. Material Status To
-
Specify the status code that the system uses to update the material status of components on the work order parts detail; enter a value from UDC 31/MS (Material Status).
6.7.4.3 Warehousing
Specify the default values to use with the warehousing options for parts.
- 1. Request Processing Mode
-
Specify whether the system generates a warehouse pick request for the items on the parts detail. Values are:
Blank: Do not generate a pick request.
1: Generate a pick request only.
2: Generate a pick request and process it via the subsystem.
Note:
To use this processing option, you must complete all warehouse setup and ensure that warehouse control is turned on in the Branch/Plant Constants program (P41001). - 2. Version for Location Selection Driver (R46171)
-
If processing pick requests through the subsystem, specify the version of Location Selection to use if processing pick requests through the subsystem. If you leave this processing option blank, the system uses XJDE0007.
- 3. Default staging location
-
Specify the default staging location for releasing warehouse goods. When you set the Request Processing Mode processing option to generate pick requests, the system stages the pick requests at the location that you enter here.
- 4. Default Staging Location for Availability
-
Specify whether the system verifies part availability in the default staging location. If the part is available at the staging location, the system does not generate a request for the part. Values are:
Blank: Do not verify part availability.
1: Verify part availability.
Note:
This processing option applies to parts without an assigned work center location.
6.7.4.4 Versions
- 1. Work Order Labor Details - P90CD018 and 2. Work Order Inventory Issues - P31113
-
Specify the version of the programs to use. If you leave these processing options blank, the system uses ZJDE0001.
6.7.4.5 EM Edits
Equipment Maintenance processing options specify default values for purchase order options.
- 1. Purchase Order Creation
-
Specify whether the system allows you to create a purchase order from the Work Order Parts Detail program (P17730). Values are:
Blank: Do not allow
1: Allow.
- 2. Purchase Order Message Consolidation by Vendor
-
Specify, when creating purchase orders, whether the system creates an order for each detail line or consolidates the detail lines by vendor onto an order. Values are:
Blank: Do not consolidate all detail lines.
1: Consolidate all detail lines.
- 3. Line Type for Non-Catalogued Items
-
Specify the line type that the system uses when copying noncatalogued parts from the Intelligent Graphic Solution (IGS) program to the work order parts detail. Enter a line type code from the Line Type Constants program (P40205). If you leave this processing option blank, the system uses line type defined within IGS.
6.7.4.6 EM Versions
- 1. Supplier Master - P04012 (Not applicable in this release)
-
Specify the version of the Supplier Master program (P04012). If you leave this processing option blank, the system uses ZJDE0001.
- 2. Open Order Inquiry - P4310
-
Specify the version for the Purchase Order Inquiry program (P430301). If you leave this processing option blank, the system uses ZJDE0006.
- 3. Supply and Demand Inquiry - P4021
-
Specify the version for the Supply and Demand Inquiry program (P4021). If you leave this processing option blank, the system uses ZJDE0003.
- 4. Item Availability by Time - P3413
-
Specify the version of the MPS Time Series program (P3413). If you leave this processing option blank, the system uses ZJDE0002.
- 5. Purchase Order Entry - P4310
-
Specify the version of the Purchase Orders program (P4310). If you leave this processing option blank, the system uses ZJDE0001.
- 6. Equipment Parts List Search and Select - P13017S
-
Specify the version of the Equipment Parts List Search and Select Inquiry program (P13017S) that you access from the Work Order Parts Detail form. If you leave this processing option blank, the system uses ZJDE0001.
- 7. Work Order Pick List - R13415
-
Specify the version of the Work Order Pick List program (R13415) that you access from the Work Order Parts Detail form. If you leave this processing option blank, the system uses XJDE0001.
6.7.4.7 Export
Specify the default values for export and change transactions.
- 1. Transaction Type for the export transaction
-
Enter a value from UDC 00/TT (Transaction Type) that the system uses for export processing or for supply chain scheduling and planning. If you leave this processing option blank, the system does not use export processing.
- 2. Before Image Processing (Future)
-
Specify whether the before image of the record is to be written for change transactions. Values are:
Blank: Do not write.
1: Write.
6.7.4.8 IGS
Specifies the mode to use when calling the IGS product.
- 1. Enter value for the IGS Mode when calling the IGS URL.
-
Specify the mode to use when calling the IGS product. Values are:
Blank: assy (assembly)
toplevel
item
asset
bom
6.7.5 Setting Processing Options for the Work Order Parts Detail Program (P17730)
Use these processing options to supply the default values for the Work Order Parts Detail program. The processing options for the Work Order Parts Detail program are the same as the CRM - Work Order Parts program (P90CD015) except where noted.
6.7.5.1 Display
These processing options are identical to CRM - Work Order Parts program (P90CD015).
6.7.5.2 Process
Specify the default values for processing work order parts detail.
- 5. Allow selection of components (S1773008)
-
Specify whether the system includes all components when you copy orders. Values are:
Blank: All components.
1: Selected components.
6.7.5.3 Warehousing
These processing options are identical to CRM - Work Order Parts program (P90CD015).
6.7.5.4 Versions
- 1. Work Order Labor Details - P17732
-
Specify the version to use of the Work Order Labor Details program. If you leave this processing option blank, the system uses ZJDE0001.
6.7.5.5 EM Edits
These processing options are identical to CRM - Work Order Parts program (P90CD015).
6.7.5.6 EM Versions
These processing options are identical to CRM - Work Order Parts program (P90CD015).
6.7.5.7 Export
These processing options are identical to CRM - Work Order Parts program (P90CD015).
6.7.5.8 IGS
These processing options are identical to CRM - Work Order Parts program (P90CD015).
6.8 Assigning Labor to a Work Order
This section provides an overview of labor assignment, lists prerequisites, and discusses how to:
-
Copy labor details from standard instructions.
-
Manually assign labor details.
-
Set processing options for the CRM - Manage Work Order Labor program (P90CD018).
-
Set processing options for the Work Order Labor Detail program (P17732).
6.8.1 Understanding Labor Assignment
When you know in advance the labor requirements for a particular task, you can set up standard labor instructions (labor details) for the task. You can copy from these instructions when you need to assign labor details for similar tasks.
After you create a work order, you can manually assign labor details for any task for which you have not set up standard instructions.
You can specify which work center is responsible for each task on a work order. You can specify the sequence of operations for each task, as well as the labor rates and the number of hours necessary to complete each task.
You can delete any work order from the system unless it has any of these characteristics:
-
It is used as a parent work order.
-
It has any account ledger transactions associated with it.
-
It has a parts list or labor detail attached.
|
Note: You can access the processing options for the CRM - Manage Work Order Labor and Work Order Labor Detail programs by entering P90CD018 and P17732 in the Interactive Versions application. |
6.8.2 Prerequisites
To use labor detail for work orders, verify that you have purchased and installed these required JD Edwards JD Edwards EnterpriseOne systems:
-
System 30: Product Data Management.
-
System 31: Shop Floor Management.
-
System 40: Inventory Base and Order Processing.
-
System 41: Inventory Management.
-
System 43: Procurement.
6.8.3 Forms Used to Assign Labor to a Work Order
| Form Name | FormID | Navigation | Usage |
|---|---|---|---|
| Service Work Order Labor - Manage [work order description] | W90CD018A | Daily Work Order Processing (G1712), Service Management Workbench.
Select the work order record on the Search for Service Work Orders form. Select the Labor tab on the Service Work Order - Manage [work order description] form. |
Manually assign labor details. |
| Work With Work Orders | W48201F | Daily Work Order Processing menu (G1712), Work Order Entry | Locate work orders. |
| Work Order Labor Details | W17732D | Locate a record on the Work With Work Orders form, and then select Labor Detail from the Row menu. | Manually assign labor details. |
| Copy by Item | W17732A | Select the Copy by Item link on the Service Work Order - Manage [work order description] form.
Select Copy by Item from the Form menu on the Work Order Labor Details form. |
Copy labor detail information from standard instructions. You can accept the values or enter different values. The system completes the Work Order Labor Details form with values from the standard labor instructions. |
6.8.4 Copying Labor Details from Standard Instructions
Access the Copy by Item form.
-
Click OK to copy the standard instructions for the displayed item and branch/plant to the work order labor details.
-
Accept the values on the Copy by Item form or enter different values.
The system completes the labor details with values from the standard instructions.
-
Make additional changes and save the record.
6.8.5 Manually Assigning Labor Details
Access the Service Work Order Labor - Manage [work order description] form.
Figure 6-6 Service Work Order Labor - Manage [work order description] form
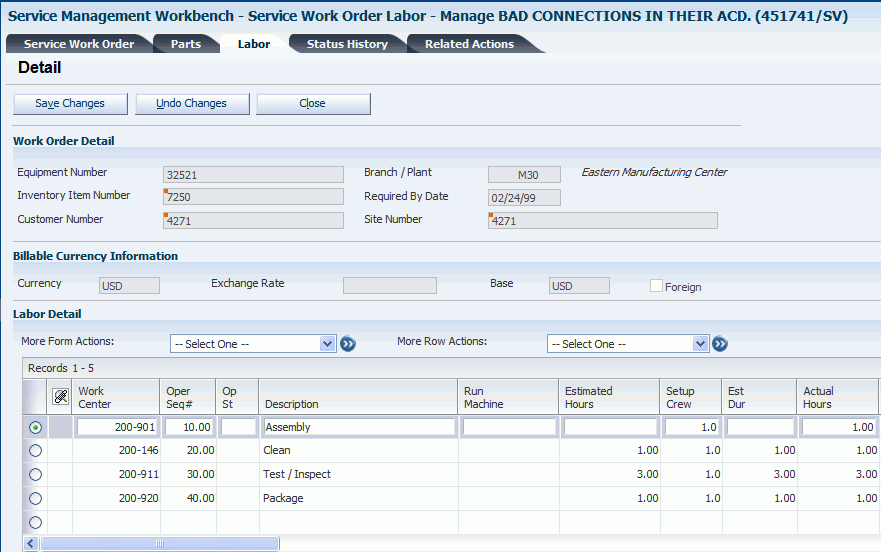
Description of ''Figure 6-6 Service Work Order Labor - Manage [work order description] form''
Select the applicable instructions to attach to the work order and click Save Changes.
6.8.6 Setting Processing Options for the CRM - Manage Work Order Labor Program (P90CD018)
Use these processing options to supply default values for the CRM - Manage Work Order Labor program.
6.8.6.1 Process
Specify the default values for labor processing.
- 1. Parts Detail
-
Specify whether the system creates parts detail records when you create labor detail lines for a work order. Values are:
Blank: Do not create.
1: Create. The system stores the parts detail information in the Work Order Parts List table (F3111).
- 2. Operation's Generic Text
-
Specify whether the system copies the generic text of an operation and attaches it to a work order labor detail record. Values are:
Blank: Do not copy.
1: Copy and attach the generic text.
- 3. Queue and Move Hours
-
Specify whether the system enters the queue and move hours from the work center into the Work Order Labor Detail program (P17732), when the queue and move hours are blank in the Work With Routing Master program (P3003). Values are:
Blank: Do not enter the queue and move hours from the work center.
1: Enter the queue and move hours from the work center only when those fields are blank in the Routing Master program.
2: Enter the queue and move hours from the work center only when you manually add a routing step or instruction in the detail area for work orders.
- 4. Address Search Type for employees
-
Enter a value from UDC 01/ST (Search Type) that identifies employees. If you leave this processing option blank, the system uses the value E.
6.8.6.2 Defaults
Specifies the time basis code.
- 1. Time Basis Code
-
Enter a value from UDC 30/TB (Time Basis Code). If you leave this processing option blank, the system uses the value U.
6.8.6.3 Display
Specify whether the system displays particular fields.
- 1. Billable Fields and 2. Payable Fields
-
Specify whether the system displays the billable-related fields or payable-related fields in the labor detail area. Values are:
Blank: Display.
1: Hide.
- 3. Contract-related fields
-
Specify whether the system displays the contract-related fields, such as Customer Number, Site Number, Entitlement Check, Coverage Group, and Percentage Covered. Values are:
Blank: Display.
1: Hide.
6.8.6.4 Export
Specifies the export transaction type.
- 1. Transaction Type
-
Enter a value from UDC 00/TT (Transaction Type) that the system uses for export processing or for supply chain scheduling and planning. If you do not want to use export processing, leave this processing option blank.
6.8.6.5 Versions
Specify the versions of programs to launch from the Work Order Labor Details form.
- 1. Capacity Load program (P3313)
-
The system uses this program to identify the capacity load in a work center for a specific operation in the work order routing. If you leave this processing option blank, the system uses the ZJDE0003 version.
- 2. Equipment Master Workbench (P1701)
-
If you leave this processing option blank, the system uses ZJDE0001.
6.8.7 Setting Processing Options for the Work Order Labor Detail Program (P17732)
Use these processing options to supply default values for the Work Order Labor Detail program. The processing options for Work Order Labor Detail are the same as the CRM - Manage Work Order Labor program (P90CD018) except where noted.
6.8.7.1 Versions
Specify the versions of programs to launch from the Work Order Labor Details form.
- 2. Work With Activity Based Costing Workbench (P1640) and 4. Work Order Process Resource Revisions (P3111P) (Future)
-
If you leave this processing option blank, the system uses ZJDE0001.
6.9 Processing Work Orders
This section provides an overview of work order processing, lists prerequisites, and discusses how to:
-
Generate and print quotes for work orders.
-
Set processing options for the Work Order Quote program (R17711).
-
Create work order prepayment transactions.
-
Issue material from a single location.
-
Issue material from multiple locations.
-
Set processing options for the Work Order Inventory Issues program (P31113).
-
Review and approve inventory journal entries.
-
Enter time.
-
Set processing options for the Work Order Time Entry program (P311221).
-
Update hours and quantities.
-
Set processing options for the W.O. Hours and Quantity Update program (R31422).
-
Review and approve cost routing journal entries.
-
Post cost routing journal entries to the general ledger.
6.9.1 Understanding Work Order Processing
After you have created work orders and made any necessary revisions, you can complete a number of tasks associated with processing work orders.
6.9.1.1 Quotes for Work Orders
You can generate quotes for work orders and print them for customers. The Work Order Quote program (R17711) displays the estimated quantities and amounts for all parts and labor, including taxes and the total amount of the work order.
6.9.1.2 Work Order Prepayment Transactions
To track a customer's payments that are prepaid, you can use prepayment processing. Customers can prepay by using cash, check, or credit card. If payment has already been made for service, the invoice reflects that the work order has been prepaid. If prepayments are being used with the work order, the full amount of the work order must be prepaid.
You can enter a work order to formally request repair work and schedule maintenance. You can also use work orders to record and communicate all details that are related to the repair task.
You must create a work order master for every service that you track. The work order master consists of basic information that defines the work order, such as the work order number, description, and the business unit to which the work order is charged. You can also enter additional information, such as category codes, to further identify the work order.
In addition, you can copy parts from a standard parts list or assign nonstandard parts to a work order. You can also assign detailed labor routing instructions to a work order. You can perform these steps:
-
Identify each work center that is needed to perform repair tasks.
-
Specify the sequence in which the tasks are performed.
-
Indicate the estimated duration of each task.
You can delete any work order from the system unless it has any of these characteristics:
-
It is used as a parent work order.
-
It has any account ledger transactions associated with it.
-
It has a parts list or a routing attached.
6.9.1.3 Issuing Inventory to Work Orders
You can use the Inventory Issue Revisions form to issue material that is associated with a work order. You can also change the commitments that the system recorded. When you change commitments, the system displays an error message if the quantities do not equal the total quantity required. The system also adjusts the available balance for any location for which you changed the quantity that is committed. The system creates journal entries. The total cost of each part can be split into separate journal entries, based on the percentage of the part that is covered under a contract.
To reverse an issue transaction, enter the item quantity as a negative number. The system decreases the amount in the Quantity Issued field.
|
Note: When you set processing options for Work Order Inventory Issues (P31113), locate the Work Order Number processing option on the Equipment Management tab. For Service Management, enter 1 for equipment issue entries. |
6.9.1.4 Inventory Journal Entries: Review and Approval
When you review journal entries for posting, you can display a list of batches based on the batch type, number, date, status, or user ID. For example, you can review all batches with a posting status of pending. If the batch review security feature is activated, the system lists only the batches that you are authorized to review and approve.
After you review a list of batches, you can access transaction detail within a batch of journal entries. For example, you can review the number of journal entries within a batch. You can also select a particular journal entry for review.
After you enter and review a batch of journal entries, you might need to approve it before posting can occur. Based on the company requirements as defined by the general accounting constants, the system assigns either a pending or an approved status to the batch.
6.9.1.5 Cost Routing Journal Entries: Review and Approval
When you review journal entries for posting, you can display a list of batches that are based on the batch type, number, date, status, or user ID. For example, can review all of the batches with a posting status of pending. If the batch review security feature is activated, the system lists only the batches that you are authorized to review and approve.
After you review a list of batches, you can access transaction detail within a batch of journal entries. For example, you can review the number of journal entries within a batch. You can also select a particular journal entry for review.
After you enter and review a batch of journal entries, you might need to approve the batch before it can be posted. Based on the company requirements as defined by the general accounting constants, the system assigns either a pending or an approved status to the batch.
6.9.1.6 Time Entry
Use the Work Order Time Entry program (P311221) to charge hours and quantities to a work order. You can use the processing options to display the information in order number format or employee number format. Use these formats to record time and quantities for employees against work order routing steps, or work order routing steps against employees.
Note this important information about entering hours and quantities:
-
Enter the quantity completed only once for each operation sequence number.
Entering the quantity for each type of hours causes a variance amount.
-
Enter hours using beginning and ending times for each entry or enter the actual hours up to two decimal places.
-
Reverse completed or scrapped quantities that you have entered by entering the quantity as a negative value.
6.9.1.7 Hours and Quantities
To process the hours and quantities that you have entered and to create journal entries for the costs, you must run the Hours and Quantities Update batch program. This program updates the Work Order Routing table (F3112) and creates journal entries. The total cost of each routing is split into separate journal entries, based on the percentage of the routing that is covered under a contract. After you run this program, you cannot make changes.
You can run the Hours and Quantities Proof program (R31322) before running W.O. Hours and Quantities Update (R31422) to review and correct any errors.
|
Note: In the processing options of the W.O. Hours and Quantities Update program, you must activate the SWM processing option 1, Create SWM Journal Entries, for the system to create journal entries. |
6.9.1.8 Work Order Workfile Generation Program
Generating the work order workfile enables you to:
-
Bill customers for services that you provided to them.
-
Pay service providers for services that they provided to the company.
The system retrieves the billing information from the parts and routing detail lines.
This table lists the tables that the system accesses when you generate the work order workfile:
| Table | Description |
|---|---|
| Work Order Master File (F4801) | Contains general work order information. |
| Service Order Extension (F4817) | Contains work order information that is specific to Service Management. |
| Work Order Parts List (F3111) | Contains general parts list information. |
| Parts Extension (F31171) | Contains parts list information that is specific to Service Management. |
| Work Order Routing (F3112) | Contains general routing and instruction information. |
| Routing Instructions - Extension (F31172) | Contains information about routings and instructions that is specific to Service Management. |
This table lists the tables that the system creates or updates when you generate the work order workfile:
| Table | Description |
|---|---|
| Billing Details Workfile (F4812) | When you run the Work Order Workfile Generation program in final mode, the system creates table F4812 records for each detail line within the Work Order Parts List table (F3111) and Work Order Routing table (F3112). When you create payable records to pay a service provider, the system creates a record within the billing details workfile for the covered expense and a separate record for the noncovered expense. |
| Parts Extension (F31171) | Based on the processing involved, it is possible for the system to update these fields:
|
| Routing Instructions - Extension (F31172) | Based on the processing involved, it is possible for the system to update these fields:
|
|
See Also: |
6.9.2 Prerequisites
Before you complete the tasks in this section:
-
Set up work order document types in the Document Type Maintenance program (P40040) from the Work Order Setup menu (G1742).
-
Set up inventory AAIs to track inventory cost.
-
Ensure that the document type on the work order is set to 1 in the Work Order field on the Document Type Maintenance program (P40040).
-
Set up AAIs to cost routings.
-
Complete the parts and labor details for the applicable work orders.
The prices for the parts and the cost of the labor are the basis for quotes.
-
Define the processing options for the CRM - Manage Service Orders program (P90CD002) or the Work Order Revisions program (P17714) to process prepayment transactions.
6.9.3 Forms Used to Process Work Orders
| Form Name | FormID | Navigation | Usage |
|---|---|---|---|
| Work Order Quote Inquiry | R17711 | Daily Work Order Processing (G1712), Work Order Quote | Generate and print quotes for work orders. |
| Service Work Order - Manage [work order description] | W90CD002B | Daily Work order Processing (G1712), Work Order Entry
Select the record, and then select the Accounting tab. |
Create work order prepayments. |
| Work Order Revisions | W17714A | Daily Work order Processing (G1712), Work Order Entry
Select the Accounting tab. |
Create work order prepayments. |
| Inventory Issues Revision | W31113A | Daily Work Order Processing (G1712), Work Order Inventory Issues
Complete the Skip to Order Number field and click Find. Select an item. |
Issue material from a single location. |
| Select Multiple Locations | W42053B | Daily Work Order Processing (G1712), Work Order Inventory Issues | Issue materials from multiple locations. |
| Work With Work Order Time Entry | W311221B | Daily Work Order Processing (G1712), Work Order Time Entry
Click Add to enter hours and quantities. |
Enter time for work orders. |
6.9.4 Generating and Printing Quotes for Work Orders
Access the Work Order Quote Inquiry form.
-
Locate and select a work order for which you want to create a quote.
-
Select Costing/Analysis, and then select Work Order Quote from the Row menu.
-
Review the quote on Online Work Order Quote Inquiry.
The system displays the estimated quantities and amounts for all parts and labor, including taxes and the total amount of the work order.
-
Select Print Quote from the Form menu to print the quote.
6.9.5 Setting Processing Options for the Work Order Quote Program (R17711)
Use these processing options to supply the default values for the Work Order Quote program.
6.9.5.1 Display
- 1. Currency to Print
-
Specify which currency to print. Values are:
F: Foreign
D: Domestic
- 2. Print Non-Billable Lines
-
Specify which detail lines appear on the report. Values are:
Blank: Print all detail lines.
1: Do not print detail lines that are designated as nonbillable by the Bill Y/N field.
6.9.5.2 Vertex
These processing options only pertain if Vertex's Quantum sales and use tax software (third-party tax software) has been implemented.
6.9.5.3 Billables
- 1. Parts Transaction Type, 2. Routing Transaction Type, and 3. Flat Rate Billing Transaction Type
-
Enter a value from UDC 73/TY (Vertex Transaction Type) that the system uses when you tax billable parts. If you leave this processing option blank, the system uses the default value SERVIC.
6.9.6 Creating Work Order Prepayment Transactions
Access the Service Work Order - Manage [work order description] form or the Work Order Revisions form.
Complete the payment information on the Accounting tab.
6.9.7 Issuing Material from a Single Location
Access the Inventory Issue Revisions form.
Figure 6-7 Inventory Issue Revisions form
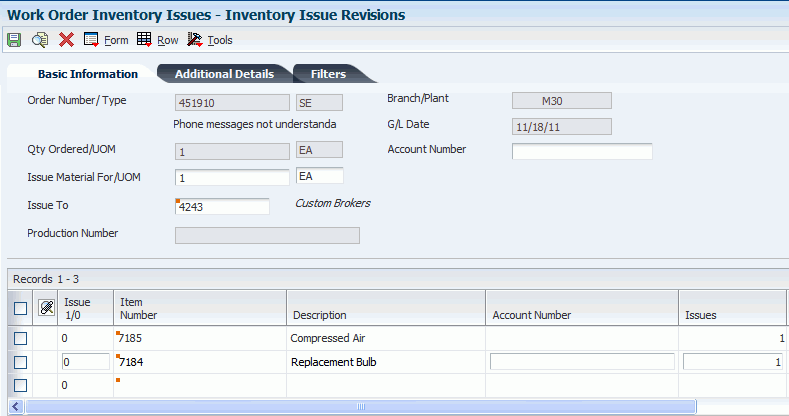
Description of ''Figure 6-7 Inventory Issue Revisions form''
- Skip to Order Number
-
Enter a number identifying the original document. This can be an invoice number, work order number, sales order number, journal entry number, and so on.
- Issue Material For/UOM (issue material for/unit of measure)
-
Enter the total quantity requested.
- Issue To
-
Enter a number that identifies an entry in the Address Book system, such as employee, applicant, participant, customer, supplier, tenant, or location.
- Mt St (material status)
-
Enter a value from UDC 31/MS (Material Status) that identifies the current status of a particular component on the work order.
- Quantity Ordered
-
Enter the quantity of units affected by the transaction.
- UM (unit of measure)
-
Enter a value from UDC 00/UM (Unit of Measure) that identifies the unit of measurement for an amount or quantity. For example, it can represent a barrel, box, cubic meter, liter, hour, and so on.
On this form, if you leave this field blank, the system uses the value from the Parts List table and updates the quantities in the Item Location table in the primary unit of measure.
- Location
-
Enter the storage location from which goods will be moved.
- Lot Serial Number
-
Enter a number that identifies a lot or a serial number. A lot is a group of items with similar characteristics.
6.9.8 Issuing Material from Multiple Locations
Access the Select Multiple Locations form.
-
Complete the Skip to Order Number field and click Find.
-
Select an item and click Select.
-
Complete the Issues field on Inventory Issue Revisions.
-
Select an item and then select Multi-Location from the Row menu.
-
Review the default information on the Select Multiple Locations form:
-
Quantity
-
Location
-
Lot / Serial
-
Branch/Plant
-
Issues
Enter the total quantity requested.
-
Quantity
Enter the number of units committed for shipment in Sales Order Entry, using either the entered or the primary unit of measure defined for this item.
In the Manufacturing system and Work Order Time Entry, this field can indicate completed or scrapped quantities. The quantity type is determined by the type code entered.
-
Location
Displays the area in the warehouse where you receive inventory. The format of the location is user-defined and you enter the location format for each branch/plant.
-
Lot / Serial
Enter a number that identifies a lot or a serial number. A lot is a group of items with similar characteristics.
-
-
6.9.9 Setting Processing Options for the Work Order Inventory Issues Program (P31113)
Use these processing options to supply default values for the Work Order Inventory Issues program.
6.9.9.1 Edits
These processing options control default values for the Inventory Issues program, as well as the status beyond which the system cannot issue inventory and the lot hold codes that still enable you to issue inventory to a lot. You can also determine whether an error message appears when an issue causes the on-hand quantity to become negative.
- 1. Document Type
-
Enter a value from UDC 00/DT (Document Type - All Documents) that the system enters when issuing inventory. The document type identifies the origin and purpose of the document. Enter the document type to use as the default value or select it from the Select User Defined Codes form.
- 2. Work Order Status Code
-
Enter a value from UDC 00/SS (Work Order Status) that identifies the status of the work order that the system uses when a material issue has been performed. If you leave this field blank, the system does not update the work order header status code.
- 3. Material Status Code
-
Enter a value from UDC 31/MS (Material Status) that identifies the status of the material to use when the system issues material. If you leave this field blank, the system does not enter a material status code.
- 4. Work Order Status Code Limit
-
Specify the default status code that the system assigns to the work order header, at or beyond which the system cannot issue material.
- 5. Negative Quantity on Hand
-
Specify whether the system displays an error message when the material issued sets the on-hand quantity to a negative amount. Values are:
Blank: Does not display.
1: Displays.
- 6. Item Sales History
-
Specify whether the system updates the Item Sales History table (F4115) when you issue material. Values are:
Blank: Does not update the Sales Item History table.
1: Updates the Sales Item History table.
- 7. Unplanned Issues
-
Specify if the system processes unplanned issues for work orders.
Blank: The system does not process unplanned issues.
1: The system processes unplanned issues.
- 8. Purchase Order Document Type
-
Enter a value from UDC 00/DT (Document Type - All Documents) that specifies the default document type of the purchase order associated with the simultaneous issue and receipt of material.
The purchase order document type identifies the document type that the system uses when searching for an open purchase order. If you leave this processing option blank, the system uses OP as the document type.
- 9. Enter Allowed Lot Status Group to validate
-
Lot Group is the name of a user-defined list of allowed non-blank lot status codes. Entry of a Lot Group name in the Processing Option will enable this application to process lots whose lot status code is defined within the specified Lot Group Name.
6.9.9.2 Display
These processing options control the display of values in the Inventory Issue program. For example, you can specify that the system only display components with valid issue type codes, and that the issue quantity is displayed with shrink or yield already applied.
- 1. Issue Type Code
-
Specify whether the system displays all components or only components with a valid issue type code. Values are:
Blank: Displays components of all issue type codes.
1: Displays only components with valid issue type codes.
- 2. Lot Number
-
Specify whether the system protects the Lot Number field from entry. Values are:
Blank: Allows you to enter a value in the Lot Number field.
1: Does not allow you to enter a value in the Lot Number field.
- 3. Issue Material For
-
Specify whether the system enters the recommended issued quantity for all components with a valid issue type code.
The system uses the value from the Issue Material For field on the Work With Work Order Inventory Issue form. The system issues only items with an issue quantity. Values are:
Blank: Does not enter the quantity.
1: Automatically enters the quantity.
- 4. Apply Shrink to Issue Quantity
-
Specify whether the system applies a parent item's shrink factor to the recommended issue quantity of a component item. Values are:
Blank: Does not apply the shrink factor to the issue quantity.
1: Applies the shrink factor to the issue quantity.
- 5. Apply Yield to Issue Quantity
-
Specify whether the system applies operation scrap percentage to the recommended issue quantity of a component item. Values are:
Blank: Does not apply the operation scrap percent to the issue quantity.
1: Applies the operation scrap percent to the issue quantity.
- 6. Select All Lines for Issue on Entry
-
Specify whether the system processes unviewed records after you click OK. The detail area displays components one page at a time. Click OK before scrolling down to view and process all records. Values are:
Blank: Process.
1: Do not process.
- 7. Display Only Open Lines
-
Specify whether the system displays only open lines or all lines in the detail area. A line is considered open if it has not been closed by choosing Close Line from the Row menu. A line is also considered open if the order quantity is greater than the issued quantity. Values are:
Blank: All lines.
1: Open lines.
6.9.9.3 Versions
These processing options control which version the system uses when you call these programs from the Inventory Issues program:
- 1. Shortage Maintenance (P3118)
-
Specify the version that the system uses when you select the row exit to the Shortage Maintenance program (P3118) from the Inventory Issue Revisions form. If you leave this field blank, the system uses the ZJDE0001 version of the Shortage Maintenance program. Versions control how the Shortage Maintenance program displays information. Therefore, you might need to set the processing option to a specific version.
- 2. Open Purchase Orders (P3160W)
-
Specify the version that the system uses when you select the row exit to the Purchase Order Inquiry program (P4310) from the Inventory Issue Revisions form. If you leave this field blank, the system uses the ZJDE0001 version of the Purchase Order Inquiry program.
- 3. PO Receipts (P4312) (purchase order receipts)
-
Specify the version that the system uses when you select the row exit to the Purchase Order Receipts program (P4312) from the Inventory Issue Revisions form. If you leave this field blank, the program uses the ZJDE0008 version of the Purchase Order Receipts program.
- 4. Movement and Disposition (P43250)
-
Specify the version that the system uses when you select the row exit to the Receipt Routing Movement and Disposition program (P43250) from the Inventory Issue Revisions form. If you leave this field blank, the program uses the ZJDE0002 version of the Receipt Routing Movement and Disposition program. Versions control how the Receipt Routing Movement and Disposition program displays information.
6.9.9.4 Equipment Management
This processing option controls whether the system automatically enters the work order number into the Subledger field of the journal entry when processing maintenance orders.
- 1. Work Order Number
-
Specify whether to process maintenance work orders in the Run Equipment/Plant Management processing option. Also, specify whether the system enters the work order number in the subledger field of the journal entry when the system processes the maintenance work order. Values are:
Blank: The system does not enter the work order number in the subledger field.
1: The system automatically enters the work order number in the subledger field.
6.9.9.5 Interop
These processing options control the default transaction type for inventory issue and work order transactions, as well as whether the system writes a before image for the work order header.
- 1. Inventory Issue Transaction Type
-
Enter a value from UDC 00/TT (Transaction Type) that the system uses for export processing. If you leave this processing option blank, the system does not use export processing.
- 2. Work Order Transaction Type
-
Specify the default transaction type for the work order header that the system uses when processing export transactions. If you leave this processing option blank, the system does not perform export processing.
- 3. Work Order Header Before Image
-
Specify whether the system writes the before image for the work order header. Values are:
Blank: The system does not include the image.
1: The system includes the image.
6.9.10 Reviewing and Approving Inventory Journal Entries
Access the Daily Work Order Processing menu (G1712), G/L Journal Review.
The G/L Journal Review program displays and updates information in the Batch Control Records (F0011) and the Account Ledger (F0911) tables. You can review information at different levels before posting journal entries. You can:
-
Review a list of journal entry batches.
-
Revise journal entry detail.
6.9.11 Entering Time
Access the Time Entry Revisions form.
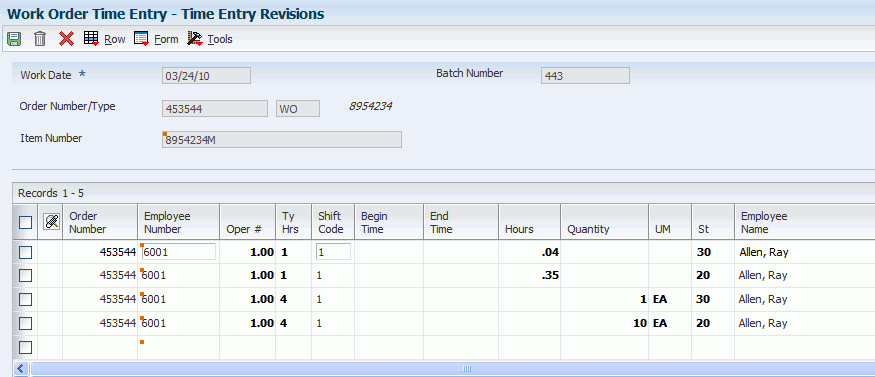
- Work Date
-
Enter a date that identifies the financial period to which the transaction is to be posted.
The company constants specify the date range for each financial period. You can have as many as 14 periods. Generally, period 14 is used for audit adjustments. The system validates this field for PBCO (posted before cutoff), PYEB (prior year ending balance), PACO (post after cutoff), and WACO (post way after cutoff) messages.
- Order Number
-
Displays a number identifying the original document. This can be an invoice number, work order number, sales order number, journal entry number, and so on.
On this form, you can specify the order number or employee number in the processing options for the Hours and Quantities program.
- Ty Hrs (type hours)
-
Enter a code that indicates the type of time entered. Values are:
1: Run labor hours.
2: Setup labor hours.
3: Machine hours.
4: Quantities completed.
5: Quantities scrapped.
9: Miscellaneous (such as piece rate bonus).
- Quantity
-
Enter the number of units committed for shipment in Sales Order Entry, using either the entered or the primary unit of measure defined for this item.
In the Manufacturing system and Work Order Time Entry, this field can indicate completed or scrapped quantities. The quantity type is determined by the type code entered.
- UM (unit of measure)
-
Enter a value from UDC 00/UM (Unit of Measure) that indicates the quantity in which to express an inventory item, for example, CS (case) or BX (box).
- St (status)
-
Enter a value from UDC 31/OS (Operation Status) that identifies the current status of a work order or engineering change order as the operation steps in the routing are completed.
6.9.12 Setting Processing Options for the Work Order Time Entry Program (P311221)
Use these processing options to supply default values for the Work Order Time Entry program.
6.9.12.1 Display
Specifies how the system displays forms.
- 1. Display
-
Specify whether the system displays forms by employee number or order number. Values are:
Blank: Employee Format Display
1: Order Number Format Display
6.9.12.2 Defaults
Specify document types and status codes.
- 1. Enter the Document Type associated with Shop Floor Activity.
-
Enter a value from UDC 00/DT (Document Type - All Documents) that is associated with shop floor activity. You define document type codes in the Document Type Maintenance program (P40040).
- 2. Work Order Status Code
-
Enter a value from UDC 00/SS (Work Order Status) that the system assigns to the work order when hours and quantities are posted to the work order routing. If you leave this processing option blank, the system does not update the work order status code.
6.9.12.3 Edits
Specify system edits.
- 1. Enter the Status Code beyond which Shop Floor Activity cannot be entered.
-
Enter a value from 00/SS (Work Order Status) that identifies the status of a work order beyond which shop floor activity cannot be entered.
- 2. Quantity Verification
-
Specify whether the system verifies if the quantity complete and the quantity scrapped exceeds the quantity at operation.
Blank: Disable Quantity Verification
1: Enable Quantity Verification
- 3. Employee Rate
-
Specify whether the system displays the employee rate. Values are:
Blank: Display
1: Hide
- 4. Apply Yield to Completed Quantity
-
Specify whether the system applies the operation yield percentage to the quantity that the user completes at an operation. The yield percentage determines the scrap quantity. Values are:
Blank: Do not apply
1: Apply
- 5. Apply Shrink to Completed Quantity
-
Specify whether the system applies the parent item's shrink factor to the recommended issue quantity of a component item. Values are:
0: The system does not apply the shrink factor to the quantity of a component item.
1: The system applies the shrink factor to the quantity of a component item.
6.9.12.4 Versions
Specify the versions of programs to launch. Enter the version for each application.
- 1. Test Results Revisions (P3711), 2. Manufacturing Scheduling Workbench (P31225), and 3. Production Status (P31226)
-
Specify a user-defined set of specifications that control how applications and reports run. You use versions to group and save a set of user-defined processing option values and data selection and sequencing options. Interactive versions are associated with applications (usually as a menu selection). Batch versions are associated with batch jobs or reports. To run a batch process, you must select a version. If you leave these processing options blank, the system uses ZJDE0001.
- 4. Hours and Quantities Update (R31422)
-
Specify a group of items that can be processed together such as reports, Business Unit, or subledgers. If you leave this processing option blank, the system uses XJDE0001.
- 5. Case Entry Add Mode (P90CG504)
-
Specify the version that you want to use when calling the Case Entry program (P90CG504) in Add mode. The system uses this version when entering a case for scrapped quantity. If you leave this processing option blank, the system uses version ZJDE0001.
6.9.12.5 Interop
Specify default values for transaction type and work order header.
- 1. Work Order Transaction Type
-
Specify the default transaction type for the work order header that the system uses when processing export transactions. If you leave this processing option blank, the system does not perform export processing.
- 2. Work Order Header Before Image
-
Specify whether the system writes the before image for the work order header. Values are:
Blank: Do not include the image
1: Include the image
6.9.13 Updating Hours and Quantities
To run the Hours and Quantities Proof program, select Daily Work Order Processing (G1712), Hours and Quantities Proof.
To run the Hours and Quantities Update program, select Daily Work Order Processing menu (G1712), Hours and Quantities Update.
6.9.14 Setting Processing Options for the W.O. Hours and Quantity Update Program (R31422)
Use these processing options to supply default values for the W.O. Hours and Quantity Update program.
6.9.14.1 Interop
- 1. Transaction Type
-
Specify the transaction type for the hours and quantities the system uses when processing outbound transactions. If you leave this processing option blank, the system does not perform outbound processing.
- 2. Outbound Subsystem UBE (outbound subsystem universal batch engine)
-
Specify whether the system calls the subsystem after the Hours and Quantities Update program (P31422) successfully processes the outbound transactions. Values are:
Blank: Does not call.
1: Calls.
6.9.14.2 SWM
- 1. S/WM Journal Entries
-
Specify whether the system creates journal entries for SWM Work Orders. Values are:
Blank: Does not create.
1: Creates.
- 2. Flex Accounting
-
Indicate whether this program searches for flex accounting rules to populate cost objects in the Account Ledger table (F0911).
The system requires flex accounting to attach cost objects to the journal entries. Values are:
Blank: Does not use flex accounting.
1 Uses flex accounting.
- 3. General Ledger Date
-
Specify the date that appears on journal entries. If you leave this processing option blank, the program uses the system date.
- 4. Subledger
-
Specify whether the system uses the work order number as the default value in the Subledger field. Values are:
Blank: Does not supply a default value.
1: Uses the work order number as the value.
- 5. Document Type
-
Specify the default document type that the system enters for journal entries on extra cost components if you do not use routings. If you use routings, the system automatically assigns a document type of IH. If you leave this field blank, the system uses document type IH.
6.9.14.3 Defaults
- 1. Work Order Status Code
-
Enter a value from UDC 00/SS (Work Order Status) that the system uses to update the work order when hours and quantities are posted to the work order routing. If you leave this processing option blank, the system does not update the work order status code.
6.9.15 Reviewing and Approving Cost Routing Journal Entries
To run the General Journal Review program, select Daily Work Order Processing (G1712), G/L Journal Review.
The General Journal Review program (P0911B) updates and displays information in the Batch Control (F0011) and the Account Ledger (F0911) tables. You can review information at different levels before posting journal entries.
You can:
-
Review a list of journal entry batches.
-
Revise journal entry detail.
6.9.16 Posting Cost Routing Journal Entries to the General Ledger
To post cost routing journal entries to the general ledger, select Daily Work Order Processing (G1712), Post Inventory to G/L.
After you enter, review, and approve cost routing journal entries (batch type equal to 0), post them to the general ledger. You can use various methods to post journal entries.
6.10 Billing and Paying Work Orders
This section provides an overview of work order billing and paying and discusses how to:
-
Generate the work order workfile.
-
Set processing options for the S/WM Work Order Workfile Generation program (R1775).
6.10.1 Understanding Work Order Billing and Paying
The typical billing and payment process includes accumulating work orders to bill and pay, creating and printing invoices, and recording journal entries for income and receivables. The typical payment process includes accumulating work orders for payment, creating and printing invoices, and recording journal entries for payables.
Invoices are based on billable work orders, and the first step in the billing process is to accumulate the billable work orders. Vouchers are based on payable work orders, and the first step in the payment process is to accumulate payable orders.
When you perform work order billing, you create accounts receivable entries for customers who you invoice. You also create accounts payable entries for service providers whom you pay. Based on a processing option in the SWM Work Order Workfile Generation program (R1775), you can select whether to process billable and payable records at the same time or perform one process before the other.
When you run Work Order Workfile Generation, the system gathers the work orders that are eligible for billing and payment from the Work Order Parts List table (F3111), the Parts Extension table (F31171), the Work Order Routing table (F3112) and the Routing Instructions - Extension table (F31172) and then creates Billing Detail Workfile records (F4812).
For multicurrency environments, the system retrieves currency information from these sources:
| Source | Currency Information |
|---|---|
| When billing for a part or routing | Domestic: Currency code of the company to which the work order business unit belongs.
Foreign: Currency code of the customer within the Customer Master. |
| When paying for a part or routing | Domestic: Currency code of the company to which the work order business unit belongs.
Foreign: Currency code of the service provider within the Supplier Master. |
6.10.1.1 Customer Invoice Processing
When you generate the work order workfile using SWM Work Order Workfile Generation (R1775), the system gathers the orders that are eligible for billing from these tables:
-
Work Order Master File (F4801).
-
Service Order Extension (F4817).
-
Work Order Parts List (F3111).
-
Parts Extension (F31171).
-
Work Order Routing (F3112).
-
Routing Instructions - Extension (F31172).
The system then creates records in the Billing Detail Workfile table (F4812).
After you generate the work order workfile, you must continue the standard billing process, which includes:
-
Generating the invoice workfile using the Service Billing Invoice Generation program (P48121).
-
Printing invoices using the Invoice Print Selection program (R48504).
-
Generating the Invoice Journal using the Journal Generation program (R48131).
-
Creating accounts receivable (AR) and GL entries using the Create A/R Entries program (R48199).
-
Posting the AR and GL entries using the General Ledger Post Report program (R09801).
Run the Service Billing Invoice Generation program to group workfile transactions and assign invoice numbers. When you run the this program, the system summarizes one or more workfile transactions into pay item records. Pay items are the billing lines that make up the total amount of a specific invoice. The system stores pay item information in the Invoice Summary Work File table (F4822), and updates the workfile transaction records with the new invoice information and the sequence and summarization key information.
After you run the Service Billing Invoice Generation program, you can print invoices for customers for services provided to them.
To complete the billing process, you must create accounts receivable and general ledger entries. You first create preliminary accounts receivable and general ledger entries using the Journal Generation program (R48131). When the system creates preliminary accounts receivable and general ledger entries, you can review the resulting reports, the Billing Journal Register and the Invoice Journal Generation Report, to determine whether the entries were generated with errors.
After you ensure that no errors are within the batch, you can create the final accounts receivable entries, using Create AR Entries, and then post invoices to the general ledger.
6.10.1.2 Service Provider Voucher Processing
When you generate the work order workfile using SWM Work Order Workfile Generation (R1775), the system gathers the orders that are eligible for payables and creates records in the Billing Detail Workfile (F4812). After you generate the work order workfile, you must continue the standard voucher process, which includes:
-
Generating the voucher workfile using the Voucher Generation program (R48122).
-
Printing vouchers.
-
Generating the Voucher Journal using the Journal Generation program (R48131).
-
Creating AP and GL entries using the Billing Vouchers A/P - G/L Journal Generation program (R48197).
-
Posting the AP and GL entries using the General Ledger Post Report program (R09801).
Run the Voucher Generation program to group workfile transactions and assign voucher numbers. The system stores pay item information in the Voucher Summary table (F4823). In addition, the system updates the workfile transaction records with the new voucher information and the sequence and summarization key information.
To complete the voucher process, you must create accounts payable and general ledger entries. You first create preliminary accounts payable and general ledger entries using the Journal Generation program (R48131). After the system creates preliminary accounts payable and general ledger entries, you can determine whether the entries were generated with errors by reviewing the associated reports, the Journal Edit Register and the Journal Audit Report. After you ensure that the batch contains no errors, you can create the final accounts payable entries by running the Create A/P Entries program (R48197). You then post vouchers to the general ledger, by running the standard General Ledger Post Report program.
6.10.2 Generating the Work Order Workfile
To run the Work Order Workfile, access the Periodic Work Order Processing menu (G1722), Work Order Workfile Generation.
6.10.3 Setting Processing Options for the SWM Work Order Workfile Generation Program (R1775)
Use these processing options to supply default values for the SWM Work Order Workfile Generation program.
6.10.3.1 Process
Specify default values for generating work orders.
- 1. Proof or Final Mode
-
Specify whether to run the program in proof or final mode. Values are:
Blank: Proof Mode
1: Final Mode
- 2. Work Center or Report
-
Specify where the system writes errors. Values are:
Blank: Write errors to work center.
1: Write errors to Report.
- 3. Bill Work Orders
-
Specify whether to bill work orders. Values are:
Blank: Bill
1: Do not bill
- 4. Pay Work Orders
-
Specify whether to pay work orders. Values are
Blank: Pay
1: Do not pay
- 5. Use Price Adjustment History
-
Specify whether the system uses price adjustment history information from the Price Adjustment Ledger File table (F4074) for detailed adjustments. Values are:
Blank: Do not use
1: Use
6.10.3.2 Billables
Specify billing default information.
- 1. Parts/Labor Pricing
-
Specify how the system should price billable parts and labor. Values are:
Blank: No actual billable amounts
1: All
2: Do not calculate
- 2. Billable Subledger Default
-
Specify the default value of the subledger field for billables. Values are:
Blank: No Default
1: Work Order Number
2: Customer Number
3: Site Number
4: Short Item Number
5: Contract Number
6: Equipment Number
- 3. Date Billed
-
Specify which date the system uses to update the date billed when you run the report in final mode. Values are:
Blank: System Date
1: Estimated Start Date on Service Order
6.10.3.3 Payables
Specify payables default information.
Processing options 1 and 2 are identical to those for specifying billing default information.
- 3. Date Paid
-
Specify which date the system uses to update the date paid when you run the report in final mode. Values are:
Blank: Use System Date
1: Use Estimated Start Date on Work Order
6.10.3.4 Vertex
These processing options only pertain if Vertex's Quantum Sales and Use Tax Software (third-party tax software) has been implemented.
6.11 Working with Work Orders on an iPad
This document provides an overview of field service work orders and discusses how to:
-
Work with work orders on an iPad.
-
Set processing options for field service work orders.
6.11.1 Understanding Field Service Work Orders
Field technicians often travel to a site to perform service and do not have access to a desktop or laptop but may be able to connect wirelessly on an iPad. They must be able to see their work assignments, know where they must go to perform the service, know the contact information of the service location, understand the nature of the problem, and have access to information that will help them perform the service. They must be able to access all of this information easily from the JD Edwards EnterpriseOne system. They must also be able to update the status of the work easily with minimal or no typing.
The Field Service Work Order application for JD Edwards EnterpriseOne was built to run on an iPad to support these unique needs of field service technicians while leveraging the features of an iPad. The Field Service Work Order application includes:
-
The Field Service Inquiry program (P48100).
-
The Field Service Revisions program (P17100).
You use these programs to review work orders and associated information, such as labor details, parts details, address book details, and so on. You set a processing option to view either service or equipment type work orders, depending on whether you are performing maintenance on customer-owned equipment or company-owned equipment. You can also set a processing option to view only work orders that are assigned to you. You can view information helpful in performing the service through media objects (text, documents, images, and so on). The system enables you to view maps of customer and service locations.
6.11.1.1 Updating the Status of a Work Order
You can easily update the status of a work order after you have finished working on it using push button functionality. When you choose this button, the system advances the work order status with the next status based on the work order activity rules and displays the text of the next status on the button. If work order activity rules are not applicable for your work order or if the status is complete and no more statuses are available, then this button does not appear.
|
Note: If you get an error message in the Field Service Revisions program that the selected work order is locked, that means the work order is opened for editing in another program (record reservation). |
6.11.2 Forms Used to Work With Work Orders on an iPad
| Form Name | FormID | Navigation | Usage |
|---|---|---|---|
| Work With Field Service | W48100A | Enter P48100 in the Fast Path field. | You can:
|
| Work With - Manage Work Order | W17100A | On the Work With Field Service form, select a work order and choose Select. | You can:
|
| Work Order Parts Inquiry | W17100B | On the Work With - Manage Work Order form, choose the Parts button. | Review parts details for work orders. |
| Work Order Labor Inquiry | W17100C | On the Work With - Manage Work Order form, choose the Labor button. | Review labor details for work orders. |
6.11.2.1 Updating Work Orders
Access the Work With - Manage Work Order form.
|
Note: Choose the Advance Status button to advance the work order to the next status as set up in the Work Order Activity Rules. If Work Order Activity Rules are not applicable for the work order or if the work order is at completed status and no more statuses are available, this button does not appear. |
- Customer
-
The system populates this field with a number that identifies an entry in the Address Book system, such as employee, applicant, participant, customer, supplier, tenant, or location.
Choose the Customer link to view a map of the customer's location.
- Site
-
The system populates this field with a unique numeric identifier for a physical location at which utility service is delivered. A service address often corresponds to a parcel of land or a unit in an apartment building. The system assigns this identifier through Next Numbers if it is not provided when a new service address is added.
Choose the Site link to view a map of the site location.
- Contact Name
-
The system populates this field with the name of the customer or a contact person.
- Prefix
-
The system populates this field with the first segment of a telephone number. In the U.S., the prefix is the three-digit area code.
- Contact Phone
-
The system populates this field with a phone number without the prefix or special characters, such as hyphens or periods, that makes up the telephone number for an entity. You can use any applicable telephone number format for a country. This field is used in conjunction with the Prefix field (AR1).
When you search for an address using a phone number, you must enter the number exactly as it is set up in the JD Edwards Address Book system, including any special characters.
- Equipment Number
-
The system populates this field with an identification code that represents an asset. The identification code can be in any one of these formats:
Asset number (a computer-assigned, eight-digit, numeric control number).
Unit number (a 12-character alphanumeric field).
Serial number (a 25-character alphanumeric field).
- Failure Description
-
The system populates this field with a description of the customer's issue.
- Priority
-
The system populates this field with a value from UDC 00/PR (Work Order Priority) that indicates the relative priority of a work order in relation to other orders.
- Status
-
The system populates this field with a value from UDC 00/SS (Work Order Status) that describes the status of a work order.
Any status change between 90 through 99 triggers the system to automatically update the completion date.
- Requested Finish Date
-
The system populates this field with the date on which the work order is planned to be completed.
This date can be calculated based on contract coverage.
- Requested Finish Time
-
The system populates this field with the time that the work order is scheduled to be completed.
6.11.3 Setting Processing Options for Field Service Work Orders
This table lists the processing options that you use to set up Field Service Work Orders.
|
Note: To access the processing options, enter IV in the Fast Path field. On the Work with Interactive Versions form, enter P48100 in the Interactive Application field. Select your version from the grid and select Processing Options from the Row menu. |
- 1. Work Order Type
-
Specify the type of work order that the system returns when you search for valid work orders. Values are:
1: Service
2: Equipment
- 2. Only Show User's Work Orders
-
Specify whether the system should show only the work orders that are assigned to you. Values are:
Blank: Show only work orders that are assigned to you.
1: Show all work orders.
The default value is Blank.