6 Setting Up Timecard Automation
This chapter contains the following topics:
6.1 Understanding Timecard Automation
Entering time for employees each pay period can be time-consuming. In addition to recording time for regular hours, most companies need to calculate overtime based on federal, state, or labor union requirements, and overtime calculations can be simple or complex. For example, some organizations need to calculate overtime differently for certain groups of employees.
In addition to entering time for regular and overtime hours, you might need to calculate additional types of pay, such as time for company holidays, bonuses, or retroactive payments for salary adjustments. Using the Timecard Automation module, you can enter the calculation information for each type of payment once, after which the system automatically applies the calculation rules to each selected employee. Automating these processes can save time and reduce the likelihood of calculation or data-entry errors.
The Timecard Automation module consists of these components:
-
Timecard Templates
-
Retroactive Pay Rules
-
Overtime Rule Sets
-
Employee Groups
6.1.1 Timecard Templates
Many organizations need to enter the same types of timecards repetitively. For example, you might need to enter timecards for bonus or commission pay each quarter. To automate this process, you can use the Timecard Templates program (P186301) to automatically create timecard templates. The Timecard Templates program enables you to create model timecards and apply those timecards to specified groups of employees. After you apply the template to the employee group, the system creates a timecard with the information from the template model for each employee in the group.
When you create a timecard template, you specify values for fields on the timecards, such as pay type, lump sum amount, hours, date, and account number. You can save the timecard template that you create and use it each time that you need to create timecards with the specified values. In addition to creating timecards, the Timecard Templates program generates a report so that you can review information about the newly created timecards before you process them through a payroll cycle.
When you create a timecard template, you can specify whether the timecard is public or private. You can set a processing option on the Processing tab of the Time Entry Master Business Function program (P050002A) to create public timecards. When the processing option is set to enable public timecards, an administrator or employees can select the Public Timecard option.
6.1.2 Retroactive Pay Rules
Occasionally, an employee's pay must be adjusted after the employee's payment has been disbursed. For example, if an employee was supposed to receive a pay increase on the first day of the month but the increase was not entered into the system until the middle of the month, then you might want to create a payment to compensate the employee for the amount of the increase from the date on which it should have been effective. This type of pay is called retroactive pay.
You can use retroactive pay rules to calculate retroactive pay amounts based on current and historical time entry information. To do so, you first define the retroactive pay calculation. After you have defined the calculation, you identify the employees for which the retroactive pay rule should apply, as well as the time period that contains the timecards that you need to adjust. When you process the retroactive pay rules, the system creates timecards and uses the pay type that you specify when you create the rule. You can then use reports and online reviews in the Timecard Automation module to review the new timecards and the timecards from which the retroactive pay originated.
6.1.3 Overtime Rule Sets
Calculating overtime correctly can be difficult due to the regulations that are imposed by federal, state, and union organizations. For example, overtime regulations for California require that a company pay nonexempt employees one-and-a-half times their hourly rate for any time that they worked over eight hours each day (or 40 hours each week). The regulations also specify that companies must pay nonexempt employees twice their hourly rate for any time worked over 12 hours each day, and over eight hours on the seventh day of work in a week.
To ensure that the organization pays employees according to regulations, you can create overtime rules and overtime rule sets to automate overtime calculations. You use overtime rules to specify how to calculate overtime pay. You can create overtime rules and store them in overtime rule sets. Overtime rule sets can consist of a single rule or multiple rules.
You can create an ordered set of overtime rules to calculate overtime for a specific employee. Overtime rule sets enable you to define and maintain the overtime rules that are required to comply with overtime regulations. For example, to comply with California overtime regulations, you might create a rule set called California Overtime Rule Set, which would consist of these overtime rules:
-
Calculate pay at one-and-a-half times the regular rate when an employee works more than eight hours in a day.
-
Calculate pay at one-and-a-half times the regular rate when an employee works more than 40 hours in a week.
-
Calculate pay at twice the regular rate when an employee works more than 12 hours in a day.
-
Calculate pay at twice the regular rate when an employee works more than eight hours on the seventh day of the week.
Because the system processes the overtime rules within a set in the sequence that you specify, the sequence of the rules is important. Processing the rules out of sequence might produce results that do not match overtime requirements.
Using overtime rules, you can automate the process of calculating more complex overtime rules. For example, some organizations calculate overtime using the Chinese Overtime method, in which an employee's overtime rate decreases with each hour of overtime that is worked. The organization might require complex calculations to satisfy overtime requirements that are mandated by labor contracts.
After you create overtime rules and define an overtime rule set, you apply the rule set to an employee group. When you process the rule set, the system changes current, unprocessed timecards and, if necessary, creates new timecards to ensure that employees are paid correctly for any overtime hours that they work.
|
Note: You cannot use the overtime rule set feature to change historical timecards. Additionally, the regulatory examples in this section are for illustrative purposes only. You should refer to the federal, state, and union labor organizations for accurate and current information about overtime pay regulations. |
You can create these overtime rules and attach them to overtime rule sets:
| Overtime Rule Set | Description |
|---|---|
| Timecard Change Rules | Timecard change rules use if/then logic to change original timecards, but they do not create new timecards. For example, you can identify timecards that include regular time on a designated company holiday, and then change the pay type from regular pay to overtime pay. In this scenario, the system changes the pay type on the original timecards. |
| Timecard Accumulator Rules | Timecard accumulator rules enable you to calculate overtime pay based on a specified limit and time period, and create additional timecards for the overtime pay. When you use timecard accumulator rules, you must use employee groups to identify eligible employees. The accumulator rule then calculates the overtime pay, changes the original timecards to remove the original overtime amounts, and creates new timecards for the overtime pay.
For example, you can create an overtime rule to pay employees one-and-a-half times their regular rate for any hours worked in excess of 40 in a week. Thus, if an employee timecard includes 45 hours of regular time in a given week, the system would change the existing timecard to include 40 hours of regular time, and create a new timecard (or timecards) that would include five hours of overtime. |
| Call Custom Rules | Use call custom rules to call a user-defined business function. If a company has special overtime requirements that cannot be accommodated using change or accumulator rules, you can create a custom function and call the function in the custom rule. For example, if you want to pay a meal allowance of 8.00 USD per day for all employees who work over nine-and-a-half hours, you can create a call custom rule to perform this calculation. |
| Call Rule Set Rules | Use call rule set rules to call overtime rule sets that you have previously defined. Call rule set rules enable you to reuse rule sets in multiple ways and eliminate the need to re-create rule sets that you use frequently. |
6.1.4 Employee Groups
To use timecard templates, retroactive pay rules, or overtime rule sets, you must define employee groups. Employee groups identify which employees the system includes in a selected process. The system cannot process timecard templates, retroactive pay rules, or overtime rule sets unless an employee group is attached. In addition to attaching a group to define which employees to include for processing, you can also attach a group to timecard templates, retroactive pay rules, and overtime rule sets to exclude employees from being processed.
The system uses employee groups with Timecard Automation in the Employee Assignment module, the Job Step Progression module, and to generate group gross-up payments using the Interim Payment module. You can create these employee groups:
-
List group
-
Select group
-
Combo group
-
Exclusion group
6.1.5 List Group
A list group is a static listing of employees by address book number. You might use a list group when you need to create a group of employees with no common criteria. For example, to create an employee group that contains employees who work in different business units, job types, and locations, you can create a list group by entering the address book numbers of the employees. When you need to remove an employee from the group, you must do it manually. A list group can contain any number of employees.
6.1.6 Select Group
A select group is a dynamic group of employees. You enter selection criteria over records in the F060116 table, F06116 table and F0618 table to create the group. For example, to create a group that includes all employees in business unit 100, you can create a select group. The system performs the selection criteria search each time that you use the employee group. The system automatically includes only the employees who meet the selection criteria at the time of processing. If an employee leaves business unit 100, that employee will no longer be part of that particular select group.
6.1.7 Combo Group
Combo groups are lists of multiple list groups or select groups. You can use combo groups to combine multiple lists and to reuse groups that you have already defined. For example, to include all employees in business unit 100 and all employees in business unit 9, you can create a combo group that contains two groups that have already been set up as list or select groups.
6.1.8 Exclusion Group
For each type of group, you can identify an exclusion group. You can set up exclusion groups as either list, select, or combo groups, and attach them to other list, select, or combo groups. For example, you might set up a list group that contains three employees in business unit 9 who should not be included for processing with the rest of the employees in business unit 9. You would then attach the select group as an exclusion group to the select group for business unit 9.
6.1.9 Timecard Review and Approval
When you process timecard templates, retroactive pay rules, or overtime rule sets, the system creates timecards in the F06116 table and assigns the newly created timecards a status of Pending. After the system creates the timecards, you can review, revise, and delete any individual timecards. You can approve or cancel entire batches of timecards. When you approve a batch of timecards, the system removes the Pending status from the timecards, which enables you to include them in a payroll cycle. When you cancel a batch of timecards, the system removes them entirely from the F06116 table.
6.1.10 Formulas and Functions
When you create timecard templates, retroactive pay rules, or overtime rule sets, you can create formulas that calculate pay rates or hours worked. The system provides several predefined business functions that calculate values for some of the variables that you commonly use when creating formulas.
6.2 Creating Employee Groups
This section provides an overview of employee groups and discusses how to:
-
Create a list group.
-
Create a select group.
-
Create a combo group.
6.2.1 Understanding Employee Groups
Employee groups are the foundation of the Timecard Automation module. You cannot process timecard templates, retropay rules, or overtime rules without using an employee group. You use employee groups to specify the employees for whom you want to create or change timecards.
Timecard templates use employee groups to create a new, template-based timecard for each employee in the group. Retropay rules use employee groups to identify employees with timecards that you need to adjust and to create the adjustment timecards for each applicable employee in the group. Overtime rule sets use employee groups to identify the employees to process, identify the timecards that you need to change or create based on the rules, and create or change timecards for each applicable employee in the group.
After you define employee groups, you can use them interchangeably to process timecard templates, retropay rules, and overtime rule sets. You can reuse employee groups for each pay period. You can also use employee groups to specify the employees whom you want to include in a process and identify employees whom you want to exclude from the group when processing timecard templates, retropay rules, and overtime rule sets.
To use a group as an exclusion group, you must first identify a group of employees to include in the process. The system processes the timecard template, retropay rule, or overtime rule set, including the employees in the first group, and bypasses any employees who are part of the exclusion group.
After you define an employee group, you can review the group online to determine whether the correct employees are included. The Employee Groups program uses these tables:
-
F060116
-
F186201
-
F186202
-
F186203
-
F186204
-
F186206
6.2.1.1 Types of Employee Groups
You use the Employee Groups program (P186201) to create employee groups. The types of groups that you can create include:
-
List groups
-
Select groups
-
Combo groups
List groups are a basic type of group that includes a static list of employees. The members of a list group change only if you manually change the group. You create list groups by entering a list of employee numbers. For example, you might create a list group of ten employees who had the highest sales performance and should therefore receive a bonus. If, after you create this list group, the top ten sales performers change, you must manually update the group.
Select groups are dynamic and flexible. You create a select group by specifying selection criteria. You can use fields from the F060116, F06116 and F0618 tables as selection criteria. For example, you can use a select group to select all hourly employees who work in a specific business unit. Regardless of whether employees change within a business unit, the selection criteria for the group remains the same. Each time that you run a process using a select group, the system generates the group based on the selection criteria. Therefore, you do not need to modify or re-create the group when members of the group change.
You can create combo groups to join multiple employee groups together. You must first define list and select groups before you can create a combo group. Combo groups save time and reduce effort by enabling you to reuse existing groups. You are not limited to the number of employees that you can include in a combo group. If the system encounters duplicate employee records when compiling a combo group, it deletes the duplicate records when the group is built. For example, you might want to create bonuses for all employees in a specified business unit, along with the top performers from several other business units. Using a combo group, you could create a list group to include the top performers and use a select group to include all of the employees in the specified business unit. You then enter both of these groups in the combo group to include all of the desired employees in one single process.
After you create an employee group, you can print the Employees by Group report (R186202) to view a list of all the employees in the group. You use this report to verify that the group includes the employees that you intended to include. For all types of employee groups and the employees included in the groups, the report displays:
-
Group name.
-
Group type.
-
Associated exclusion group (if any).
-
Names and address book numbers of employees.
-
Number of members.
You typically print this report before you process a timecard template, overtime rule set, or retroactive pay rule that uses the employee group. When you print the report for a select group, the report also includes the selection table name and the selection criteria. When you print the report for a combo group, it includes the names of the other groups within the combo group.
To support the global leave administration module, two Row menu options exist in the Employee Groups program:
-
Build Leave Group
-
View Leave Group
When you create a new group and then select Build Leave Group from the Row menu, the system creates the F186206 table and saves new leave group records. When the table already exists with data for a particular group, the system overwrites the existing data with new information. You can view the information in this table by selecting the View Leave Group option from the Row menu.
6.2.2 Forms Used to Create Employee Groups
| Form Name | FormID | Navigation | Usage |
|---|---|---|---|
| Work With Employee Groups | W186201A | Periodic Processing menu (G18620), Employee Groups | Select an existing employee group for review or revision. |
| Group Type | W186201H | Click Add on the Work With Employee Groups form. | Select the type of group that you want to create. |
| Employee List Group | W186201B | Select List Group on the Group Type form. | Create a list group. |
| Employee Select Group | W186201C | Click Select Group on the Group Type form. | Create a select group. |
| Employee Combo Group | W186201E | Select Combo Group on the Group Type form. | Create a combo group. |
| Employees In Group | W186201F | Select a group and select View Group from the Row menu to review all of the employees in the group on the Work With Employee Groups form. | View the employees in an existing group. |
| Work With Employee Information | W0801A | Select the employee to review, and then select Employee Info from the Row menu on the Employees In Group form. | Review information about an employee in a group. |
| Work With Employee Groups | W186201A | Select a report type on the Work With Employee Information form. | Select one of these options from the Report menu:
|
6.2.3 Creating a List Group
Access the Employee List Group form.
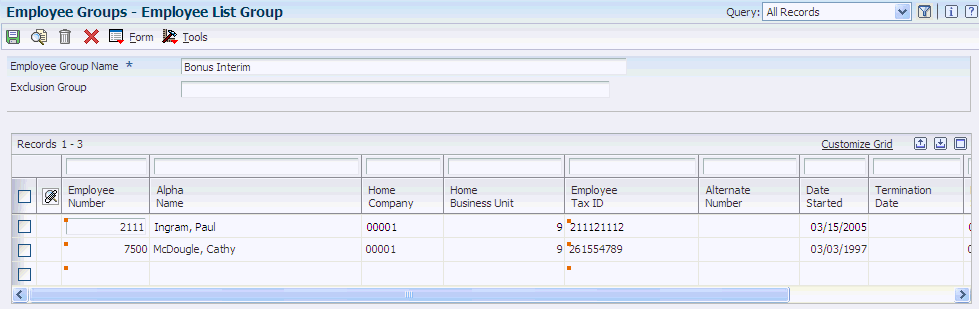
- Name
-
Enter a user-defined name for an employee group. The group name should describe the employees who make up the group. For example, a group name might be Business Unit 9.
- Exclusion Group
-
Enter the name of an existing employee group to exclude the employees in that group from processing.
- Home Company
-
Enter the number of the company where the employee records generally reside.
- Country Code
-
Indicates the country in which the employee resides. Select a value from user-defined code (UDC) table 00/CN.
6.2.4 Creating a Select Group
Access the Employee Select Group form.
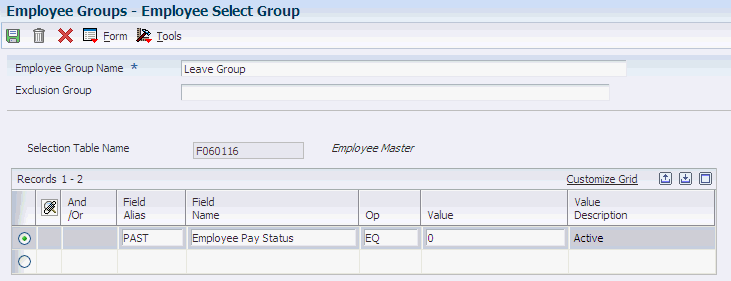
- Name
-
Enter a user-defined name for an employee group. The group name should describe the employees who make up the group. For example, a group name might be Business Unit 9.
- Exclusion Group
-
Enter the name of an existing employee group to exclude the employees in that group from processing.
- Field Name
-
Identifies and defines a unit of information. The identifier is a 32-character, alphabetic field that does not allow blanks or special characters such as%, &, +, and so on.
You cannot change the data item. It forms the C-code data name (for example Address Number) that the system uses in business functions, data structures, and event rules.
The table that you select determines which fields are available when you create the selection criteria. You can select the F060116, F06116, or F0618 table.
After you create a select group, you cannot change the selection table. If you need to change the selection table, you must create a new select group.
- Field Alias
-
Identifies a data item by the alias or alpha description.
If the field alias column is not available in the detail area, select Show Alias from the Form menu. If you enter a field alias, the system automatically completes the field name with the information that you provide. To use Field Name (and hide Field Alias), select Hide Alias from the Form menu.
- Op (operand)
-
Enter a code that identifies the operand in Boolean logic. Values are:
EQ: Equal to.
LT: Less than
LE: Less than or equal to.
GT: Greater than.
GE: Greater than or equal to.
NE: Not equal to.
NL: Not less than.
NG: Not greater than.
You use simple logic to create selection criteria statements for select groups. After you have specified the field on which you want to base selection criteria, you use the Op and Value fields to define the statement and identify whether the field value should be equal to, greater than or equal to, greater than, less than or equal to, less than, not equal to, not greater than, or not less than the value in the Value field. For example, to include all employees in business unit 9, enter HMCU in the Field Alias field, EQ in the Op field, and 9 in the Value field.
- And /Or
-
Enter a code to designate whether the test parameters or criteria are based on an AND condition or an OR condition.
Use this field to add complexity to a logic statement. For example, to further define the previous statement to narrow the group to include only hourly employees in business unit 9, enter an AND statement and enter FLSA in the Field Alias field, EQ in the Op field, and N in the Value field.
6.2.5 Creating a Combo Group
Access the Employee Combo Group form.
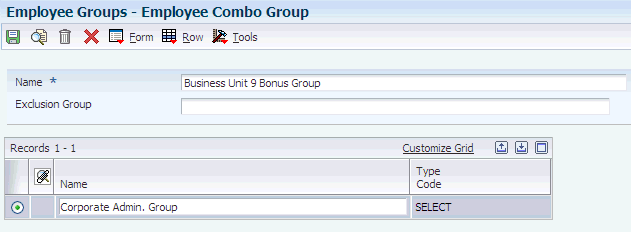
- Type Code
-
Enter a code that identifies the type of employee group. The system automatically populates this field when you enter an employee group. Values are:
LIST: A list group is a static list of employees that can be stored and used repeatedly.
ELECT: A select group is a group of employees that meet the selection criteria that you specify in a request.
COMBO: A combination group is a list of other groups. The other groups can include list groups, select groups, or both.
6.3 Creating Timecard Templates
This section provides an overview of timecard templates, lists a prerequisite, and discusses how to:
-
Create timecard templates.
-
Process timecard templates.
-
Run the Timecard Template Batch Review report.
6.3.1 Understanding Timecard Templates
You can use the Timecard Templates program (P186301) to automatically create and save timecard models for certain pay situations, such as holiday pay or bonuses. After you create the model, which is also called a template, you can process the template for a specified employee group. The system creates timecards that are based on the template for each employee in the group.
A timecard template consists of an employee group and field values. The system uses the employee group to determine which employees to process. The system uses the field values that you specify to create timecards for all employees in the employee group. Examples of fields for which you might supply values are:
A timecard template enables you to create one timecard pattern and associate an employee group with the pattern instead of manually creating a timecard for each employee. When you process the template, the system creates the employee timecards from information in the timecard template. For example, to pay all of the employees in a group eight hours of holiday pay for a company-paid holiday, you can create a timecard template to create timecards for each employee in the group. You can set up the template to automatically enter values into the timecard for date, pay type, and number of hours.
After you create a timecard template, you can save it for future use. Timecard templates can simplify the time entry process by dramatically reducing the amount of manual data entry that is necessary to create employee timecards. Timecard templates can also help reduce errors that can occur with manual data entry.
When you submit a timecard template for processing, timecard automation creates a batch of timecards. You can use the Reviewing and Approving program (P186601) to review, approve, or cancel the timecard batch. When you review a batch, you can delete selected employee timecards within the batch. You must approve the batch before the timecards can be processed in a payroll cycle. The system also generates reports that you can review to verify the timecard information before you process the timecards in a payroll cycle.
6.3.1.1 Creating Timecard Templates
When you create timecard templates, you create a model timecard for all employees in the attached group. The fields that you use to create the template are the same fields that exist in the time entry applications, and they are used in the same way on timecard templates except that you can create formulas to calculate hours worked and rates paid.
You create timecard templates using the Timecard Templates program (P186301). To ensure that you are creating all of the templates that you need, you should carefully analyze the types of pay that the organization disburses. After you have determined which templates you need, you should identify the field values for each template. Field values include items such as account number, pay type, and timecard date. The system uses field values to create batches of model timecards.
When you create a timecard template, you must attach at least one employee group. If necessary, you can change the employee group each time that you process the template, which enables you to reuse the timecard template for multiple groups of employees. You must also assign a version of the Time Entry MBF program (P050002A) when you create a timecard template. Use the Time Entry MBF program to define processing rules for creating timecards.
6.3.1.2 Submitting Timecard Templates for Processing
When you submit a timecard template for processing, the system creates a batch of timecards for the employee group that is associated with the timecard template. The timecards in this batch are created in the F06116 table with a status of Pending Approval. You cannot include timecards with a pending status in a payroll cycle. You should review these timecards and revise them if necessary. When you are satisfied that the timecards are correct, you can approve the batch. When you approve the batch, the system removes the Pending Approval status. If you cancel the batch, the system removes the timecards from the F06116 table. You must approve the batch before you can process the timecards in a payroll cycle.
|
Note: You can change any original option, including the employee group that is assigned to the template. Changes that you make to timecard templates affect all batches of timecards that you process after the change, but do not affect batches of timecards that have already been processed.You can delete a timecard template from the Timecard Templates program if the template has no batches of timecards that are pending approval with which the batches are associated. Before you can delete a timecard template, you must approve or cancel any batches of timecards on which the template is based, and then delete the associated header records for the timecards. If the timecard template has a batch of timecards with which it is associated, the system displays an error message and prevents you from deleting it. |
6.3.1.3 Timecard Template Processing Report (R186303)
When you submit a timecard template for processing, the system generates the Timecard Template Processing report (R186303). Use this report to verify that the system created timecards for all of the employees who are in the employee group and are associated with the timecard template. The Exceptions (errors) section of the report lists employees for whom one of the these criteria is met:
-
An error prevents the system from creating the timecard.
-
The system creates the timecard, but an error or warning exists.
You should investigate each error and warning and make the necessary corrections before you process a payroll cycle that includes these timecards. If all or most of the timecards are incorrect, you might have entered incorrect information on the template or the associated employee group. In this case, you can cancel the batch of timecards, correct the error, and then resubmit the batch. If only a few timecards contain errors, you can use a time entry program, such as Speed Time Entry (P051121), to review the errors and make corrections. In this case, you do not need to cancel and resubmit the batch.
In addition to the exceptions, the report also includes totals of:
-
Employee records that the system processed.
-
All timecards that the system created.
-
Timecards that the system was unable to create.
-
Timecards that the system created without errors or warnings.
-
Timecards that contained errors.
-
Timecards that contained warnings.
-
Hours worked.
-
Gross pay.
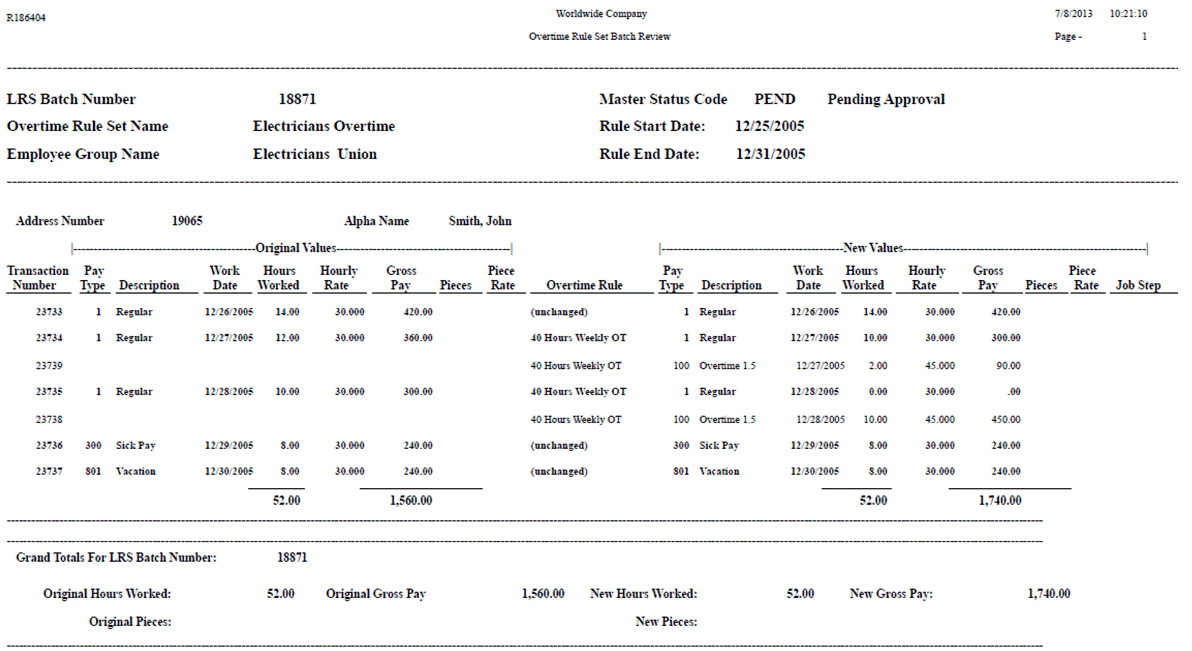
6.3.1.4 Timecard Template Batch Review Report (R186304)
After you submit a timecard template for processing, you can print the Timecard Template Batch Review report (R186304). This report lists detailed information about the timecards that were created without errors and that are currently awaiting approval or cancellation. Use this report to review information about the timecards that the system created for the employees in the employee group that is associated with the timecard template.
6.3.2 Prerequisite
Create one or more employee groups that include the employees for which you want to create timecards.
6.3.3 Forms Used to Create Timecard Templates
| Form Name | FormID | Navigation | Usage |
|---|---|---|---|
| Work With Timecard Templates | W186301B | Periodic Processing (G18620), Timecard Templates | Select existing timecard templates for review or revision. |
| Timecard Template | W186301E | Click Add on the Work With Timecard Templates form. | Create a timecard template and submit it for processing. |
| Work With Timecard Automation Batches | W186601A | Daily Processing (G18610), Reviewing and Approving | Select batches of timecards to use when generating the Timecard Template Batch Review report. |
6.3.4 Creating Timecard Templates
Access the Timecard Template form.
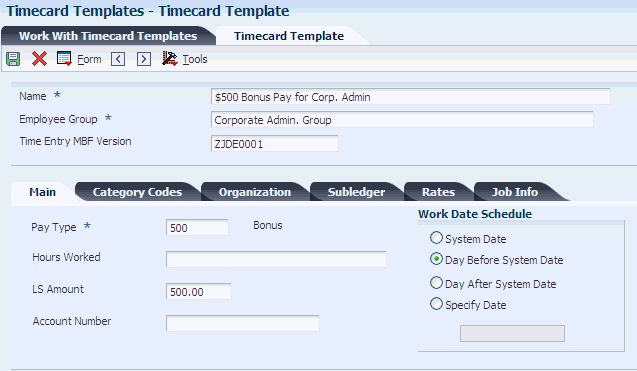
- Name
-
Enter a user-defined name for a timecard template. The name should describe the purpose of the template. For example, a timecard template name might be Holiday Timecards.
- Employee Group
-
Enter a user-defined name for an employee group.
- Time Entry MBF Version (time entry master business function version)
-
The version of the Time Entry MBF program to run when creating timecards. When you select the Time Entry MBF version for Timecard Templates, you are selecting the version that includes the processing options that you want. If you leave this field blank, the system uses version ZJDE0001. If the Time Entry MBF version has defined values for optional fields in the timecard template definition, the Time Entry MBF version enters the appropriate values in the optional fields that you leave blank.
6.3.4.1 Main
Select the Main tab.
- Hours Worked
-
Enter a formula that the system uses to calculate the number of hours that the employees worked.
You can enter a specific number of hours in the Hours Worked field or create a formula for calculating the hours worked by clicking the search button. For example, the holiday policy might stipulate that, to receive holiday pay, the employee must have worked at least eight hours on the workday prior to the holiday. You would create a formula for the system to determine whether employees meet this criteria. If you leave this field blank, you must enter a value in the LS Amount field.
- LS Amount (lump sum amount)
-
Enter a lump sum amount, an adjustment amount, or an amount that represents an employee's gross pay. This amount temporarily overrides any pay calculation that the system normally performs. If you enter a value or a formula in the Hours Worked field, you can leave this field blank.
- System Date
-
Indicates from where the timecards that were created by a timecard template will receive their work date. You can select these dates from:
System Date
Day Before System Date
Day After System Date
Specify Date
You should review the dates of the pay period before you select a date for the timecards. The system includes only the timecards with dates that occur within the pay period dates of the payroll cycle that you are processing.
6.3.4.2 Category Codes
Select the Category Codes tab.
- Category Code 01
-
Enter a category code that defines payroll system needs. You can define the use and description of this code to fit the organization. For example, you can set up a category code for information such as division, supervisor, branch office, health insurance plan, stock plan, and so on.
Note:
When setting up category codes in the JD Edwards EnterpriseOne Workforce Management system, you should coordinate information with the payroll department to ensure that information is not duplicated or overwritten.
6.3.4.3 Organization
Select the Organization tab.
- Job Location
-
Enter a value that represents the location in which the employee worked. You can use this value to specify that an employee worked at this location but charged the time to a different business unit. The system uses this value to derive rates from the Union Pay Rate table and uses the value exclusively with the Certified Payroll Register.
A value in this field overrides the rates that are set up in the F069126 table if it is set up by job or business unit.
- Check Route Code
-
Enter a code from UDC table 07/CR that specifies the check routing or mail-stop code. Use this code to sequence the printing of payroll checks to facilitate their handling and delivery.
6.3.4.4 Subledger
Select the Subledger tab.
- Subledger
-
Enter a code that identifies a detailed, auxiliary account within a general ledger account. A subledger can be an equipment item number or an address book number. If you enter a subledger, you must also specify the subledger type.
- Subledger Type
-
Enter a code from UDC table 00/ST that the system uses with the Subledger field to identify the subledger type and how the system performs subledger editing. On the User Defined Codes form, the second line of the description controls how the system performs editing. This value is either hard-coded or user-defined. Values include:
A: Alphanumeric field; do not edit.
N: Numeric field; right-justify and zero fill.
C: Alphanumeric field; right-justify and blank fill.
- Order Number
-
Enter a number that identifies an original document. This document can be a voucher, a sales order, an invoice, unapplied cash, a journal entry, and so on.
6.3.4.5 Rates
Select the Rates tab.
- Hourly Rate
-
Enter a formula that the system uses to calculate an actual hourly rate. You can enter a specific hourly rate or create a formula for calculating the hourly rate. For example, you might want to create a formula to multiply by two the employee's regular hourly rate if he or she worked on a holiday. If you leave this field blank, the system uses the employee's rate from the employee master or union pay rates table. If you enter a specific hourly rate, the system uses that rate for all employees for whom the template is processed.
6.3.5 Processing Timecard Templates
Access the Timecard Template form.
Select the timecard template that you want to process, and then select Submit from the Form menu. The system processes the timecard template, creates a new batch of timecards based on the options specified in the timecard template (including employee group), and creates the Timecard Template Processing report, which shows the processing details.
6.4 Creating Retroactive Pay Rules
This section provides an overview of retroactive pay rules, lists a prerequisite, and discusses how to:
-
Set processing options for Retroactive Pay (P186701).
-
Create retroactive pay rules.
-
Process retroactive pay rules.
6.4.1 Understanding Retroactive Pay Rules
Payroll departments frequently need to adjust payments that were previously disbursed to employees. These adjusted payments, which are called retroactive payments, are usually made when salary adjustments are made effective on a date that has already passed. You can use the Retroactive Pay Rules program (P186701) to pay employees retroactive pay. The system uses these rules to determine how to calculate retroactive pay adjustments.
The Retroactive Pay Rules program simplifies the process of paying employees retroactively and reduces the chances for miscalculated amounts by automating the calculations. When you apply retroactive pay rules, the system:
-
Determines which employees in an employee group are eligible for retroactive pay.
-
Uses current and historical timecard information to calculate the retroactive pay that each employee earns.
For example, according to a newly ratified union contract, you might need to pay union laborers retroactively at a three percent increase for hours that were worked over the last month. Instead of determining which employees are union members and calculating each employee's pay manually, you can define a retroactive pay rule that the system uses to select employees, create timecards, and calculate pay automatically. After you have defined a retroactive pay rule, you can save it for future use. The payroll process is simpler and the output more consistent because you are using one set of criteria for all timecards.
When you create a retroactive pay rule, the Retroactive Pay Rules program uses the employee group, the date range, and the pay type inclusion criteria to determine which timecards are affected in the current and historical timecards tables. The system includes timecards from both tables and selects the timecards based on whether you select all timecards, timecards of certain pay types, or timecards of certain pay-type categories. The system selects the appropriate timecards from the tables to retrieve amounts and provide template information. The Retroactive Pay Rules program does not change historical or current timecards. Instead, it creates new timecards for the retroactive pay adjustment. The system ignores any original voided timecards. The parent or original timecard in either the current or historical timecards tables corresponds directly to the child or new timecard in the batch.
After the batch is processed, it is submitted to the Reviewing and Approving program (P186601). You use the Reviewing and Approving program to review, approve, or cancel the batch. You can also review the Retroactive Pay Rule Processing report (R186702) from within the Retroactive Pay Rules program.
6.4.1.1 Creating Retroactive Pay Rules
You create a retroactive pay rule to specify information (such as the appropriate hourly rate, number of hours worked, and pay types) that the system uses to calculate retroactive pay for an employee group. You can save and reuse retroactive pay rules. For example, instead of creating timecards manually each time that you have to retroactively pay employees, you can create a retroactive pay rule once and reuse it as needed. When you create a retroactive pay rule, you must assign an employee group.
When adding a retroactive pay rule, you can select the option Select Groupto specify the group of timecards to display. You can enter select statements to select the fields from the F0618 table.
|
Note: You can select the fields in the F0618 table as all the fields of F0618 exist in F06116 but not vice versa. Also, the F186704 table stores the select statements. |
When you reuse the retroactive pay rule, you can use the existing group or change to another employee group.
The system creates timecards for retroactive pay based on the information that you enter in the retroactive pay rule. To successfully process retroactive pay rules, the system requires this information:
-
The employees that you want to process, which you specify by attaching one or more employee groups to the retroactive pay rule.
-
The period that you want to process, which you specify by selecting starting and ending work dates.
The system uses the date range to locate current and historical timecards, which are used as the basis for the new retroactive pay timecards.
-
The elements that create new timecards, which you specify by selecting a new work date, new pay type, new hourly rate, new hours worked, or no hours on timecard.
-
The timecards to include (based on pay type) for the basis of the retroactive pay calculation, which you specify by selecting all pay types, a specific list of pay types, or a pay type category.
You can change any original option, including the employee group that is assigned to the retroactive pay rule. Changes that you make to retroactive pay rules affect all batches of timecards that are processed after the change, but do not affect batches of timecards that you already processed.
You can delete retroactive pay rules from the Retroactive Pay Rules program if the retroactive pay rule does not have any batches of timecards that are pending approval. Before you can delete a retroactive pay rule, you must approve or cancel any batches of timecards on which it is based and then delete the associated header records for the timecards. If the retroactive pay rule has a batch of timecards with which it is associated, the system displays an error message and prevents you from deleting it.
6.4.1.2 Processing Retroactive Pay Rules
When you submit a retroactive pay rule for processing, the system creates a batch of new timecards for the employee group that is associated with the retroactive pay rule. The timecards in this batch have a status of Pending Approval. You cannot include pending timecards in a payroll cycle. You should review these timecards and revise them if necessary. When you are satisfied that the timecards are correct, you can approve the batch, which removes the pending status from the timecards. You must approve the batch before you can process the timecards in a payroll cycle. If, after reviewing the timecards, you find that the retroactive pay rule did not achieve the desired outcome, you can cancel the batch, modify the retroactive pay rule, and resubmit it for processing. When you cancel a batch, the system deletes any timecards that were created in the batch.
When you submit a retroactive pay rule, the system also generates the Retroactive Pay Rule Processing report (R186705), which you can use to verify the timecard information.
6.4.1.3 Reviewing the Retroactive Pay Rule Processing Report
When you submit retroactive pay rules for processing, the system generates the Retroactive Pay Rule Processing report (R186705). Use this report to verify that the system created timecards for all of the employees who are in the employee group that is associated with the retroactive pay rule. The Exceptions (errors) section of the report lists those employees for whom one of these statement is true:
-
An error prevents the system from creating the timecard.
-
The system creates the timecard, but an error or warning exists.
You should investigate each error and warning and make any corrections before you process a payroll cycle that includes these timecards. If all or most of the timecards are incorrect, you might have entered incorrect information on the retroactive pay rule or the associated employee group. If so, you can cancel the batch of timecards, correct the error, and then resubmit the batch. If relatively few timecards contain errors, you can use a time entry program, such as Speed Time Entry (P051121), to review the errors and make corrections. In this case, you do not need to cancel and resubmit the batch.
In addition to the exceptions, the report also includes totals of:
-
Employee records that the system processed.
-
All timecards that the system created.
-
Timecards that the system was unable to create.
-
Timecards that the system created without errors or warnings.
-
Timecards that contained errors.
-
Timecards that contained warnings.
-
Hours worked.
-
Gross pay.
6.4.2 Prerequisite
Create one or more employee groups that contain the employees for whom you want to process a retroactive pay rule.
6.4.3 Forms Used to Create Retroactive Pay Rules
| Form Name | FormID | Navigation | Usage |
|---|---|---|---|
| Work With Retroactive Pay Rules | W186701A | Periodic Processing (G18620), Retroactive Pay | Select existing retroactive pay rules for review or revision. |
| Retroactive Pay Rule | W186701B | Click Add or select a retroactive pay rule, and click Select on the Work With Retroactive Pay Rules form. | Create a new retroactive pay rule, or review and revise existing rules. |
6.4.4 Setting Processing Options for Retroactive Pay (P186701)
Set these processing options before you enter requests into the system.
6.4.4.1 Defaults
- 1. Time Entry MBF Version (time entry master business function version)
-
Specify the default version of the Time Entry MBF (Master Business Function) program that the system uses when timecards are added as this rule is processed.
- 2. Copy account information
-
Specify how the system determines the account information (cost center, object account, and subsidiary) for newly created timecards. This processing option does not affect the account information for modified timecards. Values are:
Blank: Retrieve the account information from the payroll automatic accounting instructions (AAIs).
Y: Copy new timecard account information from the original timecard.
1: Get the subsidiary from the work order (cost center = original timecard; object = payroll AAIs; subsidiary = work order).
- 3. Custom Rule Pay Type
-
Specify a pay type to be used in a custom retro pay rule to calculate a retro pay rate. For example, to use 886 as the pay type that the custom retro pay rule will use for calculations, enter 886.
6.4.5 Creating Retroactive Pay Rules
Access the Retroactive Pay Rule form.
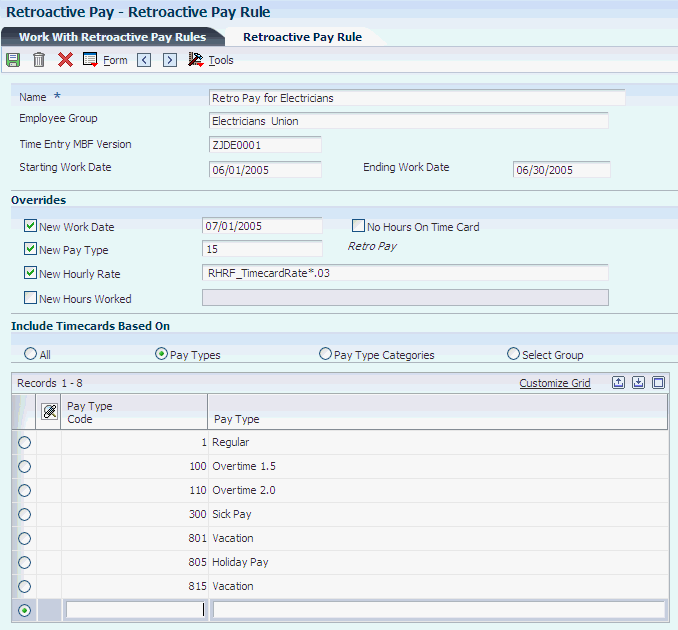
- Name
-
Enter a user-defined name for a retro pay rule.
Enter a name that describes the purpose of the retroactive pay rule. For example, if you are creating a retro pay rule to apply a 3 percent salary adjustment, the name for the retro pay rule might be Three Percent Salary Adjustment.
- Employee Group
-
Enter a user-defined name for an employee group.
- Time Entry MBF Version (time entry master business function version)
-
Enter the version of the Time Entry MBF program to run when creating timecards
If you leave this field blank, the system uses version ZJDE0001. If the version that you select has defined values for optional fields in the retroactive pay rule definition, the system enters the values that you defined into the optional fields if you leave them blank.
- Starting Work Date
-
Enter the date upon which the system begins including timecards for processing that is generated by a particular rule.
- Ending Work Date
-
Enter the date up to which the system includes timecards for processing generated by a particular rule.
- New Work Date
-
Enter a code that indicates whether timecards that are created by a rule contain a new work date or retain the same work date as the original timecard. If you select this option, the system uses this date as the timecard date for the newly created timecards. If you complete this field, verify that the date that you enter falls within the pay period dates of the payroll cycle in which you want to process the timecards.
If you do not select this option, the new timecards contain the same date as the old timecards.
- New Pay Type
-
Enter a code that indicates whether timecards that are created by a rule contain a new pay type or retain the same pay type as the original timecard. If you select this option, the system uses this pay type to create the adjustment timecards. You might want to use a pay type with a description that indicates what the payment is for. If you do not select this option, the system uses the pay type from the old timecards.
- New Hourly Rate
-
Enter a code that indicates whether timecards that are created by a rule contain a new hourly rate or retain the same hourly rate as the original timecard. If you select this option, enter a rate or a formula to calculate the hourly rate in this field. For example, if the retroactive pay adjustment is 3 percent of employees' timecard rate, you might enter this formula:
.03 × RHRF_TimecardRate
If you do not select this option, the existing timecards retain their original hourly rate.
- New Hours Worked
-
Enter a code that indicates whether timecards that are created by a rule contain a new number of hours worked or retain the same number of hours worked as the original timecard. If you select this option, enter an amount or a formula to calculate the number of hours that are worked. The system uses this amount on the newly created timecards.
If you do not select this option, the new timecard retains the same amount of hours worked as the original timecard.
- No Hours On Time Card
-
Enter a code that specifies whether timecards that are created by a retroactive pay rule will have a value of zero in the Hours Worked field.
If you select this option, the system enters a value of zero in the Hours Worked field on the new timecards. For example, if the purpose of the adjustment is to calculate three percent of employees' timecard rate, and an employee has a timecard with 40 hours that you want to adjust at an hourly rate of 12.50 USD, the system creates a new timecard in the amount of 15 USD (40 hours ×.375 USD), but enters zero in the Hours Worked field.
- Pay Types
-
If you select this option, the detail area is enabled. You must enter into the detail area the specific pay types to include in the basis of calculation for the adjustment. For example, if the new timecards should be based only on regular and overtime hours, you would enter the pay types that you use for regular and overtime pay into the detail area.
- Pay Type Categories
-
Select this option for the system to enable the detail area below the inclusion options. You must enter into the detail area the specific pay type to include in the basis of calculation for the adjustment. For example, if you want to include only regular time hours in the calculation, and all of the regular pay types are in a pay type category called Regular, enter Regular in the detail area.
- All
-
Select this option for the system to create the adjustment using all eligible timecards within the specified date range as the basis of calculation. The detail area is hidden if you select this option.
- Select Group
-
Select this option to enable the detail area. You must enter the select statements to determine the group of timecards to which the Overtime is to be applied.
6.4.6 Processing Retroactive Pay Rules
Access the Retroactive Pay Rule form.
Select the retroactive pay rule that you want to process, and then select Submit from the Form menu. The system processes the rule, creates a new batch of timecards based on the options specified, and creates the Retroactive Pay Rule Processing report (R186702) that shows the processing details.
6.5 Creating Overtime Rule Sets
This section provides an overview of overtime rules, lists a prerequisite, and discusses how to:
-
Create an overtime rule set.
-
Create a timecard accumulator rule.
-
Create a timecard change rule.
-
Create a call rule set rule.
-
Create a call custom rule.
-
Define the user parameters.
-
Set processing options for Overtime Rules (P186401).
-
Process overtime rules sets.
-
Set processing options for the Overtime Rule Set Batch Review report (R186404).
6.5.1 Understanding Overtime Rules
Due to federal, state, or union requirements, most organizations need to pay employees overtime pay when employees work a certain number of hours. When you pay overtime to employees, you can use the Overtime Rules program (P186401) to automate many actions. You can create an overtime rule set, which is a group of overtime rules that the system uses to automate the calculation of overtime pay. The system uses overtime rule sets to:
-
Determine which employees in an employee group are eligible for overtime pay.
-
Identify the timecards that are the basis for overtime pay calculation, based on a user-defined date range.
-
Calculate the overtime pay for each eligible employee.
-
Change current, unprocessed timecards, or create new timecards for the overtime pay.
Note:
Overtime rule sets can affect current, unprocessed timecards. Historical timecards are not affected when you process overtime rule sets.
An overtime rule set is a group of individual overtime rules that contains the employee group or groups for which you want to process the set of overtime rules. An overtime rule is a set of specifications that specify how the system calculates different types of overtime. This example illustrates how you can use overtime rules and overtime rule sets.
A typical overtime calculation for a company might be to pay all nonexempt employees one-and-a-half times their base salary for any time that they worked over 8 hours a day or 40 hours a week. The company might also pay employees double time for any time that they worked over 12 hours a day. To accommodate this overtime calculation, use a rule set and attach an employee group consisting of all nonexempt employees. This rule set would consist of:
-
A rule to calculate time-and-a-half for all hours worked over 8 hours per day.
-
A rule to calculate time-and-a-half for all hours worked over 40 hours per week.
-
A rule to calculate double time for all hours worked over 12 hours per day.
You can create four types of overtime rules within an overtime rule set, as described in this table:
| Rule Type | Description |
|---|---|
| Timecard change rules | Timecard change rules use if/then logic to change original timecards, but they do not create new timecards. For example, if a timecard includes regular time on a designated company holiday, then change the pay type from regular pay to overtime pay. In this example, the system changes the pay types on the original timecards. |
| Timecard accumulator rules | Timecard accumulator rules enable you to pay overtime based on a specified limit and time period, and create additional timecards for the overtime pay. When you use timecard accumulator rules, you must use employee groups to identify eligible employees. The accumulator rule then calculates the overtime pay, changes the original timecards to remove the original overtime amounts, and creates new timecards for the overtime pay.
For example, you can create an overtime rule to pay employees one-and-a-half times their regular rate for any hours worked over 40 in a week. Therefore, if an employee timecard included 45 hours of regular time in a given week, the system would change the existing timecard to include 40 hours of regular time, and create a new timecard, or timecards, that would include 5 hours of overtime. |
| Call custom rules | Use call custom rules to call a user-defined business function. If a company has special overtime requirements that cannot be accommodated using change or accumulator rules, you can create a custom function and have the system call the function in the custom rule. For example, if you want to pay a meal allowance of 8.00 USD per day for all employees who work over nine-and-a-half hours, you can create a call custom rule because neither the timecard change rule nor the timecard accumulator rule can perform this calculation. |
| Call rule set rules | Use call rule set rules to call overtime rule sets that you have previously defined. Call rule set rules enable you to reuse rule sets in a variety of situations and eliminate the need to re-create rule sets that you use frequently. |
The system uses overtime rule sets to calculate overtime amounts for batches of timecards. You can have several different overtime rules within one overtime rule set. However, you must have at least one overtime rule for the system to process an overtime rule set. Also, because you create overtime rules within overtime rule sets, an overtime rule cannot exist outside of an overtime rule set.
You create an overtime rule set and then create and add the overtime rules to the set. After you have created the overtime rules within a rule set, you must sequence the rules in the appropriate processing order. The system must process certain rules before others to obtain the desired results. For example, the system should process the rule for time-and-a-half over 8 hours per day before it processes the rule for time-and-a-half over 40 hours per week. If the rules are processed out of sequence, the rule set might not meet overtime requirements.
The Overtime Rules program uses an employee group, a date range, and the overtime rules that you identify to determine which timecards are affected. After the system selects the appropriate timecards, the Overtime Rules program uses these timecards as the basis to create new timecards or to change existing ones as necessary. The system does not change historical timecards, nor does it process any original voided timecards.
The system processes these timecards but does not change the types:
-
Posted timecards.
-
Interim, nonvoided timecards.
-
Printed check timecards.
After you submit the overtime rule set for processing, you can use the Reviewing and Approving program (P186601) to review, approve, or cancel a batch. If you cancel a batch, the system restores the original timecards. You can review the processing report from within the Overtime Rule Sets program. Later, you can review the results, without the processing notes, of submitting the overtime rule set in the Reviewing and Approving Timecards program.
6.5.1.1 Overtime Rule Sets
You create an overtime rule set to define an ordered group of overtime rules that the system uses to calculate overtime for a specific batch of timecards and employee group. You can include one overtime rule set within another to eliminate the need to re-create a rule set for multiple overtime calculations. When you create a rule set, you must specify these items before creating and sequencing overtime rules:
-
The employee group that contains the employees to whom the overtime rule set applies.
-
The dates for which employees should receive overtime pay.
You can process an overtime rule set for each pay period; however, you must change the date range before you do so. You can also reuse an overtime rule set for different groups of employees. To do so, you change the employee group before you process the rule set.
After you create an overtime rule set, you need to create the overtime rules that provide the system with the criteria that it uses to calculate overtime. Any combination of overtime rules is acceptable in overtime rule sets. The system processes overtime rules in the order in which you specify them in the overtime rule set.
You can create or delete overtime rules at any time. Changing the order of overtime rules or including additional overtime rules does not affect current or past batches of timecards.
You can change any original option, including the employee group that is assigned to the rule. Changes that you make to overtime rule sets affect all batches of timecards that are processed after the change, but do not affect batches of timecards that have already been processed.
You can delete an overtime rule set if the overtime rule set has no batches of timecards that are pending approval. Before you can delete an overtime rule set, you must approve or cancel any batches of timecards on which it is based, and then delete the associated header records for the timecards. The system verifies that no batches of timecards depend on the overtime rule set before it enables you to delete the rule set. If the overtime rule set has a batch of timecards with which it is associated, the system displays an error message and prevents you from deleting the overtime rule set.
6.5.1.2 Timecard Accumulator Rules
You can create a timecard accumulator rule to control the hourly overtime rate, overtime pay type, and the way that overtime is charged. A timecard accumulator rule enables you to create calculations to pay overtime based on an overtime limit for a given period of time, and charge the overtime to different timecards. Accumulator rules are created within an overtime rule set.
The system identifies eligible employees from the employee group that you specify in the overtime rule set, calculates the correct overtime amount, changes old timecards to reflect the time that is removed for overtime, and creates new timecards for the overtime. The overtime rule can specify a different pay type or rate for use on the new timecards. All other fields on the new timecards are populated with the same values as the original timecards. The system can create new timecards or change existing timecards based on the way that you set up the overtime rule.
Accumulator rules are used to calculate overtime in situations in which employees must accumulate a certain amount of time before they are eligible for overtime. For example, you might pay employees time and a half for all hours worked over 8 hours per day or 40 hours per week, and double time for all hours worked over 12 hours per day. In this example, you can create an accumulator rule to calculate time and a half for all hours worked over eight, indicating an accumulation period of one day. Within the accumulator rule you would specify the pay types or pay type categories that the system should use to locate the timecards that are used as the basis for the overtime calculation. For example, if you specify regular pay as the basis, the system locates all timecards with regular pay that fall within the specified criteria, changes the original timecards to remove the overtime hours, and creates new timecards that contain the overtime hours with the appropriate pay type.
For the system to perform the calculation, you must enter time on a daily basis rather than on a summarized basis by pay period.
The timecard accumulator rule consists of these components:
-
An accumulation period.
The accumulation period is the time over which the system accumulates the hours that employees work. For example, the accumulation period for a biweekly payroll might be 14 days.
-
An include section.
The include section is the criteria that the system uses to determine which timecards to include in the accumulation, based on pay type or pay type category. For example, you can include all timecards with regular time but exclude timecards with sick time.
-
An overtime limit.
The overtime limit is the point above which any additional hours are considered overtime. For example, if you pay employees overtime for all hours worked over eight hours in a day, the overtime limit would be eight hours.
-
A charge-to method.
A charge-to method specifies how and from where the system removes hours from existing timecards, and how and where it applies overtime timecards to. Available types of charge-to methods are:
-
Method 1
-
Method 2
-
Method 3
-
Method 4
6.5.1.3 Method 1
Beginning with the most recent timecard in the period and working backwards one timecard at a time, the system removes time that should be considered overtime from the existing timecards until the system accounts for all overtime. The system creates one new timecard for each original timecard on which overtime hours are removed and creates new timecards using the same data as the original timecards, with the exception of the pay type and rate, which are derived from the information that you enter in the accumulator rule. You might use this charge-to method if you track overtime by criteria, such as work order or account number.
For example, a warehouse employee works 43 hours in a week. You can pay the employee at the regular pay rate for the first 40 hours and at the overtime rate for the remaining 3 hours. The system removes 3 hours from timecards, starting with the most recent timecard and working backwards until the system accounts for all 3 hours. The system creates new timecards for those 3 hours and changes the original timecards to reflect the time that was removed.
This table illustrates the number of hours that are included on the timecards before and after processing:
| Hours on the Original Timecard | Hours on the New Regular Timecard | Hours on the New Overtime Timecard |
|---|---|---|
| 8 | 8 | Blank |
| 10 | 8 | 2 |
| 9 | 8 | 1 |
| 8 | 8 | Blank |
| 8 | 8 | Blank |
6.5.1.4 Method 2
The system removes time from timecards and changes them the same way as in Method 1. However, the system charges the overtime to timecards in a different way. Using method 2, the system charged all overtime to a single timecard. This timecard is created using the same data as the timecard with the most recent work date, with the exception of the pay type and rate, that is specified in the accumulator rule. You might use this charge-to method if you want to create fewer timecards for faster processing, and you do not need to track overtime by criteria.
For example, for the warehouse employee in the previous example, the system removes time from the timecards using the same process as Method 1, but charges the three hours of overtime to a single timecard.
This table illustrates the number of hours that are included on the timecards before and after processing:
| Original Timecard Hours | New Regular Timecard Hours | New Overtime Timecard Hours |
|---|---|---|
| 8 | 8 | Blank |
| 10 | 8 | Blank |
| 9 | 8 | Blank |
| 8 | 8 | Blank |
| 8 | 8 | Blank |
| Blank | Blank | 3 |
6.5.1.5 Method 3
The system removes time from and changes every timecard in the accumulation period on a prorated basis. The prorated basis is a percentage, which is calculated by dividing the amount of time on each individual timecard by the total time during the accumulation period. The system creates one new timecard for each original timecard with the corresponding prorated number of hours. The new timecards use the same data as the original timecards, with the exception of the pay type and rate, that is specified in the accumulator rule. You might use this charge-to method if you need to allocate overtime to all timecards, regardless of when it was earned.
For example, for the warehouse employee in the previous examples, the system removes a percentage of the three hours of overtime from each original timecard based on the percentage of total time that each original timecard represents. The system changes the original timecards to reflect the percentage of time removed. The system creates new timecards for those three hours based on the percentage of total time that the original timecard represents.
This table illustrates the number of hours included on the timecards before and after processing:
| Original Timecard Hours | New Regular Timecard Hours | New Overtime Timecard Hours |
|---|---|---|
| 8 | 7.43 | .57 |
| 10 | 9.34 | .66 |
| 9 | 8.37 | .63 |
| 8 | 7.43 | .57 |
| 8 | 7.43 | .57 |
6.5.1.6 Method 4
The system removes time from and changes timecards as in Method 3. The system charges all overtime to a single timecard. This timecard is created using the same data as the most recent timecard, with the exception of the pay type and rate, that is specified in the accumulator rule. You might use this charge-to method if you want faster system processing, but you do not need to track overtime by criteria.
For example, for the warehouse employee in the previous examples, the system removes the time in the same way as in Method 3, but charges the three hours of overtime to a single timecard.
This table illustrates the number of hours included on the timecards before and after processing:
| Original Timecard Hours | New Regular Timecard Hours | New Overtime Timecard Hours |
|---|---|---|
| 8 | 7.43 | Blank |
| 10 | 9.34 | Blank |
| 9 | 8.37 | Blank |
| 8 | 7.43 | Blank |
| 8 | 7.43 | Blank |
| Blank | Blank | 3 |
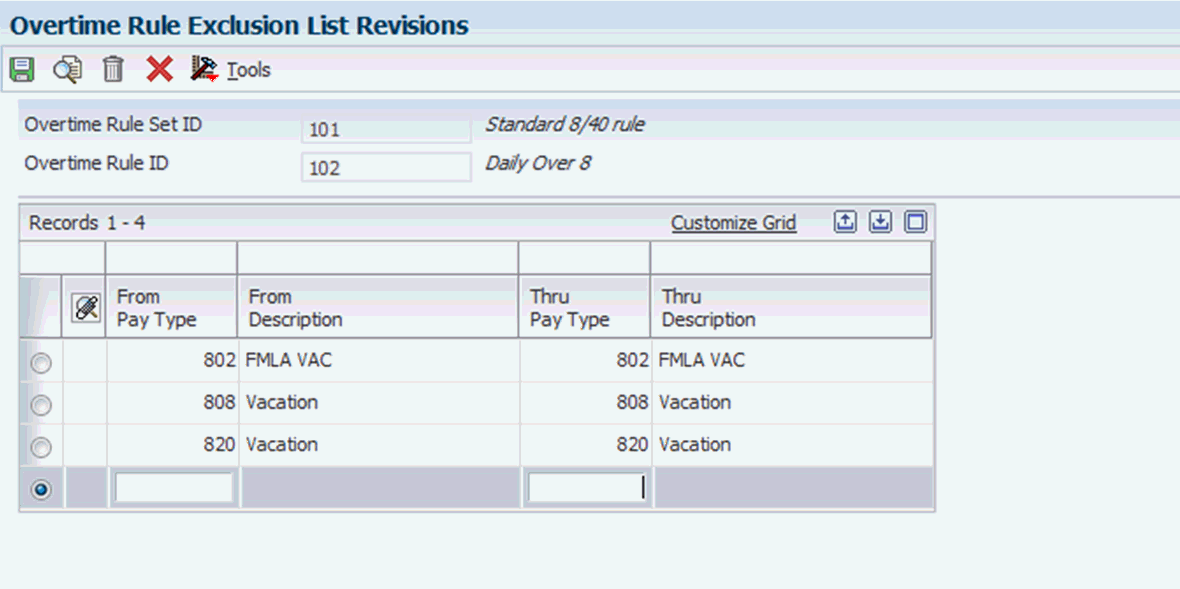
6.5.1.7 Setting Up Overtime Pay Type Exclusion Lists (Release 9.1 Update)
Use the overtime pay type exclusion lists to specify a list of pay types that are excluded from the hours reduction process used with overtime accumulator rules when you generate new overtime timecards.
You can set up pay type exclusion lists at three levels:
-
System exclusion list
-
Rule set exclusion list
-
Rule exclusion list
In the accumulator rule processing, the system uses a hierarchical search to determine if a pay type is included in one of the three exclusion lists. The system first searches the rule exclusion list for the current timecard's pay type. If the pay type is not found, then the system searches the rule set exclusion list, and then the system exclusion list as needed. If the pay type is found in any of these lists, then the overtime accumulator rule will not modify any timecard assigned to this pay type. Otherwise, the accumulator rule will modify these timecards as necessary when generating new overtime timecards.
The accumulator rule calculates overtime hours based on all timecards processed by the rule, including timecards assigned to a pay type listed in any of the exclusion lists. The exclusion lists determine which original timecards should have their hours reduced so the overtime hours can be allocated to new overtime timecards.
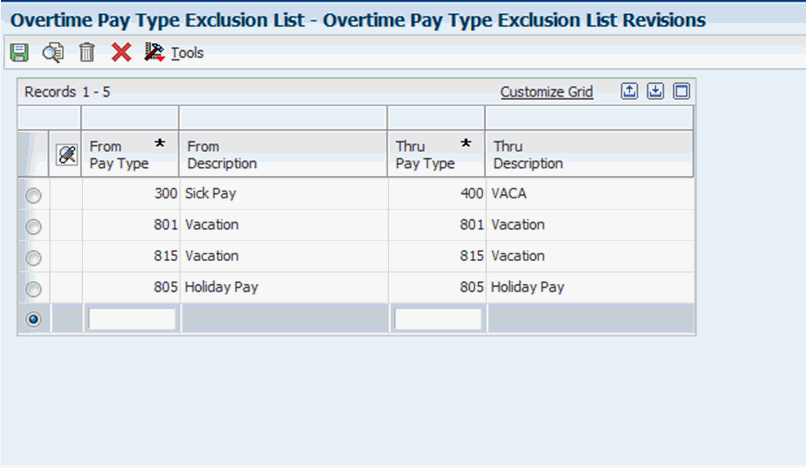
6.5.1.7.1 System Exclusion List
The system exclusion list is defined using the Overtime Pay Type Exclusion List program (P186411). You can access this program from Periodic Processing menu (G18620). Any timecard using a pay type specified on this form will be excluded from the overtime hours reduction process for all accumulator rules in the system.
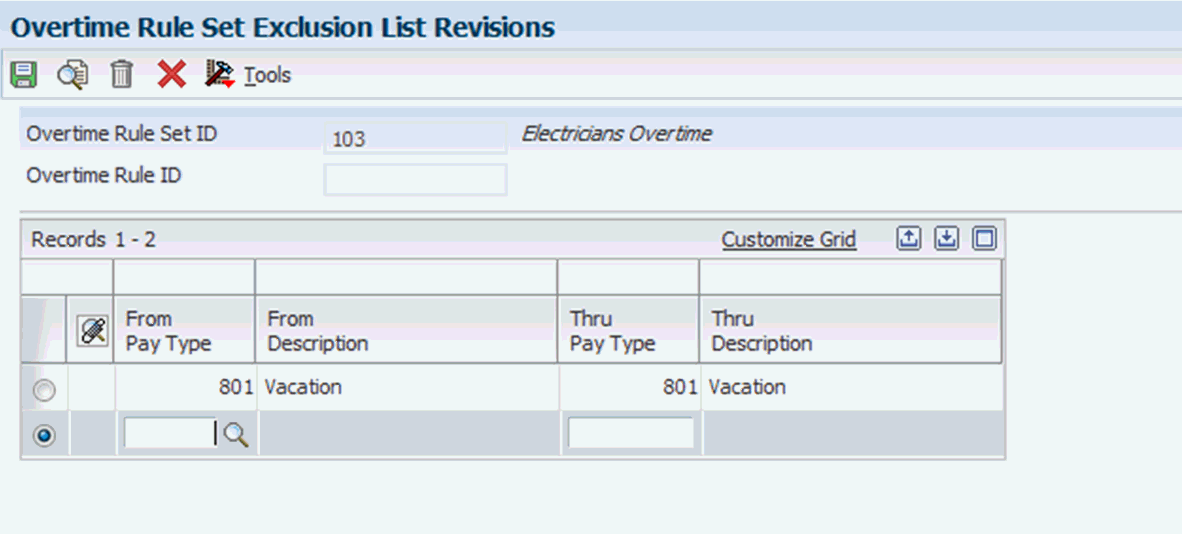
6.5.1.7.2 Rule Set Exclusion List
You can access the Rule Set Exclusion list from the Form menu on the Overtime Rule Set setup form. Any timecard using a pay type specified on this form will be excluded from the overtime hours reduction process for all accumulator rules within the rule set.
6.5.1.7.3 Rule Exclusion List
You can access the Rule Exclusion List either from the Form menu on the Timecard Accumulator Rule setup form or from the Row menu on the Rule Set setup form. Any timecard using a pay type specified on this form will be excluded from the overtime hours reduction process for the associated accumulator rule.
6.5.1.8 Timecard Change Rule
You can use a timecard change rule to pay overtime, to change timecard information, or both based on criteria that you enter. A timecard change rule changes original timecards based on criteria that you enter; it does not create new timecards. Timecard change rules can change current, unprocessed timecards only. Change rules cannot change historical timecards.
You can use a timecard change rule to change values in one field in a timecard, based on the value of other fields on the timecard. The rule consists of one or more IF clauses, which the system uses to determine the timecards to change, and one or more THEN clauses, which the system uses to determine what is to be changed. The Fields and Functions program (P186101) determines which fields are available to use in the process. For example, if you pay different rates of overtime for employees in different states, you can have the system identify the employees affected by state and change the hourly rate on the timecards.
You can use a timecard change rule to change a timecard field based on another field. For example, if an employee's timecard is for regular time and the work date is a company holiday, you can have the system change the pay type from regular pay to holiday pay.
If you are creating a timecard change rule to change all regular time that is charged on company holidays to holiday pay, the IF statement might look like this:
| Operator | ( | Field Alias | Field Name | Op | Value | Value Description | ) |
|---|---|---|---|---|---|---|---|
| IF | Blank | PDBA | DBA Code | EQ | 1 | Regular | Blank |
| AND | ( | DWK | Date-Worked | EQ | 01/01/05 | Blank | Blank |
| OR | Blank | DWK | Date-Worked | EQ | 05/30/05 | Blank | Blank |
| OR | Blank | DWK | Date-Worked | EQ | 07/04/05 | Blank | Blank |
| OR | Blank | DWK | Date-Worked | EQ | 09/05/05 | Blank | Blank |
| OR | Blank | DWK | Date-Worked | EQ | 11/24/05 | Blank | Blank |
| OR | Blank | DWK | Date-Worked | EQ | 12/25/05 | Blank | ) |
If you are creating a timecard change rule to change all regular time that is charged on company holidays to holiday pay, the THEN statement might look like this:
| Operator | Field Alias | Field Name | Op | Value | Value Description |
|---|---|---|---|---|---|
| THEN | PDBA | DBA Code | EQ | 110 | Overtime 2.0 |
6.5.1.9 Call Rule Set Rule
You can use a call rule set rule to nest an overtime rule set within another overtime rule set. You typically use a call rule set rule with an overtime rule that you use regularly. If you include an overtime rule set within itself, the system ignores the duplicate overtime rule set. For example, a rule set might verify and pay weekend and holiday overtime pay. If you have an established overtime rule set for holiday pay, you can call it from within another overtime rule set. You do not have to re-create the holiday overtime rule set every time that you want to use it.
When you use an overtime rule set within another overtime rule set, you specify the employee group, starting date, and ending date on the main overtime rule set. The main rule set should not include information that is included in the embedded overtime rule sets. If any conflicts exist between the information in the rule sets, the information in the main overtime rule set overrides the information in the embedded rule set.
6.5.1.10 Call Custom Rule
You can select a call custom rule to include a user-defined business function (BSFN) in an overtime rule set. A call custom rule calls a user-defined BSFN. You create a custom BSFN when you need to perform complex or unusual overtime calculations that are not already provided with the software. For example, if the organization pays a meal allowance of 8.00 USD to employees who work over nine-and-a-half hours per day, you can use a custom BSFN to calculate the pay. The system can create timecards or change existing timecards based on this overtime rule. The Fields and Functions program determines which functions are available; therefore, after you have created the custom BSFN, you must use the Fields and Functions program to register it for use by the Timecard Automation module. After the BSFN has been registered, you can add it to a rule set.
|
Note: If you need to create custom BSFN entries, contact the system administrator for assistance. |
6.5.1.11 User Parameters
After you define a call custom rule, you can define user parameters to specify static values that the system passes to the business function. The user parameters enable you to select specific string, numeric, integer, character, date, and Boolean fields into which you can enter the value that you want to pass into the function. Before you can define user parameters, you must create a call custom rule.
6.5.1.12 Processing Overtime Rule Sets
After you create an overtime rule set and attach and sequence the overtime rules, you can submit the overtime rule set for processing. When you submit an overtime rule set for processing, the system creates a batch of timecards for the employee group that is associated with the overtime rule set. The timecards in this batch have a status of Pending Approval. You should review these timecards and revise them, if necessary. When you are satisfied that the timecards are correct, you can approve the batch. You must approve the batch before you can process the timecards in a payroll cycle.
6.5.1.13 Overtime Rule Processing Reports
When you submit an overtime rule for processing, the system generates the Overtime Rule Set Processing report (R186405) and the Overtime Rule Set Batch Review report (R186404). Review these reports to verify that the calculations were completed as expected, and that the system processed the overtime rule without any processing errors.
You should investigate any errors or warnings on these reports, and make any necessary corrections before you approve the batch. If all or most of the timecards are incorrect, you might have entered incorrect information on the overtime rule set or the associated employee group. In this case, you can cancel the batch of timecards, correct the error, resubmit the overtime rule set, and then use the Reviewing and Approving program (P186601) to review the newly created timecards. If only a few timecards contain errors, you can use a time entry program, such as Speed Time Entry (P051121), to review the errors and make corrections. In this case, you do not need to cancel and resubmit the batch.
6.5.2 Prerequisite
Create one or more employee groups that contain the employees for whom you want to process an overtime rule set.
6.5.3 Forms Used to Create Overtime Rule Sets
| Form Name | FormID | Navigation | Usage |
|---|---|---|---|
| Work With Rule Sets | W186401A | Periodic Processing menu (G18620), Overtime | Review existing rule sets. |
| Rule Set | W186401H | Select a rule to review and click Select or click Add to add a new rule set on the Work With Rule Sets form. | Create a rule set or review an existing rule set. |
| Timecard Accumulator Rule | W186401D | On the Work With Rule Sets form, select a rule to review and click Select.
On the Rule Set form, select Add Accum Rule from the Form menu. |
Create a timecard accumulator rule and attach it to a rule set. |
| Timecard Change Rule | W186401C | On the Work With Rule Sets form, select a rule to review and click Select.
On the Rule Set form, select Add Change Rule from the Form menu. |
Create a timecard change rule and attach it to a rule set. |
| Call Rule Set Rule | W186401G | On the Work With Rule Sets form, select a rule to review and click Select.
On the Rule Set form, select Add Call Rule Set R from the Form menu. |
Create a call rule set rule and attach it to a rule set. |
| Call Custom Overtime Rule | W186401C | On the Work With Rule Sets form, select a rule to review, and click Select.
On the Rule Set form, select Add Call Custom from the Form menu. |
Create a call custom rule and attach it to a rule set. |
| User-defined Parameter Descriptions for Custom Overtime Rule | W186401J | On the Rule Set form, select the call custom rule for which you want to define user parameters, and then select Edit Rule from the Row menu.
On the Call Custom Overtime Rule form, select User Params from the Form menu. |
Define the user parameters for a specified call custom rule. |
6.5.4 Creating an Overtime Rule Set
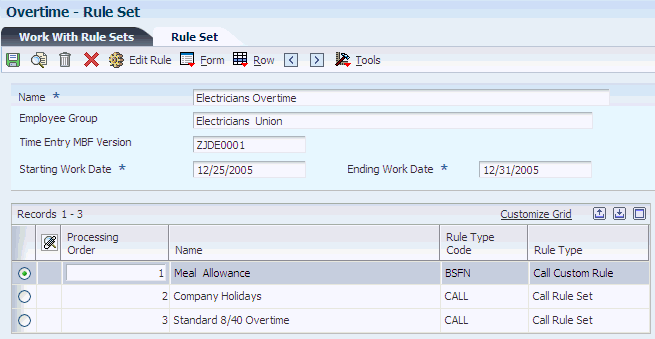
- Name
-
Enter a user-defined name for an overtime rule.
The name should describe the purpose of the overtime rule set. For example, an overtime rule set name might be California Overtime Rules.
- Time Entry MBF (time entry master business function)
-
Leave this field blank for the system to use the default version, ZJDE0001. If the Time Entry MBF version has defined values for optional fields in the overtime rule set definition, the Time Entry MBF version enters the appropriate values in the optional fields that you leave blank.
- Processing Order
-
After you have attached overtime rules to the rule set, you can change their processing order by entering a numeric value in this field.
6.5.5 Creating a Timecard Accumulator Rule
Access the Timecard Accumulator Rule form.
Figure 6-11 Timecard Accumulator Rule form
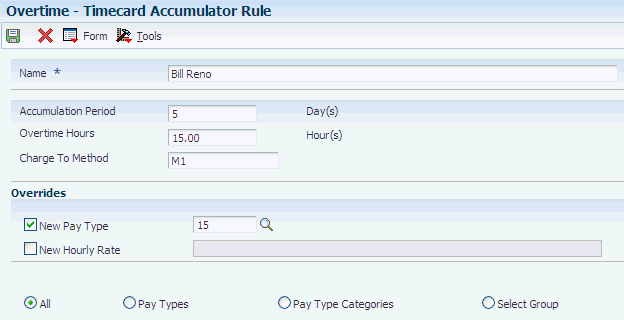
Description of ''Figure 6-11 Timecard Accumulator Rule form''
- Name
-
Describes the purpose of the accumulator rule. For example, if the rule is to calculate overtime for time worked over eight hours per day, a descriptive name might be Daily Over Eight.
- Accumulation Period
-
Enter the number of days to add up hours on timecards for calculating overtime.
This field works with the Overtime Hours field. Enter the period of time, in days, during which time can accumulate before overtime is calculated. Any time worked during this period that is over the number of hours that you enter in the Overtime Hours field is changed to overtime as a result of the rule. For example, if you are creating an accumulator rule to pay employees time-and-a-half for time worked over eight hours per day, the Accumulator Period field should contain a value of 1, and the Overtime Hours field should contain a value of 8.
Note:
Because accumulator rules accumulate time worked by day before charging excess time to overtime, you track employee time on a daily basis; otherwise, accumulator rules do not work correctly. - Overtime Hours
-
Enter a limit above which any hours accumulated will be considered overtime.
This field works with the Accumulation Period field to determine which hours are considered overtime hours. Enter the number of accumulated hours over which any excess time that is worked during the accumulation period is considered overtime. For example, if you are creating an accumulator rule to pay employees time-and-a-half for time worked over eight hours per day, the Overtime Hours field should contain a value of 8, and the Accumulator Period field should contain a value of 1.
- Charge To Method
-
Enter a code that identifies where the system will charge overtime.
The Charge To Method specifies how the system creates and changes timecards for overtime. It does specify how the system directs overtime-related labor and expenses to accounts within the general ledger. Unless the processing options are set to copy the account information from the original timecards, the system uses the AAIs that have been defined for the organization to determine general ledger account information and instructions.
- New Pay Type
-
Enter a code that indicates whether timecards that are created by a rule contain a new pay type or retain the same pay type as the original timecard. The system uses this pay type to create the overtime timecards. You might want to use a pay type with a description that indicates the purpose of the payment. Values are:
1: Contains a new pay type.
0: Retains the same pay type as the original timecard.
- New Hourly Rate
-
Enter a code that indicates whether timecards that are created by a rule contain a new hourly rate or retain the same hourly rate as the original timecard. If you select this option, enter a rate or a formula to calculate the hourly rate. If you do not select this option, the new timecard retains the same hourly rate as the original timecard.
- Pay Types
-
Select to enable the detail area. You must enter into the detail area the specific pay types to include in the basis of calculation for the adjustment. For example, if the new timecards should be based only on regular and overtime hours, you would enter the pay types that you use for regular and overtime pay into the detail area.
- Pay Type Categories
-
Select to enable the detail area below the inclusion options. You must enter into the detail area the specific pay type to include in the basis of calculation for the adjustment. For example, if you want only regular time hours to be included in the calculation, and all of the regular pay types are in a pay type category called Regular, you would enter Regular in the detail area.
- All
-
Select this option for the system to create the adjustment using all eligible timecards within the specified date range as the basis of calculation. The detail area after these options is hidden if you select this option.
- Select Group
-
Select this option to enable the detail area. You must enter the select statements to determine the group of timecards to which the Overtime is to be applied.
6.5.6 Creating a Timecard Change Rule
Access the Timecard Change Rule form.
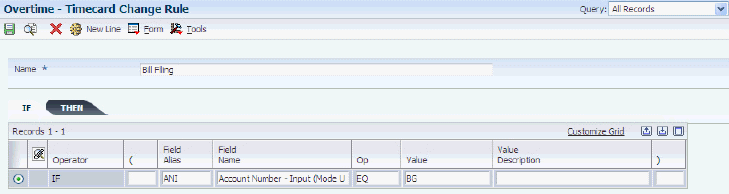
To enter a new line of logic, click the New Line button on the tool bar or select New Line from the Form menu.
- Name
-
Enter a user-defined name for an overtime rule.
Create a name that describes the purpose of the change rule. For example, if the rule is to change all regular time that is charged on a company holiday to a holiday pay type, a descriptive name might be Company Holidays.
- Operator
-
Enter a code that indicates that a specific mathematical process is to be carried out. You use an operator to create formulas for calculating change rules.
The system automatically enters IF in the Operator field on the first line of the IF statement. On subsequent lines of logic, you can select IF,AND,OR, or THEN for the Operator field. Values are:
IF
AND
OR
THEN
- (
-
Marks the beginning of a grouping. Use an open parenthesis in equations to determine the order of operation.
If you are grouping components of the statement together (for example, if you are using a string of IF operands), you might want to use this field to indicate the beginning of the grouped components.
- Field Alias
-
Enter a code that identifies and defines a unit of information. It is an alphanumeric code up to 8 characters that does not allow blanks or special characters such as%, &, or +. You create new data items using system codes 55 through 59. You cannot change the alias.
If you want to use the Field Alias field but it is not available, select Show Alias from the Form menu. If you use Field Alias, the system completes the Field Name field automatically when you enter a field alias in this field. If the jde.ini file is set appropriately, you can access field aliases for each data item by right-clicking the data item.
- Field Name
-
Enter an identifier that refers to and defines a unit of information. It is a 32-character, alphabetic field that does not allow blanks or special characters such as%, &, or +.
The data item cannot be changed.
It forms the C-code data name (for example AddressNumber) that the system uses in business functions, data structures, and event rules.
Also identify a data item by the alias or alpha description.
The system automatically enters a value in this field when you press Tab to move through the field if you entered a value in the Field Alias field. If you are not using aliases, you can use the search button to select a field name for the IF statement from a list of valid fields. If you use the Field Name field and you want to hide the Field Alias field, select Hide Field Alias from the Form menu.
- Op (operand)
-
Enter a code that identifies the operands in Boolean logic. You can specify any of these codes:
EQ: Equal to
LT: Less than
LE: Less than or equal to.
GT: Greater than.
GE: Greater than or equal to.
NE: Not equal to.
NL: Not less than.
NG: Not greater than.
- Value
-
Enter the field value that the system should locate based on the selected operand. For example, to search for all timecards with a pay type of 100, enter 100 in this field.
- )
-
Marks the end of a grouping. Use a close parenthesis in equations to determine the order of operation.
Complete this field only if you have entered a value in the Open Parenthesis field.
6.5.7 Creating a Call Rule Set Rule
Access the Call Rule Set Rule form.

- Overtime Rule Set To Call
-
Enter a user-defined name for an overtime rule set.
- (Processing Order)
-
Indicates the order in which the system processes a rule within a given rule set.
6.5.8 Creating a Call Custom Rule
Access the Call Custom Overtime Rule form.
Figure 6-14 Call Custom Overtime Rule form
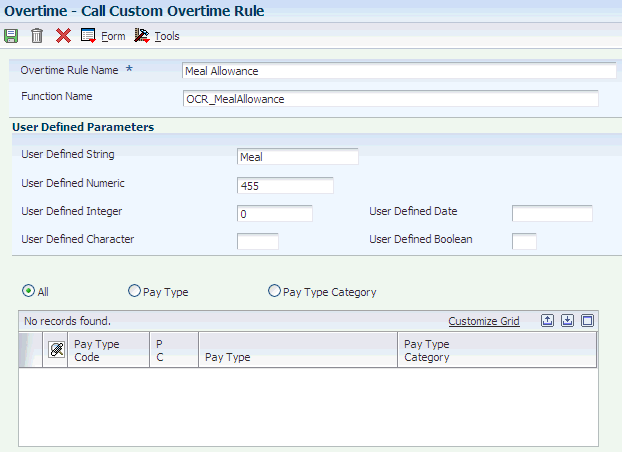
Description of ''Figure 6-14 Call Custom Overtime Rule form''
- Overtime Rule Name
-
Enter a user-defined name for an overtime rule.
- Function Name
-
Indicates the actual name of the function. It must follow standard ANSI C naming conventions (for example, no space between words).
- All
-
Enter a code that specifies which method he system uses to determine which pay types to include for processing. Values are:
0: Include all timecards.
1: Include only the timecards for which pay type is on the pay type list.
2: Include only the timecards for which pay type is on the pay type category list.
- Pay Type Category
-
Indicates which method the system uses to determine which pay types to include for processing. Values are:
0: Include all timecards.
1: Include only the timecards for which pay type is on the pay type list.
2: Include only the timecards for which pay type is on the pay type category list.
- P C (pay type categories)
-
Enter a code from UDC table 07/PC that specifies the pay type categories that you want to use:
-
For regular pay.
-
To generate overtime.
-
For reporting purposes on the Certified Payroll Register (U.S. only).
-
- Processing Orders
-
Indicates the order in which the system processes a rule within a given rule set.
6.5.9 Defining the User Parameters
Access the User-defined Parameter Descriptions for Custom Overtime Rule form.
- Data Dictionary String Alias
-
Indicates the alias of the data dictionary item that is associated with the user-defined String field.
- User-defined Description 3
-
Indicates the description that is associated with the user-defined String field.
6.5.10 Setting Processing Options for Overtime Rules (P186401)
Set these processing options before you process overtime rules.
These processing options are identical to the processing options for Retroactive Pay (P186701) except where noted.
6.5.10.1 Defaults
Use these processing options to specify default information for processing overtime rules.
- 1. Time Entry MBF Version
-
Specify whether the default version of the Time Entry MBF has to be used when timecards are added as this rule set is processed.
- 2. Process Interims for overtime processing
-
Specify whether to include timecards that are associated with interim payments in the calculation of a rule set. If you include interim payment timecards, you must process those interim payments through a payroll cycle. Values are:
Y: Apply overtime rule.
N: Do not apply overtime rule.
- 3. Copy Account Information
-
Specify whether the system determines the account information (cost center, object account, and subsidiary) for newly created timecards. This processing option does not affect the account information for modified timecards.
- 4. Process Overtime Rule across multiple assignments
-
Specify whether to process overtime rules across multiple assignments. You might process overtime rules across multiple assignments if the overtime calculations for each assignment are the same. If you leave this processing option blank, the system processes overtime rules across multiple assignments. Values are:
0: Process (default).
1: Do not process.
- 5. Copy Shift Code Information
-
Specify whether the system copies the shift code information from the original timecard to the new overtime timecard or if the system automatically populates the shift code information on the overtime timecard based on the employee's setup.
6.5.11 Processing Overtime Rule Sets
From the Form menu, select Submit.
The system processes the overtime rule sets, and creates a new batch of timecards based on the options that are specified in the overtime rule set (including employee group). The system then generates the Overtime Rule Set Processing report (R186405) and the Overtime Rule Set Batch Review report (R186404), which display the processing details.
6.5.12 Setting Processing Options for the Overtime Rule Set Batch Review Report (R186404)
Set this processing option before you process overtime rules.
6.5.12.1 Display
Specify whether piecework information appears on the report.
- Display Piecework information
-
Determine whether the system displays piece work rates and the number of pieces that an employee completes on the report. Values are:
Blank: Do not display.
1: Display.