3 Provisioning an OS
You can provision different types of targets using this software. You must create profiles to capture the provisioning requirements. You can create the following OS provisioning profiles:
-
Oracle VM Server for SPARC
-
Oracle Linux
-
Red Hat Linux
-
SUSE Linux
-
JET Template
-
Solaris SPARC
-
Solaris x86
About OS Provisioning
Enterprise Manager Ops Center's provisioning feature installs operating systems on the managed systems, automatically and consistently. When you want to initiate OS provisioning through the service processor, it does not require manual intervention except for manual netboot option. You initiate the installations from the UI.
OS provisioning is handled by a deployment plan, which can be single step or multi-step plan. For a profile that requires the OS image, Enterprise Manager Ops Center retrieves the OS image from the Software Library and uses it to provision the target servers. The Software Library is located either in a directory on the Enterprise Controller or on a Network Attached storage appliance that the Enterprise Controller can access.
The general procedure for provisioning an OS has the following steps:
-
Import a file with the OS image into a Software Library. The process creates a provisioning profile.
-
Use a deployment plan that includes the profile. Create a plan if it does not exist.
-
Apply the deployment plan on the targets.
Importing OS images and creating OS profiles are one-time tasks for each OS configuration to provision. After an OS image and an associated OS profile are created, you can use deployment plans to provision the OS onto many managed systems.
Enterprise Manager Ops Center enables OS provisioning on single systems, groups of systems, a combination of the single systems and groups, and Oracle Solaris Clusters. OS provisioning for groups of systems requires using homogeneous groups, as described in Oracle Enterprise Manager Ops Center User's Guide.
For provisioning an Oracle Solaris Cluster, you provision the same OS on all nodes of a cluster. The Cluster OS Profile profile handles the pre-action and post-action operations.
About OS Provisioning Subtypes
Using Ops Center, you can provision different types of targets. You can create OS provisioning profiles for the following:
-
Oracle VM Server for SPARC
-
Oracle Linux
-
Red Hat Linux
-
SUSE Linux
-
JET Template
-
Solaris SPARC
-
Solaris x86
This section describes some additional parameters that must be defined while provisioning Oracle VM Server for SPARC, Oracle Linux, Red Hat Linux, SUSE Linux, and JET Template.
Oracle VM Server for SPARC
You can create profiles for installing Oracle VM Server Control Domain. You must define the following parameters while creating this profile:
-
CPU Threads
-
Memory
-
Crypto Units
-
Virtual Console Port Range
-
Enable JASS
-
Enable Multiplexed I/O
Enabling JASS results in installation of SUNWJass package to harden the system. This option is supported only for installing Oracle VM Server 1.2 or lower versions. JASS is not supported for Oracle VM Server for SPARC 1.3 or higher versions. This option is disregarded even if you select Enable JASS in the profile when Oracle VM Server for SPARC version 1.3 or 2.0 is being installed.
Enabling multiplexed I/O results in enabling the Fibre Channel ports on the system that is configured for storage.
Oracle Linux and Red Hat Linux
You must define the following parameters for creating profiles for provisioning Oracle Linux and Red Hat Linux:
-
Installation number – You can enter the installation number that is used to allow installation of all of the Red Hat software that is included in your subscription.
-
Partition action – Select whether you want to change the disk partition of the system.
-
You can opt to remove all the existing Linux partitions and retain the non-Linux partitions. You can provide specification for the new partitions.
-
You can opt to preserve all the existing partitions. You must define new partitions, outside of the partitions that exist, in which to install the OS.
-
You can opt to remove all the existing partitions. Define specification for the new partitions.
-
-
Install protocol – Specify HTTP or NFS as the install protocol.
-
Kernel parameters – If necessary, enter kernel parameters for the GRUB menu of the target system.
-
MD5 Checksum – Select this option to use MD5 encryption for user passwords.
-
Reboot action – Select whether you want to reboot the target system after OS installation.
-
Disk label initialization – Select this option to initialize labels on new disks. This option creates labels that are appropriate for the target system architecture.
-
Shadow passwords – Select this option to use an
/etc/shadowfile to store passwords on the target system. -
Clear master boot record – Select this option to clear all invalid partition tables.
-
Linux packages – You can specify the Linux packages to include or exclude during provisioning. To include a package, enter the package name in a line. To exclude any package, enter the package name preceded by a dash (-).
SUSE Linux
You must define the following parameters for provisioning SUSE Linux OS:
-
FTP proxy server – Enter the name of the FTP proxy server to support FTP services.
-
HTTP proxy server – Enter the name of the HTTP proxy server to support HTTP services.
-
Install protocol – Specify HTTP or NFS as the install protocol.
-
Enable proxy servers – Select this option to enable the FTP and HTTP proxy servers that you specified in the FTP Proxy Server and HTTP Proxy Server fields.
-
Kernel parameters – Enter kernel parameters for the GRUB menu of the target system, if necessary.
-
Reboot action – Select whether you want to reboot the target system after OS installation.
-
Linux packages – You can specify the Linux packages to include or exclude during provisioning. To include a package, enter the package name in a line. To exclude any package, enter the package name preceded by a dash (-).
JET Templates
You must select the JET template which defines all the parameters for OS provisioning. See Using JET for OS Provisioning for more information about creating an OS profile with JET template.
Preparing to Provision an OS
-
Import the image to Enterprise Manager Ops Center.
See Oracle Enterprise Manager Ops Center Advanced User's Guide for information about importing images into Enterprise Manager Ops Center.
-
Create an OS profile for the target systems. Creating an OS Profile for Provisioning Solaris OS, Creating an OS Profile for Provisioning Linux OS, and Using JET for OS Provisioning describe ways to create OS profiles.
-
Discover the service processors of the target systems. You can use Custom Discovery option to discover the service processor.
See Oracle Enterprise Manager Ops Center Advanced User's Guide for information about using custom discovery method to discover the service processor.
-
Disable monitoring for the target systems to prevent events related to a system going offline. See Disabling System Monitoring for more information.
-
Verify that the Dynamic Host Configuration Protocol (DHCP) services are enabled on Proxy Controllers. You cannot create a profile or assign any network if the DHCP services are not enabled. The Install Server option to provision OS on a server is not enabled if the DHCP is not enabled on any of the interfaces.
-
If you are provisioning a dynamic system domain of an M-Series server, the domain must have an IP address.
Disabling System Monitoring
To disable the monitoring of a system, you uninstall its agent software.
-
Select Assets from the Navigation pane. The All Managed Assets list is displayed.
-
On the system that you want to provision, select the OS instance.
-
Click the Unmanage/Delete Asset icon. The Unmanage and Delete Asset wizard is displayed.
-
Read the Introduction and click Next. The Enter Server Credential pane is displayed.
-
Enter the ssh user name and password for the root or privileged user on the target system.
-
Select an option that controls how the credentials apply to the listed assets. Click Next:
-
Use the Same ssh Username and Password for All Assets Listed Below
-
Use Different ssh Username and Password for All Assets Listed Below
-
-
In the Unmanage/Delete panel, verify that the correct system to unmanage is listed. Click Next. The Summary pane is displayed.
-
Click Unmanage/Delete Asset to submit the job to unmanage and delete the selected asset.
Creating an OS Profile for Provisioning Solaris OS
You can create OS profiles for provisioning Solaris OS on SPARC and x86 systems. Whenever you import an OS image, a default profile is always created. You can either edit the profile or create a profile.
-
Import the required OS image.
-
To use JET modules other than the base_config, custom, and flash modules that are installed by default, then install those additional modules on the Proxy Controllers that will use them. See Installing JET Modules for more information about installing JET modules.
-
Verify that any scripts the profile uses are in a directory that the Enterprise Controller can access. Scripts can be located in a local directory of the Enterprise Controller, or in a directory that the Enterprise Controller mounts using NFS.
To Create an OS Provisioning Profile for Solaris Systems
-
Click Plan Management in the Navigation pane.
-
Select OS Provisioning in the Profiles and Policies tree. A list of existing OS profiles is displayed in the center pane.
-
Click Create Profile in the Actions pane. The Create Profile-OS Provisioning wizard is displayed.
-
Define the profile parameters:
-
Name – The name of the profile.
-
Description – A description of the profile.
-
Create a deployment plan for this profile – This option is selected by default to automatically create a plan using this profile. However, you can deselect this option if you do not want to create a plan automatically.
-
Subtype – Select Solaris SPARC or Solaris x86 according to your target system.
-
Target Type – The target types are automatically defined to SPARC or x86.
-
-
Click Next to define the OSP Parameters.
-
Select an OS image in the OS Image List. The images that are applicable only for SPARC or x86 are listed.
-
Select a Distribution Type from the list of types. You can select any distribution if you do not want the system to be managed by Enterprise Manager Ops Center.
Note:
Select the appropriate distribution to manage the system by Enterprise Manager Ops Center because the agent can be installed only in certain distribution. Minimum requirement of end user distribution is required. Distributions that are lower than end user require additional package dependencies to be added. -
Select Include Custom Scripts to add any scripts. Specify the scripts to include custom scripts.
-
Click the Add icon to add custom scripts.
-
Enter the script location, and specify whether you want to execute it before or after the provisioning operation. The scripts should be accessible from the Enterprise Controller.
-
-
Click Next to specify the OS setup.
-
Specify the following OS setup parameters:
-
Language – Select a language from the list.
-
TimeZone – Specify the time zone for the OS.
-
Terminal Type – Select a terminal type from the list.
-
Console Serial Port – To monitor the installation using a serial connection, select the correct console serial port device.
-
Console Baud Rate – To monitor the installation using a serial connection, select the correct serial port device baud rate.
-
NFS4 Domain – Enter the NFS4 domain name that the target system will use. The dynamic value for NFSv4 domain name enables the NFSv4 domain to be derived dynamically, at run time, based on the naming service configuration. You can also provide valid domain name to hard code the value for NFSv4 domain.
-
Password – Enter the root password for the root user on systems provisioned using this profile. Re-enter the password for confirmation.
-
-
Select the Manual Net Boot option to enable manual control of network boot operations for the target system. You must select this option for a target system that does not have a service processor because Ops Center cannot remotely control the network boot process on these systems.
-
Select Automatically Manage with Oracle Enterprise Manager Ops Center to install the agent on the system and manage the system with Ops Center.
Note:
Ensure that for systems that must be managed by Ops Center, you have selected the appropriate distribution type. Otherwise, the OS provisioning job fails. -
Click Next to specify the JET modules and parameters.
-
Enter a comma-separated list of JET module names. Enter the names of any additional JET modules that you have installed on the Proxy Controller to perform the provisioning operations described by this profile. The base_config, custom, and flash JET modules are always installed, and do not specify them here.
-
Click the Add icon to add JET name-value pairs. The JET parameters helps to customize how this profile provisions the target systems.
-
Enter the name of the JET parameter that you want to add in the Name field.
-
Enter the value that you want to assign to the JET parameter in the Value field.
-
Click Next to define the disk partitions.
-
Specify the disk partitions and file systems that you want to create on the target system.
-
Click the Add icon to define a new partition. The root (/) and a swap file system are defined by default. For each partition that you define, provide the following information:
-
File System Type – Select a file system type, either ufs, unnamed, or swap.
-
Mount Point – Enter a directory to use as a mount point for partitions.
-
Device – Enter the rootdisk keyword and a slice value to describe a partition on the target system's boot disk, for example,
rootdisk.s0, or enter the logical device name, for example,c1t0d0s0, of the partition that you want to create. -
Size (MB) – Enter the size that you want to assign to the partition, expressed in MB. When you want to allocate the remaining unused disk space to a file system, do not enter any value for the size.
Note:
Ensure that you do not userootdisk.s2or slice 2 for Solaris OS. Slice 2 represents the whole disk. You can use other slices 3, 4, 5, 6, and 7.
-
-
Click Next to specify the naming services.
-
Specify the name service, domain name and the corresponding name server. You can select the following name service:
-
DNS – Enter the domain name of the DNS server. Provide the IP address of the DNS server in the Name Server field. You can enter up to three IP addresses as the value for the Name Server. Provide the additional domains to search for name service information in the Domain Name Search List. You can specify up to six domain names to search. The total length of each search entry cannot exceed 250 characters.
-
NIS or NIS+ – Enter the domain name of the NIS or NIS+ server. If you know the NIS server details, choose the option Specify an NIS Server and provide the NIS server host name and the IP address.
-
LDAP – Enter the domain name of the LDAP server. Specify the name of the LDAP Profile you want to use to configure the system. Enter the IP address of the LDAP Profile Server. You can also optionally provide the Proxy Bind Distinguished Name and Password.
-
None – Select None when there is no naming service configured.
-
-
Click Next to specify the networking.
-
Select the network interface that the target system will use after the OS has been installed. You can define the following options for networking:
-
Use Link Aggregation
-
Use an IPMP group
-
None
-
-
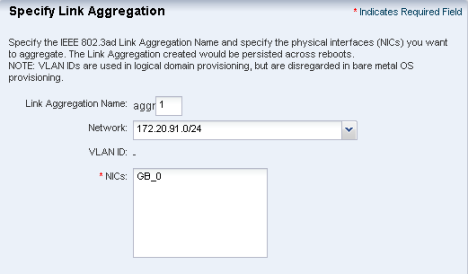
To use link aggregation, define the following information in Specify Link Aggregation:
-
Link Aggregation Name – The name of the Link Aggregation is set as aggr. Add a number to it to differentiate from other aggregation.
-
Network – Select a network from the list.
-
NICs – List out the physical interfaces of the selected network the must be configured as a single logical unit. Click Next to configure the link aggregation.
-
-
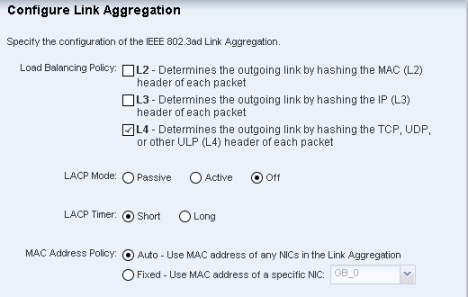
Configure the IEEE 802.3ad Link Aggregation with the following parameters in Configure Link Aggregation:
-
Load Balancing Policy – Define the policy for outgoing traffic.
-
Aggregation Mode and Switches – If the aggregation topology involves connection through a switch, you must note whether the switch supports the link aggregation control protocol (LACP). If the switch supports LACP, you must configure LACP for the switch and the aggregation. Define a mode in which LACP should operate.
-
MAC Address Policy – Define whether the MAC address of the NICs are fixed or not.
-
-
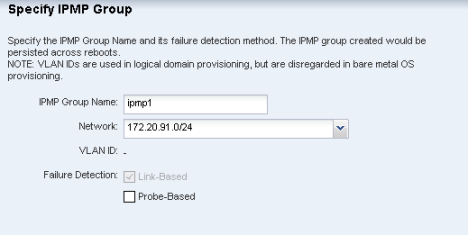
To use IPMP, define the following information in Specify IPMP Group:
-
IPMP Group Name – Provide a name for the IPMP group.
-
Network – Select a network from the list.
-
Failure Detection – The Link based detection is always embedded. To include Probe based detection, select Probe based option. Click Next to specify the IPMP interfaces.
-
-
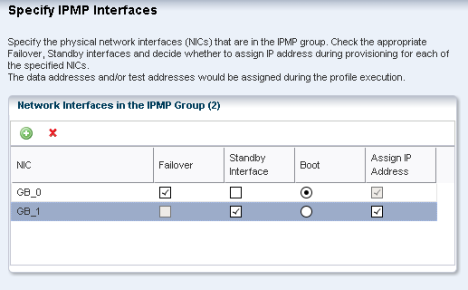
Define the following information in Specify IPMP Interfaces:
-
Specify the interfaces that will be part of the IPMP group.
-
Define the interfaces as Failover or Standby.
-
Configure additional IP addresses for the interfaces.
Note:
The data and test addresses are assigned during profile execution.Note:
Test address is not required for probe-based failure detection.
-
-
If you have selected none for networking option, select a DHCP enabled network interface for the boot interface in Select Networks.
-
Click the Add icon to add multiple networks. Select a NIC from the list of available logical interfaces for each network. Select the Address Allocation Method for the selected networks except the boot interface. All the networks that are defined in Ops Center are displayed in the Network list. If you have selected Use Static IP for Address Allocation Method then you must provide the IP address when you apply the profile. The specific IP address is assigned to the target system after provisioning.
-
Click Next to view the Summary of the parameters selected for Solaris OS provisioning.
-
Review the parameters and click Finish to save the profile. The profile is created for provisioning Solaris OS.
Creating an OS Profile for Provisioning Linux OS
You can create OS profiles for provisioning Linux OS on x86 systems. Whenever you import an OS image, a default profile is always created. You can either edit the profile or create a profile.
You can provision the following Linux operating systems:
-
Oracle Linux
-
Red Hat Linux
-
SUSE Linux
-
Import the required OS image.
-
Verify that any scripts the profile uses are in a directory that the Ops Center Enterprise Controller can access. Scripts can be located in a local directory of the Enterprise Controller, or in a directory that the Enterprise Controller mounts using NFS.
To Create an OS Provisioning Profile for Linux OS
-
Click Plan Management in the Navigation pane.
-
Select OS Provisioning in the Profiles and Policies tree. A list of existing OS profiles is displayed in the center pane.
-
Click Create Profile in the Actions pane. The Create Profile-OS Provisioning wizard is displayed.
-
Define the profile parameters:
-
Name – Name of the profile.
-
Description – The description of the profile.
-
Create a deployment plan for this profile – This option is selected by default to automatically create a plan using this profile. However, you can deselect this option if you do not want to create a plan automatically.
-
Subtype – Select Oracle Linux, Red Hat Linux or SUSE Linux according to your requirement.
-
Target Type – The target types are automatically defined to x86.
-
-
Click Next to define the OSP Parameters.
-
Select an OS image in the OS Image List. The images that are applicable only for the selected subtype are listed.
-
Select a Distribution Type from the list of types. You can select more than one distribution.
-
Select Include Custom Scripts to add any scripts. Specify the scripts to include custom scripts.
-
Click the Add icon to add custom scripts.
-
Enter the script location, and specify whether you want to execute it before or after the provisioning operation. The scripts should be accessible from the Enterprise Controller.
-
-
Click Next to specify the OS setup.
-
Specify the following OS setup parameters:
-
Language – Select a language from the list.
-
TimeZone – Specify the time zone for the OS.
-
Terminal Type – Select a terminal type from the list.
-
Console Serial Port – To monitor the installation using a serial connection, select the correct console serial port device.
-
Console Baud Rate – To monitor the installation using a serial connection, select the correct serial port device baud rate.
-
Password – Enter the root password for the root user on systems provisioned using this profile. Re-enter the password for confirmation.
-
-
Select the Manual Net Boot option to enable manual control of network boot operations for the target system. You must select this option for a target system that does not have a service processor because Ops Center cannot remotely control the network boot process on these systems.
-
Select Automatically Manage with Oracle Enterprise Manager Ops Center to install the agent on the system and manage the system with Ops Center.
-
Click Next to specify the installation parameters.
-
For Oracle Linux and Red Hat Linux, specify the following parameters:
Figure 3-5 Specifying Installation Parameters for Linux OS

Description of "Figure 3-5 Specifying Installation Parameters for Linux OS"
-
Installation number – You can enter the installation number that is used to allow installation of all of the Red Hat software that is included in your subscription.
-
Partition action – Select whether you want to change the disk partition of the system.
-
You can opt to remove all the existing Linux partitions and retain the non-Linux partitions. You can provide specification for the new partitions.
-
You can opt to preserve all the existing partitions. You must define new partitions, outside of the partitions that exist, in which to install the OS.
-
You can opt to remove all the existing partitions. Define specification for the new partitions.
-
Install protocol – Specify HTTP or NFS as the install protocol.
-
Kernel parameters – If necessary, enter kernel parameters for the GRUB menu of the target system.
-
MD5 Checksum – Select this option to use MD5 encryption for user passwords.
-
Reboot action – Select whether you want to reboot the target system after OS installation.
-
Disk label initialization – Select this option to initialize labels on new disks. This option creates labels that are appropriate for the target system architecture.
-
Shadow passwords – Select this option to use an
/etc/shadowfile to store passwords on the target system. -
Clear master boot record – Select this option to clear all invalid partition tables.
-
Linux packages – You can specify the Linux packages that you want to include or exclude during provisioning. To include a package, enter the package name in a line. To exclude any package, enter the package name preceded by a dash (-).
-
-
For SUSE Linux, specify the following parameters:
-
FTP proxy server – Enter the name of the FTP proxy server to support FTP services.
-
HTTP proxy server – Enter the name of the HTTP proxy server to support HTTP services.
-
Install protocol – Specify HTTP or NFS as the install protocol.
-
Enable proxy servers – Select this option to enable the FTP and HTTP proxy servers that you specified in the FTP Proxy Server and HTTP Proxy Server fields.
-
Kernel parameters – Enter kernel parameters for the GRUB menu of the target system, if necessary.
-
Reboot action – Select whether you want to reboot the target system after OS installation.
-
Linux packages – You can specify the Linux packages that you want to include or exclude during provisioning. To include a package, enter the package name in a line. To exclude any package, enter the package name preceded by a dash (-).
-
-
Click Next to define the disk partitions.
-
Specify the disk partitions and file systems that you want to create on the target system.
-
Click the Add icon to define a new partition. The root (/) and a swap file system are defined by default. For each partition that you define, provide the following information:
-
File System Type – Select a file system type, either ufs, unnamed, or swap.
-
Mount Point – Enter a directory to use as a mount point for partitions.
-
Device – Enter the rootdisk keyword and a slice value to describe a partition on the target system's boot disk, for example,
rootdisk.s0, or enter the logical device name, for example,c1t0d0s0, of the partition that you want to create. -
Size (MB) – Enter the size that you want to assign to the partition, expressed in MB. When you want to allocate the remaining unused disk space to a file system, do not enter any value for the size.
-
-
Click Next to specify the naming services.
-
Specify the name service, domain name and the corresponding name server. You can select the following name service:
-
DNS – Enter the domain name of the DNS server. Provide the IP address of the DNS server in the Name Server field. You can enter up to three IP addresses as the value for the Name Server. Provide the additional domains to search for name service information in the Domain Name Search List. You can specify up to six domain names to search. The total length of each search entry cannot exceed 250 characters.
-
NIS or NIS+ – Enter the domain name of the NIS or NIS+ server. If you know the NIS server details, choose the option Specify an NIS Server and provide the NIS server host name and the IP address.
-
LDAP – Enter the domain name of the LDAP server. Specify the name of the LDAP Profile you want to use to configure the system. Enter the IP address of the LDAP Profile Server. You can also optionally provide the Proxy Bind Distinguished Name and Password.
-
None – Select None when there is no naming service configured.
-
-
Click Next to specify the networking.
-
Select the network interface that the target system will use after the OS has been installed. None is selected by default.
-
Click Next to select a DHCP enabled network interface for the boot interface.
-
Click the Add icon to add multiple networks. Select a NIC from the list of available logical interfaces for each network. Select the Address Allocation Method for the selected networks except the boot interface. All the networks that are defined in Enterprise Manager Ops Center are displayed in the Network list. If you have selected Use Static IP for Address Allocation Method then you must provide the IP address when you apply the profile. The specific IP address is assigned to the target system after provisioning.
-
Click Next to view the summary of the parameters selected for Linux OS provisioning.
-
Review the parameters and click Finish to save the profile. The profile is created for provisioning Linux OS.
Creating an OS Profile for Provisioning Oracle VM Server
This section describes how to create an OS profile for Oracle VM Server. This profile is the first step towards installing the Oracle VM Server for SPARC software. In the profile, all the requirements for provisioning an Oracle VM Server such as parameters for installing an OS with the Oracle VM Server for SPARC software and resource definition for the Control Domain are all defined.
Use this profile to create a deployment plan and apply to provision the service processor with Oracle VM Server for SPARC.
Refer to Hardware and Provisioning Profiles and Deployment Plans for more information about creating profiles and plans, and applying the plans.
To Create an OS Profile for Oracle VM Server
-
Select Plan Management from the Navigation pane.
-
Select OS Provisioning option in the Profiles and Policies tree.
The OS Provisioning page is displayed in the center pane.
-
Select Create Profile in the Actions pane.
The Create Profile-OS Provisioning wizard is displayed.
-
In the Identify Profile step, provide the following information:
-
Enter a name for the profile.
-
Enter a description for the profile.
-
To create a deployment plan using this profile, select the option Create a deployment plan for this profile.
-
Select Oracle VM Server in the subtype to create a profile for installing Oracle VM Server for SPARC on the service processor.
-
-
Click Next to specify the OSP parameters.
-
Select an OS image in the OS Image List.
Solaris 10 10/09 SPARC or higher versions will be populated in the image list for Oracle VM Server.
-
Select a Distribution Type from the list of types.
Note:
Minimum requirement of End User distribution is required. Distributions that are lower than End user will require additional package dependencies to be added. -
Select Include Custom Scripts if you want to add any scripts.
You will directed to Specify Scripts if you have selected Include Custom Scripts.
-
Click the Add icon to add custom scripts.
-
Enter the script location, and specify if you want to execute it before or after the provisioning operation.
The scripts must be accessible from Enterprise Controller.
-
-
Click Next to specify the OS setup.
-
Specify the following OS setup parameters:
-
Language – Select a Language from the list.
-
TimeZone – Specify the time zone for the OS.
-
Terminal Type – Select a terminal type from the list.
-
Console Serial Port – To monitor the installation using a serial connection, select the correct console serial port device.
-
Console Baud Rate – To monitor the installation using a serial connection, select the correct serial port device baud rate.
-
NFS4 Domain – Enter the NFS4 domain name that the target system will use. The dynamic value for NFSv4 domain name enables the NFSv4 domain to be derived dynamically, at run time, based on the naming service configuration. You can also provide valid domain name to hard code the value for NFSv4 domain.
-
Password – Enter the root password for the root user on systems provisioned using this profile. Re-enter the password for confirmation.
-
-
Select the Manual Net Boot option to enable manual control of network boot operations for the target system. You must select this option for a target system that does not have a service processor because Enterprise Manager Ops Center cannot remotely control the network boot process on these systems.
-
Select Automatically Manage with Oracle Enterprise Manager Ops Center to install an agent on the system and manage the system with Enterprise Manager Ops Center.
Note:
Ensure that for systems to be managed, you have selected the appropriate Distribution Type. Otherwise, the OS provisioning job can fail. -
Click Next to specify the JET modules and parameters.
-
Enter a comma-separated list of JET module names. Enter the names of any additional JET modules that you have installed on the Proxy Controller to perform the provisioning operations described by this profile.
The base_config, custom, and flash JET modules are always installed, and you need not specify them here.
-
Click the Add icon to add JET name-value pairs.
The JET parameters helps to customize how this profile provisions the target systems.
-
Enter the name of the JET parameter that you want to add in the Name field.
-
Enter the value that you want to assign to the JET parameter in the Value field.
-
Click Next to specify the Oracle VM Server Control Domain parameters.
-
Specify the following resources that you want to assign to the control domain:
Figure 3-6 Setting Up Control Domain Parameters
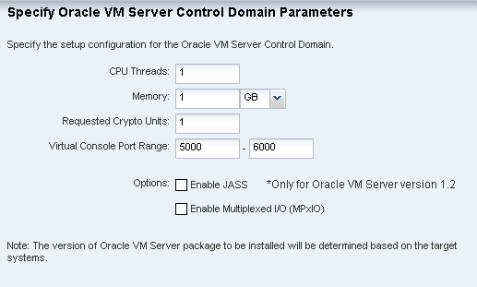
Description of "Figure 3-6 Setting Up Control Domain Parameters"
-
CPU Threads – Specify the number of CPU threads that you want to assign to the control domain. The remaining CPU threads are available for the logical domains.
-
Memory – Specify the amount of memory that you want to assign to the control domain. The remaining memory is available for the logical domains.
-
Requested Crypto Units – Specify the number of crypto units that you want to assign to the control domain. The remaining crypto units are available for the logical domains.
-
Virtual Console Port Range – Specify the minimum port and maximum port of the virtual console of the control domain. The default port range for virtual console is 5000 to 6000.
-
Enable JASS – Select this check box to harden the system by installing the SUNWjass package.
Note:
JASS is not supported for Oracle VM Server for SPARC 1.3 or higher versions. This option is disregarded even if you select Enable JASS in the profile when Oracle VM Server for SPARC version 1.3 or 2.0 is being installed. -
Enable Multiplexed I/O (MPxIO) – Select this check box to enable Fibre Channel connectivity for the control domain. This action enables the Fibre Channel ports on the system that is configured for storage.
Note:
The version of Oracle VM Server for SPARC to be installed depends on the target systems.Note:
After the provisioning job starts, an information problem mentions the Oracle VM Server for SPARC version that is installed on the target server.
-
-
Click Next to define the disk partitions.
-
Specify the disk partitions and file systems that you want to create on the target system.
-
Click the Add icon to define a new partition. The root (/) and a swap file system are defined by default.
For each partition that you define, provide the following information:
-
File System Type – Select a file system type, either ufs, unnamed, or swap.
-
Mount Point – Enter a directory to use as a mount point for partitions.
-
Device – Enter the rootdisk keyword and a slice value to describe a partition on the target system's boot disk, for example,
rootdisk.s0, or enter the logical device name, for example,c1t0d0s0, of the partition that you want to create. -
Size (MB) – Enter the size that you want to assign to the partition, expressed in MB. Do not enter any value for the size when you want to allocate the remaining unused disk space to a file system.
-
-
Click Next to specify the naming services.
-
Specify the name service, domain name and the corresponding name server.
You can select the following name service:
-
DNS – Enter the domain name of the DNS server. Provide the IP address of the DNS server in the Name Server field. You can enter up to three IP addresses as the value for the Name Server. Provide the additional domains to search for name service information in the Domain Name Search List. You can specify up to six domain names to search. The total length of each search entry cannot exceed 250 characters.
-
NIS or NIS+ – Enter the domain name of the NIS or NIS+ server. If you know the NIS server details, choose the option Specify an NIS Server and provide the NIS server host name and the IP address.
-
LDAP – Enter the domain name of the LDAP server. Specify the name of the LDAP Profile you want to use to configure the system. Enter the IP address of the LDAP Profile Server. You can also optionally provide the Proxy Bind Distinguished Name and Password.
-
None – Select None when there is no naming service configured.
-
-
Click Next to specify the networking.
-
Select the network interface that the target system will use after the OS has been installed. You can define the following options for networking:
-
Use Link Aggregation – Go to step 28
-
Use an IPMP group – Go to step 29
-
None – Go to step 27
-
-
Select a DHCP enabled network interface for the boot interface. Click the Add icon to add more than one network. Select a NIC from the list of available logical interfaces for each network. Select the Address Allocation Method for the selected networks except the boot interface.
All the networks that are defined in Enterprise Manager Ops Center are displayed in the Network list. If you have selected Use Static IP for Address Allocation Method then you must provide the IP address when you apply the profile. The specific IP address is assigned to the target system after provisioning.
-
You must specify and configure the Link Aggregation.
-
In the Specify Link Aggregation step, enter the following details:
-
Link Aggregation Name – The name of the Link Aggregation is already set as aggr. Add a number to it to differentiate from other aggregation.
-
Network – Select a network from the list.
-
NICs – List out the physical interfaces of the selected network that must be configured as a single logical unit.
Click Next to configure the link aggregation.
-
-
In the Configure Link Aggregation step, configure the IEEE 802.3ad Link Aggregation with the following parameters:
-
Load Balancing Policy – Define the policy for outgoing traffic.
-
Aggregation Mode and Switches – If the aggregation topology involves connection through a switch, you must note whether the switch supports the link aggregation control protocol (LACP). If the switch supports LACP, you must configure LACP for the switch and the aggregation. Define one of the modes in which LACP must operate.
-
MAC Address Policy – Define whether the MAC address of the NICs are fixed or not.
-
-
-
For IPMP group, you must specify the IPMP group and interfaces.
-
In the Specify IPMP Group step, define the following information:
-
IPMP Group Name – Provide a name for the IPMP group.
-
Network – Select a network from the list.
-
Failure Detection – The Link based detection is always embedded. If you want to include Probe based detection, select Probe based option.
Click Next to specify the IPMP interfaces.
-
-
In the Specify IPMP Interfaces step, define the following information:
-
Specify the interfaces that will be part of the IPMP group.
-
Define the interfaces as Failover or Standby.
-
Configure additional IP addresses for the interfaces.
Note:
The data and test addresses will be assigned during profile execution.
-
Note:
Test address is not required for probe-based failure detection. -
-
Click Next to view the Summary of the parameters selected for Oracle VM Server provisioning.
-
Review the parameters and click Finish to save the profile.
The profile will be created for provisioning Oracle VM Server.
Using JET for OS Provisioning
JumpStart Enterprise Toolkit (JET) provides a framework to simplify and extend the JumpStart functionality provided within the Oracle Solaris operating system. The JET framework is supplied in a single package called SUNWjet, which is automatically installed during OS provisioning. You can extend the functionality by adding modules, which are also supplied in package format.
Note:
Install JET modules only on Proxy Controllers that run Oracle Solaris OS. Do not attempt to install JET modules on Proxy Controllers that run the Red Hat Enterprise Linux OS.The Oracle Solaris operating system includes the SUNWjet package, which installs the base_config, custom, and flash JET modules, but you must install any additional JET modules onto the Proxy Controllers manually. The following sections describe how to install additional JET modules. In general, you download the JET datastream package, which includes all JET modules and then and use it to install only the packages with the modules that you want to use.
About JET Modules
When you install JET on the jumpstart server, you have the following advantages:
-
Install any of multiple versions of Solaris
-
Deploy flash archives
-
Utilize multiple boot methods
-
Install recommended patches
-
Configure all your network interfaces
For more information about JET resources and documentation, see Solaris 10 10/09 Installation Guide: Custom JumpStart and Advanced Installations available at:
http://www.oracle.com/technetwork/indexes/documentation/index.html
Enterprise Manager Ops Center installs some JET packages on the Proxy Controller during installation. Hence, always check for the package before installation. Do not uninstall or upgrade these packages as they are considered a core part of the Enterprise Manager Ops Center product.
Packages of JET Module
The following are the list of associated packages with the JET modules:
Table 3-1 JET Modules and Associated Packages
| JET Module Name | JET Package | Installed by Default | Description |
|---|---|---|---|
|
base_config |
SUNWjet |
Yes |
Provides the standard installation configuration for the client, including the information required to set up the JumpStart server to allow the client to boot and build. |
|
custom |
SUNWjet |
Yes |
Adds functionality to the JumpStart framework to handle packages, patches, scripts, and files. |
|
explo |
JetEXPLO |
No |
Adds explorer support to the JET JumpStart framework. |
|
flash |
JetFLASH |
Yes |
Adds the ability for the JumpStart server to deliver Solaris images in Solaris Flash format. |
|
jass |
JetJASS |
Yes |
Adds the ability for the JumpStart server to install, configure, and execute JASS. |
|
ldom |
JetLDOM |
Yes |
Adds capability to install and configure Logical Domains. |
|
san |
JetSAN |
No |
Installs and patches the SAN Foundation kit and SNIA packages, and configures STMS. |
|
sbd |
JetSBD |
No |
Adds capability to configure the Secure by Default feature in Solaris 10. |
|
sds |
JetSDS |
No |
Adds Solstice DiskSuite (Solaris Volume Manager) support to the JumpStart framework. |
|
vts |
JetVTS |
No |
Adds support for installation of the Sun VTS software under the JumpStart framework. |
|
zfs |
JetZFS |
No |
Adds capability to configure ZFS file systems on JumpStart clients. |
|
zones |
JetZONES |
No |
Allows creation of simple zones on Solaris 10 systems. |
JET Module Parameters
The SUNWjet and JetFLASH packages are installed by default on Enterprise Manager Ops Center Proxy Controllers. The SUNWjet package installs the base_config and custom JET modules. The JetFLASH package installs the flash JET module. The parameters of these JET modules are available for use in OS profiles by default. You can review the parameters for these modules by looking at the sample.template file in the /opt/SUNWjet/Templates directory on a Proxy Controller.
Refer to the module.conf configuration files that are associated with JET modules for information about parameters for specific JET modules. Configuration files for installed JET modules reside in the /opt/SUNWjet/Products/module directories on the Proxy Controller, where module is the name of the JET module. For example, the configuration files for the custom and flash JET modules are /opt/SUNWjet/Products/custom/custom.conf and /opt/SUNWjet/Products/flash/flash.conf respectively.
JET base_config Module Parameters
If you specify JET parameters with an OS profile, the following parameters from the base_config JET module are automatically updated within the OS profile and must not be modified:
-
base_config_ClientArch
-
base_config_ClientEther
-
base_config_client_allocation
-
base_config_sysidcfg_network_interface
-
base_config_sysidcfg_ip_address
-
base_config_sysidcfg_netmask
-
base_config_sysidcfg_nameservice
-
base_config_sysidcfg_system_locale
-
base_config_sysidcfg_terminal
-
base_config_sysidcfg_timeserve
-
base_config_sysidcfg_timezone
-
base_config_sysidcfg_root_password
-
base_config_sysidcfg_security_policy
-
base_config_sysidcfg_protocol_ipv6
The following list describes the parameters that are associated with the base_config JET module. These parameters provide basic operating system configuration information. Values for many of these parameters use the term targetableComponent to represent the target system.
-
base_config_client_allocation – The mechanism used to build this client. By default, the options listed in
/opt/SUNWjet/etc/jumpstart.confare used. Leave the value blank unless you need to do something different from the default for this specific client. If you are provisioning the Solaris 10 1/06 x86 release, set the value of this variable to GRUB to enable GRUB-based booting and installation. -
base_config_ClientArch – Kernel architecture, such as sun4u or x86. By default, this is set to the kernel architecture of the targetable component.
-
Default Value – [targetableComponent:kernel_arch]
-
-
base_config_ClientEther – Ethernet MAC address. By default, this is set to the Ethernet MAC address of the targetable component.
-
Default Value – [targetableComponent:ethernet_mac_address]
-
-
base_config_ClientOS – Version of the OS to be provisioned.
-
Example – Solaris9_u7_sparc
-
-
base_config_dedicated_dump_device – If set, the dumpadm utility configures the partition as a Dedicated Dump Device. See
dumpadm(1M)for supported Operating Environments. -
base_config_defaultrouter – Value to use for
/etc/defaultrouter. -
base_config_disable_sysid_probe – If set, skip the sysid step on the first reboot. This can significantly increase provisioning efficiency on systems that have many unused network adapters.
-
Default Value – yes
-
-
base_config_dns_disableforbuild – Delay DNS configuration until later. If DNS is not available in the build environment, set this variable to yes.
-
base_config_dns_domain – DNS domain entry for the
/etc/resolv.conffile. -
base_config_dns_nameservers – Space-separated list of IP addresses to use for DNS name server entries in the
/etc/resolv.conffile. -
base_config_dns_searchpath – List of entries to go in the DNS search line in
/etc/resolv.conffile. -
base_config_dumpadm_minfree – Set a limit so that crash dumps do not fill up the dump file system. See the
dumpadm(1M) -moption for possible values.-
Example – 20000k
-
-
base_config_enable_altbreak – If set, enable alternate break sequence.
-
base_config_enable_rootftp – If set to any value, enable root FTP access.
-
base_config_enable_rootlogin – If set to any value, enable network root login from telnet, rsh, and ssh.
-
base_config_enable_savecore – If set to any value, enable save core for Solaris 2.6 systems.
-
Default Value – yes
-
-
base_config_grub_append – For Solaris 10 1/06 x86 systems, specifies additional options or arguments to pass to the GRUB bootloader.
-
base_config_ipmp_networkifs – Space-separated list of interfaces to be defined under IPMP control. For each interface listed, define sets of variables to provide the netgroup, mode, test1, test2, netmask, host name, log-ip, hostname2, and log-ip2 for the interface.
-
Example – qfe0_qfe4!database-net l 10.0.0.1 10.0.0.2 24 oracle-db 10.0.0.3 apache 10.0.0.4
-
-
base_config_networkifs – Space-separated list of additional network interfaces to be defined. For logical interfaces, use underscores (_) rather than colons (:). Use the format c_ntndn. For each interface listed, define sets of variables to provide the netname, netmask, host name, and IP address for the interface.
-
Example – le1!netB 255.255.255.0 myhost-netB 192.168.1.0
-
-
base_config_nfs_mounts – Space-separated list of remote NFS mount points. Use ? to separate the mount source from the mount target, as shown in the example.
-
Example – fs?1.1.1.1:/fs
-
-
base_config_nfsv4_domain – Set up the NFSv4 domain to prevent being prompted at first reboot. If not set, look first for the entry in base_config_dns_domain, and second for the domain value in
/etc/default/nfs. -
base_config_noautoshutdown – If set to any value, disable power management.
-
Default Value – pm_disabled
-
-
base_config_nodename – Value to use for
/etc/nodenameif not the default host name. -
base_config_notrouter – If set to y, then disable IPv4 forwarding and create the
/etc/notrouterfile. -
base_config_ntp_servers – Space-separated list of names or IP addresses for the NTP servers. The first server will be given a prefer tag. This section places lines of the form: server [prefer] into the
/etc/inet/ntp.conffile. For additional NTP control, use the custom module to deploy your own custom ntp.conf file. -
base_config_patchdir – Path to the patches. If blank, use information from the jumpstart.conf file and the IP address of the JET server. If your patch files are not stored on the JET server, then provide an NFS-style path to the location of the patches.
-
base_config_poweroff_afterbuild – If set, shut down the system once the build completes.
-
base_config_productdir – Path to the products. If blank, use information from the jumpstart.conf file and the IP address of the JET server. If your package files are not stored on the JET server, then provide an NFS-style path to the location of the packages.
-
base_config_products – JET modules to provision.
-
base_config_profile – Create your own custom JumpStart profile. By default, if you leave this variable blank, the OS provisioning plug-in creates the
/opt/SUNWjet/Clients/hostname/profilebased on the other base_config_profile variables. Alternatively, you can create your own custom JumpStart profile. To use the profile that you created manually, set the base_config_profile variable to the name of the created profile. By default, the OS provisioning plug-in looks for the profile in the/opt/SUNWjet/Clients/hostnamedirectory. To direct the plug-in to a profile in another directory, provide an absolute path name in the base_config_profile variable.Note:
If you are provisioning the Solaris OS on x86 target hosts, you must create a custom JumpStart profile that deletes any existing partitions, and point to that profile in the base_config_profile variable. -
base_config_profile_add_clusters – Space-separated list of cluster packages to add.
-
base_config_profile_add_geos – Comma-separated list of geographical regions to add.
-
Example – N_Europe, C_Europe
-
-
base_config_profile_add_locales – Comma-separated list of locales to add.
-
Example – fr_FR, ja_JP.UTF-8
-
-
base_config_profile_add_packages – Space-separated list of packages to add.
-
base_config_profile_additional_disks – A list of disks to use and configure in addition to the boot disk. Use the format cntndn. For each disk listed, define sets of variables for each slice to identify the mount point and the size.
-
base_config_profile_cluster – Solaris software group package.
-
Default Value – SUNWCreq
-
Example – SUNWCreqSUNWCuserSUNWCprogSUNWCallSUNWCXallSUNWCrnet
-
-
base_config_profile_del_clusters – Space-separated list of cluster packages to remove.
-
Example – SUNWCpm SUNWCpmx SUNWCdial SUNWCdialx
-
-
base_config_profile_del_geos – Comma-separated list of geographical regions to delete.
-
base_config_profile_del_locales – Comma-separated list of locales to delete.
-
base_config_profile_del_packages – Space-separated list of packages to remove. To prevent interactive installations on Solaris x86 headless target hosts, set this value to SUNWxwssu SUNWxwscf.
-
base_config_profile_dontuse – A comma-separated list of disks that should not be used. Use the format cntndn. This variable applies only if base_config_profile_usedisk is not set.
-
base_config_profile_root – Root space (free, or size in Megabytes)
-
Default Value – free.
-
-
base_config_profile_s3_mtpt – Mount path to slice 3.
Note:
If you are using VxVM and you want your boot disk to look like the mirror, then leave slices 3 and 4 empty. -
base_config_profile_s3_size – Size of slice 3 (in Megabytes).
-
base_config_profile_s4_mtpt – Mount path of slice 4.
-
base_config_profile_s4_size – Size of slice 4 (in Megabytes).
-
base_config_profile_s5_mtpt – Mount path of slice 5.
-
Default Value –
/var
-
-
base_config_profile_s5_size – Size of slice 5 (in Megabytes).
-
base_config_profile_s6_mtpt – Mount path of slice 6.
-
Default Value –
/usr
-
-
base_config_profile_s6_size – Size of slice 6 (in Megabytes).
-
base_config_profile_s7_mtpt – Mount path of slice 7.
Note:
If you are using Solaris Volume Manager (SVM), the default behavior is to use slice 7 as a location for metastate databases. If you are using the SVM default configuration, do not use slice 7 for data.-
Default Value – /opt
-
-
base_config_profile_s7_size – Size of slice 7 (in Megabytes).
-
base_config_profile_swap – Swap space (in Megabytes).
-
Default Value – 256
-
-
base_config_profile_usedisk – Defines the boot disk onto which the OS will be loaded. Use the format cntndn or the keyword rootdisk. If the value is rootdisk, then the current boot disk will be used.
-
Default Value – rootdisk
-
-
base_config_shutup_sendmail – If set, create an alias host name to disable sendmail.
-
Default Value – yes
-
-
base_config_sysidcfg_default_route – Router IP address to use during JumpStart for Solaris 9 or later environments. If blank, will try to use value from the
defaultrouter_base_configvariable. If that is also blank, or for another net interface, JumpStart sysidcfg will get a router IP from the JET server. -
base_config_sysidcfg_ip_address – IP address to use at initial boot. By default, this is set to the IP address of the targetable component.
-
Default Value – [targetableComponent:ethernet_ip_address]
-
-
base_config_sysidcfg_nameservice – Name service to configure at initial boot.
-
Default Value – NIS
-
-
base_config_sysidcfg_netmask – Netmask to use at initial boot. By default, this is set to the netmask of the targetable component.
-
Default Value – [targetableComponent:ethernet_netmask]
-
-
base_config_sysidcfg_network_interface – Network interface to use at initial boot.
-
Default Value – NONE
-
-
base_config_sysidcfg_protocol_ipv6 – Whether to use IPv6 protocol at initial boot.
-
Default Value – no
-
-
base_config_sysidcfg_root_password – Encrypted root password.
-
base_config_sysidcfg_security_policy – Kerberos security policy to use at initial boot.
-
Default Value – NONE
-
-
base_config_sysidcfg_system_locale – System locale to use at initial boot.
-
Example – en_US.ISO8859-1
-
-
base_config_sysidcfg_terminal – Terminal emulator to set at initial boot.
-
Default Value – vt100
-
-
base_config_sysidcfg_timeserver – Where to get system time for initial boot. If blank, system time comes from the JET server. Alternatively, you can set this variable to localhost to get the system time from the hardware clock on the client.
-
base_config_sysidcfg_timezone – System time zone to use for initial boot.
-
Example – US/Pacific
-
-
base_config_sysidcfg_x86_kdmfile – For Solaris x86 systems, specifies the name of a keyboard, display, and mouse configuration file to append to the sysidcfg file.
-
Default Value – /sysidcfg-addon-file
-
-
base_config_ufs_logging_filesys – For Solaris 7 and later systems, a space-separated list of mount points to use for logging. To enable logging on all UFS file systems, use the keyword all. Solaris 9 09/04 enables logging by default. To disable logging on a specific file system, add a hyphen in front of the mount point. To disable logging on all file systems, use the keyword none.
Note:
You cannot mix keywords and mount points. You can specify the root file system (/), although the root file system is included as part of the all and none keywords.-
Default Value – all
-
-
base_config_update_terminal – If set, put the sysidcfg terminal type into inittab.
-
Default Value – yes
-
-
base_config_x86_confflags – For Solaris 9 x86 systems, specifies arguments to be used with the confflags attribute of the
add_install_clientcommand.-
Example – -f -P /boot/solaris/dca
-
-
base_config_x86_console – For x86 systems, set the console to the correct tty port if you are not going to connect a keyboard and monitor to the client. Setting this variable enables you to perform installs through the serial port. For b1600, v20z, and v40z systems, use ttya. For lx50, v60x, and v65x systems, use ttyb.
-
base_config_x86_disable_acpi – For x86 systems, any value disables ACPI. Disabling ACPI might make the installation process proceed better due to how the interrupts are handled.
-
base_config_x86_disable_kdmconfig – For Solaris x86 systems, disables the kdmconfig interactive utility for configuring the keyboard, display, and mouse of the target host. If you are installing a Solaris OS with the GRUB bootloader, set this variable value to yes.
-
base_config_x86_nowin – For x86 systems, prevents Solaris from trying to run Windows during the install.
-
Default Value – yes
-
-
base_config_x86_safetoreboot – For x86 systems, controls whether the system automatically reboots. If your PXE boot is a one-time option, and the next reboot will attempt to boot from disk, you should set this option to yes.
Installing JET Modules
To use any JumpStart Enterprise Toolkit (JET) module other than the base_config, custom, and flash JET modules, you must install the modules. The default installation of the Proxy Controller software includes the SUNWjet and JetFLASH packages, which provide the base_config, custom, flash, jass, and ldom JET modules. Additional modules that you might install require that the SUNWjet package be installed.
JET modules are only used on Solaris OS-based Proxy Controllers. Do not install JET modules on Linux-based Proxy Controllers.
To Check for Installed JET Modules
To see the JET modules installed on a Proxy Controller, list the contents of the /opt/SUNWjet/Products directory, which contains a separate subdirectory for each installed JET module. In the following example, the Proxy Controller has the default set of JET modules for Enterprise Manager Ops Center:
# cd /opt/SUNWjet/Products
# ls
base_config  custom   flash   jass   ldom
#
To Install a JET Module
Use this procedure on the Proxy Controller to install a JET module.
-
Download the JET datastream package,
jet.pkg. The JET datastream package contains the complete set of JET packages. -
Use the
pkginfocommand to list the included packages:# pkginfo -d jet.pkg application JetEXPLO jet explo product application JetISO JET ISO product application JetRBAC JET RBAC product application JetSAN JET san product application JetSBD Secure By Default product application JetSDS JET sds product application JetVTS JET VTS product application JetZFS JET zfs product application JetZONES JET Zones module application SUNWjet Sun JumpStart Enterprise Toolkit application SUNWjetd JET Documentation # -
Identify the name of the package that contains the module you want to install.
-
Use the
pkgaddcommand to install the package. For example:# pkgadd -d jet.pkg JetZONES (output omitted) Do you want to continue with the installation of <JetZONES> [y,n,?] y (output omitted) Installation of <JetZONES> was successful.
Note:
Support is provided only for the core JET modules that are bundled with Enterprise Manager Ops Center.Creating an OS Provisioning Profile with JET Templates
You can create OS provisioning profiles with JET templates. You can create your own JET templates and use it for Solaris OS provisioning. You can use JET templates to standardize the configurations as it provides more options for defining the jumpstart parameters.
JET Templates
Ensure that you place the JET template on a directory that the Enterprise Controller can access. JET templates can be located in a local directory of the Enterprise Controller, or in a directory that the Enterprise Controller mounts using NFS.
You can also create a JET template on the Enterprise Controller in the directory /opt/SUNWjet/Templates, using the following command:
./make_template template_name
You can edit the template and fill in the OS information. Save the template. A sample template is provided for your reference.
You can change the values in the JET template as required. During provisioning the OS provisioning parameters are read from the template. Ensure that you have the template on the Enterprise Manager Ops Center before provisioning.
To Create an OS Provisioning Profile with JET Templates
-
In the Navigation pane, select Plan Management section.
-
Expand Profiles and Policies and select OS Provisioning profile. The existing OS provisioning profiles are listed in the center pane.
-
In the Actions pane, select Create Profile option. The Create Profile-OS Provisioning wizard is displayed.
-
Provide a name and description for the profile.
-
The Create a deployment plan for this profile option is selected by default. If you do not want to automatically create a plan, deselect the option.
-
In the Subtype list, select JET Template.
-
Select the Target Type as OSP x86 or OSP SPARC.
-
Click Next to define the OSP parameters.
-
Select an Solaris OS image from the available ISO images list.
-
Click Browse to select the JET template location on the Enterprise Controller.
-
Select the Manual Net Boot option to enable manual control of network boot operations for the target system. You must select this option for a target system that does not have a service processor because Enterprise Manager Ops Center cannot remotely control the network boot process on these systems.
-
Select Automatically Manage with Oracle Enterprise Manager Ops Center to install an Agent on the system and manage the system with Enterprise Manager Ops Center.
-
Click Next to specify the networks for the OS.
-
Click Next to select the network interface that the target system will use after the OS has been installed. You cannot define IPMP groups or link aggregation for a JET template profile.
-
Select a DHCP enabled network interface for the boot interface.
-
Click the Add icon to add multiple networks. All the networks that are defined in Enterprise Manager Ops Center are displayed in the Network list.
-
Select a NIC from the list of available logical interfaces for each network. If you have selected Use Static IP for Address Allocation Method then you must provide the IP address when you apply a deployment plan with this profile. The specific IP address is assigned to the target system after provisioning. You can select the Address Allocation Method for the selected networks except the boot interface.
-
Click Next to view the summary of the selected profile properties.
-
Click Finish to create the profile. On a successful job completion, an OS provisioning profile is created. Create a plan from this profile and apply it on the server to provision the OS.
For more information about creating and applying a deployment plan associated with this profile, see Oracle Enterprise Manager Ops Center Advanced User's Guide.
For more information about JET Templates, see Solaris 10 Installation Guide: Custom JumpStart and Advanced Installations available at:
http://www.oracle.com/technetwork/indexes/documentation/index.html
Provisioning the OS
Using the provisioning profiles created for different targets, create a deployment plan with the associated profile.
Ensure that you have the ISO images imported and verified the procedures in Preparing to Provision an OS.
To Create a Deployment Plan for Provisioning
-
Select Plan Management section in the Navigation pane.
-
Select the appropriate plan in the Deployment Plan tree.
-
Select Create Plan from Template in the Actions pane. Create a Deployment Plan window is displayed.
-
Enter a name and description for the plan.
-
Select the type of failure policy. Failure Policy defines the course of action to be taken when there is a failure in the steps of plan execution.
-
In the Deployment Steps, select the profile or plan that must be applied for the step. The Associated Profile/Plan drop-down lists only the applicable profiles or plans for each step in the plan.
-
(Optional) Click the Create Profile icon to create a profile for the plan. This option takes you to the OS provisioning profile creation wizard.
-
Provide any additional parameter required, if any.
-
Click Save to save the plan.
To Apply a Deployment Plan for Provisioning
-
Expand Plan Management in the Navigation pane.
-
In the Provision OS section, select the deployment plan. The profiles included in the plan are listed in the center pane.
-
Select Apply Deployment Plan from the Actions pane. The Select Target Assets window is displayed.
-
Choose one or more targets from the list of available targets and click Add to Target List.
-
Select whether you want to apply the plan with minimal user interaction or override any profile values.
-
Click Next to view the summary of the parameters
-
Click Apply the deployment plan on the selected targets. The provisioning job starts. View the progress of the job by selecting the View Job Details icon in the Jobs pane.
For more information about creating and applying deployment plans that use nested plan for OS provisioning, see Oracle Enterprise Manager Ops Center Advanced User's Guide.
See Oracle Enterprise Manager Ops Center User's Guide for more detailed information about provisioning Oracle VM Server for SPARC.
OS Provisioning for an Oracle Solaris Cluster
You can provision clusters with an OS and the Oracle Solaris Cluster software. You must create the provisioning profile by importing the cluster profile and editing it to include the post-action script.
See Oracle Enterprise Manager Ops Center Advanced User's Guide for information about importing a cluster profile.
To provision an OS on an Oracle Solaris Cluster, use the procedure described in Creating an OS Update Job with the cluster provisioning profile and select the cluster as the target of the update job.
To provision both an OS and the Oracle Solaris Cluster software onto a server, use a deployment plan.
For detailed instructions in creating a complex plan, see Oracle Enterprise Manager Ops Center Advanced User's Guide.
In general, the procedure is as follows:
-
Create the OS provisioning profile.
-
Import and edit the cluster provisioning profile.
-
Create a deployment plan using the Install Server template.
-
Select the OS provisioning profile as Step 1.
-
Select the cluster provisioning profile as Step 2.
-
Complete the plan.