Collection Plans
This chapter provides you with overviews and instructions for creating and using collection plans.
This chapter covers the following topics:
- Overview of Collection Plans
- Collection Plan Types
- Collection Plan and Import Results Database Views
- Collection Elements in Collection Plans
- Creating Collection Plans
- Defining Collection Plan Elements
- Defining Collection Plan Element Values
- Associating Specification Types with Collection Plans
- Dependencies Between Context Elements and Actions
- Defining Collection Plan Element Actions
- Defining Collection Plan Element Alert Actions
- User-Defined Formulas
- Defining Assign A Value Actions: User-Defined Formulas
- Business Examples: User-Defined Formulas
- Quality Data Collection During Transactions
- Associating Collection Plans with Transactions
- Updating and Deleting Collection Plans
- Viewing Collection Plans
- Parent-Child Collection Plans
- Collection Plan Security
Overview of Collection Plans
You create collection plans to determine the data that you want to collect, where and when in the manufacturing process you want to collect it, and what actions you want to take based on the quality results that you collect. You can use collection plans to model your test or inspection plans, and you can create an unlimited number of plans to support your enterprise-wide quality data collection and analysis needs.
You can create collection plans for departments, functional areas, product lines, or for specific purposes, such as collection plans that enable you to record the following information:
-
Supplier defects in receiving and inspection
-
Shop floor defects resulting in scrapped assemblies
-
Equipment breakdowns
-
Quality characteristics, such as acidity and viscosity, for lots produced
-
Recording serial number test history
-
Root causes and resolutions for discrepant material
-
Repair codes and quantities for rework
-
Symptoms for field returns and customer returns
Quality Data Collection Structure
In order to collect quality data with Oracle Quality, you must set up a data collection structure called a collection plan. Collection plans are composed of collection elements, their values and specifications, and any actions that you want to initiate in response to quality results. There are some considerations that you must make before you set up collection plans. You first must create collection element types, then the individual collection elements that comprise the plan.
Collection Elements
Collection Elements are the building blocks of collection plans. They are the fields that you set up in the collection plan for the data that you want to collect. You must define collection elements before you can use them in a collection plan. Once you use them in a collection plan they become collection plan elements specific to that plan.
You can create collection plan elements by adding collection elements that you have defined to collection plans. You also can copy them from one collection plan into another. Collection plans can contain both predefined reference information collection elements, as well as user-defined collection elements. See: Collection Elements in Collection Plans.
Size and Complexity
You can add up to 100 user-defined collection elements to collection plans. In addition, common collection plan elements are automatically added as collection plans are created. Context elements may or may not be automatically added.
A simple equipment maintenance collection plan, for example, might only collect machine number and date maintained information, whereas a complex equipment maintenance collection plan might include machine number, serial number, maintenance personnel, machine supplier, machine parts supplier, and a historical record of all routine and remedial maintenance.
Data Collection Methods
Collection plans can be invoked manually for direct results entry, or automatically as you enter transactions in other Oracle Applications. You also can import data through Quality's Collection Import feature, as well as through Oracle Applications Open Interface. See: Collection Import and the Oracle Manufacturing APIs and Open Interfaces Manual.
Attachments
You can attach illustrative or explanatory files to collection plans, in the form of text, images, word processing documents, spreadsheets, or video. Attachments can be used to document instructions and corrective action procedures. They can be viewed by operations personnel during quality data collection. See: Attachments for Collection Plans, Specifications, and Result Lines and Viewing Attachments Associated with Quality Results.
Collection Plan Types
For sorting, grouping, categorizing, and other informational purposes, you must assign a collection plan type to each collection plan that you create. You can define your own collection plan types, or you can use any of these eight predefined collection plan types:
Since collection plan types are only informational, they do not affect a collection plan's association with transactions. For example, you can associate a collection plan that has been assigned a WIP Inspection plan type with a Receiving Inspection transaction.
Defining Collection Plan Types
You must define collection plan types before you create collection plans so that they are available on the collection plan type list of values when you set up the plan. You define collection plan types on the Collection Plan Type Quick Codes window where you can define up to 250 unique collection plan types.
To define collection plan types
-
Navigate to the Collection Plan Type Quick Codes window.
The Type, User Name, Application, and Description fields contain default information about the Quick Code window.
-
Enter a unique Code for the collection plan type. Codes can include alphanumeric characters, spaces, and underscores (_).
The system uses the Code during database searches to find that particular collection plan type.
Note: You cannot change the values in this field after saving them. To remove an obsolete QuickCode you can either disable it, enter an end date, or change the meaning and description to match a replacement code.
-
Enter the Meaning of the Code.
The Meaning is the complete name or translation of the Code. For example, you could create a collection plan type Code called "IP-1" whose meaning is "Inspection Plan-1."
-
Enter a Description for the collection plan type. The Description provides additional information about the Code, and is displayed on the list of values for the enabled collection plan types.
-
Optionally, enter the start date that the collection plan type becomes effective in the Effective Dates From field.
You cannot use the collection plan type before this effective date. If you do not enter a From effective date, the collection plan type is valid immediately.
-
Optionally, enter the date that the collection plan type expires in the Effective Dates To field.
You cannot use the collection plan type after this date. Once a collection plan type expires, you cannot select this collection element type as you create collection plans, but you can query records that already use it. If you do not enter a To effective date, the collection plan type is valid indefinitely.
-
Check the Enable box to enable the collection plan type.
If you disable a collection plan type, you cannot select it as you define collection plans, but you can still query records that already use it. You can disable but not delete collection plan types.
-
Save your work.
Related Topics
Lookups, Using Oracle HRMS - The Fundamentals
Collection Plan and Import Results Database Views
Database views are virtual tables. They allow you to access data without having to know where or how that data is stored.
In Oracle Quality, collection plan and import results database views are dynamically created and updated as you create and update collection plans. View names are derived from the collection plan name. Plan results views use the Q_collection_plan_name_V naming convention. Import results views use the Q_collection_plan_name_IV naming convention.
Collection Plan Views
Collection plan results database views can be used to create custom reports, charts, and views for your quality results. You can also use database views to access quality results with products such as Oracle Discover and Oracle Developer, as well as any other data inquiry products that can select data from an Oracle database.
To make custom reporting easier, foreign key information for entities in other Oracle Applications are automatically included when collection plan results database views are created. This feature makes it possible to dynamically access information in foreign database tables. For example, if your collection plans contains the Supplier (ID for the supplier) collection element, the supplier name can be resolved using the collection plan result database view.
Collection Import Views
Collection import result database views facilitate the insertion of data into the Collection Import Interface Table. Instead of inserting data directly into the import table, you insert data into a view of the table.
Table and View Definitions, Oracle Quality Technical Reference Manual
Collection Import, Oracle Manufacturing APIs and Open Interfaces Manual
Collection Elements in Collection Plans
When you add collection elements to collection plans, they become collection plan elements specific to that collection plan, and can have a different definition in every collection plan in which they are used. When you use a collection element in a collection plan, only its specifications and default value are copied into the plan, not its actions or values. You must reassign it some or all of its values and actions, or create new values and actions for it once you associate it with a collection plan. Any actions that you define for a collection plan element only apply to that element when used in that collection plan.
You can define your own collection elements (User-defined collection elements), use any of Quality's pre-defined collection elements (Pre-defined Reference Information collection elements), or you can copy collection elements from one collection plan into another. See: Collection Elements and Defining Collection Plan Elements.
Common Collection Plan Elements
In addition to the collection elements that you add to collection plans, there is a group of common elements that are automatically added to collection plans as they are created. The following common collection plan elements are predefined as mandatory, enabled, and displayed:
-
Collection Number
-
Collection Plan Name
-
Collection Plan Type
-
Created By
-
Entry Date
-
Last Update Date
-
Last Updated By
-
Organization
These common collection plan elements can be used to define output variables when reporting quality results. To view the results for common collection plan elements, see: Viewing Quality Results.
The item description is also recorded at the time of data collection, but it is not a common collection plan element. To view the item description, see: Viewing Quality Results Details.
Context Element Dependencies
Some context collection elements are dependent on other context elements. If you add them to collection plans before you add the context elements they depend on, a warning message is displayed, but you are allowed to continue.
For example, if you add the Lot Number collection element to a collection plan, before adding the Item collection element, you are warned that you should add Item to the collection plan before adding Lot Number. The following table lists all context dependencies.
Collection Element Dependencies
| Context Element... | ..Depends On (Add first) |
|---|---|
| Component Locator | Component Subinventory |
| Component Lot Number | Component Item |
| Component Revision | Component Item |
| Component Serial Number | Component Item |
| Component Subinventory | Component Item |
| Component Unit of Measure | Component Item |
| From/To Intraoperation Step | From/To Operation Sequence |
| From/To Operation Sequence | Job Name or Production Line |
| Line Operation | Flow Manufacturing Routing |
| Locator | Subinventory |
| Lot Number | Item |
| PO Line Number | PO Number |
| PO Release Number | PO Number |
| PO Shipment | PO Line Number |
| Production Line | Item (Repetitive) |
| Revision | Item (under revision control) |
| Serial Number | Item |
| SO Line Number | Sales Order Number |
| Subinventory | Item |
| Task Number | Project Number |
| Unit of Measure | Item |
You can choose to save a collection plan that you have added a dependent collection element to (Lot Number) even if you do not add the collection element that it depends on (Item). When you enter results using this collection plan, however, the field for the dependent collection element (Lot Number) is disabled and you are prohibited from entering results.
It is possible to sequence collection plan elements so that a dependent collection element (Lot Number) precedes the collection element it depends on (Item). In this case, as you enter results, the Lot Number field remains disabled until Item results are entered.
Collection Plans for Transactions
You can create collection plans that are specifically used to collect quality data during transactions performed in other applications. In general, these collection plans have only one requirement: that they be associated with a transaction in another product (collection plans that are used to inspect received items in purchasing, however, have additional requirements).
Additional information on creating collection plans to be used with other products can be found in the following sections:
-
Quality Data Collection in Work in Process, Shop Floor Management, and Flow Manufacturing
-
Creating eAM Quality Collection Plans, Oracle Enterprise Asset Management User's Guide
-
Mobile Quality, Oracle Mobile Supply Chain Applications User's Guide.
-
Quality Collection Plans Setup (Complex Maintenance Repair, and Overhaul), Oracle Complex Maintenance, Repair, and Overhaul User's Guide
Collection Plan Templates
You can create collection plans by copying from another plan in two ways:
-
Copying a collection plan, including child plans, and creating a new plan
-
Copying the components from one plan to a new plan
To determine which method to use, decide whether you want to copy associated child plans along with the parent plan you have chosen to copy. See: Parent-Child Collection Plans. If you do want to copy the associated child plans, refer to Setup Steps, Step 2 - Copy from Template Collection Plans, Oracle Quality Implementation Guide. These instructions explain how to copy a seeded template collection plan, but are valid for user-defined collection plans as well.
The remaining discussion focuses on creating a collection plan when only copying the components from an existing plan to a new plan. The collection plan from which you copy the components from acts as a template for the new collection plan. You can use collection plans created in one organization as templates to create new collection plans in another organization as well as in the current organization.
When you create a collection plan using a template, all of the following components are automatically copied from the source to the destination collection plan:
-
Collection plan elements and, if defined, their values
-
Collection plan element actions, action triggers, action details, and, if defined, output variables for alert actions
Collection plans for transactions and their collection triggers are not copied. Also, the specification type for the source plan is not defaulted to the destination plan.
When you create collection plans from templates, the transactions associated with the source plan are not copied, therefore you must manually associate the appropriate transaction with the new plan. You also must enable the collection plan that you set up for the transaction. When you save your work the system checks to make sure that all required collection plan elements, actions, and values exist. If they do not, you are prompted to fill in the missing fields (you also can choose to have the system automatically fill in the missing components).
You can use both pre-seeded and user-defined collection plans as templates. The following list describes the pre-seeded collection plans that are available. The elements in each plan and the actions associated with each element are listed in an appendix, Pre-Seeded Collection Plan Templates.
You can delete collection plan elements that are copied but are not required. You can also add user-defined and additional context elements.
See: Inspection Collection Plans
Creating Collection Plans From Templates
To create a collection plan from a template
-
Navigate to the Collection Plans window.
Important: To assist you as you create collection plans, you can choose the Summary/Detail option from the View Menu and run a query to view existing collection plans in summary format. See: Combination Blocks, Oracle E-Business Suite User's Guide.
-
Enter the Collection Plan name.
Collection Plan names consist of alphanumeric characters and spaces. Collection plan names can have up to 30 characters, and the first 25 characters must be distinctive. The only special characters that you can use in a collection plan name are the underscore (_) and the single quotation mark (').
-
Optionally, enter the date that the Collection Plan becomes effective in the Effective "from" field, the first field after Effective.
You cannot use the collection plan before this effective date. If you do not enter a "from" Effective date, the collection plan is effective immediately.
-
Optionally, enter the date that the Collection Plan expires in the Effective "to" field, the second field after Effective.
You cannot use the collection plan after this date. Once a collection plan expires, you cannot enter quality results using the plan, but you can query records that already use it. If you do not enter a "to" effective date, the collection plan is valid indefinitely.
-
Select the collection Plan Type from the list of values for that field. See: Collection Plan Types.
-
Choose the Copy Elements button. The Copy From Plan list appears.
-
Select the name of the source or template collection plan.
You can select any collection plan, even those that are not effective. You also can copy collection elements from more than one collection plan.
When you copy collection elements from another collection plan, their sequence numbers, prompts, parameters (mandatory, enabled, displayed), actions, lists of values, and default values are defaulted from the source. These values can be changed.
Caution: If you copy collection elements that are disabled on the source collection plan, they are copied to the destination collection plan as disabled.
-
Choose OK.
-
Change the new collection plan as required.
You can delete collection elements that are copied if they are not required. If any of the collection plan elements from the 'source' collection plan have already been added to the destination collection plan, those on the destination collection plan are not overwritten.
Related Topics
Predefined Collection Elements
Creating Collection Plans
Collection plans are the structure that you use for data collection. Collection plans are composed of collection elements (the fields that you set up for the data that you want to collect), their values and specifications, and any actions that you want to initiate in response to quality results. You can create a collection plan that you can use as the default when you directly enter, view, and update quality results and when you view lot quality results, serial quality results, and action log entries. See: QA:Default Collection Plan.
Collection plan elements are the building blocks of collection plans. You can create collection plan elements by adding individual collection elements to your collection plan. You can also create collection plans by copying the collection elements from one collection plan into another. You can define lists of values for each collection plan element that you create.
Note: In addition to the collection elements that you explicitly add to a collection plan, there are a number of common collection plan elements that are added to every collection plan that you create. See: Common Collection Plan Elements.
You can customize collection plans to meet your specific data collection needs by:
-
Associating specification types with collection plans, such as item, customer, or supplier
-
Specifying which transactions in other Oracle Manufacturing products invoke a collection plan and thus quality data collection
-
Defining values and lists of acceptable values for collection plan elements
-
Defining action rules and when those action rules are invoked
-
Attaching illustrative or explanatory files in the form of text, images, word processing documents, spreadsheets, video clips, and so on, to collection plans
-
Associating devices to collection plan elements to enable device data collection, if Oracle Manufacturing Execution System (MES) for Discrete Manufacturing is installed.
Prerequisites
- Define collection elements. See: Defining Collection Elements.
To create collection plans
-
Navigate to the Collection Plans window.
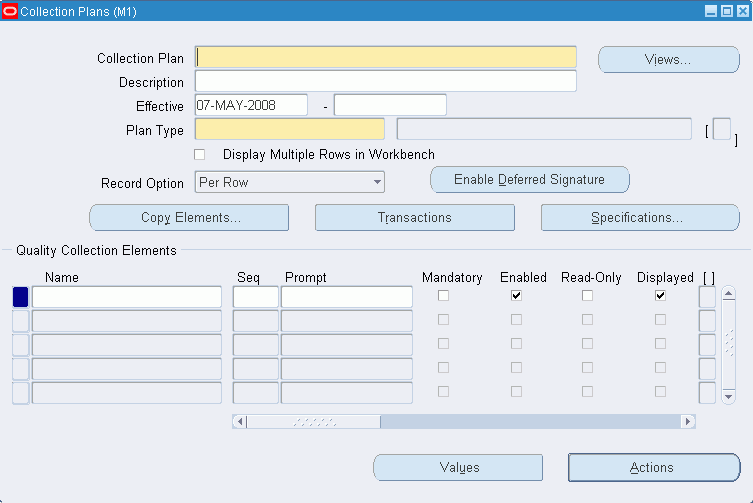
Important: To assist you as you create collection plans, you can choose the Summary/Detail option from the View Menu and run a query to view existing collection plans in summary format. See:Combination Blocks, Oracle E-Business Suite User's Guide.
-
Enter the Collection Plan name.
Collection plan names can include alphanumeric characters and spaces. Collection plan names can have up to 30 characters, and the first 25 characters must be distinctive. The only special characters that can be included in a collection plan name are the underscore (_) and the single quotation mark (').
-
Optionally, enter the date that the Collection Plan becomes effective in the Effective "from" field, the first field after Effective.
You cannot use the collection plan before this effective date. If you do not enter a "from" Effective date, the collection plan is effective immediately.
-
Optionally, enter the date that the Collection Plan expires in the Effective "to" field, the second field after Effective.
You cannot use the collection plan after this date. Once a collection plan expires, you cannot enter quality results using the plan, but you can query records that already use it. If you do not enter a "to" effective date, the collection plan is valid indefinitely.
-
Select the collection Plan Type. See: Collection Plan Types.
-
Check the Display Multiple Rows in Workbench checkbox to display standalone and parent collection plans in the multiple row layout mode in the Quality Workbench.
-
Select the Record Option for entering quality results. The options are Per Row or Per Collection. This field only appears if the profile option value for EDR: E-records and E-signatures is Yes. See: E-records and E-signatures for Oracle Quality.
Tip: The following example illustrates why you need to select Per Row as the record option:
You must enter quality results for different item numbers using one collection plan. Item A requires the approval of Approver 1 and Item B requires the approval of Approver 2. In this scenario, you must capture e-records and e-signatures per row to enable both Approver 1 and Approver 2 to enter their e-signatures.
-
Choose Enable Deferred Signature if you want to enable deferred e-signatures when entering or updating quality results for this plan. This button only appears if the profile option value for EDR: E-records and E-signatures is Yes. See: E-records and E-signatures for Oracle Quality.
Important: This button only enables deferred e-signatures when entering or updating quality results directly or when entering or updating quality results during the following transactions:
-
Depot Repair Task Transaction (Depot Repair)
-
Process Nonconformance (Oracle Process Manufacturing)
-
Service Requests (Oracle Service)
-
To copy collection elements and actions from a template plan
See: Creating Collection Plans from a Template.
To define collection plan elements
See: Defining Collection Plan Elements.
To copy collection element values to collection plans
See: Defining Collection Plan Element Values.
To define quality actions for collection plan elements
See: Defining Collection Plan Element Actions.
To associate specification types with collection plans
See: Associating Specification Types with Collection Plans.
To associate collection transactions with collection plans
See: Associating Transactions with Collection Plans.
To attach files to collection plans
See: Attaching Files to Collection Plans, Specifications, and Results Lines.
Defining Collection Plan Elements
You can add and define collection plan elements one-by-one. You can also define or redefine collection plan elements that have been copied from another collection plan.
Prerequisites
- Create a collection plan. See: Creating Collection Plans.
To add and/or define collection plan elements
-
Select the Collection Plan.
-
In the Quality Collection Elements region, select Name of the collection element.
If you are adding a collection element, you can select any enabled user-defined or predefined collection element.
Note: You must add at least one enabled and mandatory collection element to a collection plan. You can add up to 100 user-defined collection elements.
When you add collection elements, the prompt, parameters (mandatory and displayed), and default values are defaulted from the source collection element. These values can be changed.
Note: You can add up to five collection elements with a Data Type of Comment to a collection plan.
Some reference information collection elements are dependent on others. If you add them to collection plans before you add the collection elements they are dependent on, a warning message is displayed, but you are allowed to continue. If you create a collection plan that has a dependent collection element, but does not have the collection element that it depends on, the field for the dependent collection element (Lot Number) is disabled and you are prohibited from entering results for it. See: Context Element Dependencies.
Important: Adding collection elements does not automatically copy the lists of the values or the actions that are defined for that collection element.
-
The sequence number defines the columnar order of collection elements when entering quality results. You can change the sequence number as required.
-
Enter text for the data entry Prompt.
The Prompt defaults from the collection element but can be overridden. The prompt, which is displayed as you enter quality results, asks the user for required information, and also becomes the column headings for reports that you create using the Quality Results ReportWriter.
Note: Avoid using special characters like (#), (%),and (@) in the collection element prompts.
Important: If your prompt begins with a hyphen (-), the hyphen and the text that follows it are suppressed as you enter, view, and update quality results.
-
Check the Mandatory check box if you want to indicate that a value must always be entered for this collection plan element.
-
Check the Enabled check box to enable the collection plan element.
Collection plan elements must be enabled before you can use them in the data collection process.
Caution: You may need to enable collection plan elements that were copied from a source collection plan.
-
Check the Read Only check box if you do not want users to change a default value or an Assign a Value action.
When an element is read only, it can be populated by a default value and an Assign a Value action, but cannot be changed. (See: Default Specification Limit Values and Defining Actions that Assign a Value: User-Defined Formulas.)
-
Remove the check mark from the Displayed check box to suppress prompts requesting that you enter results for the collection plan element.
-
Check the Information check box to view the collection element data within the Quality Workbench rows of collection plan results (See: Overview of the Quality Workbench).
You can check the Information check box for as many as five collection elements within a plan. You can then view the collection element data of these fields in the Information column of the Quality Workbench - View page. Use the data in this column to find quality results entered, then update or view them.
-
Check the Device Enabled option, if Manufacturing Execution System (MES) for Discrete Manufacturing is installed and you want to collect data from a device for this collection plan element.
-
Comment type collection elements cannot be device enabled. Context elements will not exhibit device enabled features in transactions even if they are set up as device enabled. Context elements in transactions can receive their values only from parent transactions.
-
One collection plan element in a collection plan can receive values through one device only. You can however, connect the same collection element to different devices in different plans.

-
-
If you select the Device Enabled checkbox for a collection plan element in the Collection Plans form, the Device field will become mandatory. Use the Device field to add device details. You can choose from the list of values one combination of the Device description, Sensor Alias and the Device name. The devices you setup and enabled in the Device Data Setup page (See, Device Integration Setup) will appear in this list of values.
-
When you enable a collection plan element for device data collection, you can use the Override Device Data option to override the device data at the plan level. The default value for this check box will be the one defined at the device data setup described earlier. If the override is enabled at the device data setup, then the check box at the plan will be by default checked but can be optionally unchecked. If the override is disabled at the device data setup level then the override check box will be by default unchecked at the plan but can be optionally checked.
Note: If the Read Only check box in the plan definition is checked for a collection element, then the data cannot be overridden irrespective of the override setup. If you check both the Read Only and Override Device Data check boxes, a message will display that device data for read only elements cannot be overwritten. If a collection plan element is defined as not displayed, the device data for this element cannot be captured irrespective of the setup.
-
Enter the unit of measure (UOM) that you want to use when entering quality results for this organization.
Note: If the collection plan element is device enabled, the device data is generated only in one UOM as defined in the setup of the collection plan element. There is no need for any UOM conversions for the data collected from the device including specifications.
-
Enter the default Precision if the element is a Number data type.
The value in the Precision field represents the number of decimal places that appear when you view results for the collection element.
-
The value you enter appears as the default when you enter quality results. See: Default Specification Limit Values.
Note: In the Quality Workbench, if there is a default value for a collection element, it will not be considered as user entered value when you save the plan. For example, in the multiple row entry mode in the quality workbench for multiple row result entry in parent plans, all the five new rows that are displayed initially will have all the default values populated as per the setup. If you enter values for the first two rows, only these entries will be saved. The other rows with the default values will not be saved and will be considered as blank rows.
-
Save your work.
Related Topics
Common Collection Plan Elements
Defining Collection Plan Element Values
Collection plan element values are used to validate data as it is collected. You can define collection plan element values by copying one or all values from a collection element to a collection plan element. You can change and delete the values that you copy, as required. You can also add and define collection plan element values independently.
You can define values and lists of values for all user-defined collection elements as well as predefined attribute collection elements. You cannot define values for reference information collection elements and common collection plan elements. See: Reference Information Collection Elements.
To define collection plan element values
-
From the Quality Collection Elements region of the Collections Plan window, select the collection element.
-
In the Values window, enter the Short Code.
The short code you enter must match the data type of the collection element. For example, if you have defined a Diameter collection element that is numeric, you could enter a short code such as 45.67. Similarly, if you have defined a Nonconformity collection element that is character, you could enter an abbreviated short code such as lead to indicate a broken lead nonconformity. An abbreviation of this sort might be necessary because short code values can only be up to 11 characters long.
-
The Description provides additional information about the short code. In the above example, the short code lead might have a Description of broken lead.
-
Check the Display as Poplist on Workbench box.
The Display as Poplist on Workbench box enables you to view defined collection plan element values in a pull down list when entering results using the Quality Workbench. See: Overview of the Quality Workbench.
-
Save your work.
To copy individual collection element values to collection plan elements
-
Select the Collection Plan.
You can select any collection plan including collection plans that are not currently effective.
-
From the Quality Collection Elements region, select the collection element.
-
In the Values window, select the Short Code for the collection element value.
-
Save your work.
To copy all collection element values to a collection plan element
-
From the Quality Collection Elements region of the Collections Plan window, select the collection element.
-
Choose the Values button. The Values window appears.
-
In the Values window, choose the Defaults button. The Copy Values window appears.
-
Choose the Copy button to copy the entire list of values from the collection element.
-
Save your work.
To delete collection plan element values
From the Values window, select the value's short code. Choose Delete Record from the Edit Menu.
You can delete collection plan element values even if those values have been used in the data collection process.
Associating Specification Types with Collection Plans
You can associate any of three specification types with collection plans. You can also choose not to associate a collection plan with any specification type. Associating a specification type with a collection plan speeds the specification selection process both when entering quality results directly and when collecting data during transactions. It also enables you to determine whether or not the collected result values are within the limits established by the specification element.
Important: Most specifications are associated with items. However, it is possible to define a specification that does not have an item specification element and select it as you enter quality results.
Direct Data Entry
If you enter quality results directly, for example, using a collection plan that is associated with a Supplier Specification type, the system prompts you to find and select a Supplier Specification after you select the collection plan.
Data Collection During Transactions
If you are collecting results as you enter transactions within Oracle Manufacturing Applications, and the collection plan that you invoke is associated with a specification type, Quality automatically searches for a specification for the item being transacted. If none exists, Quality searches for a specification for the category of the item (see: Specifications for Transactional Data Collection).
When you collect results during Oracle iSupplier Portal transactions, however, the system does not automatically search for specification types for collection plans associated with these transactions. You therefore must include them on an attachment, which the user can view online or download and print.
To associate specification types with collection plans
-
Navigate to the Collection Plans window.
-
Select the Collection Plan.
-
Choose the Specifications button. The Specification Types window appears.
-
Choose the default specification type, Item Specification, Supplier Specification, or Customer Specification, or choose No specification used. See: Specifications.
The specification type that you associate with a collection plan can be overridden when you enter quality results. For example, you can associate a Supplier Specification type with a collection plan, but select an Item Specification as you enter quality results. If you choose not to associate a specification type with the collection plan, by choosing No Specification Used, you are not prompted to find a specification as you enter quality results.
-
Choose OK to save your work.
Related Topics
Finding Specifications While Entering Quality Results Directly
Finding Specifications During Transactional Data Collection
Defining Specification Limits for Collection Elements
Dependencies Between Context Elements and Actions
Some actions are independent of the collection plan elements they are associated with. For example, you can define message actions, such as Display a message to the operator, or alert actions, such as Send an electronic mail notification, for any collection plan element.
Dependencies exist, however, between collection plan elements that are context elements and actions. For example, you can only define an Assign a shop floor status to the intraoperation step action, if you have added the To Operation Sequence and To Intraoperation Step context elements to your collection plan.
The following table lists these dependencies:
| Action To Be Invoked | Context Element(s) Required for Action |
|---|---|
| Place the job on hold | Job |
| Assign a shop floor status to the intraoperation step | To operation sequence To intraoperation step |
| Hold all schedules building this assembly on this production line | Production Line and Item |
| Assign an ASL status | Supplier and Item |
| Accept the shipment | Inspection Result |
| Reject the shipment | Inspection Result |
| Place the supplier on hold | Supplier |
| Place a document or release on hold | PO Number and PO Release Number |
| Assign a lot status (See: Quality Actions). | Item and Lot Number |
| Assign a serial status (See: Quality Actions). | Item and Serial Number |
| Create a work request (See: Triggering a Work Request, Oracle Enterprise Asset Management User's Guide). | Asset Group and Asset Number |
| Create a maintenance work order (See: Triggering a Work Order, Oracle Enterprise Asset Management User's Guide). | Asset Group, Asset Number, and Followup Activity |
Related Topics
Defining Collection Plan Element Actions
You can define several action rules for each collection element that you add to a collection plan.
You can also copy a collection element's default action rules and related actions to a collection plan element. For example, if you define the action rule and related action when "Severity equals most severe, place the job on hold" for the Severity collection element, you can copy this action rule and related action to any Severity collection plan element. You can update copied action rules and related actions as required.
Prerequisites
- Create a collection plan. See: Creating Collection Plans.
To define collection plan element action rules
-
From the Quality Collection Elements region of the Collections Plans window, select the collection element.
You can select any enabled collection element.
-
Choose the Actions button. The Quality Actions window appears.
-
In the Action Rules region of the Quality Actions window, enter the Sequence. See: Action Rule Sequencing.
The Sequence number establishes the order in which action rules are evaluated as data is collected. The sequence number can be from 0 to 99999.
-
Select the Condition that must be met to invoke the action. The condition that you select tells the system what records to search for.
For example, selecting the condition “equals (=)" tells the system to select only those records that are equal to the From value. Selecting “greater than(>)" tells the system to select only those records that are greater than the From value (for a complete list of conditions, see: Query Operators).
If you define an action rule for a collection element called Failure Code, whose values are Damage, Rough Finish, and Wrong Color, and you choose to activate the action when the condition "equals (=)" the value Damage, the system will only invoke the action when it finds records in which the Failure Code is recorded as Damage. The action will not be invoked for records in which Failure Code is recorded as Rough Finish or Wrong Color.
-
Choose either the Value or Spec Limit to specify the evaluation method.
Value: If you choose Value, as quality data is collected the action rule is evaluated using the results value and the value or values entered here. If you have defined values for the collection plan element, you must choose a value from this list. If you have not defined values for the collection plan element, you can enter any value.
Spec Limit: If you choose Spec Limit, as quality data is collected the action rule is evaluated using the quality results value and either the specification limit target value, the upper or lower user-defined range limits, or the upper or lower specification range limits.
Spec Limit can be used to define action rules that evaluate numeric results.
Important: You are automatically precluded from collecting data that is not within the user-defined range limits. Therefore these range limits cannot be used to define action rules.
-
If the Condition selected requires a range of values, enter both the From and To value. If the Condition selected requires only a single value, enter only the From value.
Important: Some conditions (e.g. Is Entered and Is Empty) do not require values.
To copy all action rules and actions from collection elements to collection plan elements
-
Select the Collection Plan.
-
From the Quality Collection Elements region, select a collection element.
-
Choose the Actions button.
-
From the Quality Actions window, choose the Defaults button. The Copy Actions window appears.
-
Choose the Copy button to copy all action rules and actions.
To associate actions with action rules
-
From the Quality Actions window, select an Action Rule in the Action Rules region.
-
Select an Action in the Actions this Rule Invokes region. See: Quality Actions.
You can associate one or more actions with each action rule. However, if the action selected requires action details, you must define action details before selecting another action.
Some dependencies exist between collection plan elements and actions. For example, you can only define the "Assign a shop floor status to the intraoperation step" action, if To Operation Sequence and To Intraoperation Step collection elements have been added to the collection plan. See: Dependencies Between Context Elements and Actions.
-
If the action requires a message, enter the message in the Action Details region. Messages can be up to 256 characters in length. See: Message Actions.
If the action requires a status code, enter it in the Action Details region. See: Application Specific Actions.
If the action is an alert action, see: Defining Collection Plan Element Alert Actions.
If the Assign a Value to a collection element action is selected, see: Defining Actions that Assign a Value: User-Defined Formulas.
If the Launch a Workflow action is selected, see: Defining Launch a Workflow Actions.
-
Save your work.
Defining Collection Plan Element Alert Actions
There are four alert actions available in Oracle Quality:
-
Send an electronic mail notification
-
Execute a SQL script
-
Execute an operating system script
-
Launch a concurrent request
Oracle Quality alert actions are similar but distinctly different from the event alerts you can define using Oracle Alerts. They share the same underlying database tables and require some of the same setups. See: Overview of Oracle Alert, Oracle Alert User's Guide and Alert Setup for Quality.
Quality alert actions require action details. Examples of action details include recipients (for electronic mail notifications), arguments, and file names (for SQL and operating system scripts).
You can customize alert action details using output variables. Output variables represent quality results values (e.g. &ITEM represents "C12345") and are dynamically defined as action rules are evaluated. Output variables can be imbedded in alert action details and can thus be used in the following contexts:
Send an electronic mail notification: You can create dynamic distribution lists by including output variables in the recipient/distribution fields (List, To, Cc, and Bcc). If you send a text message, you can include quality results values in the message text.
Execute an operating system script: You can use output variables to dynamically pass quality results values as arguments to operating system scripts. If you enter operating system script text, you can include output variables in the text.
Execute a SQL script: You can use output variables to dynamically pass quality results values as arguments to SQL scripts. If you enter SQL script text, you can include output variables in the text.
Important: SQL script actions are limited to Updates or Inserts. To Select a SQL string, use the Assign a Value action. See: Defining Actions that Assign a Value: User-Defined Formulas.
Prerequisites
- Define quality actions for collection plan elements. See: Defining Collection Plan Element Actions.
To select collection elements and action rules
-
Navigate to the Collection Plans window.
-
Select the Collection Plan.
-
Select the Collection Element.
-
Choose the Actions button. The Quality Actions window appears.
-
In the Action Rules region, select the action rule.
To define electronic mail alerts
-
In the Actions this Rule Invokes region, select the Send an electronic mail notification action.
-
In the Action Details region, choose the Action Details button. The Actions:Send Electronic Mail window appears.
-
Optionally, select an Oracle Office public mail List or a distribution List. If you select an Oracle office public mail list, you can enter the list name in any of the recipient (To, Cc, Bcc) fields. If you select a distribution list, the electronic mail IDs associated with the list are automatically displayed in the recipient fields. You cannot change these values.
-
Enter the electronic mail IDs of the "To" mail message recipients separated by spaces or commas. You can enter as many recipients as you want, up to 240 characters. You can dynamically distribute mail messages by including output variables in the recipient fields.
For example, you could define and use output variable for an Inspector ID collection plan element if Inspector IDs are equivalent to electronic mail IDs.
Note: If you are integrated with Oracle Office, all electronic mail IDs listed in the recipient (To, Cc, and Bcc) fields are validated before the alert is processed. If an invalid ID is entered in any of the recipient fields, the system returns the message to the user who invoked the alert. The user's electronic mail ID is determined from the value entered in the Email/Fax field of the Users window (from the System Administrator responsibility). If the value of the Email/Fax field is null, then the system checks to see whether the value for the Default User Mail Account option in the Oracle Alert Options window is set to Operating System Login ID or Application Username and sends the message to the appropriate user using one of these two IDs. The Electronic mail validation is disabled if you integrate with other electronic mail systems to send outgoing messages.
-
Enter the Subject, up to 240 characters, of the mail notification.
-
Optionally, enter the electronic mail IDs of the Cc, carbon copy, mail recipients.
-
Optionally, enter the electronic mail IDs of the Bcc, blind carbon copy, mail recipients.
-
Define your message source by selecting either File or Text.
File: Enter the File name including the full path name.
Text: Enter the message Text for the electronic message. You can include output variables in the text. For example, you can specify that the quality results values associated with the Item collection plan element appear in the text of an electronic mail notification.
An example of a text message containing output variables is as follows:
Please test the contents of item number &ITEM received on &TRANSACTION_DATE.
-
Choose the Variables button to associate output variables with the action. See: Associating Output Variables with Actions.
-
Choose OK to Save your work.
To define concurrent request alerts
-
In the Actions this Rule Invokes region, select the Launch a concurrent request action.
-
In the Action Details region, choose the Action Details button. The Actions:Concurrent Program window appears.
-
Select the name of the Application that owns the concurrent program.
-
Select the concurrent Program Name.
-
Enter arguments, separated by spaces.
Arguments are dependent on the application and program name selected.
-
Select OK to save your work.
To define operating system script alerts
-
In the Actions this Rule Invokes region, select the Execute an operating system script action.
-
In the Action Details region, choose the Action Details button. The Actions:Operating System Script window appears.
-
Choose the source of the operating system script by selecting either File or Text. You cannot select an application or enter arguments if you choose to enter a text script.
File: You can enter the full path and file name of the operating system script source file rather than select an Application.
Text: You can enter the a text operating system script. You can include output variables in the text. For example, you can specify that the quality results values associated with the Item collection element appear in the text of an operating script.
An example of text operating system script containing output variables is as follows:
echo Please test the contents of lot number &LOT received on &TRANSACTION_DATE from supplier &SUPPLIER. The following defect was noted by receiving: &DEFECT_CODE
-
If the operating system script you want to execute is in a file located in an Application's base path bin directory, select the Application name.
Important: If you enter an application name or arguments then choose to enter operating system script Text, values entered in these fields are erased.
-
Optionally, enter arguments, separated by spaces, to pass to the operating system script file.
You can dynamically pass arguments to your operating system script using output variables. If these output variables select character or date data, place single quotes around the output variable to correctly pass the argument.
-
Optionally, choose the Variables button to associate output variables with the action. See: Associating Output Variables with Actions.
-
Choose OK to Save your work.
-
In the Actions this Rule Invokes region, select the Execute a SQL script action.
-
In the Action Details region, choose the Action Details button. The Actions:SQL Script window appears.
-
Choose the source of the SQL system script by selecting either File or Text. You cannot select an application or enter arguments if you choose to enter a text script.
File: You can enter the full path and file name of the SQL script source file rather than select an Application.
Text: You can enter the a text SQL script. You can include output variables in the text. For example, you can specify that the quality results values associated with the Item collection element appear in the text of an SQL script.
If your SQL script text includes output variables that select character or date data, place single quotes around your output variables so the system can correctly pass the data. If a single quote lies within your character string, the system adds a second single quote. For example, if your character string is resume', the system displays this as resume''.
An example of SQL script text containing output variables is as follows:
update my_lot
set status = 3
where lot_name = &LOT;
Note that in conformance with SQL standard formatting conventions, a semicolon (;) or a forward slash (/) must be placed at the end of each SQL statement.
-
If the SQL system script you want to execute is in a file located in an Application's base path sql directory, select the Application name.
Important: If you enter an application name or arguments then choose to enter SQL script Text, values entered in these fields are erased.
-
Optionally, enter arguments, separated by spaces, to pass to the SQL script file.
You can dynamically pass arguments to your SQL script using output variables. If these output variables select character or date data, place single quotes around the output variables to correctly pass the argument.
-
Optionally, choose the Variables button to associate output variables with the action. See: Associating Output Variables with Actions.
-
Choose OK to Save your work.
User-Defined Formulas
User-defined formulas make it possible to assign or derive quality results values. Values can be derived from user-defined formulas that are simple arithmetic expressions which use simple operators (+, -, *, /), specified values (3, 2, 4000, 'FAIL', 50), complex operators (square root, sin, cosine and so on), functions (SORT), and/or output variable tokens (&DEFECTIVE).
Examples
3
3+2
'A'
(4000 + 34500)/50
'FAIL'
&DEFECTIVE/&QTY
&D + SQRT(&DISCREPANCY)/SQRT(&E)
ABS(&SEVERITY) + &BAD
'Defect '||&DEFECTCODE
Values can also be derived from user-defined SQL scripts which read values from Oracle database tables.
Examples
select assigned_to from customer_reps
where customer_name = &CUSTOMER
and organization_id=:parameter.org_id
Important: To constrain the SQL Statement to the current organization, you can use the variable ':parameter.org_id' for the current organization id. To constrain the SQL Statement to the current user's id, you can use the variable ':parameter.user_id' for the current user's id.
Defining Assign A Value Actions: User-Defined Formulas
You can dynamically assign values to collection plan elements as you enter quality results. Values are assigned when action rules associated with Assign a Value actions are evaluated and found to be true. When you assign a value to a collection plan element, its current value is overwritten. See: User-Defined Formulas and Business Examples: User-Defined Formulas.
Failure Conditions
Formulas and SQL scripts may fail to process if one or more of the following conditions exist:
-
The value represented by an output variable token is null. For example, if the results value represented by the token &QTY is null in the formula &DEFECTIVE/&QTY.
-
More than one value is returned by a SQL statement. For example if the SQL statement select assigned_to from customer_reps where customer_name = &CUSTOMER returns three values.
-
The SQL statement returns no rows.
-
An invalid SQL statement is specified.
Note: This is not an exhaustive list.
Prerequisites
- Define quality actions for collection plan elements. See: Defining Collection Plan Element Actions.
To define a user-defined formula
-
From the Quality Actions window, select an Action Rule in the Action Rules region.
-
In the Actions this Rule Invokes region of the Quality Actions window, select the Assign a value action.
-
In the Action Details region, choose the Action Details button. The Assign a Value window appears.
-
Select a collection plan element to assign the value to.
You can select any collection plan element.
-
Choose the appropriate check box to define the value using either a Formula or an SQL script. The default is formula.
Formula: Use when an arithmetic expression is required. Arithmetic express can include simple operators (+, -, *, /), specific values (3, 2, 4000, 34500, 50), complex operators (square root, sin, cosine and so on), functions (SQRT), and/or output variables tokens (&DEFECTIVE) that represent quality results values. Output variables correspond to collection plan elements (e.g. &QTY represents the Quantity Defective collection plan element). As quality data is collected, quality results values are passed to your formulas via the output variables you have defined.
An example of a formula is as follows:
3 + &QTY
In this example the output variable &QTY corresponds to the Quantity Defective collection plan element.
SQL Text: Use when data must be read from database tables. You can include specific values and output variables tokens (&PARTICLE_SIZE) in your SQL text as well.
An example of SQL Text is as follows:
select kit_grade_name
from lot_grades
where &PARTICLE_SIZE between low_size and high_size
Note that in the case of user-defined formulas, it is not necessary to place a semicolon (;) or a forward slash (/) at the end of each SQL statement.
-
If you have included output variable tokens in your Formula or SQL Text, choose the Variables button to associate these output variable tokens with the action. See: Associating Output Variables with Actions.
-
Choose OK to Save your work.
Business Examples: User-Defined Formulas
The following two examples explain how to create user-defined formulas that 1) calculate process yield based upon total quantity and quantity defective and 2) calculate line thickness deviation in a circuit board based upon the actual and optimum specified thicknesses.
Calculating Percent Yield Example
To calculate the percent yield from a process, define the following collection plan elements:
-
Seq 40: Defect Quantity
-
Seq 50: Total Quantity
-
Seq 60: Yield
If the collection plan elements are sequenced in the order shown above or a similar order (e.g. 60, 70, 80), define the Assign a Value action per the following:
-
From the Collection Plans window, select the 'Total Quantity' collection plan element then choose the Actions button. The Quality Actions window appears.
-
In the Action Rules region, select the 'is entered' condition. This condition ensures that Oracle Quality calculates the Yield after the user enters the Defect Quantity and the Total Quantity.
-
In the Actions this Rule Invokes region, select the Assign a value action.
-
In the Action Details region, choose the Action Details button. The Assign a Value window appears.
-
Select the 'Yield' collection plan element to Assign the value To.
-
Select the option to assign a value using a formula (this is the default selection).
-
Enter the following formula:
(1 - &DEFECTQTY/&TOTAL)*100
-
Choose the Variables button. The Output Variables window appears.
-
Enter the token name 'DEFECTQTY' for the Defect Quantity collection plan element. Also enter the token name 'TOTAL' for the Total Quantity collection plan element.
-
Choose OK to exit both the Output Variables and Quality Actions windows.
-
Save your work.
Calculating Deviation in Line Thickness Example
To determine the deviation of the line thickness in a circuit board that is over or under a specified specification, define the following collection plan elements:
-
Seq 40: Line thickness
-
Seq 50: Specified Thickness
-
Seq 60: Deviation
If the collection plan elements are sequenced in the order shown above or a similar order (e.g. 60, 70, 80), define the Assign a Value action per the following:
-
From the Collection Plans window, select the 'Specified Thickness' collection plan element then choose the Actions button. Then Quality Actions window appears.
-
In the Action Rules region, select the 'is entered' condition. This condition ensures that Oracle Quality calculates the Deviation after the user enters the Line Thickness and Specified Thickness.
-
In the Actions this Rule Invokes region, select the Assign a value action.
-
In the Action Details region, choose the Action Details button. The Assign a Value window appears.
-
In the Assign a Value window, select a collection plan element to Assign the value To.
-
Select the option to assign a value using a formula (this is the default selection)
-
Enter the following formula:
&LINETHICKNESS-&SPECTHICKNESS
-
Choose the Variables button. The Output Variables window appears.
-
Enter the token name 'LINETHICKNESS' for the Line thickness collection plan element. Also enter the token name 'SPECTHICKNESS' for the Specified Thickness collection plan element.
-
Choose OK to exit both the Output Variables and Quality Actions windows.
-
Save your work.
Related Topics
Defining Actions that Assign a Value: User-Defined Formulas
Quality Data Collection During Transactions
You can collect quality data as you perform the following transactions in Flow Manufacturing, Purchasing, TeleService, Work in Process, Enterprise Asset Management, Advanced Service Online, Mobile Supply Chain Applications, Warehouse Management System, Shop Floor Management, Oracle Process Manufacturing and iSupplier Portal:
-
Asset Query (Enterprise Asset Management)
-
Check In and Check Out transactions (Enterprise Asset Management)
-
Completion transactions (Work in Process, Enterprise Asset Management, Flow Manufacturing)
-
Operation Completion transactions (Enterprise Asset Management, Flow Manufacturing)
-
Inspection transactions (Purchasing)
-
Maintenance transactions (Complex Maintenance, Repair, and Overhaul)
-
Mobile transactions (Mobile Supply Chain Applications, Warehouse Management System)
-
Move transactions (Work in Process, Shop Floor Management)
-
Process Nonconformance transactions (Oracle Process Manufacturing)
-
Receiving transactions (Purchasing)
-
Service Requests (TeleService, Depot Repair)
-
Work Order-less Completion transactions (Flow Manufacturing)
-
Quality for Outside Processing (iSupplier Portal)
-
Quality for PO Shipments (iSupplier Portal)
To be able to collect quality data during a transaction, you must first define and associate a collection plan specific to the transaction. You can associate a transaction with one or more collection plans. For example, you can create a collection plan to track final test results (e.g., pass/fail status) and another to record the serial numbers of serial controlled assemblies that fail final test. You then can associate the Work in Process transaction with both collection plans to ensure that the final test and serial number data is captured as assemblies are moved. Enter child data in a move transaction validates assembly serial numbers and will not save invalid serial numbers.
You also can associate a collection plan with one or more transactions. For example, you could associate a Surface Inspection collection plan with both the WIP Move transaction and the Purchasing Inspection transaction. You would then be able to collect surface inspection data as you move assemblies and complete resurfacing operations, as well as when you receive assemblies resurfaced by an outside supplier.
Collection Triggers
Collection triggers are events or conditions that a transaction must satisfy before quality data collection is invoked. They enable you to tie quality data collection to specific points in your routing, thus ensuring that quality data is recorded as soon as it is available. You can define a unique set of collection triggers for each collection transaction that you associate with a collection plan. You can define as many collection triggers as are required to make data collection as specific as possible.
Defining triggers for a transaction's collection plan is optional. If you define collection triggers for transaction collection plans, Quality data collection is automatically invoked only when all conditions for all or some collection triggers are met.
For example, if you define the following collection triggers for the Move transaction:
-
Item = (equals) C45268
-
From Operation Sequence Number = (equals) 40
Quality data collection is automatically invoked only when C45268 assembly items are moved out of operation sequence 40. In this example, the triggers work together to ensure that the right data is collected at the right point - operation sequence 40 - a critical inspection point in an assembly's routing.
For information on how to create AND and OR relationships between collection triggers, See: Associating Collection Plans with Transactions.
Context Element/Collection Trigger Relationships
When you collect quality data during transactions in other Oracle applications, you have the option to add context elements to your collection plans and/or you can use them to define collection triggers. Collection triggers are evaluated as transactions are entered and can be used to determine which collection plan should be used in the quality data collection process.
For example, if you define the trigger 'Department = (equals) Inspection' for the WIP Move transaction, data collection can be invoked each time assemblies are moved into the Inspection department. Furthermore, you can define this trigger regardless of whether or not the Department context element has been explicitly added to the collection plan because values for context elements are automatically saved in the quality data repository when you enter the parent transaction.
The following lists show the collection transactions in various Oracle applications and their associated context elements/triggers.
Oracle Advanced Service Online (Complex Maintenance, Repair, and Overhaul)
Transactions include MRB Disposition, Maintenance Job Deferral, Maintenance Operation Completion, and Mainteance Route Completion. You can use the Inspection Type trigger for all transactions.
Oracle Depot Repair
The Depot Repair Task Transaction can use the following triggers:
|
|
|
|
|
|
|
|
|
|
|
|
|
|
|
|
|
|
|
|
|
- |
Oracle Enterprise Asset Management
Transactions include EAM Asset Check In Transaction, EAM Asset Check Out Transaction, EAM Work Order Completions, EAM Operation Completions, and EAM Asset Query. Triggers include the following:
|
|
|
|
|
|
Oracle Flow Manufacturing
Transactions include Work Order-less and Line Operation Completions. Triggers include the following:
|
|
|
|
|
|
|
|
|
|
|
|
|
|
|
|
|
|
|
|
|
|
|
|
|
|
Oracle iSupplier Portal
Transactions include Self-Service Outside Processing and Self-Service Shipments. Triggers include the following:
|
|
|
|
|
|
|
|
|
|
|
|
|
|
|
|
Oracle Mobile Supply Chain Applications
Transactions include Mobile Completion, Mobile Flow, Mobile Material, Mobile Move, Mobile Move and Complete, Mobile Receiving, Mobile Return, Mobile Return and Move, Mobile Scrap/Reject, Serialized Completion, Serialized Move, Serialized Move and Complete, Serialized Return, Serialized Return and Move, Serialized Scrap/Reject, and Serialized Work Orderless. Triggers include the following:
|
|
|
|
|
|
|
|
|
|
|
|
|
|
|
|
|
|
|
|
|
|
|
|
|
|
|
|
|
|
|
|
|
|
|
Oracle Process Manufacturing (OPM) Process Execution
The Process Nonconformance transaction can use the following triggers:
|
|
|
|
|
|
|
|
|
Oracle Purchasing
Transactions include Receiving and Inspection. Triggers include the following:
|
|
|
|
|
|
|
|
|
|
|
|
|
|
|
|
|
|
|
|
|
|
|
|
|
|
|
|
|
|
|
|
|
|
|
|
|
|
|
Shop Floor Management
You can collect quality data during Move Lot Based Job transactions. Triggers include the following:
|
|
|
|
|
|
|
|
|
|
|
|
|
|
|
|
|
|
Oracle TeleService
The Service Requests transaction can use the following triggers:
|
|
|
|
|
|
|
|
|
|
|
|
|
|
|
|
|
|
Oracle Warehouse Management System
You can collect quality data during Mobile License Plate Number transactions and the WMS LPN Based Quality Check. Triggers include the following:
|
|
|
|
|
|
|
|
|
|
|
|
|
|
|
|
|
Oracle Work In Process
Transactions include Move and Completion. Triggers include the following:
|
|
|
|
|
|
|
|
|
|
|
|
|
|
|
|
|
|
|
|
|
|
|
|
|
|
Associating Collection Plans with Transactions
Once you setup and define a collection plan to be used with a transaction, you then must associate it with the transaction and enable it. This makes the associated collection plan available on the transaction's list of values when Quality collection is invoked.
To associate collection plans with transactions
-
Navigate to the Collection Plan window.
-
Select a Collection Plan.
-
Choose the Transactions button. The Collection Transactions window appears.
-
In the Quality Collection Transactions region, select a collection transaction. See: Quality Collection Transactions.
-
In the Workbench Layout field, select whether you want to enter a single set of results or multiple rows of results at one time when using the Quality Workbench.
This field is only enabled for those transactions that you can enter using the Oracle Applications Framework interface.
-
Optionally, check the Mandatory check box to indicate that quality data collection is mandatory when the transaction is entered, and that all of the conditions specified in the collection triggers, if any, must be met. If you do not check the Mandatory check box, you can skip quality result entry for this transaction.
Note: Mandatory is the default for Purchasing Receiving Transactions. Non-mandatory is the default for all other transactions, except for Purchasing Inspection transactions, which cannot be set to non-mandatory, and Oracle iSupplier Portal transactions, which ignore mandatory settings.
-
Optionally, check the Background check box to indicate that quality data collection occurs in the background. The default is non-background.
Background data collection allows you to collect quality results without invoking the Enter Quality Results window. Background data collection is initiated when a you perform a transaction associated with a collection plan marked 'background' and all the conditions specified in the collection triggers, if any, are met. Quality results are automatically saved as you save the transaction.
Important: Inspection (Purchasing) collection transactions and Oracle iSupplier Portal transactions cannot be set to background (background settings for iSupplier Portal transactions are ignored).
-
Optionally, check the Enabled check box to indicate that data collection for this quality collection plan is enabled. The default is non-enabled.
This makes the collection plan available for quality data collection during transactional data entry.
To define triggers for collection plans used with transactions
-
Navigate to the Collection Triggers region.
-
The trigger name specifies which context collection element is used to define the trigger. See: Reference Information Collection Elements.
-
Select the Condition that must be met to trigger results entry. See: Query Operators.
The condition entered determines when quality data collection is triggered. For example, for the WIP Move transaction you might choose to trigger data collection when assemblies are moved from the To Move intraoperation step of Operation Sequence 20 to the Queue intraoperation step of Operation Sequence 30. Before quality data collection can be invoked, all collection triggers and conditions must be met for the current transaction selected.
Just as you can create AND and OR relationships for transactions, you can create AND and OR relationships between triggers. To create an OR relationship between triggers, enter a second record for the same transaction in the Transaction Description field, within the Quality Collection Transactions region. For example, the windows below imply that, for the Line Operation Completion Transaction, the Item Category trigger must equal 060.00 AND the Line Operation trigger must be greater than 10 OR the Line Operation trigger must equal 20.
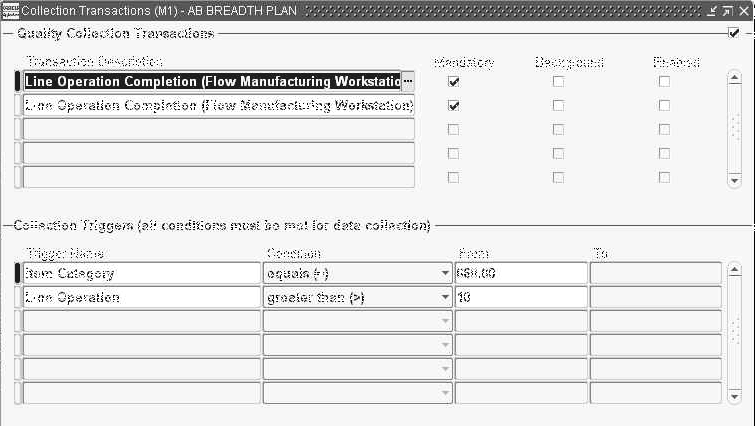
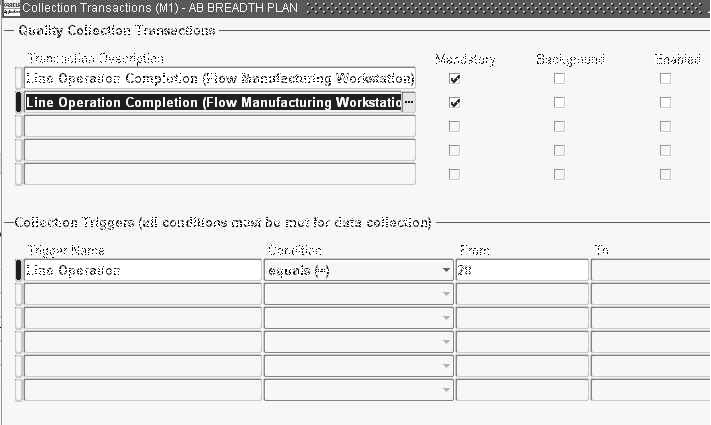
-
Based on the Condition, enter a value or range of values for the specified trigger.
If the condition requires a single value enter only a From value. If the condition selected requires a range, you must enter both a From and To value.
-
Save your work.
Related Topics
Transactional Data Collection Fundamentals
Entering Quality Results for Move Transactions
Updating and Deleting Collection Plans
Oracle Quality supports changing business practices. The people in your organization responsible for specifying and maintaining key quality information can change their quality information requirements easily and quickly.
For example, as you select or certify new suppliers, inspection requirements often change, perhaps requiring changes to the supplier collection plans. You can define new collection elements that represent new or modified products and processes then create collection plan elements from them. Similarly, you can delete collection plan elements as they become obsolete.
To update collection plans
-
Select the Collection Plan using Query Find. See: Searching for Data, Oracle E-Business Suite User's Guide.
-
Update the collection plan.
You can change the description, effective dates, and plan type of a collection plan. You can also change the type of specification that is associated with a collection plan. You can change and delete quality actions and values. Finally, you can change and delete quality collection transactions. There are no restrictions on any of these changes.
You can add collection elements to an existing collection plan. You can update parameters - mandatory, enabled, displayed - as well as the default values of your collection plan elements. You can add, change, and delete collection plan element actions and values. You can make all of these changes without restriction.
-
Save your work.
-
Choose the Views button. The Database Views window appears.
-
Choose the Create Views button.
As you add and delete collection plan elements or change some collection plan element fields, such as the prompt, the database views for the collection plan are automatically updated. If the view update fails, however, you can manually update your database views using Create Views. See: Collection Plan and Import Results Database Views.
-
Save your work.
-
Navigate to the Collection Plans window.
-
Select the Collection Plan.
You cannot delete collection plans for which you have collected results. You can, however, disable a collection plan by changing its effective dates.
-
Choose Delete Record from the Edit Menu.
-
Save your work.
To update collection plan attachments
See: Attaching Files to Collection Plans, Specifications, and Results Lines.
Related Topics
Viewing Collection Plans
You can view collection plan information in summary or detail. See: Combination Blocks, Oracle E-Business Suite User's Guide.
To view collection plans
-
Navigate to the View Collection Plan window. The Find Collection Plans window appears.
You can find specific collection plans. You can also can query to find all Enabled collection plans. You can combine search criteria as required.
-
Enter any combination of search criteria and Choose the Find button. The results display in the View Collection Plans Summary window.
You can view collection plans in either the View Collection Plans or the View Collection Plans Summary window.
Important: You can also view collection plans in summary format as you create collection plans. See: Creating Collection Plans.
To view the names of collection plan and import results database views
From the View Collection Plan window, choose the Views button.
To view associated collection transactions and triggers
From the View Collection Plan window, select a collection plan element and choose the Transactions button.
To view collection plan element values
From the View Collection Plan window, select a collection plan element and choose the Values button.
To view collection plan specification assignments
From the View Collection Plan window, choose the Specifications button.
To view collection plan element actions
From the View Collection Plan window, select a collection plan element and choose the Actions button.
Parent-Child Collection Plans
You can create logical relationships between collection plans and the collected quality data within them. Parent-Child collection plans enable you to collect quality data in an organized, multi-level fashion. The parent collection plan is created with a key definition of the collection plan, including elements such as the process name, item number, and status. While entering results information, this information defaults to all child collection plans created.
One parent collection plan can have multiple child plans, and one child plan can have multiple parent plans. Multi-level plans are also supported; a child plan can be a parent plan to additional child plans.
Caution: Take care not to create a closed loop for a parent and child collection plan. For example, if you create a collection plan named PARENT and link a collection plan named CHILD to it, do not make the PARENT collection plan a child of the CHILD collection plan.
When creating a parent-child relationship, you can specify that the data entry mode is for history. You can set up copy relationships between elements in a parent collection plan and child (history) plans, enabling you to track changes made to the parent record. When you enter or update a parent record, child records are created automatically to capture the updates. These child records contain information such as, plan information, the date updated, and the record creator's user identification number.
Note: When there is a parent-child relationship declared between two collection plans with Data Entry Mode set as "History", the history data copied in the child collection plan is for audit purposes and is not available for standalone entry and update.
Parent-Child collection plan tasks include the following:
Once you define a Parent-Child collection plan, you can make a copy of the multi-level plan in your existing organization or for another organization. Refer to Collection Plan Templates for more information.
Defining Parent-Child Collection Plans
Collection plans determine the data that you want to collect, and what actions you want to take based on the quality results that you collect. You can use collection plans to model your test or inspection plans, and you can create an unlimited number of plans to support your enterprise-wide quality data collection and analysis needs. Before you define parent-child relationship collection plans, valid collection plans need to already exist. See: Overview of Collection Plans.
The definition of Parent-Child collection plans involves a five step process. First, a Plan Relationship is defined, indicating whether the child data entry will be immediate, automatic, historical, or delayed. Second, the collection plan's Element Relationships are defined. Next, the collection plan's required collection criteria is defined. The final steps include confirming and completing the plan setup.
Note: Aggregation functions are supported only for Number type of Collection Elements for Parent-Child plans.
The first step is to define a plan relationship, indicating whether the child data entry will be immediate, automatic, historical, or delayed.
Creating a parent-child relationship does not automatically establish a relationship between collection plans for existing data.
To define a plan relationship
-
Navigate to the Plan Relationships page.
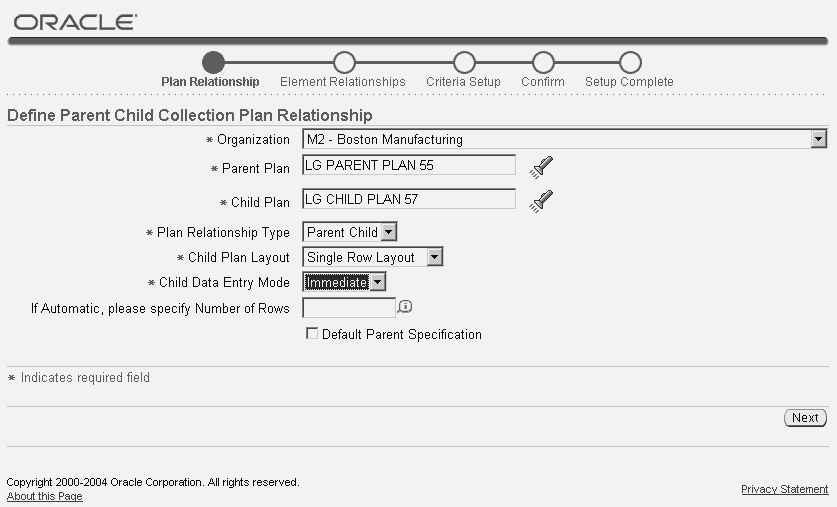
-
Select an Organization from the list of values.
-
Select a Parent Plan from the list of values. Valid collection plans must exist before you can create a parent-child relationship between them. See: Overview of Collection Plans.
-
Select a Child Plan from the list of values. Valid collection plans must exist before you can create a parent-child relationship between them. See: Overview of Collection Plans.
-
Select a Plan Relationship Type from the list of values. Currently, Parent Child is the only valid value.
-
Select a Child Plan Layout from the list of values. This value determines how child plan quality results fields are displayed in the Quality Workbench - Enter Results page (see: Entering Quality Results).
-
Single Row Layout - Enter and save one child row of results at a time.
-
Multiple Row Layout - Enter multiple rows of results and then save.
-
-
Select a Child Data Entry Mode from the list of values. This value specifies how the child record is created.
-
Automatic - Child records are created automatically when the parent record matches the setup criteria; results do not need to be entered.
-
Delayed - Child records are entered manually, later.
-
History - Child records are created automatically when changes are made to the parent record.
-
Immediate - Child records are entered immediately after the parent record.
-
-
If the Child Data Entry Mode field is populated with Automatic, specify the number of Rows. For all other Child Data Entry Modes, this field must be blank. Automatic Data Entry Mode ensures the creation of child records when the parent record matches the setup criteria. The number of child records entered is equal to the number specified in this field.
-
Optionally, select the Default Parent Specification field to enable specification requirements to default from the parent record to the created child records. See:Overview of Specifications.
Defining Element Relationships
Collection elements are the basic building blocks of collection plans, the data structures that you use to collect quality results. They define the characteristics of the product or process that you want to monitor, record, and analyze. See: Overview of Collection Elements.
The next step is to define how the parent collection elements will relate to the child collection elements. For example, you can define that the sum of all Brakepad Thickness Child Elements be stored within the parent record.
-
Choose Next.
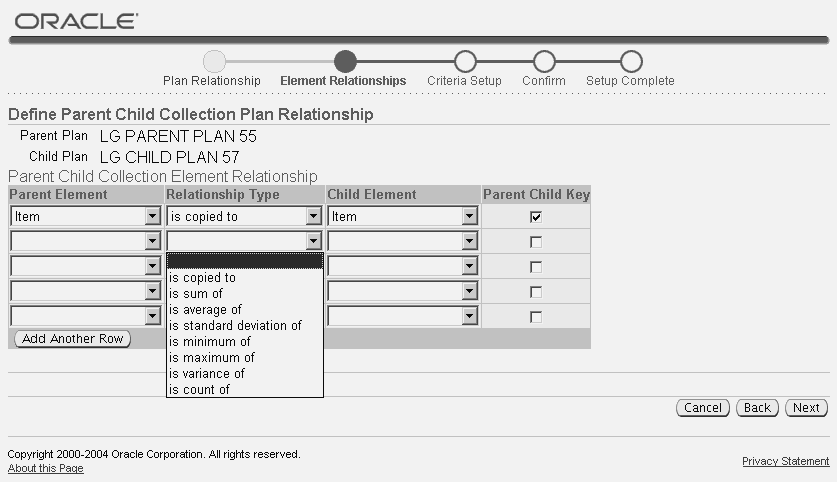
-
Select a valid Parent Element from the list of values (See: Collection Element Values). For example, Summary Thickness.
-
Select a Relationship Type from the list of values. If you select 'is copied from', the relationship type is Parent to Child; the parent element is copied to the child element. There is a 2000 character limitation while copying elements from parent plan to child plan. All other relationship types are Child to Parent. If the Parent Element field is populated with Sequence, and the Relationship Type is populated with 'is copied to', the parent sequence element is copied to the child element without generating a new sequence number for the child element. If you select 'is sum of', the results entered into the child collection plan are summed up and stored within the parent element. If you select 'is average of', 'is standard deviation of', 'is minimum of', 'is maximum of', 'is variance of', or 'is count of', the calculation of the mean, standard deviation, minimum, maximum, variance, or count, respectively, from the child results, is stored within the parent record. Set up aggregation fields as read-only and non-mandatory while defining a parent collection plan.
Note: If the child collection plan has a Child Data Entry Mode of History and the Parent Element field is populated with Sequence, then the Relationship Type 'is copied to' is the only relationship type supported. History plans are used as audit trails, so sequence number generation in child collection plans is not allowed.
-
Select a valid Child Element from the list of values (See: Collection Element Values). For example, Brakepad Thickness.
-
Optionally, select the Parent Child Key check box to indicate that the Parent Element value and the Child Element value are logically linked together.
For example, in a serial number tracking scenario, parent records containing serial numbers are created during Work In Process move transactions, and child records are created to store attributes of a routing. It is logical to store the serial number in both the parent and child collection plans to establish this link. In addition to a logical link, elements that are links are available as search criteria, within the Results Inquiry page.
Note: Specification limits in parent plan do not apply to aggregate values. Specifications attached to the collection elements in the Parent Plan, which get the values aggregated from the Child plans, will not be honoured. While you can save the record, you may get a message that the value is out of specification limit.
Finally, you need to set up collection criteria, and then confirm and complete the parent-child relationship.
After establishing parent-child relationships, you may optionally define specific criteria that determine when the relationships are established. When creating a collection plan, you have the option of adding collection triggers to the plan. Triggers are defined restrictions for a collection plan. Data collection is only initiated if all collection trigger conditions are satisfied. Similarly, the Criteria setup establishes when the parent-child relationship is supported.
-
Choose Next.
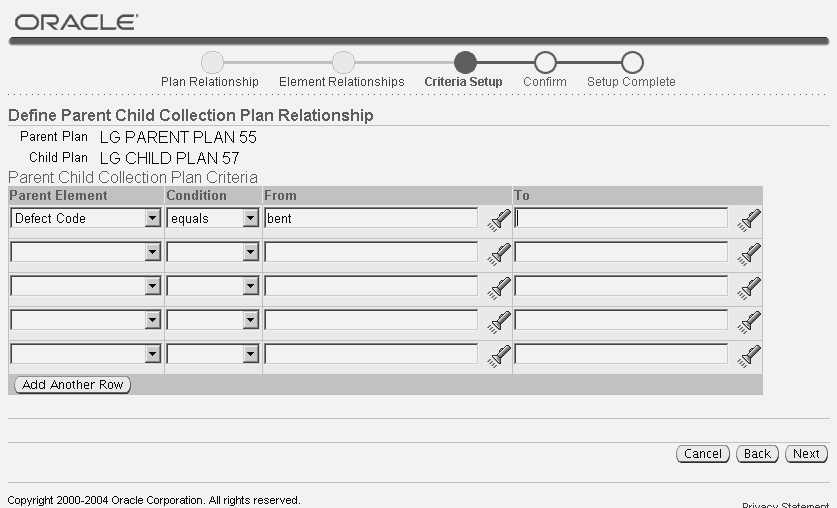
-
Select a valid Parent Element from the list of values. This is the trigger, or restriction, defined for the current Parent-Child relationship.
-
If you selected a Parent Element, select a Condition from the list of values.
-
Select a From value from the list of values. The valid values are dependent upon what is selected in the Parent Element field. Optionally, you can select a To value to create a range condition. For example, if the Parent Element is Work Order, you can enter a range of work order numbers.
-
Choose Next to confirm the current parent-child relationship.
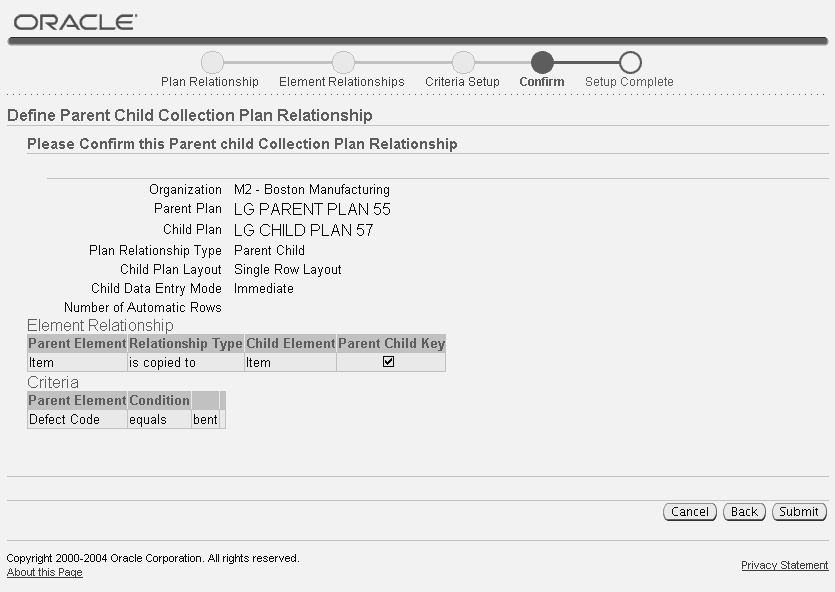
-
Choose Submit to complete the parent-child relationship setup.
Overview of Collection Elements
Updating Parent-Child Collection Plans
Updating Parent-Child Collection Plans
You can update or inquire upon the definition of existing parent-child relationship collection plans. You can also delete existing parent-child relationships.
To update or inquire upon parent-child collection plans
-
Navigate to the Update/Inquire Parent Child Collection Relationship page.
-
Select a valid Organization from the list of values.
-
Select a Parent Plan from the list of values.
-
Choose Go. Child collection plans that are associated with the current parent collection plan display in the Child Plans region.
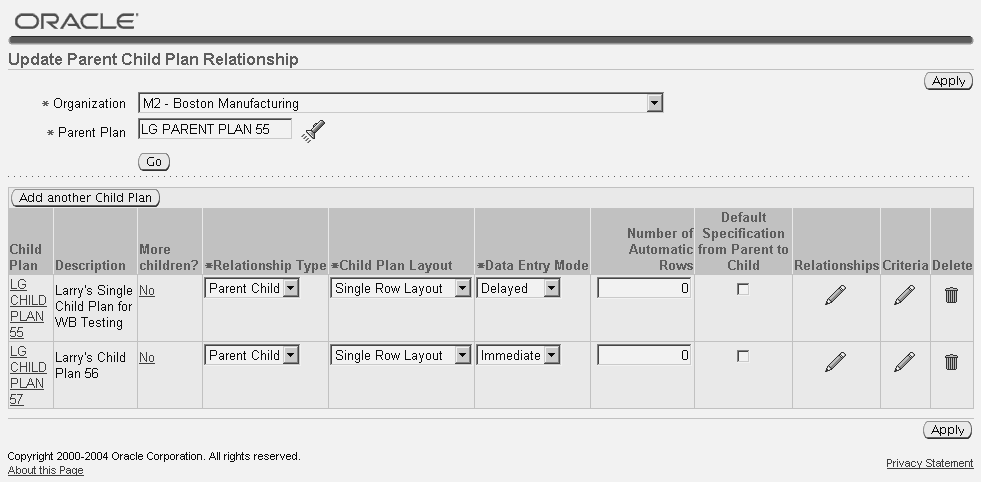
-
After updating the Relationship Type, Child Plan Layout, Data Entry Mode, Number of Automatic Rows, or Default Specification from Parent to Child, choose Apply to save the changes. For information on these fields, see: Defining Plan Relationships.
-
Choose the Relationships (pencil) icon to update the element relationships of the current Parent-Child Collection Plan relationship.
-
After updating the Parent Element, Relationship Type, Child Element, or Parent Child Key, choose Apply to save the changes. For information on these fields, see: Defining Element Relationships.
-
From the Update Parent Child Relationship page, choose the Criteria (pencil) icon to update the defined criteria of the current Parent-Child Collection Plan relationship.
-
After updating the Parent Element, Condition, or From and To range fields, choose Apply to save the changes. For information on these fields, see: Defining Criteria Setup.
To delete parent child relationships
-
From the Update Parent Child Relationship page, choose the Delete icon to delete the current Parent-Child Collection Plan relationship.
Deleting a parent-child relationship does NOT delete related collection plan data from parent or child collection plans.

-
Choose Apply to confirm the deletion of the parent-child collection plan relationship.
Defining Parent-Child Collection Plans
Entering Quality Results in Parent-Child Collection Plans
You can enter, update, and view parent-child quality results within the forms application or from the Quality Workbench user interface. You can enter quality results directly. You can access the Enter Quality Results window from the menu, or you can invoke it as you enter quality results during transactions.
To enter quality results
-
Navigate to the Enter Quality Results window in the forms application or choose Collection Results from the Quality Workbench. Select an Organization and then search for the Collection Plan.
-
Select a valid Collection Parent Plan from the list of values. Collection plans with current effective dates are available. If a default collection plan has been specified, it is automatically selected. You can choose Find Plan or the standard list of values to find and select a collection plan.
-
Select a Child Collection plan, related to the parent, from the list of values. In the Results region, enter one or more Parent results records. The prompts that you entered while defining collection elements display as column headings. You must enter results for mandatory collection plan elements.
If the element columns, within the Results region, are key elements that are copied from the parent record (you selected the Parent Child Key check box to indicate that the Parent Element value and the Child Element value are logically linked together, during the definition of the element relationships), the columns are disabled. See: Defining Element Relationships.
Note: If the current collection plan is a parent collection plan, and the Child Data Entry Mode is Immediate for the current parent-child collection plan relationship, (See: Defining Plan Relationships), you will receive a warning upon saving the record; the warning indicates that you should enter values for child plan(s) before saving.
-
Save your work. The parent record will be updated from the entered children records once the information is saved. For information on all remaining fields and buttons within this window, see: Entering Quality Results Directly.
To view quality results
-
Navigate to the View Quality Results window.
-
Select a valid Collection Plan from the list of values. Collection plans with current effective dates are available. If a default collection plan has been specified, it is automatically selected. You can choose Find Plan or the standard list of values to find and select a collection plan.
-
In the Results region, view the results records entered for the current collection plan.
-
To view child records for a parent record, select a parent record in the Results region, then select a child record from the Child Plan list of values. Choose View.
Entering Parent - Child Quality Results
Entering Quality Results Directly
Defining Collection Plan Elements
Inquiring on Parent Child Collection Plans
You can view Parent Collection Plans' related child collection plans, relationships, and criteria information via self service.
To inquire on parent-child collection plan information
-
Navigate to the Update/Inquire Parent Child Collection Plan Relationship page.
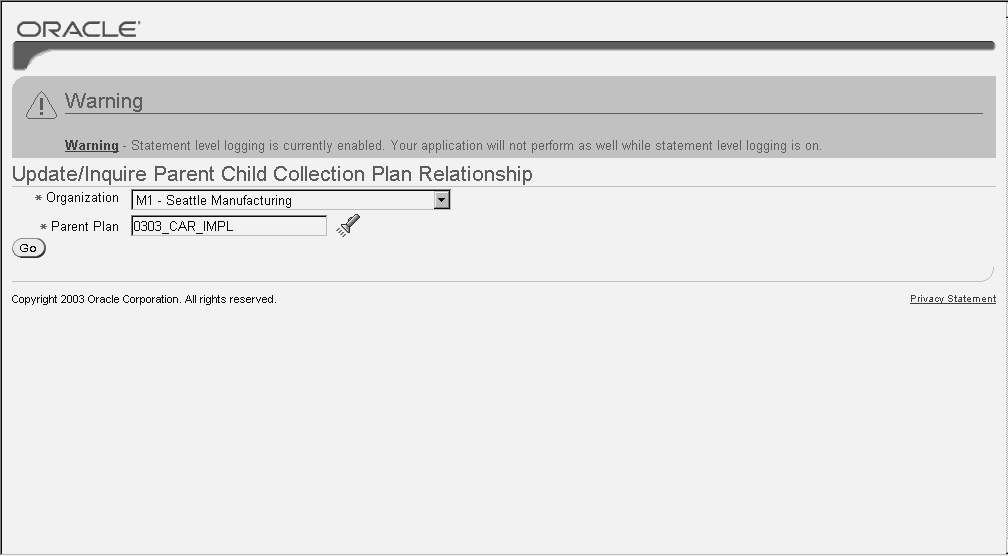
-
Select an Organization from the list of values.
-
Select a Parent Plan from the list of values.
-
Choose Go.
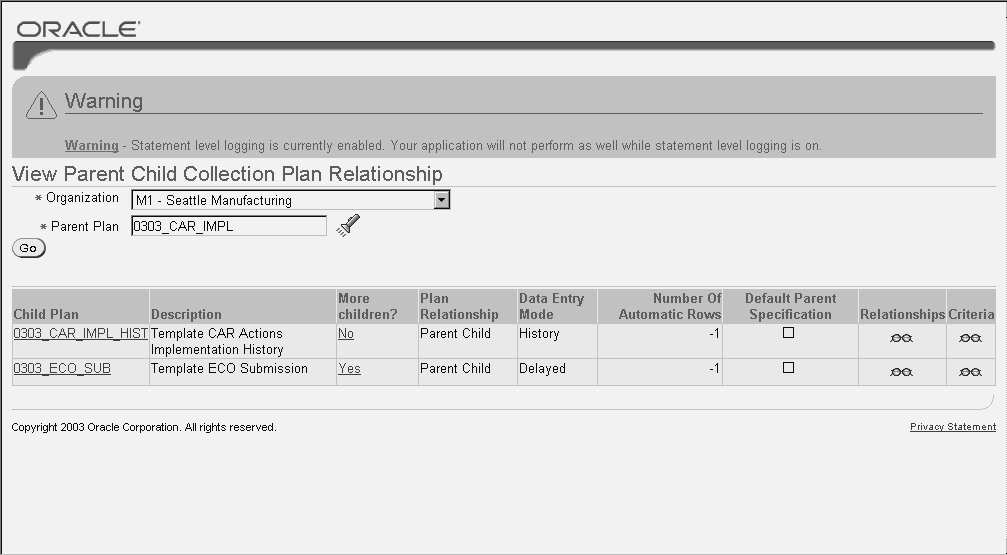
-
Optionally, select the Child Plan to view the current Child plan details.
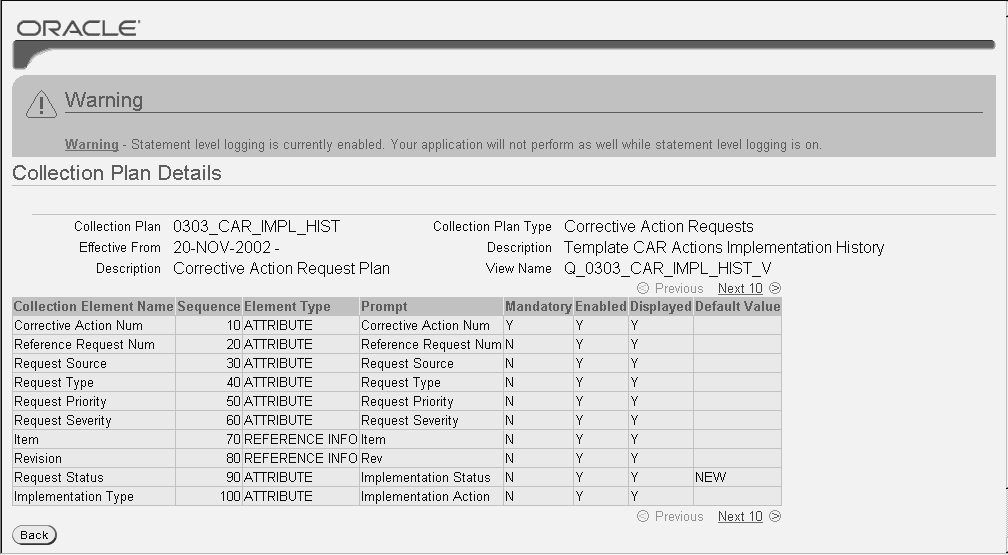
Choose Back to return to the View Parent/Child Collection Plan Relationship page.
-
Optionally, choose the Relationships (glasses) icon to view relationship information for the current Parent and Child collection plan relationship.
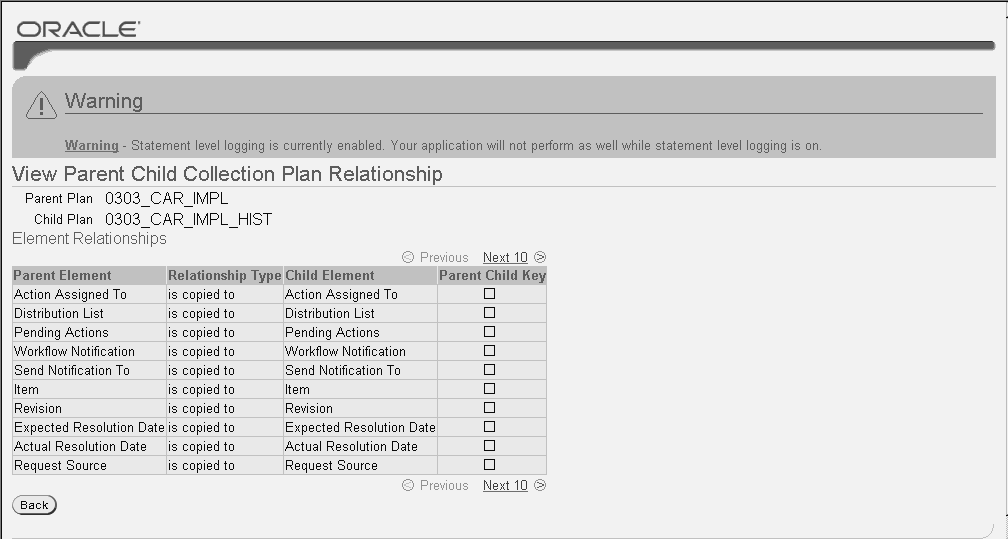
Choose Back to return to the View Parent/Child Collection Plan Relationship page.
-
Optionally, choose the Criteria (glasses) icon to view relationship information for the current Parent and Child collection plan relationship. Choose Back to return to the View Parent/Child Collection Plan Relationship page.
Inquiring on Results
You can inquire upon existing quality results for Parent-Child Collection Plans.
To inquire on results
-
Navigate to the Parent Child Results Inquiry page.
-
Select an Organization from the Please select Organization list of values.
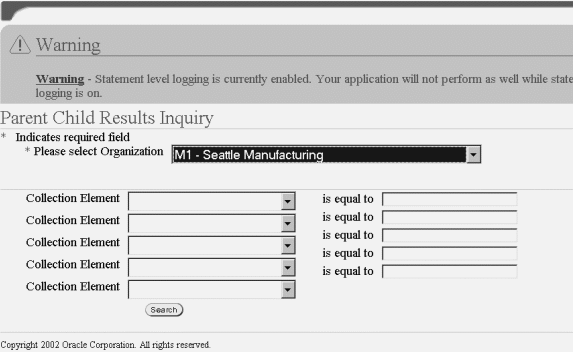
-
Select Collection Element search criteria to narrow down your search results.
Note: You must select at least one valid Collection Element, and enter valid data within their respective 'is equal to' fields.
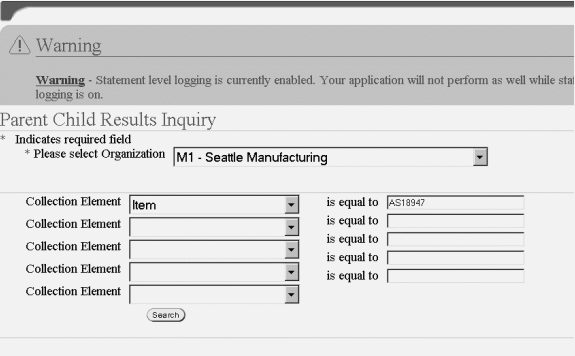
-
Choose Search to display Parent Child quality results. A list of collection plans, meeting the above criteria, is displayed.
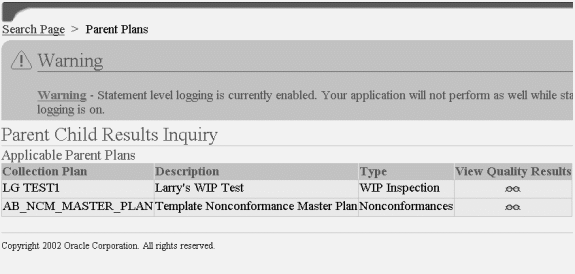
-
Optionally, choose the View Quality Results (glasses) icon to view quality results for the current Parent collection plan.
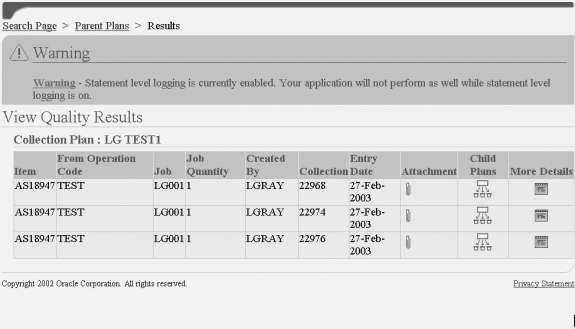
-
Optionally, choose the Attachments (paperclip) icon to view attachments associated with the current, Parent collection plan.
-
Optionally, choose the Child Plans icon to view the child collection plans that are associated with the current Parent collection plan.
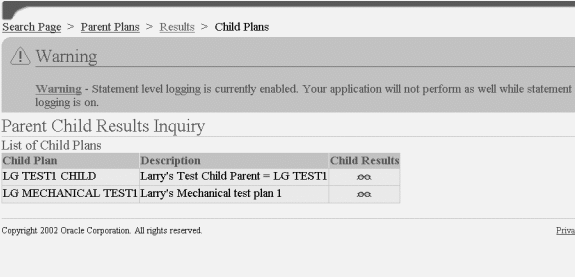
-
Optionally, choose the Child Results (glasses) icon to view quality results for the current Child collection plan.
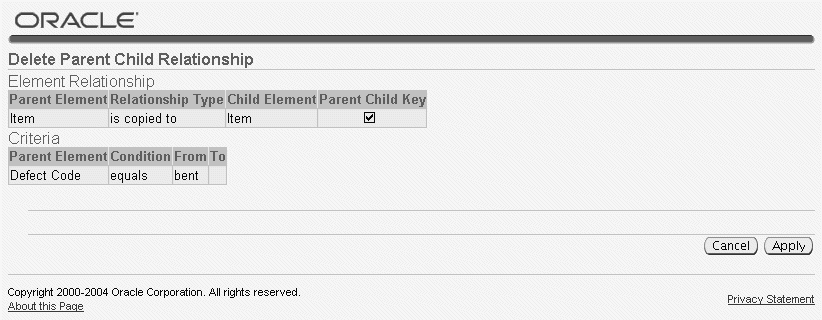
-
Optionally, choose the Attachments (paperclip) icon to view attachments associated with the current Child collection plan.
-
Optionally, choose the Child Plans icon to view the child collection plans that are associated with the current Child collection plan (a collection plan can be both a parent to and a child of multiple collection plans).
-
Optionally, choose the More Details icon to view the data collection details for the current Child collection plan.
-
Select the Results link to return to the View Quality Results page for Parent collection Plans.
-
Optionally, choose the More Details icon to view the data collection details for the current Parent collection plan.
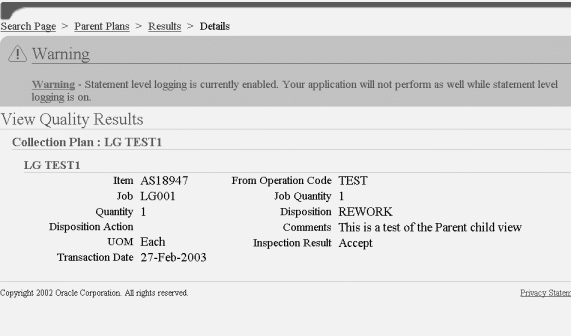
Collection Plan Security
In addition to function-level and organization-level securities, you can limit user access to specific collection plans. Security controls are implemented at a group level by assigning specific privileges to groups and collection plan combinations. You can grant one or more privileges to user groups, such as view, enter, update, and delete authority on quality results, for a collection plan. You can also grant collection plan update authority.
Collection plan security tasks include the following:
Setting Up Collection Plan Security
The setup of collection plan security involves defining user groups and then granting those user groups collection plan specific privileges.
Defining User Groups
You can add one or many users to a user group. This step involves assigning a name to a group of users. Once the group of users is assigned to a user group name, that user group name can be associated with specific collection plans and privileges.
To define a user group
-
Navigate to the Define User Groups window.
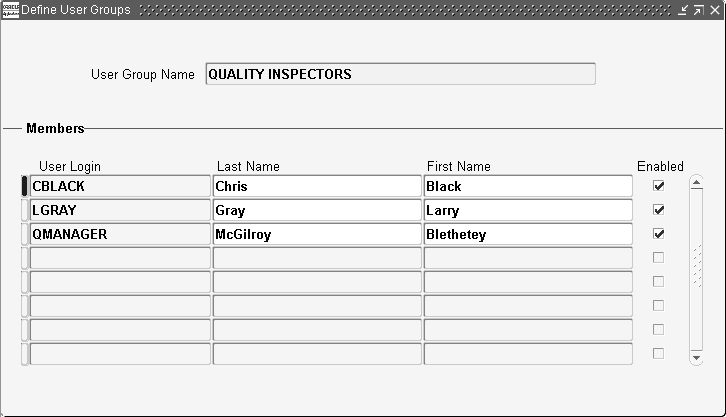
-
Enter a User Group Name.
-
In the Members region, enter the User Login of the first member of the group. The User Login needs to be a valid value within the list of values.
Additional Information: If a person has more than one user login, then all of the user logins are automatically added to the user group, giving them access to granted privileges. This occurs when, in the Users window, different user names have the same customer (see: Users Window, Oracle E-Business Suite Security Guide)
-
Enter the user's Last Name.
-
Enter the user's First Name.
-
Optionally, select the Enabled check box to indicate that the user is a current member of the group.
-
Save your work.
Granting Privileges
Once user groups have been created, you can grant collection plan specific privileges to those user groups. You can enable user groups to update collection plans, or view, update, enter, and delete quality results for specific collection plans.
To grant collection plan privileges
-
Navigate to the Grant Privileges window.
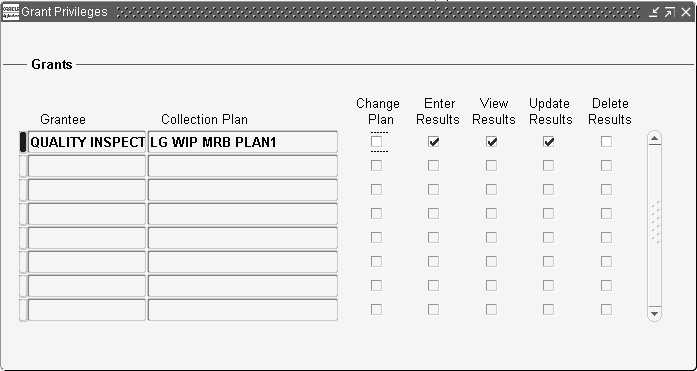
-
Select a valid user group from the Grantee list of values.
-
Select a valid Collection Plan from the list of values.
-
Grant privileges for the current user group and collection plan combination.
Change Plan: Users in the current user group can update the current collection plan.
Enter Results: Users in the current user group can enter quality results for the current collection plan.
View Results: Users in the current user group can view quality results for the current collection plan.
Update Results: Users in the current user group can update quality results for the current collection plan.
Delete Results: Users in the current user group can delete quality results for the current collection plan.
-
Save your work.