Maintenance Super User
This chapter covers the following topics:
- Introduction
- Home
- Assets
- Obtaining Asset Number Information
- Viewing Asset Number Information
- Entering Mass Meter Readings
- Using the Asset Move Workbench
- Work Requests
- Work Orders
- Work Plans
- Construction Units
- Stores
- Budget Forecasts
- Safety Management
- Failure Analysis
Introduction
This chapter discusses eAM's Maintenance Super User role, and its web based user-interface.
Maintenance Super User is an internet based user-interface for maintenance personnel. It introduces you to an easier approach of entering and searching for information from any browser. Its step-by-step process requires minimal training and is intuitive enough for you to find and update information.
Maintenance Super User is designed for the casual maintenance user (for example, trades people, such as fitters, mechanics, and electricians), in a plant or facility. Responsibilities can be assigned by employee or by role. This determines the information you can view and update.
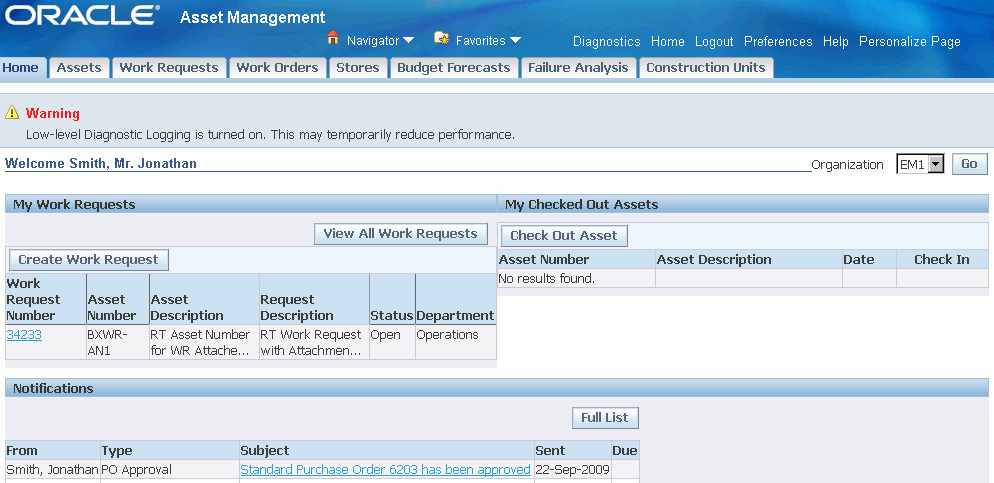
Home
The Maintenance Super User's Home tab enables you to change organizations, as well as view and transact purchase order and work request notifications.
You can indicate whether Work Requests are automatically approved upon creation. Within the eAM Parameters, if the Auto Approve check box is selected, work requests are created in an Awaiting Work Order (approved) status (See: Defining eAM Parameters). Otherwise, if the check box is not selected, work requests are created in an Open status. If an organization has selected Work Request Approval through Oracle Workflow Management, the system will notify all users that belong to that approval group to take action on the work request created (See: Defining Department Approvers). After an individual has taken action, the notification is removed from other approvers' notification lists belonging to that same approval group.
From the Home Page tab of Maintenance User, an approver can select a work request and view its details. You can see any notification routed for your responsibility (See: Defining Department Approvers).
To select an organization to view notifications
-
Navigate to the Home tab (Maintenance Super User: Home tab).
Home
-
Within Subject column, select the Work Request or Purchase Order notification to open and view.
-
You can Approve, Reject, Reassign a notification, or you can Request Information from the originator by choosing the appropriate buttons, respectively.
Choose Reassign to reassign the work request approval to another approval group.
-
Optionally close the approval request by choosing Return to Worklist.
Note: First choose an eAM organization before you can select additional tabs. See: Organization Setup.
Assets
The Assets tab enables you to identify asset numbers using capital and Rebuildable Inventory navigators. By obtaining detailed asset number information, you can either view details or launch pages to view current or historical configurations of the Asset Number. As Serialized Rebuildables are installed and removed from a particular asset, the genealogy automatically updates.
You can also access the Mass Geocode Entry tab which enables you to enter geocode information for the assets. This information is used to display assets and work on the chosen map viewer.
This section's tasks include:
Obtaining Asset Number Information
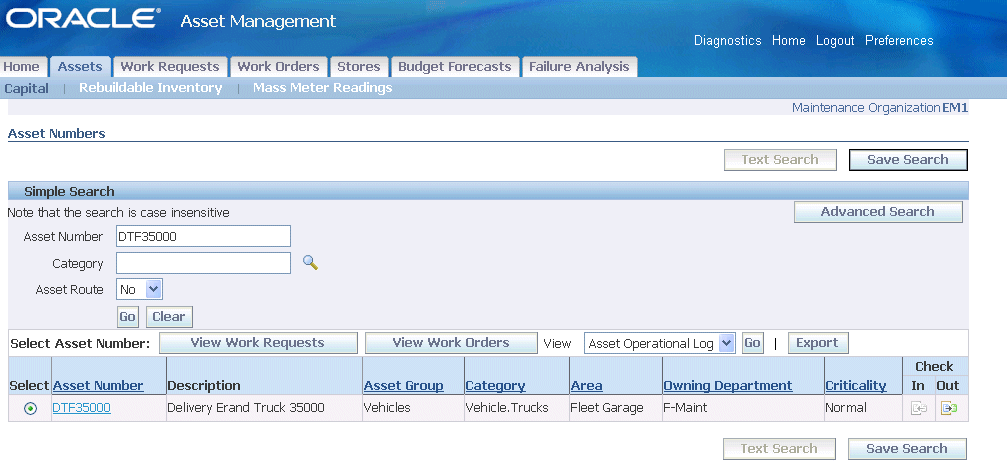
You can query Asset Numbers that you would like to view associated details, hierarchal information, cost information, associated work and service requests, enter and view meter readings, and Quality information. You can use a Simple or Advanced Search to obtain your desired Asset Numbers.
For assets that transferred from one organization to another, each organization can view only the Work Order costs on those assets that were incurred by itself.
To obtain Asset Number Information
-
Navigate to the Assets tab.
-
Select either the Capital or the Rebuildable Inventory sub-tab to view information on Capital Asset Numbers or Serialized Rebuildable Asset Numbers, respectively.
-
If you have previously saved some search criteria, the Views mode appears. You might use this mode if you frequently search for Asset Number information with specific criteria, such as Owning Department or Asset Group, among many. You can personalize a View to narrow your search criteria.
-
The View list of values contains already existing Views. You can optionally select an existing View.
-
Optionally choose Go to display the Asset Number information that applies to the current View's search criteria rules.
-
Optionally choose Personalize to update, delete, or duplicate an existing View. You can also create a new View.
-
Optionally select a View Name and then choose Duplicate to default all of the selected View's values to a new View.
-
Optionally choose Create View to create a new view.
-
Enter a View Name.
-
Optionally select the Number of Rows Displayed.
-
Optionally select the Set as Default check box to indicate that this view is the default view.
-
Optionally enter the View's Description.
-
Specify whether the search results for the current View must contain all of, or may contain any one of, the following values entered, by selecting the appropriate radio button, respectively.
-
Optionally enter an Asset Number.
-
Optionally select an Asset Group.
-
Optionally select whether the Asset Numbers have an associated Asset Route.
-
Optionally select an Owning Department.
-
Optionally select additional search criteria from the Add Another list of values.
-
Choose Cancel, Revert, Apply and View Results, or Apply.
-
-
-
The Display List value determines whether the current View exists within the View list of values.
-
Optionally select the Update icon to update the values for the current View.
-
Optionally select the Delete icon to delete the current View.
-
Optionally choose Cancel to exit the Personalize Views page, without selecting a View
-
Optionally select one or many Views to add to the Views drop down list, and then choose Apply to exit the Personalize Views page.
-
-
By default, you are in the Simple Search mode.
Assets (Simple Search Mode)
-
Optionally enter an Asset Number.
You can enter a portion of an Asset Number and append a % (wildcard) to display multiple Asset Numbers with similar names.
-
If the Capital sub-tab is selected, you can optionally select a Category to narrow your selection criteria.
-
If the Rebuildable Inventory sub-tab is selected, you can optionally select an Asset Group.
-
If the Capital sub-tab is selected, you can optionally select whether to display Asset Numbers with associated Asset Routes (tasks). Valid values are Yes and No. See: Defining Asset Routes.
-
Optionally choose Advanced Search to further narrow your selection criteria, to values such as Asset Group, Asset Route, Owning Department, Category, Area, Accounting Class, Fixed Asset Number, Criticality, Maintainable, Description, Attributes, Production Organization, Equipment Item, Equipment Serial Number, Property Location Code, and/or Property Location Name. For information on these values, See: Defining Asset Numbers.
-
Choose Go.
Viewing Asset Number Information
You can display specific details about an Asset Number, such as an asset's configuration history, costs, hierarchy information, associated meter readings, quality information, associated work orders, and associated Work Requests. You can also view the Asset Number's associated Asset Group, parent, parent group, Category, Owning Department, Area, Accounting Class, Criticality, maintainability, the associated equipment serial number, attachments, associated Activities, and asset attributes.
The asset number, description, criticality and work order priority are copied (in a concatenated format) from the work order to the Justification field on the purchase requisition.
To display asset number details
-
Navigate to the Asset Numbers page, and query an Asset Number. See: Obtaining Asset Number Information.
Asset Details
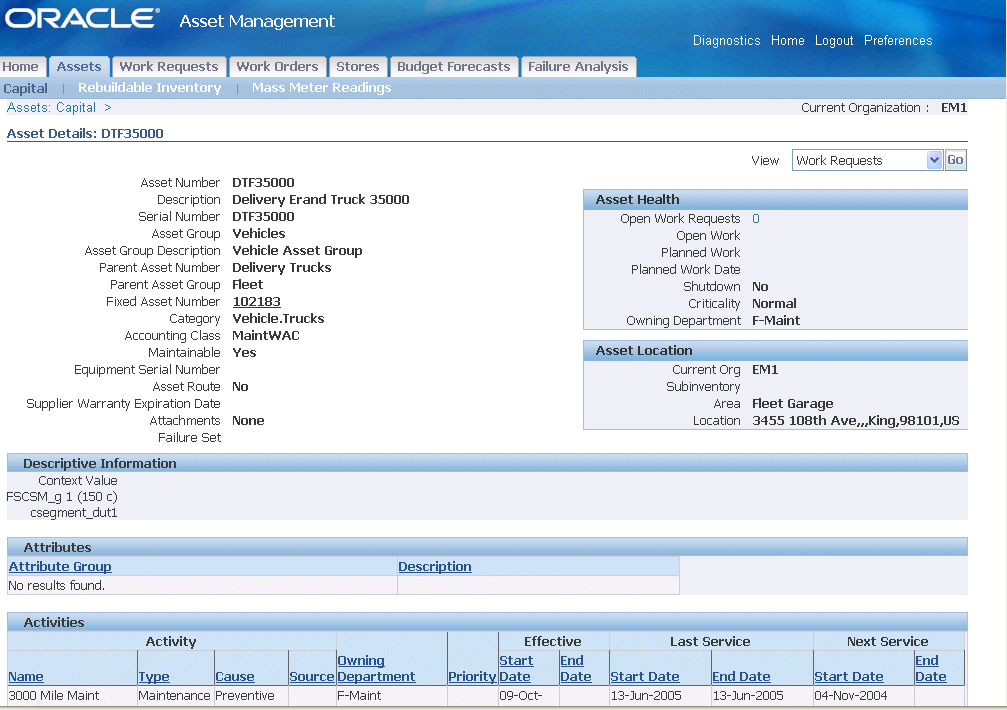
-
Select an asset number to view.
-
You can select the specific asset number or you can select Details from the View list of values, to view associated asset number information, attributes, and activities.
-
Optionally choose View Equipment Details if the current Asset Number has associated equipment details. This link is next to the Equipment Serial Number field, and is available if there are associated equipment details. You can view all equipment details in the production organization.
-
Optionally choose the View Resource Usage glasses icon to view all Work Orders created against the Asset Number for the current equipment resource. This enables you to view resource demand (Work Orders) associated with the Asset Number. This information is eAM's integration with Process Manufacturing.
-
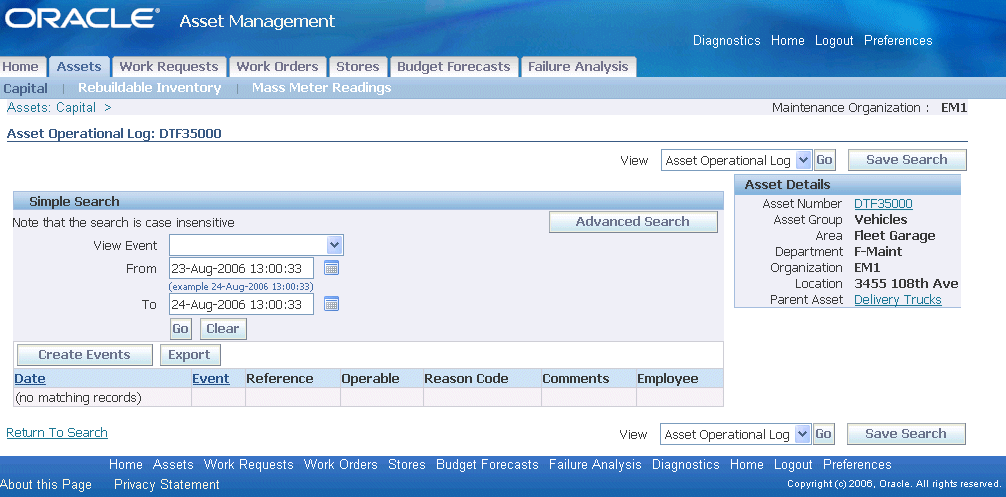
To track asset operational statuses
Maintenance organizations must track current and past operating statuses of their equipment, such as asset maintenance downtime and Check In and Check Out statuses. Maintenance organizations must track operational downtime and other critical information about an asset for a better understanding of its operations statuses and history. You can view current statuses, show operation and shutdown history, check in and check out assets, and view an Asset Operational log for analysis.
-
Navigate to the Asset Numbers page, and query an Asset Number. See: Obtaining Asset Number Information.
-
Select Asset Operational Log from the View list of values to view all current and past asset operational information, such as Check Out, Check In, associated Work Requests and Work Orders. You can remove or add a child asset, remove a parent asset, activate or deactivate the asset, transfer the asset to another location, and receive or issue the asset into/from Inventory. By default, logging is turned off for an asset (See: Defining Asset Numbers and Defining eAM Parameters).
-
Select Asset Operational Log from the View drop down list.
-
Click the Go button.
-
Optionally query information by a date and time period or Event. Choose Go.
-
Optionally choose Create Events to create events that occur for the asset. This information is important and needed to help you analyze the asset's lifecycle. Choose Apply when finished. These events are extensible; you can add to them.
-
Select the Return to Search hypertext link to return to the Asset Numbers page.
-
-
Optionally select the Check Out icon to check out an asset from the Asset Search page. You can view asset details, enter collection plan data, enter meter information, and optionally create a Work Request from this page.
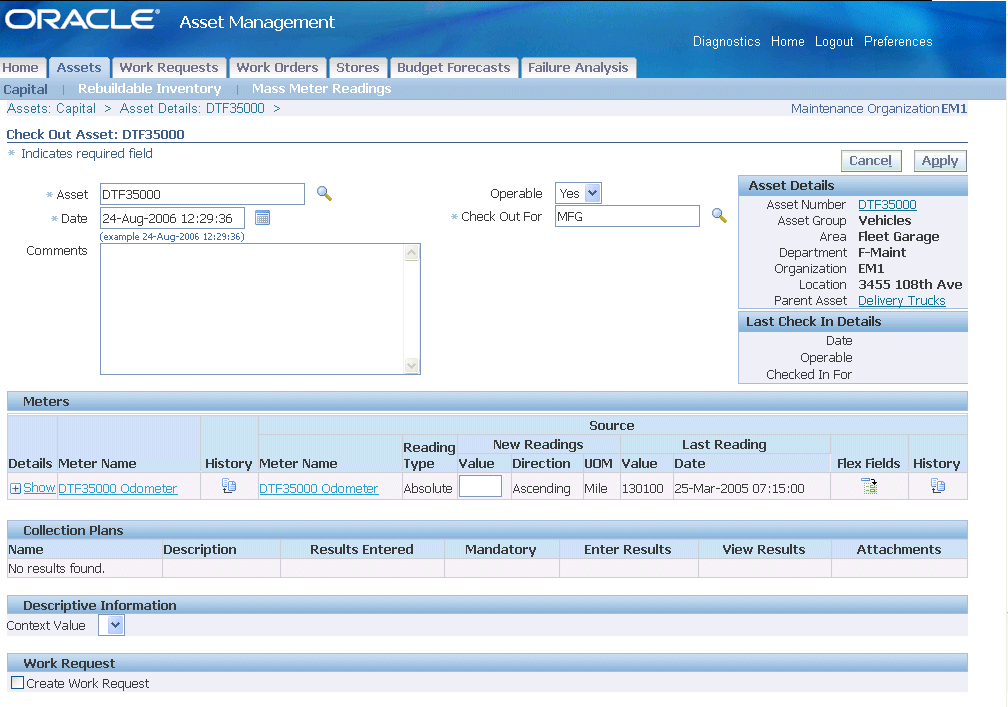
-
Choose Apply.
-
Optionally choose the Check In icon to check this asset in. You can view asset details, enter collection plan data, enter meter information, and optionally create a Work Request from this page.
-
Choose Apply.
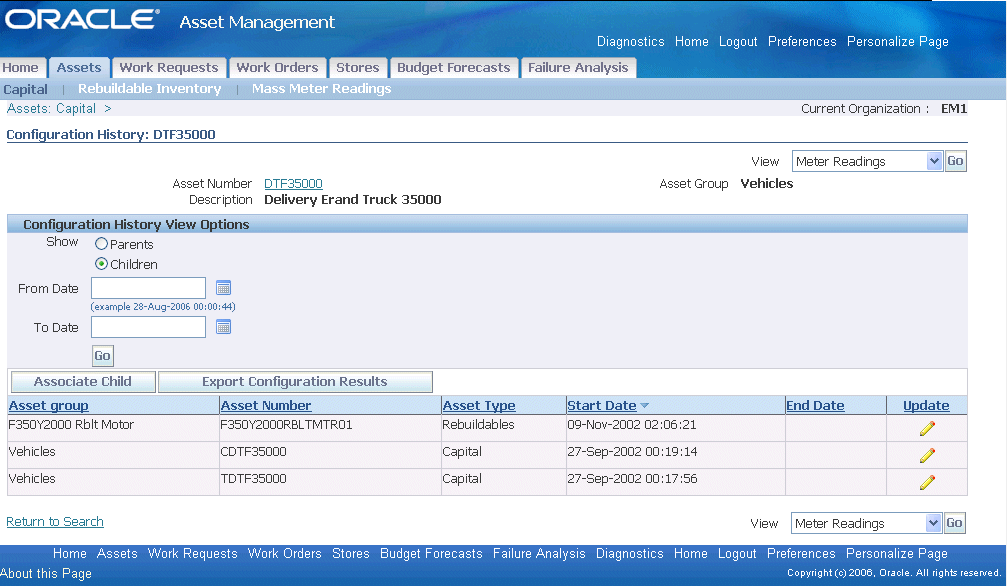
To display configuration history
You can view specified parent and child information in a tabular format, as well as dynamically add parents and children to a hierarchy.
-
Navigate to the Asset Numbers page, and query an Asset Number. See: Obtaining Asset Number Information.
-
Select Configuration History from the View list of values.
-
Choose Go.
Configuration History
-
Select whether to show the current Asset Number's Parents or Children information. The page defaults showing Children information. If you select Parents, choose Go to display the associated information.
-
Optionally narrow your selection criteria by selecting a date range.
-
Optionally choose Associate Child or Associate Parent (depending on whether you are showing Parent or Children information) to dynamically add a Child or Parent to the current Asset Number's hierarchy.
-
Select an Asset Number.
-
Enter a Start Date that this new configuration is effective. The system date defaults.
-
Optionally enter an End Date.
-
Choose Apply to save your work.
-
Choose Cancel to return to the Configuration History window.
-
-
Optionally select the Update icon to update configuration history information for the current Asset Number.
-
Optionally save and export your configuration results to a spreadsheet by selecting Export Configuration Results.
To view asset cost information
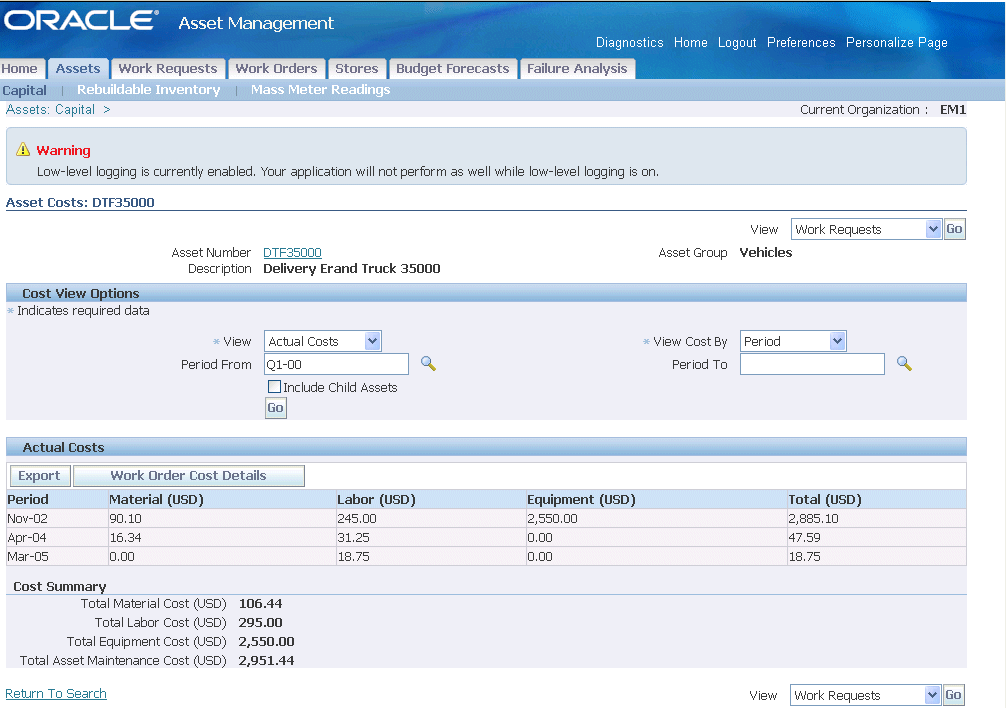
eAM integrates with Oracle Cost Management, honoring all costing rules set at the organization level, for example, the costing method used. You can view the costs of Material, Labor, and Equipment for maintenance Work Orders, associated with the current Asset Number. You can view different types of transactional cost information, including actual, estimated, variance, and summary. eAM maintains the hierarchy integrity. For example, when viewing the parent Asset Number, you can view just the parent's costs, or the costs of the parent, including all child costs rolled up to the parent level.
-
Navigate to the Asset Numbers page, and query an Asset Number. See: Obtaining Asset Number Information.
-
Select Costs from the View list of values.
-
Choose Go.
-
Select an Asset Number.
-
Choose Go.
Asset Costs
-
In the Cost View Options region, you can narrow your selection criteria.
-
From the View drop down list, select the type of cost information to view. Valid values are Actual Costs, Estimated Costs, Variance Costs, and Cost Summary.
Actual Costs: This is the accumulation of all cost for material and resource transactions for associated maintenance Work Orders, based on a specified period, or any specified selection criteria you entered in the Cost View Options region. When you select the Actual Costs from the list of values, the actual cost information for your specified criteria is provided. The Cost Manager process runs in the background to provide updated, actual cost information at user defined, periodic intervals, and/or when it is launched from the menu.
Estimated Costs: A BOM (material parts list) and routing (resources) can be associated with a Work Order. When you select Estimated Costs, the estimated costs of all materials and resources associated with a work order display, enabling you to budget costs. The Work Order Cost Estimation process runs in the background to provide updated, estimated cost information at user defined, periodic intervals, and/or when it is launched from the menu. Estimated and actual costs might differ because all materials or resources associated with a Work Order might not actually be used when the Work Order is executed.
Variance Costs: When you select Variance Cost, the difference between the actual and estimated costs appear.
Cost Summary: When you select Cost Summary type, the cost information from all work orders associated with the current asset appear.
-
From the View Cost By drop down list, select how you would like to view your cost information. Valid values are Period and Cost Category.
-
If you selected Cost Category, you can view cost information by defined categories, such as Maintenance, Contract, or Operations.
Material:All material and material overhead transaction costs appear
Labor: All employee resource and resource overhead transaction costs appear.
Equipment: All material resource and resource overhead transaction costs appear.
-
If you selected Period, optionally enter the Period From and Period To. Accounting Periods are defined within Oracle Inventory (See: Maintaining Accounting Periods, Oracle Inventory User's Guide).
-
-
-
Select the Include Child Assets check box to roll up all costs for the current Asset Number and its children. See: Defining Asset Numbers to review how hierarchies are created.
-
Choose Go to view cost element information. Summary totals, of material, labor, and equipment costs, appear.
-
Optionally save and export your cost information to a spreadsheet by choosing Export.
-
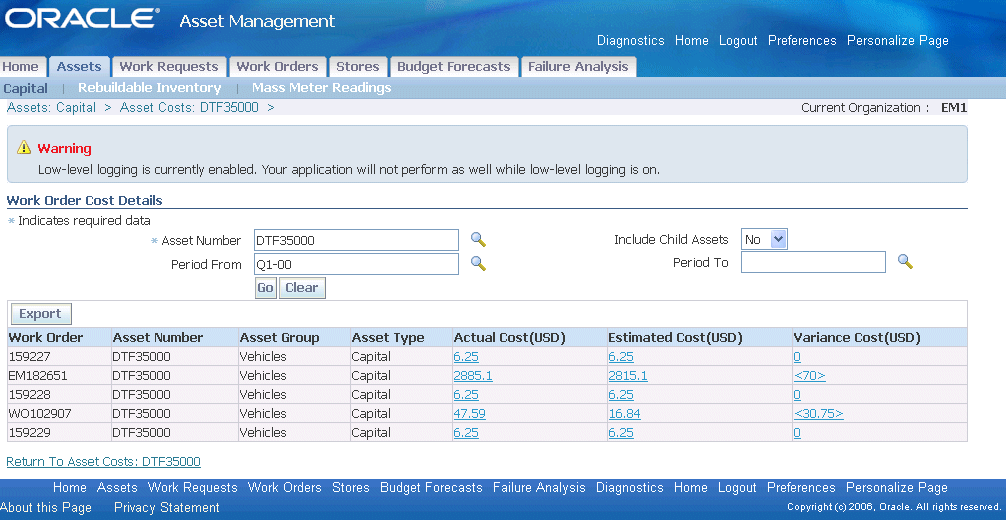
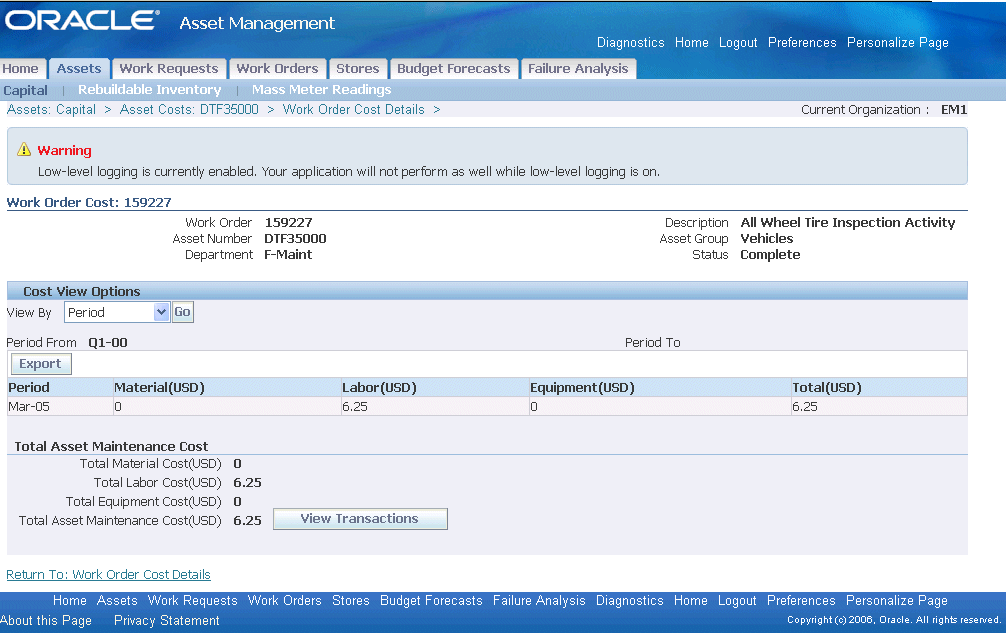
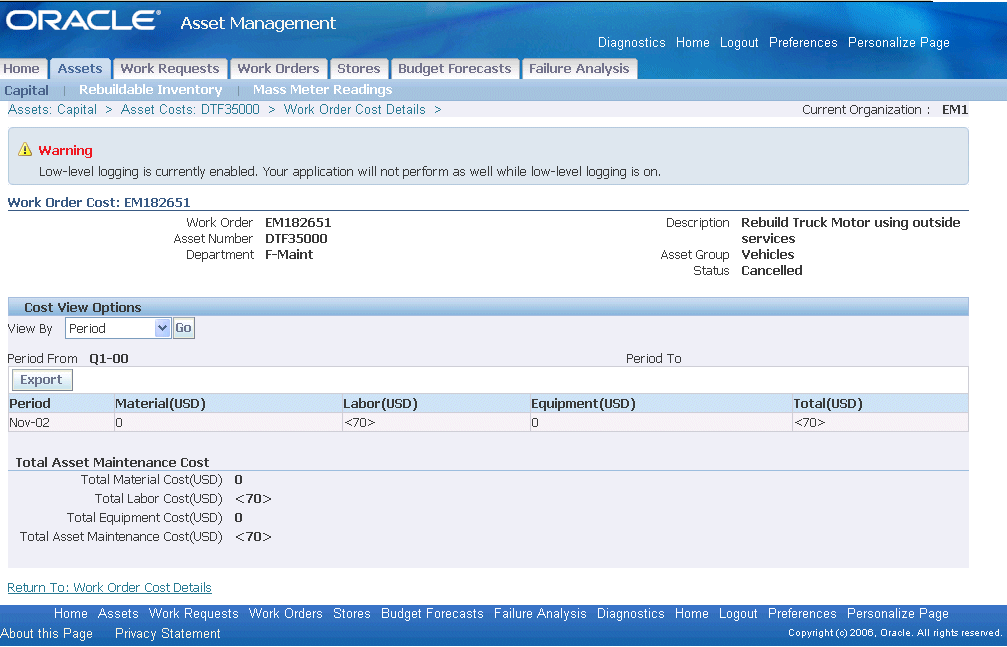
Optionally view asset cost information, broken down by specific Work Order, by choosing Work Order Cost Details.
Work Order Cost Details
-
Optionally select the Actual Cost link to view the Work Order's actual cost details by Period/Cost Category.
Work Order Actual Cost Details
-
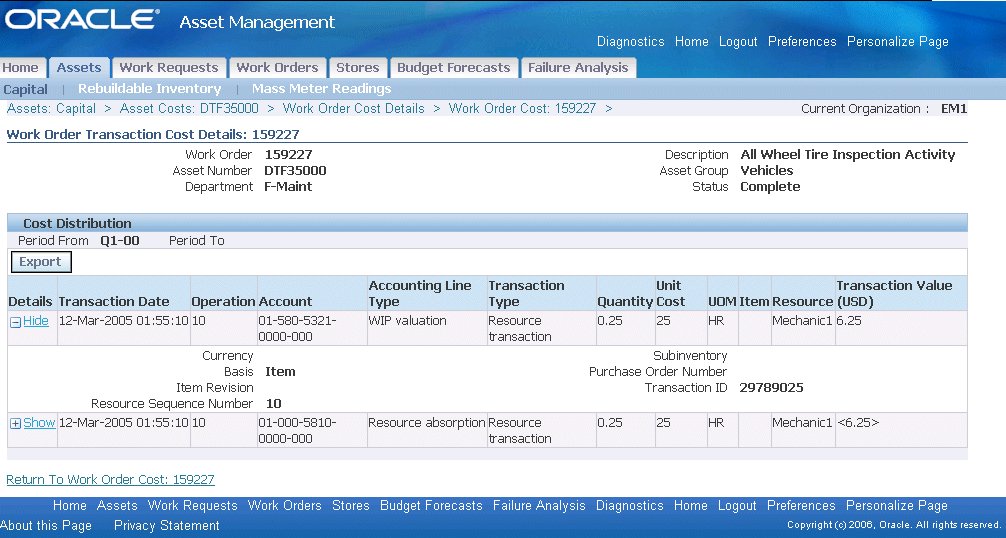
Optionally choose View Transactions to view the transaction details.
Actual Cost Distributions
-
Optionally select the Work Order Cost Details hypertext link at the top of the page.
-
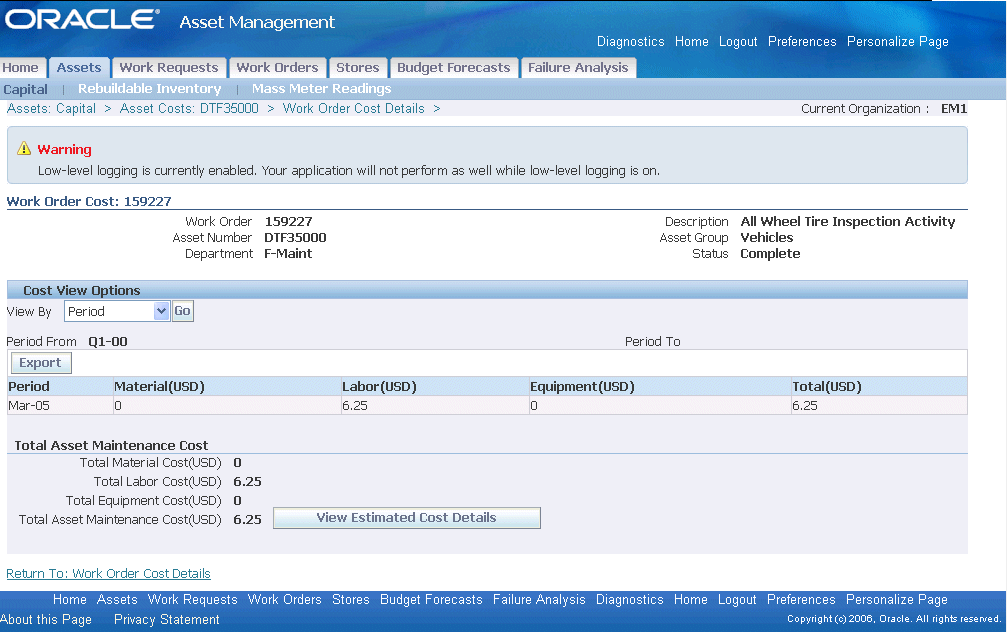
Optionally select the Estimated Cost link to view the Work Order's estimated cost details by Period/Cost Category.
Work Order Estimated Cost
-
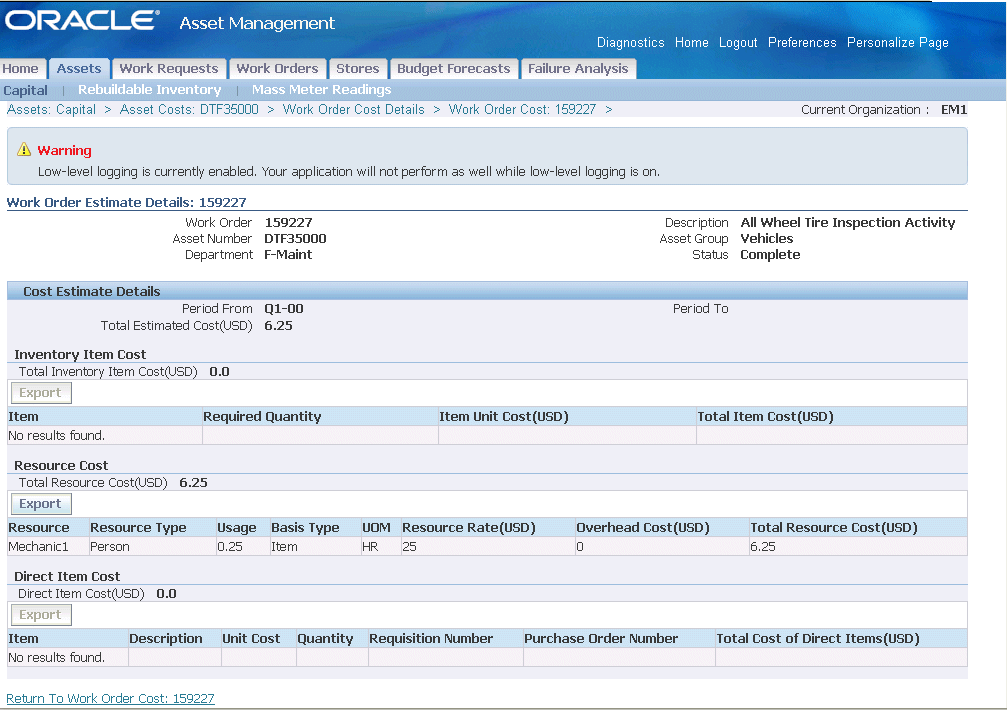
Optionally choose View Estimated Cost Details to view the Work Order's estimated cost details by Period/Cost Category.
Work Order Estimate Details
-
Select the Work Order Cost Details hypertext link, at the top of the page, to exit.
-
Optionally select the Variance Cost link to view the variance between the estimated and actual costs.
Variance Cost
-
To display the asset hierarchy
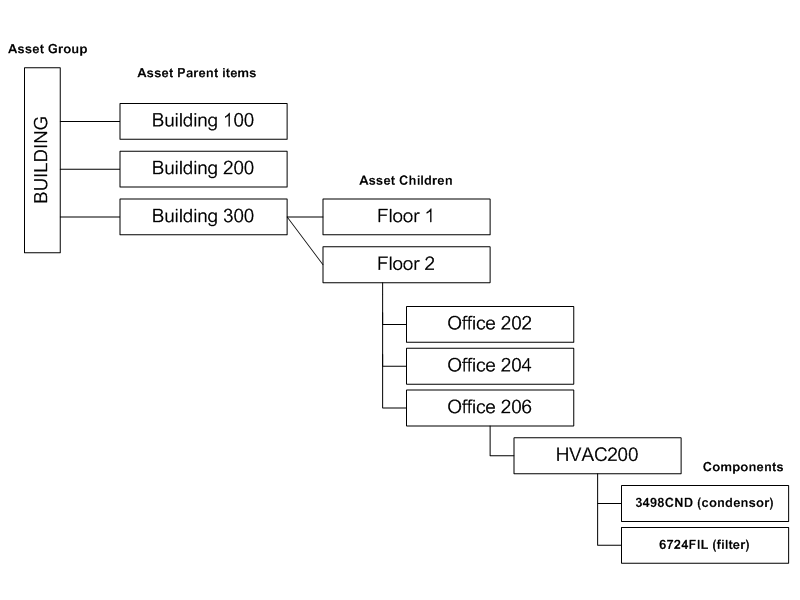
You can view Asset Number hierarchy information, enabling you to identify Asset Numbers using a navigator and the details of each Asset Number belonging to the hierarchy.
As Serialized Rebuildables are added and removed from a particular hierarchy, the asset genealogy is dynamically updated.
-
Navigate to the Asset Numbers page, and query an Asset Number. See: Obtaining Asset Number Information.
-
Select Hierarchy from the View list of values.
-
Choose Go. The associated hierarchy for the current Asset Number appears in the shaded region.
Asset Hierarchy Example
-
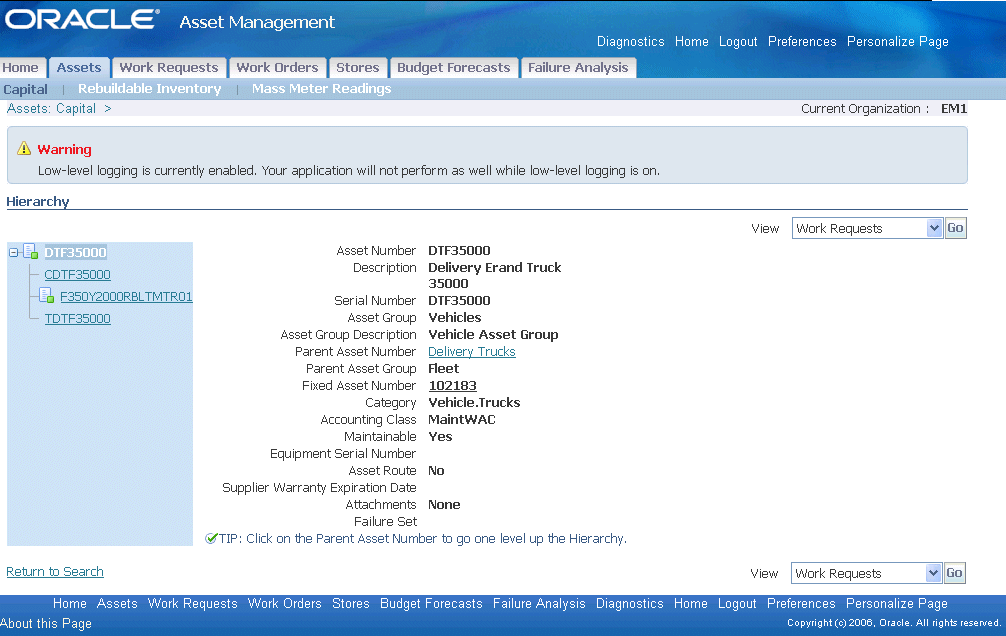
Optionally select any Asset Number in the hierarchy to view its details.
Hierarchy
-
Optionally select the Parent Asset Number to view the complete hierarchy at the parent level.
-
Choose Return to Search to exit.
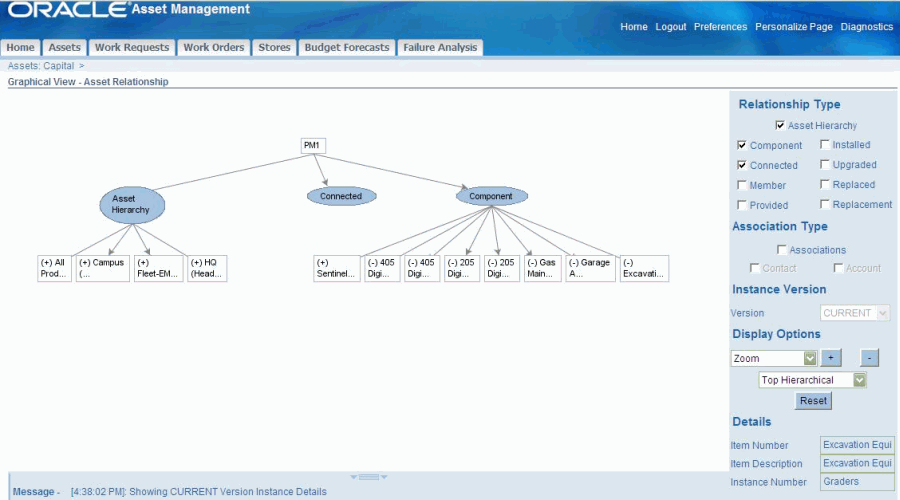
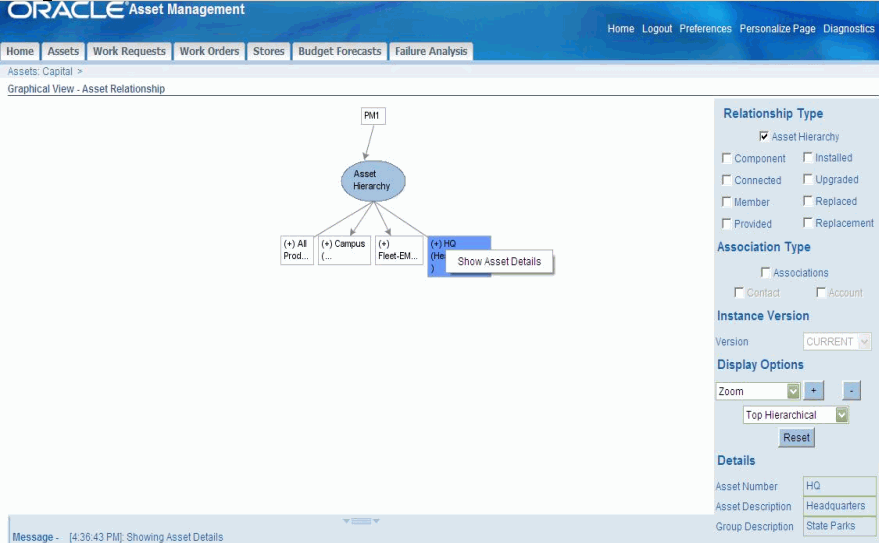
To view asset relationships graphically
You can view asset relationships in a graphical format using Oracle eAM.
Use this procedure to view asset relationships graphically:
-
Navigate to the Asset Search page, and query for a specific asset.
-
Select Graphical Hierarchy from the View list of values.
-
Click the Go button.
The Viewer appears displaying the asset relationship in a graphical format.
-
View the asset relationships.
You cannot view instance relationships.
Note: You can only view asset relationships using this navigation. If you want to add child assets or create other relationships for the asset, you must access the asset through Oracle Asset Tracking or Oracle Install Base.
For more information about viewing asset relationships, see Viewing Item Instance and Asset Network Relationships, Oracle Install Base User's Guide.
-
Right-click an asset relationship node to view the asset details.
To enter or view meter readings
Meters are defined and associated with Asset Numbers to measure an asset or rebuildable item's usage. Examples include odometers or counters. Meters are used in Preventive Maintenance Scheduling to schedule and generate Preventive Maintenance Work Orders.
You can enter and view Meter Readings for the current Asset Number.
-
Navigate to the Asset Numbers page, and query an Asset Number. See: Obtaining Asset Number Information.
-
Select the Asset Number, and then select Meter Readings from the View list of values.
-
Choose Go. Meters that are associated with the current Asset Number appear. See: Associating Meters with Asset Numbers.
Enter Asset Meter Readings
-
Enter a Value or Change Reading value for new meter readings, depending on the meter type. If the meter is an Absolute type, the Value column is enabled. If the meter is a Change type, the Change column is enabled.
-
Optionally enter any necessary Comments.
-
Optionally enter Reset information.
-
If you enter a Reset Reading value, you are resetting the source meter to this value. For example, if a motor must be replaced, you can reset the meter reading value of the pump, associated with the motor.
Companies can associate a Source Meter to an Asset Number/Meter association. The Source Meter reading subsequently feeds corresponding meters that are associated with assets within the Meter Hierarchy (See: Defining Meters for more information on Meter Hierarchies).
-
Optionally select the Include Target Reset check box to reset the current asset's target meter to the source meter's Reset Reading.
-
Optionally enter a Reset Comment.
-
-
Choose Apply to save your work.
-
Optionally select the History icon to view all meter readings for the selected meter and current Asset Number. This helps you to make logical decisions when entering and updating meter readings. For example, you can view the last meter reading, enabling you to make a logical choice when entering the next meter reading.
Meter Reading History

-
Optionally select the Disable icon to disable a past meter reading for the current Reading. If meter readings are entered before resetting the meter, you cannot disable those meter readings. The most current reading before the meter is reset cannot be disabled, unless the meter reset reading entry is disabled.
Note: Preventive Maintenance Scheduling does not use any disabled information. After a meter reading is disabled, you cannot re-enable it.
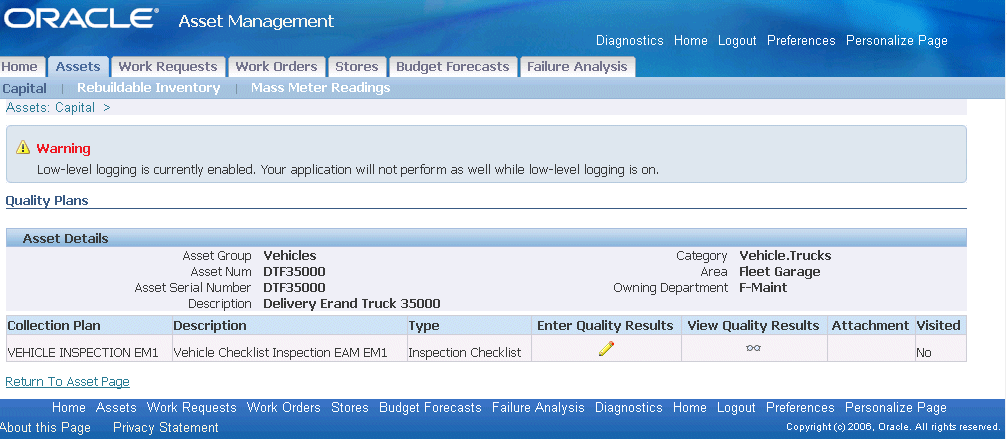
To view quality information
You can view a list of Quality collection plans and enter quality results for the current Asset Number.
-
Navigate to the Asset Numbers page, and query an Asset Number. See: Obtaining Asset Number Information.
-
Select the Asset Number, and then select Quality from the View list of values.
-
Choose Go.
Quality Plans
-
A list of collection plans, associated with the current Asset Number and requiring completion, appear (See: Creating eAM Quality Collection Plans When the collection plan was created, it was specified whether the collection plan required completion. Also, during the eAM collection plan creation process, triggers are specified to make specific Asset Numbers eligible for the collection plan (See: Creating eAM Quality Collection Plans). See: Quality Integration Setup
-
Optionally enter quality results by selecting the Enter Quality Results icon. You can enter quality results for a collection plan or update a collection plan's quality results multiple times.
-
Required fields depend on the Collection Plan's collection element specifications (See: Creating eAM Quality Collection Plans).
-
Optionally choose Add to attach any necessary files, URLs, or text to the chosen collection plan. Each collection plan can have an unlimited number of attachments.
-
Choose Apply to save your work or Cancel to return to the Quality Plans page.
-
-
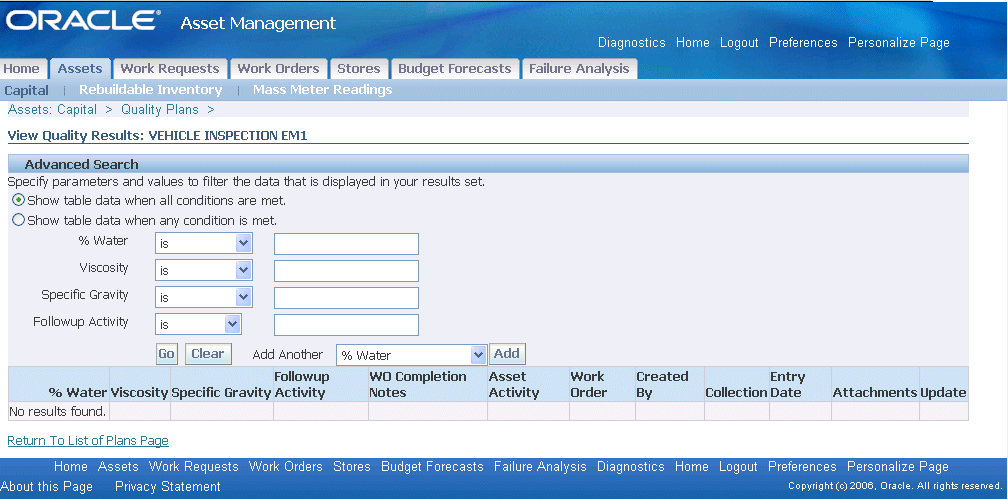
Select the View Quality Results icon to view or update any results entered for the current collection plan.
-
Select either the Show table data when all conditions are met or Show table data when any condition is metradio button.
-
Show table data when all conditions are met: Quality results containing all of the following entered parameters appear in the results set table.
-
Show table data when any condition is met: Quality results containing any of the following parameters appear in the results set table.
-
-
Optionally specify parameters to filter the data displayed. The parameters are the collection elements defined for the current collection plan. See: Creating eAM Quality Collection Plans.
-
Optionally select an additional parameter from the Add Another list of values. Choose Add.
-
Choose Go to view the entered parameters' results. Optionally choose Clear to enter new parameters.
View Quality Results
-
Optionally select the Attachments icon to attach any necessary files, URLs, or text to the chosen collection element (result entry). Each collection element in the collection plan can have an unlimited number of attachments.
-
Optionally select the Update icon to update the current entry.
-
Select the Return To List Of Plans Page link at the bottom of the page to return to the list of quality collection plans.
-
-
The Visited column indicates whether the associated collection plan has been updated.
Note: Quality results are entered at Work Order Completion for an Asset Number's required collection plans.
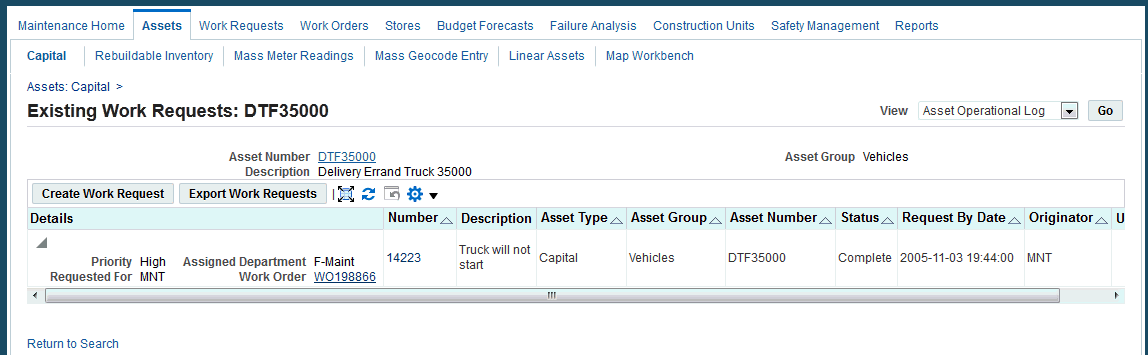
To view or create work requests for an asset
You can view an asset's associated Work Requests, create new Work Requests, or update existing Work Requests for the current asset.
-
Navigate to the Asset Numbers page, and query an asset. See: Obtaining Asset Information.
-
Select an Asset Number, and then choose View Work Requests.
Existing Work Requests
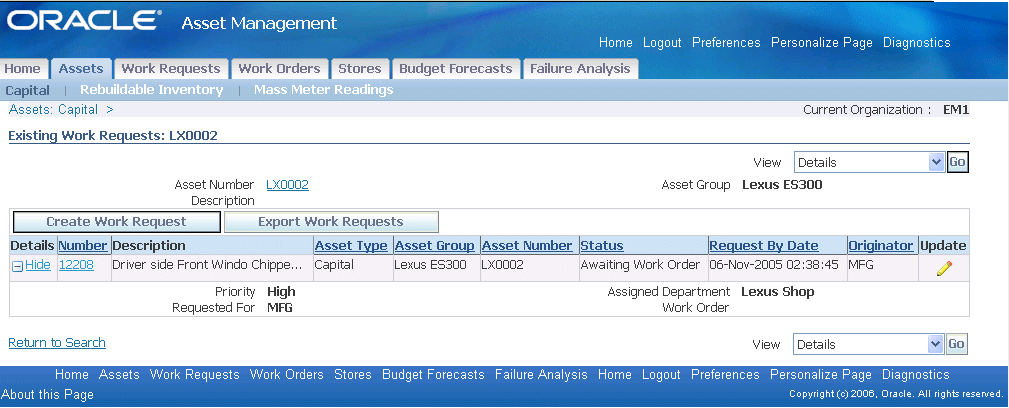
-
Optionally select a work request Number to view its details, such as the log explaining the issue reported and priority code.
View Work Request
-
Optionally choose Update if you are within the details of the Work Request, or you can select the Update icon on the Existing Work Requests page.
-
Update fields as needed.
-
Choose Apply to save your work.
-
Choose Cancel to return to the Existing Work Requests page, without updating the Work Request.
-
-
Optionally choose Create Work Request to create a new Work Request, or choose Create if viewing an existing request's details.
Create Work Request
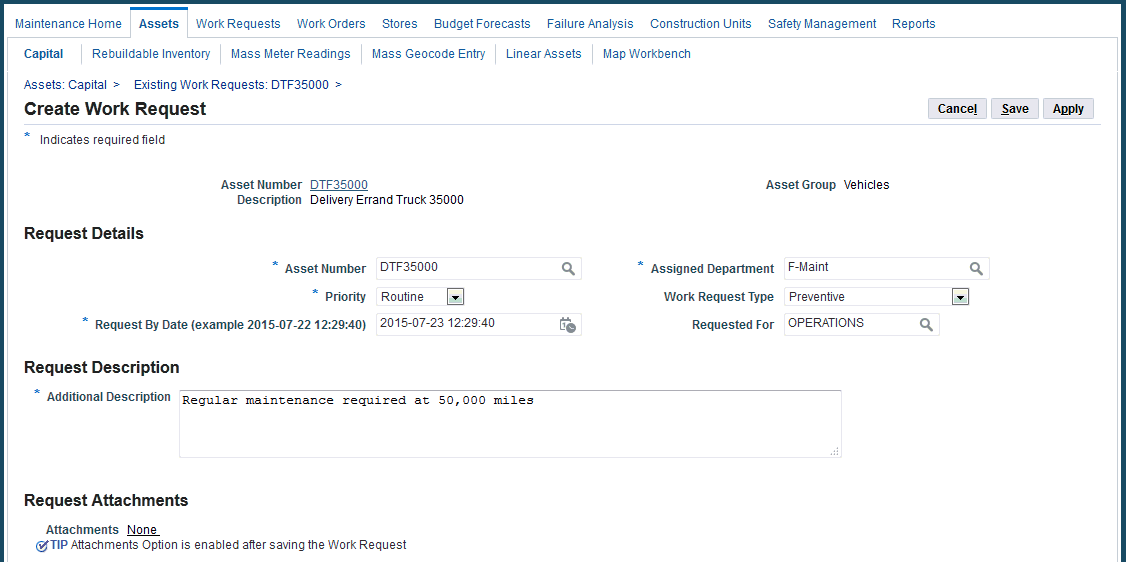
-
If required, select an Asset Number. Depending on the current organization's parameter, defining an Asset Number on Work Requests is required or optional. See: Defining eAM Parameters.
-
Select a Priority, for example High, Medium, or Low.
-
Select a Request By Date. The system date defaults.
-
Select an Assigned Department. The current Asset Number's associated Assigned Department defaults. See: Defining Asset Numbers.
-
Optionally select a Work Request Type.
-
Optionally select the user the Work Request is Requested For. The current user defaults.
-
Enter the detailed information about the work requested in the Additional Description field.
-
Enter your Creation Information, such as Phone Number, E-Mail address, and Contact Preference.
-
Optionally select a Context Value.
-
Choose Apply to create the Work Request.
-
Choose Cancel to return to the Existing Work Requests page, without creating a Work Request.
-
-
Optionally select Show in the Details column to display Work Orders linked to the current Work Request.
-
Optionally select the Work Order number to view the Work Order's associated information.
-
Choose Return to Existing Work Requests to return to the previous page.
-
-
Optionally save and export the Work Request information to a spreadsheet, by selecting Export Work Requests.
Related Topics
Overview of Cost Management, Oracle Cost Management User's Guide
Submitting a Request, Oracle Applications User's Guide, Oracle Applications User's Guide
Overview of Collection Plans, Oracle Quality User's Guide
Overview of Quality Self-Service, Oracle Quality User's Guide
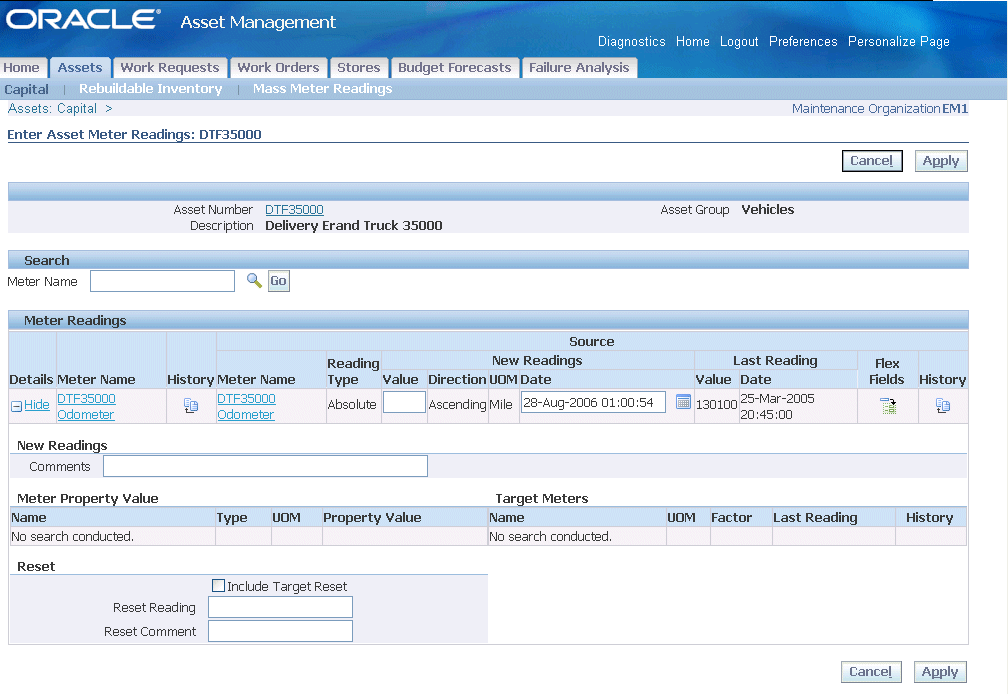
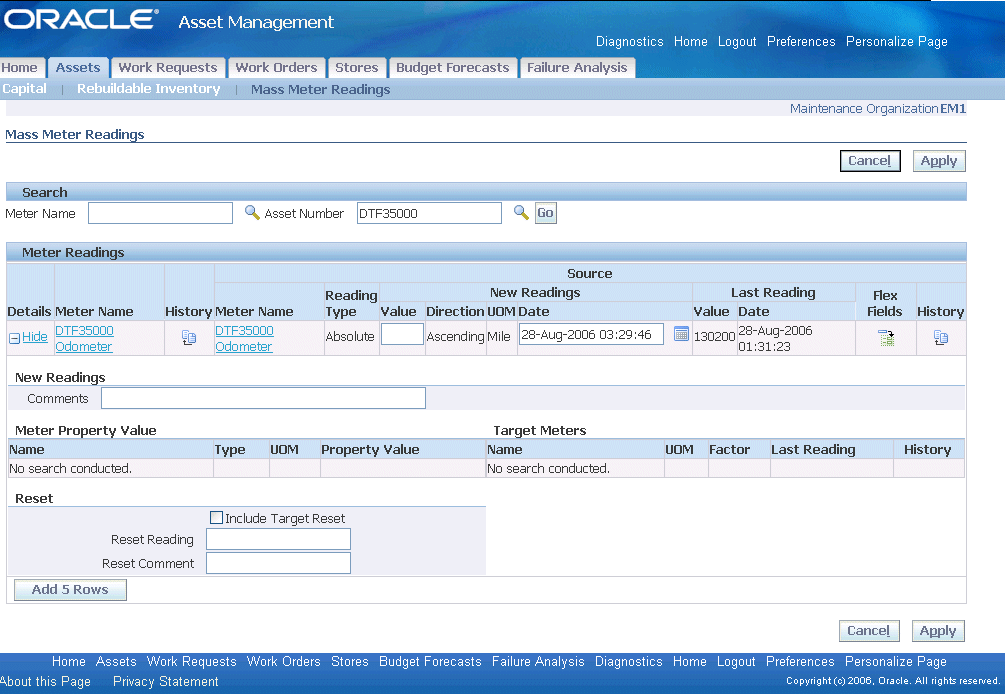
Entering Mass Meter Readings
Meters are defined and associated with Asset Numbers to measure an asset or rebuildable item's usage. Examples include odometers or counters. Meters are used in Preventive Maintenance Scheduling to schedule and generate Preventive Maintenance Work Orders.
You can enter readings for all meters that are associated with an asset. You can enter readings for all assets that are associated with a queried meter. This page enables you to enter multiple readings from one screen.
The Meter Reading window invokes with a Disable button based on the Disable Meter Reading function security setting. If you do not have access to the function security, eAM Disable Meter Reading, then the Disable button does not display and you cannot disable a meter reading.
-
Navigate to the Mass Meter Readings page (Maintenance Super User: Assets tab > Mass Meter Readings sub-tab).
Mass Meter Readings
-
Optionally enter a Meter Name and then choose Go.
-
Optionally enter an Asset Number and then choose Go. All meters that are associated with this asset appear (SeeAssociating Meters with Asset Numbers).
-
Enter a Value or Change Reading value for new meter readings, depending on the meter type. If the meter is an Absolute type, the Value column is enabled. If the meter is a Change type, the Change column is enabled. The Change field indicates the difference between the last reading and the current reading; it defaults when the Value field is populated. The Change field indicates the difference between the last reading and the current reading. The Change value is used to calculate the Life To Date Reading, within the Latest tabbed region.
-
Optionally enter any necessary Comments.
-
Optionally enter Reset information.
-
If you enter a Reset Reading value, you are resetting the source meter to this value. For example, if a motor must be replaced, you can reset the meter reading value of the pump, associated with the motor.
Companies can associate a Source Meter to an Asset Number/Meter association. The Source Meter reading subsequently feeds corresponding meters that are associated with assets within the Meter Hierarchy (See: Defining Meters for more information on Meter Hierarchies).
-
Optionally select the Include Target Reset check box to reset the current asset's target meter to the source meter's Reset Reading.
-
Optionally enter a Reset Comment.
Note: You cannot reset past meter readings if a meter reading is entered after the reading date.
-
-
Choose Apply to save your work.
-
Optionally select the History icon to view all meter readings for the selected meter and current Asset Number. This helps you to make logical decisions when entering and updating meter readings. For example, you can view the last meter reading, enabling you to make a logical choice when entering the next meter reading.
-
Optionally select the Disable icon to disable a past meter reading for the current Reading. If meter readings are entered before resetting the meter, you cannot disable those meter readings. The most current reading before the meter is reset cannot be disabled, unless the meter reset reading entry is disabled.
Note: Preventive Maintenance Scheduling does not use any disabled information. After a meter reading is disabled, you cannot re-enable it
Using the Asset Move Workbench
You may need to move assets from one organization (often a different location) to another organization for different reasons, to replace a failed asset , or to borrow an asset for a particular job or project.
The Asset Move Workbench enables you to transfer an asset and its child assets from one maintenance organization to another as a single unit, and the parent child asset relationships are preserved.
This feature also enables you to move assets using the EAM user interface by minimizing the dependency on the Inventory user interface to carry out asset transfer transactions. You can perform a miscellaneous receipt of the assets within EAM, using the Asset Move page. EAM performs a miscellaneous receipt of an asset if there is no quantity available in the expense subinventory. This process does not track the quantity for the asset. These miscellaneous receipts are done at zero cost, and are placed in an expense intermediate subinventory.
The following entities will also move with the asset:
-
Activities: if the Activity Definition is assigned to the destination organization. If not, you will need to use the Activity Workbench to assign an activity to the new organization.
-
PM schedules
-
Meters
-
Failure history and setup
These entities do not move with the asset:
-
Work orders
-
Routing
-
Cost history
-
Collection plans
You can move assets, including any child assets, between organizations and sub-inventories only.
After you have performed the asset move, you can manually adjust the asset hierarchy using the Asset Hierarchy page or the Graphical Network Page.
To move assets using the Asset Move Workbench
-
Navigate to the Maintenance Super User Home page.
-
Select a value from the Organization drop-down and click the Go button
-
Click the Assets tab.
-
Enter search criteria for the asset to be moved, and click the Go button.
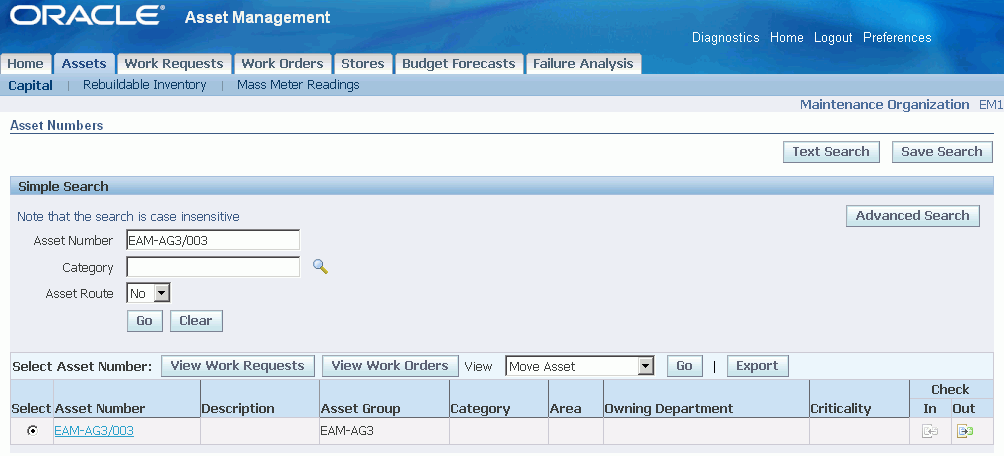
-
Select the Move Asset value in the View drop-down list, and click the Go button.
-
Select a value from the Move Type field, Inter-Org Transfer or Sub-Inventory Transfer. This a required field.
-
Enter the destination organization (required).
-
Enter a destination sub-inventory.
-
Select Yes or No in the Include Child Assets field (required).
-
Optionally select a destination locator.
Note: The current asset information relating to the organization, sub-inventory, and location displays.
-
Click the Apply button.
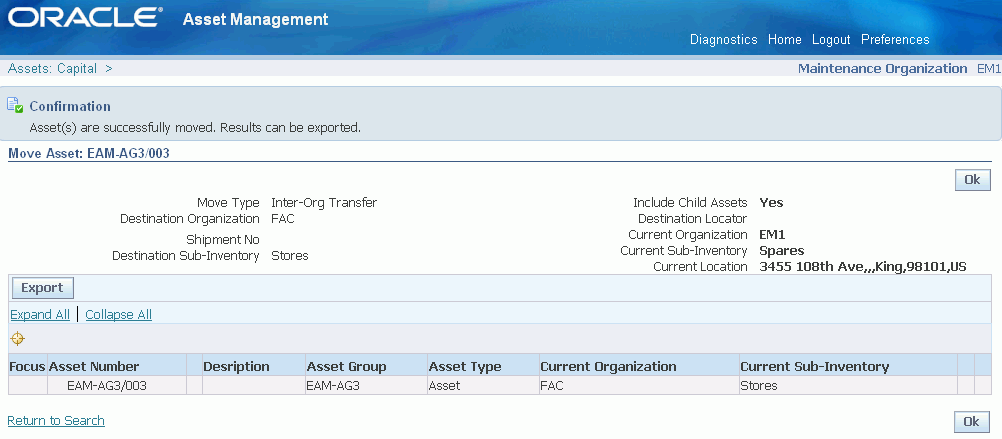
-
You will receive a confirmation message that the assets have been moved.
Work Requests
A work request serves a different function than a work order; it is a request for maintenance on an asset (Capital or Rebuildable Inventory). eAM enables operations and maintenance staff to report any problems with an asset. A supervisor can approve, request additional information, or reject a work request. A work request requires approval before it is generated into a work order. The Work Requests tab enables you to query existing, and create new work requests for an asset. See: Overview of Work Requests and Creating and Updating Work Requests.
Work Orders
The Work Orders tab is designed for users, such as crew supervisors, who execute work plans generated by a planner. You can manage operations on a work order. You can search for skills across departments, assign employees to a work order, adjust crew schedules, complete operations, hand work over to another department, complete a work order, request material, and enter quality plan information, such as inspection data. The Work Orders tab enables you to query and create work orders, view and update work order details, and create relationships among work orders (See: Work Order Relationships). After executing a work order search, you can drill into a specific work order. The Work Order page contains content containers, providing work order header information, asset details information, and work order details information.
You can query Service and Work Requests, view the requests' associated work orders, and create and assign work orders to the requests.
This section's tasks include:
Work orders are normally created by a planner from the Maintenance Workbench (See: Using the Maintenance Workbench), and are also created within the Maintenance Super User responsibility. Material and resource planning (See: Overview of Planning and Scheduling) is used at each status of the routine work order (See: eAM Work Order Statuses).
-
Navigate to the Work Orders page.
-
Click the Create Work Order button.
Note: This function is available for those users with responsibilities and roles that include function, EAM_WO_DETAILS_MODE, with their associated menu. Otherwise, you can only view work orders, and cannot update associated asset hierarchy, work order hierarchy, material, resource, operation, cost, collection plan results, work request, and attachment information. See: Implementing Function Security, Oracle Applications System Administrator's Guide - Security.
The header information displays general information about the Asset Number and the type of work required.
-
The work order number is assigned, but you can update it.
-
Enter an asset number (or Serialized Rebuild) requiring maintenance. The Asset Group (or Rebuildable Item) defaults (See: Defining Asset Numbers).
-
Enter the Scheduled Start Date for the work order if it is based on a forward schedule. The scheduling process uses this date as a starting point to calculate the Scheduled Completion Date and duration for allocated resources and material. If the material/resources are not available by this date, the scheduling process moves the start date forward (See: eAM Scheduling).
Note: Actual dates are entered at operation and work order completion. Scheduled dates are calculated by the Manufacturing scheduler if you have Oracle Manufacturing Scheduling enabled (See: Overview of Setting Up, Oracle Manufacturing Scheduling User's Guide). Otherwise, the EAM scheduler calculates the dates.
-
Enter a Scheduled Completion Date for backward scheduling. This date indicates the requested end by date for the work. The scheduling process uses this date as a starting point to calculate the scheduled start date and duration for allocated resources and material. If the material and resources are not available by that date, the scheduling process moves the start date backwards to ensure completion by the required completion date (See: eAM Scheduling).
Note: Actual dates are entered at operation and work order completion. Scheduled dates are calculated by the Enterprise Asset Management scheduler if you have Oracle Manufacturing Scheduling enabled (See: Overview of Setting Up, Oracle Manufacturing Scheduling User's Guide). Otherwise, the EAM scheduler calculates the dates.
-
Enter a WIP Accounting Class code to represent the charge (expense) accounts associated with the Asset Number. This defaults from the current Asset Number (See: Defining Asset Numbers); you can update it.
-
Optionally select a Request Number to associate a Work Request/Service Request with this work order. After selected, the Description updates to this Work Request's Description.
-
Optionally enter a Description for this work order.
-
The Department defaults from the selected asset number (See: Defining Asset Numbers). This indicates the persons or department responsible for this asset number.
You can change the department at the operation level if no transactions have been recorded for the work order.
-
After selecting an Asset Activity, the associated maintenance BOM (material) (See: Setting Up Maintenance Bills of Material) and maintenance route (resources), associated with the Activity (See: Defining Maintenance Routes), attach to the work order. After an asset activity is saved to a work order, you cannot change or delete it.
Select an Asset Activity. Only Asset Activities associated with this Asset Number are available.
Note: If this work order was previously created, you can add an Asset Activity, as long as the work order is at an Unreleased or Draft status, or an Asset Activity was not previously defined. If any tasks, material, or resource requirements exist, these must be deleted before adding an Asset Activity to an existing work order.
-
If you select Yes from the Firm list of values, planning and scheduling does not adjust the schedule, regardless of material or resource availability (See: Overview of eAM Planning and Scheduling). This value defaults as Yes or No, depending on the Auto Firm on Release and Auto Firm on Create checkbox settings, established in the Enterprise Asset Management Parameters setup for the current organization (See: Defining eAM Parameters). This defaults after the work order is Released, if you select the Auto Firm on Release checkbox, and defaults immediately if you selected the Auto Firm on Create checkbox.
If you select No from the Firm list of values, the completion date is calculated based on the work order duration. The scheduler automatically calculates the duration based on the operations (resource duration setup) on the work order. You can update the Firm setting for work orders at Draft, Released, Unreleased, On-Hold, or Cancel statuses (See: eAM Work Order Statuses).
If Firm is set to Yes, you can still manually reschedule a resource on the work order, thereby updating the dates on its corresponding operation and work order.
-
Optionally select the Status of the work order.
The list of values includes all system and user-defined statuses. If you select a user-defined status, however, the validation and the work order behavior remain unchanged, because they are based on the system status that is associated with the user-defined status. If the work order is changed to a status that requires approval (See: Workflow for Work Orders), the Pending flag is selected until an action, such as approval or rejection, occurs. If the status change is approved, the new status remains, and the Pending checkbox is cleared. If rejected, the status of the work order is changed to Canceled by Approver and the Pending checkbox is also cleared.
-
The Shutdown Type defaults from the current Asset Activity. This setting helps the planner group work orders that might require shutdowns, so that they are planned together.
-
Optionally select a Priority, for example, High, Medium, or Low.
-
Optionally enter information within the Additional Details region. The Warranty field values default from the current asset's definition, but you can update the Warranty Status and Warranty Active fields here.
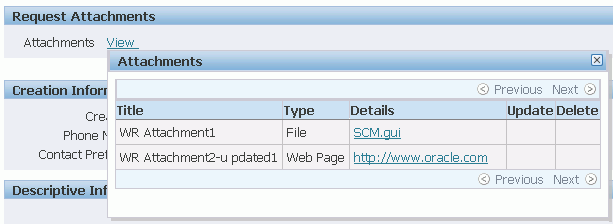
If you are creating a work order from a work request and if the work request has attachments, you can view the list of attachments by clicking the View link in the Request Attachments field.
-
Optionally open the Failure Information region to enter Failure Analysis information (See: Failure Analysis Overview).

-
The Failure Entry Required setting indicates whether failure code entry is required during work order completion. This setting defaults from the value set when you assign the Asset Group to the Failure Set. However, you can update this setting as needed (See: Defining Failure Codes and Sets).
-
Valid codes that are available are dependent on the associated Failure Set and defined Failure Codes. A Failure Set defaults, if one is associated with the current Asset Group (See: Defining Failure Codes and Sets).
Note: You cannot associate one failure occurrence with multiple work orders. For example, if you report failure data for the same asset on two different work orders, two failures are created, regardless of the failure date. When MTBF is calculated, the failure count would be two. Similarly, you can associate one combination of failure tracking codes (failure/cause/resolution) to a work order.
-
-
Optionally open the Operation Requirements region to prepare necessary operations. Operations (also known as tasks) are the instructions to perform maintenance activities.
Important: Since operation 1 is reserved for system use, we recommend that you begin the operation sequence numbering at 2 or above, and use operations in multiples of 10.
Each operation is assigned to a department (See: Defining Departments and Resources), associated with assigned resources (trades people, outside service providers, and equipment). When you create a work order for an Asset Number, you can attach the Asset Number's associated Activity (See: Associating Asset Numbers with Activities) to that work order, bringing its related maintenance route and BOM. The maintenance route is comprised of operations necessary to complete the Activity. You can view and update these operations from the work order. After creating the work order, you can view operations that default from the maintenance route (See: Defining Maintenance Routes) associated with the current Activity.
When you query for an existing work order, you can update and add to its operations. You can also assign and schedule specific employees or equipment to each operation. There are two sub-tabs within the Operations tab: Detail and Summary. The Summary sub-tab displays information at the Resource line level and assigned employees appear in the Hide/Show region. The Detail sub-tab displays the operation-resource-instance. You can remove the 'EAM_OP_SUMMARY' function from the menu to hide the Summary sub-tab, or remove the 'EAM_OP_DETAILS_TAB' function to hide Details sub-tab (See: Preparing Work Order Operations and Updating Work Orders).
You can change the department or resources at the operation level if no transactions have been recorded for the work order.
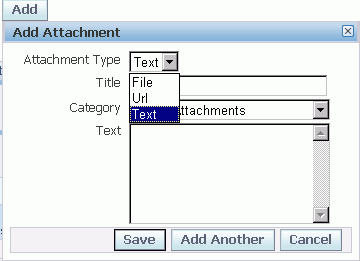
Click or hover over the Add or View button to add or view attachments. You can attach file, URL, and text attachments. If you want to view the attachments, hover or click the View button.
-
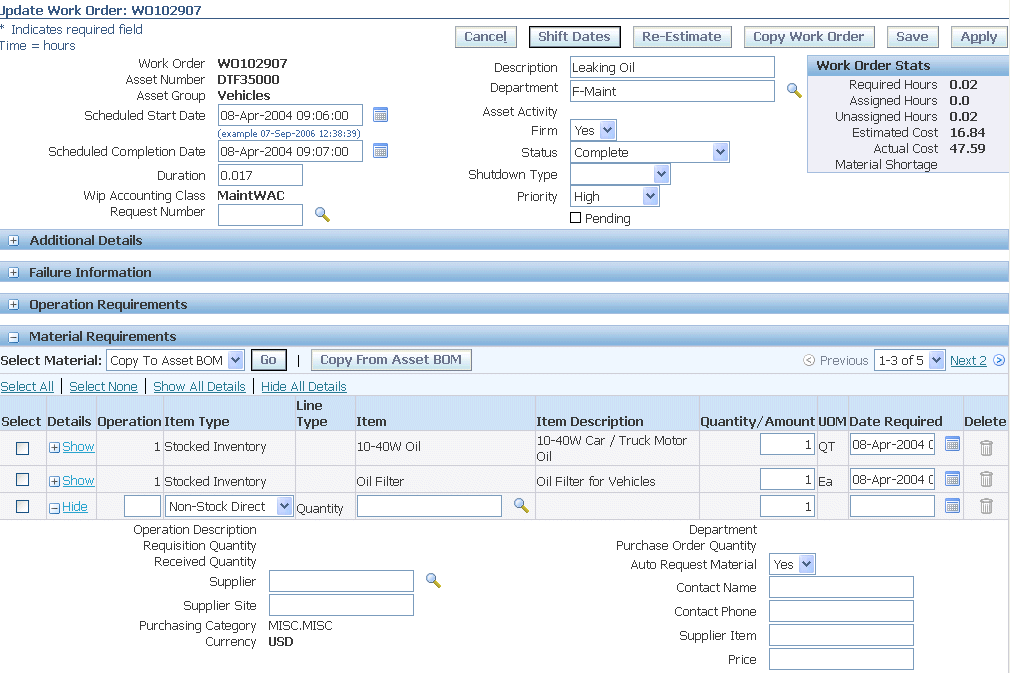
Optionally open the Material Requirements region to view or add items. After creating the work order, you can view the associated Asset Number's items list (See: Setting Up Maintenance Bills of Material and Defining Material Requirements). You can add both stocked and non-stocked material from the Asset BOM to the material requirements for this work order.
-
Adding Work Permits to Work Orders
Click the Work Permits region to create work permits or add existing work permits to this work order:
-
Select the Create check box to create a new work permit, and enter the following information (all fields are required except the Description field):
-
Work Permit name (or number)
-
Description (optional)
-
Permit status
-
Status (Draft is the default value, but you can change it)
-
Valid From Date
-
Valid To Date
-
Flexfields
-
-
Click the Work Permits field to search and add an existing work permit from the list of values.
-
-
Optionally click the Save button to save data entered, without applying it to the database.
-
Click the Apply button to create the work order.
If you need to capture work that has already been completed, use the Express Work Order feature. You can access this page through the Maintenance Super User responsibility:
-
Home > Work Orders > Express Work
-
Home > Work Orders >Work Orders > One Step Material Release
Note: You cannot create an express work order that contains direct items.
-
Select an organization from the drop-down, and then click the Go button.
-
Select the Work Orders tab.
-
Click the Express Work hyperlink.
The system defaults the following information on the page, but you can change the values:
-
Work Order Number - if your organization is automatically generating work order numbers
-
Start Date - the current system date and time
-
Status - Released. This is the default status for the work order
-
WIP Accounting Class
-
Completion Date - default value is the same as the Start Date
-
-
Optionally enter an asset number.
When you select an asset number, the default value for the Department field appears.
-
Enter an asset group; this is a required field.
-
Optionally enter an asset activity for the work order.
When you click the Save button, the asset activity and any material and resource requirements are populated on the page.
-
Optionally enter a department number. If a department has been set up for the asset, the default department value appears.
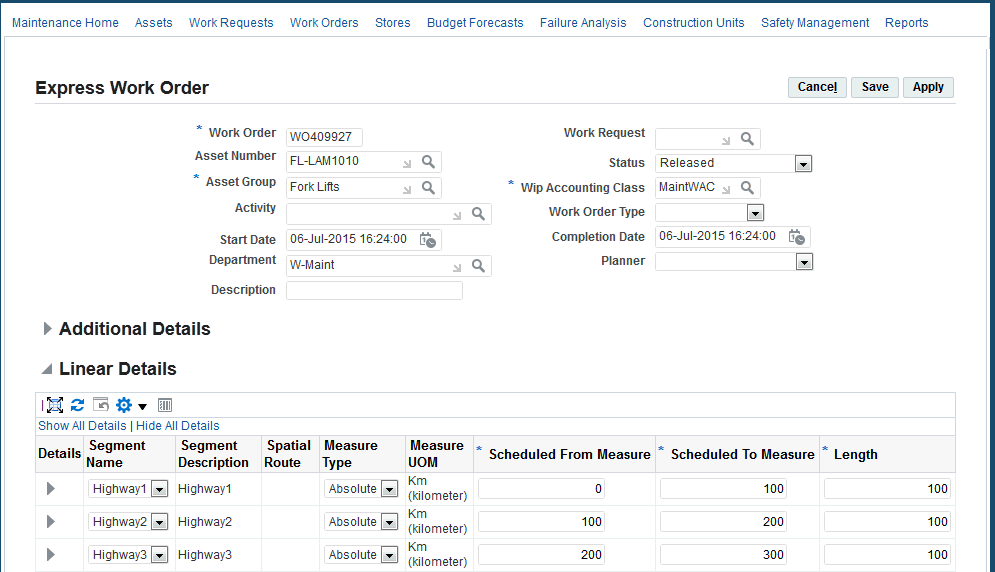
-
Optionally add details in the Additional Details group box.
-
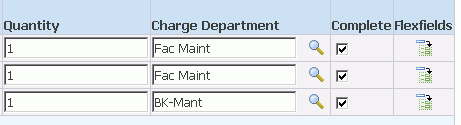
Optionally add details the Resource Reporting group box such as resources, quantities used, departments to charge, and whether you want to complete any operations. If you want to complete the work order, select the Complete checkbox.
You will enter the completion details using the Debrief Work Order page. This page is available after you save the work order.
-
Optionally add details in the Material Reporting group box.
Note: Any direct items in the BOM for the activity will not display.
-
Optionally add details in the Failure Information group box.
-
Optionally add any quality plans.
-
Click the Save button.
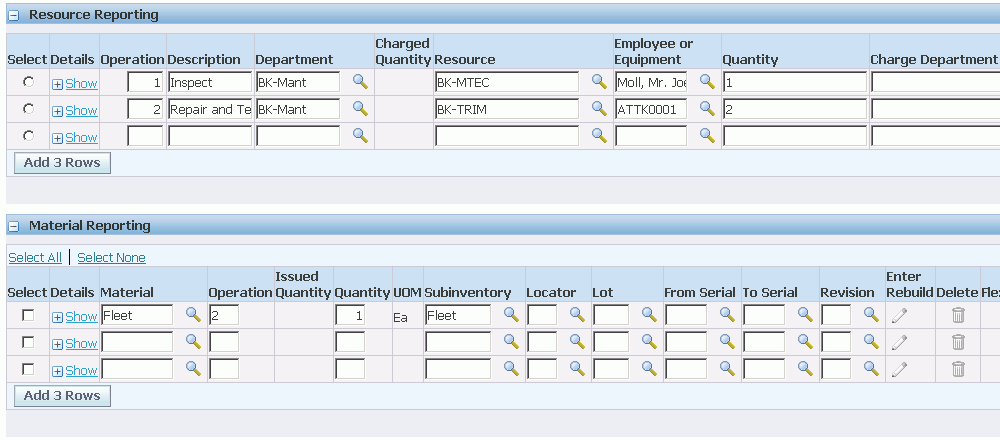
Adding Completion Details to Work Orders
You can add completion details to existing work orders by clicking the Debrief Work Order icon from the Work Orders page.
-
Navigate to the Work Orders page, and select an existing work order.
-
Click the Debrief Work Order icon for the work order to which you want to add completions information.
-
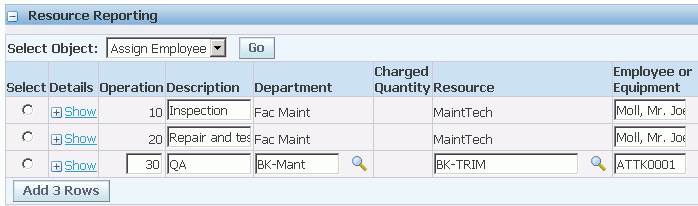
Expand the Resource Reporting section to add resource information.
-
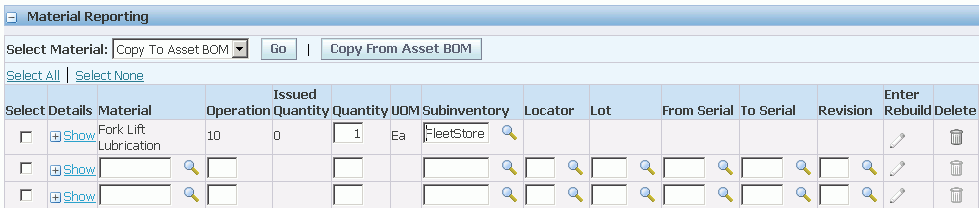
Expand the Material Reporting section to add material information.
You can manually add material to the operations, add the material to an asset BOM, or copy the material associated with the asset BOM.
Note: If you are adding material information for an Express Work Order, bear in mind that the material was issued out of inventory when you created the work order, and you are simply reporting these actions. Therefore, no allocations are necessary.
-
When you are finished, click the Save button to save your changes.
-
Click the Apply button if all the information associated with the work order is complete.
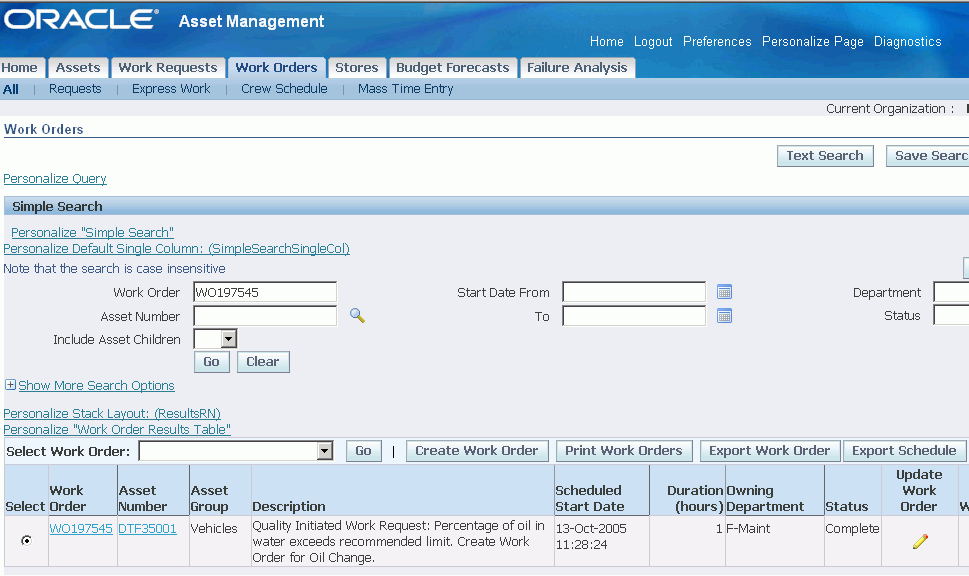
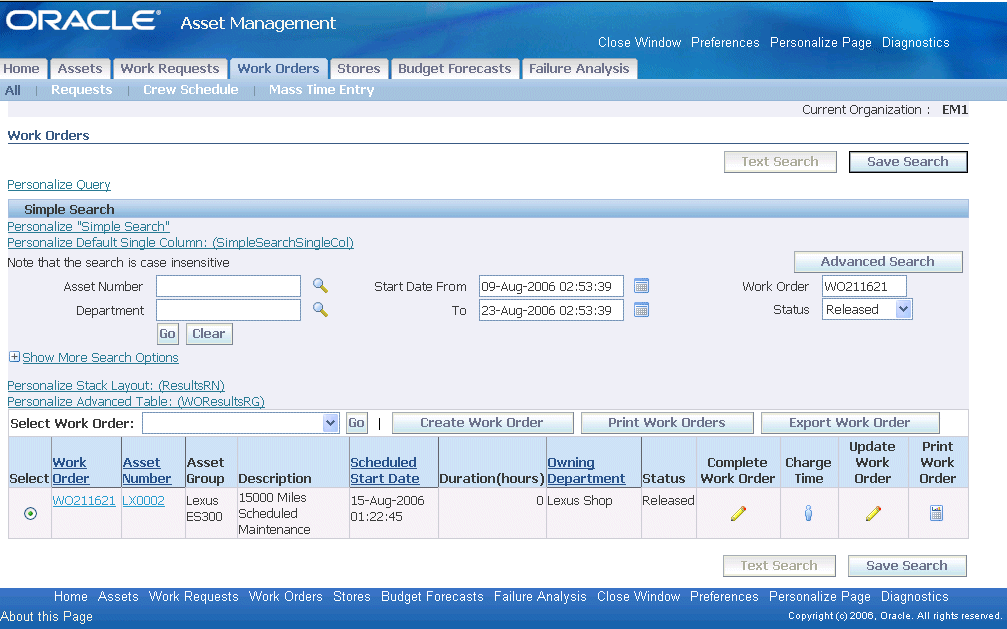
To view work orders, you can use either the Simple or Advanced Search modes. To view work orders for assets that were transferred to another organization, perform an Advanced Search within the originating organization. You can enter an Asset Group to view all work orders for the transferred assets, in the current Asset Group, that were created in the originating organization. A Simple Search filters out the transferred assets, and does not include them in the search results. You can charge resources and material, and complete open work orders for transferred assets. You can execute a Simple Search on a transferred asset, within its destination organization, to view only work orders that were created in that destination organization.
If you perform an Advanced Search, you can search for work orders based on other criteria such as Asset Group, construction Estimate Number, Creation By, Created Date, Estimate Number, Estimation Status, and so on.
You can also save search criteria to personalize your search.
After executing the search, you can drill into a specific work order. The Work Order page contains content containers, providing information relating to the work order header, asset details, and work order details.
-
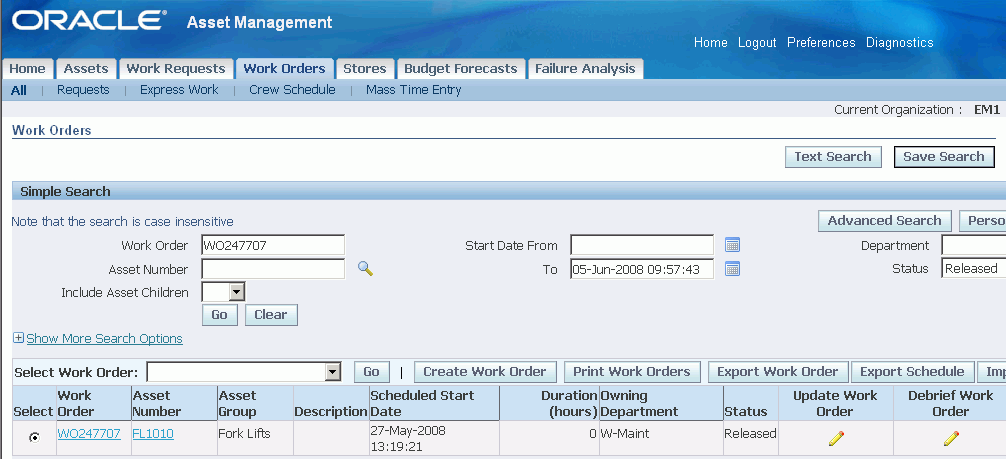
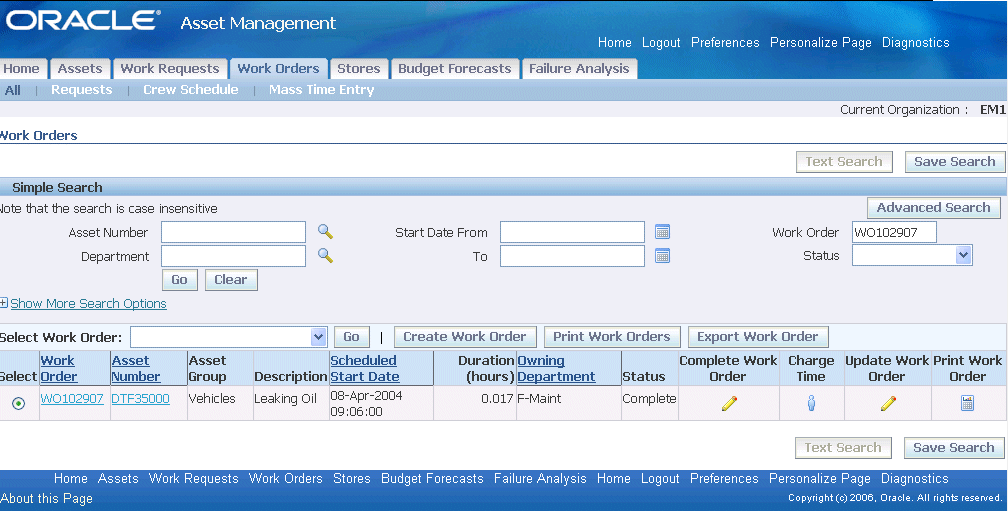
Navigate to the Work Orders tab. The All sub-tab is selected.
Note: By default, you are using the Simple Search mode. To switch to the Advanced Search mode, choose Advanced Search. Choose Advanced Search to view work orders for assets that were transferred to another organization.
-
Optionally select an Asset Number to search for its related work orders.
You can execute a Simple Search on a transferred asset, within its destination organization, to view only work orders that were created in that destination organization.
-
Optionally select a specific work order.
-
Optionally select Start Date From and To values to display work orders that fall within the specified date range.
-
Choose Go to display all work orders associated with the current search criteria.
Work Orders
-
Optionally select a work order number to view its details such as attachments. Click or hover over the View button to view the attachments.
Work Order

-
Optionally choose Check Material Shortage.
The Material Shortage field updates to display whether there is a shortage of the material (at that moment in time) that is needed to complete the work order operations. This status helps you to determine when to start work. For example, if there is a material shortage, you typically would not start work. The process that populates this field considers both stocked and direct items. For stocked items, the Work Order Material Shortage process determines whether all of the inventoried material within the associated BOM is available to transact (ATP is not considered). For direct items, the Work Order Material Shortage process determines if all of the direct items that are included within the associated BOM are received into inventory. You should set this process to automatically execute periodically by scheduling the Check Material Shortage concurrent process, but you can execute it from the menu at any time.
-
The Operations sub-tab defaults as selected.
This sub-tab enables you to view Operations on the current work order, and the operations' dependencies in the View Dependency region. Operations are scheduled to run in parallel, sequence, or through dependent steps.
-
It is important in asset management to capture both estimated and actual time spent on each operation of a work order. When resources are identified on a work order, there is a time estimate of how long it takes to perform the work. In many cases, the extent of the work load is unknown until the work starts. Resource charging enables you to post actual usage time for employees, equipment, and miscellaneous materials for specific operations on a work order.
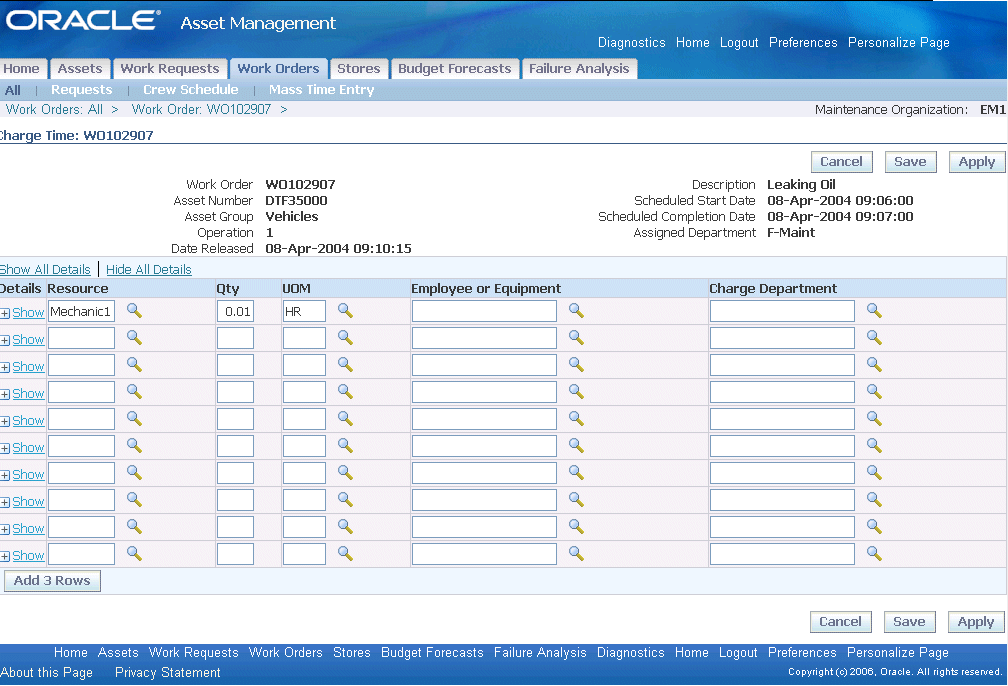
To charge resources, select an Operation, and then select Charge Time from the Select Row: list of values.
-
Choose Go.
Charge Resource
-
Select a Resource Sequence. The Resource, Unit of Measure, and Quantity (reflects the number charged, normally in hours) default, based on the selected resource sequence and the resources associated with the work order. For information on Resource Sequence, Resource, and Unit of Measure, See: Defining Resource Requirements
You can change the resource at the operation level if no transactions have been recorded for the work order.
-
Optionally select the Work Performed Date to indicate the actual date the work was performed.
-
Optionally select the Employee that performed the work.
-
Optionally select the Equipment used to perform the work.
-
Optionally select the Charge Department to identify which department is charged for the employee or equipment usage.
You can display the list of values if the Employee name or Equipment serial number fields are populated. The list of values displays all departments to which the person or equipment is assigned. If you enter a Charge Department manually, the system validates that the department matches the current operation's assigned department. If it does not, you will receive an error.
-
Optionally select a Reason code to indicate the reason the resource is used.
-
Optionally enter a Reference.
-
Choose Apply to save your work and return to the Work Order page.
-
-
Operations are scheduled to run in parallel, sequence, or through dependent steps. For example, Operation 20 is dependent on Operation 10; Operation 20 cannot be performed until Operation 10 is complete. Operations 30 and 40 run in parallel to each other. Operation 40 is independent; it can be performed at any time.
To add an operation dependency, select an Operation, and then select Add Dependency from the Select Row: list of values. After the dependency is added, you can view the dependency within
-
Choose Go.
Operation Dependency
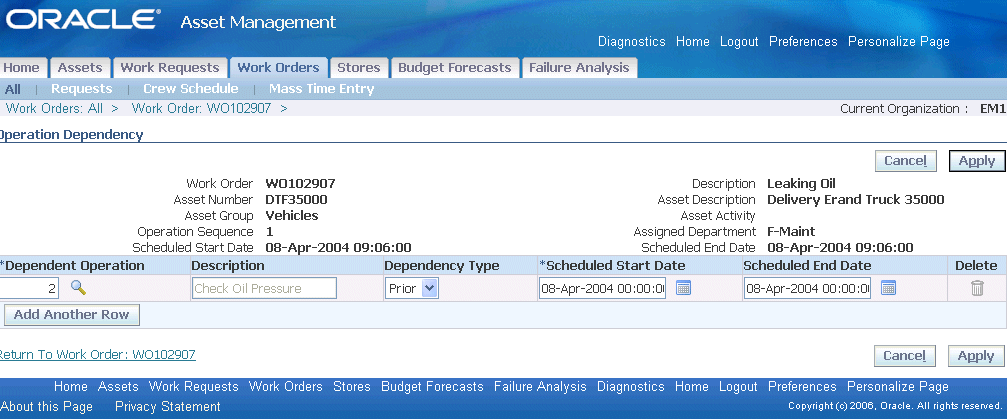
-
Select the Dependent Operation.
-
Select the Dependency Type.
-
Optionally delete existing dependencies by selecting the Delete icon.
-
Choose Apply to create the dependency or Cancel to return to the Work Order page.
-
-
You can Complete and Uncomplete operations. After an operation is complete, you can perform an Operation Uncompletion. If an operation is dependent upon another operation, you cannot uncomplete that operation's dependency if the current operation is complete. For example, operation 20 is dependent on operation 10 completing. You cannot uncomplete operation 10 after operation 20 is complete.
To Complete or Uncomplete an operation, select an Operation, and then select Complete/Uncomplete from the Select Row: list of values.
-
Choose Go.
Complete Operation
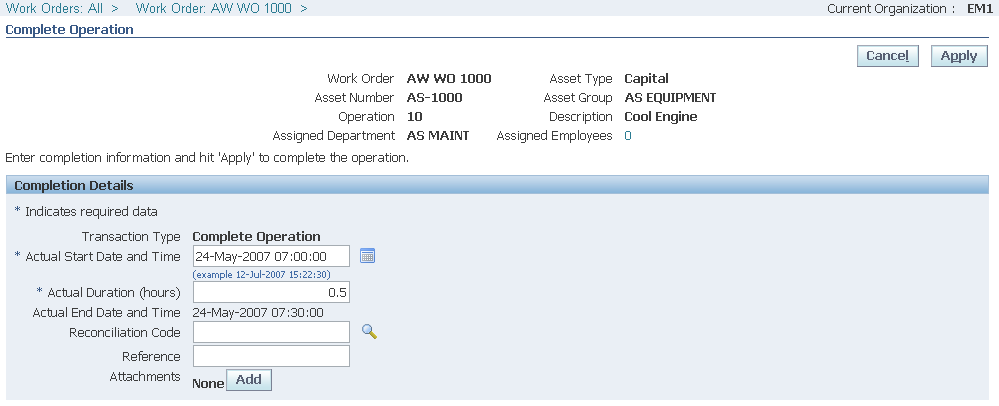
-
The Actual Start Date and Time defaults; you can optionally update it.
-
Optionally enter a Reconciliation Code to describe why you are completing this operation. For example, Operation Completed or Operation Partially Completed.
-
Actual Duration identifies the total elapsed time of the work order. It is automatically calculated as the difference between the operation's Scheduled Start and End Dates.
-
Optionally select a Reconciliation Code to describe why you are completing or uncompleting this operation.
-
Optionally enter a Reference.
-
Optionally choose Add to attach any necessary files, URLs, or text to the current operation. Each operation can have an unlimited number of attachments.
-
The Quality Plans region displays collection plans that are associated with the current asset number. When a collection plan is created, it is specified whether the collection plan requires completion. Triggers might have been specified to make specific assets eligible for the collection plan. See: Quality Integration Setup. If results entry is required for the collection plan, you are prompted to enter Quality results upon completing the Operation.
Optionally select the Enter Quality Results icon. Required Data fields depend on the Collection Plan's collection element specifications. See: Quality Integration Setup.
Enter Quality Results
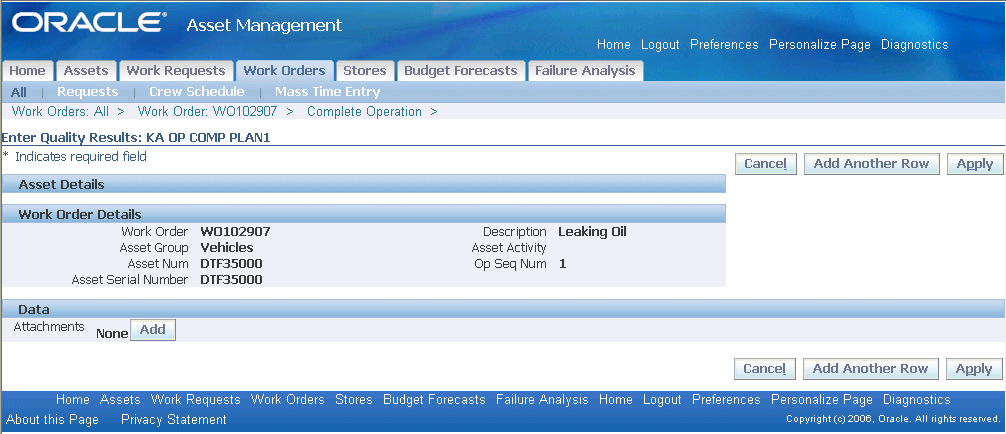
-
Optionally choose Add to attach any necessary files, URLs, or text to the current Quality results. Each results entry can have an unlimited number of attachments. Choose Apply.
-
Choose Apply to save the results entry or Cancel to return to the Complete Operation page.
-
Optionally select the View Quality Results icon to view or update existing Quality results already entered. Select Return to Complete Operation.
-
Choose Apply to complete the operation or Cancel to return to the Work Order page.
-
Optionally update the operations for the current work order. These operations default from the maintenance route (See: Defining Maintenance Routes) associated with the current Activity, but you can update and add to them (See: Preparing Work Order Operations).
-
-
-
Optionally select the Materials sub-tab to view or add items from the associated Asset Number's items list. When you enter a work order for an Asset Number, the Asset Number's associated Activity attaches the required material (See: Setting Up Maintenance Bills of Material) and resources to complete its operations. The Inventory and Direct Item requirements appear. For Direct Items, the requirement entered in the work order, as well as the items directly procured in Purchasing that have not been received yet, are included in the display. You can update, add, view, and delete material requirements for a specific work order.
-
You can optionally request new inventory items.
Request New Inventory Items
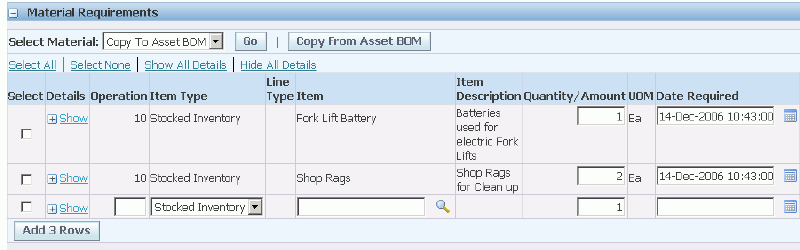
-
Enter an operation.
-
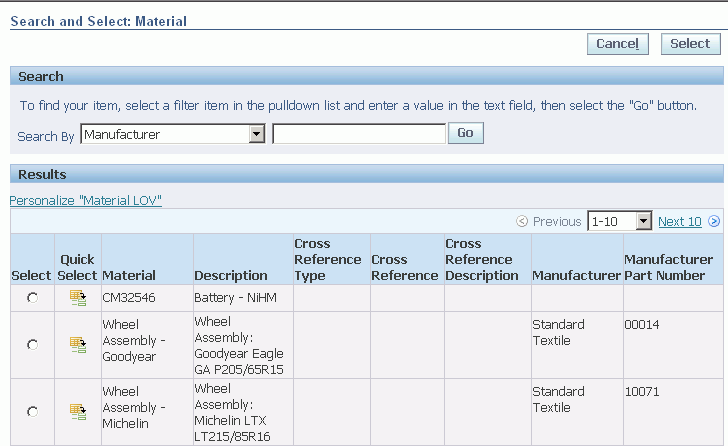
Select an Item to search for and add a new inventory item.
You can search for new inventory items by using one of these options:
-
Item
-
Description
-
Cross Reference
-
Cross Reference Description
-
Manufacturer
-
Manufacturer Part Number
-
Query for the item to be added to the work order.
-
Click the Select radiobutton for the inventory item to be added.
-
-
Enter a required Quantity.
-
Select a Date Required. The system date and time defaults.
-
Optionally select a Supply type. You can optionally select a subinventory location and source locator for the material.
-
Optionally select whether an Auto Request Material value. If you select Yes, requisitions and purchase orders are created automatically for the current inventory item when the work order is released.
-
Optionally enter a Comment.
-
Select whether to include this Inventory Item in the MRP Net.
-
Click the Apply button to add the inventory item to the material requirements.
-
-
Optionally choose Request All to deliver all required material from stores to the work order. A material issue request is generated (move order in Inventory) to request the material associated with a work order. This process is automated upon the work order release, by selecting a checkbox in the Enterprise Asset Management Parameters (See: Defining eAM Parameters).
Request All Materials
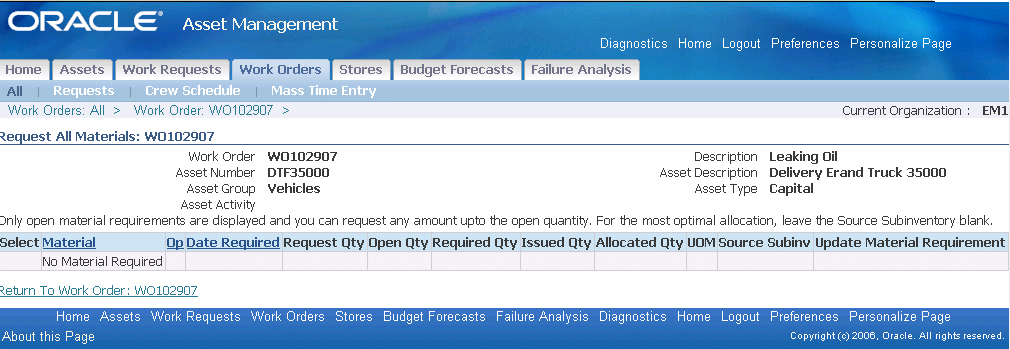
-
Choose Request to allocate the material requirements to the work order.
-
-
Optionally choose Copy From Asset BOM to update the BOM associated with the Asset Group with any items list changes (See: Setting Up Asset Bills of Material
Copy From Asset BOM
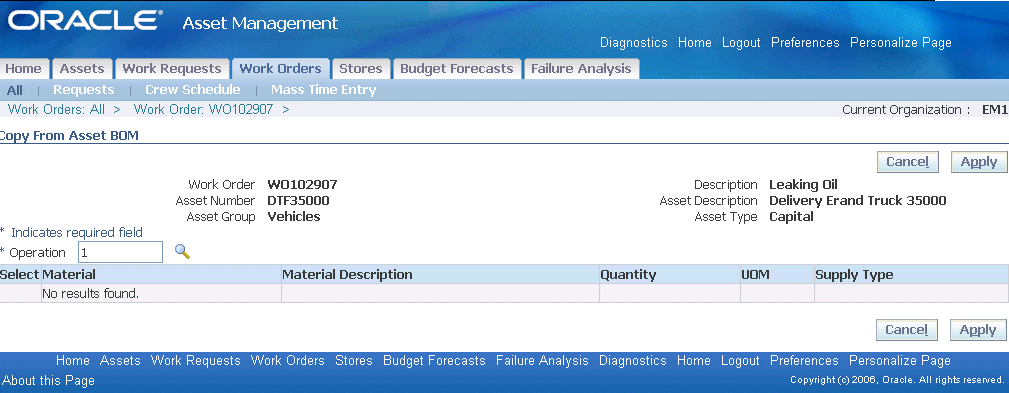
-
Select the necessary Material, and then choose Apply.
-
-
Optionally choose One Step Issue. A one-step issue is a substitute for the Material Issue Request and Material Issue Verification activities; a separate request is not created.
One Step Issue
-
Select the work order that you wish to issue material. It must be enabled for material issue requests. The current work order defaults. See: Routine Work Orders.
-
Optionally select the specific Operation to view results on existing One Step Material Issues that were issued to that operation. Operations existing within the selected work order are available.
-
Optionally select a specific Material if your query is to view existing One Step Material Issues.
-
Choose Go. All planned material appears in the Select Material(s) region. Planned material is material that exists in the material requirements. See: Defining Inventory Material Requirements.
-
Within the Select Material(s) region, optionally select unplanned Material (material not part of the material requirements) to issue to the current work order.
-
Select an Operation to issue the material. The UOM defaults to the current Material's UOM.
-
Select the Quantity of the material that you are issuing to the work order.
-
Optionally select a Subinventory to pull the material from in Inventory.
-
If you previously selected a Subinventory requiring a Locator, select a Locator.
-
If the current material is lot controlled, select a Lot.
-
If the current material is serial controlled, select From and To Serial numbers.
-
Optionally select a Revision.
-
If the material is Rebuildable Inventory, optionally choose the Replaced Rebuild Details icon to specify the replacement Rebuildable Item information for the current Rebuildable Item. After selected, you can indicate the following within the Replaced Rebuild Details page:
Rebuild Item- defaults as the current Rebuild Item; you can update it.
Rebuild Serial Number - optionally enter if you know what serial number is coming out (for serialized rebuilds).
Rebuild Activity - the activity you want to associate with the created rebuild work order
Rebuild Work Order - the name of the work order created for the replaced Rebuildable Item
- If you specify a replaced rebuildable item, a work order generates for the replaced rebuildable item because it is most likely problematic and you can have it repaired. If a serial number is provided for the replaced Rebuildable Item, it is removed from the asset's hierarchy and the configuration history is updated. If nothing is specified within the Replaced Rebuild Details page, the replaced rebuild defaults as the same rebuild item that you are issuing. A work order is created for the replaced rebuild item.
-
Optionally, select the Details Show-Hide toggle icon.
Optionally select a Reason for the current issue. Select the Date required for the material to the work order. Today's date and time defaults. Optionally enter a Reference.
-
Select the Select checkbox next to the lines you are issuing to the current work order.
-
Choose Issue.
-
-
You can optionally choose Request Item, within the Direct Items region, to add Direct Items to the material requirements. Non-stock direct items can be included in the internal catalog, but the decision is made to not maintain an inventory balance. These items are not transactable, not stockable, but you can procure them. Direct items are either non-stock or description-based. Non-Stock Direct Items can represent items that are not stocked in inventory, or services that need to be purchased from a supplier. Non-Stock Direct Items are not stocked in inventory but are defined in the Item Master as an inventory item, purchaseable, and purchase but not stockable (See: Inventory Attribute Group, Oracle Inventory User's Guide). Direct Items are contrived as "one-off", bought directly from a vendor for a specific work order and Operation. They are delivered directly to the Shop Floor from maintenance work order execution. See: Defining Direct Item Material Requirements. You can add Planned Direct Items to a work order BOM or an activity BOM. Planned Direct Items must first be created in the Item Master as Non-Stockable and Purchasable inventory items (See: Non-Stock Direct Item Setup). A purchase requisition is optionally automatically created for these items, when the work order is released.Inventory Attribute Group, Oracle Inventory User's Guide
Request New Direct Items
-
Select an Operation.
-
Select an Item Type.
Description Direct:This direct item type is not stored in Oracle Inventory.
Non-Stock Direct:This direct item type is stored in Oracle Inventory. Its Master Item record's Stockable checkbox is cleared.
-
If you selected a Non-Stock Direct item type, select an Item. This field is disabled if a Description Direct item type was previously selected.
-
Enter a Description, if you previously selected a Description Direct item Type.
-
Enter a Date Required. The system date defaults.
-
Optionally enter a Purchasing Category. See: Setting Up Purchase Order Category Associations for Direct Items.
-
Choose Apply.
-
-
Optionally select Check ATP from the Select Material(s): list of values to check available to promise information for all selected Material.
-
Choose Go.
-
-
Optionally select Copy To Asset BOM from the Select Material(s): list of values, to copy any selected Material to the current Asset Number's Asset BOM.
-
Choose Go. Both stocked and non-stocked inventory items are copied.
-
-
Optionally select the Update icon to update the current material requirement information.
-
Optionally select the Request More icon to request more of the current material requirement to the work order.
-
Optionally choose Delete to delete the current material requirement.
-
-
Optionally choose the Quality Plans sub-tab to view the current work order and operation-specific Quality collection plans. Collection plans appear that are associated with the current asset number. When a collection plan is created, it is specified whether the collection plan requires completion. Triggers might have been specified to make specific assets eligible for the collection plan. See: Quality Integration Setup.
Quality Plans
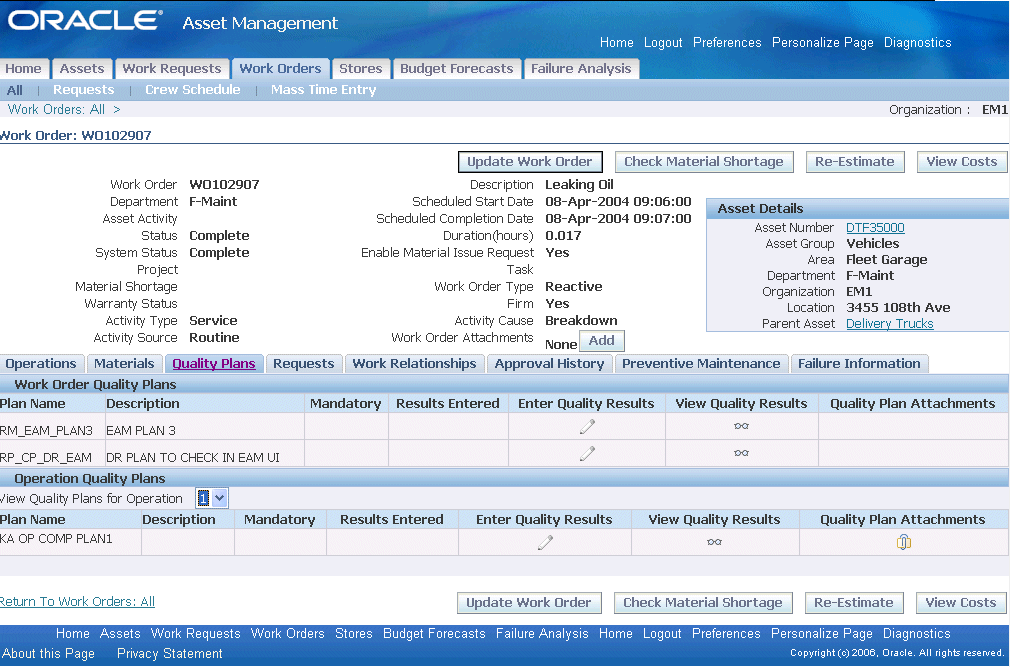
-
Optionally select the Enter Quality Results icon. Required Data fields depend on the Collection Plan's collection element specifications. See: Quality Integration Setup.
-
Optionally choose Add to attach any necessary files, URLs, or text to the current Quality results. Each results entry can have an unlimited number of attachments. Choose Apply.
-
Choose Apply to save the results entry.
-
-
Optionally select the View Quality Results icon to view or update existing Quality results already entered. Select Return to Complete Operation.
-
Choose Update Work Order to update the current work order.
-
-
Optionally select the Requests sub-tab to view any Service and/or Work Requests associated with the current work order.
Requests
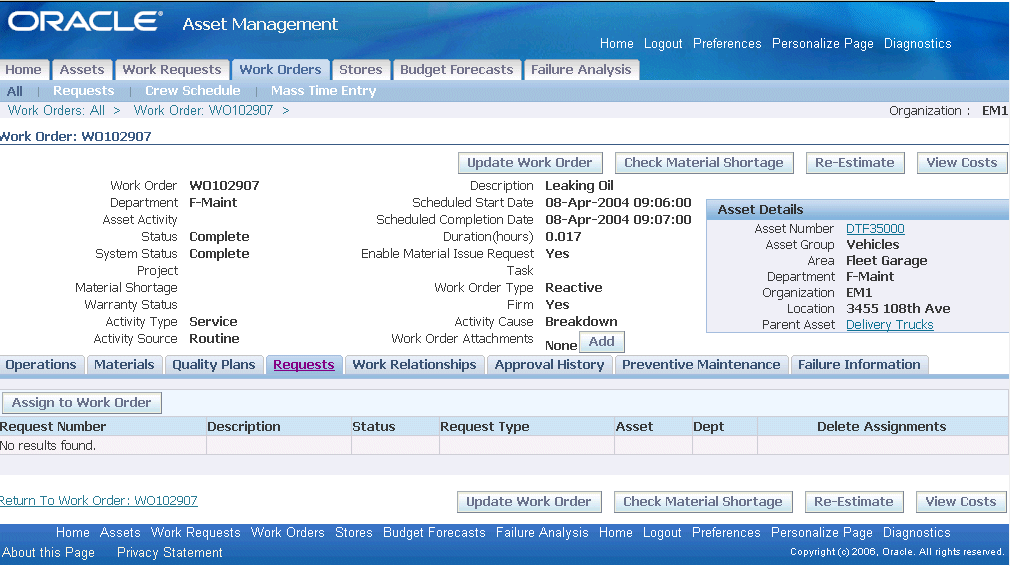
-
Choose Assign to Work Order to associate the selected requests to the current work order.
-
-
Optionally select the Work Relationships sub-tab to manage work order schedules and view work order details. Work order relationships enable you to manage a network of related work orders, enabling you to manage complex projects, such as planned or facility shutdowns. The different relationships provide separate scheduling rules that are used to manage large projects. A Gantt chart enables you to manage work by displaying work order schedules and a summary of work order details. The Gantt Chart's drag and drop functionality enables you to manage schedules with ease. See: Work Order Relationships.
Work Relationships
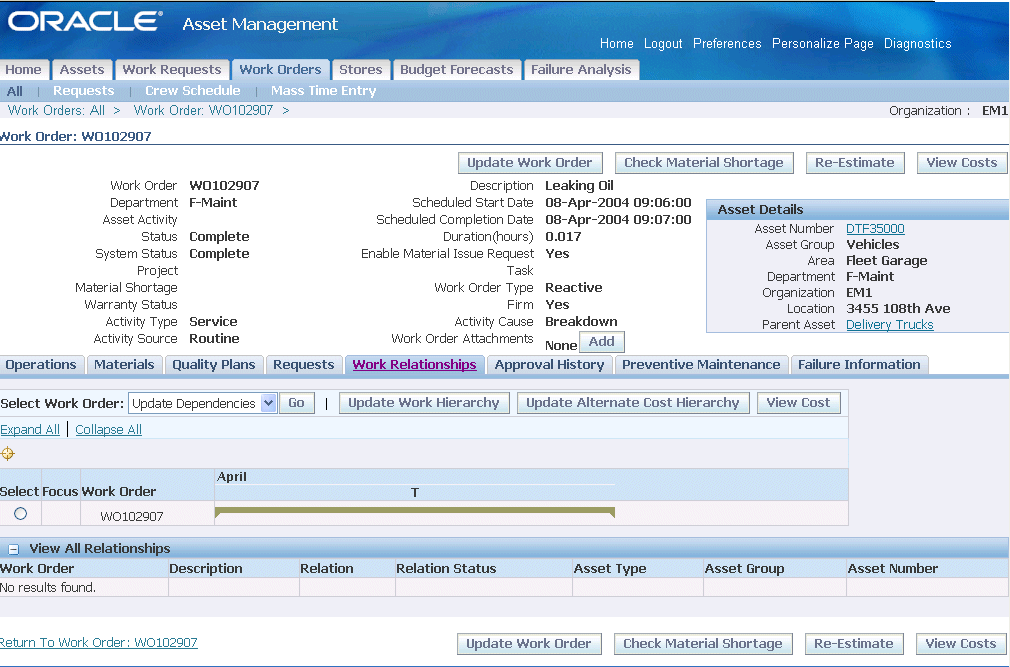
-
Optionally choose Update Work Hierarchy to view and or update the Scheduling Relationship.
-
Select Create Child Work Order from the Select Work Order: list of values to create a Parent Child Relationship. See: Work Order Relationships.
-
Select Add Existing Work Orders from the Select Work Order: list of values to add Scheduling children to the current work order.
-
Choose Apply.
-
Optionally choose Shift Dates to shift the scheduling dates.
-
Optionally choose Remove to remove the selected work order from the hierarchy.
-
-
Optionally choose Update Alternate Cost Hierarchy to view and or update the Cost Relationship. See: Work Order Relationships. You can optionally create child work orders, add existing work orders, and view cost information for the current Cost Relationship.
-
Optionally choose View Costs to view the current cost information.
-
-
Optionally select the Approval History tab to view the work order approval history.
Approval History
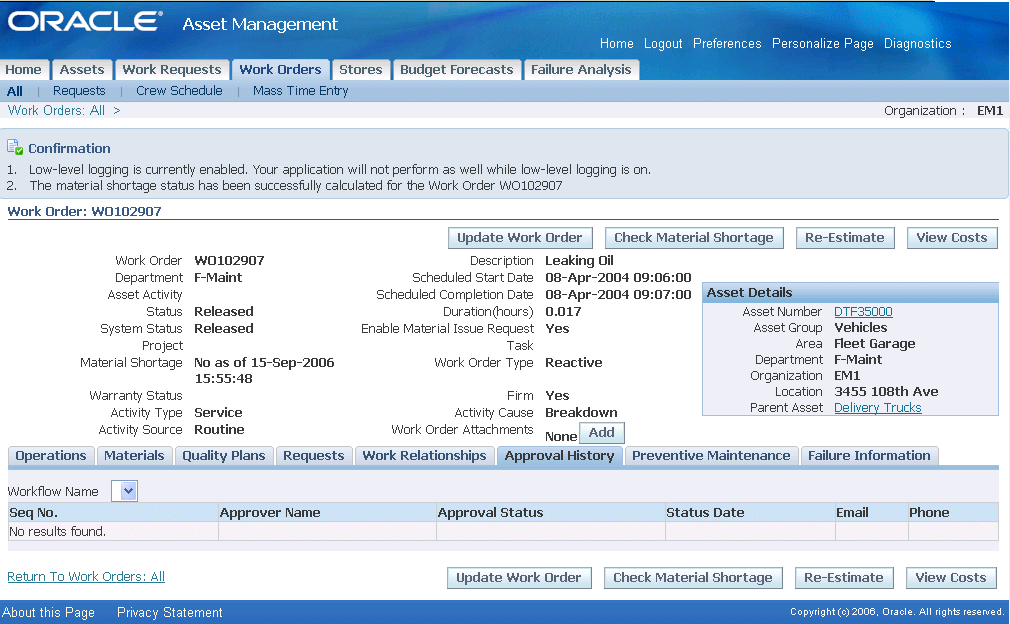
A work order might require approvals or notifications at different stages of its lifecycle. For example, organizations typically want an approval process in place before a work order is released. Workflow automates this process. You can initiate Workflow to generate notifications, approvals, transactions, and update a work order status. You can enable Workflow for Work Orders within the eAM Parameters (See: Defining eAM Parameters). You can set up Business Events and Event Subscriptions (or use seeded events and subscriptions) within Oracle Workflow to indicate what events trigger Workflow. Seeded events that you can enable to trigger Workflow are: work order creation, work order release approval, work order completion, work order status change, operation completion. See: Setting Up Oracle Workflow, Oracle Workflow User's Guide, Setting Up the Business Event System, Oracle Workflow User's Guide, Planning Your Organization's Approval Process, Oracle Approval Management User's Guide, and Defining Work Order Statuses).
-
Optionally select the Preventive Maintenance tab to view Preventive Maintenance information. Enterprise Asset Management enables you to generate work orders automatically based on meter readings, runtime intervals, and calendar days. Preventive maintenance Activities reduce the probability of failure or degradation of the assets' physical conditions. These Activities are executed periodically, by usage, or based on the condition of an Asset Number (asset or rebuildable serial number). Meters are entered to measure any Asset Number that needs to be measured and periodically serviced, based on the measurement (See: Preventive Maintenance Overview).
-
Optionally select the Failure Information tab to view Failure Analysis information for this work order (See: Failure Analysis Overview).
You can perform a comprehensive view of employee schedules by department or resource. Planners can determine their crews' workload details. Planners may also modify and change their employees' workloads.
-
Navigate to the Crew Schedule page (Work Orders tab > Crew Schedule sub-tab).
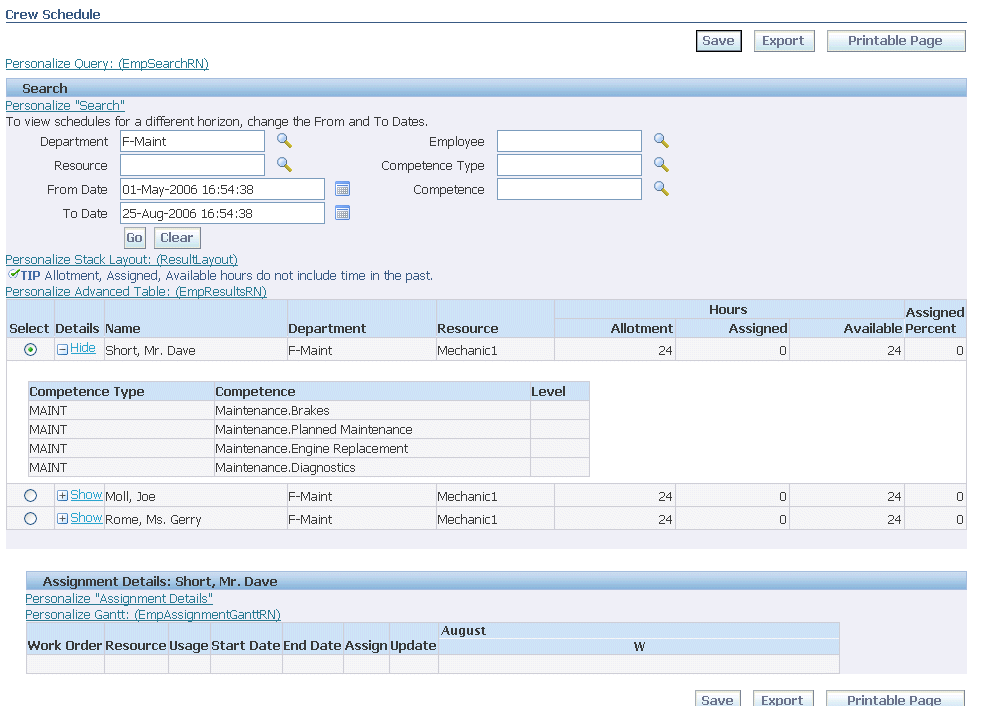
-
Using the fields in the Search region, you can select the list of employees in which to view or update work loads. You can specify a date range for which employee workload details appear.
-
Choose Go to display a list of employees, based on the results of the entered search criteria.
Entering Time for Multiple Work Orders
Resource transactions define the time an assembly spends at an operation and the cost you incur for an operation. There are two types of resources: person and machine. You can transact both person and machine resources. A resource is an employee, piece of equipment, or contractor service, used to perform an operation. You can charge resources to a specific work order
You can enter time for one or multiple orders at once, using the Mass Time Entry page. See Also: Resource Transactions, Oracle Work in Process User's Guide.
-
Navigate to the Mass Time Entry page (Maintenance Super User: Work Orders tab > Mass Time Entry sub-tab).
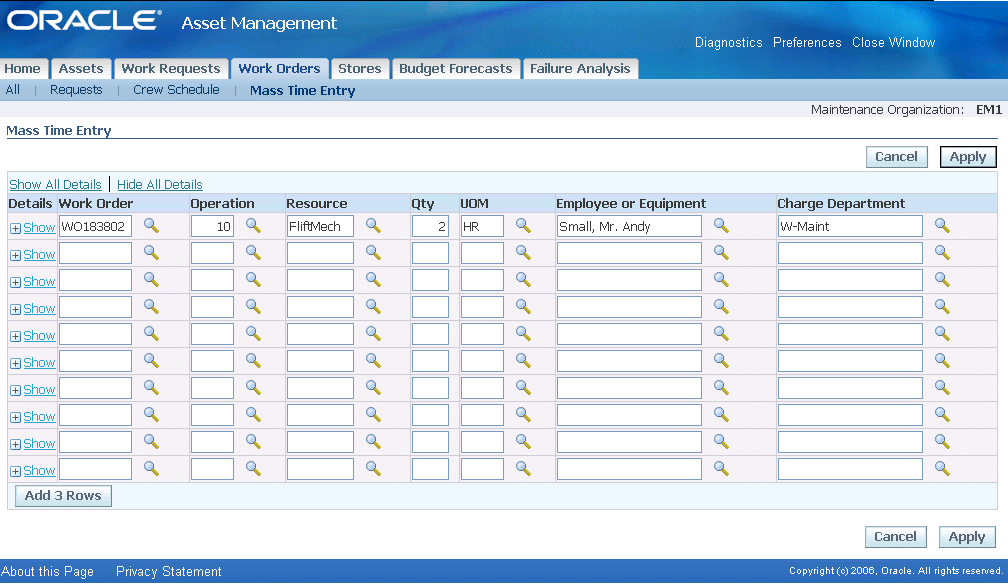
-
Select a valid work order.
-
Enter the Operation sequence of the current work order routing to charge (See: Preparing Work Order Operations).
-
Enter the Resource sequence to charge (See: Defining Resource Requirements).
-
Enter the Quantity to charge.
-
Select a UOM to measure the quantity charged. This defaults from the current resource's department setup (See: Defining Departments and Resources).
-
Select an Employee or Equipment resource to charge.
-
Select a Charge Department.
-
Optionally, in the Hide region, enter Resource Sequence, Reason, Reference, and Work Performed Date information.
-
Choose Apply to save your work.
Enterprise Asset Management work orders are created against assets. They are defined manually, or generated automatically based on a scheduled Activity. If you attach a manually created work order to an activity (normally the role of a Planner), the work order inherits the Activity's attributes, such as the Asset BOM, Asset Route (operations), attachments, quality plans, cost information, and scheduling rules.
The operations within a work order do not need to be complete to complete a work order. However, the date you complete a work order must be greater than (later) or equal to the end date of the operation that has the latest end date. Likewise, the date you start a work order must be earlier than or equal to the start date of the operation with the earliest start date. You can uncomplete a work order after it is completed to transition it to a Released status (See: eAM Work Order Statuses).
Planners or Crew Supervisors can complete or uncomplete work orders, using the Maintenance Workbench (See: Using the Maintenance Workbench), or from the Work Plan tab in Maintenance User. After completing a work order, the completion transaction record is created with your electronic signature (User Name). A record is created with this signature, during completion, for any mandatory collection plan results or mandatory meter readings, as well.
Note: You can complete associated work permits at the same time that you complete work orders. However, the associated work permit must have a status of Released or a user-defined equivalent.
-
Navigate to the Work Orders page.
Work Order Completion
-
Enter a work order number.
-
Choose Go.
-
Choose the Complete Work order pencil icon.
-
Enter a duration value: Actual Duration or Actual Start Date and Time. The Actual Start Date and Time defaults as the system date, but you can optionally update it. The value that you do not enter is automatically calculated.
Actual Duration identifies the total elapsed time of the work order. It is automatically calculated as the difference between the Scheduled Start Date and Scheduled End Date.
-
Optionally enter a Reconciliation Code. This is a simple description of why you are completing this work order, for example, Work Order Completed or Work Order Partially Completed.
-
Oracle Quality collection plans associated with the current asset number and those requiring completion appear in the Quality Plans region. When the collection plan was created, it was specified if the collection plan required completion. Also, during the Enterprise Asset Management collection plan creation process, triggers might have been specified to make only certain assets eligible for the collection plan. See: Quality Setup.
Required fields are dependent on the Collection Plan's collection element specifications. See: Quality Setup.
-
Open the Meters region to enter readings for meters associated with this Asset Number. Readings for meters defined as mandatory must be entered. You can optionally enter non-mandatory readings.
At work order completion, meter readings are mandatory for work orders generated by the Preventive Maintenance scheduling engine. After a work order is completed, meter readings are required for all runtime interval meters associated with the Asset Number in the Preventive Maintenance scheduling definition. See: Preventive Maintenance Scheduling. If there is a meter associated with this Asset Number, you are prompted to enter a Current Reading or a Reading Change. If you enter a Current Reading, the Reading Change defaults. If you enter a Reading Change, the Current Reading defaults. See: Entering Meter Readings.
-
Enter Reset Reading value to indicate that you would like to Reset the Current Reading.
-
-
Open the Failure Information region to enter Failure Analysis information (See: Failure Analysis Overview). The Failure Information region appears if the Failure Code Required value is set to Yes, within the Failure Set definition (See: Defining Failure Codes and Sets).
Failure information entry is mandatory during work order completion if the Failure Entry Required checkbox was selected when this work order was created. However, if the Failure Entry Required checkbox is was clear, you can still enter failure information at work order completion (See: Creating Work Orders).
-
Choose Apply to complete the work order.
Uncompleting Work Orders
-
Navigate to the Work Orders page.
-
Enter a work order number (with a Complete status).
-
Click the Go button.
-
Choose the Uncomplete Work Order pencil icon.
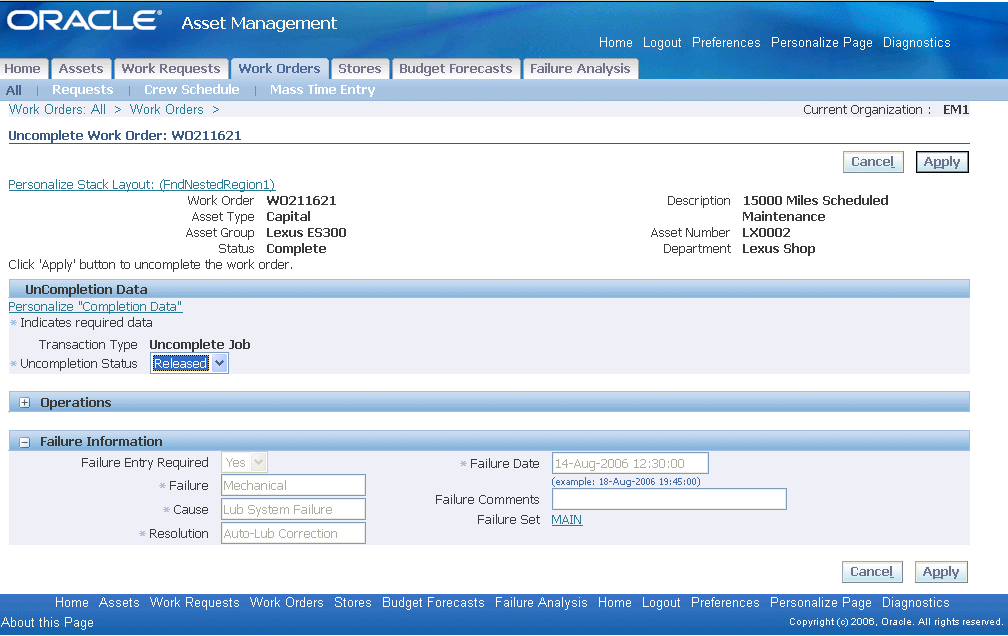
-
Choose Apply to uncomplete this work order. When you uncomplete a work order, entered failure information is not reversed. However, when you re-complete the work order, you can update your failure information.
-
Navigate to the Work Orders page.
-
Enter a work order number.
-
Optionally, indicate whether you want to include the child assets associated with the work order.
-
-
Click the Go button.
-
Click the Update Work Order button.
Note: This function is available for those users with responsibilities and roles that include function, EAM_WO_DETAILS_MODE, with their associated menu. Otherwise, you can only view work orders, and cannot update associated asset hierarchy, work order hierarchy, material, resource, operation, cost, collection plan results, work request, and attachment information. See: Implementing Function Security, Oracle Applications System Administrator's Guide - Security.
-
Update the necessary information.
You can change the department at the operation level if no transactions have been recorded for the work order.
-
Optionally select or hover over the paperclip Attachments icon to attach relevant documents, such as drawings, standard procedures, and reference guides. You can attach file, URL, and text attachments. If you want to view the attachments, hover or click the View button.
Note: The Estimate Number field is display-only and cannot be updated.
To assign employees or equipment to an operation for scheduling
-
Open the Operation Requirements region.
-
Select the operation in which to assign the employee or equipment resource.
-
Select Assign Employee from the Select Row: drop-down list.
-
Choose Go.
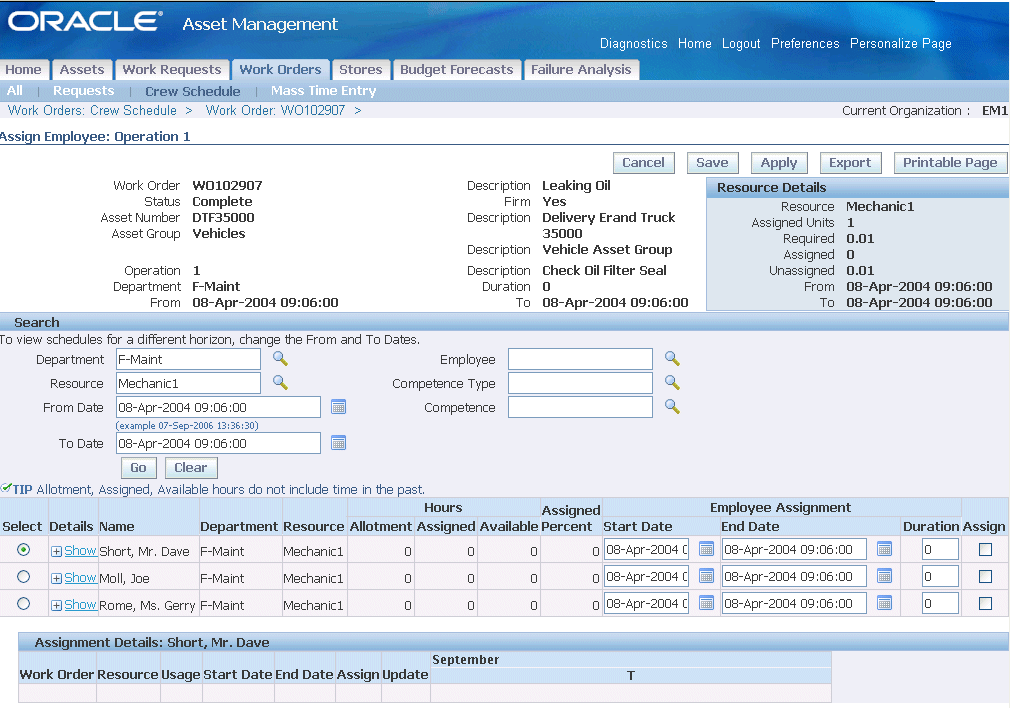
The header region displays information about the current work order and the specific operation. You can assign employees to a work order operation and work order resource. Employee assignments result in the creation of new employee or equipment Instances that are assigned to the chosen Resource code and the creation of a new resource requirement. The Resource Details content, within the header, displays all information about the resource.
Using the fields in the Search region, you can search for employees, based on their eligibility or availability, and assign one or more to the work order. All employees who belong to the current operation's department and who are assigned to the Resource code appear. The employees' start and end times default to the Resource start and end time.
-
Optionally select a different department. Available departments are all departments within the current organization.
Additional Information: You can only view employees and their schedules from other departments; they are not available for assignment. If you want to assign employees from other departments, you can perform this within the Update Work Order page by adding another operation, assigning that department to it, and then accessing this Assign Employee page.
-
Optionally select a Resource. All resources, within the current operation's department, are available.
You can change the resource at the operation level if no transactions have been recorded for the work order.
-
Optionally specify a date range for which employee workload details are displayed.
-
Optionally select an Employee. All employees who are assigned who are assigned to the work order operation are available.
-
Optionally select a Competence Type.
-
Optionally select a Competence.
-
Choose Go. A list of employees appears, based on your search criteria. You can view employee availability information to decide which employee to assign to the current operation.
-
Allotment: Total hours an employee is available for work, based on shift and specified Date Horizon (From and To Date in the Search region of the Assign Employee page).
-
Assigned Hours: Total time an employee is scheduled for any work orders during the same Date Horizon. Assigned Hours does not account for work that is at Complete-No Charges, Complete, Cancelled, or Closed statuses.
-
Available Hours: Alloted Hours – Assigned Hours
-
Assigned Hours: Total time an employee is schedule for any work orders during the same Date Horizon. Assigned Hours do not account for work that might be at Complete-No Charges, Complete, Cancelled, or Closed statuses.
-
Assigned %: Assigned Hours/Available Hours
You can update the employee schedules on existing work orders, or dissociate them using the links in this section. The region displays work orders across departments and organizations that an employee is assigned to. If the work order is from a different organization, you cannot drill down or modify it.
Note: You can modify employee schedule dates only if the work order is firm.
Additional Information: You can update the employee's start and end dates within the previous Update Work Order page by selecting the Update Work Order link at the top of the page. You can stagger employee start and end times on the Update Work Order page, as well, by adding a new employee row and providing the staggered employee's start and end times.
-
-
The Assignment Details region displays the list of work orders, at any status, that the employee is assigned to. You can update employees' schedules on existing work orders, or unassign them using the links in this section. This region also displays work orders across departments and organizations that an employee is assigned to. If a work order is from a different organization, you cannot drill down or modify it.
Note: You can modify employee schedule dates only if the work order is firm.
-
Select the Assign checkbox next to the employee to assign to this operation.
-
Choose Apply.
-
-
Optionally choose Shift Dates to shift the work order dates forward or backward by a specified number of days. You can also enter a new scheduled start date or end date. All other work order dates, including operations, resource, and resource instance dates, are shifted and synchronized accordingly.
-
Optionally choose Estimate to estimate your work order costs. The newly updated estimated costs appear in the work order Content container.
-
Optionally choose Copy Work Order to copy all work order details, including asset number, activity, operation, resource, resource instance, and materials, to a new work order. You can change any fields before creating the new work order.
-
Optionally choose Save to save the updated information, without leaving the current screen.
-
Choose Apply to save all updates and return to the Work Orders page.
Using Microsoft Projects to Change Work Order Dates
You can use Microsoft Projects to change the dates on asset work orders. You may want to use this feature to perform 'what if' scenarios without actually changing the data in Oracle eAM. After you have made revisions to the dates associated with the work order, you can import the revised data back into Oracle eAM.
Note: You can use Microsoft Projects 2003 with this feature.
By using this feature, you can:
-
Export the work order data in an XML format into Microsoft Projects.
-
Change the dates associated with the work order.
Note: You can only change the dates associated with tasks associated with a work order. You cannot change or add resources.
-
View Gantt charts reflecting the date changes while creating and updating the tasks.
-
Access multiple views of the revised schedule such as resource graphs, resource usage charts and so on.
-
Print the revised reports and views.
-
Import the revised work order data back into Oracle Enterprise Asset Management.
To use Microsoft Projects to change the dates associated with a work order:
-
Navigate to the Work Orders page and query for the asset work order to which you want to make changes.
-
Click the Go button.
-
Select the radiobutton for the work order, and then click the Export Schedule button.
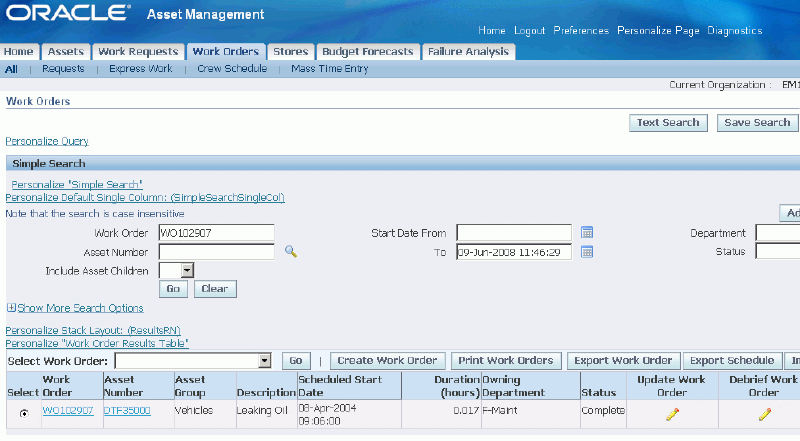
-
On the Export Work Orders page, select Microsoft Project in the Target System field.
-
Select the check box for the work order, and click the Apply button.
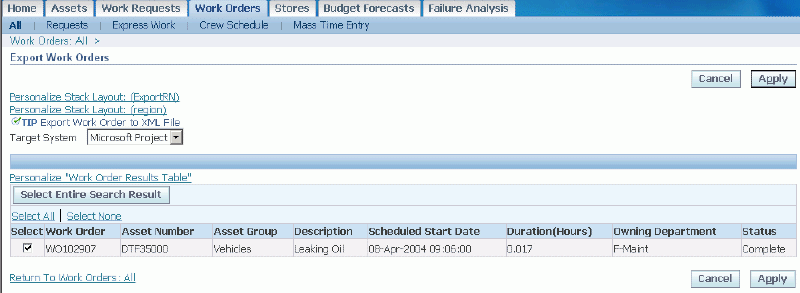
-
Click the Open button to edit the file immediately, or click the Save button to save the document and edit it at a later time.
-
Open Microsoft Projects and then select the document.
-
Make your date changes in Microsoft Projects.
-
Review the changes and when you are finished, save the project.
-
Access the Work Orders search page and click the Import Schedule button.
-
On the Import Work Orders page, select the file that you revised and now want to import.
-
In the Select Source System field, select Microsoft Project, and click the Go button.
-
Click the Apply button to import the revised data.
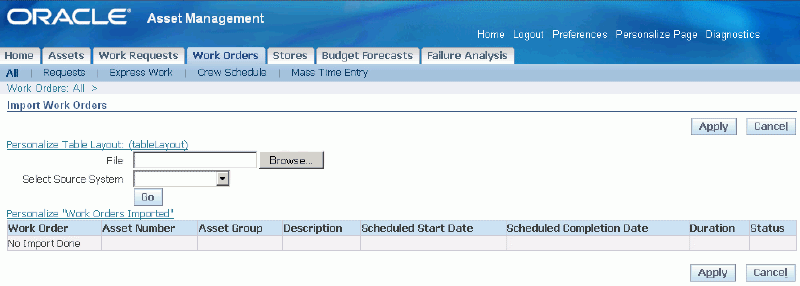
Using Primavera to Change Work Order Dates
You can also use Primavera to change the dates on asset work orders. You may want to use this feature to perform 'what if' scenarios without actually changing the data in Oracle eAM. After you have made revisions to the dates associated with the work order, you can import the revised data back into Oracle eAM.
Primavera retains any work hierarchy and parent-child relationships that may exist in Oracle eAM.
Important: You can export only employee resources to Primavera.
| Oracle eAM | Primavera |
|---|---|
| Work order scheduled start and end dates | Start and Finish milestones |
| Operations | Activities |
| Departments and Resources on an operation | Roles (concatenated) |
| Resources (employees) | Resources |
| Parent-child relationships | WBS relationships |
By using this feature, you can:
-
Export work order data in an XML format into Primavera.
-
Change the dates associated with the work order.
Note: You can only change the dates associated with tasks associated with a work order. You cannot change or add resources.
-
Import the revised work order data back into Oracle eAM.
To use Primavera to change work order dates:
-
Navigate to the Work Orders page and query for the asset work order to which you want to make changes.
-
Click the Go button.
-
Select the radiobutton for the work order, and then click the Export Schedule button.
-
On the Export Work Orders page, select Primavera in the Target System field.
-
Select the check box for the work order, and click the Apply button.
-
Click the Open button to edit the file immediately, or click the Save button to save the document and edit it at a later time.
-
Open Primavera and then select the document.
-
Make changes to the work order dates.
-
Save your work in Primavera.
-
Access the Work Orders search page and click the Import Schedule button.
-
On the Import Work Orders page, select the file that you revised and now want to import back into eAM.
-
In the Select Source System field, select Primavera, and click the Go button.
-
Click the Apply button to import the revised work order schedule.
After you receive the list of work orders from the Work Order Search page, you have two options to print the work order:
-
A Print Work Order icon at the work order level enables you to print a selected work order
-
The Print Work Order button at the Result table level enables you to print multiple work orders.
Both options navigate to the Work Order Report page.
-
Navigate to the Work Orders page (Maintenance Super User > Work Orders).
-
If you choose the Print Work Order icon at the work order level from the Search page, only one work order appears. If you choose the Print Work Orders button from the Search page, a list of work orders appears. You can then selectively specify the work orders or select all work orders to print.
-
The Select Parameters region provides print content options. Items that are checked are printed.
-
You can select a work order print Template. Maintenance Work Order Report is the seeded template, but you can define your own XML templates.
-
Select a language from the Locale list of values, to specify the language to print.
-
Select a Format for the work order print. The supported formats are: EXCEL, HTML, PDF, and RTF.
-
Choose Run to print your work orders.
Related Topics
Defining Inventory Material Requirements
Defining Direct Item Material Requirements
Work Plans
By using the Work Orders tab, crew supervisors can execute work plans generated by a planner. The Materials tab enables you to manage operations on a work order. You can skill search across departments, assign employees to a work order, adjust crew schedules, complete operations, hand work over to another department, complete a work order, request material, and enter quality plan information, such as inspection data.
Using the simple or advanced search modes, a supervisor can query on existing work orders, assigned to a department or employee to view, update, or manage operations. The Managing Operations tab enables you to search skills, assign employees to work orders, hand over work to other departments, charge resources, and complete or uncomplete an operation.
The following tasks are performed, using the Work Orders tab:
-
Work order viewing
-
Resource charging
-
Handovers
-
Employee assignment to operations
-
Completion and uncompletion of operations
Executing Work Plans
You can execute work plans for any scheduled work in your organization.
The Work Orders tab enables you to do the following:
-
Manage operations:
-
Complete operation/Un-complete operation - completing an operation does not complete the work order, however this can be done via the Work Order.
-
Construction Units
Construction units (specifically known as compatible units in the utility and telecommunications industry) are standardized repetitive units of work, which involve labor, material and equipment. An example of a construction unit is the erection of transmission towers, which involves the similar efforts of excavation, erection, and so on, and requires similar materials and equipment. Installing multiple towers includes performing the same repetitive work, while allowing for specific factors such as terrain, accessibility, and so on. One construction unit is used as a typical requirement of such work, including resources and equipment to be used repetitively. The use of construction units can reduce estimating and planning efforts.
By using this feature, you can:
-
Define a construction unit and associate activities, operations and resources.
-
Copy construction units.
-
View and modify a construction unit.
-
Group construction units to create construction estimates.
-
Define difficulty codes.
-
Generate construction estimates.
-
View and modify a construction estimate.
-
Generate work orders for the construction work, including estimates.
-
Use the Estimation Workbench to create and modify work orders for construction units and estimates.
-
Capitalize actual costs associated with construction estimates.
Prerequisites
- You must perform the following before you can create construction units:
-
Define activities to be used with the construction units, and associate the activities to your organization. See Defining Activities
-
Create material BOMs for the activities. See Setting Up Maintenance Bills of Material
-
Define operations for the construction units. See Preparing Work Order Operations
-
Assign resources to be used with the activities.
One construction unit is a collection of activities, as defined in the eAM Master Items table. You can also define a routing and bill of material for the construction unit.
Construction units are defined at the organization level, and can include only those activities that are assigned to the same inventory organization. However, you can query construction units associated with different organizations and copy them to another organization. You can search by name, description, and organization.
When you define a construction unit, you enter the activity quantities for materials, resources, and resource multipliers for the construction unit.
Perform the following steps to create construction units:
-
Navigate to the Maintenance Super User responsibility, enter EM1 in the Organization field, and then click the Go button.
-
Click the Construction Units tab, and then click the Create Construction Unit button.
The Create Construction Unit page appears.
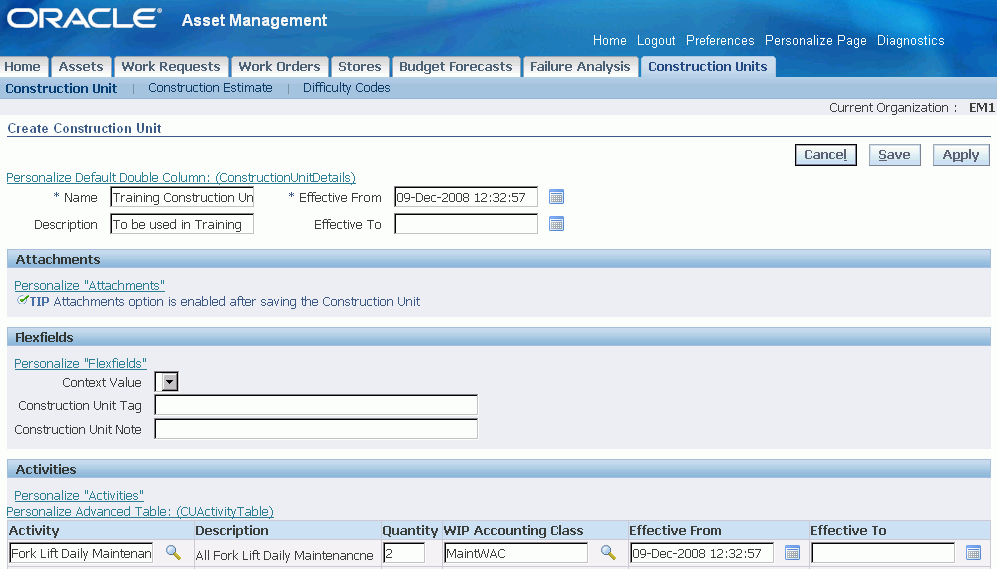
-
Enter a name for the construction unit (required).
-
Enter a description.
-
Enter a date in the Effective From (required) and Effective To fields.
Note that the Effective From date is required.
-
Add at least one activity the construction unit.
-
Enter a Quantity to indicate the amount of the activity that is required for the construction unit.
The quantities defined in the activity routing and material BOM would be multiplied with this quantity.
-
Optionally enter a WIP Accounting Class to identify the expense cost elements associated with the work performed, such as materials, labor, and resources.
-
Save your work.
You can copy an existing construction unit to create a new construction unit.
-
Navigate to the Maintenance Super User responsibility.
-
Click the Construction Units tab.
-
Enter the search criteria to query for construction units that you want to copy.
-
Click the Go button.
-
Select the construction units that you want to copy.
-
Click the Copy Construction Unit button.
The Copy Construction Unit page appears.
-
Enter a name and a description for the new construction unit.
-
Optionally enter dates in the Effective From and Effective To fields.
-
You can revise the quantity, WIP Accounting Class and effective dates to apply to the new construction unit.
The effective dates of the activities must occur after the effective date of the construction unit. You must enter an effective from date.
-
Optionally select the Assign to Org check box.
Select this check box to assign the activities to the organization. If this check box is selected, the activity has been assigned to the organization, the check box is display only.
Important: Although an activity is assigned to a new organization, you must define the BOM and the routing for the activity.
-
Save your work.
Viewing and Modifying Construction Units
You can search for construction units to add, delete or modify the activities, quantities, factors, and other related attributes. These attributes may require changes depending on the user requirements relating to specific construction projects.
-
Navigate to the Maintenance Super User responsibility, enter EM1 in the Organization field, and then click the Go button.
-
Click the Construction Units tab.
-
Enter the organization for the construction unit that you want to view or modify. By entering a value in the Organization field and leaving all the other fields blank will return all construction units that are associated with the organization. You an further refine your search by including values in the other fields such as Name, Description, and so on.
-
Click the Go button.
-
Click the hyperlink for the construction unit to view the details.
The Construction Unit page appears.
-
To modify the construction unit, click the Update button for the construction unit.
The Update Construction Unit page appears. Use this page to add attachments to the construction unit. You can hover or click the Add button to add new attachments to the construction unit, or hover over the View attachment link to view or update an existing attachment.
Note: You must first create and save a construction unit before you can add an attachment.
-
Make revisions to the construction unit such as adding attachments, flexfields, and additional activities.
-
Save your work.
Difficulty codes are defined as a multiplier with resource quantities that specify the additional resource usage required relating to factors such as soil condition, accessibility of the work site, and so on. The quantities defined for resource and material requirements are multiplied with quantities on the construction unit for cost estimation and on work orders. Difficulty codes are defined with a value assigned with them (a number larger than zero), which gets multiplied with resource quantities.
-
Navigate to the Maintenance Super User responsibility, enter EM1 in the Organization field, and then click the Go button.
-
Click the Construction Units tab, and click the Difficulty Codes hyperlink.
The Difficulty Codes page appears. You can use this page to search and define difficulty codes.
-
Click the Add 5 Rows button to define difficulty codes.
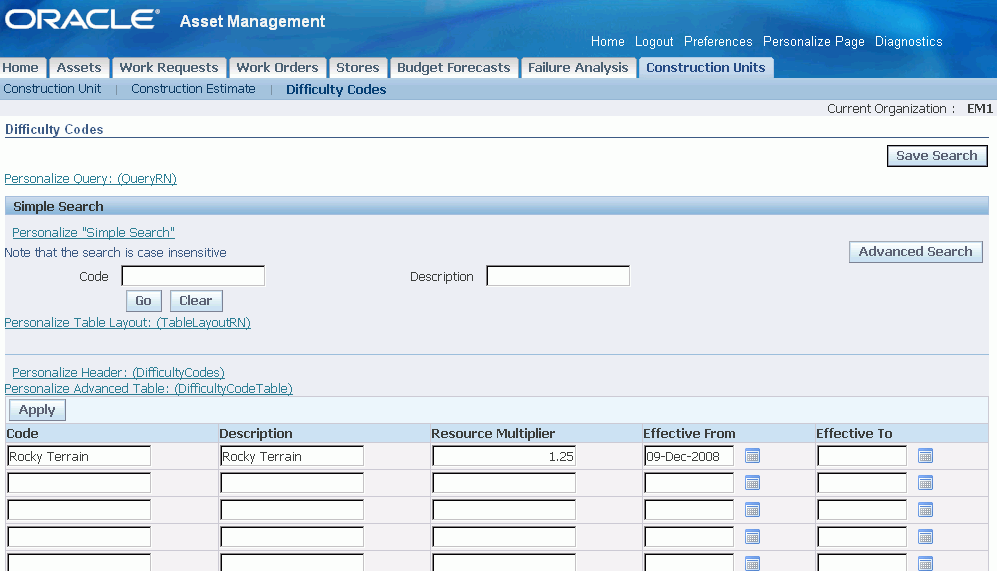
-
Add an alphanumeric name for your difficulty code.
-
Optionally add a description for the difficulty code.
-
Add a resource multiplier.
You must enter a number larger than zero. This value which gets multiplied with the labor and equipment quantities derived from the BOM, routing, construction unit and estimate definitions.
-
Save your work.
Creating Construction Estimates
You can group one or more construction units to create construction estimates and define work requirements. Grouping construction units enables you to combine various operations that are involved (and their resource and material requirements), and this assists in the design, planning and estimation of the costs.
You can also create a construction estimate and add activities directly, without adding any construction units.
You can use the construction estimates for cost estimation, planning and scheduling the work and creating work orders for execution. All the operations defined on the activities appear as default values in the Estimating Workbench, but you can make changes to the defaulted resources, materials, quantities, factors, and so on.
-
Navigate to the Maintenance Super User responsibility, enter EM1 in the Organization field, and then click the Go button.
-
Click the Construction Units tab, and then click the Construction Estimates link.
The Construction Estimates page appears.
-
Click the Create Construction Estimate button.
The Select Activities page appears.
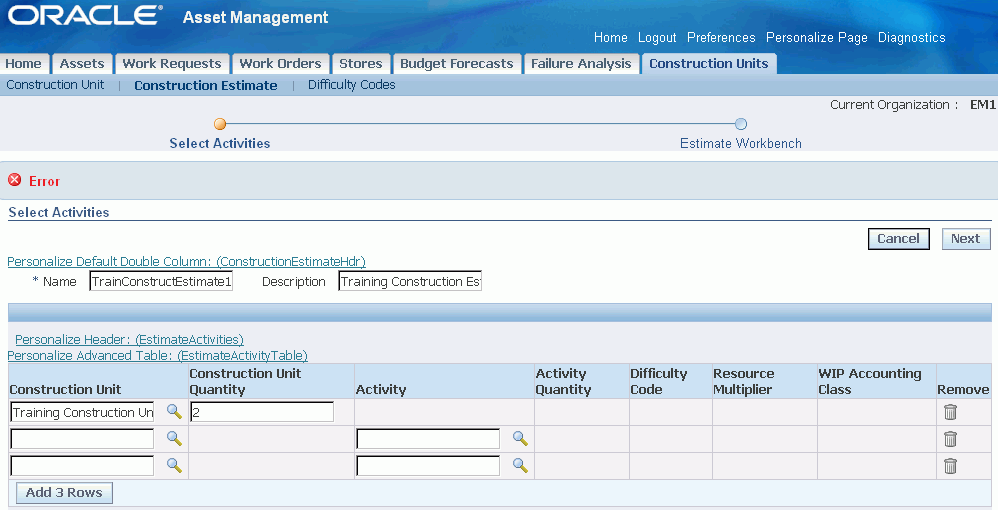
-
Add a Name for the new construction estimate.
This is a required field.
-
Optionally add a description.
-
Select the construction units and activities that you want to add to this construction estimate.
You can add construction units, activities or a combination of both construction units and activities to the construction estimate.
-
Click the Next button to access the Construction Estimate Workbench where you can add other information such as:
-
Attachments
-
Descriptive Flexfields
-
Work Order default information
-
Model Work Order information
-
-
Make additional changes to the estimate, if required.
-
Optionally perform other tasks by clicking one of these buttons:
-
Select Activities: Click this button to revise or add other activities
-
Estimate Costs: Click this button to generate an cost estimate for the construction estimate.
-
Save: Click this button if you are finished to commit the construction estimate to the system.
-
Cancel: Click this button to delete all changes that you made.
-
Create Work Order(s): Click this button to generate work orders for the construction estimate.
-
Modifying Construction Estimates
You can modify construction estimates. You may need to change the construction units or the quantity of the construction unit.
-
Navigate to the Maintenance Super User responsibility, enter EM1 in the Organization field, and then click the Go button.
-
Click the Construction Units tab, and then click the Construction Estimates link.
The Construction Estimates page appears.
-
Enter the Name of the construction estimate that you want to modify.
If you want to view a list of all the construction estimates associated with the current organization, leave the Name field blank.
-
Click the Go button.
-
Click the Update icon for the construction estimate that you want to modify.
The Construction Estimate Workbench appears.
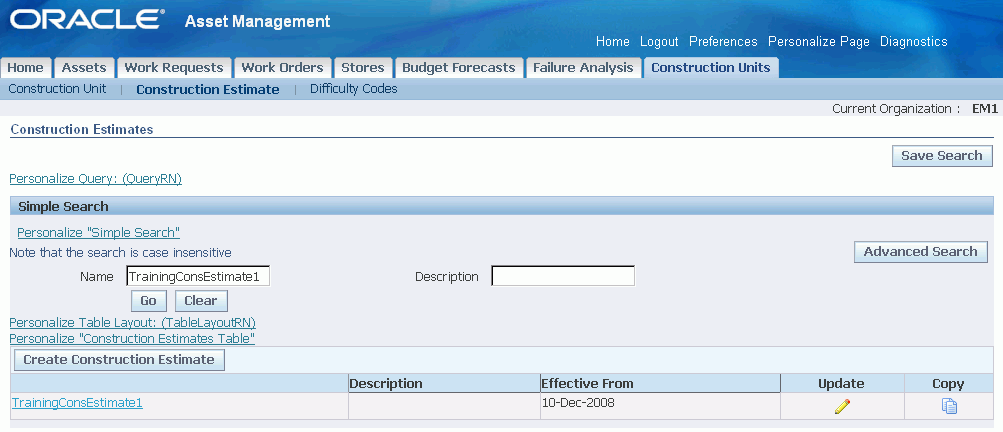
-
Modify the components of the construction estimate.
-
Save your work.
Viewing Construction Estimates
You can view a construction estimate.
Construction estimates are organization specific.
-
Navigate to the Maintenance Super User responsibility, enter EM1 in the Organization field, and then click the Go button.
-
Click the Construction Units tab, and then click the Construction Estimates link.
The Construction Estimates page appears.
-
Enter a construction estimate in the Name field.
If you want to retrieve all the construction estimates assigned to the current organization, leave the Name field blank.
-
Click the Go button.
-
Select a construction estimate that you want to view by clicking the link for the construction estimate.
-
View the details of the construction estimate such as:
-
Cost estimate
-
Model work order details such as Work Order Number, Asset Number, Cost
-
Parent Work Order details such as Asset Number, Status
-
Copying a Construction Estimate to Create a New Construction Estimate
You can copy existing construction estimates to create new construction estimates. This can eliminate the need for manual entry of information for a construction project that has similar costs associated to it.
-
Navigate to the Maintenance Super User responsibility, enter EM1 in the Organization field, and then click the Go button.
-
Click the Construction Units tab, and then click the Construction Estimates link.
The Construction Estimates page appears.
-
Enter the Name of the construction estimate that you want to copy.
If you want to view a list of all the construction estimates associated with the current organization, leave the Name field blank.
-
Click the Go button.
-
Click the Copy icon for the construction estimate that you want to use for the new construction estimate.
The Construction Estimate Workbench appears.
-
Enter a name in the Construction Estimate field.
-
Optionally add a description.
-
Optionally add attachments by clicking the Add button.
The Add Attachment page appears. You can add a Desktop File, Text or URL or a file from the Document Catalog. Add a title and description for the attachment. Select and enter information in the Define Attachments region of the page.
If you are finished, click the Apply button. Click Add Another to add other attachments to the construction estimate.
-
Click the Select Activities button to add activities.
The Select Activities page appears.
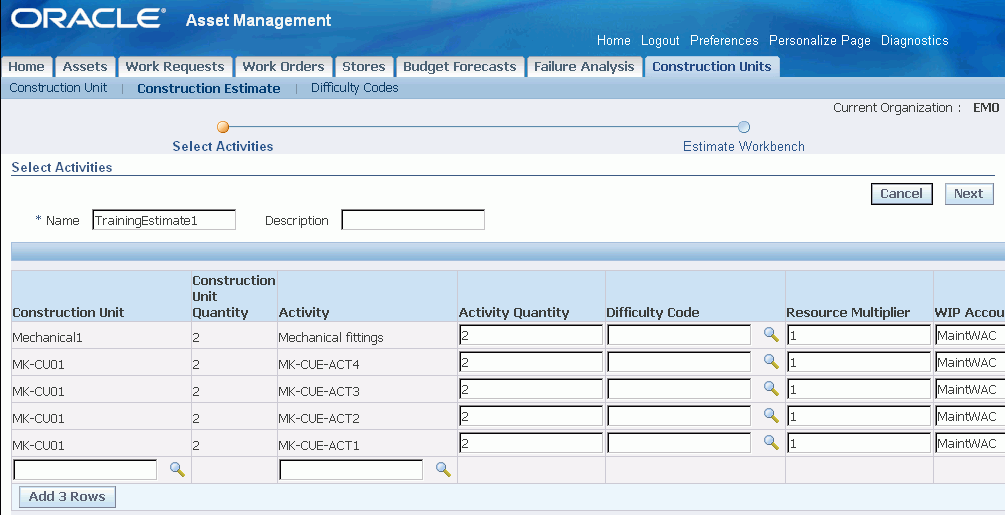
-
Enter a construction unit.
-
Select activities.
-
Enter a value in the Activity Quantity field for each activities.
-
Optionally enter difficulty codes for each activity.
-
Enter a number in the Resource Multiplier field for each activity.
-
Optionally enter a WIP Accounting Class.
-
Click the Next button.
-
Click one of these buttons:
-
Select Activities - to add or delete activities by using the Estimation Workbench.
-
Estimate Costs - to run the cost estimation
-
Save - save the construction estimate
-
Cancel - to discard the entire new construction estimate
-
Create Work Order(s) - to create work orders for the construction estimate
-
Generating Work Orders for Construction Estimates
-
Navigate to the Maintenance Super User responsibility, enter EM1 in the Organization field, and then click the Go button.
-
Click the Construction Units tab, and then click the Construction Estimates link.
The Construction Estimates page appears.
-
Enter the Name of the construction estimate that you want to view.
If you want to view a list of all the construction estimates associated with the current organization, leave the Name field blank.
-
Click the Go button.
The Construction Estimate Workbench page appears.
Construction Estimate Workbench
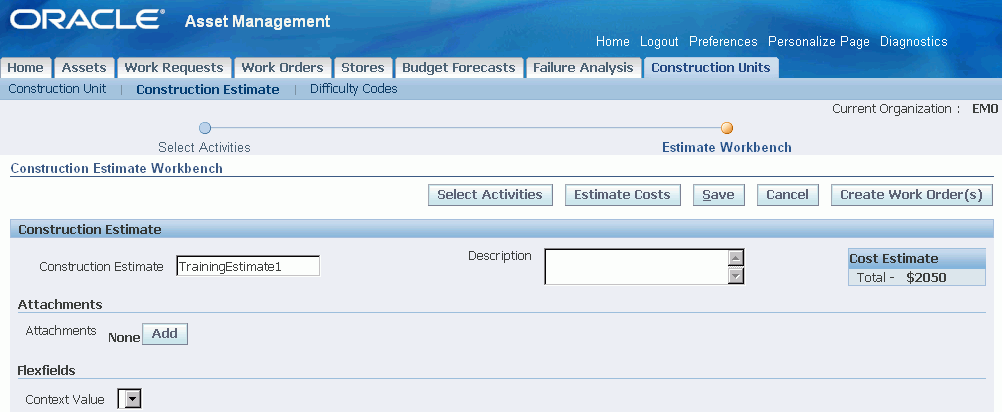
-
Optionally select a value in the Group Rows By drop-down list.
Values are None, Activity, Construction Unit, Single Work Order and WIP Accounting Class.
If you want specific information to default into the fields in the Model Work Order region, optionally enter values for these fields:
-
Work Order
-
WIP Accounting Class
-
Start Date
-
End Date
-
Asset Number
-
Department
-
Project
-
Task
-
Status - Unreleased, Awaiting Scheduling, Released, On Hold or Draft
-
-
Click the Apply Defaults button to populate the default values in the Model Work Order fields.
-
Enter the Work Order Sequence to indicate the order in which each work order should be executed.
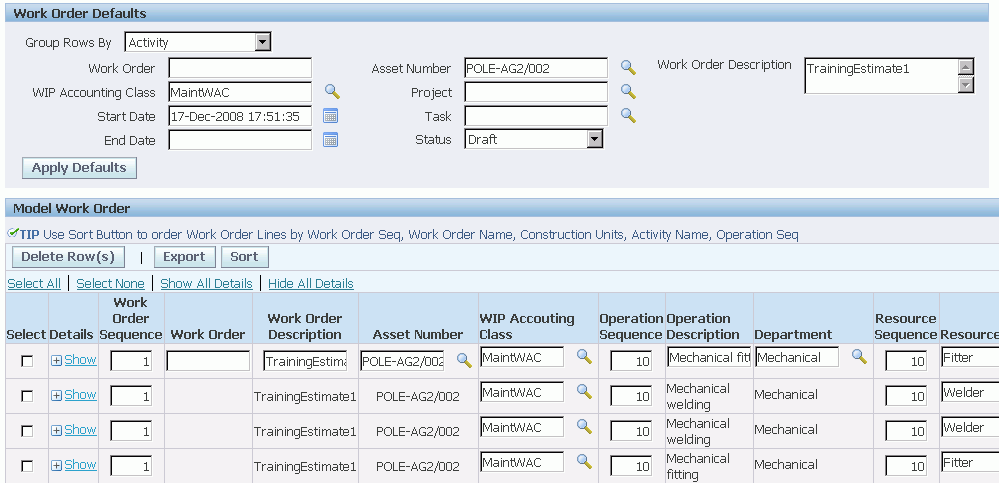
-
You can optionally perform these actions:
-
Delete Row(s) - Select the rows that you want to delete from the work order and then click this button.
-
Export - Select the rows that you want to export and then click this button.
-
Sort - Click this button to sort the rows based on the Group Rows By field.
-
-
Optionally enter the Operation Sequence to indicate at which operation step the specific work order should be executed.
The default value for the operation sequence comes from the activity.
-
Optionally select the Parent Work Order check box to create a parent work order for the construction estimate work orders.
Optionally enter a value for these fields:
-
Parent Work Order Description
-
WIP Accounting Class
-
Asset Number
-
Project
-
Task
-
Status
-
-
If you want to link these work orders to an existing work order, enter a value in the Parent Work Order field.

-
Click the Create Work Order(s) button when you are satisfied with the work order estimate.
-
The system generates the work orders.
Note: You cannot enter Descriptive Flexfields (DFFs) for Work Orders in the Construction Estimate Workbench. To enter DFFs, query the individual work order using the Work Order pages.
Using the Estimation Workbench
You can use the Estimation Workbench to:
-
Search and view the costs association with a construction estimate.
-
View work order details associated with the construction estimate.
-
Add components to the model work order such as work orders, work order sequence, asset number, WIP Accounting Classes, resources, resource descriptions, items and their required quantity, and so on.
-
Navigate to the Maintenance Super User responsibility, enter EM1 in the Organization field, and then click the Go button.
-
Click the Construction Units tab, and then click the Construction Estimates link.
The Construction Estimates page appears.
-
Enter the Name of the construction estimate that you want to view.
If you want to view a list of all the construction estimates associated with the current organization, leave the Name field blank.
-
Click the Go button.
-
View the details associated with the construction estimate such as:
-
Estimate Costs
-
Attachments
-
Work Order Details
-
-
Optionally click the Update Estimate button to make changes to the construction estimate.
-
Save your changes.
Capitalizing Actual Costs Associated with Construction Estimates
Work executed using construction units results into the creation of new assets or value addition to the existing assets. This feature enables you to collect the costs on such work orders and post them for capitalization in Fixed Asset (FA) module through mass update.
If eAM asset numbers are not associated with FA serial numbers until work order completion, you can generate the asset numbers in the FA module and use them during capitalization.
Use the Work Order Capitalization process to capitalize the costs associated with construction estimates.
Before you can capitalize the costs associated with the construction estimate, you must first set up the EAM: FA Book Type profile. This profile enables the system to select the appropriate book when new fixed asset numbers are created.
-
Navigate to the System Administrator responsibility, and click the Define Profile Options link.
The Profiles page appears.
-
Click the Search icon (Flashlight).
-
Select the EAM: FA Book Type Code option, and then click the OK button.
-
Make sure that the Hierarchy Type is set to Organization.
-
Enter a beginning effective date.
-
Click the Save button.
Capitalizing Work Order Costs for Construction Estimates
-
Navigate to the Find Work Orders form in the Enterprise Asset Management responsibility (Billing and Capitalization > Work Order Capitalization).
-
Enter an Estimate Number to select a work order associated with a construction estimate.
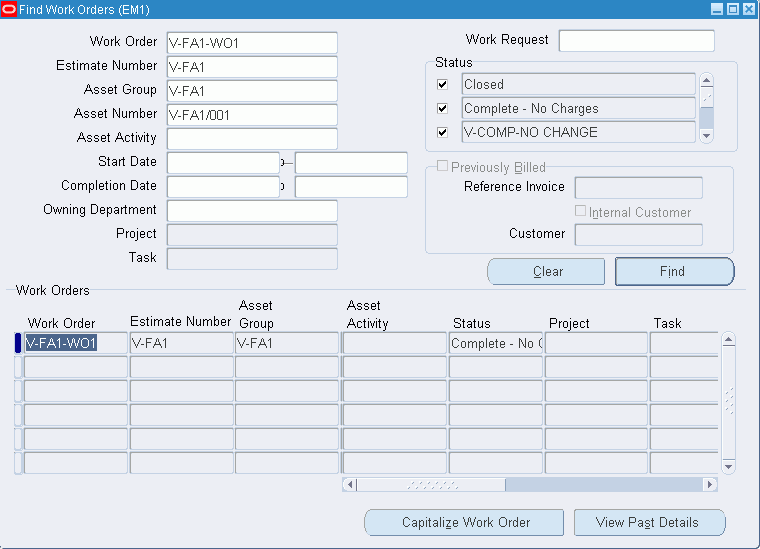
-
Click the Find button.
-
Click the Capitalize Work Order button.
-
View the capitalized costs associated with the construction estimate.
-
Save your work.
Stores
Material issue to Work Orders and returns to Inventory are typical store room functions.
The Stores tab provides Material Issue Request and Verification functionality, and is used to manage a Work Order's material availability. A Work Order's material requirements are defined on its Maintenance Bill of Material, and are available to the Work Order via the Material Issue Request and Verification process.
There are two activities involved in delivering material from stores to a Work Order. First, a Material Issue Request is generated (Move Order in Oracle Inventory) to request the material to a Work Order. This process is automated upon Work Order release, by selecting a check box in the Enterprise Asset Management Parameters (See: Defining eAM Parameters). The second activity involves Material Issue Verification (Move Order in Oracle Inventory), and is generated when you access the Stores tab and select material for a Work Order, based on available, unprocessed move orders. A one-step material issue is a substitute for these two activities; a request is not created.
You can return material to Inventory from a maintenance Work Order. If excess or defective material is issued to a Work order, it needs to return.
Related Topics
Budget Forecasts
You can extract work order cost information from Enterprise Asset Management to a spreadsheet. You can use the results as a base for creating organization budgets and forecasts. You can extract historical costs for past accounting periods, or estimated costs of future periods, based on Preventive Maintenance rules. A forecast contains criteria, along with filter options, based on work orders, assets, and costing information.
To create a forecast
-
Navigate to the Forecasts page (Maintenance Super User > Budget Forecasts tab).
-
Choose Create Forecast.

-
Enter a Forecast Name.
-
Enter a Description.
-
Optionally select a template from the Apply Template list of values. This template indicates the type of information to include in your forecast. If you select a template, the template's associated work information is populated in the Include field, such as Historical Planned Work, Historical Non-Planned Work, All Historical Work, or Forecasted Work.
-
Optionally select the Include Other Organizations check box.
-
Enter the Accounting Period From and To values to indicate the accounting period in which to include information. For historical forecasts, you can select periods in the past or the current period. For future (Preventive Maintenance) forecasts, you can select periods in the future or the current period.
-
Optionally narrow the forecast to specific criteria, such as Account, Area, WIP Accounting Class, Activity, Department, Project, Asset Number, Asset Group, Work Order, and Work Order Type.
-
Choose Apply to save the forecast.
To generate a forecast
After you save a forecast, you can generate Forecast entries by selecting the icon at the Forecast level. After the forecast entries are generated for a selected forecast, you can view them by Accounts or Work Orders.
-
Choose the Generate icon.
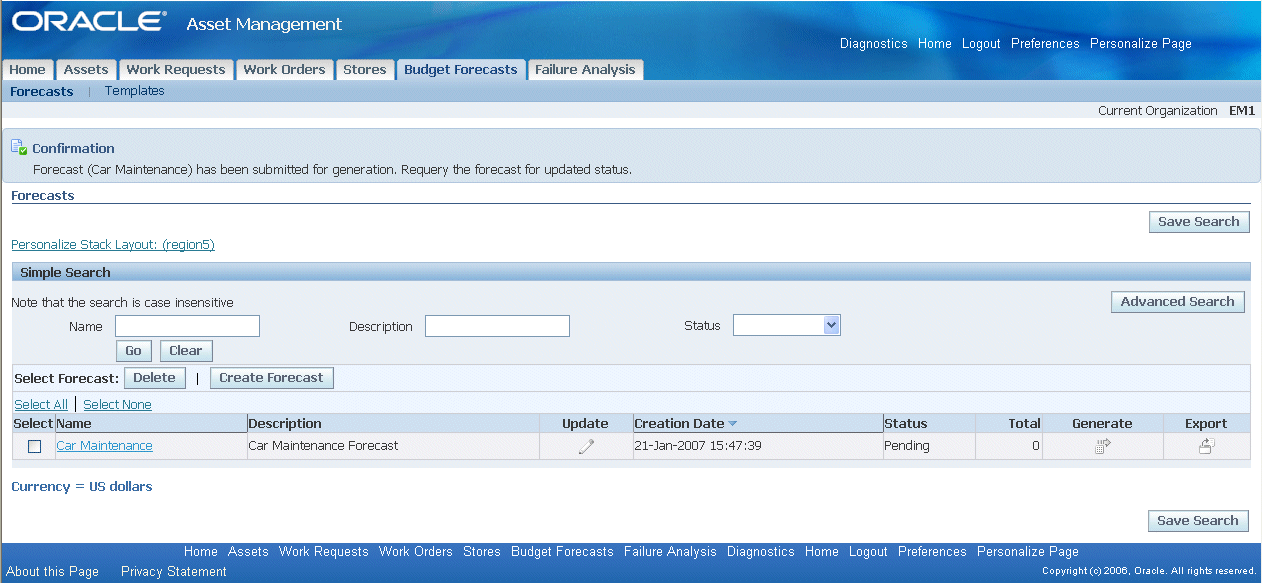
-
View By Accounts: Forecast costs are aggregated by General Ledger accounts into Accounting Period buckets. Costs derived from historical work orders are aggregated, based on the actual period when they occurred. Costs derived from planned work orders are aggregated in the period of the forecasted completion date.
-
View By Work Orders: Forecast costs for each work order appear. If it is a historical work order, the actual work order number appears. If it is a planned work order, the Work Order Number field is blank.
-
To manage existing forecasts
-
Navigate to the Forecasts page (Maintenance Super User > Budget Forecasts tab).
Forecasts
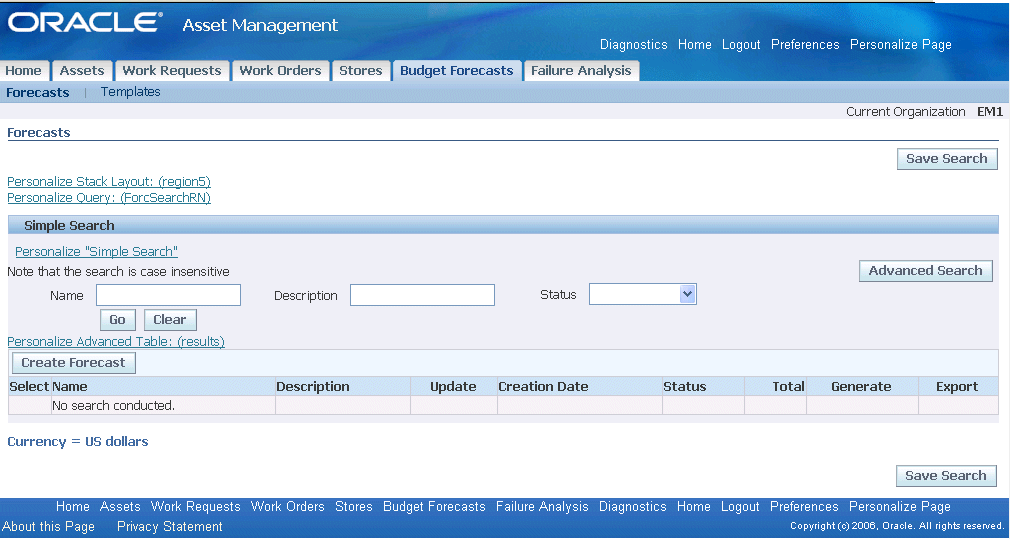
-
You can perform Simple or Advanced Searches for existing forecasts. Using the Simple Search mode, you can search on an existing forecast's Name, Description, and/or Status. You can optionally choose Advanced Search to add more search criteria.
-
Choose Go to display existing forecasts, based on entered search criteria. If you did not enter any search criteria, all existing forecasts appear.
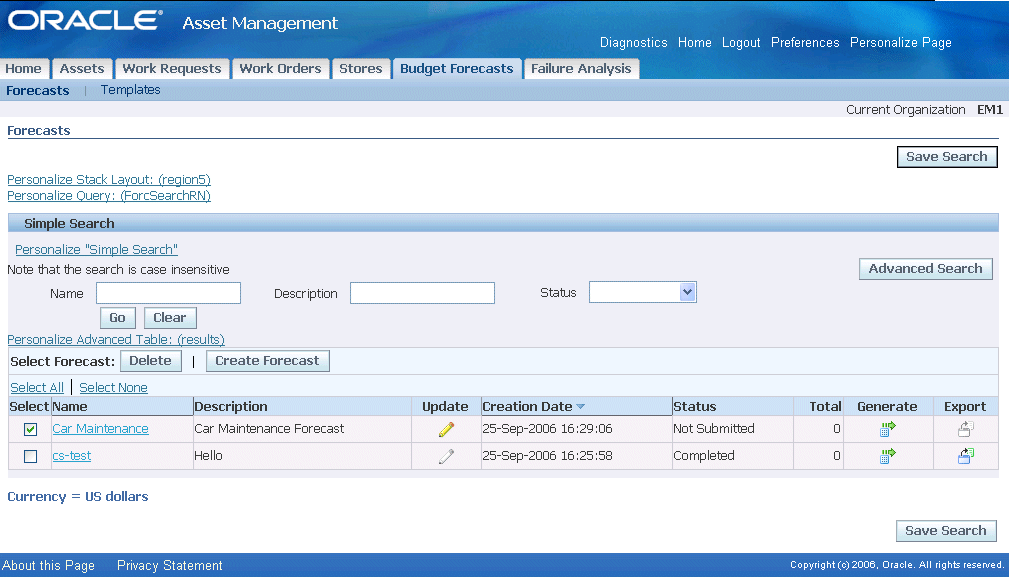
-
If a forecast has a Not Submitted status, you can optionally update its Name, Description, Accounting Periods, and Criteria, by choosing the Update icon.
-
Optionally select a forecast's hypertext link to view its details.
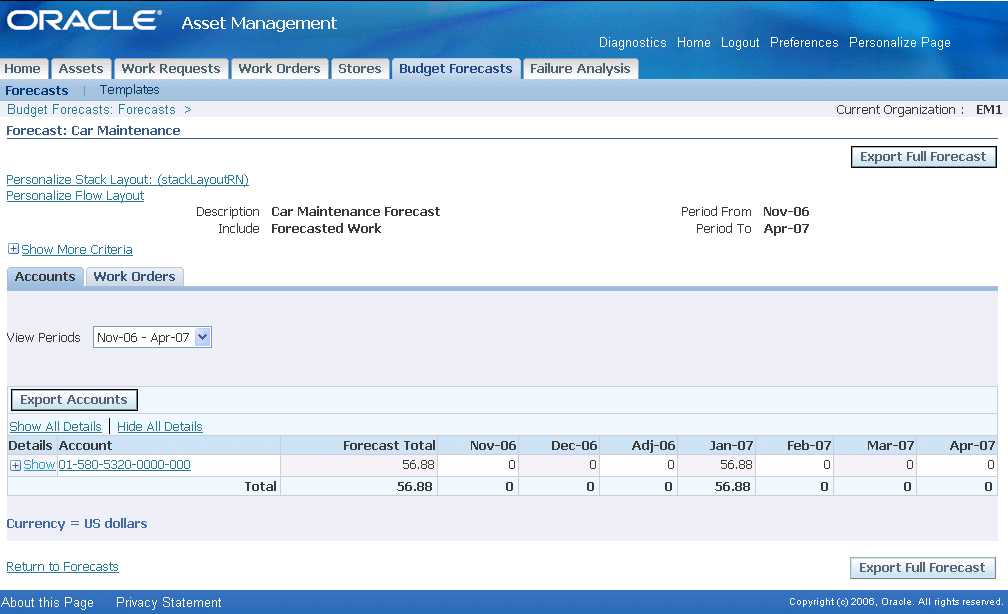
-
The Accounts tab displays the forecast's affected accounts.
-
You can optionally export the displayed account information to an Excel spreadsheet, by choosing Export Accounts.
-
Optionally select the Work Orders tab to display work order information. Future, forecasted work orders appear, if the forecast's Include field value reads Forecasted Work. Historical work orders appear, if the Include field's value reads Historical Planned Work, Historical Non-Planned Work, or All Historical Work.
-
Optionally choose Export Work Orders to:
-
export only the selected work order information to an Excel spreadsheet, if the forecast includes historical work.
-
create new forecasted work orders for the selected work, if the forecast includes forecasted work.
-
-
Optionally choose Export Full Forecast to:
-
export all work order cost information to an Excel spreadsheet, if the forecast includes historical work.
-
create new forecasted work orders for all displayed work, if the forecast includes forecasted work.
-
-
-
Optionally choose the Generate icon to generate the forecast, based on saved criteria. After the Generate icon is selected, the forecast's status transitions to a Pending status while it executes. After the forecast finishes executing, the forecast's status transitions to Completed. You can generate the forecast an unlimited number of times.
-
Optionally choose the Export icon to export the completed forecast to an Excel spreadsheet, HTML, PDF, or RTF file.
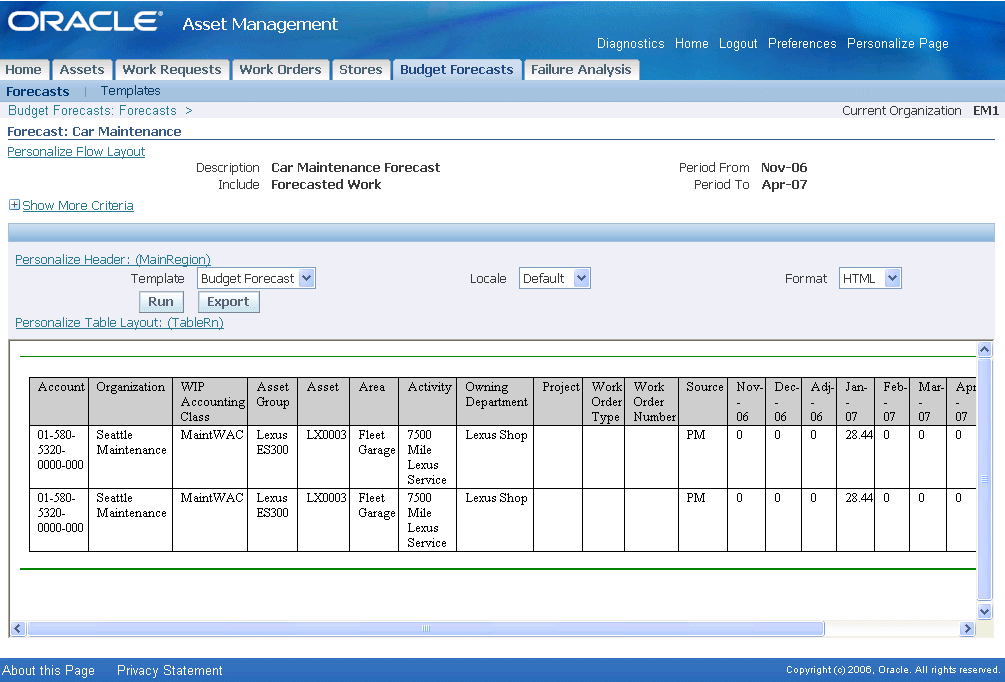
-
Select a Template.
-
Select a Locale.
-
Select the Format. This choice indicates whether you are exporting information to an Excel spreadsheet, HTML, PDF, or RTF file.
-
Choose Run to display the cost information.
-
Choose Export to export the cost information to the file type populated in the Format field.
-
Safety Management
This feature enables you to create work permits mandated by regulatory agencies to be followed by operations, maintenance and safety personnel during maintenance of assets which require work permits before the assets can be repaired.
Related Topics
Failure Analysis
Failure Analysis enables you to track an asset failure from the time it is reported until its resolution. Statistics from your collected failure data provide you with information on why an event occurs and causes your asset failure. You can then take the necessary steps to eliminate that event. Additionally, you can use the failure statistics, among others, to help you formulate your Reliability-Centered Maintenance (RCM) program. Failure hierarchies that support multiple-level failure reporting provide effective root cause and reliability analysis. For specific Asset Groups or Rebuildable Items, each failure (problem) has a defined number of root causes, with each root cause having a defined number of resolutions (remedies).
When failure is reported, each work order represents one single failure occurrence (event) for the asset specified on the work order. The cost to repair an asset that fails to a normal, operational state is assumed to be the charges accumulated in the work order that is associated with the failure. If the repair is outsourced to an external party and requisitioned on a purchase order, a work order must be created to collect the repair costs for Failure Analysis to pick it up.
Related Topics