Discrete Manufacturing
This chapter explains how to use and define jobs.
This chapter covers the following topics:
- Overview of Discrete Manufacturing
- Setting Up Discrete Manufacturing
- Overview of the Discrete Workstation
- Discrete Workstation Window
- Selecting the Department or Department and Resource
- The Discrete Workstation Branches and Tabs
- Department or Resource Branch
- Immediate Dispatch List Branch
- Time Charges Tab
- Properties Tab (Jobs for Immediate Dispatch)
- Moving Assemblies on the Workstation
- Complete Assemblies and Complete Operations
- Backfushing Lot and Serial Items
- Upstream Dispatch List
- Overview of Creating Discrete Jobs
- Defining Discrete Jobs Manually
- Linking Sales Orders and Discrete Jobs
- Serial Number Tracking Throughout Manufacturing
- Associating and Modifying Serial Number Job Information
- Moving Serialized Assemblies
- Project Jobs
- Overview of Building Discrete Jobs
- Finding Discrete Jobs
- Releasing Discrete Jobs
- Printing Reports for Current Discrete Jobs
- Overview of Viewing Discrete Jobs
- Viewing Discrete Job Information
- Viewing Pending Job Transactions
- Viewing Job Transaction Genealogy
- Overview of Changing Discrete Jobs
- Changing Discrete Jobs
- Rescheduling Discrete Jobs
- Mass Changing Discrete Job Statuses
- Simulating and Saving Simulated Jobs
- Completing Discrete Jobs
- Overview of Discrete Job Close
- Closing Discrete Jobs
- Overview of Discrete Job Purge
- Purging Discrete Jobs
- Specifying Purge Options
- Processing Pending Jobs and Schedules
Overview of Discrete Manufacturing
You can use Oracle Work in Process to produce assemblies in discrete batches, also known as discrete jobs.
Standard Versus Non-Standard Jobs
Standard discrete jobs control the material, resources, and operations required to build an assembly and collect its manufacturing cost.
Non-standard discrete jobs control material and collect costs for miscellaneous manufacturing activity. They may or may not build an assembly. This type of activity can include rework, field service repair, upgrade, disassembly, maintenance, engineering prototypes, and other projects. See: Overview of Non-Standard Discrete Jobs
Discrete Versus Lot Based Jobs
A discrete job is a production order for the manufacture of a specific (discrete) quantity of an assembly, using a specific standard routing and operations.
If you have Oracle Shop Floor Management installed, you can use lot based jobs in your manufacturing. A lot based job follows a network routing. Network routings provide flexibility in choosing the next operation which, in turn, determines the series of operations the job moves through. See: Creating a Network Routing and Creating a Lot Based Job in the Oracle Shop Floor Management User's Guide.
Shop Floor Control
Shop floor control helps you manage the flow of production inside the plant. Routings can be used to schedule job production activities and create requirements. You can use reports and views to help you control these activities.
Discrete Execution Workstation
The Discrete Execution Workstation provides a single interface to perform multiple shop floor functions, without navigating to a number of transaction windows. This Manufacturing Execution System (MES) provides three functional modes including Administrator, Supervisor, and Operator. See: Overview of the Discrete Execution Workstation, Oracle Manufacturing Execution System for Discrete Manufacturing
Material Control
Material control helps you manage the flow of component material from inventory to jobs. Bills of material can be used to create job material requirements. You can use reports and views to help you control material activities.
Non-Standard Job Bills of Material and Routings
You can assign a predefined bill of material or routing to a non-standard job or create one manually. You may use any bill or routing for the job, including one that does not match the assembly item of the job.
Engineering Bills and ECOs
You can build released as well as unreleased revisions and engineering items. You can also add engineering items as material requirements. The system can automatically update your jobs following an engineering change order (ECO).
You can create ECOs and pass down the information to unreleased jobs to specify a cumulative quantity, a range of jobs, or implement changes for specific lots. You can also add, change, or disable - items, operations, resources, and attributes. See: Defining ECO Revised Items in the Engineering User's Guide.
Processing Options
When you define discrete jobs, you can create discrete job operations, resource requirements, and material requirements either concurrently or interactively. Interactive processing loads all bill of material and routing information while you wait, returning control to you after the process is complete. Concurrent processing spawns a background process that loads all bill of material and routing information and returns control to you immediately.
Lot and Serial Control
You can build jobs for assemblies under lot control, serial control, or both lot and serial control.
You can track your jobs using serial control throughout the manufacturing process. This enables you to assign, perform serial transaction entry, import serial numbers, and print serial number labels. This functionality is supported through Oracle Mobile Supply Chain Applications. See: Serial Number Tracking Throughout Manufacturing
Work Order Interface
You can import planned order and planned order update recommendations for discrete jobs from external systems into Work in Process. See: Work Order Interface, Oracle Integration Repository at http://irep.oracle.com
Requirements and Assembly Netting
You can specify whether a job's material requirements are included as demand in the MRP netting process. You can also specify whether the assemblies you build on a job are included as supply.
MPS Relief
When you build an MPS-Planned item using a job, the master schedule for the quantity you define is automatically updated (relieved).
Simulate Discrete Jobs
You can simulate a standard job to determine what materials, operations, and operation resources are required to support that job. You can convert your simulated job into an actual job. See: Simulating and Saving Simulated Jobs.
Available-to-Promise Materials
You can view component available-to-promise (ATP) information as you define, simulate, and view discrete jobs.
Reservation of Discrete Jobs as Supply Source
You can use the Item Reservation window in Oracle Inventory to create reservations for material based on discrete jobs as a source of supply. You can also reserve completed serialized assemblies for demand: a reservation record is created by selecting and reserving specific serialized assemblies against a sales order line. See: Item Reservations, Oracle Inventory User's Guide
Final Assembly Orders
You can manually or automatically define jobs (final assembly orders) to build custom configurations for assemble-to-order products. You can allocate your discrete production by sales channel using demand classes. You can retain as-built configuration histories for quality and customer service tracking.
Job Close
You can close several standard and non-standard discrete jobs simultaneously. You can also close individual discrete jobs. See: Overview of Discrete Job Close.
Job Costs
You can cost standard and non-standard asset discrete production by job. You can report job cost on a period-to-date and cumulative-to-date basis. See: Discrete Job and Repetitive Schedule Costs
Job Purge
You can purge all information associated with discrete jobs including job header records and job detail and transaction information. You can also selectively purge some or all of the following job related information: job details (material requirements, resource requirements, and operations), ATO configurations, move transactions, and resource cost transactions.
View Workflows
You can view the status of workflows used for tracking outside processing of assemblies. Workflows automatically send notifications and activate processes during specific manufacturing points. You can display a graphical display of the status of workflows from the Tools menu in the Discrete Jobs and View Discrete Jobs windows.
Constraint-based Scheduling
Oracle provides constraint-based scheduling enabling you to schedule discrete jobs and operations based on priorities, resources, and material availability:
-
With Oracle Manufacturing Scheduling; the Scheduler Workbench is the graphical interface used to schedule single discrete jobs, and reschedule pending jobs on the entire shop floor.
Scheduling Single Discrete Jobs, Oracle Manufacturing Scheduling User's Guide, and Features, Oracle Manufacturing Scheduling User's Guide
-
Production Scheduling is a constraint-based automated scheduling tool using sophisticated scheduling algorithms. It optimizes production, enforcing minimum run length constraints, and minimizing changeover times on your resources. See: Supply Chain Planning Production Scheduling
Label Printing at Completion
Label printing capabilities are available at the time of completion. This provides the ability to create labels for any descriptive information or customer requirements. See: Label Printing at Completion
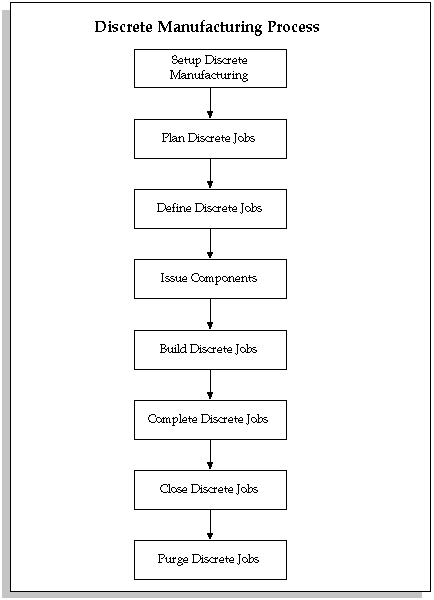
Discrete Manufacturing Process Diagram
The following diagram illustrates the discrete manufacturing process:
Setting Up Discrete Manufacturing
-
For a listing of setups that affect discrete manufacturing see: Setup Prerequisites
-
For a listing of setup steps within Work in Process see: Setup Check List
-
For additional information about discrete parameters and accounting classes see: WIP Parameters and WIP Accounting Classes.
-
For a listing of profile options that affect discrete manufacturing see: Profile Options
Overview of the Discrete Workstation
The Discrete Workstation provides you with a single window to obtain critical production information and perform common shop floor transactions. The workstation displays information by department or for a resource, and it lists all of the job operations for immediate and future dispatch at that department or resource.
You can view broad information, such as the utilization, efficiency, productivity, and load on the resources within a department or on a specific resource across all departments. You also can obtain detailed component and resource information on each individual job scheduled for the department or resource. You can perform move, completion, and other common transactions directly on the workstation's tabs, or open their corresponding Work in Process windows directly from the workstation. There is also a link to Oracle Project Contracts records associated with specific jobs.
The Discrete Workstation can record and track discrete production in organizations enabled for Oracle Shop Floor Management. You can use all the capabilities of monitoring and transaction work on discrete jobs in a mixed mode organization where discrete and lot based jobs are both used.
Features of the Discrete Workstation
On the Discrete Workstation, you can:
-
View the utilization, efficiency, productivity, and load on the resource from all departments in table and graph format
-
View all of the jobs for immediate and future dispatch at the selected resource, including their components and resources
-
Complete assemblies and operations, and move quantities across more than one operation in a routing
-
Backflush lot and serial items
-
Scrap assemblies
-
Launch the workstation for a specific resource instance, and view dispatch lists by individual machine or person
-
View job component shortages
-
View resource properties
-
View project contract information linked to specific jobs
-
Open the Material Transactions window and Issue components to jobs
-
Open the Work in Process Move Transactions window and perform Move transactions
-
Open the Work in Process Resource Transactions window and manually charge resources to jobs
-
Collect quality results data during move and completion transactions
-
Obtain operating instructions, diagrams, component attachments, and other information previously attached to jobs, assemblies, and components
Note: Use profile option, WIP: Display Scrap and Reject Quantity in Discrete Workstation, to display jobs with quantities remaining only in the Scrap or Reject intraoperation step on the Discrete Workstation. If there is no quantity remaining in the Queue, Run and To Move steps, but there is a quantity in the Reject or Scrap —the work order will not appear unless this profile option is set to Yes.
Discrete Workstation Layout, Tools, and Menus
For an overview of the workstation and its branches and tabs, and for information on how to perform common transactions from the workstation, see the following topics:
Discrete Workstation Window
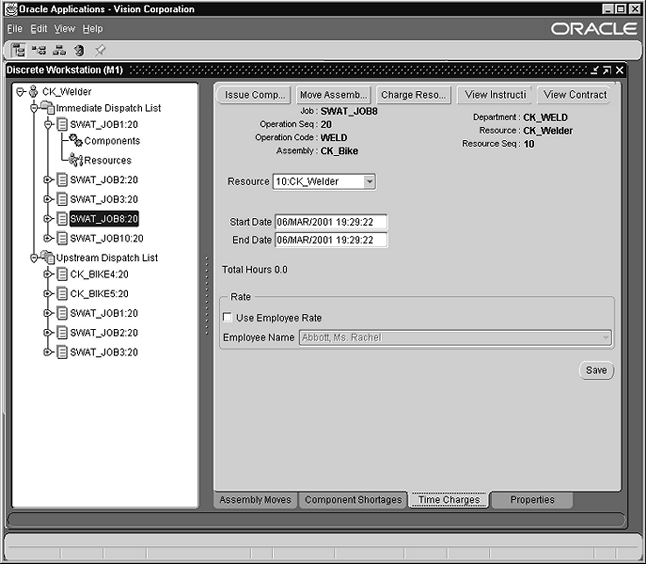
The Discrete Workstation window is composed of two panes. The left pane displays the navigational tree. The right pane displays one or more tabs of detailed information that correspond to the branch or tab that you select from the tree.
Navigational Tree
The workstation's left pane contains its navigational structure, which displays a hierarchical listing of the workstation contents. Since its structure is analogous to a tree with branches, it is referred to as the workstation tree, The tree displays four branches or levels of information. When you select a branch (the branch is highlighted), information relevant to that branch is displayed on tabs in the right pane of the workstation. See: Discrete Workstation Tree and Tabs for detailed information on each of the workstation branches and tabs.
Tabbed Regions
The workstation's right pane displays one or more tabs of detailed information pertaining to the branch that you selected from the tree. The information is displayed either in tables, on lists, pictorially, or on graphs, so that you can quickly assess the status of the job. Tabs may also have buttons that enable you to:
-
Perform common transactions directly from the tab, such as issuing components, performing assembly moves, or charging resources,
-
Open the WIP Material Transactions, Move Transactions, and Resource Transactions forms directly from the workstation
-
Obtain attachments previously appended to a job, such as drawings and instructions
Viewing the Discrete Workstation Tree
The information on the tree is always current, as jobs are completed - they are automatically removed from the tree. You can update the display at any time by choosing the Refresh tool.
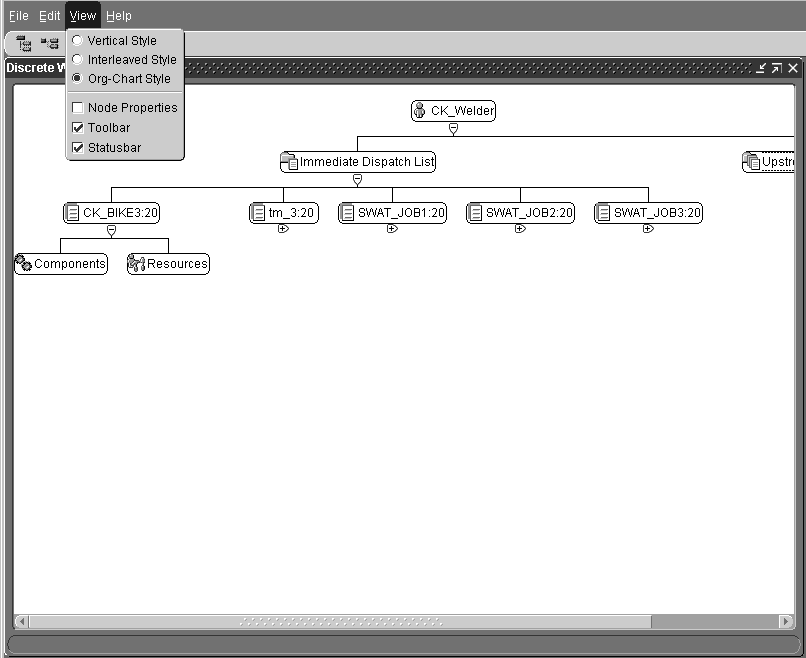
You can choose to view the information on the workstation tree in Vertical (the default), Interleaved (horizontal), or Org Chart (organization chart) format. These choices are available through tools on the toolbar, or as menu selections under the View menu.
To view the tree in Interleaved or Org Chart format, you may need to widen the left pane to see the full display. You can use your mouse to drag the right side of the pane towards the right side of the window, or you can hide the tabs so the window's full width can be used to display the contents of the left pane.
To hide the right pane of the workstation:
-
Select the View menu, and remove the check mark from the Node Properties check box. The right pane is hidden.
To again display the right pane of the workstation:
-
Select the View menu and place a check mark in the Node Properties check box. The right pane is displayed.
Finding Records
You can search for records on the tree. After entering search criteria on the Find in Discrete Workstation window, and choosing Find—a list of nodes meeting your criteria display on this window. Select a node to display that information on the workstation canvas.
To find records on the Discrete Workstation
-
Navigate to the Find in Discrete Workstation window.
-
In the Find what field, select a dispatch type: upstream or immediate.
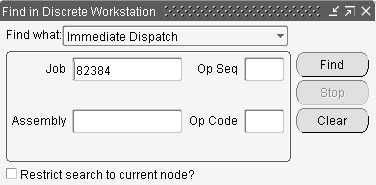
-
Enter search criteria. You have the option to enter values in the Job, and corresponding Operation Sequence fields, or Assembly and corresponding Operation Code fields.
-
You have the option to search records in one node only. Select a note and search criteria, and check Restrict search to current node.
-
Choose Find. Choose Stop to end the search program while it is compiling.
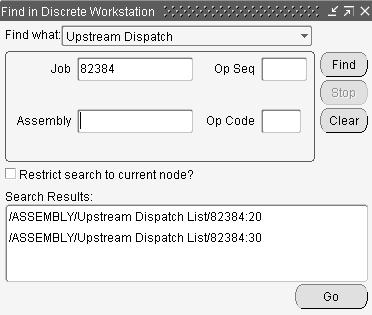
A listing of nodes meeting your search criteria displays in the window.
-
Select a node to display that information on the workstation window.
Selecting the Department or Department and Resource
The Discrete Workstation provides you with production information on the jobs assigned to a particular department or resource. You select the department, or the department and the resource to launch the workstation for jobs to view. You can also launch the workstation for a specific instance and see dispatch lists by individual machine or person.
To launch the Discrete Workstation
-
Navigate to the Discrete Workstation to open the Discrete Workstation Startup window.
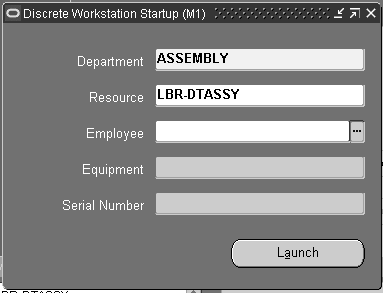
-
In the Department field, select the department to view.
To view all of the job operations scheduled in a department, select only the department
-
Select a Resource to view the job operations assigned to a resource associated with a specific department.
-
If you are using resource instances, you can select a defined Employee value for labor type resources—or an Equipment value for machine resources.
-
Optionally, select defined Serial Number values for machine type resources.
-
Choose Launch to display the Discrete Workstation.
The Discrete Workstation Branches and Tabs
The first, topmost branch on the Discrete Workstation tree displays information for the department or the resource that you selected when you launched the workstation. Listed below it are its two main branches:
-
The Immediate Dispatch List branch, which displays all of the job operations that are ready to be worked on in the department or by the resource (there is a quantity of assemblies in its queue).
-
The Upstream Dispatch List branch, which displays all of the job operations that are to be worked on in the department or by the resource in the near future (there is a quantity of assemblies ready to be moved in the previous operation).
Expanding any of the individual job operation branches under either main branch displays two additional branches, the components and resources branches for that job.
Branch Naming Conventions
The branch names displayed on the Discrete Workstation are automatically generated by the system. They contain the name of the job (which you created when you defined the job in the Discrete Jobs window), and the number of the operation, separated by a colon. For example: BIKE_Assy1:20 is the BIKE_Assy1 job at operation 20.
Discrete Workstation Transactions
From the Discrete Workstation, you can issue components, move assemblies, complete assemblies and operations, and charge resources without having to return to the main menu. You can either perform the transactions directly on the workstation tabs, or open the appropriate Work in Process window for that transaction.
Issue Components
To issue components to a job from the workstation, you choose the Issue Components button, which opens the WIP Material Transactions window. All relevant job information is automatically defaulted into the window from the workstation. See: Component Issues and Returns.
Quality Collection
During move and completion transactions, you can access the Enter Quality Results window when there are available collection plans. Choose Quality on the Move or Complete dialog box to navigate to this window.
Move Assemblies
You can perform simple assembly Move transactions directly on the Assembly Move tab graphic using the mouse. The graphic displays a bucket for each intraoperation step, and uses a red ball to represent the assembly quantity. You have the option to move quantities across more than one operation in a routing. See: Moving Assemblies on the Workstation
Related Topics
Completing and Returning Assemblies.
Move Completion/Return Transactions.
Performing Move Completion and Move Return Transactions.
Setting Up Collection Plans for Line Operation Completion Transactions, Oracle Quality User's Guide
Entering Quality Results Directly, Oracle Quality User's Guide
Charge Resources
Resources are automatically charged when you move assemblies, unless you set them up to be charged manually. If you are set up to charge resources manually, you charge them on the Resource Transactions window, which you an open directly from the workstation by choosing the Charge Resources. All relevant job information is automatically defaulted into the window from the workstation.
You also can use the workstation Time Charges tab to charge person and machine time to a resource. On this tab, you select the resource that you want to charge, and enter the Start and End Dates, and the workstation calculates the time. The time is charged at the standard rate unless you select the Use Employee Rate check box, which charges the time at the employee rate.
See: Charging Resources Manually, and Charging Resources with Move Transactions.
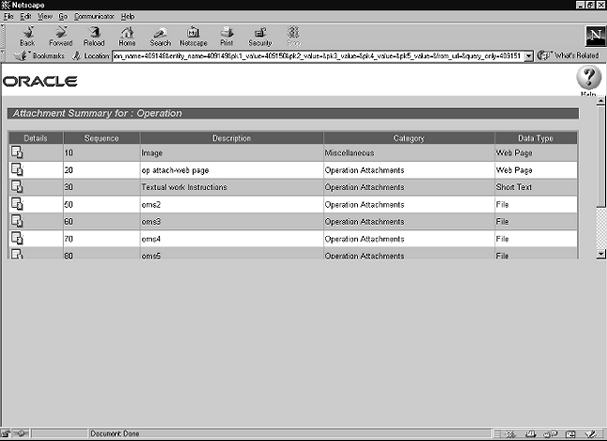
View Instructions
The View Instructions button is displayed on the Assembly Moves, Component Shortages, and Time Charges tabs. It enables you to download, view, and print instructions or other documents including drawings and web pages that were previously attached to the operation.
Choosing the View Instructions button opens an Oracle Web Applications page that lists the available attachments. Selecting an attachment displays it in the space below the list. To view a different attachment, choose the web page's Back button, which returns you to the list. To return to the workstation, choose the Back to Invoking Page button (appears after you select an attachment to view). See: Attaching Files to Jobs, Schedules, and Operations.
View Contracts
You can view Oracle Project Contracts information for jobs that have an associated contract. The View Contracts tab is enabled only when Oracle Project Contracts is installed; and the discrete job has a project and, if applicable, corresponding task referenced.
When you select a job in the hierarchical tree, and then select View Contracts - the contracts associated with this job display including detail information about contract number, type, status, related project number and task, and description.
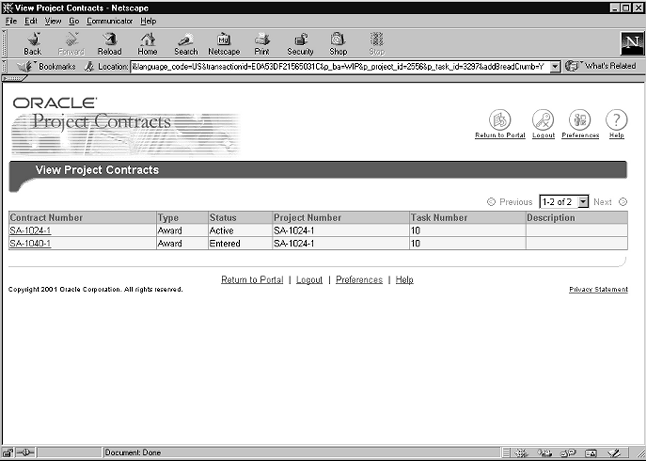
You can select the contract number to display the flowdown details which can include system attributes, terms and conditions types, article subjects, and standard note types.
Related Topics
Using the Contract Authoring Workbench, Oracle Project Contracts User's Guide
Business Areas and Contract Flowdown Attributes, Oracle Project Contracts User's Guide
Flowdown, Oracle Project Contracts Implementation Manual.
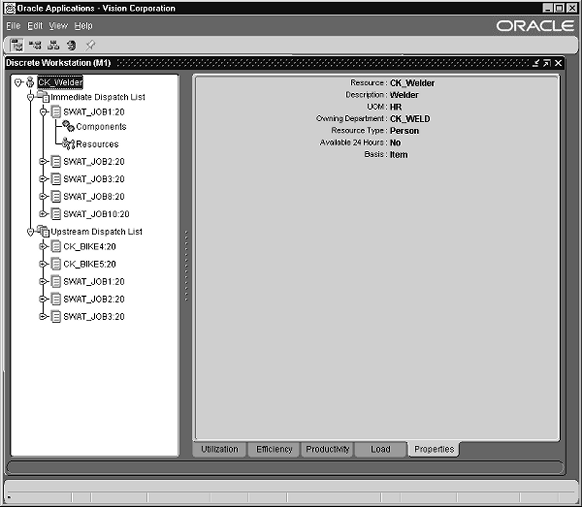
Department or Resource Branch
The topmost branch of the tree displays the name of either the department or the resource that you selected when you launched the workstation. Your choice affects which jobs are displayed, as described below:
Viewing a Department
If you launch the workstation by selecting a department, but do not select a resource, the workstation branches display all of the job operations scheduled to be worked on in that department. You can identify whether you are viewing information for a department or a resource by the graphic preceding the name. Department names are preceded by a graphic of a building.
Viewing a Resource
If you launched the workstation by selecting a department and a resource, the workstation branches display only the job operations scheduled to be worked on at or by that resource. If you selected a person resource when you launched the workstation, the name of the resource on this branch will be preceded by a graphic of a person; machine resources are preceded by a graphic of a conveyor belt.
You can also launch the workstation using a specific instance to display dispatch lists by individual machine or person.
Corresponding Tabs
When you select this branch, five tabs of information are displayed in the workstation's right pane. Four of the tabs provide tables and graphs that show you the utilization, efficiency, productivity, and load of the resources within the department or on a specific resource from across all departments that use the resource. The fifth tab displays a list of the department's or resource's properties.
For detailed information on each tab and its graph(s), see the following topics:
Utilization Tab
The Utilization tab displays in graph and table format, the department's or resource's daily percent utilization during the past five days (the default date range), or during a date range that you select. The top section of the tab displays the name of the department or resource and its description, and provides you with two Date fields that you can use to change the date range of the graph.
Utilization Graph
The Utilization graph displays as a percentage the hours the department or resource was actually used compared to the hours it was available to be used. It shows the daily percent utilization of the resources within the selected department, or of a particular resource across all departments, depending on whether you chose to view a department or a department/resource when you launched the workstation.
The utilization formula is: Utilization = Actual Hours / Available Hours.
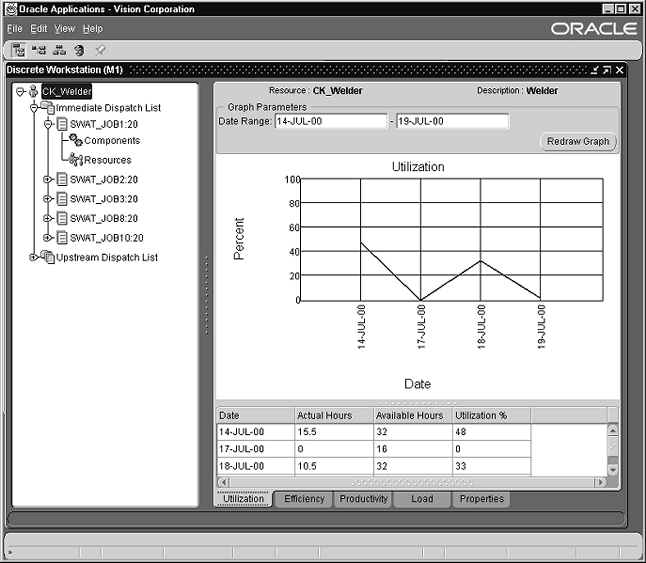
The default view for the graph displays information for the last five working days, however, you can change the date range (you are restricted to dates in the past). If you change the graph dates, you use the Redraw Graph button to refresh (update) the display.
The following information on the graph is also displayed in a table below the graph:
-
Date: a day in the selected date range (the default date range is the last five working days)
-
Actual Hours: the actual hours charged
-
Available Hours: the hours defined in Bills of Material resource definitions
-
Utilization Percent (%): Actual Hours / Available Hours
Efficiency Tab
The Efficiency tab displays in graph and table format the efficiency percentage of the department or resource. It shows the daily percent efficiency of the resources within the selected department, or of a particular resource across all departments, depending on whether you chose to view a department or a department/resource when you launched the workstation. The top section of the tab displays the name of the department or resource and its description, and contains two Date fields that you can use to change the date range for the graph.
Efficiency Graph
The Efficiency graph is a line graph that represents the daily percentage of hours the department or resource is actually being used compared to how many hours it was expected to be used. The default date range for the graph is the last five working days, however you can change it (you are restricted to dates in the past). If you change the date range of the graph, you use the Redraw Graph button to refresh (update) the display.
The Efficiency formula is: Efficiency = Actual Hours / Standard Hours
The information from the graph is also displayed in a table below the graph:
-
Date: a day in the selected date range (the default date range is the last five working days)
-
Actual Hours: the actual hours charged to the resource
-
Standard Hours: the number of hours that were expected to have been charged as defined in the routing
-
Efficiency Percent (%): Actual Hours / Standard Hours
Productivity Tab
The Productivity tab displays the daily productivity of the department or resource in graph and table format. It shows the percent productivity of the resources within the selected department or of a particular resource across all departments, depending on whether you chose to view a department or a department/resource when you launched the workstation. The top section of the tab displays the name of the department or resource and its description, and provides you with two Date fields that you can use to define the date range for the graph.
Productivity Graph
The Productivity graph displays the daily percentage of hours the department or resource was expected to be used compared to the number of hours it was available to be used. The default date range for the graph is the last five working days, however you can change it (you are restricted to dates in the past). If you change the graph's dates, you must choose the Redraw Graph button to refresh (update) the display.
The Productivity formula is: Productivity = Standard Hours / Available Hours
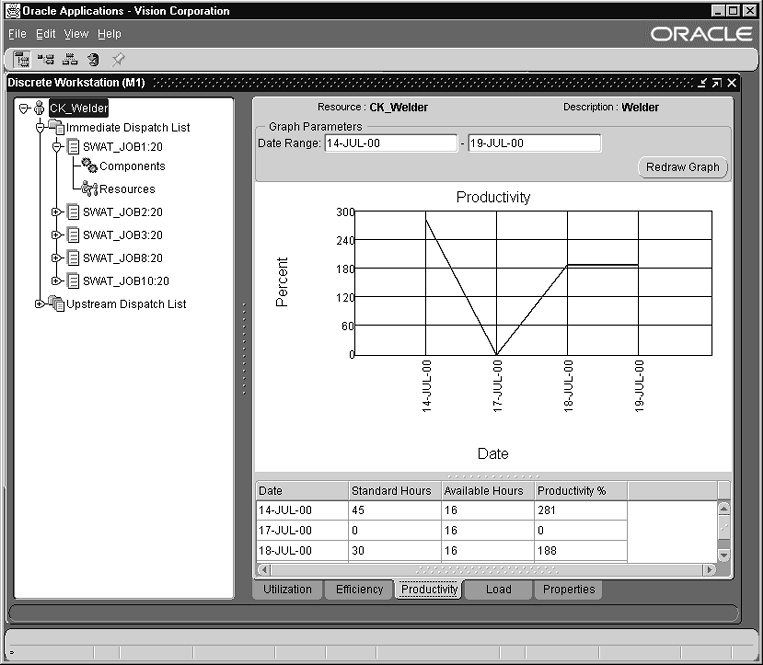
The information from the graph is also displayed in a table below the graph:
-
Date: a day in the selected date range (the default date range is the last five working days)
-
Standard Hours: the number of hours that were expected to have been charged as defined in the routing
-
Available Hours: the hours defined in Bills of Material resource definitions
-
Productivity Percent (%): Standard Hours /Available Hours
Load Tab
The Load Tab displays a bar graph that represents the load versus the capacity of the resource. It shows the percent load versus capacity of the resources within the selected department or of a particular resource across all departments, depending on whether you chose to view a department or a department/resource when you launched the workstation. The top section of the tab displays the name of the resource and its description, and provides you with two Date fields that you can use to define the date range for the graph.
On this tab, you can view the load on the department or resource on the two graphs, the Cumulative Load and Daily Load graphs, which you select from the Graph Type field's list of values.
Cumulative Load Graph
The Cumulative Load graph displays the cumulative available and required hours for the department or resource across the entire date range. The default date range for the graph is the last five working days, however you can change it (you are restricted to dates in the past). If you change the date range of the graph, you use the Redraw Graph button to refresh (update) the display.
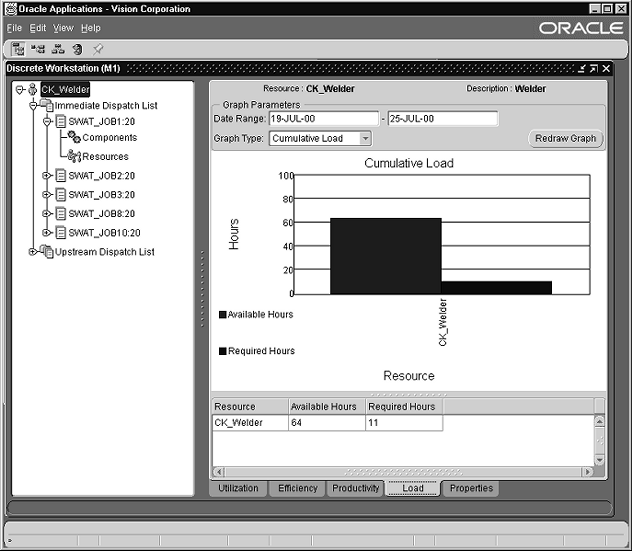
The following information from the graph is also displayed in a table below the graph:
-
Department or Resource: the name of the department or resource that you selected at launch
-
Available Hours: calculated from Bills of Material resource definitions. It represents the number of hours that can be worked during the given date range.
-
Required Hours: calculated from the scheduled start/end times and the usage rates. It represents the number of hours required to be worked on any scheduled jobs during the given date range.
Daily Load Graph
The Daily Load graph displays the available and required hours for the resource by day. The default date range for the graph is the last five working days, however you can change it (you are restricted to dates in the past). If you change the date range of the graph, you use the Redraw Graph button to refresh (update) the display.
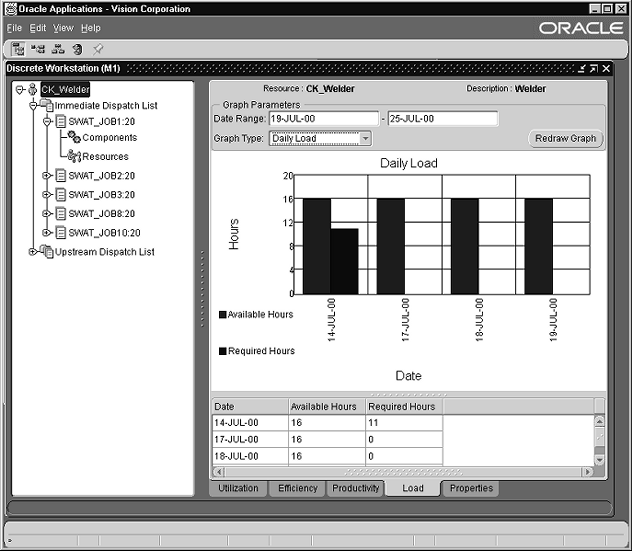
The following information from the graph is also displayed in a table below the graph:
-
Date: a day in the selected date range (the default date range is the last five working days)
-
Available Hours: calculated from Bills of Material resource definitions. It represents the number of hours that can be worked during the given date range.
-
Required Hours: calculated from the scheduled start/end times and the usage rates. It represents the number of hours that are required for any job operations scheduled during the given date range.
Properties Tab
The Properties tab for the department or resource provides you with the resource, description, UOM (Unit of Measure), owning department, resource type, whether or not the resource is available 24 hours, and the basis:
Immediate Dispatch List Branch
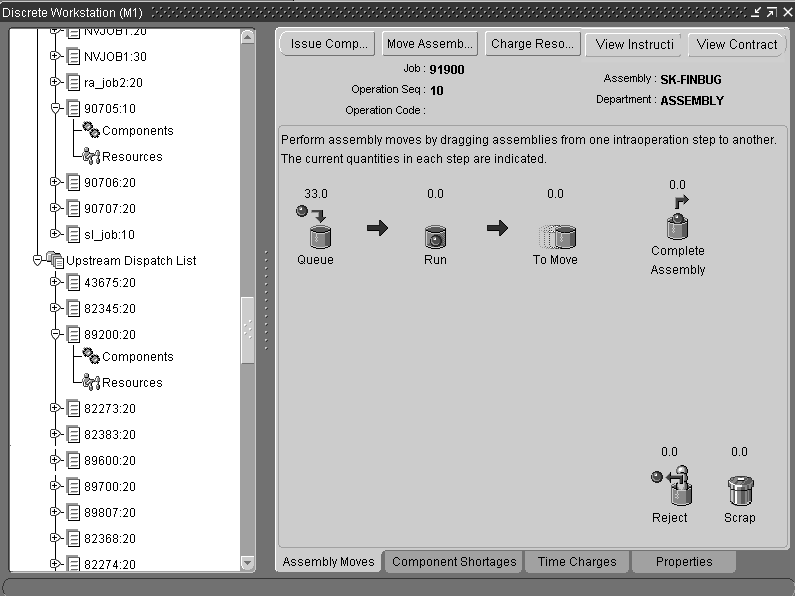
The Immediate Dispatch List is the first of the two main branches on the Discrete Workstation's navigation tree. When you select the Immediate Dispatch List branch itself, the Schedule tab is displayed. This tab lists all of the job operations on the tree in a table, along with their job and operation start and end times.
Listed below the Immediate Dispatch List branch are all of the current job operations that need to be worked on at the department or resource that you selected when you launched the workstation. Selecting an individual job operation branch displays the job operation's Components and Resources branches.
Each of the Immediate Dispatch List branches displays tabs of information about the job operation. Further, the tabs contain buttons that you can use to perform common transactions, and one that enables you to view attachments. All of these branches, tabs, and buttons are described in the sections that follow.
Schedule Tab
The Schedule tab lists all of the job operations on the Immediate Dispatch List and provides you with the job name, operation code, and operation start and end times. The top of the tab displays the name of the department and resource that you selected when you launched the workstation. There also are two Date fields that you can use to select a different date range for the jobs that appear on the graph (the last five working days are the default dates for the graph). If you change the default dates, you must choose the Show Graph button to refresh (update) the display.
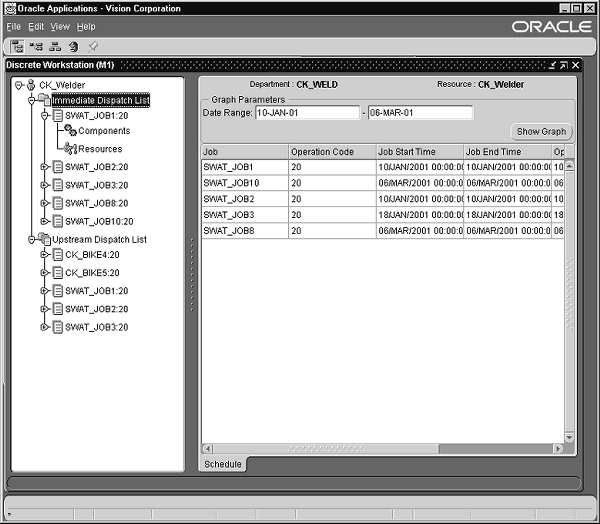
Jobs for Immediate Dispatch
Job operations listed under the Immediate Dispatch List branch have assembly quantities in their Queue intraoperation step, and thus are jobs that you can work on immediately. Any job operation listed on the tree in red text and preceded by an icon of a stoplight, however, has been put on hold.
Each branch represents one job operation, and each job operation is supported by two branches of information: its Components branch, which displays the operation's Component Requirements tab, and its Resources branch, which displays its Resource Requirements tab.
When you select a job operation branch, four tabs of information about that operation are displayed in the workstation's right pane: the Assembly Moves, Component Shortages, Time Charges, and Properties tabs. These tabs provide you with production information and enable you to perform common shop floor transactions using the Issue Components, Move Assemblies, and Charge Resources buttons that appear at the top of the tabs. You also can download and print any operating instructions or other attachments associated with the operation by choosing the tab's View Instructions button.
Each of the tabs are pictured below and described in the following sections. For a description of each button and how you can use it to perform transactions, see Discrete Workstation Transactions.
Assembly Moves Tab
The top section of the Assembly Moves tab displays the job that you selected, its operation sequence, operation code, assembly, department, resource, and resource sequence:
The Assembly Moves tab displays an interactive graphic that you can use to perform simple Move and Completion transactions. It consists of buckets that represent Work in Process intraoperation steps, and a red ball graphic that represents the assembly quantity for the job. You use the mouse to perform simple move and transactions on the graphic.
The tab also displays three buttons, the Issue Components, Move Assemblies, and Charge Resources buttons, which you can use to open Work in Process transaction windows. You also can download operating instructions by choosing the View Instructions button.
Moving Assemblies: you use the mouse to perform simple move transactions by dragging the red ball graphic from one bucket to another. When you drag the red ball a small window opens so that you can enter the assembly quantity that you want to move. The assembly quantities that you move at each intraoperation step are displayed above the step's bucket.
Completing Assemblies: you can complete assemblies on the Assembly Tab if you are at the last operation on the routing. The completed assembly is then moved into the completion subinventory designated on the routing. You also can complete and over-complete assemblies on the Move transactions window, which you open by choosing the Move Assemblies button.
Completing Operations: at any operation other than the last operation, you can complete the operation, and the assembly is moved into the Queue of the next operation. You complete assemblies and operations when you drag the red ball graphic into the Complete Assembly or Complete Operation bucket on the tab's interactive graphic.
For information on performing these transactions, see Discrete Workstation Transactions
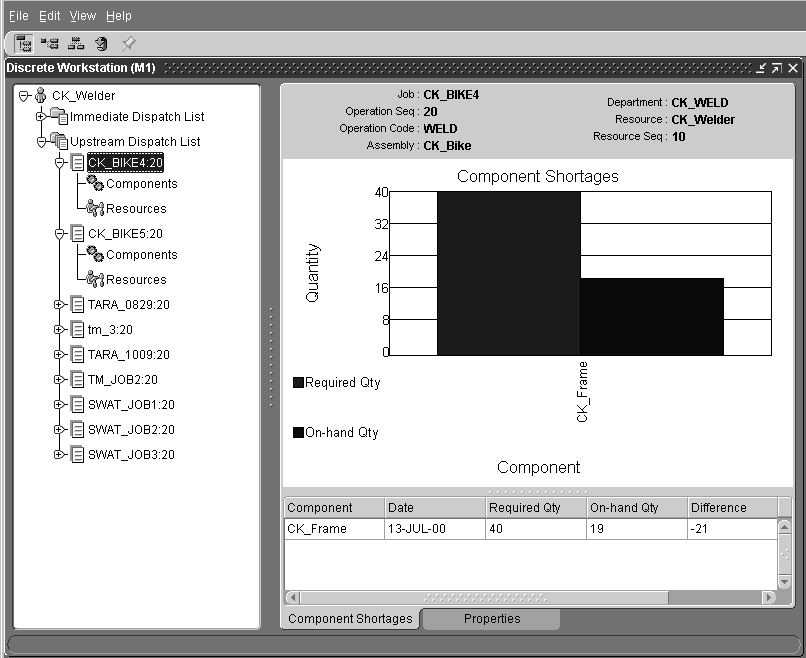
Component Shortages Tab
The Components Shortages tab displays in graph and table format a comparison of the components required for a job operation to the quantities of components on-hand. You can choose the Issue Components button on the tab, which opens the WIP Material Transactions window so that you can issue components to the job.
The top section of the Component Shortages tab displays the job that you selected, its operation sequence, operation code, assembly, department, resource, and resource sequence:
Component Shortages Tab Graph
The Component Shortages bar graph compares the job operation's required quantity to its on-hand quantity. The graph only displays job operations that have fewer components on-hand than are required for the operation.
The graph provides you with the following information, which is also presented in a table below the graph:
-
Component: the name of the component
-
Date: the date where a shortage occurred
-
Required Quantity: the number of components required for the job operation
-
On-Hand Quantity: the number of the components required for the job operation that are in inventory
-
Difference: the Required quantity minus the On-Hand quantity
Time Charges Tab
If an operation has been set up to allow manual resource charging, you can use the features on the Time Charges tab to manually charge both person- or machine-type resources to the operation.
You can charge resources directly from the Time Charges tab or you can charge them on the Resource Transactions window, which you can open by choosing the Charge Resources button. When you charge resources on the Resource Transactions window, the job, assembly, and other information from the workstation are automatically defaulted in the fields. The steps for manually charging resources on the Time Charges tab are listed below. For information and instructions on manually charging resources on the Resource Transactions window, see: Charging Resources Manually.
To manually charge resources on the Time Charges tab
-
In the Resource field, open the drop-down box and select the resource to which you are charging time.
The first resource on the list is the resource that you selected when you launched the workstation. Select this resource if you are charging time for a person-type resource. All other resources listed are machine-type resources assigned to that operation.
-
In the Start Date field, enter the start date and time for the period of time that you are charging to the resource. The date must be the current or a future date (if an invalid date is entered the field color changes to red).
-
In the End Date field, enter the end date and time for the period of time that you are charging to the resource. The date must be either the same as the Start Date or a future date (if an invalid date is entered the field color changes to red).
Note: When you change the start and end dates and times, the system calculates the total hours for that period and displays them directly below the End Date field.
-
In the Rate block, check the Use Employee Rate check box ONLY if you are charging an employee's time to the operation at the employee's rate. If you do NOT check the check box, the employee's time will be charged at the standard rate (the default).
-
From the drop-down list for the Employee Name field, select the employee for whom you are charging time. The list only displays the names of employees assigned to the resource whose employee rate has already been set up in the system.
-
Choose the Save button on the tab to save your entries.
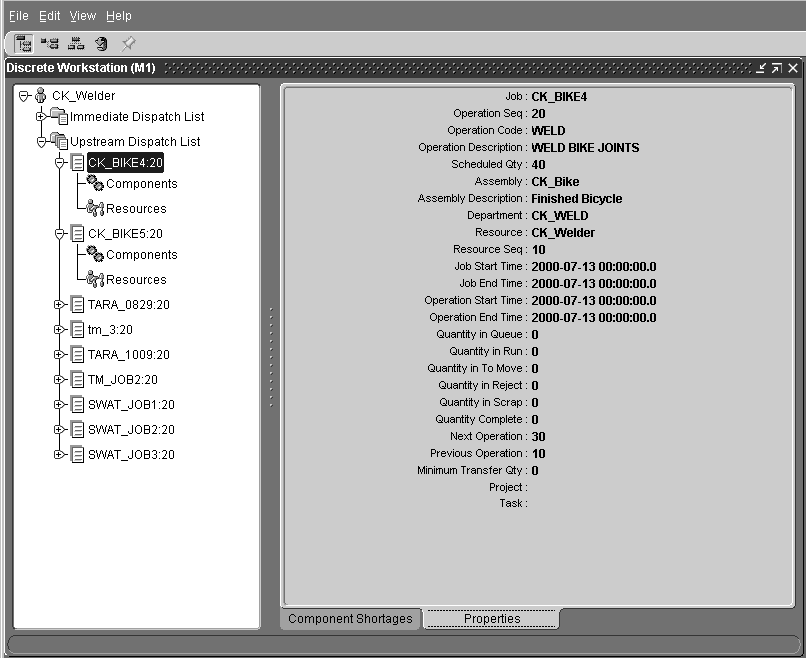
Properties Tab (Jobs for Immediate Dispatch)
The Properties tab for jobs in the immediate dispatch list provides you with the following information: job, operation sequence, operation code, operation description, scheduled quantity, assembly, assembly description, department, resource, resource sequence, job start time, job end time, operation start time, operation end time, quantity in Queue, quantity in Run, quantity in To Move, quantity in Reject, quantity in Scrap, quantity complete, next operation, previous operation, minimum transfer quantity, project, and task.
Components Branch (Jobs for Immediate Dispatch)
The Components branch displays the Component Requirements tab. This tab lists all of the components required for the job operation.
Component Requirements Tab (Jobs for Immediate Dispatch)
The header of the Component Requirements tab for jobs in the immediate dispatch list displays the job, operation sequence, operation code, assembly, department, resource, and resource sequence.
The tab's table provides the following information about the component:
-
Component
-
Description
-
UOM (Unit of Measure)
-
Basis
-
Required Quantity
-
Supply Type
-
Date
-
Subinventory
-
Locator
-
Quantity Issued
-
Quantity Per Assembly
-
Inverse Usage
-
Yield
-
Comments
Resources Branch (Jobs for Immediate Dispatch)
Selecting the Resources branch opens the Resource Requirements tab. This tab lists all of the resources required the job operation.
Resource Requirements Tab (Jobs for Immediate Dispatch)
The top section of the Resource Requirements tab for jobs in the immediate dispatch list provides you with the job, operation sequence, operation code, assembly, department, resource, and resource sequence.
The tab's table provides the following information about the resource (you may have to scroll to see all of the columns of information):
-
Sequence
-
Resource
-
Assigned Units
-
Type
-
Description
-
UOM
-
Basis
-
Usage Rate
-
Start Date
-
Completion Date
Moving Assemblies on the Workstation
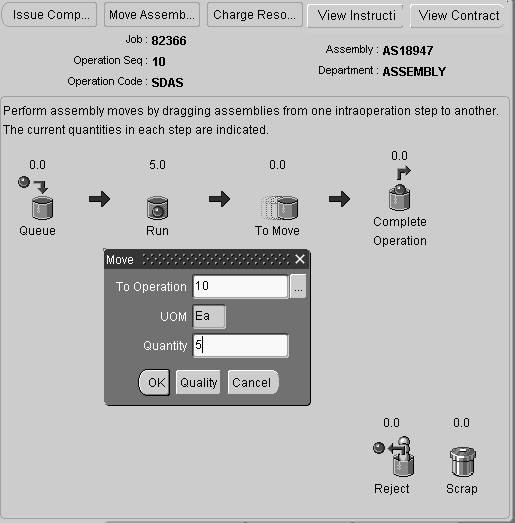
You can perform simple assembly Move transactions directly on the Assembly Move tab. You move assembly quantities by dragging the red ball to the bucket at that step. You have the option to move quantities across more than one operation in a routing.
You can also navigate to the Move Transactions window. You open the window directly from the workstation by choosing the Move Assemblies button on the Assembly Moves tab. All relevant job information is automatically defaulted into the window from the workstation.
To move assemblies on the Discrete Workstation
-
Navigate to the Discrete Workstation, the Assembly Moves tabbed region.
-
Select an assembly in the tree hierarchy to display the operation steps in the Assembly Moves region.
-
With your cursor, select the red ball at the step you want to move, and drag it to your move location.
The Move dialog window displays. The To Operation field defaults to the current operation.
-
You have the option to move quantities across more than one operation in a routing—for operations eligible to you. Select the list of values tag in the To Operation field to display the Find dialog box.
-
Select an operation, and Choose Find.
Note: If the Autocharge flag is enabled, each operation must be in the same department to cross over operations. See: Count Point and Autocharge Fields, Oracle Bills of Material User's Guide, and Adding and Updating Operations
-
Enter a quantity.
The assembly quantity at each intraoperation step is displayed numerically above the step, and changes to reflect the number of assemblies moved in and out of that step.
-
If quality collection plans exist for this assembly, choose Quality to navigate to the Enter Quality Results window. See: Entering Quality Results Directly, Oracle Quality User's Guide
-
Choose OK to save your work.
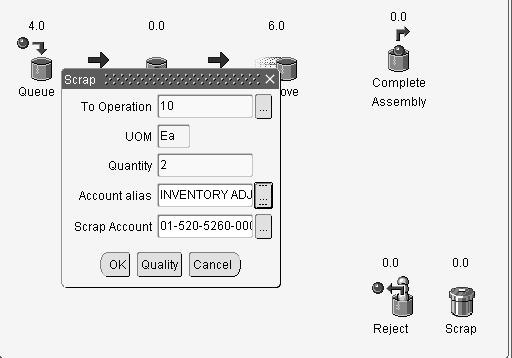
Scrapping Assemblies
You can capture account information when scrapping assemblies. Enter values in the To Operation and Quantity fields. If the Require Scrap Account parameter is enabled, you must also enter either a value in the Account alias or Scrap Account field.
Complete Assemblies and Complete Operations
You can complete assemblies and complete operations directly on the workstation Assembly Moves tab. You complete assemblies and operations when you drag the red ball graphic into the Complete Assembly or Complete Operation bucket.
Quality Collection
You can access the Enter Quality Results window during the completion transaction when collection plans exist. Choose Quality on the Complete dialog box to navigate to this window.
Serial Control
You can backflush lot and serial number controlled items during completion transactions. The system automatically explodes the bill of material and accesses the Components dialog window. You can then navigate to windows for lot and serial entry. See: Backflushing Lot and Serial Items
Completing Operations
When you complete the operation on the Assembly Moves tab, the assembly is moved into the Queue of the next operation.
To complete operations on the Discrete Workstation
-
Navigate to the Discrete Workstation, the Assembly Moves tabbed region.
-
Select an assembly operation in the tree hierarchy to display the operation steps in the Assembly Moves region.
When you complete operations, select any operation except the last operation in the routing. The Assembly Moves region displays the last step with a Complete Operation graphic icon.
-
With your cursor, drag the red ball to the bucket of the last step of that operation.
The Move dialog window displays.
-
Enter the number you are completing in the Quantity field.
-
If quality collection plans exist for this assembly, choose Quality to navigate to the Enter Quality Results window.
-
Choose OK to save your work.
The window refreshes with the completed quantity displaying next to the Complete Operation graphic icon.
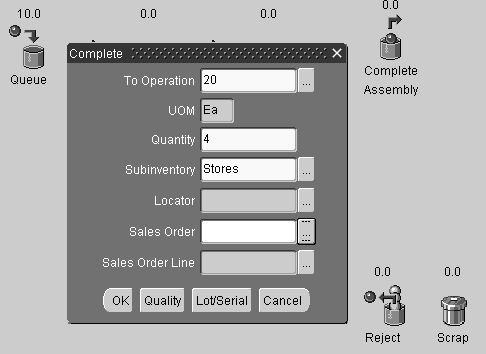
Completing Assemblies
You can complete assemblies on the Assembly Moves tab if you are at the last operation on the routing. The completed assembly is then moved into the completion subinventory designated.
To complete assemblies on the Discrete Workstation
-
Navigate to the Discrete Workstation, the Assembly Moves tabbed region.
-
Select an assembly in the tree hierarchy to display the operation steps in the Assembly Moves region.
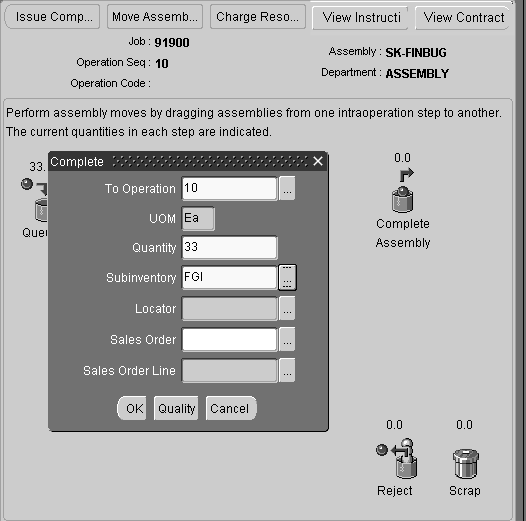
-
With your cursor, drag the red ball to the bucket of the last step of the operation—at the Complete Assembly icon.
The Complete dialog window displays.
-
Enter the number you are completing in the Quantity field.
-
In the Subinventory field, you have the option to specify the completion subinventory. Select the list of values tag to display the Find dialog box to choose a value
-
In the Locator field, specify locator information if applicable. Select the list of values tag to display the Find dialog box to choose a value.
-
If applicable sales orders are attached to this job, you can select values in the Sales Order and Sales Order Line fields.
-
If quality collection plans exist for this assembly, choose Quality to navigate to the Enter Quality Results window.
-
Choose OK to save your work.
The window refreshes with the completed quantity displaying next to the Complete Assembly graphic icon.
Sales Orders and Outside Processing Operations
When a job with outside processing operations is changed to complete, closed, or canceled status - an informational warning message displays if open purchase orders or requisitions exist for any of the operations.
Changing a job status to completed, closed, or canceled is prevented if open reservations exist. If you attempt one of these transactions for a job linked to a sales order, an error message displays. You have two options in order to continue:
-
Unlink the sales order reserved to this job
-
Reduce the job quantity of the job to equal the completed quantity
Related Topics
Assembly Completions and Returns.
Performing Move Completion and Return Transactions.
Completing and Returning Assemblies.
Linking ATO Sales Orders and Discrete Jobs
Entering Quality Results Directly, Oracle Quality User's Guide
Backfushing Lot and Serial Items
The Discrete Workstation enables backflushing of lot and serial controlled items during move transactions and completion transactions. When you are performing a completion transaction, and choose OK—the system automatically explodes the bill of material and accesses the Components dialog window. Components under serial number, or lot and serial number control, require entry of these values. On this window, the Quantity field displays the background in the color red if data entry is required. Backflushing lot and serial controlled items on the Discrete Workstation enables you to:
-
Access the Lot Entry or Serial Entry windows directly from the workstation
-
View a visual indication of the required data entry
-
Over or under issue Pull components requiring lot and serial number entry
See: Lot and Serial Number Backflushing, and Backflush Supply Subinventories and Locators
To enter operation completion transactions for serial, or lot and serial components on the Discrete Workstation
-
During operation completion transactions, when moving quantity to the last step of the operation, the Move dialog box displays. Enter the number you are completing in the Quantity field.
-
If quality collection plans exist, choose Quality to navigate to the Enter Quality Results window. Entering Quality Results Directly, Oracle Quality User's Guide
-
Choose OK to save your work
The Components dialog window displays. This window displays fields for the Operation, Component, Unit of Measure, Quantity, Subinventory, Locator, and Revision.
You can change the default information for Unit of Measure and Subinventory.
In the Quantity field, if information is required, it displays with a background color of red. The default is the required quantity. If you have enabled the Allow Quantity Changes During Backflush parameter—you can change the quantity. Otherwise, you must transact the Quantity Required value. See Backflush Transaction Options
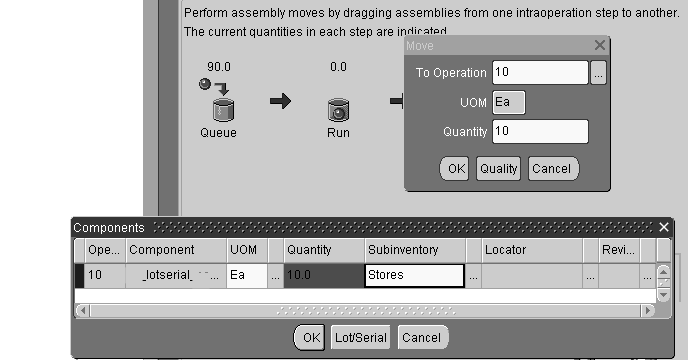
-
Choose Lot/Serial to assign lot and serial numbers.
The Lot Entry window displays to select or assign lot information, if required. Otherwise, if only serial number values are required, the Serial Entry window displays.
-
Enter lot information, if applicable. See: Assigning Lot Numbers, Oracle Inventory User's Guide
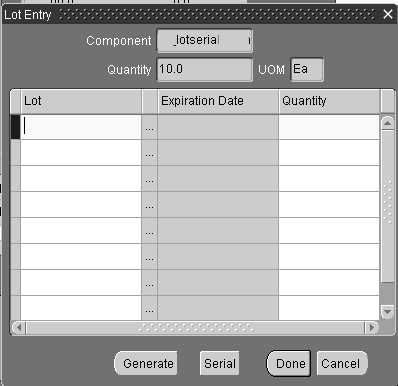
-
Choose Serial to access the Serial Entry window, see: Assigning Serial Numbers, Oracle Inventory User's Guide
-
Choose Done to save your work, and return to the workstation canvas.
To enter completion transactions for serial, or lot and serial assemblies on the Discrete Workstation
-
During assembly completion transactions, when moving quantity to the last operation, the Completion dialog box displays. Enter the completion information for this assembly.
-
Choose Lot/Serial to assign lot and serial numbers. The Lot Entry window displays to select or assign lot information, if required. Otherwise, if only serial number values are required, the Serial Entry window displays.
-
Enter lot information, if applicable. See: Assigning Lot Numbers, Oracle Inventory User's Guide
-
Choose Serial to access the Serial Entry window. Enter the serial number information, see: Assigning Serial Numbers, Oracle Inventory User's Guide
-
Choose Done to save your work, and return to the workstation canvas.
Upstream Dispatch List
The Upstream Dispatch List branch is the second of two main branches on the Discrete Workstation. The tab for the Upstream Dispatch List branch itself is blank. If there are jobs for future dispatch at that department or resource, expanding the tree displays them on a list below this branch. When you select a job operation from the tree, the workstation also displays the operation's Components and Resources branches.
Job operations on the Upstream Dispatch List display two tabs of information, the Component Shortages and Properties tabs. The job operation's Components branch displays the Component Requirements tab, and its Resources branch displays the Resource Requirements tab.
Detailed information on each of these tabs is provided in the sections that follow.
For detailed information on each tab, see the following topics:
Jobs for Upstream Dispatch
Job operations on the Upstream Dispatch List have assembly quantities in the To Move intraoperation step of the previous operation. These job operations are scheduled to be worked on in the near future at the resource you are viewing.
Each branch under the Upstream Dispatch List represents one job operation, and each job operation is supported by two branches of information: its Components branch, which displays the operation's Component Shortages and Properties tabs, and its Resources branch, which displays its Resource Requirements tab.
Component Shortages Tab (Jobs for Upstream Dispatch)
The Component Shortages tab displays a comparison of the components required for a job operation to the quantities of components on-hand.
The top section of the Component Shortages tab displays the following information about the department and resource: job, operation sequence, operation code, assembly, department, resource, and resource sequence.
Component Shortages Tab Graph
The Component Shortages bar graph for jobs in the upstream dispatch list compares the job operation's required quantity to its on-hand quantity. The graph only displays job operations that have fewer components on-hand than are required for the operation.
The graph provides you with the following information, which is also presented in a table below the graph:
-
Component: the name of the component
-
Date: the date where the shortage occurred
-
Required Quantity: the number of components required for the job operation
-
On-Hand Quantity: the number of the components required for the job operation that are in inventory
-
Difference: the Required quantity minus the On-Hand quantity
Properties Tab (Jobs for Upstream Dispatch)
The Properties tab for jobs in the upstream dispatch list displays the following information:
-
Job
-
Operation Sequence
-
Operation Code
-
Operation Description
-
Scheduled Quantity
-
Assembly
-
Assembly Description
-
Department
-
Resource
-
Resource Sequence
-
Job Start Time
-
Job End Time
-
Operation Start Time
-
Operation End Time
-
Quantity in Queue
-
Quantity in Run
-
Quantity in To Move
-
Quantity in Reject
-
Quantity in Scrap
-
Quantity in Complete
-
Next Operation
-
Previous Operation
-
Minimum Transfer Quantity
-
Project
-
Task
Components Branch (Jobs for Upstream Dispatch)
The Components branch displays the Component Requirements tab. This tab lists all of the components required for the job operation.
Component Requirements Tab (Jobs for Upstream Dispatch)
The header section of the Component Requirements tab for jobs in the upstream dispatch list displays the job, operation sequence, operation code, assembly, department, resource, and resource sequence.
The tab's table provides the following information about the component:

-
Component
-
Description
-
UOM (Unit of Measure)
-
Basis
-
Required Quantity
-
Supply Type
-
Date
-
Subinventory
-
Locator
-
Quantity Issued
-
Quantity Per Assembly
-
Inverse Usage
-
Yield
-
Comments
Resources Branch (Jobs for Upstream Dispatch)
Selecting the Resources branch opens the Resource Requirements tab. This tab lists all of the resources required the job operation.
Resource Requirements Tab (Jobs for Upstream Dispatch)
The top section of the Resource Requirements tab for jobs in the upstream dispatch list provides you with the job, operation sequence, operation code, assembly, department, resource, and resource sequence.
The table provides the following information about the resource (you may have to scroll to see all of the columns of information):
-
Sequence
-
Resource
-
Assigned Units
-
Type
-
Description
-
UOM
-
Basis
-
Usage Rate
-
Start Date
-
Completion Date
Overview of Creating Discrete Jobs
You can create discrete jobs in the following ways:
-
Manually (both standard and non-standard discrete jobs). See: Defining Discrete Jobs Manually.
-
Manually from a simulation (standard discrete jobs only). See: Simulating and Saving Simulated Jobs.
-
Automatically using Oracle planning products to plan your standard discrete production, then using the Planner Workbench to implement your planned orders. See: Planned Discrete Jobs.
-
Automatically using Advanced Planning and Scheduling's High Level Scheduling Engine to schedule jobs and import them into Work in Process
-
Automatically (standard discrete jobs only) from final assembly orders for specific customer configurations and/or standard assemble-to-order (ATO)/configure-to-order items. See: Final Assembly Orders.
-
Using the Work Order Interface to import planned orders and updated planned order recommendations. See: Work Order Interface, Oracle Integration Repository at http://irep.oracle.com
Note: If you have Oracle Shop Floor Management installed, you can create lot based jobs. The entire quantity of a lot based job moves on the basis of the network routing.
Planned Discrete Jobs
You can create planned orders and reschedule recommendations using the Planner Workbench in Oracle planning products. You can modify the due dates and quantities of planned orders, and also firm plan these orders. You can create new discrete jobs by implementing all or some planned orders.
When you create jobs using the Planner Workbench, you can specify the WIP accounting class. Accounting classes can be defaulted. See: WIP Accounting Class Defaults, Product Line Accounting Setup, Oracle Cost Management User's Guide, Discrete Parameters, and Discrete Accounting Classes.
If the job being created is for a lot controlled assembly, the WIP Default Lot Number Type parameter is used to determine whether lot numbers are assigned based on the job name or based on the Oracle Inventory lot number rules.
Discrete jobs created from planned orders use the planned order quantity as the default job quantity. The primary bill of materials and primary routings for the assemblies are used to create work in process bills and routings. Jobs created from planned orders are backward scheduled from the required completion date. The calculated start date is used to determine the bill and routing revisions and revision dates.
Planning takes shrinkage rate, component yield, and safety stock into consideration in the planning process. Once you define the standard job, supply is calculated using the following formula:
available supply quantity = (MRP net quantity - quantity completed - quantity scrapped) x 1 - item shrinkage rate)
You can also use the Planner Workbench to reschedule existing jobs. For example, you can reschedule every assembly in the plan or you can reschedule only certain specific assemblies.
When you implement planned orders and create discrete jobs, Planning does not take into account the WIP:View Only Released ECOs profile option in the Personal Profile Values window.
Oracle Advanced Planning provides a profile option enabling you to align Work in Process production with engineering changes for planning See: Aligning Engineering Change Order Dates in Planning and Production
Related Topics
Creating and Implementing Firm Planned Orders, Oracle Advanced Supply Implementation and User's Guide
Releasing Recommendations, Oracle Advanced Supply Implementation and User's Guide
Shrinkage Rate, Oracle Master Scheduling/MRP and Oracle Supply Chain Planning User's Guide
Final Assembly Orders
You can automatically create final assembly orders for Assemble to Order (ATO) items entered in Oracle Order Management. These discrete job orders are created on a single job to single sales order delivery basis.
On the Sales Order window (which you open from the Discrete Jobs window in Work in Process), you also can associate discrete jobs for both standard items and ATO items with sales orders and thereby allocate production to specific customers.
To determine the job start date, you schedule jobs created from final assembly orders backwards from the order due date. The calculated start date is used to determine the bill and routing revisions and revision dates.
Related Topics
Overview to Supplying Unique Configurations, Oracle Configure To Order Implementation Manual
Linking ATO Sales Orders and Discrete Jobs
AutoCreating Final Assembly Orders
Work Order Interface
You can load planned orders, planned order update recommendations, and suggested repetitive schedules from any source - planning systems, order entry systems, finite scheduling packages, production line sequencing programs, spreadsheets, and even custom entry forms - into the Work Order Interface. For example, if your plant directly feeds to your customer's plant, you can take demands directly from your customer rather than waiting for the next MRP run thus reducing response time and eliminating unnecessary overhead.
You then use the Import Jobs and Schedules window to launch the WIP Mass Load program, which validates records in the Work Order Interface table and implements any imported records as new discrete jobs, updated discrete jobs, or pending repetitive schedules.
See: Work Order Interface, Oracle Integration Repository at http://irep.oracle.com
Aligning Engineering Change Order Dates in Planning and Production
In Oracle Advanced Planning, the ECO Use-up Date is the date when the on-hand quantity is calculated to be 0. It is calculated from inventory supply and requirement demand. Work in Process detailed scheduling calculations are taken sequentially. Therefore, production order recommendations from planning can result in recommendations that either ignore active ECOs, or assume future ECOs are already active.
Oracle Advanced Planning provides a profile option to align Work in Process production with engineering change orders in planning. This enables you to control if resource and component schedules, calculated by Oracle Advanced Planning, are forwarded to Oracle Work in Process when ECO Revision Date differs from the order Start Date.
The profile option, MSC: Release WIP Details if Order Date Different than BOM Revision Date, has the following settings:
-
Yes: Work in Process details are release even if the job or schedule Start Date is different than the bill of material Revision Date.
The planning engine updates the ECO Revision Date to the Start Date of the earliest affected job or schedule. Oracle Work in Process ignores the job BOM Revision Date and explodes the bill of material and routing details. It uses the planning recommended new Start Date, instead of the existing order Start date. This eliminates revision conflicts among multiple engineering change orders.
-
No: Work in process details are not released if the job or schedule Start Date is different than the bill of material Revision Date. Work in Process explodes the details effective as of the Start Date.
Engineering Change Orders Use-Up Effectivity, Oracle Advanced Planning Implementation and User's Guide
Kanban Replenishments
In a pull-based system, inventory items for a particular part or assembly area are replenished as soon as they are needed. When the items are needed, kanban cards in Oracle Inventory change their Supply Status to Empty, and Inventory generates production kanban replenishment request automatically.
If the source type of the kanban card is Production, as opposed to Supplier or Inter-Org, the type of Work in Process Entity that is created is determined based on the assembly referenced by the kanban card per the following rules:
-
If the lowest priority or primary routing of the assembly is a Flow routing, a Flow schedule is created. This is true even if the items Repetitive Planning attribute is set
-
If the lowest priority or primary routing of the item is not a Flow routing, and the Repetitive Planning attribute is set, then a repetitive schedule is created.
-
If the lowest priority or primary routing of the item is not a Flow routing, and the Repetitive Planning attribute is NOT set, then a discrete job is created
Signals to create discrete jobs and repetitive schedules are processed by the WIP Mass Load program.
When discrete jobs and repetitive schedules are created in response to kanban replenishment signals, they are automatically loaded into the Work Order Interface and automatically processed. If the replenishment signal creates a discrete job, the kanban card is referenced on that job; however, if the replenishment signal creates a repetitive schedule, the kanban card is not referenced. Once the discrete job or repetitive schedule has been successfully loaded, the status of the kanban card is updated to In process.
When kanban replenishment jobs and schedules fail validation and processing, they are automatically deleted from the interface table. The reason for their failure is noted on the Job and Schedule Interface report, which is automatically printed each time the Mass Load program is run. When imported, non-kanban job and schedule information that fails validation or processing is marked. You can use the Pending Jobs and Schedules window to view, update, and resubmit this information.
Related Topics
Processing Pending Jobs and Schedules
Overview of Kanban Replenishment, Oracle Inventory User's Guide
Build Sequencing
You can sequence the jobs and Flow schedules that you are building within schedule groups. This is done by assigning a unique schedule number to each job or Flow schedule within a group.
Schedule Groups
Schedule groups are defined in the Define Schedule Groups window and can be optionally assigned to jobs, in the Discrete Jobs window, or to Flow schedules, in the Line Scheduling Workbench Options window. The schedule group assigned in the Line Scheduling Workbench Options window can be overridden in the Work Order-less Completions window, but only with a schedule group that is associated with a Flow schedule.
Build Sequence
Sequencing jobs and Flow schedules within a schedule group makes it possible to prioritize, for example by customers, the jobs or Flow schedules being built on a specific production line.
Production Lines
You must specify a production line when you sequence Flow schedules. Production lines are optional for discrete jobs. When a production line is assigned, the schedule group/build sequence/production line combination must be unique, as shown in the following table.
| Schedule Group 1000 | Schedule Group 2000 |
|---|---|
| Production Line 4000, Build Sequence 0001 | Production Line 4000, Build Sequence 0001 |
| Production Line 4000, Build Sequence 0002 | Production Line 4000, Build Sequence 0002 |
| Production Line 5000, Build Sequence 0001 | Production Line 5000, Build Sequence 0001 |
| Production Line 5000, Build Sequence 0002 | Production Line 5000, Build Sequence 0002 |
All of the above combinations would be valid for any job or Flow schedule, but you cannot assign the same combination to both a discrete job and a Flow schedule.
Related Topics
Associating WIP Accounting Classes with Categories, Oracle Cost Management User's Guide
Product Line Accounting Setup, Oracle Cost Management User's Guide
Defining Discrete Jobs Manually
A number of features are available when defining discrete jobs manually including:
-
Defining standard, non-standard, and project jobs
-
Assigning bills and routings to standard discrete jobs to create material requirements, schedule operations, and create resource requirement
-
Assigning alternate bills of material and alternate routings for standard discrete jobs
-
Assigning bill of material references and routing references to non-standard discrete jobs to create material requirements, schedule operations, and resource requirements
-
Attaching illustrative or explanatory files in the form of text, images, word processing documents, spreadsheets, and video
After saving a job, you can access the Components and Operations windows to view the details of the job, including its material requirements, operations, and operation material and resource requirements. You can enter a subjective completion percentage on any job operation. The system uses these entries to calculate the percent complete for the entire job. See: Adding and Updating Operations
About Attachments, Oracle E-Business Suite User's Guide
Creating a Bill of Material, Oracle Bills of Material User's Guide
To define a discrete job
-
Navigate to the Discrete Jobs window. The Discrete Jobs Summary window appears
-
Choose New to display the Discrete Jobs window.
You can define discrete jobs one-at-a-time in the Discrete Jobs window. This method is described below. You can, however, also define several jobs simultaneously using the Discrete Jobs Summary folder window.
Note: The following nine fields cannot be accessed in the Discrete Jobs Summary folder window even if included in your user folder: bill and routing Alternates, bill and routing Revisions and Revision Dates; Completion Subinventory and Locator; and Supply Type. If you need to change the values that are defaulted into these fields, navigate to the Discrete Jobs detail window.
-
Enter or generate the Job name.
You can generate a default Job name by choosing Apply Default Job Name from the Tools menu or by simply pressing the tab key. If you do enter the job name, it must be unique and alphanumeric.
Note: Default job names can only be automatically generated by the automatic sequence generator if a prefix has been specified for the WIP:Discrete Job Prefix profile option.
-
Select the job Type, either Standard or Non-Standard. See: Standard Versus Non-Standard Discrete Jobs.
-
If defining a standard discrete job, select the job Assembly.
The assembly is the item you are building. If a primary bill of material, primary routing, or both exist for this assembly, they are defaulted.
You cannot select an assembly that has a primary routing that is Flow related. If you do, a warning is displayed and you are prompted to enter another routing designator.
See: Creating a Flow Routing, Oracle Flow Manufacturing User's Guide.
Assemblies are optional for non-standard discrete jobs, however, you must enter them for non-standard discrete jobs with routings if you want to track shop floor move and resource transactions.
If you set the WIP:See Engineering Items profile option to Yes, you can define jobs for engineering items.
Note: If you are defining a job for an ATO sales order, you must enter an ATO item.
Note: You can define discrete jobs for assemblies that do not have components and for assemblies that have components with disable dates less than or equal to the current date.
-
See: WIP Accounting Class Defaults, Discrete Accounting Classes, and Accounting Class Defaults on the Discrete Jobs Window
-
When you define a job, its status defaults to Unreleased but can be changed to Released or On Hold. See: Discrete Job Statuses.
-
Check the Firm check box to firm your job. You cannot firm a non-standard discrete job.
Firming a discrete job prevents MRP from suggesting rescheduling and replanning recommendations when changes to supply or demand occur. If replanning is required, the MRP planning process creates new jobs to cover the new demand. See: Firm Order Planning, Oracle Master Scheduling/MRP and Oracle Supply Chain Planning User's Guide.
To define job quantities
-
Standard discrete jobs must have a start quantity greater than zero. When you enter a start quantity for jobs with bills and routings, the component material requirements, department schedules, resource load, and job start and end dates are all determined automatically.
For non-standard jobs, if you enter a start quantity of 0 and specify a bill of material reference, the corresponding bill is exploded but material requirements equal to 0 are created. To perform move and completion transactions for a non-standard job, the start quantity must be greater than zero.
Note: If you link a job to an ATO sales order, the start quantity defaults from the sales order. If you link several sales orders to a single job, the order quantities are totalled and the start quantity is automatically updated.
-
The MRP net quantity is the number of assemblies that MRP considers as supply on the scheduled completion date.
For standard and non-standard discrete jobs with assemblies, the MRP net quantity is derived from the job start quantity. For non-standard discrete jobs without assemblies, the default is zero.
Note: On standard jobs, do not use MRP net quantity to identify planned shrinkage due to operation yield loss. The planning processes automatically deduct scrapped assemblies from the quantity as you scrap. Therefore, reducing the MRP net quantity and scrapping assemblies double counts job scrap.
Note: You can use MRP net quantity to identify planned shrinkage due to operation yield loss on non-standard jobs. Planning does not include quantities scrapped or the item shrinkage factor in determining available supply from a non-standard job.
See: Shrinkage Rate, Oracle Master Scheduling/MRP and Oracle Supply Chain Planning User's Guide
To schedule a discrete job with a routing
-
Enter or select either the Start or Completion date and time.
If you enter a start date and time the completion date and time are automatically forward scheduled based on the assembly's routing. Similarly, if you enter a completion date, the start date and time are automatically backward scheduled based on the assembly's routing. You can enter a past due start date to forward schedule a job that should have started before the current date. You cannot enter a start date and time greater than the completion date and time.
You can use the start date of the job to default bill and routing revisions and revision dates. If a start date is not entered, bill and routing revisions and revision dates default based on fixed and variable lead times of the assembly.
To schedule a discrete job without a routing
-
Enter or select either the Start and/or Completion date and time.
If you enter only one date and time and your job type is standard, the missing date and time is calculated using the fixed and variable lead time of the assembly. If the assembly has both a fixed and variable lead time, the lead time for the job is calculated as job quantity times variable lead time plus fixed lead time. If you enter only one date and time and your job type is non-standard, the other dates and times are calculated using the fixed and variable lead time of the routing reference.
If your job is non-standard and has a routing reference, the fixed and variable lead times of the routing reference are used instead of the assembly lead time. If your job is non-standard and you specify no routing reference, you must enter both dates and times.
Note: You can use the WIP:Default Job Start Date profile option to specify whether the start date for a job defaults to the current date and time or does not default at all.
To assign a bill of material reference to a non-standard discrete job and/or an alternate bill of material/revision to a standard discrete job
-
On the Bill tab, select the bill of material Reference if defining a non-standard discrete job.
Bill of material references are used to create material requirements for non-standard discrete jobs, however, they are not required. Instead, you can define the job without material requirements, then customize it by adding only those material requirements that are required. See: Adding and Updating Material Requirements.
-
Select the Alternate bill of material. See: Primary and Alternate Bills of Material, Oracle Bills of Material User's Guide.
You can select an alternate bill if alternates have been defined for the assembly you are building. If the WIP:See Engineering Items profile option is set to Yes, you can also select engineering items as alternates.
For non-standard discrete jobs, you can enter any alternate defined for the bill Reference specified.
-
Select the bill of material Revision.
The bill revision and date determines which version of the bill of material is used to create job component requirements. The start date of a standard discrete job can be used to default the bill revision and revision date. If a start date is not selected, the revision and revision date are derived based on fixed and variable lead times of the assembly.
You can update the bill revision of a standard discrete job as long as the job remains unreleased. You can update the bill revision for standard bills or alternate bills. See: Item and Routing Revisions, Oracle Bills of Material User's Guide.
You can explode item revisions that have associated ECOs with Release, Schedule, and Implement statuses. If you set the WIP:Exclude ECOs profile option to None, you can also explode revisions for ECOs that have an Open status. See: .
If you are building a non-standard job and the Revision Control attribute for the assembly item is set to Yes, the revision of the bill reference must be valid for the assembly. See: Defining Items, Oracle Inventory User's Guide and Inventory Attribute Group, Oracle Inventory User's Guide.
You can create an ECO for a job and specify a cumulative quantity, a range of jobs, or implement changes for specific lots. For example: Job1 quantity is for 100 units of an item. If an ECO is created specifying a cumulative quantity of 50, the existing job is divided into two jobs and the ECO is implemented on the remaining 50 units. See: Defining ECO Revised Items, Oracle Engineering User's Guide
-
Select the bill Revision date and time.
You can select a bill revision date other than the one that is derived for standard bills, alternate bills, or bill references. You can update this date as long as the job remains Unreleased.
-
The supply type defaults to Based on Bill. This supply type indicates that component requirements are supplied based upon their individual supply types. You can override this default by choosing one of the following supply types: Push, Assembly Pull, Operation Pull, Bulk, or Supplier. See: Supply Types.
To assign a routing reference to a non-standard discrete job and/or an alternate routing/revision to a job
-
On the Routing tab, select the routing Reference if defining a non-standard job.
Routing references can be used to create routings (operations and resource requirements) for non-standard discrete jobs, but are not required. You can optionally define non-standard jobs without routings, then customize them by adding only those operations that are required. See: Adding and Updating Operations.
Note: You can assign any routing to a non-standard job, including one that does not match the assembly you assigned, using the routing reference.
-
You can select an alternate routing if alternates have been defined for the assembly you are building. If the WIP:See Engineering Items profile option is set to Yes, you can select engineering routings as alternates. See: Profile Options and Primary and Alternate Routings, Oracle Bills of Material User's Guide.
For non-standard job, you can enter any alternate defined for the routing reference specified.
-
Select the routing Revision. See: Item and Routing Revisions, Oracle Bills of Material User's Guide.
The start date of a standard discrete job can be used to derive the routing revision and revision date. If a start date is not selected, the revision and revision date are derived based on fixed and variable lead times of the assembly.
You can update the routing revision as long as the job remains unreleased. For standard discrete jobs, the routing revision determines which version of the routing is used to create the job routing (operations and resource requirements). For non-standard discrete jobs, the routing reference determines the routing for the job. The revision you select for the non-standard job applies to the routing reference, not the assembly.
-
Select the routing Revision Date and time.
You can update routing revision dates for standard routings, alternate routings, or routing references. You can update routing revision dates as long as the job remains unreleased.
-
Select the completion Subinventory and, if required by the subinventory, Locator.
Assemblies are completed into or returned from this subinventory and locator. If the assembly has a routing, the completion subinventory and locator are defaulted from the routing but can be overwritten. For non-standard discrete jobs, you can select completion subinventories and locators only if you specified an assembly.
If the Oracle Inventory INV:Allow Expense to Asset Transfer profile option is set to Yes, you can select an expense subinventory. See: Inventory Profile Options, Oracle Inventory User's Guide.
Note: You can override the completion subinventory and locator you specify here when you complete or return assemblies using the Completion Transactions window.
Note: You must specify a completion subinventory and locator if you plan to complete or return assemblies using the Move Transactions window since the subinventory and locator specified here are automatically used for those transactions.
Project locator logic is used if you are assigning a completion subinventory to a project job. See: Locators in Project Manufacturing, Oracle Project Manufacturing User's Guide
To assign a demand class, kanban identifier, lot number, description, and overcompletion tolerance type and tolerance value
-
On the More tab, select the Demand Class.
You can select any enabled and active demand class. Demand classes are not required. See: Overview of Demand Classes, Oracle Master Scheduling/MRP and Oracle Supply Chain Planning User's Guide and Creating Demand Classes, Oracle Master Scheduling/MRP and Oracle Supply Chain Planning User's Guide.
-
If the assembly is under lot control, select a Lot Number.
Lot numbers are automatically assigned based on how the Default Lot Number Type parameter is set, either by job name or based on Inventory lot number rules, but can be overwritten or deleted. See: Discrete Parameters.
When you complete or return assemblies using the Completion Transactions window, job lot numbers entered here are automatically defaulted but can be changed. Job lot numbers must be entered here before you can move and complete or move and return lot controlled assemblies using the Move Transactions window.
-
Descriptions can be used to identify jobs on standard reports. They can be up to 240 characters of alpha numeric text. They are optional.
-
Enter the Kanban reference.
-
In the Overcompletion region, select the Tolerance Type. The options are Percent or Amount. If you do not select the Tolerance Type, it implies an infinite tolerance value.
-
Enter the Overcompletion Tolerance Value that corresponds to the Overcompletion Tolerance Type that you selected.
-
If you did not select an Overcompletion Tolerance Type, no tolerance is indicated and you can over-complete all assemblies on this job.
-
If you indicate a value of zero, you will not be able to over-complete any assemblies on this job.
-
To define schedule group and project information
-
On the Schedule Group, Project tab, select the Schedule Group.
You have the option to assign discrete jobs to any active schedule group. See: Defining Schedule Groups
-
Enter a Build Sequence identifier. See: Build Sequencing.
-
You can select any active production line. Production lines are optional for discrete jobs. They are not used for scheduling or transactional purposes. However, if you do select a production line, the combination of schedule group, build sequence, and production line must be unique.
-
Select a Project and, if required, a task.
You can only select a project if the current organization's Project References Enabled parameter is set in Oracle Inventory. You must select a task if the Project Control Level parameter is set to Task and you have entered a project. See: Organization Parameters Window, Oracle Inventory User's Guide and Creating Projects, Oracle Projects User's Guide.
-
Enter the Unit Number. This enables you to associate an end item model/unit effectivity number with the item.
You must have Oracle Project Manufacturing installed, the item must be under model/unit effectivity control, and you must have a model/unit number associated with it to enable this functionality. If the item is not under model/unit number control, this field is disabled. See: Model/Unit Effectivity, Oracle Project Manufacturing Implementation Manual.
Note: You can update unit effectivity through Mass Load for discrete jobs that are unreleased and project related.
-
Save your work.
If you are defining a discrete job, you must save the job before viewing component requirements and operations for that job.
To define Oracle Manufacturing Scheduling information
If you have installed Oracle Manufacturing Scheduling, you can use the fields on this tab to change scheduling information defaulted from the WIP Parameters window. To enable this functionality, select the Constraint Based Scheduler check box on the Scheduling tab of the WIP Parameters window.
Note: Do not check the Constraint Based Schedule check box unless you have installed Oracle Manufacturing Scheduling. Oracle also provides Production Scheduling, a constraint-based automated scheduling tool using sophisticated scheduling algorithms. See: Supply Chain Planning Production Scheduling
-
Select the Scheduling tab.
-
In the Requested Due Date field, you can enter a due date that is different than the completion date for the job.
-
In the Scheduling Priority field, enter a number ranging from 1 to 99, with 1 being the highest priority. The default priority is 10. See: Rescheduling All Jobs or Pending Scheduling Jobs, Oracle Manufacturing Scheduling User's Guide,
-
In the Penalty Per Day Late field, enter a penalty factor value used for scheduling jobs not completed by the scheduled due date. Higher penalties generate attempts in scheduling to circumvent such an event.
-
In the Due Date Tolerance (days) field, specify the maximum number of days the job can be delayed during scheduling.
-
Save your work.
To change a saved job
To view pending job information
-
You can determine if there are any pending transactions or documents for a job using the Pending Actions window. See: Viewing Pending Job Transactions.
To view operations:
-
Choose Operations The Operation window appears and the job's operations are displayed. You can optionally view the components required at a selected operation by choosing Components. See: Viewing Job and Schedule Operations.
To view component requirements
-
Choose the Components button. The Material Requirements window appears and the job's components are displayed. See: Viewing Component Requirements and Viewing Component ATP Information.
Note: When no routing exists, all components default to operation sequence of 1.
To view outside processing workflows
To link an ATO sales order to a standard discrete job
-
See: Linking ATO Sales Orders and Discrete Jobs.
Note: The Sales Order button is disabled if you are changing a production kanban job.
Related Topics
Setting up Discrete Manufacturing
Overview of Changing Discrete Jobs
Overview of Non-Standard Discrete Jobs
Attaching Files to Jobs, Schedules, and Operations
Linking Sales Orders and Discrete Jobs
You can reserve assemblies on a Discrete job for a specific sales order line whether or not the assemblies are Assemble-to-Order (ATO) items. You link both standard and non-standard Discrete jobs to sales orders by selecting one or more sales orders from the Sales Order window when you create the job. You can link one or more sales order lines with one or more jobs.
You can also enter the demand class for the job to help you track production by sales channel. When you are building final assembly orders, the demand class is automatically loaded based on the customer. You can enter any valid demand class.
When linking ATO sales orders and jobs, however, the following rules are applied:
-
Assembly item cannot be a Pick-to-order item
-
Sales order line item must be demanded, but not yet shipped
-
Assembly item must be a standard item or an ATO item, not a model or an option
The WIP parameter, Respond to Sales Order Changes, determines the response to changes for configured sales orders and their linked Discrete jobs. Options are to ignore the sales order change or change the status of linked jobs to On Hold. When making changes to sales order lines with ATO items, this parameter is ignored by the system. See: WIP Parameters.
You cannot cancel jobs linked to sales orders without first undoing the links between them (see the task.
Prerequisites
- Define at least one discrete job. See: Defining Discrete Jobs Manually.
To link a Discrete job with a sales order
-
Enter the Job name.
Note: Once you chose a job or assign an assembly to a job, you can only select sales order lines that are for that assembly.
-
Choose the Sales Orders button. The Sales Order window appears.
-
Select one or more sales orders.
You can select multiple sales orders as long as the total quantity allocated does not exceed the job quantity. You cannot select a sales order that has order lines that are currently being satisfied by a Flow schedule.
Note: You can attach a sales order to a job before entering an assembly, start quantity, or demand class for a job. Work in Process defaults the assembly, start quantity, or demand class based upon the sales order you specify.
-
If you enter a line that also specifies a shipment number, the sales order shipment number is entered in the Ship Number field. You can specify a sales order line that does not include a sales order shipment number.
-
Enter the Quantity Allocated.
This is the quantity of the sales order, line number, and shipment number combination that the discrete job fulfills.
-
Save your work.
To link a Discrete job with an ATO sales order
-
Select a Sales Order that has a line defined for the job's ATO item and demand class.
You can select multiple sales orders as long as the total quantity allocated does not exceed the job quantity. You cannot select a sales order that has order lines that are currently being satisfied by a Flow schedule.
Note: You can attach a sales order to a job before entering an assembly, start quantity, or demand class for a job. Work in Process defaults the assembly, start quantity, or demand class based upon the sales order you specify.
-
Enter the sales order Line.
If you enter a line that also specifies a shipment number, the sales order shipment number is entered in the Ship Number field. You can specify a sales order line that does not include a sales order shipment number.
-
Enter the Quantity Allocated.
This is the quantity of the sales order, line number, and shipment number combination that the discrete job fulfills.
-
Save your work.
To view an ATO sales order linked with a discrete job
-
Choose Find from the Query Menu. See: Finding Discrete Jobs.
To undo links between Discrete jobs and sales orders
-
Navigate to the Sales Order window.
-
Enter the Job name.
-
Choose the Sales Orders button. The Sales Order window appears.
-
Select one or more sales orders.
-
Choose Delete from the Edit Menu to undo the link.
-
Save your work.
Over-completion Quantities Reserved to Sales Orders
You can reserve over-completion quantities from jobs linked to sales orders when using the Completion Transactions and Move Transactions windows. To reserve over-completions:
-
The linked sales order must be open.
-
You enter the sales order number for each completion line. This reserves the surplus amount, otherwise the over-completion is unreserved excess inventory.
Note: Oracle Mobile Supply Chain Applications does not support this feature.
Over-completion Reservations and Multiple Sales Orders
When multiple sales orders are tied to the same job, you can have instances where a job fulfilled by several sales orders is closed by over-completing only one order line. For example:
-
JobA is a quantity of 200
-
It is linked to Sales Order1 for 100, and Sales Order2 for 100, the completed quantities on both lines are reserved
-
The over-completion tolerance for the job is 20 percent
Note: Over-completion tolerance limits for discrete jobs are defined in the WIP Parameters window. See: Defining WIP Parameters
-
80 are completed referencing Sales Order1
-
120 completed referencing Sales Order2
The over-completion quantity meets the tolerance level, and the job status is changed to complete-even though Sales Order1 still has 20 units open linking to this job. You have several options to close this open record:
-
Cancel the jobs linked to the sales order line
-
Delink the jobs linked to the same sales order line
-
Reduce the quantity on the jobs linked to the same sales order line
Sales Order Over-shipments and Over-completion Reservations
The over-shipment tolerance for the sales order is defined in Order Management. Depending on the tolerance settings for job over-completions and sale order over-shipments, it is possible to have job over-completions that are not reserved to the sales order. For example:
-
JobA is for a quantity of 10, and linked to Sales Order1 for 10 each
-
The over-completion tolerance is 20 percent for the job, and the over shipment tolerance is 10 percent for the sales order
-
12 are completed for Job A-an over-completion quantity of 2, (20 percent)
One of the over-completions is reserved to the job, the other is unreserved. You can reserve the other surplus by increasing the quantity on the picking transaction to reserve it to the sales order.
Related Topics
Defining Discrete Jobs Manually,
Assembly Over-completions and Over-returns
Move Completion/Return Transactions.
Performing Move Completion and Move Return Transactions
Completing and Returning Assemblies
Serial Number Tracking Throughout Manufacturing
You can track your jobs using serial control throughout the manufacturing process. This enables you to assign and associate serial numbers to a job, and track the assembly by serial number as it progresses on the shop floor. Serial number tracking is enabled for discrete jobs, both standard and non-standard. This feature also includes:
-
Serial control beginning at a specific point in the routing
-
Association of serial numbers to jobs before build
-
Serial based transaction entry
-
Import and auto-generation of serial numbers
-
Serial number label printing
You can view the genealogy of the serialized assembly including component issues and returns, and assembly completions and returns. See: Viewing Serial Genealogy, Oracle Inventory User's Guide
Serial tracking for work in process transactions is only supported in the online mode through Oracle Mobile Supply Chain Applications.
Completed serialized assemblies can be reserved as supply sources using the Item Reservation window in Oracle Inventory. A reservation record is created by selecting and reserving specific serialized assemblies against a sales order line. See: Item Reservations, Oracle Inventory User's Guide
Setting Up Serial Number Control Tracking
Serial control for items is defined in Oracle Inventory. Work order serial tracking for assemblies is set in the Work in Process Parameters window.
Inventory Setup
-
Specify the serial control type as Predefined. This value is defined in Inventory attribute, Serial Generation.
Work in process serial tracking is only enabled when you use the value of Predefined. See: Inventory Attribute Group, Oracle Inventory User's Guide.
-
Establish the type of serial number uniqueness for your organization in the Oracle Inventory Organization Parameters window.
Your options for serial number uniqueness are Within inventory items, Within an organization, or Across organizations. See: Defining Revision, Lot, LPN Serial Parameters, Oracle Inventory User's Guide
-
Optionally, you can predefine serial numbers in Oracle Inventory.
You can generate serial numbers using the Serial Number Generation concurrent program, see: Generating Serial Numbers, Oracle Inventory User's GuideYou also have the option to generate numbers from within the Associate Serial Numbers window.
Work in Process Setup
Several parameters are set in the Serial tabbed region of the Work in Process Parameters window. See: Defining WIP Parameters
-
Default Serialization Start Operation
Determines the job operation where serial number tracking begins. The serial start operation on the item routing is always copied to the job routing during job creation. If there is no serialization start operation on the item routing, and this parameter is enabled - the serialization start operation is defaulted to the first operation on the job routing, This value displays on the Discrete Jobs window. If this parameter is not enabled, the serialization start operation on the job routing is blank, and serialization is disabled.
-
Auto Associate Serial Numbers on Job Creation From Interface
If this parameter is enabled, serial numbers are automatically generated and associated to a job when a job is created through the WIP Mass Load Interface.
When you submit the WIP Mass Load program using the Import Jobs and Schedules window, new standard and non-standard discrete jobs are created. The Work Order Interface uses the value in this parameter to create serialized records for the new jobs. See: Importing Jobs and Schedules, and Work Order Interface, Oracle Integration Repository at http://irep.oracle.com
-
Default Intraoperation Step for Assembly Moves
This parameter is used for move transactions on a serialized job. It defines a default value for the intraoperation step where you are moving assemblies - the To step. Your choices are Queue, Run, To move, and Null. The following table shows the next move for Default Intraoperation Step values in this parameter.
Default Intraoperation Step Value To Step for the Next Move Transaction Queue The next Queue step in the routing Run The next Run step in the routing To move The next To move in the routing Null A default step is not set, you must specify the step in your move transaction -
Example One
There are three operations in a serialized job -10, 20, 30. Operation 10 is the Serialization Start Operation, and the Default Intraoperation Step for Assembly Moves is set to Queue.
The first time a serialized move is performed, the From Operation and From Step are set to 10 Queue because the assembly is still at 10 Queue.
The To Operation is defaulted to the next count point operation, and the To Step is defaulted to Queue because the parameter is set to this value.
If all the operations are count point operations, the first transaction moves from 10 Queue to 20 Queue, and the second transaction moves from 20 Queue to 30 Queue.
-
Example Two
There are three operations in a serialized job -10, 20, 30. Operation 10 is the Serialization Start Operation, and the Default Intraoperation Step for Assembly Moves is set to either Run or To Move.
The first time a serialized move is performed, the From Operation and From Step are set to 10 Queue because the assembly is still at 10 Queue.
The To Operation is defaulted to the From Operation because the value for Default Intraoperation Step for Assembly Moves is later in the routing than the current step (that is, Run and To Move takes place after Queue),
If all the operations are count point operations, the first transaction moves from 10 Queue to 10 Run or To Move (depending on the default value). The second transaction moves from 10 Run or To Move, to 20 Run or To Move.
-
-
Transaction Processing Mode
This parameter has two settings: Online and Background. For serialized transactions, this parameter is ignored and will always use the Online setting.
Related Topics
Associating and Modifying Serial Number Job Information
Setting Up Serial Number Control, Oracle Inventory User's Guide
Serial Number Control, Oracle Inventory User's Guide,
Associating and Modifying Serial Number Job Information
The Associate Serial Numbers window is accessed from the Discrete Jobs window, and is enabled only for jobs under serialization. If you are creating a new job, you must first save your record in order to enter information on this window.
This window enables you to generate and associate new or existing serial numbers to the job. You can also print labels for these serial numbers from this window.
To associate serial number to jobs
-
Navigate to the Associate Serial Numbers window.
The Job name, Job Quantity, and Assembly name field values default from the record accessed on the Discrete Jobs window.
If there is a quantity of this job already associated to serial numbers - that quantity displays in the Qty Associated field, and those serial records display in the Associate Serial Numbers region.
Association can be performed either by creating a new record, selecting from the list of values, or generating multiple serial numbers to a job.
-
To create a new serial number and associate to an assembly, enter a value in the Serial Number field.
You can enter any value according to serial number uniqueness rules. See: Defining Revision, Lot, LPN Serial Parameters, Oracle Inventory User's Guide
-
You also have the option to select a serial number from a predefined list of values.
See: Generating Serial Numbers, Oracle Inventory User's Guide.
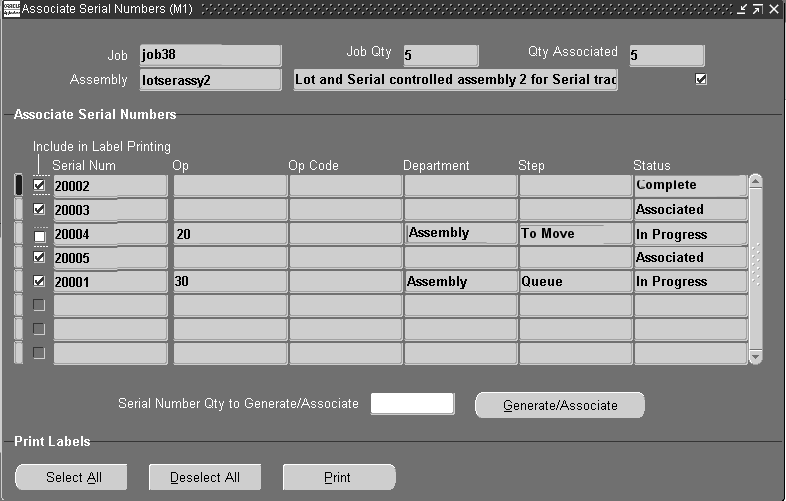
-
To generate and associate serial numbers from this window, enter the number of serial numbers to generate in the Serial Number Qty to Generate/Associate field.
-
Choose Generate/Associate.
The serial number values display in the Serial Number field. The number of serial numbers associated to this job displays in the Qty Associated field.
-
Check the Include in Serial Printing if you want to print labels for these records.
-
Save your work.
Initially, the values in the Operation, Operation Code, Department, and Step fields are blank - and the Status field is Associated until you perform transactions.
As you perform move transactions, the applicable values for those moves display Operation, Operation Code, Department, and Step fields. The Status field is In Progress while you are performing move transactions.
When the assembly is completed, the value in the Status field changes to Complete.
To cancel a serial number associated to a job
-
Select the row for the record you want to disassociate.
-
Delete the entire row from the window.
You can only disassociate or delete rows with a status of Associated.
Label Printing for Serialized Parts
Labels can be printed after serial numbers have been associated to a job. You can set up serial label printing either in Oracle Inventory, or Oracle Warehouse Management. This includes selecting serial number label types, formats, and assigning printers.
You can print labels from the Associate Serial Numbers window, or from the mobile device window.
To print serial number labels using the Associate Serial Numbers window
-
Enable the Include in Label Printing check box for the serial records you want to print.
In the Print Labels region, you can enable all the serial number records for printing by choosing Select All. You can disable all selected records for printing by choosing Deselect All. .
-
Choose Print.
Moving Serialized Assemblies
You can perform serialized move transactions through Oracle Mobile Supply Chain Applications using a mobile device. The location of the assembly on the routing determines the window used for the transactions. For example, jobs not serialized do not require serial entry - and serialized jobs require serial number entry before you can proceed. This functionality uses the following rules:
-
Before reaching the serialization start operation, move transactions are performed using the window where serial number entry is not available.
-
Once a serialized assembly moves to the Queue of the serialization start operation, move transactions are performed using a window requiring serial number entry.
-
The current location of the assembly (the From Operation and Step), and the setting of the Default Intraoperation Step for Assembly Moves parameter - is used as the default destination for the To Operation and Step.
The default destination is the next occurrence of the step that you selected for the parameter setting. The next occurrence is in either the current operation, or the next countpoint operation - depending on the From Step. Default information can be changed. For example:
-
If the From Operation and Step is 20 Queue, and the parameter is set to Run, 20 Run is the default value for the To Operation.
-
If the From Operation and Step is 20 Queue, and the parameter is set to Queue, 30 Queue is the default if 30 is a countpoint operation.
-
-
Before the serialization start operation, where serial number entry is not available, you can move both backward and forward. However, when moving forward, an assembly must be moved to Queue of the serialization start operation before it can move forward. Starting from that point, the serial number represents a specific assembly and serial number entry is required.
-
Backflush components are issued in the quantity and item as defined on the bill of material.
-
Genealogy is not built for negative issues and negative return transactions in serial number tracking.
-
Only serial numbers associated with a specific job can be transacted for that job.
-
Only one assembly can be moved or completed per transaction.
-
In Rules based component picking, you cannot employ the option to have push issue transactions created automatically for serialized components.
Project Jobs
You can use Project Manufacturing to meet demand driven production requirements for large contracts or projects. Project Manufacturing enables you to plan, schedule, process, and create costs for a specific contract or a group of contracts. Jobs with project or project and task references are known as project jobs. You can add project references to both standard and non-standard discrete jobs. Project jobs make it possible to track the material and manufacturing costs that are specific to a project. You can issue project or common inventory to project jobs. You can also charge resources and overhead to project jobs.
Like other discrete jobs, project jobs can created in several ways:
-
Manually defined in the Discrete Jobs window
-
Planned in Oracle planning products, then implemented using the Planner Workbench
.
Note: You can add project references to discrete jobs only If the Project References Enabled organization parameter in Oracle Inventory is set. You must also specify a task if the Project Control Level organization parameter is set to Task and the job has a project. See: Organization Parameters Window, Oracle Inventory User's Guide and Creating Projects, Oracle Projects User's Guide.
There are several parameters defined for Work in Process transactions. In the Oracle Project Manufacturing Parameters window:
-
Enable Project Reference and Project Control Level parameters enable you to assign project and task references to planned orders, jobs, purchase orders, sales orders, miscellaneous transaction and other entities within Oracle Manufacturing.
-
Allow Cross Product Issues enables components with a different unit number from your assemblies to be issued to work in process.
In the Organization Parameters window in Oracle Inventory:
-
Project Cost Collection Enabled parameter associates an expenditure type with each subelement.
-
Enable Model/Unit Number Effectivity enables model/unit number effectivity for an organization;
Related Topics
Assigning Project Parameters, Oracle Project Manufacturing User's Guide
Overview of Building Discrete Jobs
Steps involved in building discrete jobs include:
-
Releasing jobs to production. See: Releasing Discrete Jobs.
-
Issuing components to jobs and, if necessary, returning them back to inventory. See: Issuing and Returning Specific Components and Issuing and Returning All Push Components.
-
Using Shop Floor Control to coordinate, on an as required basis, the following:
-
Moving assemblies between routing operations and intraoperation step. See: Performing Move Transactions.
-
Scrapping assemblies. See: Scrapping Assemblies.
-
Backflushing or issuing and returning operation pull and assembly pull components automatically with move transactions
-
Charging resources. See: Charging Resources with Move Transactions and Charging Resources Manually.
-
-
Changing jobs to accommodate changes in production. See: Changing Discrete Jobs and Mass Changing Discrete Job Statuses.
Note: If you have Oracle Shop Floor Management installed, you can use lot based jobs in your manufacturing. The entire quantity of a lot based job moves on the basis of the network routing.
Related Topics
Overview of Shop Floor Control
Finding Discrete Jobs
You can find then view, release, change, reschedule, or close discrete jobs. You can also query to find jobs to purge.
To find one or several discrete jobs to view, release, change, reschedule, or close
-
When the Find Discrete Jobs window appears, enter your search criteria.
You can query by Job name, job Type (standard or non-standard), Assembly, Schedule Group, a range of Build Sequences, accounting Class, a range of Start Dates, a range of Completion Dates, Sales Order, Project Number, Task Number, or job Status. You can combine or omit criteria as required.
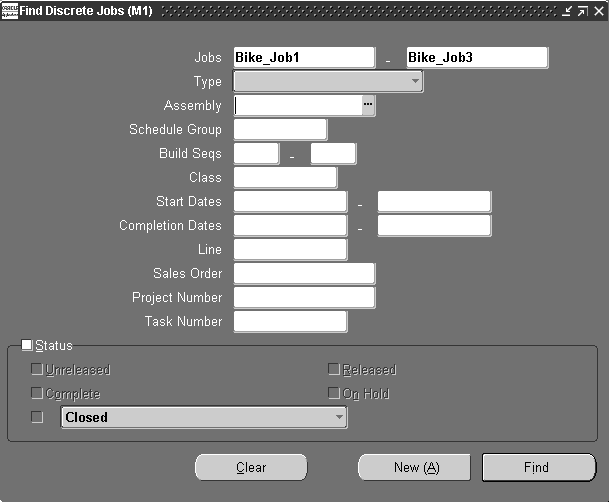
Note: Querying to find jobs does not validate the records returned. For example, querying to find a range of jobs to close does not return only those jobs in that range that can be closed.
-
Choose the Find button.
To find one or several discrete jobs to include in your purge
-
When the Find Discrete Jobs window appears, enter your general search criteria.
You can by query by Job name, job Type (standard or non-standard), Assembly, Schedule Group, a range of Build Sequences, accounting Class, a range of Start Dates, a range of Completion Dates, Sales Order, Project Number, or Task Number.
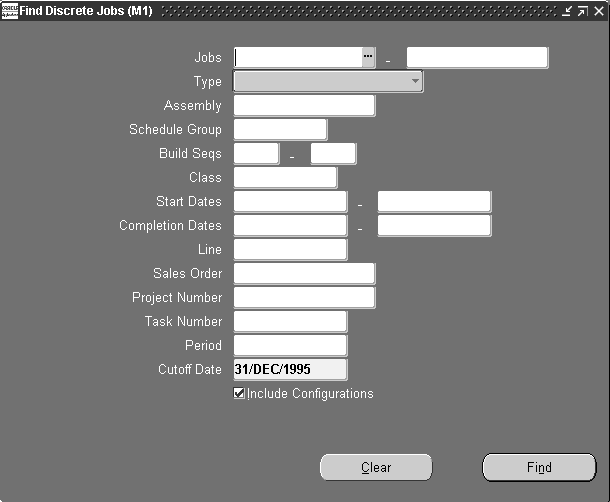
-
Select an accounting Period or enter a Cutoff Date for the purge.
You can query by closed accounting Period. When you select an accounting period, the end date of that period is defaulted as the purge Cutoff date and cannot be overridden.
If you do not select an accounting Period, the cutoff date of the most recently closed accounting period is defaulted. You can override this date with any date in a closed period.
Note: Only jobs with close dates before or on the purge cutoff date are purged.
-
Choose whether to Include Configurations for jobs that have ATO configurations.
If you do not choose to include jobs that have ATO configurations in your query, no jobs that include ATO configurations are returned when you choose Find. If you do include configurations, you still have access to lot and serial information using the Lot Genealogy window or the Lot Transactions and Transaction Serial Numbers windows in Oracle Inventory. See: Viewing Material Transactions, Oracle Inventory User's Guide.
Note: If Oracle Bills of Materials purges the configured item that you build in Work in Process, then Oracle Bills of Material replaces the configured item on the job with the model the configuration was based on. You do not want to include configurations if you need this information for customer support. For example, if a customer complains that you did not build the configuration he ordered.
Related Topics
Searching for Information, Oracle E-Business Suite User's Guide
Releasing Discrete Jobs
You must release a job to production before transacting against it. Releasing a discrete job with a routing automatically loads the job quantity into the Queue intraoperation step of the first operation. If PO Move or PO Receipt resource requirements exist at the first operation, purchase requisitions for these resources are automatically generated.
To release a single job
-
Find a job. See: Finding Discrete Jobs.
-
Change the selected job's status to Released. See: Discrete Job Statuses.
Note: You can release discrete jobs in either the Discrete Jobs Summary window or the Discrete Jobs window. .
-
Save your work.
To release several discrete jobs
Related Topics
Job and Repetitive Schedule Status Changes
Printing Reports for Current Discrete Jobs
If you are in the Discrete Jobs, Close Discrete Jobs, Purge Discrete Jobs, or View Discrete Jobs window, you can use the Print Reports Tools menu option to print the Discrete Job Routing Sheet, Discrete Job Pick List Report, or the Discrete Job Shortage Report for the active or current job. See: Current Record Indicator, Oracle E-Business Suite User's Guide.
Note: These are the reports that make up the Discrete Shop Packet.
You can also use the Print Reports window to navigate to the Submit Requests window.
To print a report for the current discrete job
-
From the Discrete Jobs, Close Discrete Jobs, or View Discrete Jobs window choose Print Reports from the Tools menu.
The Print window appears.

-
Select the Print Current Record with option.
-
Select the name of the report and choose OK.
When you choose OK, a concurrent request to print the report is submitted. You can view the status of concurrent requests. See: Using the Concurrent Requests Window, Oracle E-Business Suite User's Guide.
To submit a request for a different report
-
Select the Other Reports option from the Print Reports window.
-
Choose OK. The Submit Requests window appears.
Related Topics
Submitting a Request, Oracle E-Business Suite User's Guide
Overview of Viewing Discrete Jobs
To view discrete job information see:
-
Viewing Material Requirements, Viewing Component Requirements, and Viewing Component ATP Information
You also can view discrete job information on a variety of reports.
If you have Oracle Shop Floor Management installed, discrete job reports also support lot based job information.
Viewing Discrete Job Information
You can view information for discrete jobs of any status, including jobs that are closed, cancelled or on hold. You can also view operation, material requirement, and resource requirement information associated with discrete jobs.
To view discrete job information
-
Navigate to View Discrete Jobs window. When the Find Discrete Jobs window appears, enter your search criteria. See: Finding Discrete Jobs.
Jobs are automatically displayed in the View Discrete Jobs Summary folder window. The information you can view in summary window, depends on how your discrete job folder is defined. Using the Summary/Detail option from the Go Menu, you can switch to the View Discrete Jobs window to view all information for a selected job. You can optionally navigate to the View Discrete Jobs window by choosing the Open button from the View Discrete Jobs Summary window.
To print reports for a job
-
You can print reports for the 'active' or current job. See: Printing Reports for Current Discrete Jobs.
-
From either the View Discrete Jobs or View Discrete Jobs Summary windows choose the Operations button. The Operation window appears and displaying the job's operations. You can optionally view the components required at a selected operation using the Components button. See: Viewing Job and Schedule Operations.
To view component requirements:
-
From either the View Discrete Jobs or View Discrete Jobs Summary windows, choose the Components button. The Material Requirements window appears and the job's components are displayed. See: Viewing Component Requirements and Viewing Component ATP Information.
Note: When no routing exists, all components default to operation sequence of 1.
To view sales orders that are linked to a standard discrete job:
-
From either the View Discrete Jobs window, choose the Sales Order button. See: Linking ATO Sales Orders and Discrete Jobs.
To view pending job information
-
You can determine if there are any pending transactions or documents for a job using the Pending Actions window. See: Viewing Pending Job Transactions.
To view outside processing workflows
-
See: Outside Processing Workflows.
Work in Process provides workflows to track outside processing of assemblies. If you want to activate workflow notifications, you must have your system administrator set up the WIP:Enable Outside Processing Workflows profile option. See: Outside Processing Workflow Setup
Viewing Pending Job Transactions
You can use the Transaction Summary window to determine if there are pending transactions or unprocessed documents associated with a job. You cannot purge or close jobs if pending transactions or unprocessed documents exist. In some instances, you also cannot change a job from one status to another. For example, you cannot change jobs from a Released to an Unreleased status if pending information exists.
To view pending transactions and conditions for a job
-
Select a queried job in the Discrete Jobs, View Discrete Jobs, Close Discrete, or Purge Discrete Jobs window. See: Finding Discrete Jobs.
-
Choose Pending Actionsfrom the Tools menu to invoke the Pending Actions window.
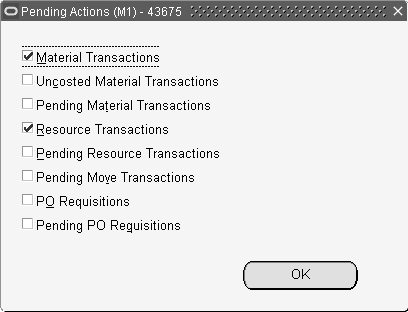
If a restriction exists, the check boxes indicating the type of restrictions is marked. An explanation of each restrictive condition follows:
Material Transactions: Components have been issued to the job and there are records in the WIP_REQUIREMENTS_OPERATIONS table. You can view information about issues material in the Material Requirements. See: Viewing Material Requirements and Viewing Component Requirements.
Uncosted Material Transactions: There are uncosted transaction records in the MTL_MATERIAL_TRANSACTIONS table. You can check to see if transactions are uncosted, the costed indicator is off, using the Material Transactions window. See: Viewing Material Transactions, Oracle Inventory User's Guide and Oracle Inventory Electronic Technical Reference Manual (eTRM) .
Pending Material Transactions: There are unprocessed material transaction records in the MTL_MATERIAL_TRANSACTIONS_TEMP table. You can view, update, and resubmit these records in the Pending Transactions window in Oracle Inventory. See: Viewing Pending Transactions, Oracle Inventory User's Guide.
Resource Transactions: Resources have been charged and there are records in the WIP_OPERATIONS_RESOURCES table.
Pending Resource Transactions: There are pending resource and overhead transaction records in the WIP_COST_TXN_INTERFACE table. You can view and resubmit these records using the Pending Resource Transactions window. See: Processing Pending Resource Transactions .
Pending Move Transactions: There are pending move transaction records in the WIP_MOVE_TXN_INTERFACE table. You can view and resubmit these records using the Pending Move Transactions window. See: Processing Pending Move Transactions a.
PO Requisitions: There are purchase requisitions in the PO_REQUISITION_LINES table. See: Reviewing Requisitions, Oracle Purchasing User's Guide and Oracle Purchasing Electronic Technical Reference Manual (eTRM) .
Pending PO Requisitions: There are unprocessed records in the PO_REQUISITION_ INTERFACE table. See: Requisition Import Process, Oracle Purchasing User's Guide .
Related Topics
Viewing Discrete Job Information
Viewing Job Transaction Genealogy
You can view historical information for discrete jobs in the Genealogy window in Oracle Inventory. This graphical interface provides a combined view of lot and serial genealogy in one inquiry. There are several tabbed regions to view genealogy details for a job including material, pending transactions, and quality results. You can view transaction information for discrete jobs, lot based jobs, and Oracle Warehouse Management inventory transactions. Features include:
-
Viewing genealogy for each assembly by lot or serialized components to provide traceability
-
Accessing the Material Workbench to view transaction quantities
-
Viewing existing reservations
-
Ability to track serial controlled items through work in process transactions across organizations
Related Topics
Viewing Lot Genealogy, Oracle Inventory User's Guide
Viewing Serial Genealogy, Oracle Inventory User's Guide
Describing Lot Split, Merge, and Genealogy, Oracle Warehouse Management User's Guide
Overview of Changing Discrete Jobs
You can make the following changes to your discrete jobs:
-
Change the name of existing jobs in the Discrete Jobs window, but only if the WIP:Job Name Updatable profile option is set. See: Profile Options.
-
Change dates, quantities, bills, statuses, and routings. See: Changing Discrete Jobs, Rescheduling Discrete Jobs, and Mass Changing Discrete Job Statuses.
-
Add, update, and delete operations. See: Adding and Updating Operations, Deleting Operations, and Midpoint Rescheduling.
-
Add, update, and delete material requirements. See: Adding and Updating Material Requirements and Deleting Material Requirements.
-
Add, change, and delete resource requirements. See: Adding and Updating Resource Requirements and Deleting Resource Requirements.
-
See Implementation of ECO's on Discrete Jobs and Repetitive Schedules in the Oracle Engineering User's Guide.
-
Add, change, and delete WIP Attachments. See: Attaching Files to Jobs, Schedules, and Operations.
-
If you have Oracle Shop Floor Management installed, you can create and update lot based jobs. The entire quantity of a lot based job moves on the basis of the network routing.
Related Topics
Job and Repetitive Schedule Status Changes
See: Creating a Lot Based Job in Oracle Shop Floor Management.
Changing Discrete Jobs
You can change discrete jobs using the Discrete Jobs and Discrete Jobs Summary windows. The status of the job determines if and what information can be changed. See: Discrete Job Status Control.
Quantities
You can increase or decrease the job quantity with no restrictions if the job is unreleased. If the job is released and work has begun on the assembly, you cannot decrease the job quantity lower than the number of assemblies that have already passed the Queue intraoperation step of the first operation. If a sales order is linked to the job, you cannot decrease the job quantity lower than the order quantity. The material requirements and job dates are automatically adjusted based upon the quantity change. If the job's assembly is an MPS-planned item, the update process automatically adjusts the MPS relief quantity.
Dates
You can reschedule standard and non-standard jobs to respond to changes in plans or unexpected downtime by changing their start and/or completion dates and times. Jobs might require rescheduling when capacity or material schedules change, or when standards change. See: Rescheduling Discrete Jobs.
Statuses
You can change the status of a discrete job although some changes from one status to another are disallowed and others are conditional. See: Job and Repetitive Schedule Status Changes.
Prerequisites
- Define at least one standard or non-standard discrete job. See: Defining Discrete Jobs Manually.
To change discrete jobs
-
Choose Find from the Query Menu. See: Finding Discrete Jobs.
-
Change jobs in either the Discrete Jobs or Discrete Jobs Summary folder window. From the Discrete Jobs Summary window, you can choose the Open button to navigate to the Discrete Jobs window.
To view pending job information
-
You can use the Pending Actions window to determine if pending transactions or conditions exist for a job. Some status changes are disallowed when pending information exists. See: Viewing Pending Job Transactions.
Related Topics
Defining Discrete Jobs Manually
Mass Changing Discrete Job Statuses
Attaching Files to Jobs, Schedules, and Operations
Rescheduling Discrete Jobs
You can reschedule standard and non-standard discrete jobs with and without routings. You can enter job start and completion dates earlier than the current date to maintain relative date priorities for department schedules and material requirements. You can also reschedule discrete jobs by rescheduling their operations. See: Adding and Updating Operations and Midpoint Rescheduling.
If you change a job quantity, the system automatically prompts you to reschedule the job.
Prerequisites
- Define at least one discrete job with a status of Released or Complete. See: Defining Discrete Jobs Manually.
To reschedule a standard job with a routing or a non-standard job with a routing reference
-
Enter the Name of the job.
-
In the Dates region, enter either the Start or Completion date and time.
For standard jobs, if you enter a start date and time, the completion date and time are automatically forward scheduled based on the assembly's routing. Similarly, if you enter a completion date and time, the start date and time are automatically backward scheduled based on the assembly's routing. You can enter a past due start date to forward schedule a job that should have started before the current date. You cannot enter a start date and time greater than the completion date and time.
For non-standard jobs, the same forward and backward scheduling logic is applied. However, for non-standard jobs, scheduling is based on the routing reference not the assembly's routing.
Note: If your job is non-standard and has a routing reference that has no routing, the fixed and variable lead times of the routing reference are used to calculate the start or completion date and time.
-
Save your work.
To reschedule a standard job without a routing or a non-standard job without a routing reference
-
Navigate to the Discrete Jobs window.
-
Select the Job.
-
In the Dates region, enter either the Start or Completion date and time or enter both the Start or Completion date and time.
For standard jobs without routings, you can enter either the start date and time or the completion date and time. If you enter a start date and time, the lead time for the job is calculated by adding the job assembly's fixed and variable lead times and multiplying this sum by the job quantity. The completion date and time are then automatically forward scheduled using this lead time. Similarly, if you enter a completion date and time, the start date and time are automatically backward scheduled using this lead time. Standard jobs can also be manually scheduled by entering both the start and the completion date and time.
For non-standard job without routing references, both the start and the completion dates and times must be entered.
-
Save your work.
To reschedule a discrete job with a routing after changing a start quantity
-
After changing your start quantity and saving your work, the Schedule Discrete Job window appears.
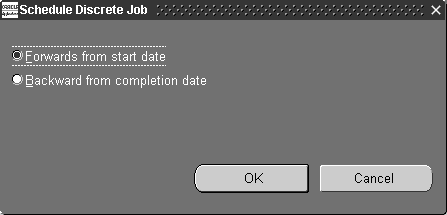
Select a scheduling method:
Forwards from start date: The completion date is cleared and the job is forward scheduled using the start date and time.
Backwards from completion date: The start date is cleared and the job is backward scheduled using the completion date and time.
Manual: For jobs without routings and operations, you have the option to reschedule by accepting the current job start and completion dates.
-
Choose OK to save your work.
To reschedule a discrete job using Constraint-based Scheduling
If you have installed Oracle Manufacturing Scheduling, the Constraint-based Scheduling engine enables you to reschedule jobs based on your date if constraints allow. Or it moves the job forward to the first available time slot as resources and material are available.
-
Rescheduling All Jobs or Pending Scheduling Jobs
When you reschedule all jobs or pending scheduling jobs from the Schedule Discrete Jobs window, the constraint-based scheduling engine uses the requested due date and scheduling priority. The highest priority jobs are scheduled first. Jobs with the same priority are scheduled based on the earliest requested due date. Firm jobs and any associated operations are not rescheduled.
Automatically Rescheduling Jobs and Operations
The required resource and material are used as the determining factor. The automatic scheduler enables you to specify the start and end dates, forward or backward schedule a job, and schedule an operation using the midpoint or midpoint forward scheduling method.
Note: Oracle also provides Production Scheduling, a constraint-based automated scheduling tool using sophisticated scheduling algorithms. See: Supply Chain Planning Production Scheduling
Related Topics
Defining Discrete Jobs Manually
Rescheduling All Jobs or Pending Scheduling Jobs, Oracle Manufacturing Scheduling User's Guide
Mass Changing Discrete Job Statuses
You can change the status of a group of discrete jobs using the Change Status option from the Tools menu. This mass change capability can be used for a variety of purposes such as releasing jobs to production and putting jobs on hold.
To change the status of several Discrete jobs
-
Choose Find from the Query menu. See: Finding Discrete Jobs.
The Discrete Jobs Summary window appears with the results of the query.
-
In the Discrete Jobs Summary window, select and deselect jobs as required. .
-
Choose Change Status from the Tools menu. .
The Change Status window appears.
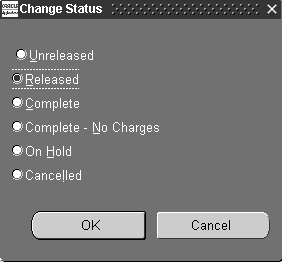
-
Choose a status. See: Discrete Jobs Statuses and Job and Repetitive Schedule Status Changes.
-
Choose OK.
-
Save your work.
To view pending job information
-
You can use the Pending Actions window to determine if pending transactions or conditions exist for a job. Some status changes are disallowed when pending information exists. See: Viewing Pending Job Transactions.
Related Topics
Simulating and Saving Simulated Jobs
You can simulate a standard job to determine what materials, operations, and operation resources are required to support that job. You can specifically do all of the following:
-
vary the job quantity and/or start and completion dates to determine scheduling and requirement constraints
-
view both on-hand and available to promise quantities for simulated component requirements
-
vary the bills of material and/or routings and their associated revisions and revision dates
When you are satisfied with the simulated job, you can convert it into an actual job and save it.
To simulate a discrete job
-
Navigate to the Simulate Discrete Jobs window.
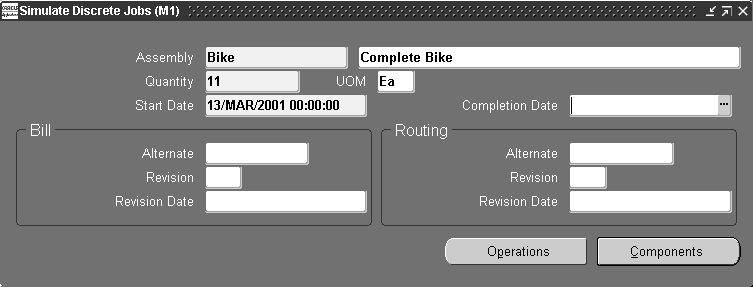
-
Select the simulation Assembly.
You can only simulate standard discrete jobs with assemblies, although routings are not required.
If you set the WIP:See Engineering Items profile option to Yes, you can also simulate jobs for engineering items.
You cannot select an assembly that has a primary routing that is flow related. If you do, a warning is displayed and you are prompted to enter another routing designator.
See: Creating a Flow Routing, Oracle Bills of Material User's Guide.
-
Enter either a job Start Date and time or a Completion Date and time.
You can enter start dates and times earlier than the current date to maintain relative date priorities for department schedules and material requirements
-
Optionally, select an Alternate bill of material. See: Primary and Alternate Bills of Material, Oracle Bills of Material User's Guide.
You can select an alternate bill if alternates have been defined for the assembly you are building. This bill of material is used instead of the assembly's standard bill of material.
-
Select the bill Revision and Revision Date and time.
The bill revision and date determines which version of the bill of material is used to create job component requirements. The start date of a standard discrete job can be used to default the bill revision and revision date. If a start date is not selected, the revision and revision date are derived based on fixed and variable lead times of the assembly. See: Item and Routing Revisions, Oracle Bills of Material User's Guide
You can explode item revisions that have associated ECOs with Release, Schedule, and Implement statuses. If you set the WIP:Exclude ECOs profile option to None, you can also explode revisions for ECOs that have an Open status. .
-
Optionally, select an Alternate routing. See:Overview of Routings, Oracle Bills of Material User's Guide.
You can select an alternate routing if alternates have been defined for the assembly you are building. This routing is used instead of the assembly's standard routing. If the WIP:See Engineering Items profile option is set to Yes, you can select engineering routings as alternates. See: Profile Option Summary and Primary and Alternate Routings, Oracle Bills of Material User's Guide.
-
If the assembly has a routing, select the routing Revision and Revision Date and time. See: Item and Routing Revisions, Oracle Bills of Material User's Guide
The start date of a standard discrete job can be used to derive the routing revision and revision date. If a start date is not selected, the revision and revision date are derived based on fixed and variable lead times of the assembly.
To save a simulated job
-
Choose Save Simulated Job from the Tools menu. The Save Simulated Jobs window appears.
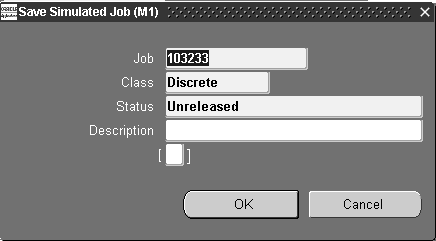
-
Enter the Job Name.
If a prefix has been entered for the WIP:Discrete Job Prefix profile option, the automatic sequence generator generates a default job name. This name can be overwritten. See: Profile Option Descriptions.
The following fields are defaulted as follows:
Class: If a default accounting class can be found, it is used. If one cannot be found, you must assign an accounting class to the job in the Discrete Jobs window. See: WIP Accounting Class Defaults and Discrete Accounting Classes.
Status: The status defaults to Unreleased. See: Discrete Job Statuses.
Note: The above defaults can be changed using the Discrete Jobs window. See: Defining Discrete Jobs Manually
-
Descriptions can be used to identify jobs on standard reports. They can be up to 240 characters of alpha numeric text. They are optional.
-
Optionally, enter the a descriptive flex value for the job. See: Setting Up Descriptive Flexfields.
-
Save your work.
Note: Values for the following fields are derived or defaulted but can be changed using the Discrete Jobs window. See: Defining Discrete Jobs Manually
MRP Net Quantity: Derived from the job start quantity.
Supply Type: Defaults to Based on Bill. See: Supply Types.
Firm Planned option: Defaults to off (not automatically firmed).
Completion Subinventory and Locator: For jobs with routings, defaults from the routing.
Lot Number: For lot controlled job assemblies, defaults based on how the WIP Default Lot Number Type parameter is set. See: Material Parameters.
You can also use the Discrete Jobs window to enter values for optional fields: Demand Class, Project, Task, Schedule Group, Build Sequence, and Production Line.
To view simulated job operations:
-
Choose the Operations button. The Operation window appears displaying the job's operations. You can optionally view the components required at a selected operation using the Components button. See: Viewing Job and Schedule Operations.
To view simulated component requirements:
-
Choose the Components button. The Material Requirements window appears and the job's components are displayed. See: Viewing Component Requirements and Viewing Component ATP Information.
Important: When no routing exists, all components default to operation sequence of 1.
Completing Discrete Jobs
You complete job assemblies into inventory using the Completion Transactions and Move Transactions windows. You also use these windows to return completed assemblies back to jobs. When you complete or return assemblies, any remaining quantities are automatically updated.
Note: You can also complete Work in Process assemblies using the Inventory Transaction Interface and the Open Move Transaction Interface.
Over-completions
Over-completing and over-moving assembly quantities
You can complete an assembly quantity into inventory that is greater than the job start quantity, or move an assembly quantity that is greater than the quantity at an intraoperation step, whether or not the assemblies have a routing. This is referred to as an over-completion, and it is useful when your production process yields more assemblies than planned.
Note: You also can over-complete assemblies using the Inventory Transaction Interface and the Open Move Transaction Interface, but you must explicitly specify the over-completion transaction quantity, as it will not be derived by Work in Process.
To be able to over-complete assemblies on jobs, you must:
-
Set up a tolerance level to restrict the number of assemblies that can be over-completed
-
Enable the over-completion feature by checking the Over-completion check box on the Completion Transaction or Move Transaction windows when completing assemblies
When you over-complete assemblies to Discrete jobs, all resources are charged and any backflush components are backflushed.
Over-completion Tolerance
You must set up a tolerance level for the quantity of assemblies that can be over-completed. The tolerance level is used to validate the over-completion quantity. If a completed quantity is greater than the tolerance allows, the transaction will fail.
You can set up tolerances at three levels: at the organization level by setting the Default Over-completion Tolerance Percent parameter, at the item level by setting Oracle Inventory item attributes, or at the job or schedule levels when defining jobs and schedules. If you do not set up a tolerance at either the item or job or schedule level, the default over-completion tolerance percent parameter is used to validate over-completion assembly quantities. If you do not enter a value for this parameter, it defaults to zero, and you will be unable to over-complete assemblies. Instead, you will receive a message telling you that you cannot over-complete because there is no tolerance. For more information on over-completion tolerance levels, see: Assembly Over-completions
Over-Completions from the Completion Transaction and Move Transaction windows
Once you set up tolerance levels, you enable over-completion on the Completion Transaction and Move Transaction windows by selecting the Over-Completion check box before performing the transaction. For instructions, see: Completing and Returning Assemblies and Performing Move Completion/Return Transactions.
You can specify any completion subinventory and, if required, locator when you complete or return assemblies with a completion transaction. If you complete or return assemblies using move transactions, the subinventory and locator that you assigned (if any) to the job is used. You can complete or return partial job or schedule quantities to different subinventories and locators. The status of a discrete job is automatically updated to complete when your cumulative quantity completed equals the job quantity.
Quantities Reserved to Sales Orders
You can reserve over-completion quantities from jobs linked to sales orders when using the Completion Transactions and Move Transactions windows. The sales order number for each completion line must be entered. This reserves the surplus amount, otherwise the over-completion is unreserved excess inventory. See: Linking Sales Orders and Discrete Jobs.
Backflushing
When you complete assemblies, all components with the supply type of Assembly pull are automatically backflushed. When components for assemblies under lot control, serial number control, or lot and serial control are backflushed upon assembly completion, you must assign lot and/or serial numbers to the components.
Note: The Work in Process parameter, Allow Quantity Changes During Backflush, provides the ability to over or under issue pull components requiring lot and serial number entry for assembly moves and completions; see: Backflush Supply Subinventories and Locators
Shop Floor Statuses
You cannot complete assemblies from a job if a shop floor status that prevents shop floor moves has been assigned the To move intraoperation step of the last operation. In this case, you must assign a status that allows shop floor moves in order to complete the assemblies.
Outside Processing Operations
When a job or schedule with outside processing operations is changed to complete status - an informational warning message displays if open purchase orders or requisitions exist for any of the operations.
Sales Orders
Changing a job status to completed is prevented if open reservations exist. If you attempt one of these transactions for a job linked to a sales order, an error message displays. You must reduce the job quantity, or unlink the sales order to continue the transactions. See: Linking ATO Sales Orders and Discrete Jobs
Non-Standard Job Completions
You must have an assembly and job quantity to complete a non-standard discrete job. You can complete an assembly quantity greater than the job start quantity, with or without a routing, as long as the quantity is within the tolerance set. For some non-standard jobs, such as those used for disassembly or equipment maintenance, there is no need to complete assemblies.
Final Assembly Order Completions
When you complete assemblies from final assembly orders using a completion transaction, reservations are automatically transferred from the job to the subinventory and locator based on sales order line delivery due dates. You may override the automatic transfer. When returning completed assemblies back to a final assembly order, you must enter the sales order line and delivery information so that the system knows which reservations to transfer from inventory to WIP.
Costing
Under standard costing, assemblies are received into inventory at standard cost and the job is relieved of costs at standard. Under average costing, assemblies are received and the job relieved of costs at average.
Serial Number Validations for Discrete Assembly Completions
For a serialized item returned to stock, validations occur to prevent re-issuing to a different job. At the time of completion, serialized assemblies and components are available from stock if they have specific values set for discrete assemblies and components in the Serial Numbers window in Oracle Inventory:
See: Serial Number Validations for Component Returns and Assembly Completions
Label Printing at Completion
Label printing capabilities are available at the time of completion. This provides the ability to create labels for any descriptive information or customer requirements. See: Label Printing at Completion and Maintaining Serial Number Information, Oracle Inventory User's Guide
Related Topics
Overview of Assembly Completions and Returns
Assembly Completions and Returns
Performing Move Completion/Return Transactions
Completing and Returning Assemblies
Overview of Discrete Job Close
You can close discrete jobs using the Close Discrete Jobs (SRS) and Close Discrete Jobs windows. The window you choose depends on your requirements
The Close Discrete Jobs window enables you to:
-
Submit and immediately process job close requests
-
Specify a close date other than the system date
-
Unclose discrete jobs
-
Check and resubmit failed job close requests
-
View discrete jobs before closing them
The Close Discrete Jobs (SRS) window enables you to:
-
Specify when to submit the close request (concurrent or scheduled processing)
-
Specify a close date other than the system date
-
Use criteria for closing jobs based on a range of accounting classes, job numbers, and dates - including release, start, and completion dates
-
Exclude or include jobs linked to sales orders from the processing
-
Exclude or include uncompleted jobs from the processing
-
Exclude or include jobs with pending transactions
You can use the Close Discrete Jobs window to close discrete jobs and to resubmit jobs that have failed to close. You can also use this window to unclose jobs, that is, correct jobs closed in error.
Prior to closing discrete jobs, you can review job value information using the Discrete Job Value Report, which lists standard and non-standard asset jobs, or the Expense Job Value Report, which lists non-standard expense jobs. See: Discrete Job Value Report and Expense Job Value Report.
Note: Only jobs closed in error should be unclosed, and this should be done immediately after the close. If assembly costs are rolled up between the time you close then unclose a job, your costs may be incorrect because the unclose process does not revalue the job.
Before closing, unclosing, or resubmitting jobs, you can view job detail information (operations, material requirements, and resource requirements) and ATO sales order information for those jobs. You can also print reports for selected jobs.
Close Requirements
In the Close Discrete Jobs (Form) window, you cannot close a job that has pending material, resource, or move transactions including those that the concurrent manager has not processed. You also cannot close a job that has uncosted material transactions. If you attempt to close a job for which pending or uncosted transactions exist, the close process fails and the job status changes to Failed Close. See: Viewing Pending Job Transactions. You have the option to close these types of jobs in the concurrent program.
When a job with outside processing operations is changed to complete, closed, or canceled status - an informational warning message displays if open purchase orders or requisitions exist for any of the operations.
Changing a job status to completed, closed, or canceled is prevented if open reservations exist. If you attempt one of these transactions for a job linked to a sales order, an error message displays. You have two options in order continue:
-
Unlink the sales order reserved to this job
-
Reduce the job quantity of the job to equal the completed quantity
If you close a job for an MPS-planned item with a quantity complete different from the quantity originally scheduled, the MPS for the actual quantity is automatically updated.
In Oracle Warehouse Management organizations, open move orders for a job are cancelled when the job is closed. However, you must perform an unload task transaction to delete the material requirement and move order record.
Unclose Requirements
You cannot unclose a job that does not have a status of Closed. You cannot unclose a job that is linked to a sales order. You also cannot unclose a job that was closed in a now closed accounting period.
History
Information associated with a job is not deleted when the job is closed. You can view information for closed discrete jobs. You also can print reports on closed jobs and closed job values. See: Discrete Job Data Report and Discrete Job Value Report.
Related Topics
Closing Discrete Jobs Using Submit Requests
Purging Transaction History, Oracle Inventory User's Guide
Period Close, Oracle Cost Management User's Guide
Closing Discrete Jobs
The form function parameter, WIP_WIPDJMDF_CLOSE. enables the Unclose option in the Tools menu. If you do not want Unclose to display in the menu, set the parameter to No. See: Security Functions.
To find one or more jobs to view, close, or reopen
-
Navigate to the Close Discrete Jobs window. The Find Discrete Jobs window appears.
-
Query to find one or more jobs. See: Finding Discrete Jobs.
The Close Discrete Jobs Summary window appears with the results of your query. Option: to navigate to the Close Discrete Jobs window, choose the Open button.
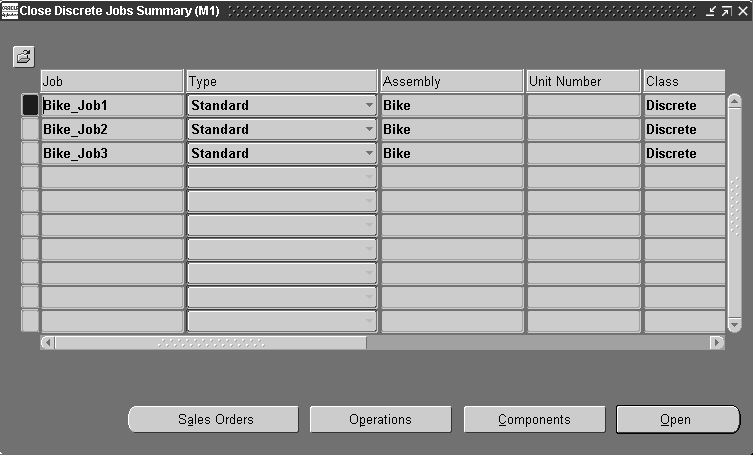
You can view information about the jobs you intend to close from either the Close Discrete Jobs or the Close Discrete Jobs Summary window. You can view job operation information by choosing the Operations button and component requirement information by choosing the Components button, see: Viewing Job and Schedule Operations, Viewing Component Requirements, and Viewing Component ATP Information. You can also view sales orders that are linked to standard discrete jobs by choosing the Sales Orders button, see: Linking ATO Sales Orders and Discrete Jobs.
To close discrete jobs
-
Navigate to the Discrete Jobs Summary window. If more than one job is displayed in the Discrete Jobs Summary window, select the jobs to close. .
You can only close jobs with statuses of Cancelled, Complete, Complete - No Charges, Failed Bill Load, Failed Close, Failed Routing Load, On Hold, Released, and Unreleased.
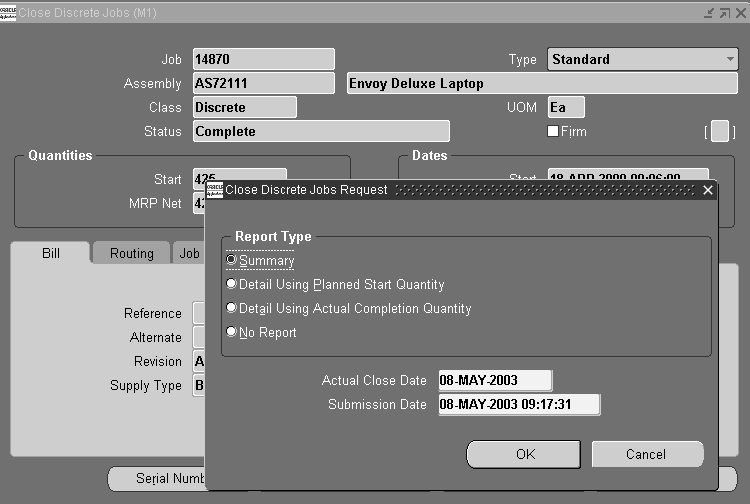
-
Choose Close from theTools menu. The Close Discrete Jobs Request window appears.
-
Select a Report Type.
Reports are printed per the Report Type specified, after the close process computes job close variances. If your organization uses standard costing, the Discrete Job Value Report - Standard Costing is printed when standard discrete jobs and non-standard asset jobs are closed. If your organization uses average costing, the Discrete Job Value Report - Average Costing is printed. The Expense Job Value Report is printed when expense non-standard jobs are closed regardless of your costing method. It is always printed in detail format regardless of the Report Type option specified. For more information about these reports see: Discrete Job Value Report and Expense Job Value Report.
Report Type options and formats are as follows:
Summary: Lists each job and includes job header, period-to-date summary, and cumulative-to-date summary information. The system also lists summary elemental account values for each job.
Detail Using Planned Start Quantity: Lists each job using the planned start quantity of the job to calculate the material usage variance. A detail report includes the following: job header, material, resource, resource-based and move-based overhead costs, completion, scrap, and job close variance transactions. It also includes period-to-date and cumulative-to-date summary information.
Detail Using Actual Completion Quantity: Lists each job using the actual completion quantity of the job to calculate the material usage variance. A detail report includes the following: job header, material, resource, resource-based and move-based overhead costs, completion, scrap, and job close variance transactions. It also includes period-to-date and cumulative-to-date summary information.
No Report: Does not print a report.
-
Select an Actual Close Date. The system date is the default.
The actual close date must be later than the most recently dated material, resource, or move transactions associated with the selected job or jobs. It must also be in an open accounting period. If it is not, the last date of the most recent open accounting period is defaulted.
-
Select a Submission Date and time. The system date and time is the default.
-
Choose OK to submit the request.
Only those jobs with appropriate statuses are closed. The statuses of jobs that are being closed are changed to Pending Close until the close process completes.
Note: The abnormal termination of a close request, either due to a hardware problem or manual termination of a concurrent request, can result in a status of Pending Close. These jobs must be manually resubmitted.
-
From the queried jobs displayed, select which jobs to reopen. .
You can only reopen closed jobs. When you reopen a job, it reverts to its pre-close status. For example, reopening a job that had a pre-close status of Complete changes its status from Closed back to Complete. See: Discrete Job Statuses.
-
Choose Unclose from the Tools menu to submit the request.
When you choose Unclose, job statuses are immediately changed to their pre-close status.
Note: Only the status of the job is changed. Costing information, historical information, and MPS quantities are not updated.
To check the status of close requests:
-
You can check the status of close requests using the Concurrent Requests window. See: Concurrent Requests, Oracle E-Business Suite User's Guide.
To print reports for a job
-
If you need additional information about a job, you can optionally print reports for the active or current job. See: Printing Reports for Current Discrete Jobs.
To view pending job information
-
You can use the Pending Actions window to determine if there are pending or uncosted transactions associated with a job. You cannot close jobs if pending or uncosted transactions exist. See: Viewing Pending Job Transactions.
To resubmit jobs with a Pending Close status:
-
From the queried jobs displayed, select one or more jobs to resubmit. .
-
Choose Check Requests from the Tools menu. .
You can use the Check Requests option from the Tools menu to manually resubmit jobs that have failed to close and have a Pending Close status. Resubmitting a job with Check Request sets the job's status back to its original status. Resubmitting jobs that have Pending Close statuses because the process has not yet concluded does not interrupt the close process.
To view operations for a selected job
-
From either the Close Discrete Jobs or Close Discrete Jobs Summary windows choose the Operations button.
You can optionally view the components required at a selected operation using the Components button. See: Viewing Job and Schedule Operations.
To view component requirements and their ATP statuses for a selected job
-
From either the Close Discrete Jobs or Close Discrete Jobs Summary windows choose the Components button. The Material Requirements window appears and the job's components are displayed. See: Viewing Component Requirements and Viewing Component ATP Information.
Note: When no routing exists, all components default to operation sequence of 1.
To view sales orders that are linked to a standard discrete job
-
From Close Discrete Jobs Summary window choose the Sales Order button. See: Linking ATO Sales Orders and Discrete Jobs.
Related Topics
Overview of Discrete Job Close
Defining Discrete Jobs Manually
Period Close, Oracle Cost Management User's Guide
Overview of Discrete Job Purge
You can purge discrete job information using the Purge Discrete Jobs window and Purge Discrete Jobs (SRS). You can purge all information associated with discrete jobs including job header records and job detail and transaction information. You can also selectively purge some or all of the following job related information: job details (material requirements, resource requirements, and operations), ATO configurations, move transactions, and resource cost transactions. Selective purging allows you to retain pertinent historical information. For example, you can retain operation information but purge move transactions associated with these operations.
Purge Rules
A discrete job may not purge if the any of the following information still exists:
-
Material transactions that reference the job
You can purge material and completion transaction information in Oracle Inventory. See: Purge Transactions, Oracle Inventory User's Guide.
-
Purchase transactions, purchase requisitions, or purchase orders that reference the job in Oracle Purchasing
-
Quality results records that reference the job
You can delete quality results records in the Oracle Quality. See: Updating and Deleting Quality Results, Oracle Quality User's Guide.
Reporting
You can submit a request to print a Purge Report as you purge discrete jobs. When you printed a report as part of the purge process, the output of the report is determined by the defaulted purge parameters used and the level of detail (Full, Summary, or Excepting) in the Purge Options window.
The Purge Report can also be submitted independently of the purge process using the Submit Requests window. When submitted independently of the purge process, only the jobs and/or schedules that failed to purge are listed.
Related Topics
Purging Discrete Jobs
You can use the Purge Discrete Jobs window to purge information associated with discrete jobs that were closed in a now closed accounting period. You can purge all discrete job information or just selected information: details (material requirements, resource requirements, and operations), associated ATO configurations, or associated move and/or resource cost transactions.
Before purging a job, you can view detail and ATO sales order information for that job. You can also print one or all of the reports in the Discrete Job Packet for the job. See: Current Record Indicator, Oracle E-Business Suite User's Guide and Discrete Shop Packet.
Prerequisites
- You must have at least one closed period for your organization. See: Period Close, Oracle Cost Management User's Guide.
-
Navigate to the Purge Discrete Jobs window. The Find Discrete Jobs window appears.
-
Query to find one or more discrete jobs. See: Finding Discrete Jobs.
The Purge Discrete Jobs Summary window appears with the results of your query.
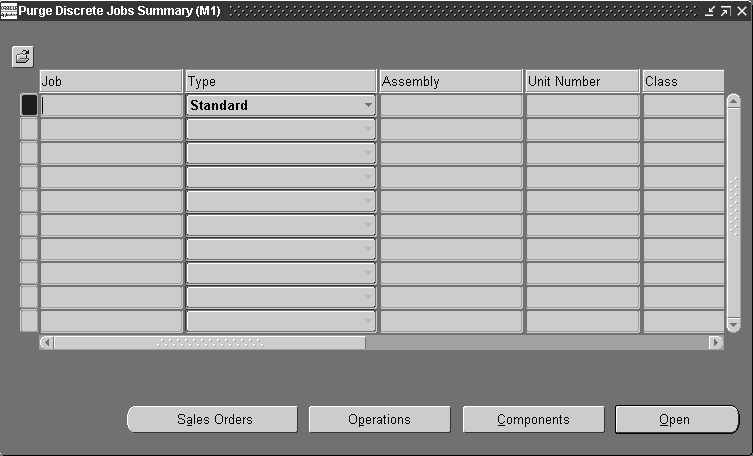
To print reports for a selected job
To view pending job information
-
You can use the Pending Actions window to determine if there are pending transactions or conditions associated with a job. You cannot purge jobs if pending transactions or unprocessed documents exist. See: Viewing Pending Job Transactions.
To view operations and operation requirements for a selected job:
-
From either the Purge Discrete Jobs or Purge Discrete Jobs Summary window choose the Operations button.
The operations, if any, required for the job are displayed. See: Viewing Job and Schedule Operations.
To view component requirements for a selected job:
-
From either the Purge Discrete Jobs or Purge Discrete Jobs Summary window choose the Components button.
The component materials, if any, required the job are displayed. See: Viewing Component Requirements.
Note: When no routing exists, all components default to operation sequence of 1.
To view sales orders that are linked to a standard discrete job:
-
From the Purge Discrete Jobs Summary window choose the Sales Order button. See: Linking ATO Sales Orders and Discrete Jobs.
To select which discrete jobs to purge and/or report:
-
From the jobs displayed, select which to include in the purge. You can select and deselect jobs as required. .
-
Choose Purge from the Tools menu. .
The Purge Options window appears. See: Specifying Purge Options.
Related Topics
Specifying Purge Options
After selecting which jobs/schedules to purge in the Purge Jobs or Purge Repetitive Schedules window, you can choose from the following action type options:
| Variable | Description |
|---|---|
| Purge and Report | Purges the selected jobs/schedules and prints a report. |
| Report Only | Prints a report listing the selected jobs/schedules but does not purge them. |
| Purge Only | Purges the selected jobs/schedules but does not print a report. |
If you choose to the print a report, you can choose whether the report is printed in Full, Summary, or Exception format.
Note: Printing a report before submitting a purge request allows you to view the records you have selected, but does not give you any indication of whether the selected jobs/schedules meet the purge conditions.
Prerequisites
- Select the jobs/schedules to include in your purge. See: Purging Discrete Jobs and Purging Repetitive Schedules.
To purge information for the selected jobs or schedules and print a report
-
From the Purge Options window, choose the Purge and Report action. This is the default option.
-
Choose the level of detail to include in the report. The options are as follows:
Full: The report lists all job and/or schedule records selected for the purge, the table and number of rows affected as well as those records that cannot be purged because of purge rule violations. Full is the default option.
Summary: The report lists all job and/or schedule records selected for the purge but in a tabular form. The table and row detail is omitted although exception information is included.
Exception: The report lists only those job and/or schedule records that cannot be purged because of purge violation rules. Exception information is included.
-
Choose OK to submit the purge and print the report.
Note: Once you commit the process, all related information is removed from the database.
To only print a report for the selected jobs or schedules
-
From the Purge Options window, choose the Report Only action.
-
Choose the level of detail to include in the report. The options are Full, Summary, or Exception (see above).
-
From the Include option group, choose what information to include in the report. The options are as follows:
Headers: If you choose to purge Headers, all other options are automatically selected and are, furthermore, required. Purging headers purges all information associated with the selected jobs or repetitive schedules.
Details: You can choose to purge job or repetitive schedule details (operations and material and resource requirements). If you choose this option, you can also choose to purge move and resource transactions.
Move Transactions: You can choose to purge move transactions. If you choose this option, you can also choose to purge schedule details and resource transactions.
Resource Transactions: You can choose to purge resource transactions. If you choose this option, you can also choose to purge schedule details and move transactions.
Note: If you enter a date that is earlier than the repetitive schedule's complete or cancel date or the discrete job's close date, the system does not purge any job or schedule information.
-
Choose OK to print the report.
To purge without printing a report
-
From the Purge Options window, choose the Purge Only action.
-
From the Include option group, choose what information to purge. See above.
-
Choose OK to submit the purge and print the report.
To view pending job information
-
You can determine if there are any pending transactions or conditions for a job using the Pending Actions window. See: Viewing Pending Job Transactions.
Related Topics
Processing Pending Jobs and Schedules
You can view, update, delete, and resubmit records (rows) that have failed validation and remain in the Work Order Interface (WIP_JOB_ SCHEDULE_INTERFACE) table. You can view the error messages associated with failed records. Error messages assist you in updating failed records before resubmission.
You cannot insert new job and schedule records into your interface table using this window.
Prerequisites
- Insert job and schedule data into the Work Order Interface table. See: Work Order Interface, and Open Job and Schedule Interface, Oracle Integration Repository at http://irep.oracle.com
To find job and schedule interface records:
-
Navigate to the Pending Jobs and Schedules window. The Find Pending Jobs and Schedules window appears.
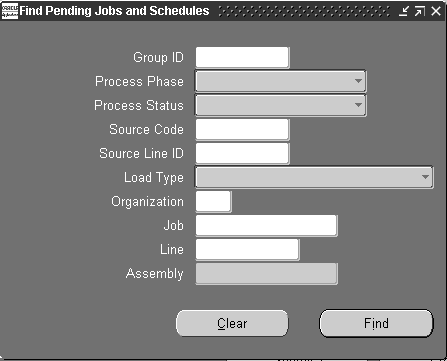
-
Enter your selection criteria.
You can find all records with a specific Group ID. You can also find all records that have a specific Process Phase (Validation, Explosion, Creation, or Complete), Process Status (Pending, Running, Error, or Complete), Source Code, Source Line ID, Load Type (Create Standard job, Create Repetitive Schedule, Update Discrete Job, or Create Non-standard Job), or are for a specific Organization. You can also search for a specific Job, Assembly, or Line and Assembly.
-
Choose the Find button. The Pending Jobs and Schedules window appears with the results of your query.
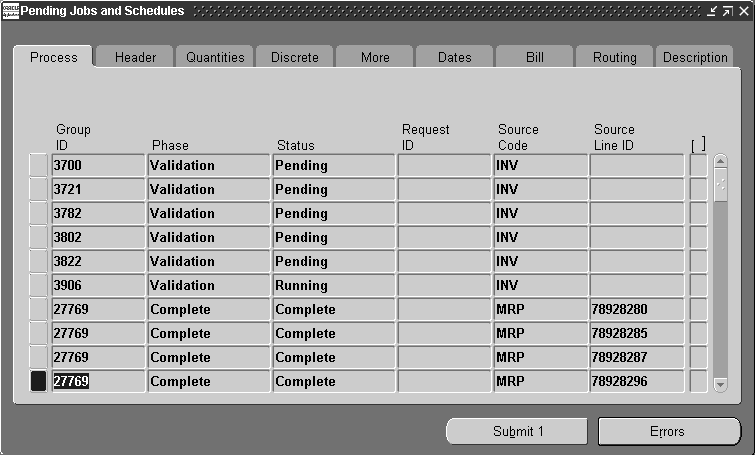
To view job and schedule interface records:
-
For each record, you can view the following information using the Pending Jobs and Schedules window's tabbed regions:
-
Process: Group ID, Phase, Status, Request ID, Source Code, and Source Line:
-
Header: Load Type, Organization, Job, Line, Assembly
-
Quantities: Discrete Start and Net Quantities, Repetitive Daily Quantity and processing Days, and Total Quantity (both discrete and repetitive)
-
Discrete: Class, Lot Number, Schedule Group, Build Seq, Project Number and Task
-
More: Status, Firm planned option, Demand Class, Scheduling Method, Unit Number
-
Dates: First Unit Start Date, First Unit Completion Date, Last Unit Start Date, and Last Unit Completion Date
-
Bill: Reference, Alternate, Revision, Revision Date, Supply Type
-
Routing: Reference, Alternate, Revision, Revision Date, and Completion Subinventory, and Completion Locator
-
Description: Description and Created By
-
To view error details for failed job and schedule records:
-
In the Pending Jobs and Schedules window, select the failed (Status=Error) record.
-
Choose the Errors button. The Pending Job and Schedule Errors window appears.
All errors for the selected record are displayed. The Type indicates whether the failed record produced an Error or a Warning. The Message explains why the transaction failed. Using these messages you can determine what fields need to be updated.
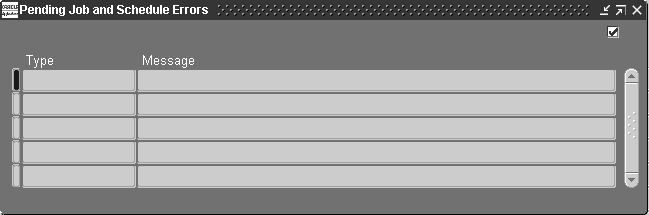
To update job and schedule interface records
-
Select the record to update.
You can only update records with a processing status of Error. You can update all fields except the Group ID, processing Phase, processing Status, Request ID, and Total Quantity.
In general, the default values are derived in the same way that they are derived when you manually enter discrete jobs and repetitive schedules in the Discrete Jobs and Repetitive Schedules windows. See: Defining Discrete Jobs Manually and Defining Repetitive Schedules Manually.
-
In the Process tabbed region, enter the Source Code and Source Line.
The Source Code and Source Line identify the source of the interface record. For example, if you load jobs and schedules from different sources, you can use a difference Source Code to identify each.
-
In the Header tabbed region, select the Load Type.
The Load Type indicates whether the current interface record is a planned order, update recommendation, or suggested repetitive schedule.
Possible values include:
-
Create Standard Discrete Job
-
Create Pending Repetitive Schedule
-
Update Standard or Non-Standard Discrete Job
-
Non-Standard Discrete Job
-
-
You can only select enabled organizations. See: Creating an Organization, Oracle Human Resources User's Guide.
-
Select the Job, Line/Assembly, or Assembly.
The assembly is the item you are building. An assembly is optional for non-standard discrete jobs.
Select the production Line on which to build the repetitive assembly and the repetitive Assembly to be produced on that line.
-
In the Quantities tabbed region, enter the Start Quantity and Net Quantity for discrete jobs or the Daily Quantity and number of Days for repetitive schedules.
-
In the Discrete tabbed region, select the class.
For records with a Load Type of 4 (Non-Standard Discrete Job), you can select any active Asset Non-standard, Expense Non-standard, or Project accounting class. For records with a Load Type 1 (Create Standard Discrete Job), you can select any active Standard Discrete accounting class.
-
You can optionally assign discrete jobs to any active schedule group. See: Defining Schedule Groups
-
Enter the Build Sequence identifier. See: Build Sequencing.
The combination of schedule group and build sequence must be unique for each job.
-
Select the Project and, if required, task.
You can only select a project if the current organization's Project References Enabled parameter is set in Oracle Inventory. You must select a task if the Project Control Level parameter is set to Task and you have entered a project. See: Organization Parameters Window, Oracle Inventory User's Guid and Creating Projects, Oracle Projects User's Guide.
-
On the More tab, select a status for the job or repetitive assembly/line.
You can select a status of Unreleased, Released or On Hold for any record. See: Discrete Job Statuses or Repetitive Schedule Statuses.
-
Select whether the discrete job or repetitive schedule is Firm.
-
Select the Demand Class.
You can select any enabled and active demand class. See: Overview of Demand Classes, Oracle Master Scheduling/MRP and Oracle Supply Chain Planning User's Guide and Creating Demand Classes, Oracle Master Scheduling/MRP and Oracle Supply Chain Planning User's Guide.
-
For discrete jobs, select the Scheduling Method.
You can choose one of the following:
Routing: You can schedule discrete jobs using routing lead times, if the Load Type is 1 (Create Standard Discrete Job) or 3 (Update Standard or Non-Standard Discrete Job).
Item Lead Time: You can schedule discrete jobs using item lead times, even if the item has a routing, if the Load Type is 1 (Create Standard Discrete Job) or 3 (Update Standard or Non-Standard Discrete Job).
Manual: You can manually schedule your discrete jobs by entering start and/or completion dates.
-
Enter the Unit Number. If you have Oracle Project Manufacturing installed, this enables you to associate an end item model/unit effectivity number with the item.
The item must be under model/unit effectivity control, and you must have a model/unit number associated with it. If the item is not under model/unit number control, this field is disabled. See: Model/Unit Effectivity, Oracle Project Manufacturing Implementation Manual.
You can update the assembly unit number through WIP Mass Load for discrete jobs that are unreleased, project related, and use unit effectivity. You can change job status from Unreleased to Released in the same process.
-
In the Dates tabbed region, enter a First Unit Start Date (FUSD), First Unit Completion Date, a Last Unit Start Date, or a Last Unit Completion Date (LUCD).
If you are using Manual scheduling, enter both a FUSD and a LUCD.
-
In the Bill tabbed region, select the bill of material Reference for your non-standard discrete job.
You can select bill of material reference if the Load Type is 3 (Update Standard or Non-Standard Discrete Job) or 4 (Non-Standard Discrete Job).
-
Select the bill Alternate if creating a discrete job.
You can select an alternate bill if alternates have been defined for the assembly. For non-standard jobs, you can enter any alternate defined for the bill Reference specified.
-
Select the bill Revision and bill Revision date. See: Item and Routing Revisions, Oracle Bills of Material User's Guide.
-
You can select any of the following Supply Types: Push, Assembly Pull, Operation Pull, Bulk, or Supplier. See: Supply Types.
-
In the Routing tabbed region, select the routing Reference your non-standard discrete job.
Routing references are used to create routings (operations and resource requirements) for non-standard discrete jobs, however, they are not required.
-
Select the routing Alternate if creating a discrete job.
You cannot enter a value here unless you have defined alternate routings for the assembly you are building. For non-standard jobs, you can enter any alternate defined for the routing reference you specify. See: Primary and Alternate Routings, racle Bills of Material User's Guide.
-
Select the routing Revision and Revision Date. See: Item and Routing Revisions , racle Bills of Material User's Guide.
-
Select the Completion Subinventory, and if required, locator.
You can select a Completion Subinventory if your Load Type is 1 (Create Standard Discrete Job) or if your Load Type is 4 and you have an assembly.
-
In the Description tabbed region, enter the Description
You can optionally enter a Description that can be used to identify jobs on standard reports. They can be up to 240 characters of alpha numeric text.
-
Enter the Created By identifier.
You can update the name of the user that created the transaction is displayed. This field can be updated.
-
Save your work.
To select and resubmit pending job and schedule records
-
From the queried records displayed, select which to resubmit. .
You can only resubmit records with a processing status of Error. If you do not mark a row for re-submission, you can still update it but the WIP Mass Load Program does not process it again when polling the Open Job and Schedule Interface table.
-
Choose the Submit from the Tools menu.
Resubmitting records resets their process status flags to 1 (Pending), and nulls their Group ID. The next time the WIP Mass Load Program polls the Open Job and Schedule Interface table, these records are reevaluated.
To delete job and schedule interface records
-
Select the record to delete. .
You can only delete records with a processing status of Error. When you delete records, their corresponding error messages are deleted from the Errors table (WIP_INTERFACE_ERRORS).
-
Choose Delete from the Edit menu.