| Skip Navigation Links | |
| Exit Print View | |

|
Oracle GlassFish Server Message Queue 4.5 Administration Guide |
| Skip Navigation Links | |
| Exit Print View | |

|
Oracle GlassFish Server Message Queue 4.5 Administration Guide |
Part I Introduction to Message Queue Administration
1. Administrative Tasks and Tools
Starting the Administration Console
Administration Console Online Help
Adding a Broker to the Administration Console
To Add a Broker to the Administration Console
To View Available Connection Services
Working With Physical Destinations
Creating a Physical Destination
To Add a Physical Destination to a Broker
Viewing Physical Destination Properties
To View or Modify the Properties of a Physical Destination
Purging Messages From a Physical Destination
To Purge Messages From a Physical Destination
Deleting a Physical Destination
To Delete a Physical Destination
Working With Administered Objects
To Add a Connection Factory to an Object Store
To Add a Destination to an Object Store
Viewing Administered Object Properties
To View or Modify the Properties of an Administered Object
Deleting an Administered Object
To Delete an Administered Object
Running the Sample Application
3. Starting Brokers and Clients
6. Configuring and Managing Connection Services
8. Configuring Persistence Services
9. Configuring and Managing Security Services
10. Configuring and Managing Broker Clusters
11. Managing Administered Objects
12. Configuring and Managing Bridge Services
13. Monitoring Broker Operations
14. Analyzing and Tuning a Message Service
17. Broker Properties Reference
18. Physical Destination Property Reference
19. Administered Object Attribute Reference
20. JMS Resource Adapter Property Reference
21. Metrics Information Reference
22. JES Monitoring Framework Reference
A. Distribution-Specific Locations of Message Queue Data
B. Stability of Message Queue Interfaces
An object store is used to store Message Queue administered objects, which encapsulate implementation and configuration information specific to a particular Message Queue provider. An object store can be either a Lightweight Directory Access Protocol (LDAP) directory server or a directory in the local file system.
Although it is possible to instantiate and configure administered objects directly from within a client application’s code, it is generally preferable to have an administrator create and configure these objects and store them in an object store, where client applications can access them using the Java Naming and Directory Interface (JNDI). This allows the client code itself to remain provider-independent.
Although the Administration Console allows you to manage an object store, you cannot use it to create one; the LDAP server or file-system directory that will serve as the object store must already exist ahead of time. You can then add this existing object store to the Administration Console, creating a reference to it that you can use to operate on it from within the Console.
Note - The sample application used in this chapter assumes that the object store is held in a directory named Temp on the C drive. If you do not already have a folder named Temp on your C drive, create one before proceeding with the following exercise. (On non-Windows platforms, you can use the /tmp directory, which should already exist.)
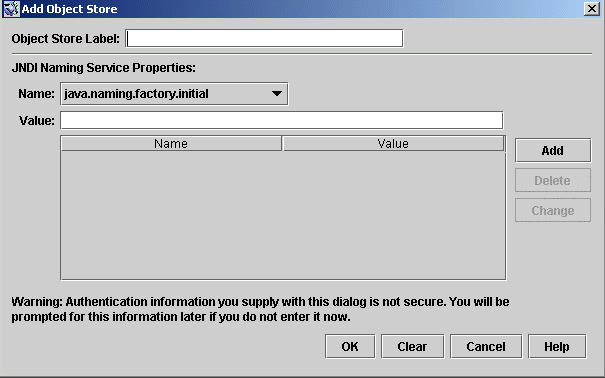
Alternatively, you can right-click on Object Stores and choose Add Object Store from the pop-up context menu. In either case, the Add Object Store dialog box (Figure 2-11) will appear.
Figure 2-11 Add Object Store Dialog Box

This provides a label that identifies the object store in the Administration Console.
For this exercise, type in the name MyObjectStore.
The property and its value will appear in the property summary pane.
Repeat steps Adding an Object Store to Adding an Object Store for as many attributes as you need to set.
For this exercise, set the java.naming.factory.initial attribute to
com.sun.jndi.fscontext.RefFSContextFactoryand the java.naming.provider.url attribute to
file:///C:/Temp(or file:///tmp on the Solaris or Linux platforms). These are the only attributes you need to set for a file-system object store; see LDAP Server Object Stores for information on the attribute values needed for an LDAP store.
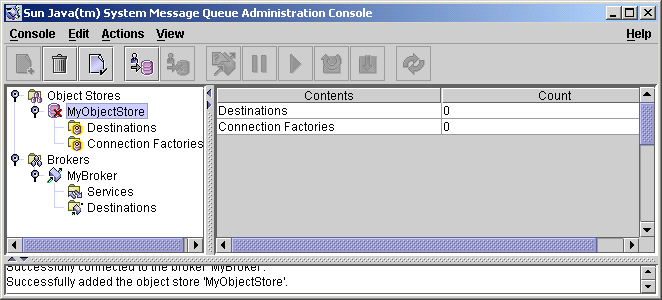
The new object store will appear under Object Stores in the navigation pane, as shown in Figure 2-12. The red X over the object store’s icon indicates that it is not currently connected to the Administration Console.
Figure 2-12 Object Store Displayed in Administration Console Window

When you click on the object store in the navigation pane, its contents are listed in the result pane. Since you have not yet added any administered objects to the object store, the Count column shows 0 for both destinations and connection factories.
Once you have added an object store, you can use the Properties command on the Actions menu (or the pop-up context menu) to display an Object Store Properties dialog box, similar to the Add Object Store dialog shown in Figure 2-11, to view or modify any of its properties.
Now that you have added an object store to the Administration Console, you must connect to it in order to add administered objects to it.
Alternatively, you can right-click on the object store’s name and choose Connect to Object Store from the pop-up context menu. In either case, the red X will disappear from the object store’s icon, indicating that it is now connected to the Administration Console.