| C H A P T E R 3 |
|
Vending Manager |
This chapter describes the tasks for administering the Vending Manager. There are two administration roles: Administrator and Customer Care agent. The role is assigned when the Administrator account is created.
Only Vending Manager administrators can perform the following tasks:
Creating, adding, and editing categories
Creating messages to send to subscribers
Creating and managing Vending Manager Administrator accounts
In addition to the tasks, the administrator also performs all the tasks that Customer Care Agents perform.
Customer Care Agents perform the following tasks:
Viewing the content stocked on the Vending Manager
Creating and managing Subscriber plans
Customer Care Agents can also edit their own accounts. They cannot edit other Administrator accounts.
As a Vending Manager administrator, you are responsible for administering all features of the Vending Manager. The tasks include the tasks described in this section as well as the tasks described in Customer Care Agent Tasks. Administration tasks are performed through the Vending Manager administration console. See Accessing the Administration Consoles for information.
To properly manage content, you must first create the categories that you want to use. Categories are the logical containers that hold the content. You use categories on the Vending Manager to control subscriber access to the content.
A default set of categories is provided with the Vending Manager. You can edit or delete these categories. You can also add categories and subcategories. Only main categories can have subcategories.
1. From the Vending Manager administration console, click Content on the main menu bar.
The Content Management page is displayed.
2. From the Stocked Content tab, click Manage Categories.
The Catalog Management page is displayed showing the Vending Manager Categories.
3. If you want to create a main category, go to Step 4.
If you want to define a subcategory of an existing category, click the category name and then proceed to Step 4.
For example, if you want to create a category that is a subcategory of "Business and Professional," click Business and Professional. The Business and Professional category information page is displayed.
The Edit Category page is displayed. An asterisk (*) beside a field indicates that it is a required field.
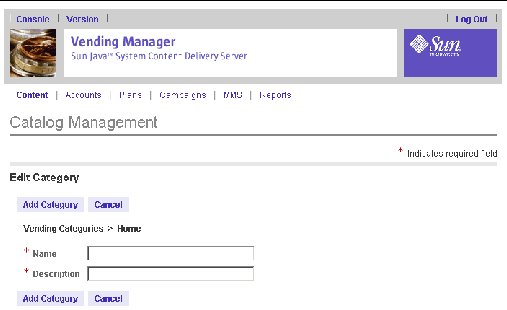
5. Enter a name and description of the category.
The name must be unique within the category. You cannot have two categories of the same name under the same level of hierarchy.
The new category is added to the database.
1. From the Vending Manager administration console, click Content on the main menu bar.
The Content Management page is displayed.
2. From the Stocked Content tab, click Manage Categories.
The Catalog Management page is displayed.
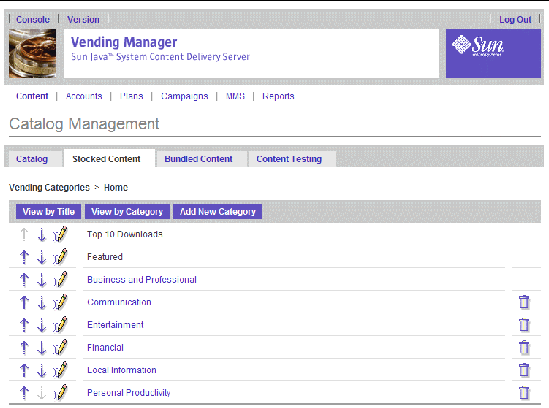
3. Click on an Up or Down arrow to change the placement of a category in the category tree.
4. If you want to edit a main category, go to Step 5, otherwise, click the category name to navigate to the subcategory you want to edit.
For example, if you want to edit the Legal subcategory of the Business and Professional category, click Business and Professional. The Business and Professional category information page is displayed.
5. Click the edit symbol  beside the category that you want to modify.
The Edit Category page is displayed. An asterisk (*) beside a field indicates that it is a required field.
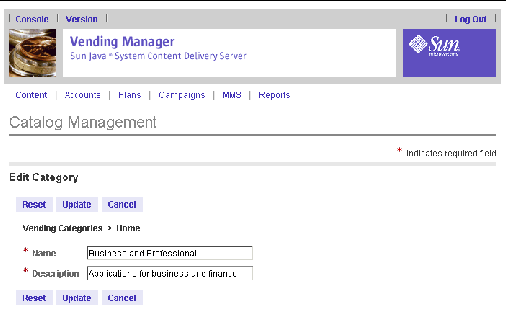
6. Change the category name and description as required.
The previous Edit Category page is displayed.
You can only delete categories that do not contain content. You must either move or delete content in an undesired category before you can delete that category.
1. From the Vending Manager administration console, click Content on the main menu bar.
The Content Management page is displayed.
2. From the Stocked Content tab, click Manage Categories.
The Catalog Management page is displayed.
3. Click the delete category button  for the category that you want to delete.
The category and all its subcategories are deleted and are removed from all plans and content with which they are associated.
To delete a subcategory, click the category name to display its list of subcategories. For example, to delete the Small Business subcategory of the Business and Professional category, click Business and Professional. The Business and Professional category information page is displayed.
|
Note - You cannot delete a category that contains content. You must first assign the content to a different category. |
As a Vending Manager administrator, you can stock content published by the Catalog Manager, categorize it, and price it for subscribers to purchase. The Catalog tab of the Content Management page provides you with access to all content published to this Vending Manager.
1. From the Vending Manager administration console, click Content on the main menu bar.
2. Click the Catalog tab if it is not the active tab.
The Content Management page displays a list of the main categories. The information displayed above the catalog tree shows the current state of the auto-stocking feature and the auto-update pricing feature. The current values for the General Pricing Rule are also shown.
A number beside each category indicates the number of published items available to you from the Catalog Manager. You can decide whether or not to make this content available to your subscribers.
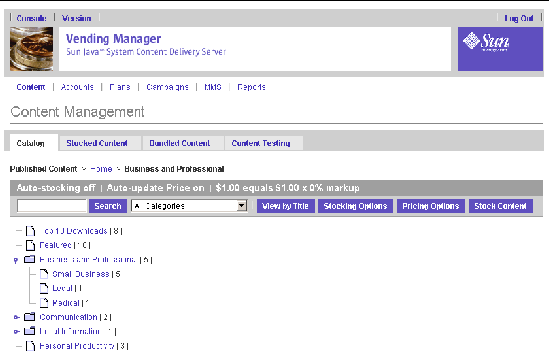
3. See a list of content by following one of these steps:
a. Click a category name that has no subcategories to see the list of content in that category.
b. Expand a category with subcategories by clicking the category name, then click the subcategory name to see its content list.
c. Click View By Title to see the list of all published content.
This view allows you to browse all content alphabetically by title. Initially, the first 20 items are displayed on the first page. Use the alphabet links in the browse bar to show only content beginning with the selected letter.
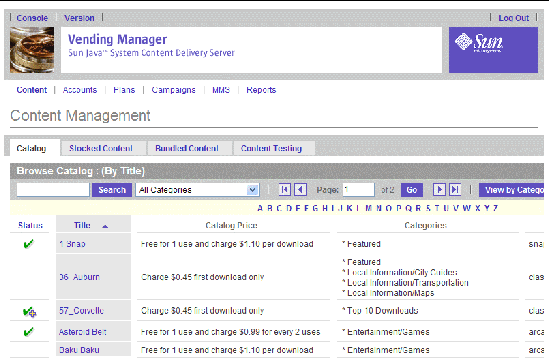
The following information is displayed for each item. Click the Status, the Title, or the Type column title to sort content by that information type.
|
|
Application is stocked - content is available to subscribers |
|
|
|
|
|
Unstocked applications are listed without an associated icon.
To return to the list of categories, click View By Categories in the Browse Catalog bar.
1. From the Vending Manager administration console, click Content on the main menu bar.
2. Click the Catalog tab if it is not the active tab.
The Content Management page displays a list of the main categories.
3. Enter the search term in the Search field.
Enter a part of the content title or the entire title or words in the content description in the Search text field. A list of all content containing one or more of the search entries is displayed.
4. Select the category from the Category drop-down list.
The Catalog page returns a list of available content that meets the search criteria.
1. From the Vending Manager administration console, click Content on the main menu bar.
2. Click the Catalog tab if it is not the active tab.
The Content Management page displays a list of the main categories.
3. Navigate to the item that you want to work with.
You can use the search feature or view the list of content for the category that contains the item.
4. Click the title of the item.
The Content Properties page is displayed.
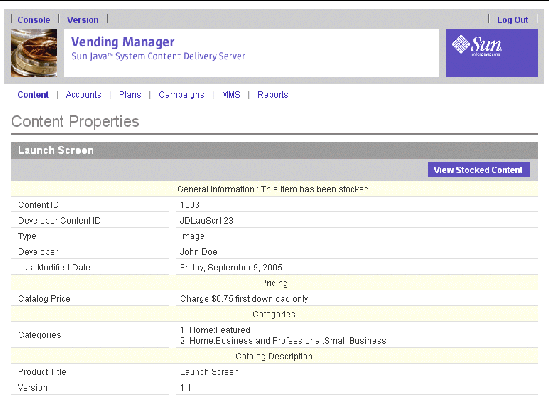
The following items appear on this page:
The General Information field displays the following information:
1. From the Vending Manager administration console, click Content on the main menu bar.
2. Click the Catalog tab if it is not the active tab.
The Content Management page displays a list of the main categories.
3. Navigate to the item with which you want to work.
You can use the search feature or view the list of content for the category that contains the item.
4. Click the title of the item.
The Content Properties page is displayed. The list of editions available is shown in the Editions section at the bottom of the page.
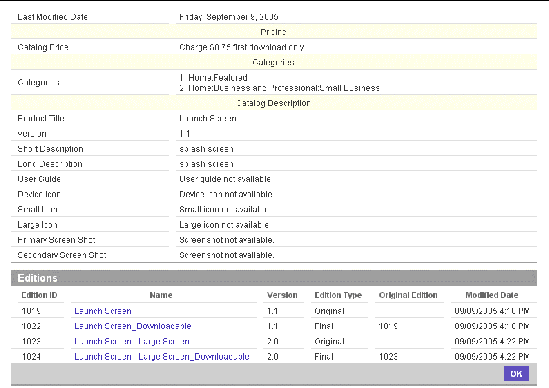
The following information is shown for each edition:
The Edition Type, Original, indicates the initally submitted content, while Final indicates the actual content that is delivered to subscribers. If the content item has OMA DRM protection, a Trial type indicates a content item that is delivered to subscribers for trial usage.
If the Catalog Manager administrator enables Preview for a content type, the Preview field is included in the Catalog Description section.
5. Click the name of the edition that you want to view.
The Properties page for the edition is displayed.
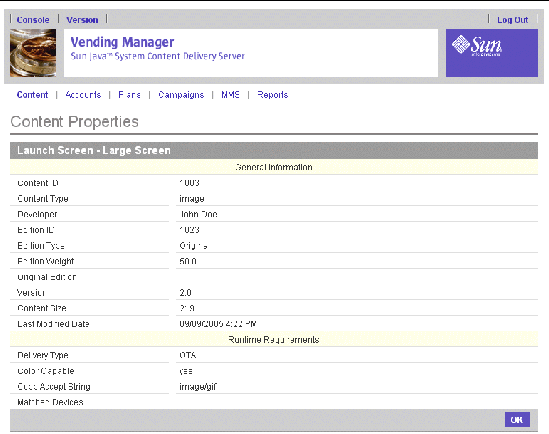
6. When you are done viewing the Edition Properties, click OK.
If no devices are listed in both the Supported Devices and Matched Devices fields, the Catalog Manager administrator made the edition unavailable to subscribers.
From the Catalog tab, you can specify stocking options. The current status of the stocking options is displayed after the title of the tab. The following two options for automatically stocking content are available from the Catalog Manager:
Stocking options are particularly important when the same person administers both the Catalog Manager and the Vending Manager. Automated Stocking enables you to automatically push all published content from the Catalog Manager, using the categories specified in the Catalog Manager, directly to the subscriber site without having to administer content on the Vending Manager.
To enable auto-stocking, follow these steps:
1. From the Vending Manager administration console, click Content on the main menu.
2. Click the Catalog tab if it is not the active tab.
The Stocking Options page is displayed.
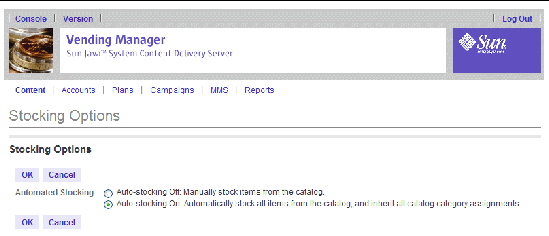
5. Click OK to save your changes.
To set automated price markups, see Setting Local Pricing.
If a content item is not stocked to your subscriber site, you can stock it manually using the Stocked Content option on the Content Properties page. This feature allows you to stock individual content items one by one. To stock multiple content items at once or whole categories of items, see Stocking Multiple Content Items.
To stock content, follow these steps:
1. From the Vending Manager administration console, click Content on the main menu bar.
2. Click the Catalog tab if it is not the active tab.
The Content Management page displays a list of the main categories.
Use the search feature or view the list of content for the category that contains the item.
4. Click the title of the content that you want to stock.
The Content Properties page is displayed. If the content is not stocked, a Stock Content button is displayed at the top of the page.
|
Tip - Unstocked content does not have an symbol in the status column of the content list. |
The Stock Content page is displayed. An asterisk (*) beside a field indicates that it is a required field.
6. In the Stock Content page, specify the following options:
You can only change the purchase price, you cannot change the pricing model, which is set in the Catalog Manager. For a description of pricing models, see TABLE 2-6.
If configured at deployment, you can have grace periods applied to the Every Download pricing model. At purchase time, a grace period allows additional numbers of downloads or extends the download period.
For example, if a grace period is not configured in the Vending Manager, the Every Download option appears as:
With grace period turned on, the same pricing option appears as:
Charge $N on every download or every N days.
Keywords provide an alternative means for systems, such as Mobile Originated (MO) Push to request content items instead of using content IDs.
8. Click OK to close the Confirmation page.
The content list is shown and the item that you just stocked shows the stocked status symbol  in the status column.
|
Note - You can alter the purchase price for more than one content item at once, see Customizing Prices for Stocked Content for more information. |
You can stock multiple content items at once. Only unstocked content can be selected and stocked into the desired categories.
You can only stock content into existing categories. Once content is stocked, you cannot undo the operation. To unstock content, you must manually unstock individual content items from the content item's property page.
|
Note - When scheduling a stocking operation, be aware that if large numbers of content are being stocked, the operation can take some time to complete. |
1. From the Vending Manager administration console, click Catalog on the main menu bar.
The Stock Content page is displayed.
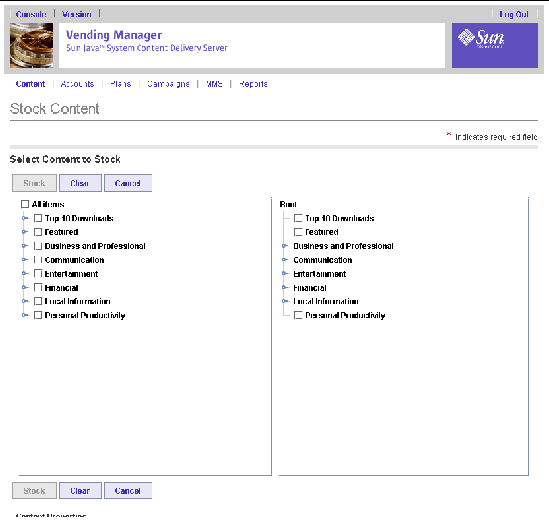
An asterisk (*) beside a field indicates that it is a required field.
Only unstocked content items are selectable. Category and content item names change from gray to black as the categories and content items are loaded. Wait until all items are loaded before making a selection.
3. Select the categories that you want to stock.
Under the catalog categories column on the left, you can select one or more categories of content or individual content items to stock. Selecting a category to stock, selects all unstocked content in the category and its subcategories. All selected items must have the same External ID and status.
4. Select one or more destination categories under the Vending Categories column.
Under the Vending Manager categories column on the right, you can select one or more terminal categories in which you want the content to be stocked. A terminal category is the lowest level category and contains only content items. You cannot select higher level categories.
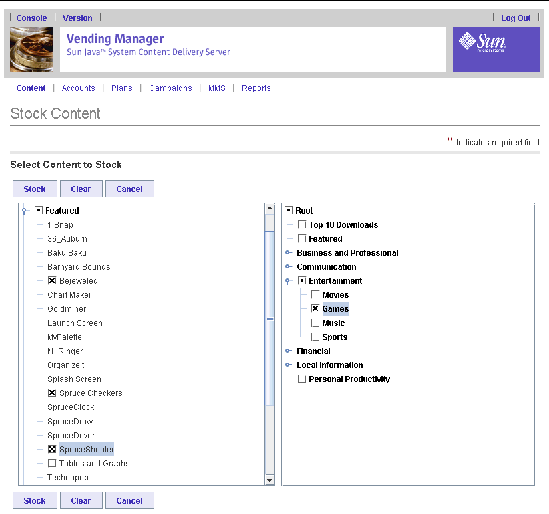
5. Specify the content status and the External Content ID.
You can enter the External Group ID that your billing system uses to identify this content or select it from the list provided, if applicable. This field can be blank if your system does not use group IDs.
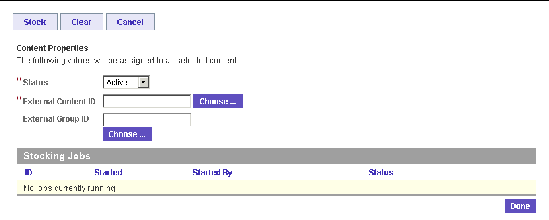
Click Clear to remove all selections in both trees and reselect categories and content items. Clicking the Cancel button clears all selections and displays the top-level Catalog page.
7. Confirm or cancel the operation.
The Stocking Job Status page appears.
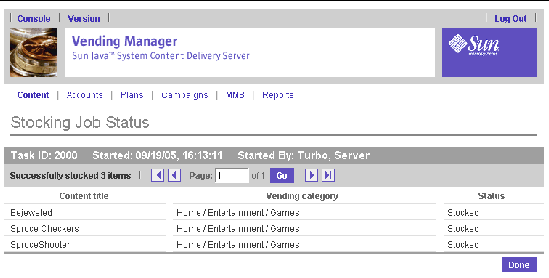
TheStock Content page is displayed.
If for some reason, the connection between the Catalog Manager and the Vending Manager is broken, the stocking process is suspended and resumes automatically at the point it stopped when the connection is restored.
To stop a stocking job from this page, see the next section.
At the bottom of the Stock Content page, you can see a list of executing, pending, and failed stocking jobs:

The following information is shown for each job:
Executing and pending jobs have a Stop icon  . Clicking the icon stops the stocking operation. See Stopping a Stocking Jobfor more information.
You can clear the Stocking Jobs list of jobs with Completed, Stopped, or Failed status by clicking on the Trash icon. The dialog box asks for confirmation. Clicking Yes clears the job item from the list.
You can stop a stocking job with an Executing or Pending status from the Stocking Jobs Status page or the Stocking Jobs section of the Stock Content page.
1. From the Stocking Job Status page, click Stop.
2. Confirm or cancel the stocking job.
No undo command is available. Items that are already stocked remain stocked. Any items in Pending or Failed status are not stocked.
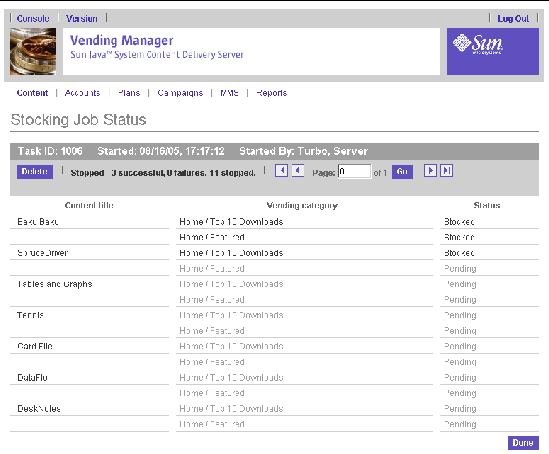
You can also stop a stocking job from the Stock Content page by selecting a stocking job in the Stocking Jobs list with an Executing or Pending status. Click an item's Stop icon  . The Stop icon changes to a Trash icon and the status of the job is changed to Stopped.
You can check on the status of a stocking job in one of the following ways:
The Stocking Job Status page is displayed showing the status of the selected job:
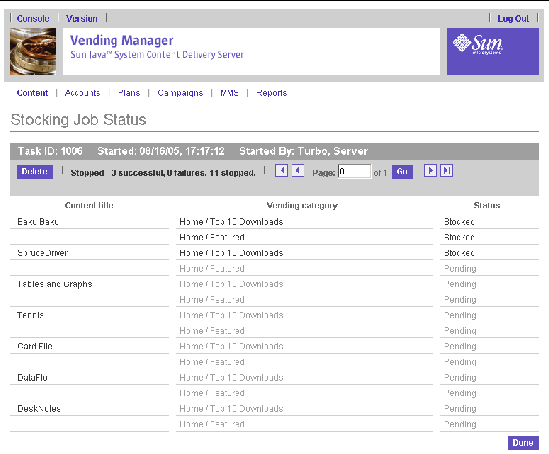
The following information is displayed:
The page is refreshed every 30 seconds. To refresh immediately, click Refresh.
To clear job items in this page, click Delete for any job item with a status of Completed, Failed, or Stopped.
If the item in a catalog is already stocked but the catalog property information has been updated, you can update the properties of the stocked item. Even if you choose not to update property information, the subscriber downloading the content always receives the latest copy of the JAR.
To update the catalog, follow these steps:
1. From the Vending Manager administration console, click Content on the main menu bar.
2. Click the Catalog tab if it is not the active tab.
The Content Management page displays a list of the main categories.
3. Click View by Title to find the content item you want to update.
You can also use the search feature to locate the content.
4. From the content list, click the title of the content that you want to update.
|
Tip - Updated content is identified by the updated status symbol |
The View Content Properties page is displayed.
A confirmation page is displayed.
The View Content Properties page is displayed showing the updated information.
Vending Managers can be widely distributed geographically. In such cases, multiple currencies are involved in pricing content. The system administrator configures the currencies and initial price equivalents for a Vending Manager's locale. This is known as the General Pricing Rule. A General Pricing Rule is established for each Vending Manager so that a one-to-one correlation exists between one currency unit in the Catalog Manager and the equivalent amount in the Vending Manager's currency.
For example, suppose a Catalog Manager administrator is in Canada and a Vending Manager administrator is in Italy. The General Pricing Rule calculates what the Italian currency equivalent of $1.00 Canadian is and applies that calculation to all content in the Vending Manager. So if a content item is priced at $1.50 Canadian, the Vending Manager administrator in Italy sees the content priced at 0.95 Euros.
In situations where the Catalog Manager and Vending Manager are running on the same server, both must use the same locale, therefore, the price for content is the same in the Catalog Manager and the Vending Manager unless a custom price has been created.
If the Automatically Update Catalog Price is checked, all content in the Vending Manager is automatically updated based on the General Pricing Rule whenever the pricing option for content is changed in the Catalog Manager. If this feature is not checked, you can manually update content pricing from the Pricing Option page.
The Pricing Option page lists the content types of all content in the Vending Manager and their assigned pricing option information. It also shows the last time content pricing was updated in the Catalog Manager and in the Vending Manager.
For content with custom pricing (content that is disassociated from its original pricing option), you can manually apply the General Pricing Rule to update those content items.
1. From the Vending Manager administration console, click Catalog on the main menu bar.
The Pricing Options page is displayed.
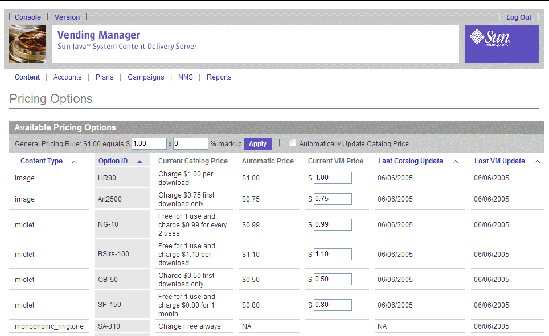
The page displays the following information:
3. Enter the value for your local currency equal to the one currency unit.
If the one currency unit is one Euro and your local currency is Yen, enter the current equivalent value in Yen.
4. Enter the percentage markup by which you want to increase the purchase price, if desired.
If you do not want to increase the purchase price of content by a percentage, enter 0 or leave the field empty.
Automatic markup (percentage increase) of content purchase prices is applied to both manually and automatically stocked content.
A table displays a list of content types and their assigned pricing option information. It also shows the last time content pricing was updated.
6. Click Done to enact the change.
When automatic price updating is turned off in the Vending Manager, an Ignore Update alert is displayed in the Pricing Options table to alert you that a price change is in effect for the associated content in the Catalog Manager. You can perform one of the following actions:
When you click Done to change the price, the Ignore Update alert is removed.
You can change the purchase price for content on an individual basis. Only the purchase price of published content can be changed, that is, you cannot change the purchase price for content with Testing status. Also, you cannot change the purchase price of individual content items within a bundle.
If you change the purchase price of a content item through the content's property page, you disassociate that content from its pricing option. See Disassociating Content From Pricing Options for more information.
1. From the Vending Manager administration console, click Content on the main menu bar.
2. Click the Stocked Content tab.
3. Click View by Title to list all content.
4. Click the content name to go to the content's property page.
7. Click OK to save the change.
A confirmation message appears.
8. Click OK to close the confirmation message.
As a Vending Manager administrator, you can make content unavailable to subscribers by unstocking the content or changing its status to inactive. The Stocked Content tab of the Content Management page provides you with access to all content that has been stocked for this Vending Manager.
This task is described in the section on tasks for customer care agents. See Viewing Stocked Content.
1. From the Vending Manager administration console, click Content on the main menu.
2. Click the Stocked Content tab if it is not the active tab.
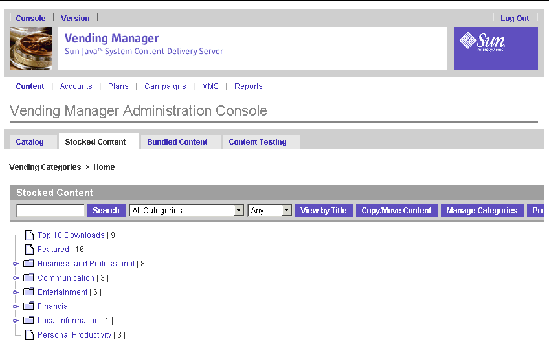
3. Enter the search term in the Search field.
4. Select the category that you want to search from the Category drop-down list.
5. Select the status of the content from the Status drop-down list.
The Stocked Content page shows a list of stocked content that meets the search criteria that you specified.
Stocked content can have the following three states:
You can change the status of content in either the Active or Inactive state. To change the status of stocked content, follow these steps:
1. From the Vending Manager administration console, click Content on the main menu.
2. Click the Stocked Content tab if it is not the active tab.
3. Navigate to the item with which you want to work.
You can use the search feature or view the list of content for the category that contains the item.
4. In the first column of the content list, check the content whose status you want to change.
5. From the Change Status To drop-down list, select the status you want.
The Confirmation page is displayed.
7. Click OK to confirm the status change.
The Stocked Content list is displayed and the Status column displays the updated status information.
You can unstock content that you no longer want in your catalog.
To unstock content, follow these steps:
1. From the Vending Manager administration console, click Content on the main menu.
2. Click the Stocked Content tab if it is not the active tab.
3. Navigate to the item that you want to unstock.
You can use the search feature or view the list of content for the category that contains the item.
4. From the content list, check the content that you want to unstock.
The View Content Properties page is displayed.
The Confirmation page is displayed.
6. Click OK to confirm you want to unstock the content listed.
The Stocked Content page is displayed. The content that you unstocked is not listed and is no longer available to subscribers.
1. From the Vending Manager administration console, click Content on the main menu.
2. Click the Stocked Content tab if it is not the active tab.
3. Navigate to the stocked item that you want to edit.
You can use the search feature or view the list of content for the category that contains the item.
4. From the content list, click the title of the content that you want to edit.
The View Content Properties page is displayed.
The Edit Content page shows the properties. An asterisk (*) beside a field indicates that it is a required field.
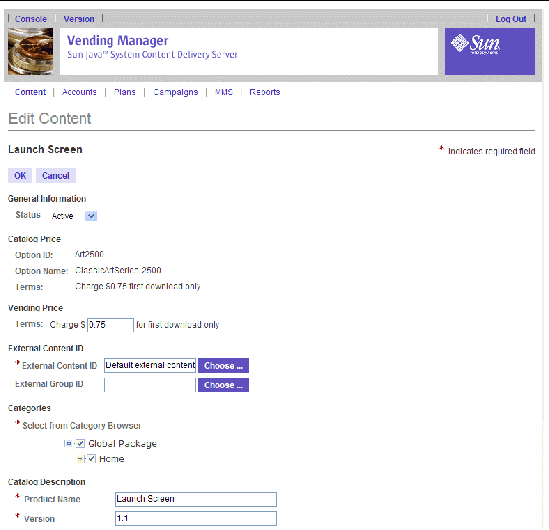
You can edit the following fields:
The Catalog Price shows the pricing option for the content item in the Catalog Manager.
You can change one or both of the following content ID types:
6. Modify the fields as required.
8. Click OK to close the confirmation message.
The content is updated in the database and the properties page is displayed.
If your billing system requires something other than the Content Delivery Server content ID to identify the content, you can edit the external content IDs for multiple items from the list of stocked content.
To edit a single item, you can edit the properties for that item. See Editing Stocked Content.
To edit multiple items, follow these steps:
1. From the Vending Manager administration console, click Content on the main menu bar.
2. Click the Stocked Content tab if it is not the active tab.
3. Navigate to the items that you want to edit.
To view all content, click View By Title.
4. Select the items that you want to edit.
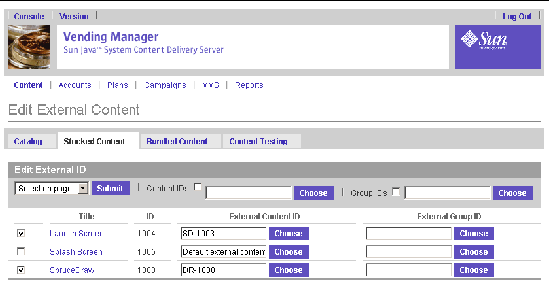
The Edit External Content page is displayed.
6. Select the items that you want to change.
7. Enter or select the external content ID and external group ID in the fields for an item to change individual items.
To change all selected items to the same external content ID, select Content IDs and enter a value or select the value to be assigned to all items.
To change all selected items to the same external group ID, select Group IDs and enter a value or select the value to be assigned to all items.
8. Click Submit to submit your changes.
If an update is available for stocked content, the Properties page displays the following options at the top of the page:
You can move or copy whole categories of content at a single time in the Vending Manager. By copying or moving one or more categories, you are copying or moving all the content items within those categories.
|
Note - When scheduling a copy or move operation, be aware that if large numbers of categories and content are being copied or moved, the operation can take some time to complete. |
You can also selectively move or copy individual items of content. See Copying or Moving Content Items for more information.
1. From the Vending Manager administration console, click Content on the main menu bar.
2. Click the Stocked Content tab.
The Copy/Move Content page is displayed. The default selection is Category/Categories.
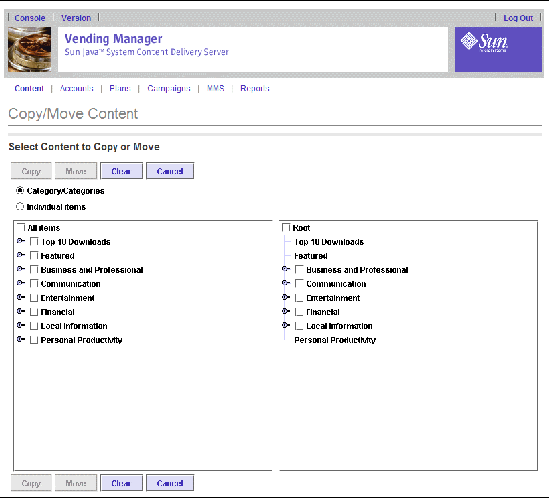
Category and content item names change from gray to black as the categories and content items are loaded. Wait until all items are loaded before making a selection.
4. Select the categories you want to copy or move.
Under the source column on the left, select one or more categories to copy or move. If you select a higher level category, all of its subcategories, including their content items, are also copied or moved. You cannot select individual items of content. Also, you cannot copy or move a parent category into one of its child categories. You must click the check box to select an item in the tree. See Copying or Moving Content Items for more information.
Note that an X indicates a selected category. A dot (.) indicates that at least one category has been selected in the column. A higher level category with a dot indicates that at least one of its subcategories is selected.
5. Select one or more destination categories.
Under the destination column on the right, you can select one or more higher levelcategories. The destination category you select cannot be a terminal category. A terminal category is the lowest level category and contains only content items. You must click the check box to select an item in the tree.
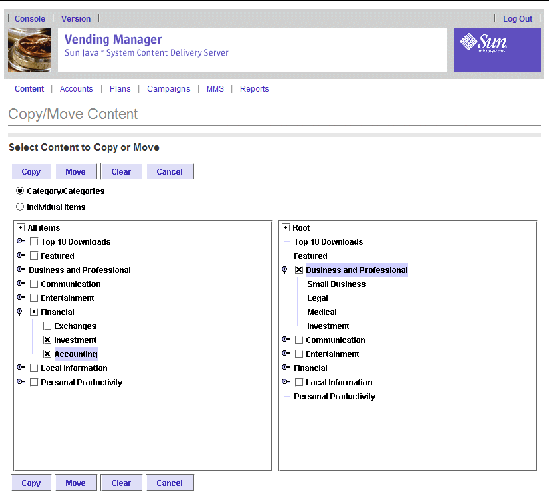
The Copy and Move buttons only become active when at least one selection is made in both the source and destination trees. If one category tree does not have a selection, for instance, if you clear all selections in a tree, the buttons are inactive.
7. Confirm or cancel the operation.
If copied, categories and their associated content are duplicated under each destination category. If moved, categories and their content are removed from the original location and placed in the destination category. If more than one destination category is selected, categories and content are duplicated under each destination category.
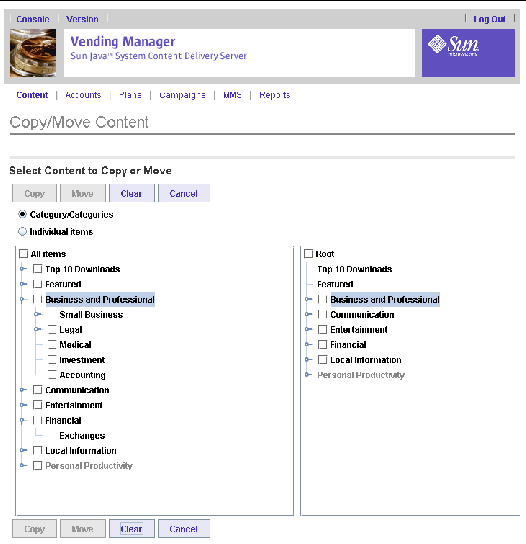
The preceding figure shows the results of moving the Investment and Accounting categories to the Business and Professional category. All content items in Investment and Accounting were also moved.
If you copy or move a category to another category and decide you no longer want that category in its new location, you can take one of the following actions:
By selecting Individual items on the Copy/Move Content page, you can select specific content items to copy or move to other categories.
|
Note - When scheduling a copy or move operation, be aware that if large numbers of categories and content are being copied or moved, the operation can take some time to complete. |
1. From the Vending Manager administration console, click Content on the main menu bar.
2. Click the Stocked Content tab.
The Copy/Move Content page is displayed.
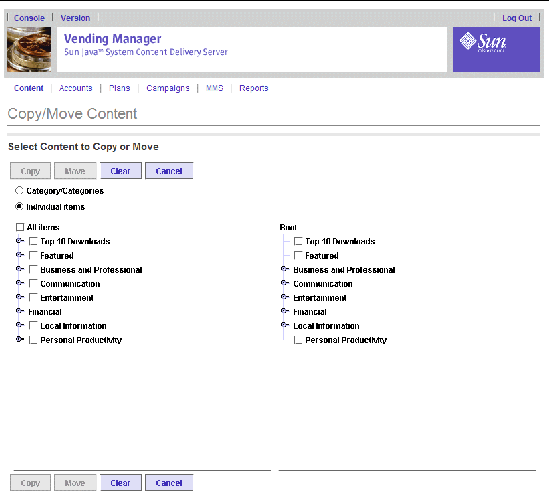
Category and content item names change from gray to black as the categories and content items are loaded. Wait until all items are loaded before making a selection.
5. Select the content items of content in one or more categories that you want to copy or move.
Under the source column on the left, you can select one or more items of content to copy or move but you cannot select categories. You must click the check box to select an item in the tree. See Copying or Moving Categories of Content for more information.
Note that an X indicates a selected content item. A dot (.) indicates that at least one content item has been selected in the column. A category with a dot indicates that at least one of its content items is selected.
6. Select one or more destination categories.
Under the source column on the right, the destination categories you select must be terminal categories. A terminal category is the lowest level category and contains only content items. You must click the check box to select an item in the tree.
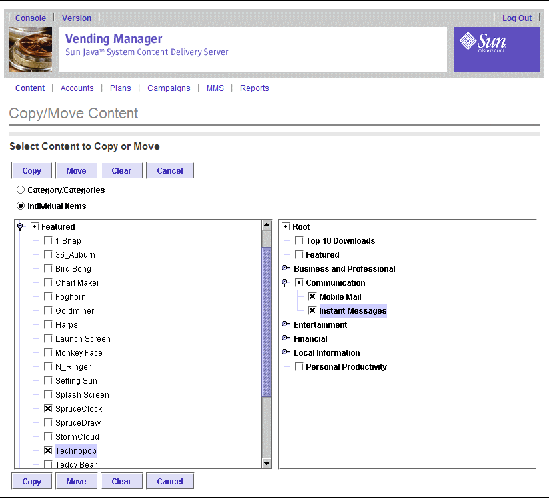
The Copy and Move buttons only become active when at least one selection is made in both the source and destination trees. If one category tree does not have a selection, for instance, if you clear all selections in a tree, the buttons are inactive.
8. Confirm or cancel the operation.
If copied, content is duplicated under each destination category. If moved, content is removed from the original location and placed in the destination category. If more than one destination category is selected, content is duplicated under each category.
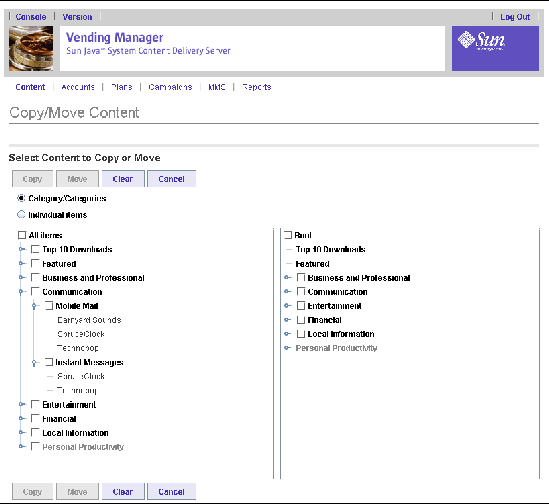
The preceding figure shows the results of copying the content items, SpruceClock and Technopop to the Mobile Mail and Instant Messages categories. The content items are still available in the Featured category.
If you copy a content item to a category and decide that you do not want the item in that category, you can edit the content to change the category assignment. See Editing Stocked Content for information.
Another way to manage the purchase price for content is to set the price for categories of content. You can change the price per category of content to affect a pricing change over a wide range of content simultaneously. Keep in mind that changing the price in this manner, dissociates the selected content items from their pricing options. See Disassociating Content From Pricing Options for more information.
|
Note - Customizing content pricing has no Undo operation. Before enacting any changes, be sure to review the changes to ensure that the correct changes apply only to the intended contents. |
To change the price of content per category, follow these steps:
1. Click Content from the Vending Manager's main menu.
2. Click the Stocked Content tab.
The Customize Prices page is displayed.
An asterisk (*) beside a field indicates that it is a required field.
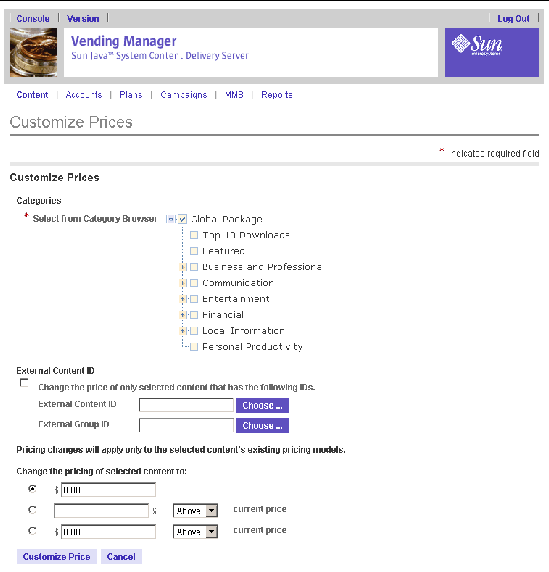
4. Select the category or subcategories of content or specific contents.
To change the purchase price of all the contents of a category, simply click the category itself.
To change the purchase price of specific content items in a category, navigate through the category to select individual content items.
5. (Optional) Select the External Content ID filter to apply the pricing change to only those selected contents that have the given ID.
Click Choose to select the desired content ID or group ID.
Content items in the same category but assigned to a content or a group ID different than the one chosen are not affected by the price change.
6. Change the purchase price in one of the following ways:
The price is applied to all selected content regardless of their pricing models. For example, if SpruceDraw is $5.00 per monthly subscription and Launch Screen is $0.50 per download, increasing the purchase price by 10% results in SpruceDraw being offered at $5.50 per monthly subscriptions and Launch Screen at $0.55 per download.
8. Click OK in the confirmation dialog box to establish the change.
No Undo operation is available once you click OK. Check that your pricing changes will affect only the desired contents. Otherwise, manually reset the pricing for erroneously changed content.
Bundles are a collection of related files (for instance, you could have a bundle for a particular business activity that includes an application and associated audio, video, or image files), making the information accessible to subscribers in a convenient form. The Vending Manager administrator creates and manages bundles.
This section covers the following topics:
A subscriber can only see the bundles in the list of available content if all the items within a bundle can run on the subscriber's device. By examining the details of a bundle, a subscriber can see the items that the bundle contains.
When the status of a bundled item of content is changed from Published to Unpublished by a Catalog Manager administrator, it remains in the bundle but is unavailable to subscribers. In the bundle's property page, subscribers who already purchased the bundle see a status of Unavailable for the content item. Subscribers purchasing the bundle do not see the content in the bundle's content list.
If the status of the content is changed back to Published, one of the following situations occurs:
See Editing a Bundle, Stocking Content Manually, and Setting Stocking Options for more information.
When you create a bundle, you set a purchase price for the bundle, not for each of the individual content items within the bundle. Bundles can use only a First Download pricing model. Use of the individual content items, however, are dependent on their individually assigned pricing models. For example, a subscriber pays a single purchase price to get a bundle containing an image and a ring tone. The image has a Per Use pricing model and the ring tone has an Every Download pricing model. The subscriber's access to the picture is determined by the allowed number of uses and access to the ring tone by the allowed number of downloads.
Due to the delivery mechanisms of some DRM types (see Content Protection), content using a Per Subscription or a Trial pricing model cannot be included in a bundle. The following list explains the usage conditions for content items in a bundle with different pricing models:
Subscribers who purchased bundled content in the previous release of the Content Delivery Server can still download and run content in those bundles per the pricing and usage conditions in effect at that time, including those associated with the subscription pricing model.
Once a bundle is purchased, the following purchase conditions apply:
If a bundle is purchased but not downloaded and the subscriber looks at the details page for a content item that is in the bundle, the subscriber sees a link to the bundle's details page and is informed that the content item was purchased through the bundle.
1. Click Content in the Vending Manager administration console's main menu.
2. Click Bundled Content in the Content Management page.
The categories list displays the number of bundles per category.
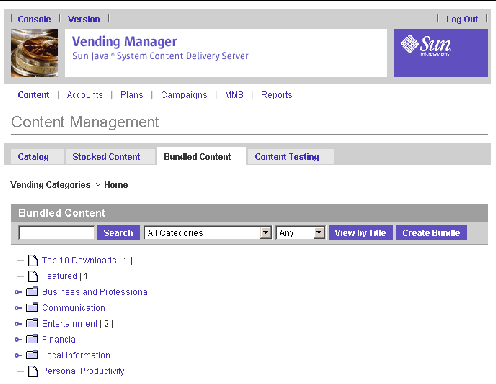
The Create Bundle page is displayed.
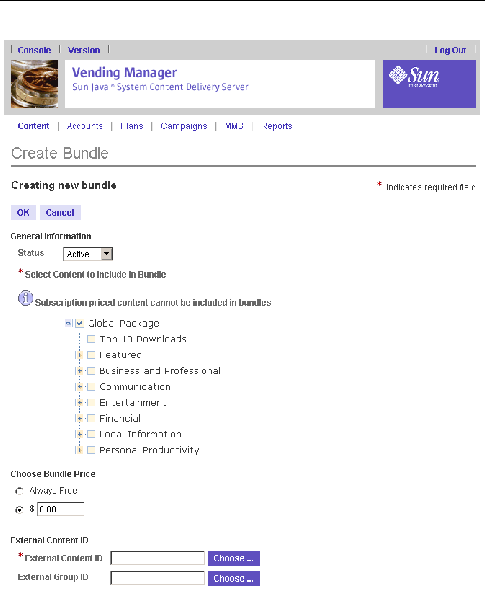
An asterisk (*) beside a field indicates that it is a required field.
4. Specify the following information:
A bundle cannot contain other bundles. A bundle is always comprised of individual content items.
Bundle price overrides the pricing assigned to individual content items for first download. The pricing models for individual content items still apply.
This section is available only if your system uses something other than the Content Delivery Server content ID to identify the content. If this section appears, enter the following information:
Use the Select from Category Browser option to select a category for the bundle from your Vending Manager categories. You can select a top-level category or navigate down to select a subcategory.
5. Click OK to create the bundle.
If you create a bundle and no device exists that is capable of running all content in that bundle, an error message is generated. A dialog box opens with the following message:
The bundle has been created successfully, but no handset capable of running all of the included content exists.
You can still save the bundle by clicking OK in the dialog box.
6. Click OK to close the Confirmation page.
The top-level Bundled Content page is displayed.
1. Click Content in the Vending Manager administration console's main menu.
2. Click Bundled Content in the Content Management page.
The Browse Vending Content By Title page is displayed.
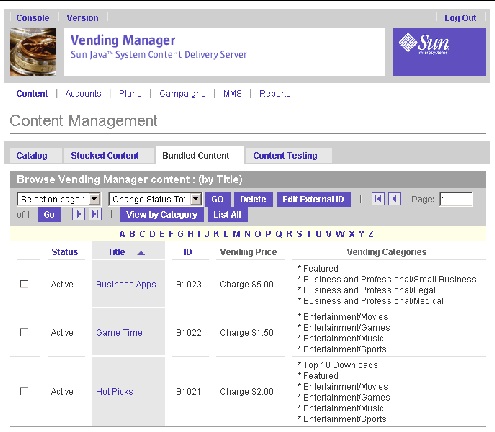
For each bundle in the list, its status, title, content ID, retail price, and vending categories are displayed. You can also view bundles specific to a category by clicking on a category from the Bundled Content categories list.
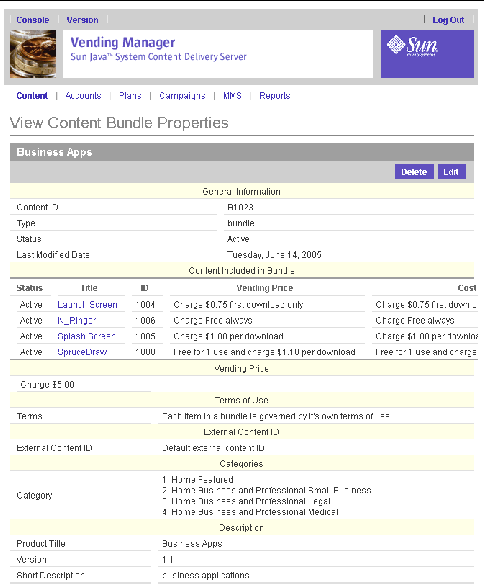
4. Click on the title of the bundle to see detailed information about it.
The View Content Bundle Properties page lists each item of content in the bundle including status, content ID, pricing, and content type information.
1. Click Content in the Vending Manager administration console's main menu.
2. Click Bundled Content in the Content Management page.
4. Select the check box for the desired bundle in the list.
You cannot delete individual items within a bundle. You must create a new bundle containing only those desired items.
6. Click OK to confirm the unbundling of the content for the selected bundle.
Subscribers never see a deleted bundle unless they purchased it prior to it being deleted by the Vending Manager administrator. Subscribers who purchased the bundle before it was deleted see the bundle in their list of purchased items and can download content in that bundle.
If your billing system requires something other than the Content Delivery Server content ID to identify the content, you can edit the external content ID for a bundle from the list of bundled content.
To edit External Content IDs, follow these steps:
1. Click Content in the Vending Manager administration console's main menu.
2. Click Bundled Content in the Content Management page.
4. Check the box for the desired bundle or bundles.
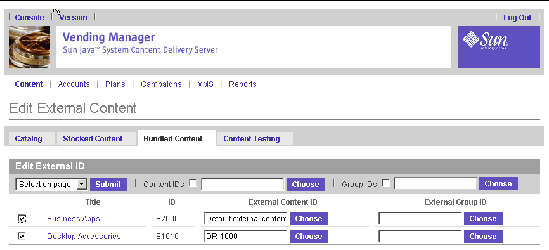
The Edit External Content page for bundles is displayed.
6. Select the items that you want to change.
7. Enter a value or select the External Content ID or the External Group ID in the for each selected bundle.
To change all selected items to the same external content ID, select Content IDs and enter a value or select the value to be assigned to all items.
To change all selected items to the same external group ID, select Group IDs and enter a value or select the value to be assigned to all items.
8. Click Submit to submit your changes.
1. Click Content in the Vending Manager administration console's main menu.
2. Click Bundled Content in the Content Management page.
4. Select the check box for the desired bundle and choose the state you want applied from the Change Status To drop-down list.
6. Click OK to close the Confirmation page.
The list of bundles shows the current state of each bundle.
You can modify a bundle by changing its status, contents, retail price, and so on.
To edit a bundle, follow these steps:
1. Click Content in the Vending Manager administration console's main menu.
2. Click Bundled Content in the Content Management page.
4. Click on the title of the bundle you want.
The View Content Bundle Properties page opens.
5. Click Edit and make your changes.
7. Click OK to close the Confirmation page.
For a description of fields on the Edit page, see Creating a Bundle.
|
Some content received from the Catalog Manager might be undergoing testing before being made available to regular subscribers. This type of content has the status Testing. Only testing subscribers have access to testing content and do not see regular published content on the Subscriber portal. It is your responsibility to assign a testing role to a subscriber. To assign a role to a subscriber, see Adding a Subscriber Account.
To see a list of testing content, follow these steps:
1. Click Content on the Vending Manager administration console's main menu.
2. Click the Content Testing tab.
A list of all content with Testing status is displayed.
3. Click on the desired content to see its properties.
When the Catalog Administrator changes the status of testing content to Published, the content is automatically reactivated in the Vending Manager whether the Auto-stocking option is turned on or off.
|
If the auto-stocking option is set to OFF, you can manually stock content items with Testing status to make them available to subscribers with testing roles.
1. Click Content on the Vending Manager administration console's main menu.
2. Click the Content Testing tab.
A list of all content with Testing status is displayed.
3. Click Stock for the testing content item you want to stock.
The Stock Content page is displayed.
An asterisk (*) beside a field indicates that it is a required field.
6. Click OK to close the Confirmation page.
If you decide to make a stocked testing content item unavailable to subscribers, you can go to the list of testing content and click Unstock.
When you initiate advertising campaigns or want to promote content by offering it at special prices, you can create customized marketing campaigns to send advertisements to subscribers. You can select one or more items that you want to promote and specify the criteria by which subscribers are selected to receive the advertisements. The advertisements can be sent as email or as a message to the subscriber's device.
In addition to creating the marketing campaign, you also define the segment of subscribers that the campaign will target. To keep the format of the campaign consistent, create a template for the marketing message. This section covers the following topics:
The Content Download Server provides a wizard to help you define a marketing campaign. The wizard leads you through the steps of specifying the campaign type, the target audience, the marketing message, content and pricing details, and scheduling and duration.
To start the Campaign Wizard, follow these steps:
1. Click Campaigns on the Vending Manager administration console's main menu.
2. Click New on the Campaign List header.
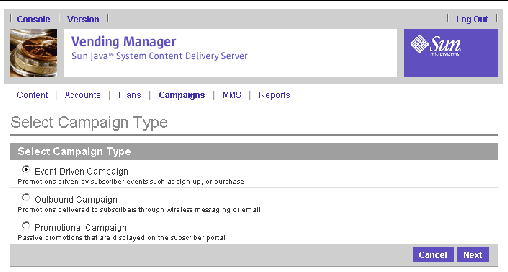
The first page of the Campaign wizard is displayed.
1. In the first page of the wizard, click the radio button to select one of these campaign types:
2. Click Next to specify campaign options and target audience.
The Campaign Options page lets you define the name and description of the campaign, and the market segment that receives it. You can also assign a coupon to the campaign. If you are creating an event-driven campaign, you can define the event that triggers the campaign.
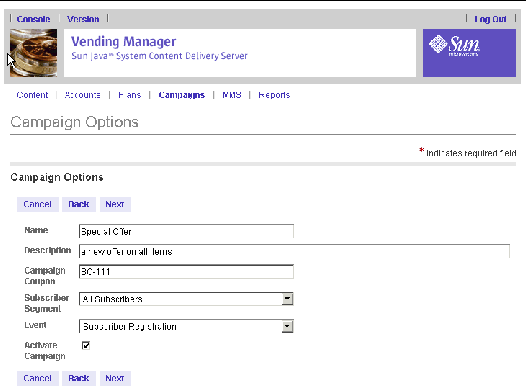
Complete the fields in the Campaign Options page. An asterisk (*) beside a field indicates the field is required.
1. Enter the name of the campaign and a description.
The name of the campaign must be unique to all other campaigns.
A coupon is an attribute of a campaign. This field identifies any coupons associated with the campaign. A subscriber can redeem a coupon by entering it when viewing content. In most cases, entering a coupon activates the campaign as long as the subscriber is part of the campaign's segment.
You can enter a maximum of 32 characters, which can consist of characters and numbers.
3. Choose the Subscriber Segment from the drop-down list.
The Subscriber Segment is the target audience for the campaign. The list contains all of the subscriber segments that are currently defined. See Creating a Subscriber Segment for more information.
Only subscribers who selected the option of "Notify me for update or promotions" through the subscriber portal are included in a subscriber segment.
4. Select a triggering event and activate a campaign.
a. Choose the event that triggers the sending of the campaign message (for event-driven campaigns only).
b. Select the Activate Campaign check box to make the campaign available when it is submitted (for event-driven or promotional campaigns).
5. Click Next to specify the campaign message.
The Specify the Campaign Message page lets you specify the message that is sent to subscribers and the template that is used for the message.
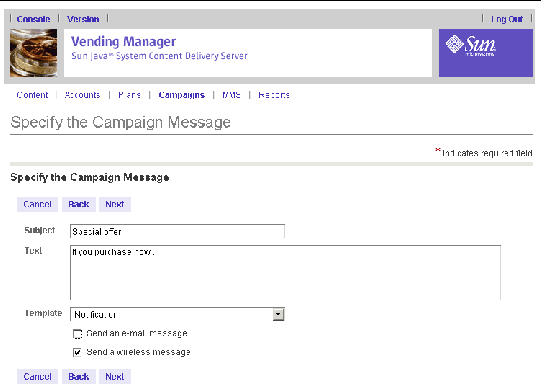
To specify a campaign message, follow these steps:
1. Enter the subject of the advertisement.
This string is also used as the subject line for advertisements sent as email.
Note that though you can enter as much text you like in the Subject and Text fields, a character limit might apply when sending the message depending on the template that might be applied to it (for example, SMS).
2. Enter any message that you want included in the advertisement in the text field.
You can leave this blank if you do not want to include a message.
When creating the message, note that a content purchased event is generated for free content as well as purchased content. That is, the notification message is sent whether the subscriber purchases content or obtains it for free.
3. Choose a template from the drop-down list if you want the message to be inserted into an existing template.
You must specify how you want the notification sent. Select one or both of the following means of transmission:
4. Click Next to specify the content items that are offered with this campaign.
The Campaign Content page lets you choose the content items that is a part of the campaign. The page uses a tree structure to display a list of all of the available categories.
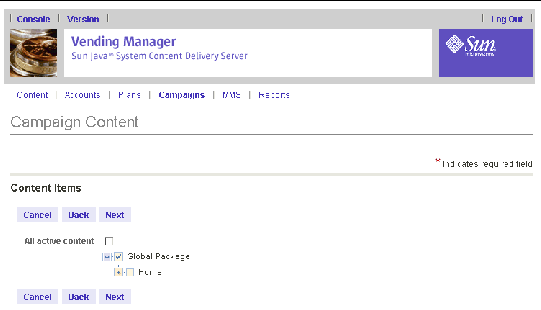
To specify content for a campaign, follow these steps:
1. Set the content in one of the following ways:
This action enables all currently valid content, including newly stocked content, to be included in existing campaigns.
b. Open the tree and select the check boxes next to the specific items that you want to include in the campaign.
To include all of the content in a category, select the check box next to a category name.
Use this page to specify a discount on the price of the content and the duration of the offer.
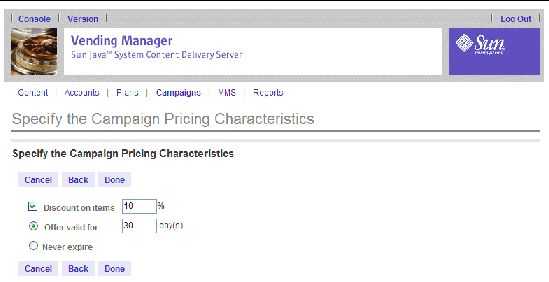
To specify pricing characteristics for a campaign, follow these steps:
1. Select the Discount on Items check box and enter a value by which the price of the item is to be discounted.
2. Set a duration for the discount offer:
3. Click Done to complete the campaign definition.
If you are defining an outbound campaign, click Next to proceed to the campaign scheduling page.
For outbound campaigns, you can specify when the campaign should occur. You can have the advertisement executed immediately or schedule the execution for off-peak hours. Processing the advertisement can be data-intensive and sending the advertisement can be network-intensive, so consider the load on the system when scheduling the execution for your distribution.
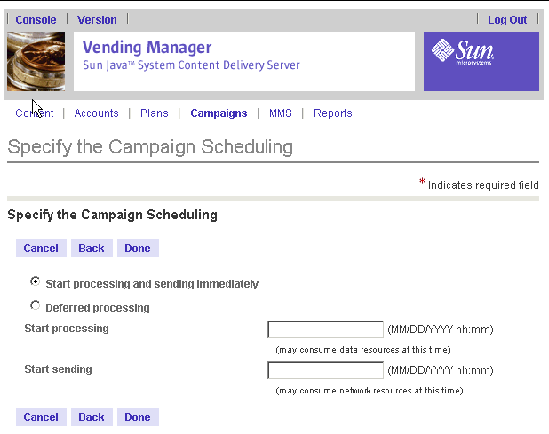
To create a schedule for a campaign, follow these steps:
1. Set up the campaign schedule.
Choose one of the following schedules:
Enter the date and time of processing and sending the campaign in the format shown next to each field. Enter the time based on a 24-hour clock.
Click OK to return to the list of defined campaign.
1. Click Campaigns in the Vending Manager main menu.
2. Click the name of a campaign.
The Campaign Details page is displayed.
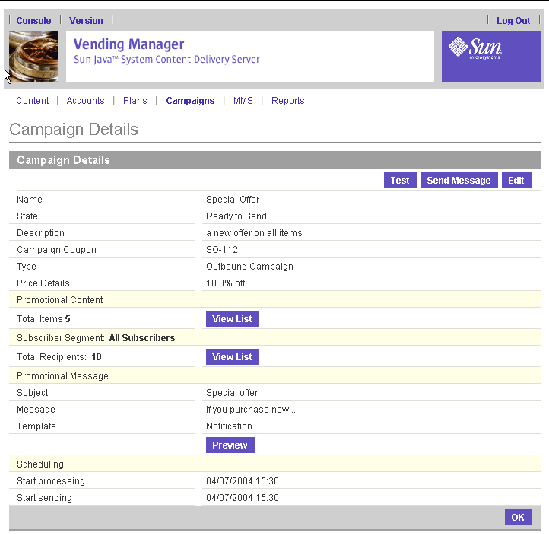
This page enables you to review the information for your advertisement.
3. Click Send Message to queue the advertisement for processing.
A confirmation page is displayed.
1. Click Campaigns in the Vending Manager administration console menu bar.
2. Click the name of a campaign.
The Campaign Details page is displayed.
The Campaign Wizard opens with the current values for the selected campaign.
4. Edit the values that you want to change and click Next to continue.
You can edit the campaign message, content items, pricing characteristics, and, if applicable, the campaign schedule.
5. Click Done on the last page of the wizard.
1. Click Campaigns in the Vending Manager administration console menu bar.
2. Click the name of a campaign.
The Campaign Details page is displayed.
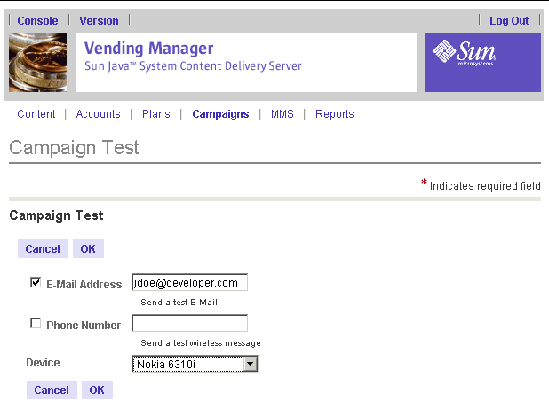
4. Send test email or a test wireless message or both.
6. Click OK to close the Confirmation page.
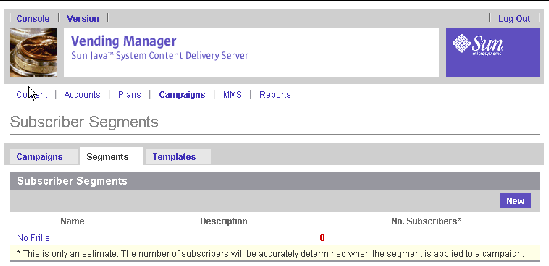
A subscriber segment defines the criteria for separating subscribers into groups. The Subscriber Segment List page displays the current list of subscriber segments, a short description of each segment, and an estimated number of subscribers. The number of subscribers is only an estimate because some segments need to know the content list to determine whether a subscriber matches a criterion. Also, a subscriber can initiate service after the segment has been created and they might be included in the segment when a campaign is processed.
Only subscribers who selected the "Notify me for update or promotions" option through the subscriber portal are included in a subscriber segment.
1. Click Campaigns in the Vending Manager administration console menu bar.
The Campaign List page is displayed.
2. Click the Segments tab in the Campaign List page.
The Subscriber Segments page is displayed.
1. Open the Subscriber Segments page.
The Subscriber Details page is displayed.
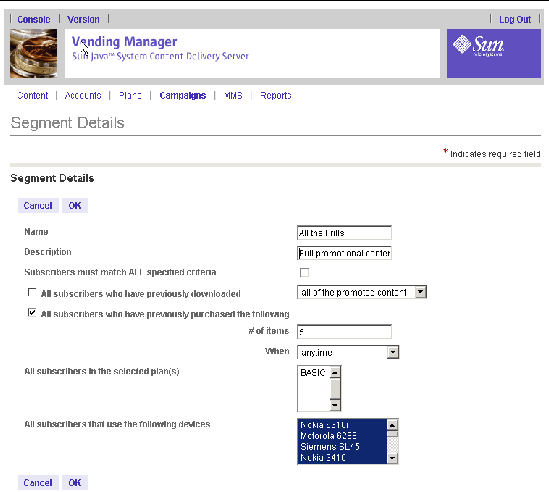
3. Specify the following information:
The name must be unique to other segment names and it must not exceed 255 characters.
If the check box is clear, advertisements are sent to subscribers who meet any of the criteria specified.
The selection can be based on the following factors:
1. Open the Subscriber Segment List page.
See Displaying Subscriber Segments for more information.
2. Click a subscriber segment name or description.
The Segment Details page is displayed.
3. Edit the fields in the Segment Details page.
See Creating a Subscriber Segment for a description of the fields.
4. Click OK when you are finished.
A template provides a consistent format for a campaign message. This section explains how to create and use campaign templates.
1. Click Campaigns in the Vending Manager administration console menu bar.
The Campaign List page is displayed.
2. Click the Templates tab in the Campaign List page.
The Campaign Templates page is displayed.
1. Open the Campaign Templates page.
3. Edit the Template Details page:
You can write code that presents the same general format for the message but allows for variations suitable for each delivery method.
If you define a style sheet for MMS, specify the name of the MMS message to which it applies.
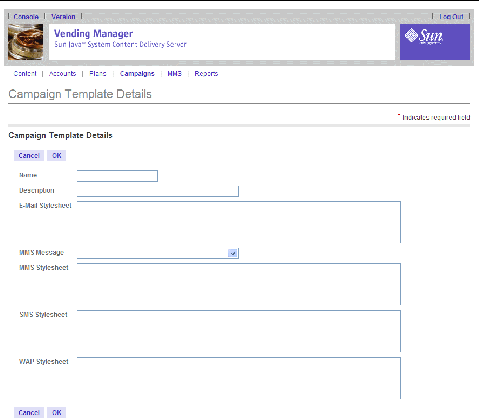
TABLE 3-2 describes the properties that you can use to customize the template for your needs.
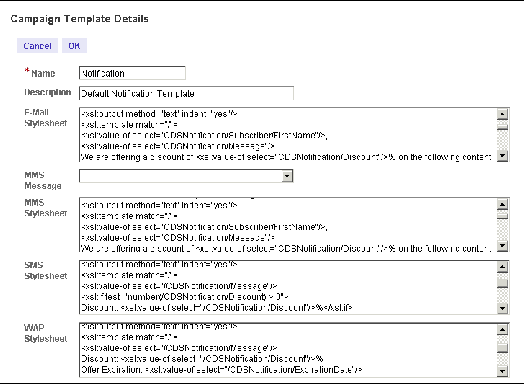
To see examples of campaign notification templates, follow these steps:
1. Open the Campaign Templates page.
2. Click the name or description of the default notification template.
An example of a template is provided for each type of style sheet.
1. Open the Campaign Templates page.
See Displaying Available Campaign Templates for more information.
2. Click the name or description of the template you want to edit.
3. Edit the values in the Campaign Template Details page.
Administrators have access to the Vending Manager. There are two administrator roles:
You can disable any administrator you no longer want to access the Vending Manager, which keeps the account information in the system but does not allow the user ID access.
You can perform each of the following functions on any of the account views:
1. From the Vending Manager administration console, click Accounts on the main menu bar.
2. Click the Administrators tab.
The list of Administrator Accounts is displayed.
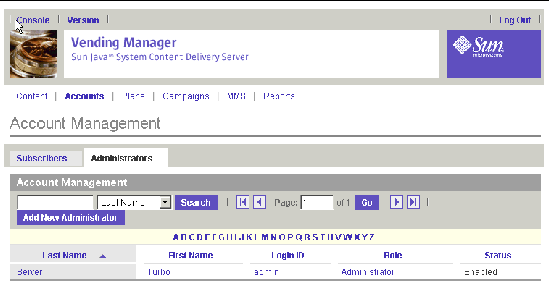
3. To view an individual Administrator Account, click the administrator name.
If you are a Customer Care Agent, you can view your own account by clicking the My Account tab on the Account Management page.
The Administrator Account Details page is displayed. From here you can edit or delete an Administrator Account.
1. From the Vending Manager, click Accounts on the Main menu.
2. Click the Administrators tab.
The list of Administrator Accounts is displayed
3. Click Add New Administrator.
The Add New Administrator page is displayed. An asterisk (*) beside a field indicates the field is required.
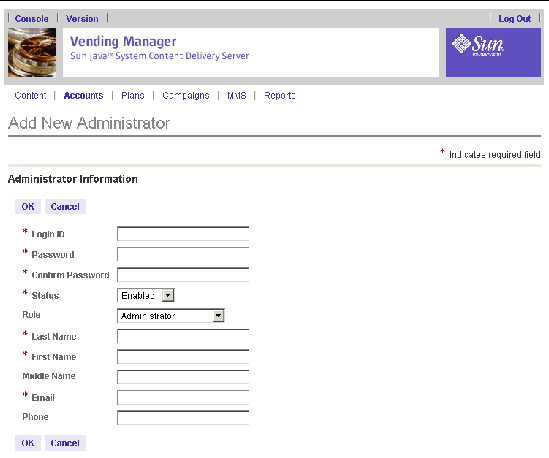
Complete the following fields:
5. Click OK again to close the Confirmation page.
You are informed that the new account is added to the database.
To edit all Administrator Accounts, you must be an administrator. Customer Care Agents can edit only their own account.
To edit an Administrator Account, follow these steps:
1. From the Vending Manager administration console, click Accounts on the main menu bar.
The list of Administrator Accounts is displayed.
3. Click an administrator name.
The Administrator Account page is displayed.
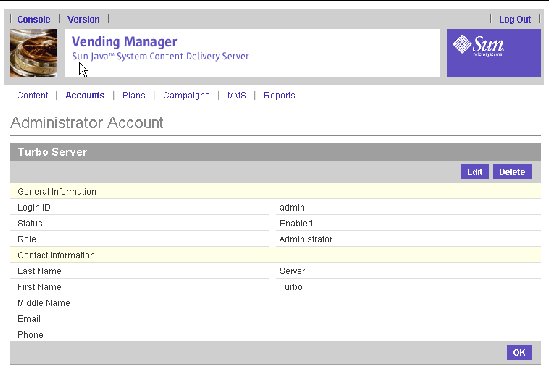
The Edit Account Details page displays the same fields as those described in Adding a Vending Manager Administrator Account.
5. Modify the information as required.
The Edit Administrator confirmation page is displayed.
7. Click OK again to close the confirmation message.
The Administrator Account is updated in the database.
1. From the Vending Manager administration console, click Accounts on the main menu bar.
2. Click the Administrators tab.
The list of Administrator Accounts is displayed.
3. Click an administrator name.
The Administrator Account Details page is displayed.
The Delete Administrator confirmation page is displayed.
5. Click OK to close the Confirmation page.
The Administrator Account is deleted from the database and the administrator will no longer have access to the Vending Manager.
The primary responsibility of customer care agents is to manage subscribers. This includes managing subscriber plans and subscriber accounts. Customer care agents can also view stocked content and reports. These tasks are handled through the Vending Manager administration console.
Customer care agents might also need to work with subscribers to resolve problems that they are having. See the Sun Java System Content Delivery Server Error Messages guide for information.
|
1. From the Vending Manager administration console, click Content on the main menu bar.
The Stocked Content page displays a list of the main categories defined. A number beside each category indicates the number of stocked items.
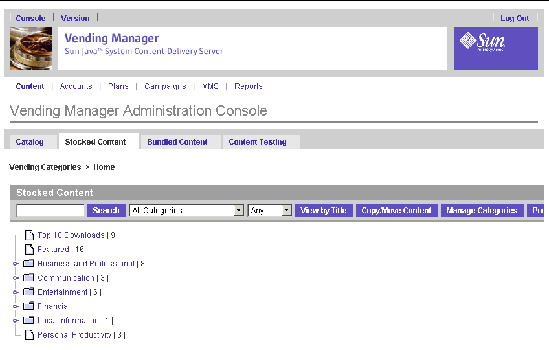
2. Click a content category or subcategory to view a list of the stocked content for the selected category.
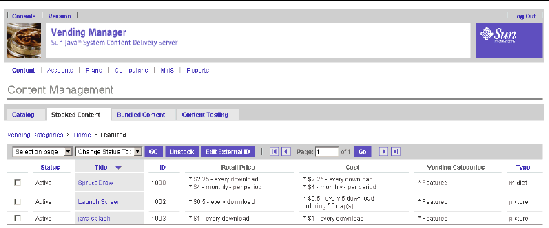
To view all content by title, click View By Title.
This view allows you to browse content alphabetically by title. By default, the view is set to List All, displaying the first 20 items alphabetically on the first page.
|
Note - The Edit External ID button appears only if your billing system requires something other than the Content Delivery Server content ID to identify the content. |
The following information is displayed for each item:
The list can be sorted by Status, Title, ID, and Type. Click a column title to sort the list by the selected title. To return to the list of categories, click Vending Categories in the browse bar.
You can determine how stocked content is displayed for subscribers in the Subscribers Portal through the Vending Manager.
To set the display of stocked content, follow these steps:
1. From the Vending Manager administration console, click Content on the main menu bar.
2. Click the Stocked Content tab if it is not the active tab.
The Vending Preferences page is displayed.
Select one of the following display orders:
4. Set MMS as the preferred content delivery mechanism for the stocked content, if applicable. For information on using MMS as the preferred content delivery system, see Sending MMS Messages.
To set the featured view of contents in a category, see Editing a Category.
1. From the Vending Manager administration console, click Content on the main menu bar.
2. Click the Stocked Content tab if it is not the active tab.
The Content Management page displays a list of the main categories defined.
3. Navigate to the item that you want to examine.
You can use the search feature or view the list of content for the category that contains the item.
4. Click the title of the item.
The View Content Properties page is displayed. If icons, documentation, or screen shots were submitted with the content, click the View button for the item to see what was submitted. If the item is a ring tone and a preview was submitted, you can click the Listen button to hear the preview.
1. From the Vending Manager administration console, click Content on the main menu bar.
2. Click the Stocked Content tab if it is not the active tab.
The Content Management page displays a list of the main categories defined.
3. Navigate to the item that you want to examine.
You can use the search feature or view the list of content for the category that contains the item.
4. Click the title of the item.
The View Content Properties page is displayed. The list of editions available are shown in the Editions section at the end of the page.
5. Click the name of the edition that you want to view.
The View Content Edition properties page is displayed.
The View Content Properties page is displayed. Click OK again to return to the Stocked Content list.
Subscriber accounts are for individuals who buy content from the Vending Manager. Subscriber accounts include the licenses for content that the subscriber downloaded.
The Vending Manager assigns subscriber roles, which determine the type of content that is available to subscribers.
Each Subscriber account is associated with one or more Subscriber plans. Before you create a Subscriber account, you might want to ensure that an appropriate Subscriber plan exists for you to assign to the account. If not, you can assign accounts to the default Subscriber plan and edit the account later. See Managing Subscriber Plans for more information.
You can perform each of the following functions on any of the account views.
1. From the Vending Manager administration console, click Accounts on the main menu bar.
The list of Subscriber accounts is displayed.
If no device is specified to be used, the Device field is blank.
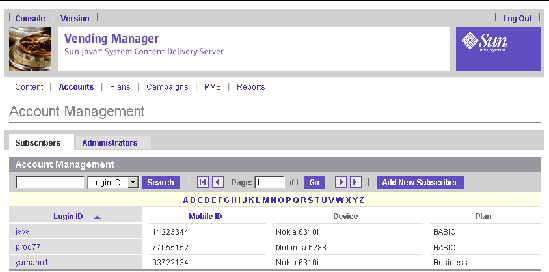
3. Click the login ID for the subscriber account that you want to examine.
The Subscriber Account page is displayed. From this page you can edit or delete a Subscriber account.
4. Click OK to return to the previous page.
You can add a Subscriber account in the Vending Manager. Subscribers can also sign up for their own accounts through the subscriber portal. An account is automatically created using the default Subscriber plan for new subscribers who access the subscriber portal from their device.
To add a Subscriber account, follow these steps:
1. From the Vending Manager, click Accounts on the Main menu.
The list of Subscriber accounts is displayed.
The Add New Subscriber page is displayed.
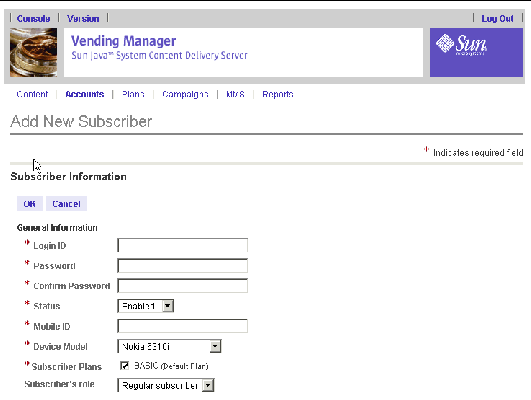
4. Enter the required information:
An asterisk (*) beside a field indicates that it is a required field.
Complete the other fields on the page as desired.
6. Click OK again to close the Confirmation page.
The new Subscriber account is added to the database.
7. Click OK to close the Information page.
1. From the Vending Manager administration console, click Accounts on the main menu bar.
The list of Subscriber accounts is displayed.
3. Click the Login ID for the subscriber account with which you want to work.
The Subscriber Account page is displayed.
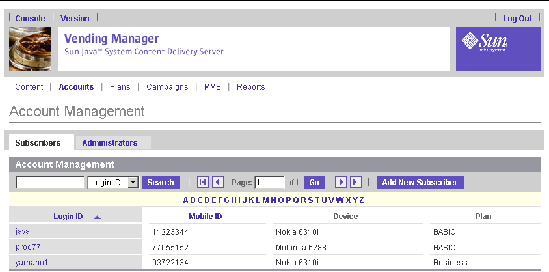
The Edit Account page displays the same fields as those described in Adding a Subscriber Account.
5. Modify the information as required, then click OK.
The Edit Subscriber confirmation page is displayed.
6. Click OK again to close the Confirmation page.
The Subscriber account Is updated in the database.
To view the list of content that a subscriber has downloaded, follow these steps:
1. From the Vending Manager administration console, click Accounts on the main menu bar.
The list of Subscriber accounts is displayed.
3. Click the Login ID of the subscriber whose history you want to view.
If you do not know the ID, search for the subscriber using their MSISDN.
The Subscriber Account page is displayed.
4. Click the Content List tab.
The Subscriber Account page shows the list of content downloaded by the subscriber. Under the License column, any content sent or received as gift is noted along with the Login ID of the recipient or the giver of the gift.
You can change the status of an application license for a subscriber. The change takes effect the next time the subscriber attempts to access that application. If you cancel a license, the subscriber must either wait for you to reactivate the license or purchase another license to continue using the application. If you reactivate a license that you previously cancelled, the terms of the original license are reinstated and the subscriber is not billed.
|
Note - You can change the status of licenses only for content items that use the subscription pricing option except for content that was given or received as a gift. |
To manage subscriber licenses, follow these steps:
1. From the Vending Manager administration console, click Accounts on the main menu bar.
The list of Subscriber accounts is displayed.
3. Click the Login ID for the subscriber account with which you want to work.
The Subscriber Account page is displayed.
The list of content that the subscriber has downloaded is displayed.
5. Click Edit License for the content with which you want to work.
6. Select the new status from the Status list.
7. Click OK to save the change.
8. Click OK to close the Confirmation page.
Trials can be extended for content that was downloaded but not yet purchased by the subscriber.
To extend a trial for a subscriber, follow these steps:
1. From the Vending Manager administration console, click Accounts on the main menu bar.
The list of Subscriber accounts is displayed.
3. Click the Login ID for the subscriber account with which you want to work.
The Subscriber Account page is displayed.
The list of content that the subscriber has downloaded is displayed.
5. Click Edit License for the content with which you want to work.
The subscriber receives one additional free usage.
|
Note - The subscriber's device does not show the additional trial until the original trial runs have completed. |
7. Click OK to save your change.
1. From the Vending Manager administration console, click Accounts on the main menu bar.
The list of Subscriber accounts is displayed.
3. Click the login ID for the subscriber that you want to work with.
The Subscriber Account Details page is displayed.
The list of content that the subscriber downloaded is displayed.
5. Click Edit License for the content with which you want to work.
The content list is displayed.
1. From the Vending Manager administration console, click Accounts on the main menu bar.
The list of Subscriber accounts is displayed.
3. Click the Login ID for the subscriber account with which you want to work.
The Subscriber Account Details page is displayed.
The Delete Subscriber confirmation page is displayed.
5. Click OK to close the Confirmation page.
The Subscriber account is deleted and is removed from any Subscriber plan with which it was associated.
6. Click OK to close the Information page.
Subscriber accounts are assigned to Subscriber plans. Subscriber plans determine which content a subscriber can access and download. A Subscriber plan is mapped to selected categories in the Vending Manager. The content in the selected categories is made available to plan members. If content is in a category that is not supported by the Subscriber plan, the subscriber cannot access it for download.
The following features exist for Subscriber plans:
1. From the Vending Manager administration console, click Plans on the main menu bar.
The Subscriber Plan Management page displays all the Subscriber plans defined.
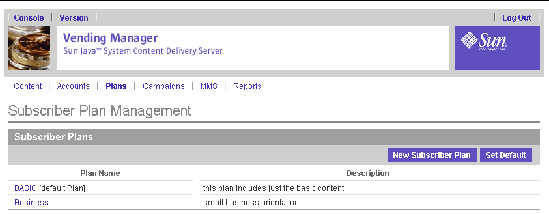
The properties of the Subscriber plan is displayed.
The Properties page displays the following information about the Subscriber plan:
The Members page displays all the Subscriber accounts that are currently members of the Subscriber plan. From this page you can view a Subscriber account and add and remove Subscriber accounts from the plan.
1. From the Vending Manager administrator console, click Plans on the Main menu bar.
The Subscriber Plan Management page displays all the Subscriber plans defined.
The Add New Subscriber Plan page is displayed.
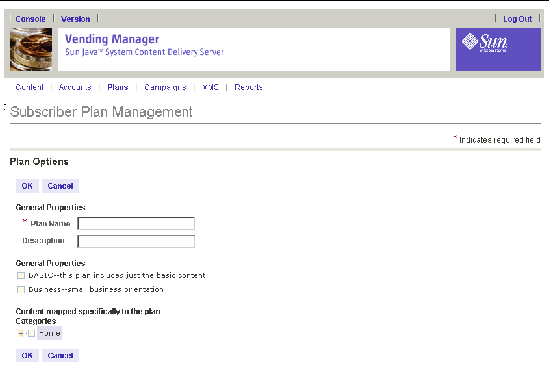
3. Enter the following information
|
Note - You can now add the Subscriber account to a Subscriber plan. See Adding Members to a Subscriber Plan. |
Before you edit a plan, review the Subscriber accounts that are assigned to the plan. See Viewing Subscriber Plan Members.
To edit a Subscriber plan, follow these steps:
1. From the Vending Manager administration console, click Plans on the main menu bar.
The Subscriber Plan Management page displays the list of Subscriber plans defined.
2. Click the name of the Subscriber Plan you want to edit.
The Subscriber Plan Management page is displayed.
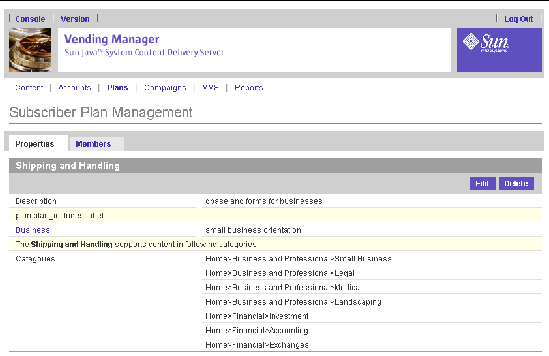
The Subscriber Plan Management page displays the same fields as those described in Adding a Subscriber Plan.
4. Modify the plan as required, then click OK.
The plan is updated in the database.
The list of subscriber plans is displayed.
Members are the Subscriber accounts assigned to a Subscriber plan. After you create a new plan, you can add members. You can also add and remove members from an existing plan.
To view members of a Subscriber plan, follow these steps:
1. From the Vending Manager administration console, click Plans on the main menu bar.
The Subscriber Plan Management page displays all the Subscriber plans defined.
2. Click the plan whose list of members you want to see.
The Subscriber Plan Management page for the selected plan is displayed.
All members subscribing to the selected plan are shown.
1. From the Vending Manager administration console, click Plans on the main menu bar.
The Subscriber Plan Management page displays all defined Subscriber plans.
2. Click the Subscriber plan name to view the properties of a Subscriber Plan.
The Subscriber Plan Management page is displayed.
The Members tab displays all Subscriber accounts that are currently members of the plan.
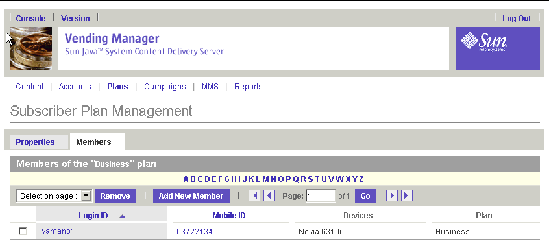
The Members tab displays all Subscriber accounts that are not currently members of the plan.
5. Check the Subscriber accounts that you want to add to the plan, then click OK.
The accounts are added to the plan and the plan is updated in the database.
1. From the Vending Manager administration console, click Plans on the main menu bar.
The Subscriber Plan Management page displays all defined Subscriber plans.
2. Click the Subscriber Plan name to view the properties of a Subscriber plan.
The Subscriber Plan Properties page is displayed.
The Members tab displays all Subscriber Accounts that are currently members of the plan.
4. Check the Subscriber accounts that you want to remove from the plan, then click Remove.
The Subscriber Plan Management page is displayed.
The accounts are removed from the plan and the plan is updated in the database. If a removed account is not assigned to any other Subscriber plan, the default plan is assigned.
The Vending Manager allows you to set a default plan that is automatically assigned to new Subscriber accounts. You can set any of the defined Subscriber plans as the default plan.
To set a default Subscriber plan, follow these steps:
1. From the Vending Manager administration console, click Plans on the main menu bar.
The Subscriber Plan Management page is displayed.
The Set Default page is displayed.
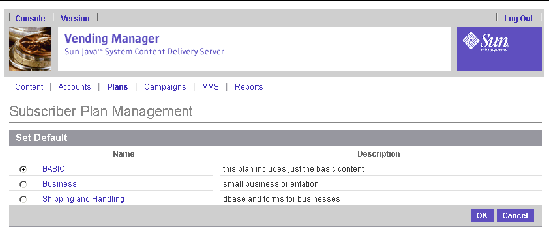
3. Check the plan you require, then click OK.
The default plan is automatically assigned to new Subscriber accounts until alternative plan assignments are made.
Before you delete a plan, you might want to review the Subscriber accounts that are assigned to the plan. See Viewing Subscriber Plan Members.
To delete a Subscriber plan, follow these steps:
1. From the Vending Manager administration console, click Plans on the main menu bar.
The Subscriber Plan Management page displays all defined Subscriber plans.
2. Click the name of the Subscriber Plan that you want to delete.
The Subscriber Plan Management page for the selected plan is displayed.
Note that you cannot delete the default Subscriber plan. If you want to delete the plan currently assigned as the default, you must first assign a different plan as the default.
The Delete Subscriber Plan confirmation page is displayed.
4. Click OK to confirm the deletion.
The plan is deleted from the database and the plan is deleted from any Subscriber accounts associated with it. If this is the only Subscriber plan assigned to a Subscriber account, the default Subscriber plan is assigned to the account until a new Subscriber plan is assigned.
|
This function is available only to Customer Care Agents. Vending Manager administrators edit their account the same way that they edit the account of another Vending Manager administrator. See Editing a Vending Manager Administrator Account.
To edit your own Customer Care Agent account, follow these steps:
1. From the Vending Manager administration console, click Accounts on the main menu bar.
The Accounts Management page is displayed.
The Edit Account Details page displays the same fields as those described in Adding a Vending Manager Administrator Account.
4. Modify the information as required.
6. Click OK again to close the Confirmation page.
The Administrator Account is updated in the database.
|
The Vending Manager provides daily statistical reports so you can view and track application download information and usage statistics downloads.
To view reports, follow these steps:
1. From the Vending Manager administration console, click Reports on the main menu bar.
The Sun Java System Content Delivery Server Reporting page displays the Java Applications Report.
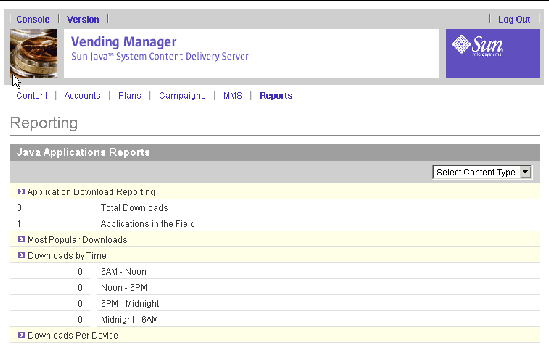
2. Select a content type from the Select Content Type drop-down list to display reports for other content types.
Reports display the following information:
The Vending Manager's MMS feature lets you send messages containing video, image, and audio files. This section covers the following actions:
|
The Content Delivery Server lets you choose MMS as the preferred delivery mechanism for message content. By choosing this preference, all subscribers with MMS-enabled devices are able to download message content using MMS. If you do not choose this preference, then subscribers cannot download content using MMS.
To enable MMS as the preferred content delivery mechanism, follow these steps:
1. From the Vending Manager administration console, click Content on the main menu bar.
2. Click Preferences on the Vending Manager administration console page.
3. Select the Prefer MMS as content delivery mechanism check box in the Vending Preferences page.
 Click MMS on the main menu of the Vending Manager administration console.
The MMS Messages page displays the current list of MMS messages stored in the system. The messages can be sorted by name or date. If the list spans more than one page, navigation controls enables you to display additional rows.
|
1. Click MMS in the main menu of the Vending Manager administration console.
The MMS wizard opens and the Edit MMS page is displayed.
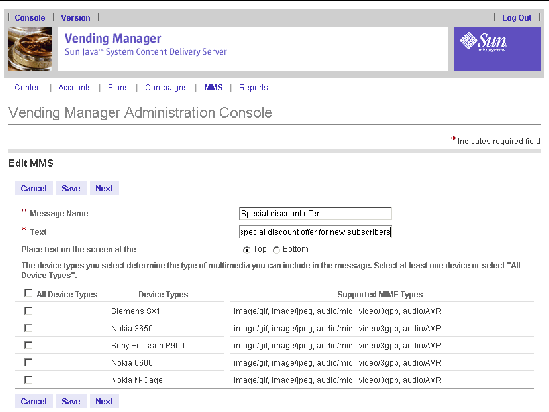
3. Enter a name for the message and the message text.
A maximum of 256 characters are allowed for the message text.
4. Specify whether you want the text to appear on the top or the bottom of the device's display area.
5. Select one or more device types in the table.
The device type table lists the MMS-capable devices from your chosen list of supported devices. The table has navigation buttons that enables you to display additional device entries.
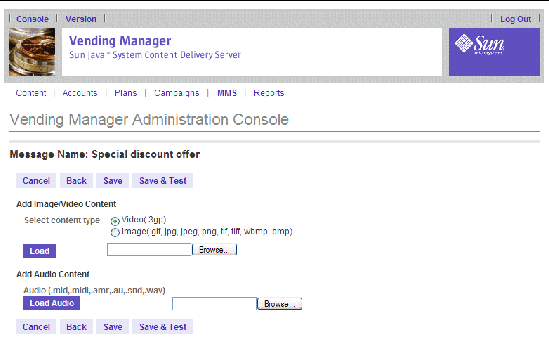
7. Select the media type you want to include with the message.
This page enables you to select any of the media types that are appropriate for the selected devices. If you select both image (or video) and audio, the media types are run serially.
8. Enter the path or browse for the media file.
The page refreshes and now Preview and Remove buttons are present.
10. (Ooptional)Click Preview to preview the media file.
In the case of a video or image file, clicking Load previews the image or video. For an audio file, clicking Load Audio plays the file. If you do not want to use this file, click Remove to remove the file and return to Step 9.
11. Click Save to save the MMS message to the server.
Alternatively, you can click Save and Test to save the message and to perform a test send. See Testing a New MMS Message for more Information.
12. Click OK to close the Confirmation page.
|
1. Click MMS on the main menu of the Vending Manager administration console.
2. Click the title or text of a message.
The MMS Message wizard is displayed.
3. Edit the information that you want to change in the MMS Message wizard.
In the Edit MMS page, you can change the message name and text, placement of the message on the screen, or the device types.
To change the image, video, or audio file for the message, click Next to proceed to the Message Name message_name page.
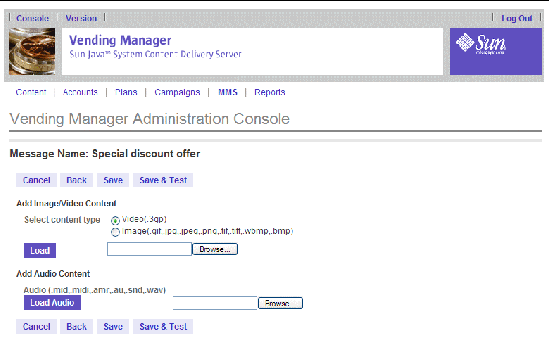
Click Remove to delete the respective image, video, or audio content (Preview or Play Audio and Remove buttons appear respective to the content type in the existing MMS message). Click the Browse button to make another file selection.
4. Click Save to save the MMS message to the server or Save and Test to save the message and to perform a test send.
See Testing an MMS Message for more information.
5. Click OK to close the Confirmation page.
|
The Test MMS Message page enables you to send a test message to an email address and to a wireless device. You can send a test MMS message when you create it or you can test sending any message in the MMS message list. This section covers the following topics:
You can perform a test send of an MMS message when you create it:
1. Click Save and Test in the Add Video/Image Content page.
2. Enter the email address or the phone number (you can also enter both) of the recipient of the test message.
3. Select the device that corresponds to the telephone number from the drop-down list.
The drop-down list contains the MMS-capable devices from your chosen list of supported devices.
4. Click Test to send the message.
5. Enter the results of the test in the Test Log table page.
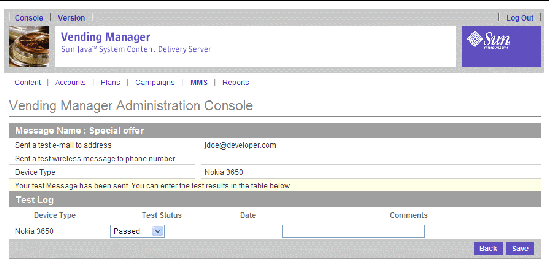
Test status is either Passed, Failed, or Not Tested. Enter any comments regarding the test in the Comments field.
See Using the MMS Test Log for more information.
To perform a test send of an existing MMS message, follow these steps:
1. Open the MMS Messages page.
See Displaying MMS Messages for instructions on accessing this page.
2. Click the title or text of a message.
The MMS Message wizard is displayed.
3. Click Send Test MMS Message in the Edit MMS menu bar.
4. Continue with Step 2 through 6 of Testing a New MMS Message.
|
1. Open the MMS Messages page.
See Displaying MMS Messages for instructions on accessing the page.
2. Select the messages you want to delete in one of the following ways:
4. Click OK to close the confirmation dialog box.
|
The MMS Test Log enables you to record the results of sending a test MMS message for a particular device. You can also record comments about the test.
1. Click Edit MMS Test Log in the Edit MMS page.
2. Select the appropriate test results from the drop down list and enter any comments about the test.
You can also click Test in the Send Test Message page to open the Test Log page.
Copyright © 2005, Sun Microsystems, Inc. All Rights Reserved.