Chapter 7 Managing Users With User Manager and Group Manager
This chapter describes how to manage user accounts using two applications within the Solstice AdminSuite software:
-
Group Manager, a graphical user interface for managing group information
-
User Manager, a graphical user interface used to manage user account information
This is a list of the step-by-step instructions in this chapter.
Command-Line Equivalents of Group Manager
Table 7-1 lists the commands that provide the same functionality as Group Manager and can be used without running an X Window System. Many of the Group Manager procedures in this chapter provide corresponding examples using the command-line equivalents.
Table 7-1 Command-Line Equivalents of Group Manager|
Command |
Description |
|---|---|
|
admgroupadd |
Adds a new group and members (if specified) to the group |
|
admgroupmod |
Modifies an existing group |
|
admgroupdel |
Deletes an existing group |
|
admgroupls |
Lists the existing groups in the selected name service |
Files Modified by Group Manager
Table 7-2 lists the files Group Manager modifies depending on what name service you selected.
Table 7-2 Files Modified by Group Manager|
If the Name Service You Selected Is ... |
Then Group Manager Modifies The ... |
|---|---|
|
NIS or NIS+ |
Name service's group database |
|
None |
Command-Line Equivalents of User Manager
Table 7-3 lists the commands that provide the same functionality as User Manager and can be used without running OpenWindows or Motif CDE. Many of the User Manager procedures in this chapter provide corresponding examples using the command-line equivalents.
Table 7-3 Command-Line Equivalents of User Manager|
Command |
Description |
|---|---|
|
admuseradd |
Adds a new user account. Unlike the User Manager, you cannot copy a user account with this command. |
|
admusermod |
Modifies an existing user account. |
|
admuserdel |
Deletes an existing user account. |
|
admuserls |
Lists the existing user accounts in the selected name service. |
Files Modified by User Manager
Table 7-4 describes the system files that are modified by User Manager.
Table 7-4 Files Modified by User Manager
Setting Up User Accounts
Table 7-5 Task Map: Setting Up User Accounts|
Activity |
|
|
Description |
For Instructions, Go To |
|---|---|---|---|---|
|
Add Groups |
|
Optional. To help administer users, add groups by choosing Add from the Group Manager's Edit menu. This is usually a one-time task. | ||
|
|
|
|
|
|
|
Set User Account Defaults
|
|
Optional. Before you add several user accounts, set up defaults for the User Manager by choosing Set Defaults from the User Manager's Edit menu. Setting up defaults can increase the consistency and efficiency of adding user accounts. | ||
|
|
|
|
|
|
|
Add a User Account
|
|
Add a New User Account Add a user account by choosing Add from the User Manager's Edit menu. | ||
|
|
|
Copy an Existing User Account Copy an existing user account by choosing Copy from the User Manager's Edit menu. This is useful if you need to add a user account that is similar to an existing user account. | ||
How to Start Group Manager
-
Verify that the prerequisites described in Chapter 1, Introduction, are met.
-
Start the Solstice Launcher.
$ solstice &
The Solstice Launcher is displayed.
-
Click on the Group Manager icon.

The Load window is displayed.
-
Select the name service used in your network.
-
Check that the domain or host name is correct.
If not, type the name of the domain or host you need to access.
-
Click on OK.
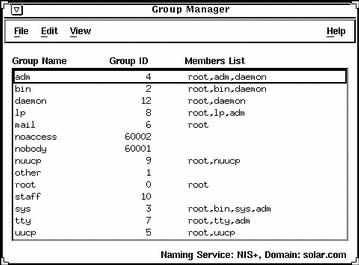
Example of the Group Manager Main Window
How to Add a Group
-
Start Group Manager from the Solstice Launcher and select the name service, if not done already.
See "How to Start Group Manager" for more information.
-
Choose Add from the Edit menu on the Group Manager main window.
The Add window is displayed. If you need information to complete a field, click on the Help button to see field definitions for this window.
-
Type the group ID for the new group in the Group ID text box.
-
(Optional) Type user names in the Members List text box.
The list of users will be added to the group. User names must be separated by commas.
-
(Optional) Select the Password button to set the group password.
Enter the group password and then verify the password in the fields provided in the Password dialog box.
-
Click on OK.
The list of groups displayed in the Group Manager main window is updated to include the new group.
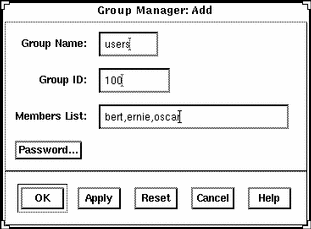
Example of a Completed Add Window
The following example adds a group named users that has a group ID of 100.
Example of a Command-Line Equivalent for Adding a Group
The following example is the equivalent of using Group Manager to add a group named users that has a group ID of 100.
D
# admgroupadd -g 100 -x pass=abc users |
How to Start User Manager
-
Verify that the prerequisites described in Chapter 1, Introduction, are met.
-
Start the Solstice Launcher.
$ solstice &
The Solstice Launcher is displayed.
-
Click on the User Manager icon from the Solstice Launcher.

The Load window is displayed.
-
Select the name service used in your network.
-
Check that the domain or host name is correct.
If not, type the name of the domain or host you need to access.
-
Click on OK.
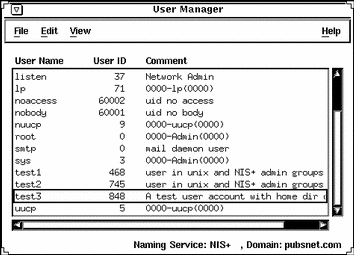
Example of the User Manager Main Window
How to Set Up User Account Defaults
-
Start User Manager from the Solstice Launcher and select the name service, if not done already.
See "How to Start User Manager" for more information.
-
Choose Set Defaults from the Edit menu.
The Set Add Defaults window is displayed.
-
Fill in the Set Add Defaults window.
The defaults you select will be the initial defaults values in the Add window. If you need information to complete a field, click on the Help button to see field definitions for this window.
You can set the following defaults:
-
Primary and Secondary Groups
-
Login Shell
-
Password Policy
-
Creating a Home Directory
-
Home Directory Server
-
Skeleton Path (Path to User Initialization Files)
-
Using AutoFS (AutoHome Setup)
-
Permissions in Home Directory
-
Mail Server
-
-
Click on OK.
Command-Line Equivalent for Setting Up User Account Defaults
You can use the admuseradd command with the -D option to set up user account defaults from the command line.
How to Add a New User Account
-
Start User Manager from the Solstice Launcher and select the name service, if not done already.
-
Fill in the Add window.
If you need information to complete a field, click on the Help button to see field definitions for this window.
-
Click on OK.
The list of user accounts displayed in the User Manager main window is updated to include the new user account.
Example of a Completed Add Window
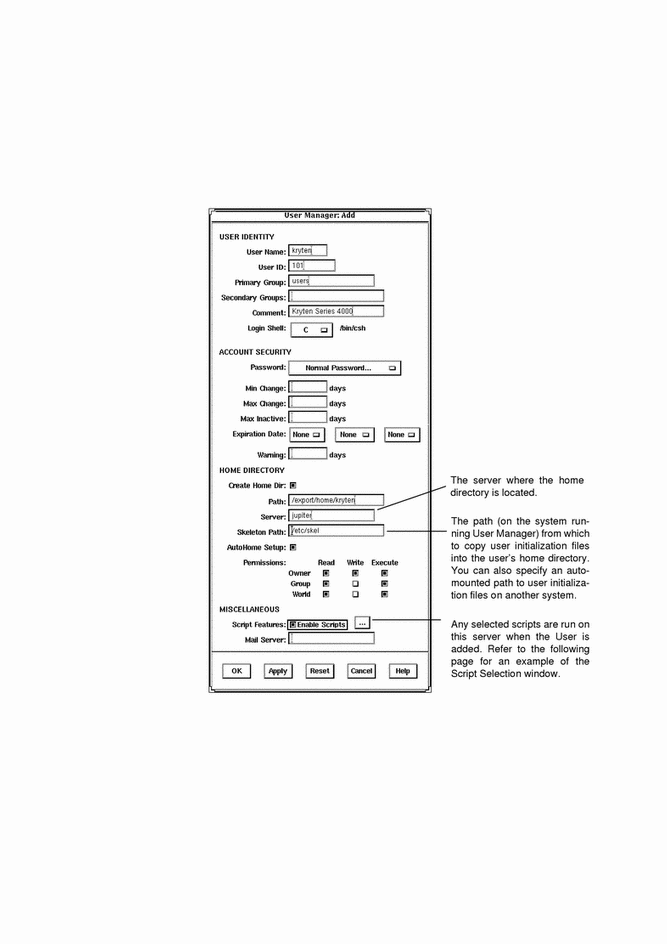
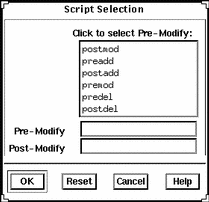
Example of the Script Selection Window
The following screen shows an example of the Script Selection window; in order for scripts to be run from this window, the scripts must be located in the /opt/SUNWadmd/Scripts directory.
Example of a Command-Line Equivalent for Adding a User
The following command is the equivalent to adding a user with User Manager.
# admuseradd -u 101 -g users -c "Kryten Series 4000" -s /bin/csh -k /etc/skel -x preadd=preaddscript -x postadd=postaddscript -x pw=NORM \ -x pwwarn=1 -d /export/home/kryten -m -x autohome=Y -x serv=jupiter kryten |
In this command,
| -u 101 | Specifies the user ID, in this case 101. |
| -g users | Specifies the user's primary group, in this case a group named users. |
| -c "Kryten Series 4000" | Specifies a comment for the user account. |
| -s /bin/csh | Specifies the default shell environment, in this case the C shell. |
| -k /etc/skel | Specifies a directory containing skeleton information, such as .cshrc, that will be copied into the user's home directory. |
| -x preadd=preaddscript | Specifies the user created script (preaddscript) located in /opt/SUNWadmd/Scripts that is designated to run before the user is added. |
| -x postadd=postaddscript |
Specifies the user created script (postaddscript) located in /opt/SUNWAdmd/Scripts that is designated to run after the user is added. |
| -x pw=NORM |
Specifies the initial password type, in this case normal. |
| -x pwwarn=1 |
Specifies the number of days that the user will be warned about password expiration. |
| -d /export/home/kryten |
Specifies the name of the home directory. |
| -m |
Creates the new user's home directory (as specified with the -d option) if it does not already exist. |
| -x autohome=Y |
Specifies whether the home directory should be set up to be automounted. |
| -x serv=jupiter |
Specifies the name of the server where the home directory will reside. |
| kryten |
Specifies the name of the system. |
How to Copy an Existing User Account
-
Start User Manager from the Solstice Launcher and select the name service, if not done already.
-
Select a user account entry to copy from the main window.
-
Choose Copy from the Edit menu.
The Copy window is displayed with the following fields copied from the selected user account:
-
Primary Group
-
Secondary Groups
-
Comment
-
Login Shell
-
Path
-
Server
-
Skeleton Path
-
-
Fill in the fields in the Copy window.
If you need information to complete a field, click on the Help button to see field definitions for this window.
-
Click on OK.
The list of user accounts displayed in the User Manager main window is updated to include the new user account.
Note -There is no command line equivalent for copying an existing user account.
Maintaining User Accounts
Table 7-6 Task Map: Maintaining User Accounts
How to Modify a Group
-
Start Group Manager from the Solstice Launcher and select the name service, if not done already.
See "How to Start Group Manager" for more information.
-
Select the group entry to modify from the Group Manager main window.
-
Choose Modify from the Edit menu.
The Modify window is displayed containing the selected group entry.
-
Either modify the group's name or the users in the group.
User names must be separated by commas. If you need information to complete a field, click on the Help button to see field definitions for this window.
-
Modify the group's password by selecting the Password button.
Enter the group password and then verify it in the fields provided in the Password dialog box.
-
Click on OK.
The group information displayed in the main window is updated.
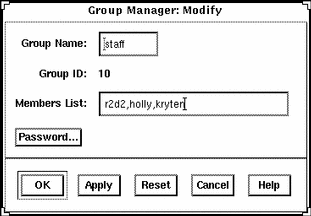
Example of a Completed Modify Window
Example of a Command-Line Equivalent for Modifying a Group
The following command is the equivalent to modifying the member list in a group with Group Manager.
# admgroupmod -g 10 -x members=r2d2,holly,kryten -x passwd=abc groupname |
In this command,
| -g 10 |
Specifies the number of group, in this case 10. |
| -x members= r2d2,holly,kryten |
Specifies the users who belong to group 10: r2d2, holly, and kryten. |
| -x passwd=abc |
Specifies the group password: abc |
| groupname |
Specifies the name given to the group |
How to Delete a Group
-
Start Group Manager from the Solstice Launcher and select the name service, if not done already.
See "How to Start Group Manager" for more information.
-
Select the group entry you want to delete from the Group Manager main window.
-
Choose Delete from the Edit menu.
A window is displayed asking you to confirm the deletion.
-
Click on OK.
The group entry is deleted from the Group Manager main window.
Command-Line Equivalent for Deleting a Group
You can also use the admgroupdel command to delete a group.
How to Modify a User Account
-
Start User Manager from the Solstice Launcher and select the name service, if not done already.
See "How to Start User Manager" for more information.
-
Select the user account entry to modify from the User Manager main window.
-
Choose Modify from the Edit menu.
The Modify window is displayed containing the selected user account entry.
-
Modify the user account.
If you need information to complete a field, click on the Help button to see field definitions for this window.
-
Click on OK.
Verification
Double-click on the modified user account entry in the User Manager main window to verify that the modifications were made. Click on Cancel to close the window without making any modifications.
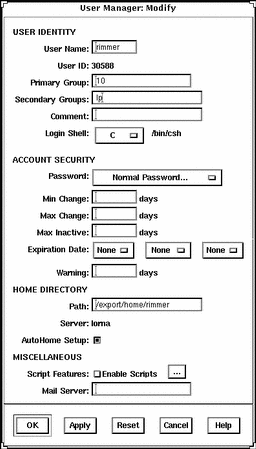
Example of a Completed Modify Window
The following example sets the user lacey to be a member of the lp secondary group.
Example of the Script Selection Window

Example of a Command-Line Equivalent for Modifying a User Account
The following command is the equivalent to modifying a user account with User Manager. In this case, the command sets the user rimmer to be a member of the lp secondary group.
# admusermod -G lp rimmer |
How to Delete a User Account
-
Start User Manager from the Solstice Launcher and select the name service, if not done already.
See "How to Start User Manager" for more information.
-
Select the user account entry to remove from the main window.
-
Choose Delete from the Edit menu.
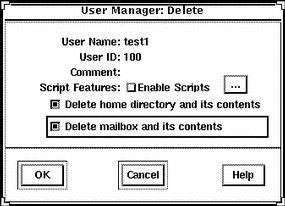
The Delete window is displayed to confirm the removal of the user account.
-
(Optional) Click on the check box to enable scripts and then click on the ellipsis button to select the script to be enabled from the Script Selection dialog box.
The script can be enabled to run before or after the user account is deleted.
Note -In order to run the user supplied scripts, the scripts must be located in the /opt/SUNWadmd/Scripts directory.
-
(Optional) Click on the check box to delete the user's home directory and its contents.
-
(Optional) Click on the check box to delete the user's mailbox and its contents.
-
Click on OK when you are ready to delete the user account.
The user account entry is deleted from the User Manager main window.
Example of the Delete Window
Example of a Command-Line Equivalent for Deleting a User Account
The following command is the equivalent of deleting a user account with User Manager.
# admuserdel -r -x serv=lorna -x predel=predelscript -x postdel=postdelscript test1 |
In this command,
| -r |
Specifies that the contents of the user's home directory be removed. |
| -x serv=lorna |
Specifies the name of the server where the home directory resides. |
| -x predel=predelscript |
Specifies the name of the script to run before the user is deleted. |
| -x postdel=postdelscript |
Specifies the name of the script to run after the user is deleted. |
| test1 |
Specifies the name of the user account. |
Note -
The scripts are user created scripts that are located in the /opt/SUNWadmd/Scripts directory.
- © 2010, Oracle Corporation and/or its affiliates
