How to Add Support for a Standalone System or OS Server
The high-level steps in this procedure are:
-
Add system information about the system.
-
(Optional) Set up remote install capabilities for the system.
-
(Optional) Install the system.
-
Start Host Manager from the Solstice Launcher and select the name service, if not done already.
See "How to Start Host Manager" for more information.
-
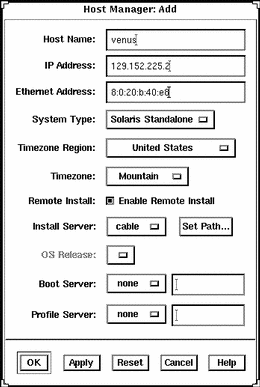
Fill in the system information, selecting Solaris Standalone or OS Server as the system type.
The system information includes all the fields from the host name through the time zone. If you need information to complete a field, click on the Help button to see field definitions for this window.
-
If you want to set up remote install capabilities for the system, continue to Step 5. If not, skip to Step 10.
-
Click on Enable Remote Install.
-
The Install Server defaults to the current host. Select Other from the Install Server menu to specify another host as the install server.
-
Click on Set Path to identify the path to the Solaris CD image on the install server.
If the install server is a remote system, note that it must be minimally set up as a managed system.
If You Are Using ...
And ...
Then Enter the Path ...
The Solaris CD as the Solaris CD image
The Solaris CD is managed by Volume Management
/cdrom/cdrom0 or/cdrom/cdrom0/s0 or /cdrom/cdrom0/s2
The Solaris CD is not managed by Volume Management
Where you mounted the Solaris CD
A copy of the Solaris CD on the install server's hard disk (by using setup_install_server)
To the Solaris CD image
-
Select the system's architecture type and OS release from the OS Release menu.
The architecture type must match the system's architecture and the OS release should match the Solaris release you want to remotely install on the system.
-
If necessary, specify a boot server and/or profile server.
To specify another server other than the default, select Other from the menu. Select a Profile Server from the Profile Server pull-down menu. You must also specify a path to the boot software on the boot server or the custom JumpStart directory on the profile server.
To set up the other components of a custom JumpStart installation and preconfiguring network and system information, see Solaris Advanced Installation Guide and x86: Installing Solaris Software.
-
Select Save Changes from the File menu to add support for the standalone system or OS server.
The standalone system or OS server is displayed in the Host Manager main window.
-
(Optional) Boot and install the standalone system or OS server.
For more information about booting and installing, see Solaris Advanced Installation Guide or x86: Installing Solaris Software.
Note -If you are installing an OS server, you must allocate space in /export and /export/swap for the desired number of clients.
Example of a Completed Add Window for a Standalone System

Example of a Command-Line Equivalent for Adding a Standalone System
The following command is equivalent to using Host Manager to add a standalone system to the name service database.
%
|
In this command,
|
-i 129.152.225.2 |
Specifies the IP address of the system. |
|
-e 8:0:20:b:40:e9 |
Specifies the Ethernet address of the system. |
|
-x type=STANDALONE |
Specifies the type of the system. |
|
-x tz=US/Mountain |
Specifies the system's timezone. |
|
venus |
Specifies the name of the system. |
Example of a Command-Line Equivalent for Adding a Standalone System and Enabling Remote Installation
The following command is equivalent to using Host Manager to add a standalone system and to enable a network installation.
% admhostadd -i 129.152.225.2 -e 8:0:20:b:40:e9 -x type=STANDALONE \ -x tz=US/Mountain -x install=Y -x installpath=cable:/cdrom/cdrom0/s0\ venus |
In this command,
|
-i 129.152.225.2 |
Specifies the IP address of the system. |
|
-e 8:0:20:b:40:e9 |
Specifies the Ethernet address of the system. |
|
-x type=STANDALONE |
Specifies the type of the system. |
|
-x tz=US/Mountain |
Specifies the system's timezone. |
|
-x install=Y |
Specifies that remote installation is enabled. |
|
-x installpath= cable:/cdrom/cdrom0/s0 |
Specifies that the Solaris CD image is on a mounted CD on a remote system named cable. Note that the remote system must be minimally set up as a managed system. |
|
venus |
Specifies the name of the system. |
Where to Go From Here
If you want to add OS services after you install an OS server, see "How to Add Solaris 2.x OS Services to an OS Server".
- © 2010, Oracle Corporation and/or its affiliates
