Adding Server and Client Support
Table 6-8 Task Map: Adding Server and Client Support|
Activity |
|
|
Description |
For Instructions, Go To | |
|---|---|---|---|---|---|
|
Update System Types |
|
Optional. Make sure Host Manager recognizes all the previously added system types. This is usually a one-time task before using the AdminSuite 2.3 Host Manager for the first time. | |||
|
|
|
|
|
| |
|
Set Defaults for Adding Support
|
|
Optional. Before you add support for several clients, set up defaults for the Add window by choosing Set Defaults from the Host Manager's Edit menu. Setting up defaults can increase the consistency and efficiency of adding support for systems. | |||
|
|
|
|
|
| |
|
Add Support for a Standalone System
|
|
Add Support for a Standalone System Add support for a standalone system by choosing Add from the Host Manager's Edit menu. Once in the Add window, choose Standalone System from the System Type menu.
You can also convert a AutoClient system or generic system to a standalone system by choosing Convert to Standalone from the Edit menu. | |||
|
|
|
|
|
| |
|
Add Support for an OS Server |
|
Add Support for an OS Server Add support for an OS server by choosing Add from the Host Manager's Edit menu. Once in the Add window, choose OS Server from the System Type menu. | |||
|
|
|
| |||
|
|
Convert a Standalone System to an OS Server Convert a standalone system to an OS server by choosing Convert from the Host Manager's Edit menu. You can add Solaris 2.x OS services during the conversion. | ||||
|
|
|
|
|
| |
|
Add OS Services to an OS Server |
|
Add SunOS 4.x OS Services If you need to add support for SunOS 4.x diskless or dataless clients, an OS server must have the appropriate SunOS 4.x services added. | |||
|
|
|
| |||
|
|
Add Solaris 2.x OS Services If you need to add support for Solaris 2.x diskless clients, dataless clients, or AutoClient systems, an OS server must have the appropriate Solaris 2.x services added. | ||||
|
|
|
| |||
|
|
Add JavaOS Services If you need to add support for JavaStation clients, an OS server must have the appropriate JavaOSTM services added. | ||||
|
|
|
|
|
| |
|
Remove OS Services from an OS Server |
|
Remove OS Services If you need to remove OS services from an OS server because you no longer need to support it, choose Delete from the Host Manager Modify window. | |||
|
|
|
|
|
| |
|
Add Support for Clients |
|
Add Support for AutoClient Systems Add support for an AutoClient system by choosing Add from the Host Manager's Edit menu. Once in the Add window, choose Solstice Autoclient System from the System Type menu. |
Solstice AutoClient 2.1 Administration Guide | ||
|
|
|
| |||
|
|
Add Support for a Diskless Client Add support for a diskless client by choosing Add from the Host Manager's Edit menu. Once in the Add window, choose Solaris Diskless Client from the System Type menu. | ||||
|
|
|
| |||
|
|
Add Support for a JavaStation Client Add support for a JavaStation client by choosing Add from the Host Manager's Edit menu. Once in the Add window, choose JavaStation from the System Type menu. | ||||
|
|
|
| |||
|
Add Support for Clients (continued) |
|
Add Support for a Dataless Client Add support for a dataless client by choosing Add from the Host Manager's Edit menu. Once in the Add window, choose Solaris Dataless Client from the System Type menu. | |||
|
|
|
|
|
| |
|
Creating a Multihomed Host |
|
Add a Multihomed Host Add a Multihomed host by choosing Add from the Host Manager's Edit menu. Once in the Add window, enter the name of the host that already has one IP address; the Add window will change to the Multihomed Host window. | |||
How to Start Host Manager
-
Verify that the prerequisites described in Chapter 1, Introduction, are met.
-
Start the Solstice Launcher.
$ solstice &
The Solstice Launcher is displayed.
-
Click on the Host Manager icon.

The Load window is displayed.
-
Select the name service used in your network.
-
Check that the domain or host name is correct.
If not, type the domain or host name you need to access.
-
Click on OK.
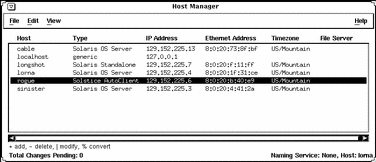
Example of a Host Manager Main Window
How to Update System Types
This procedure attempts to determine the system types for systems marked as generic.
-
Start Host Manager from the Solstice Launcher and select the name service, if not done already.
See "How to Start Host Manager" for more information.
-
Select Update System Types from the File menu on the Host Manager Window.
-
Click on Update to update the systems marked as generic.
Command-Line Equivalent for Updating System Types
You can also use the admhostmod -x type=type host command to update a system type.
How to Set Defaults for Adding Support
-
Start Host Manager from the Solstice Launcher and select the name service, if not done already.
See "How to Start Host Manager" for more information.
-
Fill in the Set Add Defaults window.
The defaults you select will be the initial defaults values in the Add window. If you need information to complete a field, click on the Help button to see field definitions for this window.
-
Click on OK.
Command-Line Equivalent for Updating System Types
You can also use the admhostadd -D command to set up defaults for adding support.
How to Add Support for a Standalone System or OS Server
The high-level steps in this procedure are:
-
Add system information about the system.
-
(Optional) Set up remote install capabilities for the system.
-
(Optional) Install the system.
-
Start Host Manager from the Solstice Launcher and select the name service, if not done already.
See "How to Start Host Manager" for more information.
-
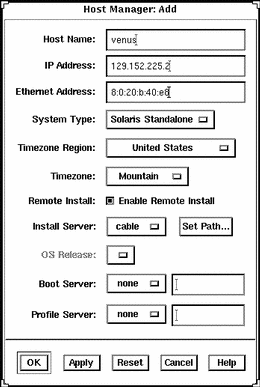
Fill in the system information, selecting Solaris Standalone or OS Server as the system type.
The system information includes all the fields from the host name through the time zone. If you need information to complete a field, click on the Help button to see field definitions for this window.
-
If you want to set up remote install capabilities for the system, continue to Step 5. If not, skip to Step 10.
-
Click on Enable Remote Install.
-
The Install Server defaults to the current host. Select Other from the Install Server menu to specify another host as the install server.
-
Click on Set Path to identify the path to the Solaris CD image on the install server.
If the install server is a remote system, note that it must be minimally set up as a managed system.
If You Are Using ...
And ...
Then Enter the Path ...
The Solaris CD as the Solaris CD image
The Solaris CD is managed by Volume Management
/cdrom/cdrom0 or/cdrom/cdrom0/s0 or /cdrom/cdrom0/s2
The Solaris CD is not managed by Volume Management
Where you mounted the Solaris CD
A copy of the Solaris CD on the install server's hard disk (by using setup_install_server)
To the Solaris CD image
-
Select the system's architecture type and OS release from the OS Release menu.
The architecture type must match the system's architecture and the OS release should match the Solaris release you want to remotely install on the system.
-
If necessary, specify a boot server and/or profile server.
To specify another server other than the default, select Other from the menu. Select a Profile Server from the Profile Server pull-down menu. You must also specify a path to the boot software on the boot server or the custom JumpStart directory on the profile server.
To set up the other components of a custom JumpStart installation and preconfiguring network and system information, see Solaris Advanced Installation Guide and x86: Installing Solaris Software.
-
Select Save Changes from the File menu to add support for the standalone system or OS server.
The standalone system or OS server is displayed in the Host Manager main window.
-
(Optional) Boot and install the standalone system or OS server.
For more information about booting and installing, see Solaris Advanced Installation Guide or x86: Installing Solaris Software.
Note -If you are installing an OS server, you must allocate space in /export and /export/swap for the desired number of clients.
Example of a Completed Add Window for a Standalone System
Example of a Command-Line Equivalent for Adding a Standalone System
The following command is equivalent to using Host Manager to add a standalone system to the name service database.
%
|
In this command,
|
-i 129.152.225.2 |
Specifies the IP address of the system. |
|
-e 8:0:20:b:40:e9 |
Specifies the Ethernet address of the system. |
|
-x type=STANDALONE |
Specifies the type of the system. |
|
-x tz=US/Mountain |
Specifies the system's timezone. |
|
venus |
Specifies the name of the system. |
Example of a Command-Line Equivalent for Adding a Standalone System and Enabling Remote Installation
The following command is equivalent to using Host Manager to add a standalone system and to enable a network installation.
% admhostadd -i 129.152.225.2 -e 8:0:20:b:40:e9 -x type=STANDALONE \ -x tz=US/Mountain -x install=Y -x installpath=cable:/cdrom/cdrom0/s0\ venus |
In this command,
|
-i 129.152.225.2 |
Specifies the IP address of the system. |
|
-e 8:0:20:b:40:e9 |
Specifies the Ethernet address of the system. |
|
-x type=STANDALONE |
Specifies the type of the system. |
|
-x tz=US/Mountain |
Specifies the system's timezone. |
|
-x install=Y |
Specifies that remote installation is enabled. |
|
-x installpath= cable:/cdrom/cdrom0/s0 |
Specifies that the Solaris CD image is on a mounted CD on a remote system named cable. Note that the remote system must be minimally set up as a managed system. |
|
venus |
Specifies the name of the system. |
Where to Go From Here
If you want to add OS services after you install an OS server, see "How to Add Solaris 2.x OS Services to an OS Server".
How to Convert a System to an OS Server
-
Start Host Manager from the Solstice Launcher and select the name service, if not done already.
See "How to Start Host Manager" for more information.
-
Select a host entry from Host Manager's main window.
You can convert a standalone system, dataless client, and generic system to an OS server.
-
Choose Convert to OS Server from the Edit menu.
The Convert window is displayed, and the selected system is displayed in the host name field.
-
Click on the Add button in the OS Services window to add services.
-
Click on Set Path to identify the path to the Solaris CD image from which to add the client services.
The Install Server defaults to the current host. Select Other from the Install Server menu to specify another host as the install server. Note that a remote system must be minimally set up as a managed system.
If You Are Using ...
And ...
Then Enter the Path ...
The Solaris CD as the Solaris CD image
The Solaris CD is managed by Volume Management
/cdrom/cdrom0 or/cdrom/cdrom0/s0 or /cdrom/cdrom0/s2
The Solaris CD is not managed by Volume Management
Where you mounted the Solaris CD
A copy of the Solaris CD on the Install Server's hard disk (by using setup_install_server)
Where you specified setup_install_server to copy the Solaris CD
-
Specify the type of services you want to add and click on Add.
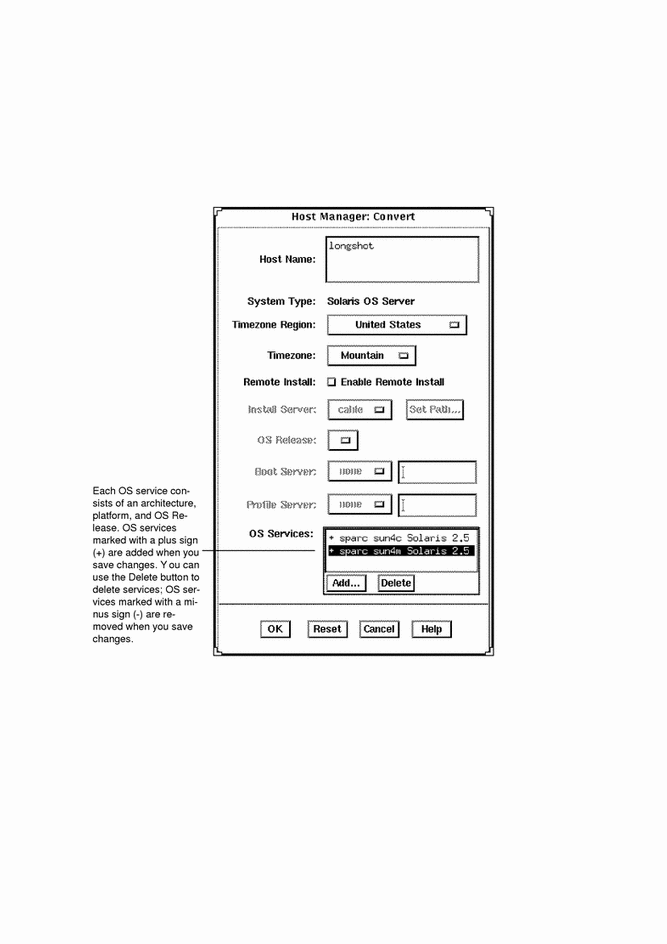
The OS service is added to the OS Services list and marked with a plus sign (+), which means it will be added when you save changes. You can use the Delete button to delete an OS service from the list before you save changes.
-
Select Save Changes from the File menu to convert the system to an OS Server.
The converted system is displayed as an OS server in the Host Manager main window.
Example of a Completed Convert Window
Example of a Command-Line Equivalent for Converting a Standalone to an OS Server
The following command is equivalent to using Host Manager to convert a standalone system to an OS server.
% admhostmod -x type=OS_SERVER minnie |
Example Command-Line Equivalent for Adding Services to an OS Server
The following command is equivalent to using Host Manager to add OS services on an OS server.
% admhostmod -x mediapath=jupiter:/cdrom/cdrom0/s0\ -x platform=sparc.sun4m.Solaris_2.5minnie |
In this command,
| -x mediapath= jupiter:/cdrom/cdrom0/s0 |
Specifies that the Solaris CD image is on a mounted CD on a remote system named jupiter. Note that the remote system must be minimally set up as a managed system. |
| -x platform= sparc.sun4m.Solaris_2.5 |
Specifies the services to be installed, in this case the Solaris 2.5 services for a SPARC Solaris, Sun4m kernel architecture. |
| minnie |
Specifies the name of the OS server. |
How to Add SunOS 4.x OS Services to an OS Server
Note -
SunSoft plans to remove support for the SunOS 4.x release in a later version of the Solstice AdminSuite software. Also, you cannot add SunOS 4.x services to x86 servers.
The high-level steps in this procedure are:
-
Determine the OS server to which you want to add SunOS 4.x OS services for diskless and dataless clients.
-
Verify that the SunOS 4.x heterogeneous install software is installed.
-
Install the required SunOS 4.x release software (install4x command).
-
Log in as root on the OS server to which you want to add SunOS 4.x OS services for diskless and dataless clients.
-
Verify that the SunOS 4.x heterogeneous install software is installed.
# pkginfo SUNWhinst
If the package information is displayed, proceed to Step 7. If not, go to the next step.
-
Insert the Solaris 2.x CD into your CD-ROM drive.
This step assumes that your system is running Volume Management.
Note -Use the Solaris 2.x CD that matches the Solaris 2.x release that is installed on the OS server. For example, use the Solaris 2.4 11/94 CD if the OS server is running the Solaris 2.4 11/94 release.
To access the SunOS 4.x CD from another system running either the Solaris 2.x release or the SunOS 4.x release, see "Setting Up the CD-ROM Drive for install4x" in the Solaris 1.x to 2.x Transition Guide.
-
Change directory to the location of the software.
# cd /cdrom/cdrom0/s0/Solaris_2.x
-
Install the SunOS 4.x heterogeneous install software.
# pkgadd -d `pwd` SUNWhinst
-
Eject the Solaris 2.x CD.
# cd
# eject cd
-
Insert the SunOS 4.x release CD into your CD-ROM drive.
This step assumes that your system is running Volume Management, and the CD-ROM drive is directly attached to the server. Volume Management automatically mounts the CD directory on /cdrom/volume1/s0.
-
Start the SunOS 4.x release software installation program.
# /usr/sbin/install4x -m /cdrom/volume1/s0 -e /export
*** 4.1* Install Main Menu ***
Choose an Architecture (then select modules to load):
Modules
Loaded Selected
[a] sun4.sun4c.sunos.4.1.2 0 0
[b] sun4.sun4.sunos.4.1.2 0 0
[c] sun4.sun4m.sunos.4.1.2 0 0
or begin the loading process for all selected modules:
[L] Load selected modules
or abort without loading any modules:
[Q] Quit without loading
Disk Usage:
Type any bracketed letter to select that function. 0K Selected
53634K Free
Type ? for help.
-
On the main menu, specify the architecture you want to support by typing the associated character that is shown in brackets.
The Module Selection menu is displayed.
Select sun4.sun4c.sunos.4.1.2 modules:
+[a] R proto root................240K | [o] User_Diag................6352K
+[b] R usr.....................26240K | [p] Manual...................7456K
+[c] R Kvm......................4832K | +[q] D TLI........................48K
+[d] R Install...................936K | [r] D RFS.......................912K
[e] D Networking...............1040K | [s] D Debugging................2928K
[f] D System_V.................4008K | [t] SunView_Programmers......1840K
[g] D Sys......................5288K | [u] Shlib_Custom.............1376K
[h] C SunView_Users............2664K | [v] Graphics.................1784K
[i] SunView_Demo..............512K | +[w] uucp......................608K
+[j] Text......................712K | +[x] Games....................3136K
[k] Demo.....................4264K | [y] Versatec.................5960K
[l] C OpenWindows_Users.......25936K | [z] Security..................312K
[m] C OpenWindows_Demo.........4288K | [A] OpenWindows_Programmers.10200K
[n] C OpenWindows_Fonts........7840K |
Module + = already loaded R = Required C= Common
Legend: ** = selected for loading D = Desirable Others are optional
Select [a-A] or a Quick-Pick Option:
[1] All Required Modules [4] All Optional Modules Disk Usage:
[2] All Desirable Modules [5] All Modules 0K Selected
[3] All Common Modules 53634K Free
or [D] (done) to return to the main screen
-
Select modules to load by typing the associated character that is shown in brackets.
The Module Selection screen readily enables you to pick groups of modules to be loaded. When you enter a 1, it marks all required modules for loading. When you enter a 2, it marks all recommended modules. When you enter a 3, it marks all commonly loaded modules. When you enter a 4, it marks all optional modules. When you enter a 5, it marks all modules shown on the Module Selection screen.
-
Return to the main menu by typing D.
The main menu is displayed.
*** 4.1* Install Main Menu ***
Choose an Architecture (then select modules to load):
Modules
Loaded Selected
[a] sun4.sun4c.sunos.4.1.2 0 4
[b] sun4.sun4.sunos.4.1.2 0 3
[c] sun4.sun4m.sunos.4.1.2 0 1
or begin the loading process for all selected modules:
[L] Load selected modules
or abort without loading any modules:
[Q] Quit without loading
Disk Usage:
Type any bracketed letter to select that function. 0K Selected
53634K Free
Type ? for help.
-
Type L to install the software.
The modules you previously selected are installed.
Installing module `proto root' [size: 248K]
in directory /export/exec/proto.root.sunos.4.1.2 ...
Updating server databases ...
Press any key to continue:
-
After the modules are installed, press any key to return to the main menu.
The loaded modules are displayed in the main menu.
-
If you want to add support for other architectures, repeat Step 9 through Failed Cross Reference Format. Otherwise, type Q to exit.
Note -There is no command-line equivalent for adding SunOS 4.x services to an OS server.
Where to Go From Here
If you want to add SunOS 4.x support for a diskless client, see "How to Add Support for a Diskless Client". If you want to add SunOS 4.x support for a dataless client, see "How to Add Support for a Dataless Client".
How to Add Solaris 2.x OS Services to an OS Server
-
Start Host Manager from the Solstice Launcher and select the name service, if not done already.
See "How to Start Host Manager" for more information.
-
Select an OS server to modify from the Host Manager main window.
-
Select Modify from the Edit menu on the Host Manager window.
The Modify window is displayed.
-
Click on the Add button in the OS Services window to add services.
-
Click on Set Path to identify the path to the Solaris CD image from which to add the client services.
The Install Server defaults to the current host. Select Other from the Install Server menu to specify another host as the install server. Note that a remote system must be minimally set up as a managed system.
-
Specify the type of services you want to add and click on Add.
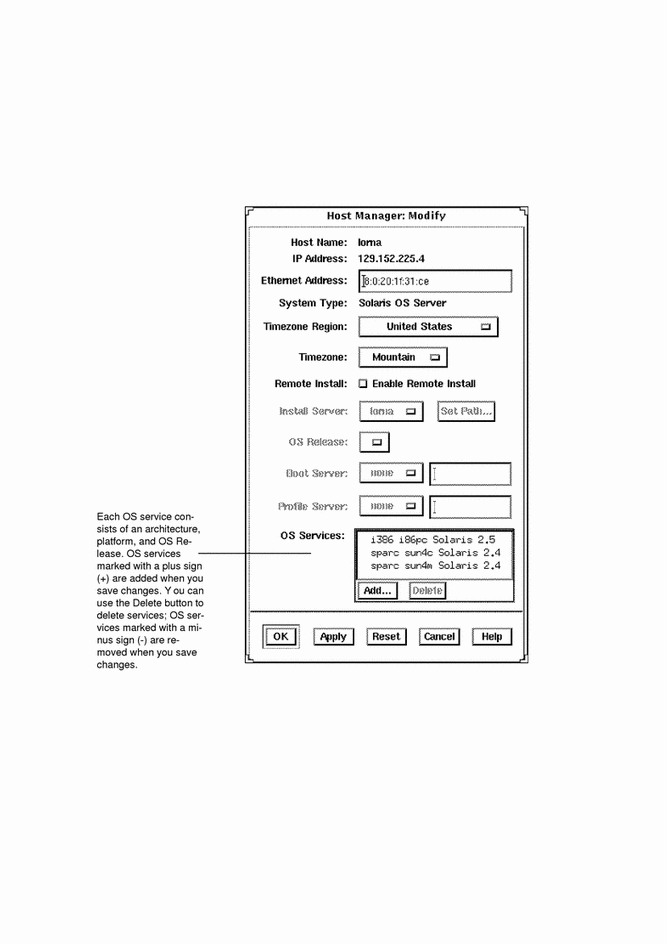
The OS service is added to the OS Services list and marked with a plus sign (+), which means it will be added when you save changes. You can use the Delete button to delete an OS service from the list before you save changes.
-
Click on OK on the Add window.
-
Select Save Changes from the File menu to add services.
Example of a Completed Add OS Services Window
Example of a Command-Line Equivalent for Adding Services to an OS Server
The following command is equivalent to using Host Manager to add OS services on an OS server.
% admhostmod -x mediapath=jupiter:/cdrom/cdrom0/s0 -x platform=sparc.sun4c.Solaris_2.5 rogue |
In this command,
| -x mediapath= jupiter:/cdrom/cdrom0/s0 |
Specifies that the Solaris CD image is on a mounted CD on a remote system named jupiter. Note that the remote system must be minimally set up as a managed system. |
| -x platform= sparc.sun4c.Solaris_2.5 |
Specifies the services to be installed, in this case the Solaris 2.5 services for a SPARC Solaris, Sun4c kernel architecture. |
| rogue |
Specifies the name of the OS server. |
How to Add JavaOS Services to an OS Server
-
Start Host Manager from the Solstice Launcher and select the name service, if not done already.
See "How to Start Host Manager" for more information.
-
Select an OS server to modify from the Host Manager main window.
-
Select Modify from the Edit menu on the Host Manager window.
The Modify window is displayed.
-
Click on the Add button in the OS Services window to add services.
-
Click on Set Path to identify the path to the JavaOS image from which to add the OS services.
The Install Server defaults to the current host. Select Other from the Install Server menu to specify another host as the install server. Note that a remote system must be minimally set up as a managed system.
If You Are Using ...
And ...
Then Enter the Path ...
The JavaOS as the JavaOS CD image
/cdrom/cdrom0 or/cdrom/cdrom0/s0 or /cdrom/cdrom0/s2
The JavaOS CD is not managed by Volume Management
Where you mounted the JavaOS CD
-
Specify the type of services you want to add and click on Add.
The OS service is added to the OS Services list and marked with a plus sign (+), which means it will be added when you save changes. You can use the Delete button to delete an OS service from the list before you save changes.
-
Click on OK on the Add window.
-
Select Save Changes from the File menu to add services.
How to Remove OS Services from an OS Server
-
Start Host Manager from the Solstice Launcher and select the name service, if not done already.
See "How to Start Host Manager" for more information.
-
Select an OS server to modify from the Host Manager main window.
-
Select Modify from the Edit menu on the Host Manager window.
The Modify window is displayed.
-
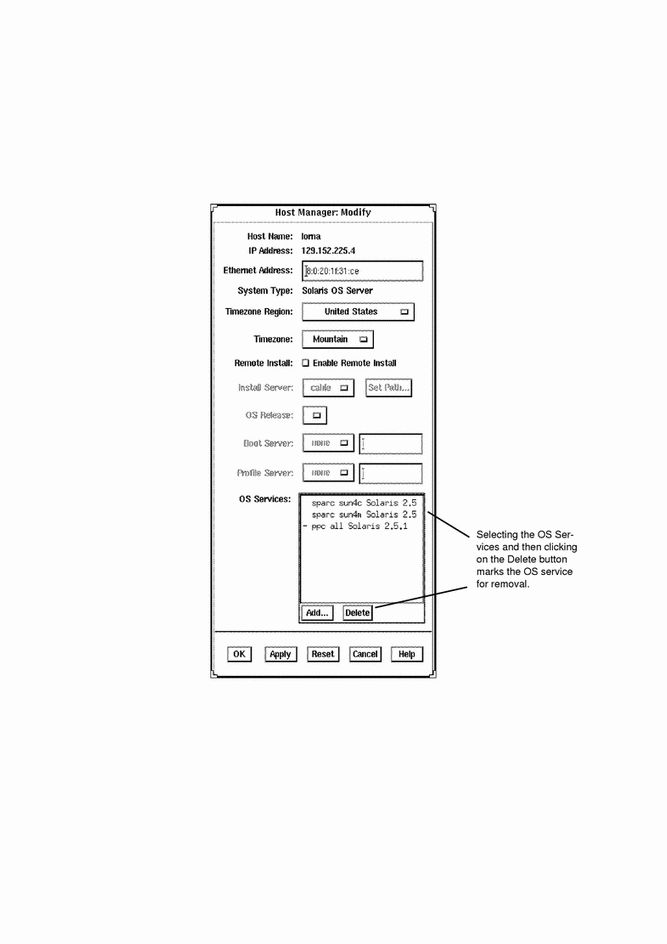
Select the OS services you wish to remove from the list.
OS services that are installed on the system have a + sign in front of the name.
-
Click on Delete button in the OS Services window to delete the OS services.
Note -When you select an OS services for a particular version (i.e. sparc), all OS services for that version, regardless of what platform it is running on, will be deleted.
Example of a Completed Modify Window for Removing OS Services
Example of a Command-Line Equivalent for Removing Services from an OS Server
The following command is equivalent to using Host Manager to remove OS services from an OS server.
% admhostmod -x rmplatform=sun4.all.sunos_4.1.1 rogue |
In this command,
| -x rmplatform=sun4.all.sun os_4.1.1 |
Specifies the services to be removed, in this case SunOS4 .1.1 services |
| rogue |
Specifies the name of the OS server. |
How to Add Support for a Diskless Client
The high-level steps in this procedure are:
-
Add system information about the diskless client.
-
Select OS services for the diskless client.
-
Boot the diskless client.
Note -This procedure assumes the system providing the services (the file server) has already been configured as an OS server.
-
Start Host Manager from the Solstice Launcher and select the name service, if not done already.
See "How to Start Host Manager" for more information.
-
Select Add from the Edit menu on the Host Manager main window.
The Add window is displayed.
-
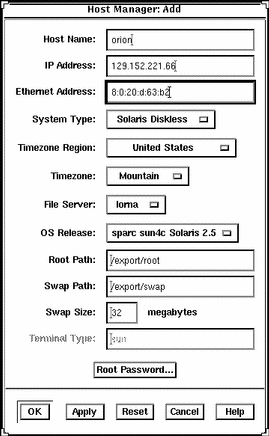
Fill in the system information, selecting Solaris Diskless as the system type.
The system information includes all the fields from the host name through the timezone. If you need information to complete a field, click on the Help button to see field definitions for this window.
-
The File Server defaults to the current host. Select Other from the Install Server menu to specify another host as the install server.
-
Select the client's architecture type and the OS release from the OS Release menu.
The architecture type must match the diskless client's architecture and the OS release should match the Solaris release you want diskless client to run.
-
Set the system's root password.
-
Click on OK on the Add window.
-
Select Save Changes from the File menu to add support for the diskless client.
The diskless client is displayed in the Host Manager main window. It takes several minutes to add the diskless client support, particularly to create the system's root and swap areas and apply any applicable patches with the admclientpatch(1M) command.
 Caution -
 For the diskless client to work properly, it needs root access to its /export/root directory. If Host Manager displays a message that the /export directory is already shared and has different share options than required, you need to allow root access to the client root area before the diskless client will function properly. The access mode for the client root is normally rw=clientname, root=clientname. If Host Manager displays a message that the /usr directory is already shared, it is because it tried to share /usr read-only. If you have it shared with read-write permissions, it is okay and you do not have to make any modifications.
-
Boot the diskless client from the network.
Refer to Chapter 12, Booting a System From the Network, for detailed information on how to boot a diskless client manually or how to set up a diskless client to automatically boot from the network.
-
Provide the following system configuration information for the diskless client during the initial boot process, if prompted.
-
Geographic region
-
Time zone
-
Date and time
-
-
Create a root password when prompted, if not set at the client creation time.
Example of a Completed Add Window for a Diskless Client
Example of a Command-Line Equivalent for Adding Diskless Client
The following command is equivalent to using Host Manager to add support for a diskless client.
% admhostadd -i 129.152.221.66 -e 8:0:20:d:63:b2 -x type=DISKLESS -x tz=US/Mountain -x fileserv=pluto -x os=sparc.sun4c.Solaris_2.5 -x passwd=abc -x root=/export/root\ -x swap=/export/swap -x swapsize=24 orion |
In this command,
|
-i 129.152.221.66 |
Specifies the IP address for the diskless client. |
|
-e 8:0:20:d:63:b2 |
Specifies the Ethernet address for the diskless client. |
|
-x type=DISKLESS |
Specifies the type of the system. |
|
-x tz=US/Mountain |
Specifies the system's timezone. |
|
-x fileserv=pluto |
Specifies the name of the OS server for the diskless client. |
|
-x os= sparc.sun4c.Solaris_2.5 |
Specifies platform, kernel architecture, and software release of the diskless client. |
|
-x passwd=abc |
Specifies the root password. |
|
-x root=/export/root |
Specifies the root path of the diskless client. |
|
-x swap=/export/swap |
Specifies the directory where the swap file will be created. |
|
-x swapsize=24 |
Specifies the size the swap file. |
|
orion |
Specifies the name of the diskless client. |
How to Add Support for a JavaStation Client
The high-level steps in this procedure are:
-
Add system information about the JavaStation client.
-
Boot the JavaStation client.
Note -This procedure assumes the system providing the services (the file server) has already been configured as a Java OS server.
-
Start Host Manager from the Solstice Launcher and select the name service, if not done already.
See "How to Start Host Manager" for more information.
-
Select Add from the Edit menu on the Host Manager main window.
The Add window is displayed.
-
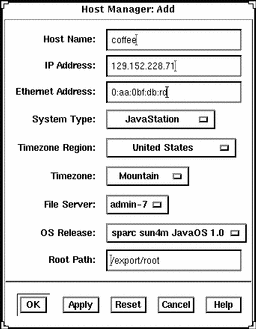
Fill in the system information, selecting JavaStation as the system type.
The system information includes all the fields from the host name through the timezone. If you need information to complete a field, click on the Help button to see field definitions for this window.
-
The File Server defaults to the current host. Select Other from the Install Server menu to specify another host as the install server.
-
Select the sparc sun4m JavaOS 1.0 OS Release.
In order to select this OS release you must have JavaOS services installed on your server. Refer to "How to Add JavaOS Services to an OS Server" for more information about adding JavaOS services.
-
Click on OK on the Add window.
Example of a Completed Add Window for a JavaStation Client
How to Add Support for a Dataless Client
The high-level steps in this procedure are:
-
Add system information about the dataless client.
-
Select OS services for the dataless client.
-
(Optional) Set up remote install capabilities for the dataless client.
-
(Optional) Boot and install the dataless client.
Note -This procedure assumes the system providing the services (the file server) has already been configured as an OS server. If you are running an operating system later than Solaris 2.5.1, dataless clients are no longer supported.
-
Start Host Manager from the Solstice Launcher and select the name service, if not done already.
See "How to Start Host Manager" for more information.
-
Select Add from the Edit menu on the Host Manager main window.
The Add window is displayed.
-
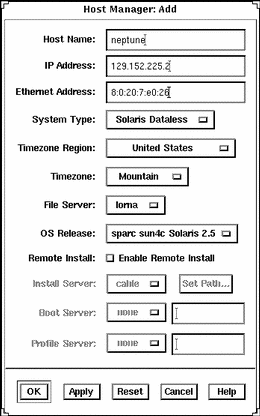
Fill in the system information, selecting Solaris Dataless as the system type.
The system information includes all the fields from the host name through the time zone. If you need information to complete a field, click on the Help button to see field definitions for this window.
-
The File Server defaults to the current host. Select Other from the Install Server menu to specify another host as the install server.
-
Select the system's architecture type and OS release from OS Release menu.
The architecture type must match the dataless client's architecture, and the OS release should match the Solaris release you want the dataless client to run.
-
If you want to set up remote install capabilities for the system, continue to Step 7. If not, skip to Step 11.
-
Click on Enable Remote Install.
Note -The remote install button enables the client to boot from the specified install server.
-
The Install Server defaults to the current host. Select Other from the Install Server menu to specify another host as the install server.
-
Click on Set Path to identify the path to the Solaris CD image on the install server.
If the install server is a remote system, note that it must be minimally set up as a managed system.
Note -The path to the Solaris CD image must be the same release that you specified in the OS Release menu.
If You Are Using ...
And ...
Then Enter the Path ...
The Solaris CD as the Solaris CD image
The Solaris CD is managed by Volume Management
/cdrom/cdrom0 or/cdrom/cdrom0/s0 or /cdrom/cdrom0/s2
The Solaris CD is not managed by Volume Management
Where you mounted the Solaris CD
A copy of the Solaris CD on the Install Server's hard disk (by using setup_install_server)
Where you specified setup_install_server to copy the Solaris CD
-
If necessary, specify a boot server and/or profile server.
To specify another server other than the default, select Other from the menu. Select a Profile Server from the Profile Server pull-down menu. You must also specify a path to the boot software on the boot server or the custom JumpStart directory on the profile server.
To set up the other components of a custom JumpStart installation and preconfiguring network and system information, see Solaris Advanced Installation Guide or x86: Installing Solaris Software.
-
Click on OK on the Add window.
-
Select Save Changes from the File menu to add support for the dataless client.
The dataless client is displayed in the Host Manager main window.
 Caution -
 For the dataless client to work properly, it needs root access to its /export/root directory. If Host Manager displays a message that the /export directory is already shared and has different share options than required, you need to allow root access to the client root area before the dataless client will function properly. The access mode for the client root is normally rw=clientname, root=clientname. If Host Manager displays a message that the /usr directory is already shared, it is because it tried to share /usr read-only. If you have it shared with read-write permissions, it is okay and you do not have to make any modifications.
-
(Optional) Boot and install the dataless client.
For more information about booting and installing, see Solaris Advanced Installation Guide or x86: Installing Solaris Software.
Example of a Completed Add Window for a Dataless Client
Example of a Command-Line Equivalent for Adding Dataless Client
The following command is equivalent to using Host Manager to add support for a dataless client.
% admhostadd -i 129.152.225.2 -e 8:0:20:7:e0:26 -x type=DATALESS -x tz=US/Mountain -x fileserv=pluto -x os=sparc.sun4c.Solaris_2.5 neptune |
In this command,
| -i 129.152.225.2 |
Specifies the IP address for the dataless client. |
| -e 8:0:20:7:e0:26 |
Specifies the Ethernet address for the dataless client. |
| -x type=DATALESS |
Specifies the type of the system. |
| -x tz=US/Mountain |
Specifies the system's timezone. |
| -x fileserv=pluto |
Specifies the name of the OS server for the dataless client. |
| -x os= sparc.sun4c.Solaris_2.5 |
Specifies platform, kernel architecture, and software release of the dataless client. |
| neptune |
Specifies the name of the system. |
Note -
Operating systems greater than Solaris 2.5.1 no longer support dataless clients.
How to Add a Multihomed Host
-
Start Host Manager from the Solstice Launcher and select the name service, if not done already.
See "How to Start Host Manager" for more information.
-
Select Add from the Edit menu on the Host Manager main window.
The Add window is displayed.
-
Enter the name of the host you wish to add another IP address to in the Host Name field provided and press the tab key to advance to the next field.
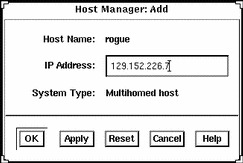
The Host Manager: Add window condenses to a smaller window where the only field you can change is the IP Address field and System Type: indicates that it is a Multihomed host.
-
Enter the additional IP Address and click on the OK button.
You will see that in the Host Manager main window, the host that you made a multihomed host is listed twice.
-
Choose the Save Changes option from the File menu.
Example of a Completed Add Window for a Multihomed Host
- © 2010, Oracle Corporation and/or its affiliates
