How to Install a Printer
-
Connect the printer to a system and turn on the power to the printer.
Consult the printer vendor's installation documentation for information about the hardware switches and cabling requirements.
-
Start Printer Manager.
When you log in:
-
If your name service is NIS or NIS+, you can log in on any system on the network because you'll be able to specify the system on which you are installing the printer.
-
If you are not using a name service, you can log in on any system on the network and change the host name in the Load window to the name of the system to which you attached the printer.
For detailed information about starting Printer Manager, see the procedure on "How to Start Printer Manager".
-
-
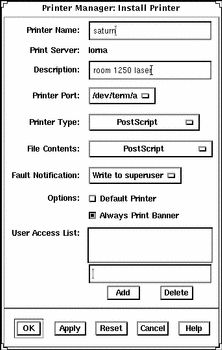
If you need information to complete a field, click on the Help button to see field definitions for this window.
-
Click on OK.
If you are using NIS or NIS+, the printer is entered in the name service master file and all SunSoft print clients have access to it. The printer is also entered in the print server's /etc/printers.conf file and /etc/lp directory.
If you are not using a name service, the printer is entered in the print server's /etc/printers.conf file and /etc/lp directory.
Verification
Verify that the printer has been installed by checking for the new printer entry in the Printer Manager main window.
Example of a Completed Install Printer Window
This example shows the Install Printer window when Printer Manager was loaded without a name service. If you use a name service, you can specify any system on the network as the print server in this window.
If you are not using a name service, the Print Server field displays the host name you specified in the Load window, and you cannot change the name of the print server in this window.

- © 2010, Oracle Corporation and/or its affiliates
