Chapter 9 Setting Up SunSoft Print Client Software With Printer Manager
This chapter provides the procedures for setting up and managing the SunSoft print client software by using the Printer Manager application, a graphical user interface within the Solstice AdminSuite software.
This is a list of the step-by-step instructions in this chapter.
Note -
The Printer Manager tasks are only part of what you need to know to effectively set up and manage the SunSoft print client software. The Solstice AdminSuite Printer Administration Guide provides an overview that helps you understand the SunSoft print process. It also contains task information about converting the configuration information for existing printers and copying the information to SunSoft print clients.
For step-by-step instructions on administering printing, see the System Administration Guide.
You can set up printing by using LP print service commands instead of Printer Manager. For detailed examples, see the System Administration Guide.
Files Modified by Printer Manager
Table 9-1 describes the SunSoft and Solaris system files that are modified by Printer Manager.
Table 9-1 Files Modified by Printer Manager|
System File |
Description |
|---|---|
|
A file containing printer configuration information for SunSoft print client operation |
|
|
printers.conf.byname |
An NIS map that contains printer configuration information for SunSoft print client operation |
|
fns.ctx_dir |
An NIS+ map that contains printer configuration information for SunSoft print client operation and other information |
|
/etc/lp/printers/printer/* |
A Solaris file containing LP printer configuration information |
|
/etc/lp/interfaces/printer |
A Solaris shell script used to communicate with a local printer |
|
/etc/lp/default |
A Solaris file containing the name of the LP system default printer |
|
/etc/lp/filter.table |
A Solaris lookup table containing the configured LP filters |
|
/etc/lp/Systems |
A Solaris file containing a list of remote systems for Solaris LP |
|
/etc/saf/sactab |
A Solaris file containing service access facility configuration |
|
/etc/saf/tcp_pmtab |
A Solaris file containing port monitor configuration |
Setting Up and Managing SunSoft Print Client Software
Table 9-2 gives you an overview of the tasks for using Printer Manager to set up and manage printing services with the SunSoft print client software.
Table 9-2 Task Map: Setting Up and Managing SunSoft Print Client Software|
Activity |
|
|
Description |
For Instructions, Go To |
|---|---|---|---|---|
|
Install a Printer on a Print Server |
|
Install a Printer Install a printer on the system to which it is attached. This procedure tells the system about the printer so the system can act as a print server. If you use a name service, this task also makes the printer available to all SunSoft print clients. | ||
|
|
|
|
|
|
|
Install a Network Printer |
|
Install a Network Printer Installs a printer to your network that provides access to all network users. | ||
|
|
|
|
|
|
|
Give Print Clients Access to a Printer |
|
Add Access to a Printer Give SunSoft print clients access to a printer that is installed on a print server. | ||
|
|
|
|
|
|
|
Modify Existing Information for a Printer |
|
Modify Printer Information Modify the current configuration information for a printer. | ||
|
|
|
|
|
|
|
Delete Access to a Printer |
|
Delete Access to a Printer Delete access to a printer from the NIS or NIS+ master file or from each specified print client's /etc/printers.conf file if you do not use a name service. | ||
|
|
|
Delete a Printer From a Print Server Delete a printer from the print server's /etc/printers.conf file. This step applies only if you are not using a name service. |
"How to Delete a Printer From a Print Server (If No Name Service)" |
|
Starting Printer Manager
To use Printer Manager to complete all the tasks necessary to set up and maintain the SunSoft print client software, first, start the Printer Manager application with Solstice AdminSuite.
How to Start Printer Manager
-
Verify that the following prerequisites are met. To use the Solstice AdminSuite software, you must have:
-
A bit-mapped display monitor. The Solstice AdminSuite software can be used only on a system with a console that is a bit-mapped screen such as a standard display monitor that comes with a Sun workstation.
-
If you want to perform administration tasks on a system with an ASCII terminal as the console, use Solaris commands instead.
-
OpenWindows software. Start this software with the following command:
$ /usr/openwin/bin/openwin
-
Membership in the sysadmin group (group 14).
-
The required access privileges for managing the NIS or NIS+ database. If your name service is NIS+, you must be a member of the NIS+ admin group.
-
If your name service is NIS+, you must initialize the NIS+ namespace to use FNS by entering the following command:
$ fncreate -t org org//
This command creates the organization context and default subcontexts for an existing NIS+ domain. It also creates NIS+ tables and directories in the NIS+ hierarchy.
-
-
Log in as yourself.
You should use the Solstice AdminSuite software as a regular user who has membership in the sysadmin group rather than as root.
-
Start the Solstice Launcher.
$ solstice &
The Solstice Launcher window is displayed.
-
Click on the Printer Manager icon to start the application.

The Load window is displayed as an overlay on the Printer Manager main window.
-
Select the name service used in your network.
Choices are: NIS+, NIS, or None.
-
Check that the domain or host name is correct.
If not, type the host name you need to access. The NIS or NIS+ domain name is static and can not be changed.
-
Click on OK.
The Printer Manager main window is displayed by itself after you click on OK.
Installing a Printer
When you use Printer Manager to install a printer on a system, you define the characteristics of the printer and identify the users who are permitted to access it. The system on which you install the printer becomes the print server.
Installing a printer means something different depending on whether you use a name service.
How to Install a Printer
-
Connect the printer to a system and turn on the power to the printer.
Consult the printer vendor's installation documentation for information about the hardware switches and cabling requirements.
-
Start Printer Manager.
When you log in:
-
If your name service is NIS or NIS+, you can log in on any system on the network because you'll be able to specify the system on which you are installing the printer.
-
If you are not using a name service, you can log in on any system on the network and change the host name in the Load window to the name of the system to which you attached the printer.
For detailed information about starting Printer Manager, see the procedure on "How to Start Printer Manager".
-
-
If you need information to complete a field, click on the Help button to see field definitions for this window.
-
Click on OK.
If you are using NIS or NIS+, the printer is entered in the name service master file and all SunSoft print clients have access to it. The printer is also entered in the print server's /etc/printers.conf file and /etc/lp directory.
If you are not using a name service, the printer is entered in the print server's /etc/printers.conf file and /etc/lp directory.
Verification
Verify that the printer has been installed by checking for the new printer entry in the Printer Manager main window.
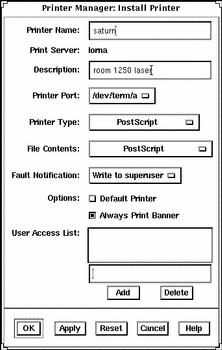
Example of a Completed Install Printer Window
This example shows the Install Printer window when Printer Manager was loaded without a name service. If you use a name service, you can specify any system on the network as the print server in this window.
If you are not using a name service, the Print Server field displays the host name you specified in the Load window, and you cannot change the name of the print server in this window.

Installing Network Printers
Installing a network printer can only be done if you are running Solaris 2.6.
How to Install a Network Printer
-
Start Printer Manager.
You can log in on any system on the network to install a network printer from a print server. Select None as the name service and change the host name to the name of the print server.
For detailed information about starting Printer Manager, see the procedure on "How to Start Printer Manager".
-
Fill in the window.
If you need information to complete a field, click on the Help button to see field definitions for this window.
-
Click on OK.
Verification
Verify that the printer has been installed by checking for the new printer entry in the Printer Manager main window.
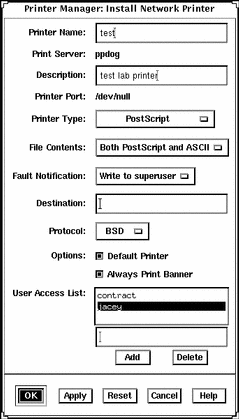
Example of a Completed Install Network Printer Window
This example shows a completed Install Network Printer Window.

Adding Access to a Printer
When you give a system access to a printer that is attached to a print server, that system becomes a print client. You may not need to add access for SunSoft print clients depending on whether you installed the printer through Printer Manager and whether you use a name service.
|
If You Installed the Printer Through ... |
Then ... |
|---|---|
|
Printer Manager and you have a name service |
The printer is already available to all SunSoft print clients. You don't need to add access to the printer. |
|
Printer Manager and you don't have a name service |
You need to add access to the printer for SunSoft print clients. |
|
UNIX commands and you have a name service |
Unless you converted information for this printer from a SunOS 5.x or 4.x system and loaded NIS or NIS+, the printer is not listed in the name service. You need to add access to the printer so it will be entered in the name service and made available to all SunSoft print clients. |
|
UNIX commands and you don't have a name service |
Unless you converted information for this printer from a SunOS 5.x or 4.x system and copied the master /etc/printers.conf file to print clients, you need to add access for SunSoft print clients. (If a print client had access previously, that access has been erased.) |
How to Add Access to a Printer
-
Start Printer Manager.
You can add access to a printer from any system on the network.
-
If you use a name service, you don't need to specify print clients. You add access to the printer for all SunSoft print clients on the network.
-
If you don't use a name service, you will be able to specify the print clients to be given printer access.
For detailed information about starting Printer Manager, see the procedure on "How to Start Printer Manager".
-
-
Fill in the window.
If you need information to complete a field, click on the Help button to see field definitions for this window.
-
Click on OK.
If your name service is NIS or NIS+, the printer is entered in the name service master file and all SunSoft print clients have access to it.
If your name service is None, the printer is entered in the /etc/printers.conf file of each print client you specified.
Note -Do not try to add access in NIS or NIS+ on the print server. However, you can delete the printer in the None naming service, then install the printer in the correct naming service.
Verification
Verify that the access has been added by submitting a print request from the print client and checking the printer for output.
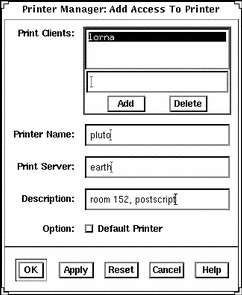
Example of a Completed Add Access to Printer Window
In this example, the network does not use a name service, so the window contains the Print Clients field. This field enables you to specify the print clients to be given access to the specified printer. If the name service is NIS or NIS+, the window does not contain the Print Clients field.

Modifying Printer Information
After you've installed a printer through Printer Manager, you can modify some of the information originally entered. You can also set two additional options that control the printer's ability to accept and process print requests.
The Modify window of Printer Manager has two versions. On the short version, you can change only the printer description and whether the printer is set up as the default printer. You'll see the short window if:
-
You don't use a name service and the printer is not local to the print server.
-
You are not a member of the sysadmin group (group 14), regardless of your name service selection.
-
The print server does not have the Solstice AdminSuite software.
Otherwise, you'll get the long version of the window, where you can change more information and set the options for accepting and processing print requests.
Note -You can't change certain printer information even on the long version of the window. If you need to change the printer name, print server, or printer type, you'll have to delete the printer and reinstall it. For these procedures, see Failed Cross Reference Format and Failed Cross Reference Format.
How to Modify Printer Information
-
Start Printer Manager.
You can log in on any system on the network. For detailed information about starting Printer Manager, see the procedure on "How to Start Printer Manager".
-
Select the printer that you want to modify from the scrolling list in the Printer Manager main window.
-
Select Modify from the Edit menu or double-click on the printer name in the scrolling list.
The short version or the long version of the Modify window is displayed.
-
Fill in the window.
If you need information to complete a field, click on the Help button to see field definitions for this window.
-
Click on OK.
Note -If the modify action is not on the printer server, a warning window is displayed stating that the print server information was not modified.
Verification
Verify that the printer information has been changed by reloading Printer Manager and checking for your changes, as follows:
-
Select Load from the File menu.
The Load window is displayed.
-
Leave the settings as they are, and click on OK.
The Printer Manager main window is displayed.
-
Select the printer you just modified from the scrolling list in the Printer Manager main window.
-
Select Modify from the Edit menu.
The Modify window is displayed.
-
Check to see if your changes to the printer information are displayed.
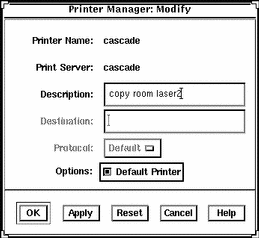
Example of a Completed Modify Window
This example shows the short version of the Modify window. The long version contains more field; it displays the printer name and print server, and enables you to change the printer description, destination, printer port, file contents, fault notification, and user access list. In addition, the long version enables you to select the following options: default printer, print banner, accept print requests, and process print requests.

Deleting Access to a Printer
The only way to change the name, print server, or printer type originally assigned to a printer is to delete the printer and reinstall it using new information.
If you need to move, replace, or reinstall a printer with new information, you should first make sure that all the print requests in the printer's queue are printed or moved to another printer. You must also delete print clients' access to the printer and delete the printer from the print server before you physically detach the printer from the print server.
If your name service is NIS or NIS+, you delete access to a printer and delete the printer from the print server at the same time.
If you are not using a name service, you must first delete access to a printer for each print client and then delete the printer from the print server as a separate task.
How to Delete Access to a Printer
-
Start Printer Manager.
You can log in on any system on the network to delete access to a printer.
-
If your name service is NIS or NIS+, you won't need to specify print clients. You delete access to the printer for all SunSoft print clients on the network and delete the printer from the print server at the same time.
-
If you are not using a name service, you can log in on any system on the network and change the host name to the name of the print client for which you want to delete printer access.
For detailed information about starting Printer Manager, see the procedure on "How to Start Printer Manager".
-
-
Select the printer for which you want to delete access from the scrolling list in the Printer Manager main window.
-
Select Delete from the Edit menu.
The Warning window is displayed. It contains a prompt asking you to verify that you really want to delete the printer.
-
Click on OK.
If your name service is NIS or NIS+, the printer is deleted from the name service master file and access is removed for all print clients. The printer is also deleted from the print server's /etc/printers.conf file and /etc/lp directory.
If you are not using a name service, the printer is deleted only from this print client's /etc/printers.conf file. You must repeat steps 1 through 4 to delete access to the printer for other SunSoft print clients.
Verification
If your name service is NIS or NIS+, verify that the printer has been deleted from the name service by making sure that the printer is not listed in the Printer Manager main window.
If you are not using a name service, verify that the print client's access has been deleted by making sure that the printer is not listed in the Printer Manager main window.
How to Delete a Printer From a Print Server (If No Name Service)
-
Start Printer Manager.
You can log in on any system on the network to delete a printer from a print server. Select None as the name service and change the host name to the name of the print server.
For detailed information about starting Printer Manager, see the procedure on "How to Start Printer Manager".
-
Select the printer to be deleted from the scrolling list in the Printer Manager main window.
-
Select Delete from the Edit menu.
The Warning window is displayed. It contains a prompt asking you to verify that you really want to delete the printer.
-
Click on OK.
The printer is deleted from the print server's /etc/printers.conf file and /etc/lp directory.
Verification
Verify that the printer has been deleted from the print server by making sure that the printer is not listed in the Printer Manager main window.
Where to Go From Here
After you have set up the systems at your site to use the SunSoft print client software, users may also want to set up their ~/.printers home directory to contain custom printer aliases.
For step-by-step instructions on these tasks, see the Solstice AdminSuite 2.3 Print Administration Guide.
- © 2010, Oracle Corporation and/or its affiliates
