| C H A P T E R 1 |
|
Introduction |
This manual describes the differences between the common ILOM and the ILOM as implemented for the Sun Blade X6275 server module.
This chapter consists of the following sections.
Additional information is provided in the following chapters:
The Integrated Lights Out Manager (ILOM) is system management firmware that allows you to manage your Sun server when the host system is powered down. This is possible because the ILOM runs on a separate Service Processor (SP) that is powered by the host system’s standby power.
The following interfaces provide network access to the ILOM: command-line interface (CLI), web interface, SNMP, and IPMI.
The ILOM also supports remote access to the host’s system console through a network remote keyboard video and mouse (RKVM). The host’s I/O to optical and floppy drives can be redirected to real and virtual drives on the network. This allows a remote user to perform most maintenance operations, including installing an operating system.
The server module’s ILOM can also be accessed through the chassis ILOM, which is called the Chassis Management Module (CMM). Refer to the Chassis ILOM documentation for more information.
| Note - To support the Sun Blade X6275 server module, the CMM must be configured with firmware version 2.0.3.13 or later. |
Not all common ILOM features are supported on every platform. On the Sun Blade X6275 Server Module,the following features are not supported:
All other features are supported. However, some features have been enhanced, and others have been added. These are described in Platform-Specific ILOM Features.
The Sun Blade X6275 server module has some unique features, and the ILOM has been modified to support them.
The following sections and chapters describe the features that are modified or added to the ILOM for the Sun Blade X6275 server module:
| Note - Some of the features described in this section require that the chassis’s CMM be running ILOM 2.0.3.13 or later. |
A single Sun Blade X6275 server module contains two complete systems, each referred to as a node. Each node has its own SP running its own ILOM.
To handle this, the CMM ILOM displays slot addresses as if there are two separate server modules.
This convention is reflected in the following CMM ILOM features:
| Note - The slot addressing described above is used by the CMM ILOM only. The server module ILOM displays the actual slot number in all instances, for both nodes. |
You can access the web interface for either ILOM by entering the Service Processor’s network address in a browser address bar. Alternately, you can use the CMM network address to access the CMM ILOM, which also provides access to individual blade ILOM web interfaces.
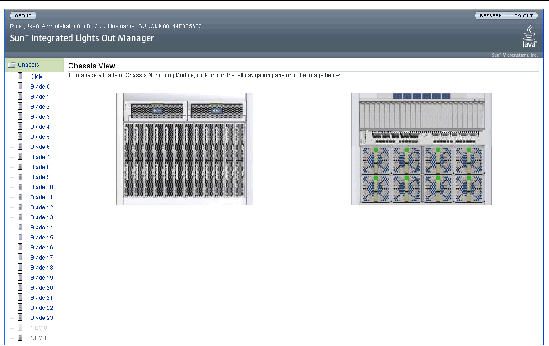
FIGURE 1-1 shows the web interface of a CMM ILOM provisioned with Sun Blade X6275 server modules.
To access the web interface for an individual server module ILOM, click on the server module name in the left-hand frame, or click on the graphic representing the server module in the right-hand frame. In the case of a Sun Blade X6275 server module, click on the upper half of the graphic to access node 0, and click on the lower half of the graphic to access node 1.
FIGURE 1-1 CMM ILOM Web Interface Showing 2-Node Blades

The Sun Blade X6275 server module handles faults slightly differently from the common ILOM. The details are provided in the Sun Blade X6275 Server Module Diagnostics Guide.
This section describes the differences between power management metrics in the common ILOM and in the Sun Blade X6275 server module ILOM.
The power management function in ILOM 2.0 enables you to monitor power consumption metrics from the command-line interface (CLI) or web interface. The following power management metrics are common to all Sun servers:
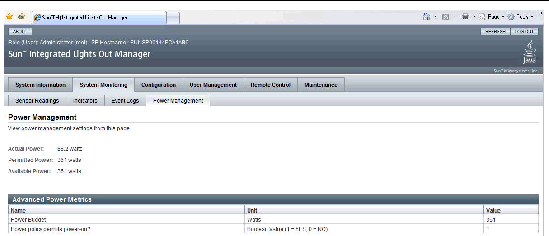
For examples of these common power management metrics provided in ILOM 2.0, see the web interface example shown in FIGURE 1-2 Power Management Metrics - ILOM Web Interface or the command-line output shown in Step 2 of the To Monitor Advanced Power Metrics From the CLI.
For additional information about the common power management metrics provided for all Sun servers, see the Addendum to the Sun Integrated Lights Out Manager 2.0 User’s Guide or the Sun Integrated Lights Out Manager 2.0 User’s Guide.
In addition to the common power consumption metrics provided in ILOM 2.0 for all Sun servers, the power management function in ILOM 2.0 provides the following advanced power consumption metrics for the Sun Blade X6275 Server Module.
For information about how to view these advanced power consumption metrics in ILOM 2.0, see these topics:
1. Log in to the ILOM web interface.
2. Select System Monitoring --> Power Management.
The common power consumption metrics and advanced power consumption metrics for the Sun Blade X6275 Server Module appear.
FIGURE 1-2 Power Management Metrics - ILOM Web Interface

2. To display the actual power, permitted power, and available power, use the show command. For example:
-> show /SP/powermgmt
/SP/powermgmt
Targets:
advanced
Properties: actual_power = 88.2 permitted power = 366 available power = 366 Commands: cd show |
3. To display the advanced power metric properties for power budget and power policy use the show /SP/powermgmt/advanced/n command:
-> show /SP/powermgmt/advanced/1 /SP/powermgmt/advanced/1 Targets: Properties: name = Power Budget unit = Watts value = 361 Commands: cd show |
-> show /SP/powermgmt/advanced/2 /SP/powermgmt/advanced/2 Targets: Properties: name = Power policy permits power-on? unit = Boolean Value (1 = Yes, 0 = NO) value = 1 Commands: cd show |
You can switch the serial port output of the server module between the SP console and the host console. By default, the SP console is connected to the system serial port. This feature allows you to view non-ASCII character traffic from the host console.
You can switch serial port output using either the web interface or the CLI. For instructions, see the following sections:

|
Caution - Set up the network on the SP before attempting to switch the serial port owner to the host server. If a network is not set up, and you switch the serial port owner to the host server, you will be unable to connect via the CLI interface or web interface to change the serial port owner back to the SP. To change the serial port owner back to the SP, you must perform the procedures in Restoring ILOM Access to the Serial Console. |
|
1. Open a browser and enter the IP address of the server.
The ILOM web interface login page appears.
2. Log in to ILOM using the root account.
The default password for the root account is changeme.
The ILOM web interface appears.
3. Select Configuration  Serial Port.
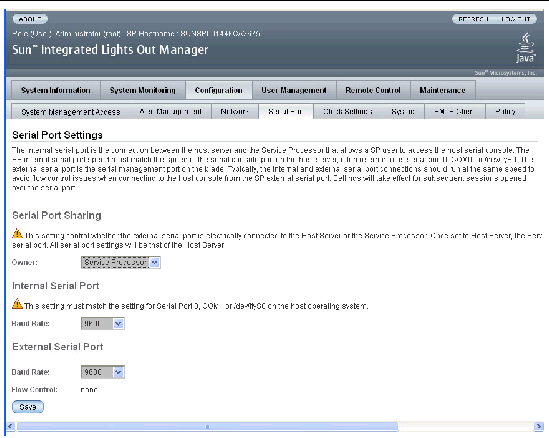
The Serial Port Settings page appears.
FIGURE 1-3 Serial Port Settings Page

4. To select a serial port owner, click the Owner drop-down list and select the desired serial port owner.
The drop-down list allows you to select either Service Processor or Host Server.
By default, Service Processor is selected.
|
1. Log in to ILOM. Open a terminal window and type:
The default password for the root account is changeme.
The ILOM CLI prompt appears (->).
2. To set the serial port owner, type:
-> set /SP/serial/portsharing/owner=selection
A policy has been added to the CMM to support the Sun Cooling Door that might be used with your chassis.
Sun supports two types of cooling doors, Sun Cooling Door 5200, and Sun Cooling Door 5600. This section applies to both.
To configure the Sun Cooling Door policy using the web interface, see To Configure the Sun Cooling Door Policy Using the Web Interface.
To configure the Sun Cooling Door policy using the CLI, see To Configure the Sun Cooling Door Policy Using the CLI.
|
1. Open a browser and enter the IP address of the server.
The ILOM web interface login page appears.
2. Log in to ILOM using the root account.
The default password for the root account is changeme.
The ILOM web interface appears.
3. Select Configuration  Policy.
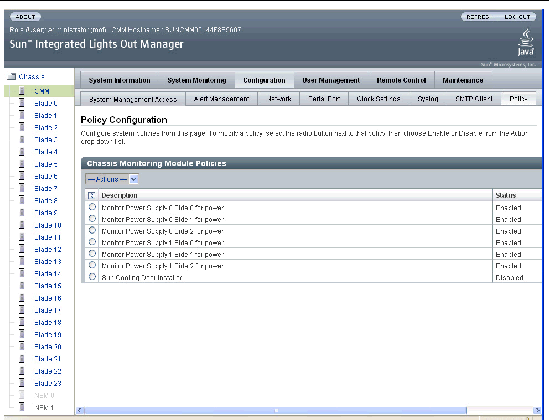
The Policy Configuration page appears.
FIGURE 1-4 Policy Configuration Page

4. Click the radio button next to Sun Cooling Door Installed.
The status changes to indicate your selection.
|
1. Log in to ILOM. Open a terminal window and type:
The default password for the root account is changeme.
The ILOM CLI prompt appears (->).
-> set /CMM/policy/COOLING_DOOR_INSTALLED=selection
enabled if your chassis has a cooling door
disabled if your chassis does not have a cooling door
The following display shows the policy settings with the cooling door disabled:
Copyright © 2009 Sun Microsystems, Inc. All rights reserved.