4 Extending the Functionality of the Connector

After you deploy the connector, you must configure it to meet your requirements.

This chapter discusses the following connector configuration procedures:

Note:

From Oracle Identity Manager Release 11.1.2 onward, lookup queries are not supported. See Managing Lookups in Oracle Fusion Middleware Administering Oracle Identity Manager guide for information about managing lookups by using the Form Designer in the Oracle Identity Manager System Administration console.

4.1 Configuring the Connector for a New Target System

You can configure the connector to support an additional flavor of UNIX.

Note:

Perform this procedure only if you want to configure the connector for an additional flavor of UNIX other than the target systems listed in Certified Components.

By default, the connector uses pre-configured scripts to support Linux, Solaris, AIX, and HP-UX.

The scripts are available in the connector bundle JAR file. You can download the bundle from Oracle Identity Governance database using the DownloadJars utility in OIM_HOME/ bin directory or from the installation media. If you are using Connector Server, then you can copy the bundle from CONNECTOR_SERVER_HOME/ bundles directory.

You can add similar scripts with similar directory structure to support an additional flavor of UNIX. For example, you can add connector support for a target system with BSD/OS flavor of UNIX. To do so:

  1. Create the following directories, which will be packaged into the connector bundle JAR:

    scripts/bsdos/nonsudo/

    scripts/bsdos/sudo/

  2. Create the following scripts for sudo and non-sudo authentication types. Then, drop them in the corresponding directories created in the previous step.

    Note:

    It is recommended that the script files have read-only permissions.

    Table 4-1 Custom Scripts to Support New Flavor of UNIX Target System

    Script Name Description

    CreateNativeUser.txt

    Create a user on target

    DeleteNativeUser.txt

    Delete a user from target

    FetchAllGroupRecords.txt

    For group lookup reconciliation

    FetchAllUserRecords.txt

    For full user reconciliation

    FetchAllShellRecords.txt

    For Shell lookup reconciliation

    FetchSingleUserRecord.txt

    Get one user

    NativeUserIncrementalRecon.txt

    Used by SyncOp for incremental reconciliation

    UpdateNativeUser.txt

    For user updates

  3. Create and update the ScriptProperties.properties file with details of all the scripts.

    The values should be paths to the new scripts. See the scripts/linux/ScriptProperties.properties file for sample values. For example:

    CREATE_USER_SCRIPT=scripts/bsdos/sudo/CreateNativeUser.txt
    DELETE_USER_SCRIPT=scripts/bsdos/sudo/DeleteNativeUser.txt
    FETCH_SINGLE_USER=scripts/bsdos/sudo/FetchSingleUserRecord.txt
    FETCH_FULL_RECON_SCRIPT=scripts/bsdos/sudo/FetchAllUserRecords.txt
    INCREMENTAL_RECON_SCRIPT=scripts/bsdos/sudo/NativeUserIncrementalRecon.txt
    
  4. Ensure that the values returned by the scripts are appropriate format, as expected by the bundle. See scripts/linux/ for sample scripts.
  5. Create and update the ResponseMapping.properties file in the scripts/bsdos directory.

    The ResponseMapping.properties file contains mapping between the message to be expected and the exception class with which the message has to be wrapped and thrown. See the scripts/linux/ResponseMapping.properties file for sample values. For example:

    User already exists=org.identityconnectors.framework.common.exceptions.AlreadyExistsException
    Group already exists=org.identityconnectors.framework.common.exceptions.AlreadyExistsException
    
  6. Run the following command to update the bundle JAR file with the new scripts:
    jar uvf org.identityconnectors.genericunix-1.0.0.jar scripts/bsdos/
    
  7. In the PropertyFileName basic configuration parameter, specify the value of the path to the properties file.

    For example: scripts/bsdos/nonsudo/ScriptProperties.properties (for non-sudo authentication)

    See Table 2-2 for more information about the PropertyFileName parameter.

4.2 Configuring the Connector for Multiple Instances and Multiple Versions of the Target System

Note:

Perform this procedure only if you want to configure the connector for multiple installations of the target system.

You may want to configure the connector for multiple installations of the target system.

The following example illustrates this requirement:

The Tokyo, London, and New York offices of Example Multinational Inc. have their own installations of the target system. The company has recently installed Oracle Identity Manager, and they want to configure Oracle Identity Manager to link all the installations of the target system.

To meet the requirement posed by such a scenario, you must configure the connector for multiple installations of the target system.

To configure the connector for multiple installations of the target system:

  1. Create and configure one IT resource for each target system installation.

    The IT Resources form is in the Resource Management folder. An IT resource is created when you import the connector XML file. You can use this IT resource as the template for creating the remaining IT resources, of the same resource type.

  2. Configure reconciliation for each target system installation. See Scheduled Tasks for instructions. Note that you only need to modify the attributes that are used to specify the IT resource and to specify whether or not the target system installation is to be set up as a trusted source.
  3. If required, modify the fields to be reconciled for the UNIX User resource object.

When you use the Administrative and User Console to perform provisioning, you can specify the IT resource corresponding to the target system installation to which you want to provision the user.

4.3 Adding Custom Attributes for Target Resource Reconciliation

The connector provides a default set of attribute mappings for reconciliation between Oracle Identity Manager and the target system. If required, you can add new user or group attributes for reconciliation.

Note:

In this section, the term "attribute" refers to the identity data fields that store user data.

By default, the attributes listed in User Attributes for Target Resource Reconciliation and Provisioning are mapped for reconciliation between Oracle Identity Manager and the target system. If required, you can map additional attributes for reconciliation as follows:

  1. Log in to the Oracle Identity Manager Design Console.
  2. Create a new version of the process form as follows:
    1. Expand Development Tools.
    2. Double-click Form Designer.
    3. Search for and open the UD_UNIX process form.
    4. Click Create New Version.

    On the Create a new version dialog box, enter a new version in the Label field, and then click the save icon.

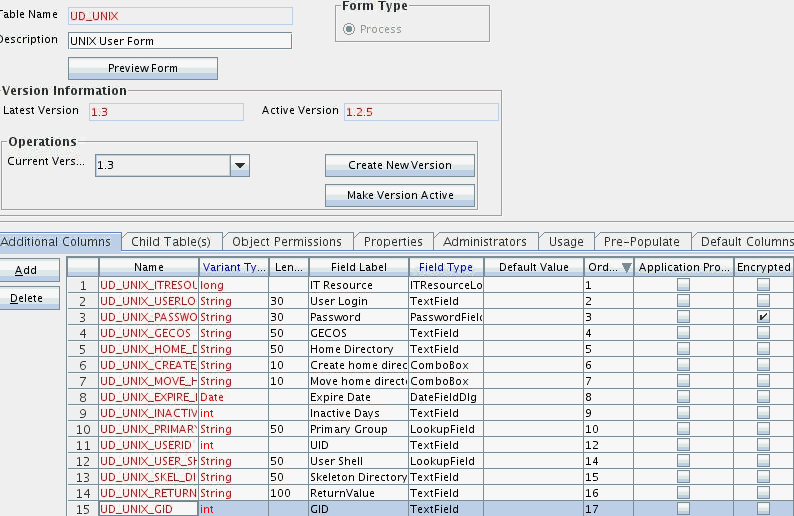
  3. Add the new field on the process form as follows:.
    1. Click Add.

      A field is added to the list. Enter the details of the field.

      For example, if you are adding the GID field, enter UD_UNIX_GID in the Name field and then enter the rest of the details of this field.

    2. Click Save.
    3. To activate the newly created form, click Make Version Active.

      Figure 4-1 is a sample screenshot of the new version of process form.

      Figure 4-1 Adding a New Version of Process Form

      Description of Figure 4-1 follows
      Description of "Figure 4-1 Adding a New Version of Process Form"
  4. Create an entry for the field in the lookup definition for reconciliation as follows:
    1. Expand Administration.
    2. Double-click Lookup Definition.
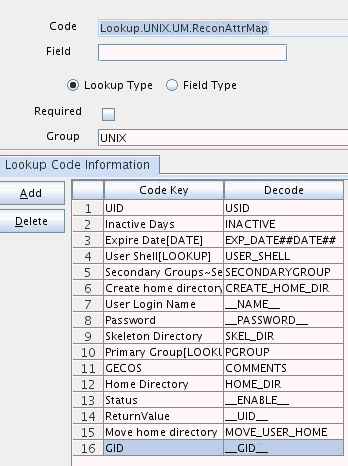
    3. Search for and open the Lookup.UNIX.UM.ReconAttrMap lookup definition.
    4. Click Add and enter the Code Key and Decode values for the field.

      The Code Key value must be the form field name. The Decode value must be the name that would be used for this attribute in the shell scripts.

      For example, enter GID in the Code Key field and then enter __GID__ in the Decode field.

    5. Click the save icon.

      Figure 4-2 is a sample screenshot of the new entry added to the reconciliation lookup definition.

      Figure 4-2 Adding an Entry to Reconciliation Lookup

      Description of Figure 4-2 follows
      Description of "Figure 4-2 Adding an Entry to Reconciliation Lookup"
  5. Copy the connector bundle JAR file.

    You can download the bundle from Oracle Identity Manager database using the DownloadJars utility in OIM_HOME/bin directory or from the installation media. If you are using Connector Server, then you can copy the bundle from CONNECTOR_SERVER_HOME/bundles directory.

  6. Extract the JAR file to edit the scripts.

    For example, to extract the script for Linux, non-sudo user for reconciliation, run the following command:

    jar xvf org.identityconnectors.genericunix-1.0.0.jar scripts/linux/nonsudo/FetchAllUserRecords.txt
    

    The FetchAllUserRecords.txt script is called when you run full reconciliation without the equalsTo filter. If you want, you can edit additional reconciliation scripts:

    • FetchSingleUserRecord.txt - this script is called when you run full reconciliation with the equalsTo filter.

    • NativeUserIncrementalRecon.txt - this script is called during incremental reconciliation.

  7. Open the script for editing.

    Note:

    You must have a good knowledge of bash scripts to edit the scripts. Before editing the scripts, you can create a backup of the original scripts.

    For example, you can construct a block for the __GID__ attribute similar to other blocks.

    Add the following line after line 9 starting with PGROUP to fetch the __GID__ field:

    __GID__=$( id -G $__NAME__ | cut -d' ' -f1);
    

    Add an entry to line 32 starting with RESULT as follows:

    RESULT=__NAME__:$__NAME__:__GID__:$__GID__:__ENABLE__:$ENABLE
    

    Add an entry to line 41 starting with unset as follows:

    unset inputline __NAME__ USID COMMENTS HOME_DIR USER_SHELL PGROUP secgrplist __GID__;
    

    See Also:

    Sample Scripts for Updating Default Attributes for Reconciliation for the original and updated FetchAllUserRecords.txt script

  8. Save the script and update the bundle as follows:
    jar uvf org.identityconnectors.genericunix-1.0.0.jar scripts/linux/nonsudo/FetchAllUserRecords.txt
    
  9. Replace the old bundle by using UpdateJars utility in OIM_HOME/bin directory.

    If you are using the Connector Server, stop it. Then, replace the JAR in the CONNECTOR_SERVER_HOME/bundles directory and restart the Connector Server.

  10. Add the new field to the list of reconciliation fields in the resource object as follows:
    1. Expand Resource Management.
    2. Double-click Resource Objects.
    3. Search for and open the UNIX User resource object.
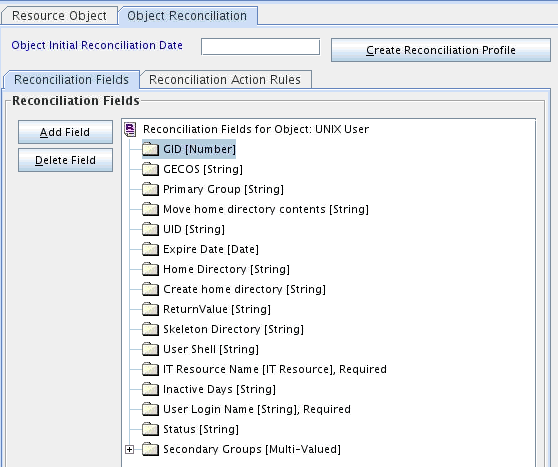
    4. On the Object Reconciliation tab, click Add Field.
    5. In the Add Reconciliation Field dialog box, enter the details of this field.

      For example, enter GID in the Field Name field and select Number from the Field Type list.

    6. Click the save icon.
    7. Click Create Reconciliation Profile. This copies changes made to the resource object into the MDS.

      Figure 4-3 is a sample screenshot of the newly added reconciliation field.

      Figure 4-3 Adding a New Reconciliation Field

      Description of Figure 4-3 follows
      Description of "Figure 4-3 Adding a New Reconciliation Field"
  11. Create a reconciliation field mapping for the new field on the process form as follows:
    1. Expand Process Management.
    2. Double-click Process Definition.
    3. From the Process Definition table, select and open the UNIX User resource object.
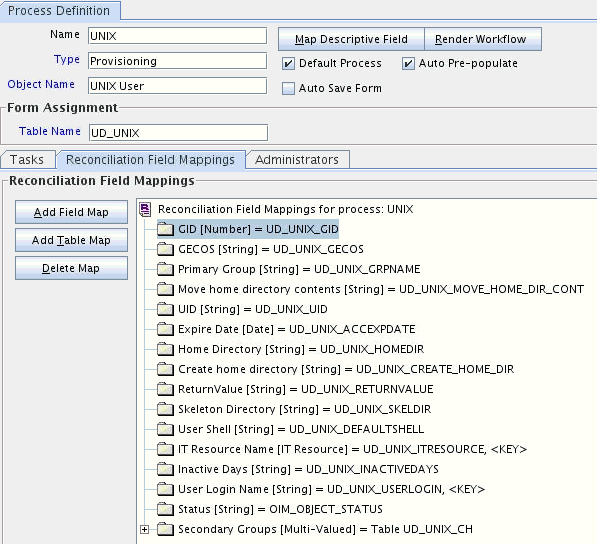
    4. Click Reconciliation Field Mappings and then click Add Field Map.
    5. In the Field Name field, select the value for the field that you want to add. For example, select GID.
    6. In the Field Type field, select the type of the field that is prepopulated.
    7. Double-click the Process Data Field field.

      A list of process data columns is displayed. From the list, select the process data column corresponding to the process data field.

      For example, select GID [Number] = UD_UNIX_GID.

    8. Click the save icon.

      Figure 4-4 is a sample screenshot of the reconciliation field mappings.

      Figure 4-4 Adding a Reconciliation Field Mapping

      Description of Figure 4-4 follows
      Description of "Figure 4-4 Adding a Reconciliation Field Mapping"
  12. On the Resource Objects form, click Create Reconciliation Profile.
  13. Perform reconciliation to verify the GID attribute.

    You should be able to see GID in the connector logs. Ensure that they appear in the reconciliation events.

  14. If you are using Oracle Identity Manager release 11.1.2.x or later, create a new UI form and attach it to the application instance to make this new attribute visible. See Creating a New UI Form and Updating an Existing Application Instance with a New Form for the procedures.

4.4 Adding Custom Attributes for Provisioning

The connector provides a default set of attribute mappings for provisioning between Oracle Identity Manager and the target system. If required, you can add new user or group attributes for provisioning.

Note:

In this section, the term "attribute" refers to the identity data fields that store user data.

By default, the attributes listed in User Attributes for Target Resource Reconciliation and Provisioning are mapped for provisioning between Oracle Identity Manager and the target system. If required, you can map additional attributes for provisioning as follows:

  1. Log in to the Oracle Identity Manager Design Console.
  2. Create a new version of the process form as follows:
    1. Expand Development Tools.
    2. Double-click Form Designer.
    3. Search for and open the UD_UNIX process form.
    4. Click Create New Version.

      On the Create a new version dialog box, enter a new version in the Label field, and then click the save icon.

  3. Add the new field on the process form as follows:
    1. Click Add.

      A field is added to the list. Enter the details of the field.

      For example, if you are adding the GID field, enter UD_UNIX_GID in the Name field and then enter the rest of the details of this field.

    2. Click Save.
    3. To activate the newly created form, click Make Version Active.

      Figure 4-5 is a sample screenshot of the new version of process form.

      Figure 4-5 Adding a New Version of Process Form

      Description of Figure 4-5 follows
      Description of "Figure 4-5 Adding a New Version of Process Form"
  4. Create an entry for the field in the lookup definition for reconciliation as follows:
    1. Expand Administration.
    2. Double-click Lookup Definition.
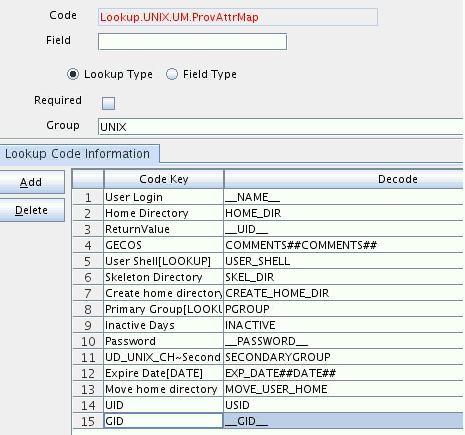
    3. Search for and open the Lookup.UNIX.UM.ProvAttrMap lookup definition.
    4. Click Add and enter the Code Key and Decode values for the field.

      The Code Key value must be the form field name. The Decode value must be the name that would be used for this attribute in the shell scripts.

      For example, enter GID in the Code Key field and then enter _GID_ in the Decode field.

    5. Click the save icon.

      Figure 4-6 is a sample screenshot of the new entry added to the reconciliation lookup definition.

      Figure 4-6 Adding an Entry to Provisioning Lookup

      Description of Figure 4-6 follows
      Description of "Figure 4-6 Adding an Entry to Provisioning Lookup"
  5. Copy the connector bundle JAR file.

    You can download the bundle from Oracle Identity Manager database using the DownloadJars utility in OIM_HOME/bin directory or from the installation media. If you are using Connector Server, then you can copy the bundle from CONNECTOR_SERVER_HOME/bundles directory.

  6. Extract the JAR file to edit the scripts.

    For example, to extract the script for Linux, non-sudo user for provisioning, run the following command:

    jar xvf org.identityconnectors.genericunix-1.0.0.jar scripts/linux/nonsudo/CreateNativeUser.txt
    

    This script is used to enable create operations on the newly added attribute. Similarly, you can edit the UpdateNativeUser.txt script to enable update operations.

  7. Open the script for editing.

    Note:

    You must have a good knowledge of bash scripts to edit the scripts. Before editing the scripts, you can create a backup of the original scripts.

    For example, you can construct a block for the __GID__ attribute similar to other blocks, as follows (lines 76 to 78):

        if [ ! -z $__GID__ ] ;then 
            command="$command -g $__GID__";
        fi;

    Add an entry to line 91 starting with unset as follows:

    unset defaultHomeBaseDir homedir checkHomeBaseDir grp defaultPriGroup __GID__;

    See Also:

    Sample Scripts for Updating Default Attributes for Provisioning for the original and updated CreateNativeUser.txt script

  8. Save the script and update the bundle as follows:
    jar uvf org.identityconnectors.genericunix-1.0.0.jar scripts/linux/nonsudo/CreateNativeUser.txt
    
  9. Replace the old bundle by using UpdateJars utility in OIM_HOME/bin directory.

    If you are using the Connector Server, stop it. Then, replace the JAR in the CONNECTOR_SERVER_HOME/bundles directory and restart the Connector Server.

  10. If you are using Oracle Identity Manager release 11.1.2.x or later, create a new UI form and attach it to the application instance to make this new attribute visible. See Creating a New UI Form and Updating an Existing Application Instance with a New Form for the procedures.

4.5 Configuring Validation of Data During Reconciliation and Provisioning

You can configure validation of reconciled and provisioned single-valued data according to your requirements. 

The Lookup.UNIX.UM.ProvValidation and Lookup.UNIX.UM.ReconValidation lookup definitions hold single-valued data to be validated during provisioning and reconciliation operations, respectively.

For example, you can validate data fetched from the First Name attribute to ensure that it does not contain the number sign (#). In addition, you can validate data entered in the First Name field on the process form so that the number sign (#) is not sent to the target system during provisioning operations.

Note:

The Lookup.UNIX.UM.ProvValidation and Lookup.UNIX.UM.ReconValidation lookup definitions are optional and do not exist by default.

You must add these lookups as decode values to the Lookup.UNIX.UM.Configuration lookup definition to enable exclusions during provisioning and reconciliation operations. See Lookup.UNIX.UM.Configuration for more information.

To configure validation of data:

  1. Write code that implements the required validation logic in a Java class with a fully qualified domain name (FQDN), such as org.identityconnectors.genericunix.extension.UNIXValidator.

    This validation class must implement the validate method. The following sample validation class checks if the value in the First Name attribute contains the number sign (#):

    package com.validationexample;
    
    import java.util.HashMap;
     
    public class MyValidator {
        public boolean validate(HashMap hmUserDetails, HashMap hmEntitlementDetails, String sField) throws ConnectorException {
     
            /* You must write code to validate attributes. Parent
                     * data values can be fetched by using hmUserDetails.get(field)
                     * For child data values, loop through the
                     * ArrayList/Vector fetched by hmEntitlementDetails.get("Child Table")
                     * Depending on the outcome of the validation operation,
                     * the code must return true or false.
                     */
            /*
            * In this sample code, the value "false" is returned if the field
            * contains the number sign (#). Otherwise, the value "true" is
            * returned.
            */
            boolean valid = true;
            String sFirstName = (String) hmUserDetails.get(sField);
            for (int i = 0; i < sFirstName.length(); i++) {
                if (sFirstName.charAt(i) == '#') {
                    valid = false;
                    break;
                }
            }
            return valid;
     
        }
    }
    
  2. Log in to the Design Console.
  3. Create one of the following new lookup definitions:
    • To configure validation of data for reconciliation:

      Lookup.UNIX.UM.ReconValidation

    • To configure validation of data for provisioning:

      Lookup.UNIX.UM.ProvValidation

  4. In the Code Key column, enter the resource object field name that you want to validate. For example, SimpleDisplayName.
  5. In the Decode column, enter the class name. For example, org.identityconnectors.genericunix.extension.UNIXValidator.
  6. Save the changes to the lookup definition.
  7. Search for and open the Lookup.UNIX.UM.Configuration lookup definition.
  8. In the Code Key column, enter one of the following entries:
    • To configure validation of data for reconciliation:

      Recon Validation Lookup

    • To configure validation of data for provisioning:

      Provisioning Validation Lookup

  9. In the Decode column, enter one of the following entries:
    • To configure validation of data for reconciliation:

      Lookup.UNIX.UM.ReconValidation

    • To configure validation of data for provisioning:

      Lookup.UNIX.UM.ProvValidation

  10. Save the changes to the lookup definition.
  11. Create a JAR with the class and upload it to the Oracle Identity Manager database as follows:

    Run the Oracle Identity Manager Upload JARs utility to post the JAR file created in Step 7 to the Oracle Identity Manager database. This utility is copied into the following location when you install Oracle Identity Manager:

    Note:

    Before you use this utility, verify that the WL_HOME environment variable is set to the directory in which Oracle WebLogic Server is installed.

    For Microsoft Windows:

    OIM_HOME/server/bin/UploadJars.bat

    For UNIX:

    OIM_HOME/server/bin/UploadJars.sh

    When you run the utility, you are prompted to enter the login credentials of the Oracle Identity Manager administrator, URL of the Oracle Identity Manager host computer, context factory value, type of JAR file being uploaded, and the location from which the JAR file is to be uploaded. Select 1 as the value of the JAR type.

  12. Run the PurgeCache utility to clear content related to request datasets from the server cache.
  13. Perform reconciliation or provisioning to verify validation for the field, for example, SimpleDisplayName.

4.6 Configuring Transformation of Data During User Reconciliation

You can configure transformation of reconciled data according to your requirements.

The Lookup.UNIX.UM.ReconTransformation lookup definition holds single-valued user data to be transformed during reconciliation operations. For example, you can use First Name and Last Name values to create a value for the Full Name field in Oracle Identity Manager.

Note:

The Lookup.UNIX.UM.ReconTransformation lookup definition is optional and does not exist by default.

You must add this lookup as decode value to the Lookup.UNIX.UM.Configuration lookup definition to enable exclusions during provisioning and reconciliation operations. See Lookup.UNIX.UM.Configuration for more information.

To configure transformation of single-valued user data fetched during reconciliation:

  1. Write code that implements the required transformation logic in a Java class with a fully qualified domain name (FQDN), such as org.identityconnectors.genericunix.extension.UNIXTransformation.

    This transformation class must implement the transform method. The following sample transformation class creates a value for the Full Name attribute by using values fetched from the First Name and Last Name attributes of the target system:

    package com.transformationexample;
    
    import java.util.HashMap;
     
     
    public class MyTransformer {
        public Object transform(HashMap hmUserDetails, HashMap hmEntitlementDetails, String sField) throws ConnectorException {
            /*
            * You must write code to transform the attributes.
            * Parent data attribute values can be fetched by
            * using hmUserDetails.get("Field Name").
            * To fetch child data values, loop through the
            * ArrayList/Vector fetched by hmEntitlementDetails.get("Child          Table")
            * Return the transformed attribute.
            */
            String sFirstName = (String) hmUserDetails.get("First Name");
            String sLastName = (String) hmUserDetails.get("Last Name");
            return sFirstName + "." + sLastName;
     
        }
    }
    
  2. Log in to the Design Console.
  3. Create a new lookup definition, Lookup.UNIX.UM.ReconTransformation.
  4. In the Code Key column, enter the resource object field name you want to transform. For example, SimpleDisplayName.
  5. In the Decode column, enter the class name. For example, org.identityconnectors.genericunix.extension.UNIXTransformation.
  6. Save the changes to the lookup definition.
  7. Search for and open the Lookup.UNIX.UM.Configuration lookup definition.
  8. In the Code Key column, enter Recon Transformation Lookup.
  9. In the Decode column, enter Lookup.UNIX.UM.ReconTransformation.
  10. Save the changes to the lookup definition.
  11. Create a JAR with the class and upload it to the Oracle Identity Manager database as follows:

    Run the Oracle Identity Manager Upload JARs utility to post the JAR file created in Step 7 to the Oracle Identity Manager database. This utility is copied into the following location when you install Oracle Identity Manager:

    Note:

    Before you use this utility, verify that the WL_HOME environment variable is set to the directory in which Oracle WebLogic Server is installed.

    For Microsoft Windows:

    OIM_HOME/server/bin/UploadJars.bat

    For UNIX:

    OIM_HOME/server/bin/UploadJars.sh

    When you run the utility, you are prompted to enter the login credentials of the Oracle Identity Manager administrator, URL of the Oracle Identity Manager host computer, context factory value, type of JAR file being uploaded, and the location from which the JAR file is to be uploaded. Select 1 as the value of the JAR type.

  12. Run the PurgeCache utility to clear content related to request datasets from the server cache.
  13. Perform reconciliation to verify transformation of the field, for example, SimpleDisplayName.

4.7 Configuring Resource Exclusion Lists

The Lookup.UNIX.UM.ProvExclusionList and Lookup.UNIX.UM.ReconExclusionList lookup definitions hold user IDs of target system accounts for which you do not want to perform provisioning and reconciliation operations, respectively.

Note:

The Lookup.UNIX.UM.ProvExclusionList and Lookup.UNIX.UM.ReconExclusionList lookup definitions are optional and do not exist by default.

You must add these lookups as decode values to the Lookup.UNIX.UM.Configuration lookup definition to enable exclusions during provisioning and reconciliation operations. See Lookup.UNIX.UM.Configuration for more information.

The following is the format of the values stored in these lookups:

Code Key Decode Sample Values

User Login resource object field name

User ID of a user

Code Key: User Login

Decode: User001

User Login resource object field name with the [PATTERN] suffix

A regular expression supported by the representation in the java.util.regex.Pattern class

Code Key: User Login[PATTERN]

To exclude users matching any of the user ID 's User001, User002, User088, then:

Decode: User001|User002|User088

To exclude users whose user ID 's start with 00012, then:

Decode: 00012*

See Also: For information about the supported patterns, visit http://download.oracle.com/javase/6/docs/api/java/util/regex/Pattern.html

To add entries in the lookup for exclusions during provisioning operations:
  1. On the Design Console, expand Administration and then double-click Lookup Definition.
  2. Create a new lookup definition, Lookup.UNIX.UM.ProvExclusionList.

    Note:

    To specify user IDs to be excluded during reconciliation operations, create a new lookup definition called Lookup.UNIX.UM.ReconExclusionList and add entries to that lookup.

  3. Click Add.
  4. In the Code Key and Decode columns, enter the first user ID to exclude.

    Note:

    The Code Key represents the resource object field name on which the exclusion list is applied during provisioning operations.

  5. Repeat Steps 3 and 4 for the remaining user IDs to exclude.

    For example, if you do not want to provision users with user IDs User001, User002, and User088 then you must populate the lookup definition with the following values:

    Code Key Decode

    User Login

    User001

    User Login

    User002

    User Login

    User088

    You can also perform pattern matching to exclude user accounts. You can specify regular expressions supported by the representation in the java.util.regex.Pattern class.

    See Also:

    For information about the supported patterns, visit http://download.oracle.com/javase/6/docs/api/java/util/regex/Pattern.html

    For example, if you do not want to provision users matching any of the user IDs User001, User002, and User088, then you must populate the lookup definition with the following values:

    Code Key Decode

    User Login[PATTERN]

    User001|User002|User088

    If you do not want to provision users whose user IDs start with 00012, then you must populate the lookup definition with the following values:

    Code Key Decode

    User Login[PATTERN]

    00012*

  6. Click the save icon.