167 Floor Information
This chapter contains these topics:
The facility information for commercial, residential, or other rentable property is organized on a property, building, floor, and unit basis. The Floor Information screen lets you set up and maintain information for a group of units. Such a group can be the units on a physical floor or the units that have some other relationship. This relationship is based on a specific field in the Unit Master file (F1507), which is identified by the grouping code for the floor.
The screen is available in two formats: Facility Data and General Information. The first format displays detail about the floor in the form of log lines. Log lines include information such as critical dates, the number of units on a floor, inspection of the sprinkler system, and so on. The second format displays the related property or project and category codes that you can use for reporting purposes. This information is stored in the following files: Floor Master (F1506), Log Standards Master (F1503), and Log Standards Extension Master (F1504).
The screen has processing options that control how the system displays and processes the information.
From any Real Estate Management menu, enter 29 in the Selection field.
From the Real Estate Management Setup menu (G1541), choose Floor Information.
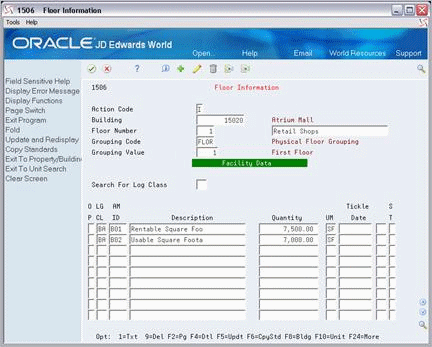
Figure 167-2 Floor Information (Fold Area) screen
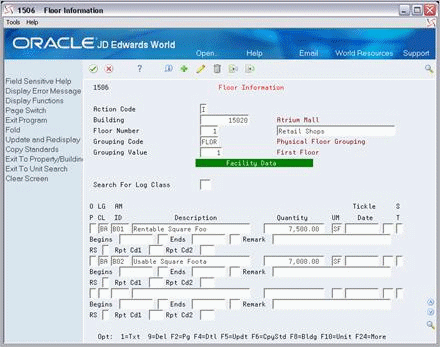
Description of "Figure 167-2 Floor Information (Fold Area) screen"
Select Page Switch or F2 to toggle between Facility Data and General Information in the lower part of the screen.
Figure 167-3 Floor Information (Alternate Format) screen
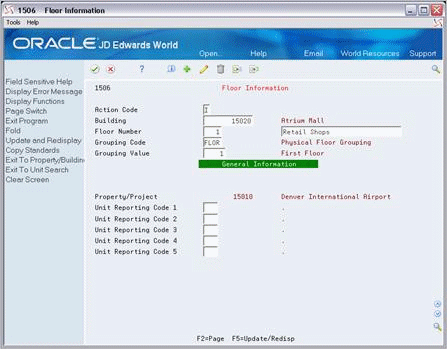
Description of "Figure 167-3 Floor Information (Alternate Format) screen"
167.1 Add Floor Information
To add a floor, choose Add in the Action Code field, type the appropriate information, and press Enter or F5.
The following information is required for adding a floor:
-
Building number
-
Floor number
-
Grouping code
167.2 Display Floor Information
To display the information for a floor, choose Inquire in the Action Code field, type the number of the building in the Building field, type the number of the floor in the Floor Number field, and then press Enter.
167.3 Change Floor Information
To change the information you have displayed, choose Change in the Action Code field, type the new information, and then press Enter or F5.
167.4 Delete Floor Information
There are two methods that you can use to delete the information you have displayed:
-
To delete the floor, choose Delete in the Action Code field and press Enter.
-
To delete a log line, choose Change in the Action Code field, type 9 in the OP (Option) field for that line, and then press Enter or F5.
Note:
If extended text exists for a log line, the OP (Option) field for that line is highlighted. In this case, JD Edwards World recommends that you first delete the text information before you delete the line. This prevents the wrong text from appearing for a duplicate log line.167.5 Unit Groups
The following table shows sample combinations of the values for the Floor Number, Grouping Code, and Grouping Value fields on which unit groups are based:
| Floor Number | Grouping Code | Grouping Value |
|---|---|---|
| 1 (First Floor) | FLOR (Physical Floor) | 1 |
| *All | MART (Market Rent) | 1200 |
| M | MSTU (Master Unit) | M |
| *All | RL01 (Report Code 01) | |
| O (Occupied) | UST (Unit Status) | O |
| SALE | UTTY (Unit Type) | RSALE |
| A (Apartment) | UTUS (Unit Usage) | A |
Note the following:
-
The floor number identifies the floor or group of units.
-
If you group units by unit type and the unit type is five characters, you must use the last four characters of the unit type as the floor number.
-
To group the units that share an attribute within an entire building, you can use the code *All as the floor number.
-
-
The grouping code identifies the kind of group. If it is not a physical floor, the code is the data item of a field for the related units in the Unit Master file.
-
The grouping value is either the number of the physical floor or the actual value or code contained in the field identified by the grouping code.
167.6 Copy Standard Log Information
You can copy standard log information to reduce the entry time and the possibility of errors. To do this, you can use either an automatic method or a manual method. A processing option controls whether the system automatically copies the information.
-
If the processing option is set to automatically copy the information, the system copies a model of standard lines into a floor when you first add it. After you have typed the necessary information, press Enter or F5 and the screen displays the log information. This gives you a chance to verify and make more changes to the information. To add the floor, you then must press Enter or F5 a second time.
-
When you add a floor, you can manually copy a model into it. You use this method if the processing option is not set to automatically copy the information or if no log line in the model has a Y in the RS field. To do this, type A in the Action Code field, type the appropriate information, and press F6. Then press Enter or F5.
-
You can also manually copy a model into an existing floor you have displayed. To do this, choose Change in the Action Code field, press F6, and then press Enter or F5. Remember to press F6 only once. If you press it more than once, duplicate log lines appear for the floor because the system copies each log line from the model as many times as you press F6.
The system uses the grouping code to choose standard log lines. Before you can copy a model of the standards, therefore, you must set up the model for the specific grouping code. To do this, use the Log Standards Information screen.
167.7 Processing Options
167.8 Area Edits
The system can verify quantities for both the rentable and usable areas between a building and its floors and between a floor and its units. These are called area edits, which are controlled by processing options. The system compares the total area of a building with the total area of all the floors in that building or compares the total area of the floor with the total area of all the units on that floor. If the area of the floor is changed and the total area of the building is exceeded, the system gives an error message and highlights the Building field. Likewise, if the total area of the floor is less than the total area of the units on the floor, the system gives an error message and highlights the Floor Number field.
To find the error, review the information for the floors and units on their respective screens. You must correct the error before you can add the facility or make the change.
Before the system can perform an area edit, the following information is required:
-
The log class and amenity identification codes for the rentable and usable areas must be set up in the Real Estate Management Constants file. The system uses these constants to identify the log lines that define those areas for the buildings, floors, and units.
-
The log lines for rentable and usable areas must be set up for the related building, floors, and units. The log class and amenity identification codes for those lines must be the same as the ones specified as the constants.
The following examples demonstrate the method of computation and comparison the system uses when it performs an area edit between a building and its floors. The system uses the same logic for an area edit between a floor and its units.
167.8.1 Example 1
Suppose a building has a total rentable area of 70,000 square feet. The building contains three floors with the following rentable areas: 10,000 square feet on the first floor, 30,000 on the second, and 30,000 on the third. As you add the three floors, the system verifies their areas with the building as follows:
| Floor Number | Floor Area | Building Subtotal | Results |
|---|---|---|---|
| 1 | + 10,000 | 10,000 | No error |
| 2 | + 30,000 | 40,000 | No error |
| 3 | + 30,000 | 70,000 | No error |
The subtotal of 70,000 square feet is equal to the total area of the building, so the system accepts the area of the third floor.
167.8.2 Example 2
Suppose you entered the wrong area when you added the second floor. Instead of 30,000 square feet, you typed 20,000. The system verifies the areas with the building as follows:
| Floor Number | Floor Area | Building Subtotal | Results |
|---|---|---|---|
| 1 | + 10,000 | 10,000 | No error |
| 2 | + 20,000 | 30,000 | No error |
| 3 | + 30,000 | 60,000 | No error |
The subtotal of 60,000 square feet is less than the total area of the building, so the system accepts the area of each floor. You do not know that an error exists with the second floor because the total area of all the floors is less than the total area of the building.
Note:
In the case of units and floors, if the total area of all the units on a floor is less than the total area of that floor, the Building/Unit Statistics report would show the difference as an undefined area for the floor.167.8.3 Example 3
This example is like example 2, except you entered 40,000 square feet instead of 30,000 when you added the second floor. The system verifies the areas with the building as follows:
| Floor Number | Floor Area | Building Subtotal | Results |
|---|---|---|---|
| 1 | + 10,000 | 10,000 | No error |
| 2 | + 40,000 | 50,000 | No error |
| 3 | + 30,000 | 80,000 | Error |
The subtotal of 80,000 square feet is greater than the total area of the building, so the system does not accept the area of the third floor. It gives an error message and highlights the Building field. The system does not know which floor is incorrect, so you must review the information for each floor to find the error.
167.9 Guidelines
Before you can add a floor, set up the following information:
-
Building
-
Floor number
The floor number must already be set up only if the system verifies that it exists in the User Defined Codes file (F0005). A processing option controls this.
-
Grouping code