182 Statement Messages - Enhanced
This chapter contains these topics:
This screen works in conjunction with the Print Statements - Enhanced program. It lets you set up and work with the user defined codes (15/MS) that identify the messages you can print on a statement. You use the processing options for the Print Statements - Enhanced program to specify what messages are printed. The actual messages are set up on the General Message screen, which you can access with an option.
This information is stored in the Generic Message/Rate Types and Generic Message/Rates files (F0019 and F00191, respectively). A DREAM Writer version of the screen controls how the information is displayed. Unless you have proper authority, you cannot make changes to the default version.
Note:
Unlike most user defined codes, the information is not stored in the User Defined Codes file (F0005). Therefore, it cannot be displayed on the User Defined Codes screen or window.From any Real Estate Management menu, enter 29 in the Selection field.
From the Real Estate Management Setup menu (G1541), choose System Setup.
From the System Setup menu (G1542), choose Statement Messages - Enhanced.
Figure 182-1 Statement Messages - Enhanced screen
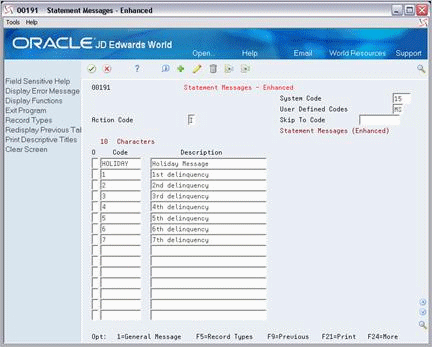
Description of "Figure 182-1 Statement Messages - Enhanced screen"
182.1 Display Enhanced Statement Messages
When you access the Statement Messages - Enhanced screen, it automatically displays the existing message codes. After you add or change a code, the system clears the screen. To display the information again, choose Inquire in the Action Code field and then press Enter.
182.2 Add and Change Statement Messages - Enhanced
You can use either action code Add or Change to add and change message codes. To do this, choose Add or Change in the Action Code field, type the appropriate information, and then press Enter.
Note that both the Code field and Description field are required information for a code. However, the system uses only the Code field to differentiate between the codes. Therefore, the following are true:
-
If you enter the information in both fields on a blank line, the system adds it as a new code.
-
If you enter the information in either the Code field or both fields of an existing code, the system adds it as a new code and retains the original code. This eliminates the need to scroll to a line of blank fields in order to add a code.
-
If you enter information in only the Description field of an existing code, the system only changes the description for that code.
182.3 Delete Statement Messages - Enhanced
To delete one or more message codes, choose Add or Change in the Action Code field, use the Field Exit key to blank out the respective Code field, and then press Enter.
Note:
Action code Delete is not valid on this screen.182.4 Display Text
To display the General Message screen and the text defined for a message code, type 1 in the O (Option) field next to that code and press Enter. For more information, see Chapter 183, "General Message" in this guide.