13 Work with Vouchers
This chapter contains these topics:
After you create your payment vouchers, you can work with them to change how the system generates payments against them.
You can revise the payment instrument that the system uses to generate payments against vouchers. The payment instrument determines the method of payment and the type of information that prints on the pay stub for each payment.
You can also hold a voucher that you do not want to pay, or release a held voucher so that you can pay the voucher. In addition, you can make a payment to someone other than the subcontractor. You can also split a voucher into more than one payment and change the due date for each payment.
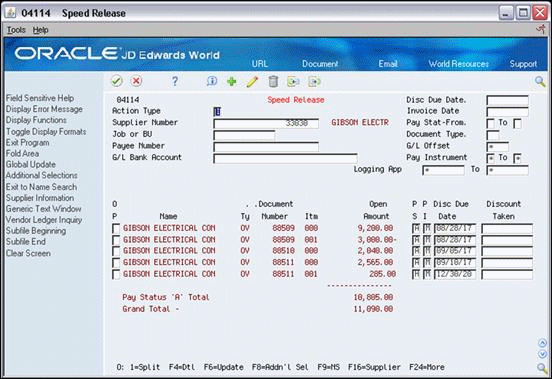
13.1 Processing Options
See Section 44.11, "A/P Speed Release (P04114)"
From Subcontract Management (G44), choose Automatic Payment Processing
From Automatic Payment Processing (G0413), choose Speed Release
13.2 Revising the Payment Instrument
You can change the type of payment the system makes against a voucher by changing the payment instrument. For example, you can pay by check, electronically, and so on. You can revise the payment instrument for individual vouchers or multiple vouchers.
Complete the following tasks:
-
To revise the payment instrument for multiple vouchers
-
To revise the payment instrument for individual vouchers
To revise the payment instrument for multiple vouchers
-
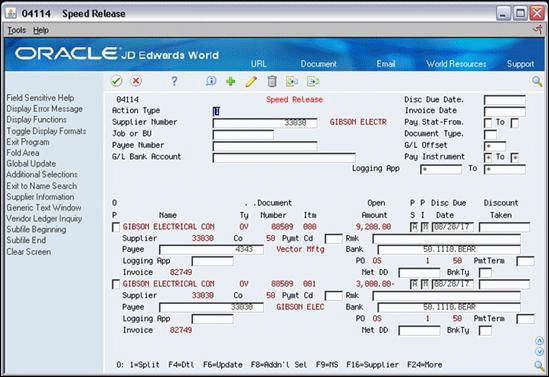
On Speed Release, complete one or more of the following fields to locate the vouchers:
-
Supplier Number
-
Job
-
G/L Bank Account
-
-
Complete the following fields and click Change.
-
Payment Instrument
-
To
-
Caution:
When you click Change, the system changes all of the records that display on the screen.| Field | Explanation |
|---|---|
| Supplier Number | The address number of the subcontractor. You can use the short format, the long format, or the tax ID (preceded by the indicators listed in the Address Book constants). |
| Job or BU | A code that identifies a separate entity within a business for which you want to track items and costs. This entity might be a warehouse location, job, project, work center, or branch/plant. The Business Unit field is alphanumeric. |
| G/L Bank Account | A field that identifies an account in the general ledger. You can use one of the following formats for account numbers:
The first character of the account indicates the format of the account number. You define the account format in the General Accounting Constants program. Screen-specific information When you enter a valid cash account number in this field, the system displays all open pay items to be disbursed from this cash account. You can override this account number in the detail portion of the screen. |
| Pay Instrument | The user defined code that determines the type of payment to be made to the supplier. |
13.3 Assigning Hold Codes to Vouchers
If you do not want to make a payment against a voucher, you can place the voucher on hold. If you want to make a payment against a voucher that is on hold, you can release the voucher on hold. You can place and release holds on individual vouchers and on groups of vouchers.
Complete the following tasks:
-
To assign hold codes to multiple vouchers
-
To assign hold codes to individual vouchers
To assign hold codes to multiple vouchers
-
On Speed Release, complete one or more of the following fields to locate the vouchers:
-
Supplier Number
-
Job
-
G/L Bank Account
-
-
Complete the following field:
-
Pay Status From
-
-
Complete the following field and click Change.
-
Pay Status To
-
Caution:
When you click Change, the system changes all of the records that display on the screen.| Field | Explanation |
|---|---|
| Pay Stat-From | A user defined code (00/PS) that indicates the current payment status for a voucher or an invoice. Codes are:
P – Paid. The voucher or invoice is paid in full. A – Approved for payment, but not yet paid. This applies to vouchers and automatic cash applications. H – Hold pending approval. R – Retainage. % – Withholding applies. ? – Other codes. All other codes indicate reasons that payment is being withheld. The Accounts Payable system does not print payments for any other code. If you are releasing retainage in Contract Management, you must change this field to an H. Screen-specific information You cannot change the pay status to P (paid), D (draft accepted), or # (payment in-process). |
| Pay Stat To | The code indicating what the pay status will be changed to.
If you are releasing retainage in Contract Management, you must change this field to an A. |
13.4 Entering an Alternate Payee
If you want to make your progress payments to someone other than the subcontractor, you can enter an alternate payee.
13.4.2 To enter an alternate payee
-
On Speed Release, complete one or more of the following fields to locate the voucher:
-
Supplier Number
-
Job
-
G/L Bank Account
-
-
Choose Fold Area to access the detail area.
-
Complete the following field and click Change.
-
Payee
-
| Field | Explanation |
|---|---|
| Payee Address Number | The address number that identifies the recipient of the payment. |
13.5 Splitting Payments
You can split a voucher into two or more payments. You can send the payments to different payees and generate them on different dates.
Split payments can be for any amount, but they must add up to the gross payment.
-
On Speed Release, complete one or more of the following fields to locate the voucher:
-
Supplier Number
-
Job
-
G/L Bank Account
-
-
Enter 1 in the Option field to split the vouchers.
Figure 13-3 Speed Release Pay Item Split screen
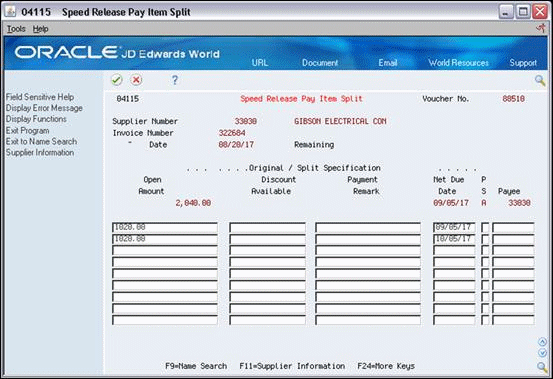
Description of "Figure 13-3 Speed Release Pay Item Split screen"
-
On Speed Release Pay Item Split, enter the split amounts on individual lines in the following field:
-
Open Amount
-
-
Complete any of the following fields and click Enter.
-
Discount Available
-
Payment Remark
-
Net Due Date
-
Pay Status
-
Payee
-
| Field | Explanation |
|---|---|
| Open Amount | The amount of an invoice, voucher, or pay item that is unpaid. |
| Discount Available | The amount of the discount available as opposed to the amount of the discount actually taken. If the supplier's invoice specifies a discount available, type that amount. If not, do one of the following:
NOTE: If the discount is to be calculated automatically, take care in determining the amount available for discount. Usually, freight, sales taxes, and labor included in the gross amount do not qualify for discounts. If this is the case, separate these pay items to ensure that the discount is calculated correctly. |
| Payment Remark | The description that will appear as the check remark on vouchers for each pay item. You can override it when you create a payment. |
| Net Due Date | The date the net payment is due (accounts receivable). In accounts payable, this date is either the discount date or the net due date, depending on what you entered or how you set up your payment terms.
If you leave this field blank during invoice entry or voucher entry, the system calculates the due date using the invoice date and the payment terms code. If you leave the Payment Terms field blank, the system calculates them based on the payment terms you specified for the customer on Customer Master Information or for the supplier on Supplier Master Information. Screen-specific information If you do not enter a date, the system uses the default value from the original pay item. |
13.6 Revising the Due Date for a Payment
You can change the net due date for payments against your vouchers. The net due date is the date on which a payment is due. You can revise the net due date to change the date on which a payment is due. You can revise the due date for individual payments or for multiple payments.
Complete the following tasks:
-
To revise the due date for multiple payments
-
To revise the due date for an individual payment