Journal Entry
The General Ledger Accounting Cycle
General Ledger Accounting Cycle
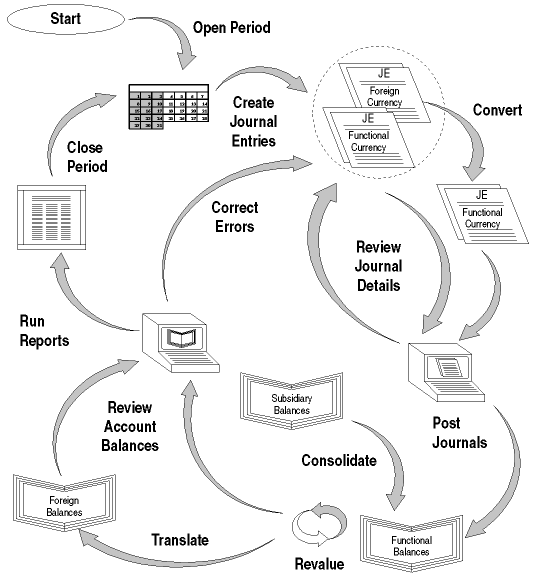
After you set up your ledger, follow these steps to enter, maintain, and report on actual accounting information for your enterprise:
-
Open an accounting period. See: Opening and Closing Accounting Periods, Oracle General Ledger Implementation Guide.
-
Enter manual journal entries, including:
-
Standard journal entries. See: Creating Journal Batches.
-
Entered currency journal entries. See: Entering Entered Currency Journals.
-
Statistical journal entries. See: Entering Statistical Journals.
-
Intercompany and Intracompany Balancing
-
-
Import journals from subledgers. If you encounter an error when trying to import a subledger journal, you can correct the import data and rerun journal import. See: Importing Journals.
-
Define recurring journal formulas for transactions that have a common format or that you enter frequently. You can also create recurring journal formulas to create allocation entries. See: Creating Recurring Journal Formula Batches.
You can use recurring journals to create three types of journal entries:
-
Skeleton entries affect the same accounts each period, but have different posting amounts. See: Creating Skeleton Journal Entries.
-
Standard recurring journal entries use the same accounts and amounts each period. See: Creating Standard Recurring Journal Entries.
-
Formula entries use formulas to calculate journal amounts that vary from period to period. Entering Recurring Journal, Budget, and Elimination Entry Formulas.
-
-
Define MassAllocation formulas to allocate a cost pool across a group of departments, companies, ledgers, etc. See: Creating MassAllocation Formulas.
-
Generate recurring journal and MassAllocation journal batches based on formulas you defined. See: Generating Recurring Journal Batches and Generating MassAllocation Journals.
-
Review the details of your unposted journal batches.
-
To view and optionally change unposted journal batches online, use the Enter Journals window.
-
To view unposted journal batch detail online, use the Journal Inquiry window.
-
To print a report showing unposted batch detail, produce a Journals - General report (set the Posting Status parameter to unposted).
-
-
Edit unposted journals to change information about an unposted batch or its journal detail, including the batch period and the journal currency.
-
Post your journal batches manually or automatically. See: Posting Journal Batches.
-
Check for posting errors. General Ledger automatically produces a Posting Execution Report so you can check the results of your posting. This report notifies you of any errors.
-
Reverse journals. You can reverse a posted or unposted journal entry. Once you assign a reversing period to the journal, generate and post the reversing batch. See: Defining Reverse Journal Entries.
-
Revalue your foreign-denominated assets and liabilities to reflect exchange rate fluctuations at the end of each accounting period. See: Revaluing Balances.
-
Translate your actual account balances to any foreign currency for reporting purposes. See: Translating Balances.
-
Consolidate ledgers by defining and running a consolidation. You can consolidate ledgers that have different charts of accounts and calendars. See: Global Consolidation System.
-
Produce financial reports and perform online inquiries to review current account balances.
-
Review account balances online using the Account Inquiry window. See: Performing an Account Inquiry.
-
Review posted journal details in the Posted Journals Report, as well as in the General Ledger and Account Analysis reports.
-
You can also define an unlimited variety of custom reports using the Financial Statement Generator to review account balances in the format of your choice. See: Overview of the Financial Statement Generator.
-
-
Enter journals to clear suspense account balances. Examine General Ledger and Account Analysis reports to identify the source of suspense account entries.
-
Close the current accounting period. See: Opening and Closing Accounting Periods, Oracle General Ledger Implementation Guide.
For Year-End Closing information, see: Year-End Closing Journals and Year-End Close Checklist.
-
Open the next accounting period.
Entering Journals
This section discusses various topics related to entering journals, including journal batches, journal and journal lines, taxable journals, entered currency journals, statistical journals, automatically copying journals, checking or reserving funds, and approving journals.
Creating Journal Batches
You can organize journal entries with common attributes into batches. For example, you might group your journal entries by type or date. You can have multiple journals in one batch, or you can have a separate batch for each journal entry.
A batch can contain multiple journals, each of which can belong to a different ledger, but all of the ledgers within a batch must have the same calendar, period type, and chart of accounts.
All journal entries in a batch must share the same period. You can create a journal batch for any Open or Future Enterable accounting period, but you can only post batches in Open accounting periods.
If you do not want to enter batch information, you can enter a journal directly. General Ledger will create a batch for the entry automatically, using the source (Manual) combined with a unique batch ID and the system date.
Note: If budgetary control is enabled, all journals in a batch must be entered for the same ledger.
Data Access Set
The data access set assigned to your user responsibility controls whether or not you can enter, modify, delete, post, and view journal batches for your ledger.
-
Full Read and Write Access: You can enter, modify, delete, post, and view journal batches for your ledger if your data access set provides full read and write access. The following lists the three types of full access:
-
Full data access type that provides read and write access to the full ledger
-
Balancing segment value data access type that provides read and write access to all balancing segment values for a ledger using the All Values check box
-
Management segment value data access type that provides read and write access to all management segment values for a ledger using the All Values check box
-
-
Partial Read and Write Access: If you have read and write access to some balancing segment values and management segment values, you have the following access:
-
Read and write access to specific balancing segment values or management segment values allows you to enter and view journal lines for those balancing segment values or management segment values. You can modify journal lines if you have read and write access to all of the balancing segment values or management segment values in the journal. You can post the journal batch if you have read and write access to all of the balancing segment values or management segment values in the journal batch.
-
-
Read Only Access: If you have read only access to a ledger, balancing segment values, or management segment values, you have view privileges only.
-
Read only access to the ledger allows you to view that journal.
-
Read only access to specific balancing segment values or management segment values enables you to view the journal lines with those balancing segment values or management segment values in the journal batch.
-
Additional Information: The lines generated for intercompany balancing may include balancing segment values or management segment values that are not included in your Data Access Set. If this occurs, you will not be able to view the generated lines. Hence, first review the intercompany balancing rules to determine their set up. Then review your Data Access Set to determine if it must be updated to obtain view access to the generated lines.
Reporting Currencies
If you use Reporting Currencies, (Journal or Subledger Level), when you post the original journals in your source ledger, General Ledger automatically generates journals in your reporting currencies where the entered currency amounts have been converted to the reporting currency amounts.
If budgetary control is enabled, all journals in a batch must be entered for the same ledger. When the budgetary control batch is posted, however, posting may generate additional journals for reporting currencies within the same batch.
You may occasionally want to manually enter a journal directly into your reporting currency. If you do find it necessary to manually enter a journal batch in your reporting currency (journal or subledger level), use the Enter Journals window. Select the journal or subledger level reporting currency from the ledger's list of values and continue in the same manner as entering journals for a ledger.
Caution: Be careful when changing amounts in a reporting currency, since the changes will not be reflected in your source ledger. Making changes to a reporting currency's journals may also make it more difficult to reconcile your reporting currency to your source ledger.
Tip: In general, we suggest that you only enter or change your journals in your source ledger, and then allow posting to create the associated journals in your reporting currencies.
Note: You can modify the Enter Journals folder form to customize your query capabilities on existing journal information. Refer to the Oracle E-Business Suite User's Guide for more information on modifying and saving folder forms.
Prerequisites
-
Set your user profile options to define various journal entry features, including default categories and sequential document numbering.
-
If you have Journal Approval enabled for your ledger, have your system administrator set the following profile options:
-
Journals: Allow Preparer Approval - determines whether preparers can approve their own journals.
-
Journals: Find Approver Method - set the default method for seeking approval.
-
For entered currency journals, define rate types and daily rates.
To create a new batch with multiple journal entries:
-
Navigate to the Enter Journals window.
The Find Journals window appears.
-
From the Find Journals window, choose New Batch.
The Batch window appears.
Note: The Status region displays the current statuses for Posting, Funds Reservation, and Journal Approval.
-
Enter an optional Batch name to identify the batch in General Ledger and journal entry reports. The batch name must be unique for the combination of chart of accounts, accounting calendar, and period type level.
If you do not enter a batch name, General Ledger creates a default name from the source, combined with a unique batch ID and the system date.
-
Enter the accounting Period for which you want to post the entries in your journal batch. General Ledger defaults to the latest Open period.
Note: If you enter a period prior to the current accounting period and the user profile option Journals: Enable Prior Period Notification is set to Yes, General Ledger displays a message indicating that you are entering a prior period journal. You must confirm that this is what you want to do.
Balance Type is a display-only field. It displays Actual when you are entering actual journals.
-
(Optional) Enter a Description for the journal batch.
-
If you have average balance enabled and your ledger is a consolidation ledger, select Standard or Average as the Journal Type.
In a consolidation ledger, you can create journal entries that affect either standard or average balances. The balances are not linked. In a non–consolidation ledger, you can only create journal entries that directly affect standard balances. Average balances are calculated automatically from your standard balances.
Note: The Journal Type field is displayed only when a consolidation ledger is defined in the application.
-
(Optional) Enter a Control Total if you want to verify the total debits for your journal batch against the batch control total. You can also enter a control total at the journal entry level.
-
Choose Journals to add journals to the batch.
Related Topics
Entering Journals for a Prior Period
Entering Journals for a Future Period
Submitting Journal Batches for Approval
Opening and Closing Accounting Periods, Oracle General Ledger Implementation Guide
Defining Conversion Rate Types
Setting General Ledger Profile Options, Oracle General Ledger Reference Guide
Overview of Reporting Currencies
Data Access Sets, Oracle General Ledger Implementation Guide
Entering Journals
In Enter Journals, an account is considered valid if it satisfies all of the following rules:
-
The account itself is enabled.
-
All of the individual segment values used in the account are enabled.
-
The effective date of the journal line (or the journal if this is a manual journal) is within the start and end date range specified for the account, if any.
-
The effective date of the journal line (or the journal if this is a manual journal) is within the start and end date range specified for each of the individual segment values used in the account.
-
The account itself is not a summary account.
-
None of the individual segment values used in the account are parent values
-
The account exists OR if the account does not exist, it satisfies all of the following:
-
The individual segment values used in the account are all defined and in the appropriate value sets.
-
Dynamic insertion is turned on.
-
The account does not violate cross validation rules.
-
-
For actual or encumbrance journals, detailed posting is on for the account.
-
For budget journals, detailed budgeting is on for the account.
-
For actual or encumbrance journals, detailed posting is on for all of the individual segments used in the account
-
For budget journals, detailed budgeting is on for all of the individual segments used in the account.
-
Security rules don't deny the current user access to any of the individual segments used in the account.
For Journal Import, if the account being processed is a NEW account (in other words, hasn't ever been used before), then the rules followed are exactly the same as for the Enter Journals form.
If the account being processed is an existing account, then only rules 1, 3, 5, 8, and 9 are enforced for performance reasons. Specifically only the account rules are enforced. All of the rules that deal with individual segment values are not enforced.
To enter a journal:
-
Navigate to the Enter Journals window.
The Find Journals window appears.
-
Enter or query the batch for which you are entering journals. To enter a journal without entering batch information, choose New Journal from the Find Journals window and proceed to Step 4.
-
To enter journals for a new batch, choose New Batch from the Find Journals window and enter the batch information.
-
To add journals to an existing batch, query the batch from the Find Journals window and choose Review Batch in the Enter Journals window.
The Batch window appears.
Note: The Status region on the Batch window displays the current statuses for Posting, Funds reservation, and Journal Approval.
-
-
Choose Journals.
The Journals window appears.
-
In the Journals window, enter a unique Journal name for the entry. If you do not enter a journal name, General Ledger automatically assigns a name using the following format: Source Journal ID Date.
-
(Optional) Enter a Description for the journal entry. General Ledger uses this as the default description for each journal entry line. You can change the journal entry description as necessary.
-
Select a ledger for your journal. Your data access set must provide read and write access to the ledger, or read and write access to one or more of the balancing segment values or management segment values to select the ledger from the list of values.
If you use reporting currencies (journal or subledger level), you can select a reporting currency for your journal.
-
Enter a Category to describe the purpose of your journal entry, such as accrual, payments, or receipts. All lines in a journal entry share the same journal category.
General Ledger defaults the journal category if you defined the profile option Journals: Default Category.
-
Enter the Period for the journal entry. If you entered a period at the batch level, you must use the same period for each journal entry in the batch. If you did not enter a period at the batch level, choose any Open or Future Enterable period for your journal entry. Note that you can only post journals in Open periods.
Note: If you enter a period prior to the current accounting period and the user profile option Journals: Enable Prior Period Notification is set to Yes, General Ledger displays a message indicating that you are entering a prior period journal. You must confirm that this is what you want to do.
-
Accept or change the default Effective Date for the journal entry.
-
Balance Type is a display–only field. It displays Actual when you are entering actual journals and Budget when you are entering budget journals.
-
If you use document sequences with manual numbering, enter a unique Document number. This field is only available if the Sequential Numbering profile option is set to Always Used or Partially Used.
If you set your profile options to always use or partially use sequential numbering and use a defined Automatic document numbering sequence, General Ledger enters a document number automatically when you save your work.
Note: If sequential numbering is always or partially used, you cannot change the journal category or document number after you save your journal entry.
-
If you are entering a intracompany journal that includes multiple balancing segment values where the total debits and credits for each balancing segment value do not net to zero, you can specify the clearing company to balance the journal.
Note: You can also define balancing rules and a clearing company in the Intercompany Accounting Module, which General Ledger then uses to automatically balance the journal. The clearing company you manually enter in the More Details window may not override the rules defined in the Intercompany Accounts window.
-
If you use automatic tax on journal entries, enter Required in the Tax field to indicate that you want to enter additional tax information. Otherwise, enter Not Required. This field only appears if you have automatic tax enabled for your ledger.
-
(Optional) If you have average balance processing enabled and your ledger is a consolidation ledger, select Standard or Average as the Journal Type.
In a consolidation ledger, you can create journal entries that affect either standard or average balances. The balances are not linked. In a non–consolidation ledger, you can only create journal entries that directly affect standard balances. Average balances are calculated automatically from your standard balances.
-
(Optional) Enter a Control Total if you want to verify the total debits for the journal lines against the journal control total.
-
Accept the default Currency or change the journal currency to an entered currency or statistical journal.
-
Enter a reversal Period and Method. You can then generate a reversing journal entry for that period. You can also reverse a journal entry without assigning a reversal period. Reversal Method can be either:
-
Switch Dr/Cr: General Ledger creates your reversing journal by switching the debit and credit amounts of the original journal entry. This method is often used when reversing accruals.
-
Change Sign: General Ledger creates your reversing journal by changing the sign of your original journal amounts from positive to negative. This reversal method is often used when reversing journals to correct data entry mistakes.
If you have average balances enabled, enter a reversal Date, Period, and Method. You can then generate a reversing journal entry for that effective date and period.
-
-
(Optional) Select the Other Information tab to enter optional reference information about the journal entry.
-
Enter a Reference description to further identify the journal entry on general ledger and journal entry reports.
-
Enter a Journal Reference Date. The primary function of this field is to satisfy Libro Giornale Requirements in Italy, but it can be used for any other date information that you want to store at the journal header level.
If you are using Reporting Currencies (Journal or Subledger Level) and you enter the Reference Date in the journal in your source ledger, it is also transferred to the journals of the reporting currencies.
If the profile option Enter Journals: Validate Reference Date is set to Yes, the date you enter is validated to ensure the date falls into an open or future enterable period.
If the profile option GL Consolidation: Preserve Journal Batching is set to Yes for the parent ledger, the consolidation process transfers the reference date information from the subsidiary ledger to the parent ledger.
-
-
Select the Lines tab and enter the journal lines.
-
Save your work.
Related Topics
Entering Entered Currency Journals
Entering Journals for a Prior Period
Entering Journals for a Future Period
Defining Reverse Journal Entries
Overview of Average Balance Processing
Data Access Sets, Oracle General Ledger Implementation Guide
The Intercompany Segment and Use of Security Rules, Oracle General Ledger Implementation Guide
Entering Journal Lines
To enter journal lines:
-
Navigate to the Enter Journals window.
-
Enter your journal information. Alternatively, you can set up a default category, default ledger and accept all default batch and journal information to enter lines directly.
-
Enter a Line number for each journal line to control the sequence in which the journal entry lines appear online and in reports. After you enter the first journal entry line number, General Ledger automatically increments the numbers for the following lines. You can change the line numbers as necessary.
-
Enter an Account for the journal line. Your data access set must provide read and write access to the ledger, or read and write access to the account's balancing segment value or management segment value.
-
Enter the Debit or Credit amount for the designated account.
Note: If needed, you can enter debits and credits as negative amounts.
-
If you enabled the General Ledger descriptive flexfields, enter additional descriptive information about the journal line.
-
Use Journals - Journal Entry Line to enter any additional information related to your journal lines.
-
Use Journals - Captured Information to enter additional information about journal lines with certain natural account segment values.
-
Use Value-Added Tax to incorporate tax information into your accounting transactions. You cannot change the definition of this descriptive flexfield in General Ledger.
-
-
Save your work.
Related Topics
Entering Taxable Journal Entries
Entering Entered Currency Journals
Generating Reversing Journal Batches
Defining Descriptive Flexfields for General Ledger, Oracle General Ledger Implementation Guide
Data Access Sets, Oracle General Ledger Implementation Guide
Entering Taxable Journal Entries
Generally, you enter journals for taxable amounts as usual, and enter additional taxation information, then calculate taxes before you post the journal. However, there are specific restrictions about when you can enter or modify tax information.
After you calculate tax for a journal, the system does not recalculate tax if you revise any line in that journal. If you need to revise a taxable amount or alter its tax information after you have calculated tax, you should either reverse and re-enter the journal (if it is already posted), or delete the unposted journal and re-enter it correctly.
After you calculate tax, the resulting new tax journal lines can be edited just like any other journal lines. For example, if you need to change the tax liability account for a specific calculate tax line, you can edit the account after you calculate tax.
Note: You cannot reserve funds for a journal until you calculate tax for that journal.
To calculate tax information during manual journal entry:
-
Navigate to the Enter Journals window.
-
Enter optional batch information.
Note: The Status region on the Batch window will display the current statuses for Posting, Funds reservation, and journal Approval.
-
Enter your journal information. In the Tax field, enter Required to indicate that you want to enter additional tax information and calculate tax amounts.
-
For each taxable journal line, open the Tax Information descriptive flexfield window and enter a tax type, code, and rounding rule, and specify whether the amount is tax inclusive, or accept the default values specified during system setup. You can also enter other tax information, such as a document identifier or reference information, as appropriate for your accounting policy.
Depending upon how your tax system is configured, you may also be able to enter a code into the Tax Code field then skip the Tax Information flexfield window.
-
Save your work.
-
Choose Tax Journal to create additional tax lines, and to reduce entered tax inclusive amounts, as appropriate. Or, choose Tax Batch to calculate tax for a journal batch.
-
Save your work.
Tax Information Fields
Tax Type: Input or Output
Tax Code: a user-defined Receivables tax code (if the tax type is Output), or a Payables tax name (if the tax type is Input).
Rounding Rule: Up, Down, or Nearest rounding for tax amounts calculated from this entered amount.
Amount Includes Tax: enter Yes if this is a tax-inclusive amount.
Document Identifier, Document Date: (Optional, not validated) You can use these fields for storing a document number such as customer or vendor invoice number and date.
Customer/Vendor Name, Reference: (Optional, not validated)
Tax Registration Number: (Optional, not validated) VAT registration number.
Reversing Taxable Journal Entries
You can reverse a journal entry before or after you calculate tax.
If you have not already calculated tax for the reversed (original) journal, you can still manipulate the tax information for the reversing journal. For example, you can change the Tax field to Required then enter taxable lines and calculate tax. Or, you can delete all the tax information and change the journal's Tax field to Not required.
However, if you reverse a journal for which you have already calculated tax, you cannot remove the tax information from the reversing journal.
Note: If you are using Currencies (Journal or Subledger Level), you must post your primary or secondary ledger's journal before you can reverse the journal.
Posting Taxable Journal Entries
Tax journals are posted exactly the same as any other journal; posting creates intercompany or suspense balancing entries.
You cannot post a taxable journal until you have calculated tax for that journal. Your data access set must provide read and write access to the ledger, or read and write access to the balancing segment values or management values in the batch to post.
Related Topics
Setting Up Automatic Tax Calculation, Oracle General Ledger Implementation Guide
Tax Calculation Rules, Oracle General Ledger Implementation Guide
Entering Entered Currency Journals
Generating Reversing Journal Batches
Defining Descriptive Flexfields for General Ledger, Oracle General Ledger Implementation Guide
Defining Reverse Journal Entries
Entering Entered Currency Journals
You can enter manual journal entries using an entered currency. An entered currency is a currency that is not the ledger currency.
If you use reporting currencies (journal or subledger level), an entered currency is a currency that is not the currency of the reporting currency.
Note: Review entered currency account balances using the Trial Balance Report. See: Trial Balance Report.
Use the Revalue Balances window to revalue entered currency-denominated accounts. See: Revaluing Balances.
To enter an entered currency journal:
-
Navigate to the Enter Journals window.
The Find Journals window appears.
-
Enter or query a batch from the Find Journals window or choose New Batch.
The Batch window appears.
-
Enter optional batch information in the Batch window and choose Journals.
-
In the Journals window, enter journal information, specifying the entered Currency you want to use for your journal entry.
-
Enter the journal currency conversion information.
-
The conversion Date should be within the accounting period you defined for the journal entry but the Date field allows other entries in case you want to use a different period's daily rate. The conversion date is the posting date for the journal entry.
-
If you don't choose a conversion date, General Ledger uses the default effective date of the journal.
-
The conversion Type can be the Spot, Corporate, or User type, or any conversion type you defined. If your conversion rate type is assigned to a definition access set, you must have Use privilege to select it.
-
You must enter a conversion Rate if you enter User as the conversion type. If you specify a conversion type other than User, General Ledger automatically enters the daily conversion rate based on the rates you entered in the Daily Rates window.
-
-
Enter your journal lines, using debit and credit amounts in the entered currency. General Ledger automatically converts the entered amounts into your ledger's currency based on the designated conversion rate.
-
Use the scrolling region to review the results of your currency conversion. You can override the Converted Debit and Converted Credit amounts if you enable the user profile option Journals: Allow Multiple Exchange Rates.
Related Topics
Overview of Multi-Currency Accounting
Setting General Ledger Profile Options, Oracle General Ledger Reference Guide
Overview of Average Balance Processing
Data Access Sets, Oracle General Ledger Implementation Guide
Entering Statistical Journals
General Ledger provides two ways to enter statistical journals. You can enter journals with only statistical debit and credit amounts. If your user profile permits, you can also combine monetary and statistical amounts in the same journal line.
Note: Statistical journal entries do not require balanced debits and credits.
Note: If you use Reporting Currencies (Journal or Subledger Level), statistical journals will be generated for your reporting currencies, but the journals are not affected by the currency conversion process.
To enter a statistical journal:
-
Navigate to the Enter Journals window.
-
Enter optional batch information.
-
Enter your journal information, specifying STAT for the journal Currency.
-
Enter your journal lines, using statistical debit and credit amounts. The debits do not need to equal credits for a statistical journal.
-
Save your work.
To enter a combined statistical and monetary journal:
-
Set the profile option Journals: Mix Statistical and Monetary to Yes.
-
Define statistical units of measure for the natural account segment values for which you want to combine statistical and monetary journals.
-
Navigate to the Enter Journals window.
-
Enter optional batch information.
-
Enter your journal information.
-
Enter your journal lines, using debit and credit amounts in any monetary currency.
-
Enter the statistical Quantity for each journal line. General Ledger automatically displays the Unit of Measure associated with the natural account segment value for the line.
-
Save your work.
Related Topics
Setting General Ledger Profile Options, Oracle General Ledger Reference Guide
Defining Statistical Units of Measure, Oracle General Ledger Implementation Guide
Overview of Reporting Currencies
Data Access Sets, Oracle General Ledger Implementation Guide
Autocopying Journal Batches
You can create a new journal batch by copying and modifying an existing journal batch. Use Autocopy to copy a journal batch from the Journals window, the Batch window or the Enter Journals window.
Note: If you have multiple journals contained in a journal batch, using Autocopy will copy the entire batch. You cannot copy a single journal in the batch.
Special Note for Reporting Currencies
If you copy journal batches that contain journals for both the source ledger and its reporting currencies, Autocopy will not copy the reporting currency journals. Posting will automatically create the reporting currency journals when you post the autocopied journals in the source ledger. Autocopied Journals will show the seeded source as AutoCopy.
To copy a journal batch:
To copy a journal batch, perform the following steps.
-
Navigate to the Enter Journals window.
-
Query and select the journal batch you want to copy.
-
Select Autocopy to copy the batch. You can also choose to review the batch or review the journal before autocopying.
-
Enter the batch name, period, and effective date for the new journal batch.
-
Choose OK.
General Ledger submits a concurrent process to create an unposted journal batch.
Changing a Batch Period
If you change the period for an unposted batch, General Ledger updates the posting date for each journal entry.
Note: If you are using budgetary control, and have reserved funds for the batch, you must unreserve funds before you can change the batch period.
To change the period for a journal batch:
-
Navigate to the Enter Journals window.
The Find Journals window appears.
-
Query the batch you want to change.
-
Choose Review Batch.
The Batch window appears.
-
Choose Change Period.
The Change Period window appears.
Your data access set must provide read and write access to the ledger, or read and write access to all of the balancing or management segment values in the batch in order to update the period.
-
In the To field, select a period from the list of values and choose OK.
Note: Similarly, you can also change the period for a journal from the Journals window.
-
If the original creation date of your journal entry batch is within the new period, General Ledger assigns the creation date as the new Effective Date.
If the creation date of your journal entry batch is not in the same period as the new batch period, General Ledger assigns either the first or last day of the new period as the new Effective Date, depending on which date is closer to the creation date.
-
Choose OK to save the revised batch.
Related Topics
Entering Journals for a Prior Period
Entering Journals for a Future Period
Data Access Sets, Oracle General Ledger Implementation Guide
Changing the Journal Entry Currency
You can change the currency for any unposted journal entry.
Note: If you are using budgetary control, and have reserved funds for the journal entry, you must unreserve funds before you can change the currency.
To change the currency of an unposted journal entry:
-
Navigate to the Enter Journals window.
-
Query the batch and journal within the batch that you want to change.
The Enter Journals window appears.
-
Choose Review Journal.
The Journals window appears.
-
Choose Change Currency.
The Change Currency window appears.
Your data access set must provide read and write access to the ledger, or read and write access to all of the balancing or management segment values in the batch in order to change the currency.
-
Enter the journal currency conversion information.
-
The conversion Date must be within the accounting period you defined for the journal entry. The conversion date is the posting date for the journal entry.
-
The conversion Type can be the Spot, Corporate, or User type, or any conversion type you defined. If your conversion rate type is assigned to a definition access set, you must have Use privilege to select it.
-
You must enter a conversion Rate if you enter User as the conversion type. If you specify a conversion type other than User, General Ledger automatically enters the daily conversion rate based on the rates you entered in the Daily Rates window.
-
-
Save your work.
Related Topics
Entering Entered Currency Journals
Data Access Sets, Oracle General Ledger Implementation Guide
Checking or Reserving Funds for a Journal Batch
If you are using budgetary control, you can check, reserve, or unreserve funds for individual journal entries or a journal batch.
Note: Funds are checked or reserved for the entire batch, whether you perform the fund check or reservation at the journal or batch level.
To check or reserve funds for a journal batch:
-
Navigate to the Enter Journals window.
-
Query the batch for which you want to check or reserve funds.
The Batch window appears.
-
Enter optional batch information.
Note: The Status region on the Batch window displays the current statuses for Posting, Funds Reservation, and Journal Approval.
-
Choose Journals.
The Journals window appears.
-
Enter journal information.
-
Enter journal lines and save your work.
-
You can check funds any time before reserving them. To check the availability of funds for the current journal entry or for the entire batch, choose Check Funds.
A message indicates whether funds are available.
-
To reserve funds for the current journal entry or for the entire batch, choose Reserve Funds.
A message indicates whether funds are reserved.
Note: After you reserve funds, you can only modify the journal entry or batch if you unreserve the funds. After funds are reserved, the button label on the Reserve Funds button changes to Unreserve Funds. If you choose Unreserve Funds, the journal batch reverts back to unreserved status and the button label changes to Reserve Funds.
-
After checking or reserving funds, choose View Results to view available funds.
Note: You can check, reserve, or view funds from the Batch window, as well as from the Journals window, by choosing the Check Funds, Reserve Funds, or View Results buttons respectively.
To unreserve funds:
-
To update or delete an approved journal batch, you can unreserve funds, modify your journal batch, and then re-reserve funds, if necessary.
You can unreserve funds only if your journal batch has a funds status of Passed and the batch posting status is Unposted or Processing.
Choose Unreserve Funds for an approved journal or batch to unreserve the funds. If your funds unreservation succeeds, your journal batch funds status changes to Required, and all corresponding funds check information is deleted.
Related Topics
Using Budgetary Control and Online Funds Checking
Reviewing Budgetary Control Transactions
Reviewing the Batch Posting Status
Submitting Journal Batches for Approval
If Journal Approval is enabled for your ledger, journal batches whose journal source requires approval must be approved by a manager whose authorization limit is high enough to allow approval. You will not be able to post your batch to the general ledger until you receive this approval. Approval is also required in a multi-ledger journal batch where one of the ledgers has Journal Approval enabled.
Note: The approval limit is compared against the maximum net journal line value for each ledger that requires approval. The approver must have sufficient read and write access to the ledger, balancing segment values, or management segment values access to all of the journal lines in the batch that require approval. For entered currency journal entries, the limit is applied against the converted amount.
If you use reporting currencies (journal or subledger level), you can enable journal approval for your reporting currencies in Accounting Setup Manager.
To submit a journal batch for approval:
-
Navigate to the Find Journals window.
-
Query the journal batch you want to submit for approval.
The Enter Journals window appears.
Your data access set must provide read and write access to the ledger, or read and write access to all balancing or management segment values in the batch to submit the batch for approval.
-
Optionally choose Review Batch or Review Journal to review the batch information or journal details before submitting it for approval.
Note: The Status region on the Batch or Journals window displays the current statuses for Posting, Funds Reservation, and Journal Approval.
-
From either the Enter Journals, Batch, or Journals window, choose the Approve button.
After submitting your journal batch for approval, you will receive a message indicating the result of your request. The message indicates one of the following journal batch statuses:
-
batch was self-approved, if you are authorized to approve your own journal batches
-
batch has been sent to an approver
-
batch was invalid
Invalid batches must be corrected and resubmitted for approval. If your journal batch was sent to an approver, periodically check your notifications for a response.
-
Related Topics
Setting Up Journal Approval, Oracle General Ledger Implementation Guide
Approving Journal Batches
If Journal Approval is enabled for your ledger, journal batches whose journal source requires approval must be approved by a manager whose authorization limit is high enough to allow approval. When the journal batch is submitted for approval, it will move through your organization's approval hierarchy, based on the approver method specified by the Journals: Find Approver Method profile option. Approval is also required in a multi-ledger journal batch where at least one of the ledgers in the batch has Journal Approval enabled.
If you have secondary ledgers, secondary ledger journal batches created from a posted primary ledger journal batch do not need to be approved if they are posted from the AutoPost feature or if they are manually posted from the Post Journals window or from the Enter Journals window. However, if a user at least views the secondary ledger journal details in the Journals window before posting the journal batch, the journal batch will require journal approval if the secondary ledger has Journal Approval enabled. This is so the secondary ledger journal batches created from a posted primary ledger journal batch will require approval if any modifications are made to the journal batch.
If you enter a journal batch directly into a secondary ledger that has Journal Approval enabled, the journal batch will require journal approval.
When the journal batch is submitted for approval, it moves through your organization's approval hierarchy, based on the approver method specified by the Journals: Find Approver Method profile option.
Each approver receives a notification when approval is required. The approver must have sufficient read and write access to the ledger, balancing segment values, or management segment values access to all of the journal lines in the batch that requires approval.
To review and approve or reject a journal batch:
-
Check your notifications. Journal approval requests display the following in the Subject field of the Notifications Summary window:
Journal batch <batch name> submitted by <user name> requires your approval.
-
Open the notification that requests your approval.
-
(Optional) Review the batch information or journal details before you approve or reject it. If your current responsibility allows you access to the journal batch's ledgers, you can drill down from the Notifications window to the Enter Journals window to review the batch. Otherwise, you can query journal or journal batches in the Enter Journals window to review the batch.
See: Performing a Journal Entry Inquiry
Tip: The journal approval notification you receive includes the batch name, total batch amount, ledger currency, preparer's name, monitor URL, and preparer's comments. Use this information to query the journal batch.
-
With the journal batch approval request displayed in the Notifications window, choose the Respond button.
-
Select Approve or Reject from the Action poplist.
-
(Optional) Enter a Comment.
-
Choose OK to save your work.
Related Topics
Setting Up Journal Approval, Oracle General Ledger Implementation Guide
Performing a Journal Entry Inquiry
Journal Wizard
Journal Wizard is a spreadsheet based extension to the Oracle E-Business Suite. By enabling interaction with a spreadsheet interface where familiar data entry and modeling techniques can be used, Journal Wizard enables you to enter journals for, budgets, and encumbrances quickly and easily.
Oracle General Ledger integrates with the spreadsheet interface through the following extensions:
-
Journal Wizard
-
Budget Wizard
-
Currency Rates Manager
Journal Wizard Overview
Journal Wizard enables you to define and create journal entries through formatted Excel spreadsheets on your desktop. With the Journal Wizard you can:
-
Use the powerful spreadsheet features of Excel for journal entry. For example, you can use formulas to calculate amounts. You can also customize spreadsheets by defining "layouts" and default values for appropriate journal worksheet fields.
-
Save a journal worksheet to a file, which can then be transferred to another PC for sharing. You can subsequently make edits to the spreadsheet even while being disconnected from the network.
-
Users can enter recurring journal entries by saving a journal spreadsheet and then uploading it whenever appropriate, such as every month
Once you are done editing the spreadsheet, Journal Wizard can validate the data before uploading it to the Oracle E-Business Suite. Journal Wizard validates journal data against the accounts, security rules, and reference information defined in GL. After validating the data, you can automatically upload your journals to GL.
Prerequisites
Before you can use Journal Wizard to enter journals using formatted spreadsheets, the following steps must be completed:
-
Define a ledger.
-
Open one or more accounting periods.
-
The following profile options are mandatory and must be set before using Journal Wizard:
GL: Data Access Set - To view and interact with ledger data, the appropriate Data Access Set must be assigned to the responsibility.
GL: Default Desktop Viewer - Set up according to the version of Excel being used.
Note: A number of profile options impact journal wizard functionality. These profile options are detailed in the Oracle General Ledger Reference Guide.
Creating Journal Entries with the Journal Wizard
To create a journal entry with the Journal Wizard, navigate to the Journal Wizard window.
Select a Layout and Content (optional) to create your spreadsheet. These structures are described below.
Working with Web ADI Layout
Layouts in Web ADI provide a spreadsheet interface for journal entry. If you choose not to use one of the pre-formatted layouts (discussed below), then you are required to define one before you can create a spreadsheet document. The layout determines the fields in the spreadsheet, their position, and any default values that automatically populate the fields.
Seeded Layouts
Oracle General Ledger provides eight seeded layouts for your use as follows:
-
Functional Actuals - Single
-
Functional Actuals - Multiple
-
Foreign Actuals - Single
-
Foreign Actuals - Multiple
-
Budgets - Single
-
Budgets - Multiple
-
Encumbrances - Single
-
Encumbrances - Multiple
You can use or modify these eight seeded layouts or create your own.
Layout Details - Single vs. Multiple
Single Layouts are used to create an individual journal entry worksheet. These layouts contain two sections, a "header" section along with an associated "lines" section. Information common to all lines in the journal entry is reflected in the journal worksheet header and includes the Ledger, Category, Source, Currency, and Accounting Date. For each line of the actual entry, you can enter information such as account, debit amount, and credit amount.
Multiple Layouts are used to prepare multiple journal entries. All information pertaining to a journal entry, even that which is common to more than one line, is entered on each line of the worksheet. With the Multiple Layouts option, you can combine journal entries that have different categories, sources, and currencies in a single journal worksheet and then upload these different journal entries at the same time. When GL imports the entries from the GL interface table, it separates the lines into appropriate entries and batches.
Note: The context for a "single" layout is determined by factors like the Balance Type and Access Set Name. These values cannot be changed.
Layout Details - Balance Type
There are four types of journal entries that can be entered through a Layout:
-
Functional Actuals create actual journal entries using the functional currency for your ledger.
-
Foreign Actuals create actual journal entries using a currency which is different from the functional currency for your ledger.
-
Budgets create journal entries that are to be posted against a budget.
-
Encumbrances create journal entries to update encumbrance balances.
Customizing the Layout
Instead of using a seeded layout to enter your journals, you may update one of the predefined layouts or create your own. Creating or updating a layout includes determining the fields to be included in the layout, their placement (Header, Line, or Context sections), and default values. Once the customized layout is defined, return to the Journal Wizard window to complete your data entry.
See Oracle Web Applications Desktop Integrator.
Header Sections
While customizing a layout, you can opt to have multiple header blocks or sections. Each of these sections appear as a separate cluster of header fields and you select which fields are displayed in each of them.
For example, if you decide on two Headers, then you can place some fields in the header under "Header 1," and some items in the header under "Header 2."
Required vs. Optional Fields
Required Fields - These fields include the Balance Type, Database, Ledger, Category, Source, Currency, Accounting Date, Debit, and Credit.
Depending on the type of layout being modified, other fields may be required. For example, Budget, Budget Period, and Organization are usually optional during journal entry. However, they are mandatory when creating Budget Journals.
Optional Fields - Select the optional fields to include in your document and their placement. These include all other fields that can be entered in a journal entry like Conversion Type/ Date/ Rate, Batch Name/ Description, Journal Name/ Description, Descriptive Flexfield Information fields, Tax Code, etc.
Choose the placement for required and optional fields in your document. All these fields match up with the fields in the GL Interface table. Note that you can place these fields in the Header, Line, Or Context sections of the Layout.
Note: Once the layout is saved, you can select this layout when creating Journal Entries with the Journal Wizard.
The table that follows provides additional information on values you should use when creating custom layouts for various journal types.
| Journal Type | Balance Type and Default Type | Default Value for Balance Type | Other Values |
|---|---|---|---|
| Functional Actuals Journals | Add Balance Type to the context region and enter 'Constant' for default type. | Enter 'Actual' | Add the following optional fields to your layout if you want to create a reversing journal: Reverse Journal and Reversal Period. The following fields are necessary if you want to include VAT information in the journal entry: VAT Context, Invoice Date, Tax Code, Invoice Identifier, and Invoice Amount. |
| Foreign Actuals Journals | Add Balance Type to the context region and enter 'Constant' for default type. | Enter 'Actual' | Add Conversion Type, Conversion Rate, and Conversion Date to the layout. (Conversion Rate and Conversion Date must both be in the lines or header region.) In addition, the Reverse Journal and Reversal Period fields are necessary for a reversing foreign journal. The VAT information fields can also be added as listed against Functional Actuals Journals. Optionally you can add converted debit and converted credit columns. |
| Budget Journals | Add Balance Type to the context region and enter 'Constant' for default type | Enter 'Budget' | Add Organization, Budget Name, and Period to the layout. The Organization field must be added to the header region. Reversal fields can also be added as appropriate. |
| Encumbrance Journals | Add Balance Type to the context region and enter 'Constant' for default type. | Enter 'Encumbrance' | Add Encumbrance Type to the layout. Reversal fields can also be added as appropriate. |
Uploading Data
Upload your spreadsheet to Oracle General Ledger by selecting Oracle > Upload. The following table describes select parameters in the Upload window:
| Upload Parameter | Description |
|---|---|
| All Rows vs. Flagged Rows | You can upload all rows in your worksheet, regardless of whether changes have been made. You can upload only those rows that are marked with a flag character in the upload column. Note that you can create a new flag character on the Upload column by simply clicking in the column field. This is particularly useful when working with saved worksheets. |
| Automatically Submit Journal Import | If selected, starts the journal import process automatically after the upload completes. The system will then do the following:
|
| Create Summary Journals | If selected, GL summarizes all transactions that share the same account, period, and currency. Else, GL creates a journal line for every row in your journal worksheet. |
| Upload Unbalanced Journals | Posted to a predefined suspense account.
Note: To use this function, suspense posting must first be enabled in GL. |
Importing Data using Web ADI Content
Content functionality can be used to automatically import data from a text file into the spreadsheet. This import takes place when the layout is built during the Create Document flow. Before you can execute an import, you will need to define a default, text import "Mapping."
Web ADI requires a mapping in order to determine where imported data should be placed in the spreadsheet. A mapping associates columns in the imported data text file with columns in the spreadsheet layout. Once the default mapping is created, you can use it to import data by selecting the appropriate layout with the content as a "Text File" in the Journal Wizard.
Entering Journals for a Prior Period
You can post journal entries to a prior accounting period, as well as to a prior fiscal year, as long as the prior period is open. When you post to a prior period, General Ledger automatically updates the beginning balances of all subsequent periods. In addition, if you post a journal entry into a prior year, General Ledger adjusts your retained earnings balance for the effect on your income and expense accounts.
Enter and post prior period journal entries just like any other journal entry. To ensure complete control over prior period adjustments, you can only post journal entries to an open period. When you finalize your activity for an accounting period, simply close the period to prevent the entry or posting of additional journal entries.
Note: To ensure that you don't accidentally enter a journal for a prior period, choose to have General Ledger display a message whenever you try to enter a prior period journal. To use this feature, have your system administrator set the user profile option Journals: Enable Prior Period Notification to Yes.
Note that if there are many open accounting periods following the period to which you are posting, General Ledger must update many beginning balances. Therefore, to speed up the posting process, keep a minimum number of accounting periods open.
Note: We recommend that you run a Trial Balance Report whenever you post to a previous fiscal year to ensure that your Retained Earnings account is properly reconciled. General Ledger automatically updates this account whenever you open the first period of a new fiscal year.
Related Topics
Opening and Closing Accounting Periods, Oracle General Ledger Implementation Guide
Entering Journals for a Future Period
You can enter journal entries for as many future periods as you want. For example, you might want to enter journal entries for the following month while you are closing the books for the current month. You control the number of future accounting periods for which you want to allow journal entry when you define your ledger. General Ledger automatically assigns a status of "Future-Entry" to the appropriate number of accounting periods following the latest open accounting period in your calendar.
Although you can enter journal transactions to any accounting period with the status of Future-Entry, you cannot post journals into a period until you open the period.
Related Topics
Defining Ledgers, Oracle General Ledger Implementation Guide
Opening and Closing Accounting Periods, Oracle General Ledger Implementation Guide
Reviewing Budgetary Control Transactions
If you use budgetary control to check or reserve funds while entering journals, budgets, or encumbrances, you can review the results of your funds check or funds reservation request.
For each transaction, General Ledger shows the posting Period, Account, Balance Type, and the transaction Amount (debit or credit) in your ledger currency. For encumbrance or budget transactions, you also see the Encumbrance Type or Budget Name of your transaction.
Note: You can alter the Budgetary Control Transactions folder form to customize the information that is displayed. Refer to the Oracle E-Buisness Suite User's Guide for more information on modifying and saving folder forms.
Budgetary control transactions can have the following statuses:
| Variable | Description |
|---|---|
| Pending: | Funds reservation request is pending |
| Approved: | Funds reservation request is approved |
| Rejected: | Funds reservation request is rejected |
| Checking: | Funds check request is pending |
| Passed Check: | Funds check request has passed |
| Failed Check: | Funds check request has failed |
| Fatal: | General Ledger detected an irrecoverable error |
To review the results of a funds check or funds reservation:
-
Check or reserve funds for a journal, encumbrance, budget journal, or budget transfer.
-
Choose View Results to review the budgetary control transactions resulting from your funds action request.
-
Scroll through the displayed transactions in the Budgetary Control Transactions window. General Ledger displays transactions with funds failure followed by those transactions which passed funds check and reservation.
-
Review the Status for each transaction line.
General Ledger displays A (actual), B (budget) or E (encumbrance) for your balance type.
-
Select a transaction line to review its transaction detail.
-
Print a Budgetary Control Transactions report to keep a record of the current transactions and their status, or any errors and warnings you encountered.
-
Choose Done to return to the window in which you entered your budgetary control transactions.
Related Topics
Reviewing Budgetary Control Transaction Detail
Printing a Budgetary Control Transactions Report
Using Budgetary Control and Online Funds Checking
Reviewing Budgetary Control Transaction Detail
For each budgetary control transaction line, General Ledger displays the Result of your funds checking or reservation request on the account.
General Ledger displays the Budget, Encumbrance, Actual, and Funds Available balances for the account. The budget balances are the balances in your funding budget. The available balance is calculated as:
Funds Available = Budget - Encumbrance - Actual
For each of these balances, General Ledger also displays several specific amounts:
-
Posted: Balance of the posted transactions which passed funds reservation.
-
Approved: Balance of the unposted transactions which passed funds reservation.
-
Pending: Balance of the transactions awaiting funds reservation.
-
Total: Sum of the Posted, Approved and Pending balances.
Important: Note that these balances reflect your interval options. For example, if your funds check Amount Type is YTD and your Boundary is Quarter, then these balances are the year-to-date balances as of the end of the accounting quarter for this transaction.
Use this zone to view the details of the funds available corresponding to your transaction lines.
Printing a Budgetary Control Transactions Report
You can print a report of your budgetary control transactions. You can print the report to show the details of all your transactions, or only include errors and warnings.
To print a Budgetary Control Transaction report:
-
Check or reserve funds for a journal, encumbrance, budget journal, or budget transfer.
-
Choose View Results to review the budgetary control transactions resulting from your funds action request.
-
Choose Print All to print a Budgetary Control Transactions report containing the details of all transactions included in your funds check or reservation request.
-
Choose Print Errors and Warnings to print a Budgetary Control Transactions Report containing the details of only those transactions that contain failures and/or warning messages.
-
Choose Done to return to the window in which you entered your budgetary control transactions.
Related Topics
Budgetary Control Transactions Report
Reviewing Budgetary Control Transaction Detail
Using Budgetary Control and Online Funds Checking
Journal Approval
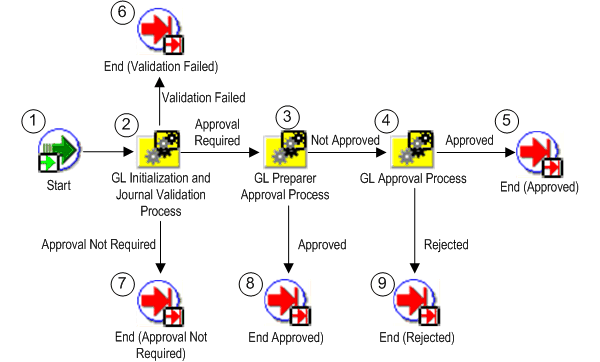
Oracle General Ledger Journal Approval
Overview
The GL Journal Approval Process obtains the necessary management approvals for manual journal batches. The process validates the journal batch, determines if approval is required, submits the batch to approvers (if required), then notifies appropriate individuals of the approval results.
The process has a result type of GL Journal Approval Process Result that gives one of four results:
-
Approval Not Required: The journal batch does not need approval.
-
Approved: The journal batch was approved by all necessary approvers. In some cases, this may be the preparer.
-
Rejected: The journal batch was rejected by an approver.
-
Validation Failed: The journal batch failed the validation process and was never submitted to the approver.
The process consists of five unique activities, some of which are reused, to comprise the nine activity nodes that appear in the workflow diagram:
General Ledger Journal Approval Process
Customizing Journal Approval
You can customize Journal Approval to meet your organization's specific needs through three mechanisms:
Profile options: There are two profile options that affect how Journal Approval operates:
-
Journals: Allow Preparer Approval: Determines whether preparers can approve their own journals.
-
Journals: Find Approver Method: Sets the default method for seeking approval.
See: Setting General Ledger Profile Options, Oracle General Ledger Reference Guide
Workflow activity settings: You can change the default settings for the:
-
Request Approval From Approver timeout: The standard setting is 7 days. After this time has expired, Journal Approval notifies the preparer that no approver response has been received.
-
Reached Manager Notification Resend Limit: The standard setting is 1 notification. Journal Approval will resend notifications to the approver until the limit is reached.
Note: If you decide to change these settings, be careful when selecting your new values, since the settings work together with a compounding effect. Specifically, the approver timeout is processed for each manager notification sent.
For example, if the approver timeout is 7 days and the notification resend limit is 3, a journal batch will remain in the approval cycle for 21 days if the approver does not respond.
-
Default Error Notification: Journal Approval uses Oracle Workflow's standard error processing to handle runtime errors. You can choose to send a notification to your system administrator whenever such errors occur. Open the Journal Approval workflow file in Oracle Workflow and set the Performer for the Default Error Notification, in the Default Error process, to your system administrator's userid.
Customizable activities: You can customize four activities and one process:
-
Customizable: Is Journal Batch Valid activity
-
Customizable: Does Journal Batch Need Approval activity
-
Customizable: Is Preparer Authorized to Approve activity
-
Customizable: Verify Authority activity
-
Customizable: Verify Authority Process
Note: We strongly recommend that you modify only these activities and processes when customizing the GL Journal Approval Process.
GL Journal Approval Process Activities
Following is a description of each activity listed by the activity's function name. You can create all the components for an activity in the graphical Oracle Workflow Builder except for the PL/SQL stored procedures that the function activities call. All function activities execute PL/SQL stored procedures which you must create and store in Oracle8. The naming convention for the PL/SQL stored procedures used in the GL Journal Approval process is:
GL_WF_JE_APPROVAL_PKG.<PROCEDURE>
GL_WF_JE_APPROVAL_PKG is the name of the package that groups all the procedures used by the GL Journal Approval process, except the customizable procedures. <PROCEDURE> represents the name of the procedure.
Customizable procedures are grouped together in the package named GL_WF_CUSTOMIZATION_PKG. The naming convention is the same as described for the GL Journal Approval package.
Start (Node 1)
This activity marks the start of the process.
| Variable | Description |
|---|---|
| Function | WF_STANDARD.NOOP |
| Result Type | None |
GL Initialization & Validation Process (Node 2)
This activity is a subprocess that performs initialization, then validates the journal batch. If the journal batch is valid, the subprocess also determines whether the batch requires approval. To view the subprocess, choose GL Initialization & Validation Process under the Processes branch of the Workflow Builder navigator tree.
| Variable | Description |
|---|---|
| Result Type | GL Initialization & Validation Process Result |
GL Preparer Approval Process (Node 3)
This activity is a subprocess that determines if the journal batch preparer is authorized to approve his/her own journal batch. If so, the batch is approved, the approver name is set, and notifications are sent. To view the subprocess, choose GL Preparer Approval Process under the Processes branch of the Workflow Builder navigator tree. See: GL Preparer Approval Process.
| Variable | Description |
|---|---|
| Result Type | GL Preparer Approval Process Result |
| Prerequisite Activities | GL Initialization & Validation Process |
GL Approval Process (Node 4)
This activity is a subprocess that finds all necessary approvers, seeks journal batch approval, and sends notifications of approval or rejection. To view the subprocess, choose GL Approval Process under the Processes branch of the Workflow Builder navigator tree. See: GL Approval Process.
| Variable | Description |
|---|---|
| Result Type | GL Approval Process Result |
| Prerequisite Activities | GL Initialization & Validation Process, GL Preparer Approval Process |
End (Nodes 5 through 9)
This function activity marks the end of the process. Although the activity itself does not have a result type, each node of this activity in the process must have a process result assigned to it. The process result is assigned in the property page of the activity node. Since the GL Journal Approval process activity has a result type of GL Journal Approval Process Result, each End activity node must have a process result matching one of the lookup codes in the GL Journal Approval Process Result lookup type.
| Variable | Description |
|---|---|
| Function | WF_STANDARD.NOOP |
| Result Type | None |
Related Topics
Setting Up Journal Approval, Oracle General Ledger Implementation Guide
GL Initialization & Validation Process
The GL Initialization & Validation Process performs initializes, then validates the journal batch. If the journal batch is valid, the subprocess also determines whether the batch requires approval.
The process has a result type of GL Initialization & Validation Process Result that gives one of three results:
-
Approval Not Required: The journal batch does not require approval.
-
Approval Required: The journal batch requires approval before further action can be taken by the preparer.
-
Validation Failed: The journal batch failed the validation process and was never submitted to the approver.
The process consists of 15 unique activities, some of which are reused, to comprise the 18 activity nodes that appear in the workflow diagram:
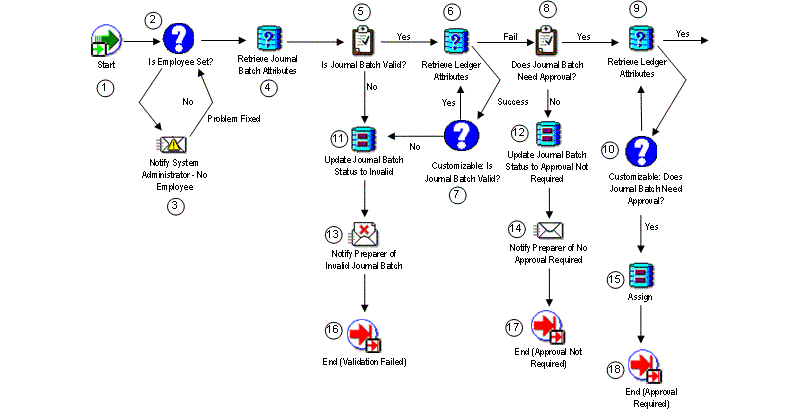
Start (Node 1)
This standard activity marks the start of the process.
| Variable | Description |
|---|---|
| Function | WF_STANDARD.NOOP |
| Result Type | None |
Is Employee Set (Node 2)
This function activity determines whether an employee is associated with the user who created the journal batch.
| Variable | Description |
|---|---|
| Function | GL_WF_JE_APPROVAL_PKG.IS_EMPLOYEE_SET |
| Result Type | Yes/No |
Notify System Administrator - No Employee (Node 3)
This activity notifies the system administrator that there is no employee associated with the user who submitted the journal approval.
| Variable | Description |
|---|---|
| Message | No Employee Found |
| Result Type | None |
Retrieve Journal Batch Attributes (Node 4)
This function activity retrieves your journal batch attributes, which are then used to determine if the journal batch is valid.
| Variable | Description |
|---|---|
| Function | GL_WF_JE_APPROVAL_PKG.GET_JEB_ATTRIBUTES |
| Result Type | None |
Is Journal Batch Valid (Node 5)
This function activity determines if the journal batch is valid. If the batch is valid, the procedure returns a value of 'Yes'. If the batch is not valid, the procedure returns a value of 'No'.
| Variable | Description |
|---|---|
| Function | GL_WF_JE_APPROVAL_PKG.IS_JE_VALID |
| Result Type | Yes/No |
Retrieve Ledger Attributes (Nodes 6 and 9)
This function activity retrieves various attributes of the ledgers in the journal batch.
| Variable | Description |
|---|---|
| Function | GL_WF_JE_APPROVAL_PKG.GET SOB ATTRIBUTES |
| Result Type | Success/Fail |
Customizable: Is Journal Batch Valid (Node 7)
With this function activity you can customize the journal batch validation process. If the batch is valid, the procedure returns a value of 'Yes'. If the batch is not valid, the procedure returns a value of 'No'.
| Variable | Description |
|---|---|
| Function | GL_WF_CUSTOMIZATION_PKG.IS_JE_VALID |
| Result Type | Yes/No |
Does Journal Batch Need Approval (Node 8)
This function activity determines whether the journal batch needs approval. If so, the procedure returns a value of 'Yes'. If not, the procedure returns a value of 'No'.
| Variable | Description |
|---|---|
| Function | GL_WF_JE_APPROVAL_PKG.DOES_JE_NEED_APPROVAL |
| Result Type | Yes/No |
Customizable: Does Journal Batch Need Approval (Node 10)
With this function activity you can customize the process of determining whether a journal batch needs approval. If the batch does need approval, the procedure returns a value of 'Yes'. If not, the procedure returns a value of 'No'.
| Variable | Description |
|---|---|
| Function | GL_WF_CUSTOMIZATION_PKG.DOES_JE_NEED_APPROVAL |
| Result Type | Yes/No |
Update Journal Batch Status to Invalid (Node 11)
This function activity updates the journal batch approval status to Invalid.
| Variable | Description |
|---|---|
| Function | GL_WF_JE_APPROVAL_PKG.SET_JE_INVALID |
| Result Type | None |
Update Journal Batch Status to Approval Not Required (Node 12)
This function activity updates the journal batch approval status to Approval Not Required.
| Variable | Description |
|---|---|
| Function | GL_WF_JE_APPROVAL_PKG.SET_APPROVAL_NOT_REQUIRED |
| Result Type | None |
Notify Preparer of Invalid Journal Batch (Node 13)
This activity notifies the preparer that the journal batch was invalid. The message includes 'Send' or 'Respond' attributes that display the batch name, invalid journal entry error message, the monitor URL, and the Enter Journals window.
| Variable | Description |
|---|---|
| Message | Notify Preparer of Invalid Journal Batch |
| Result Type | None |
Notify Preparer of No Approval Required (Node 14)
This activity notifies the journal batch preparer that no approval is required. The message includes 'Send' or 'Respond' attributes that display the batch name, the monitor URL, and the Enter Journals window.
| Variable | Description |
|---|---|
| Message | Notify Preparer of No Approval Required |
| Result Type | None |
Assign (Node 15)
This function activity resets the Ledger ID attribute value.
| Variable | Description |
|---|---|
| Function | WF_STANDARD.ASSIGN |
| Variable | Description |
|---|---|
| Result Type | None |
End (Nodes 16 through 18)
This function activity marks the end of the process. Although the activity itself does not have a result type, each node of this activity in the process must have a process result assigned to it. The process result is assigned in the property page of the activity node. Since the GL Initialization & Journal Validation process activity has a result type of GL Initialization & Journal Validation Process Result, each End activity node must have a process result matching one of the lookup codes in the GL Initialization & Journal Validation Process Result lookup type.
| Variable | Description |
|---|---|
| Function | WF_STANDARD.NOOP |
| Result Type | None |
Related Topics
GL Preparer Approval Process
The GL Preparer Approval Process determines whether the preparer is authorized to approve his/her own journal batch. If so, the batch is approved, the approver name is set, and notifications are sent.
The process has a result type of GL Preparer Approval Process Result that gives one of two results:
-
Approved: The journal batch was approved by the preparer.
-
Not Approved: The journal batch cannot be approved by the preparer.
The process consists of 10 unique activities, some of which are reused, to comprise the 11 activity nodes that appear in the workflow diagram:
General Ledger Preparer Approval Process
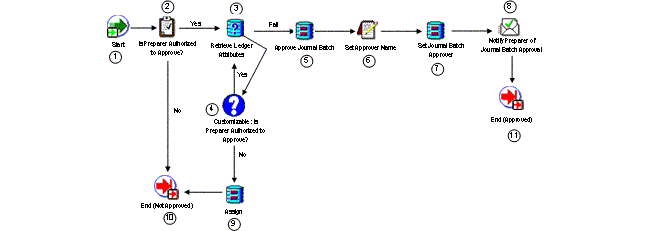
Start (Node 1)
This standard activity marks the start of the process.
| Variable | Description |
|---|---|
| Function | WF_STANDARD.NOOP |
| Result Type | None |
Is Preparer Authorized to Approve (Node 2)
This function activity determines whether the preparer is authorized to approve his/her own journal batch. If the preparer can approve, the procedure returns a value of 'Yes'. If the preparer cannot approve, the procedure returns a value of 'No'.
| Variable | Description |
|---|---|
| Function | GL_WF_JE_APPROVAL_PKG.CAN_PREPARER_APPROVE |
| Result Type | Yes/No |
Retrieve Ledger Attributes (Node 3)
This function activity retrieves various attributes of the ledgers in the journal batch.
| Variable | Description |
|---|---|
| Function | GL_WF_JE_APPROVAL_PKG.GET_SOB_ATTRIBUTES |
| Variable | Description |
|---|---|
| Result Type | Success/Fail |
Customizable: Is Preparer Authorized to Approve (Node 4)
With this function activity you can customize the process of determining whether a preparer can approve his/her own journal batch. If the preparer can approve, the procedure returns a value of 'Yes'. If the preparer cannot approve, the procedure returns a value of 'No'.
| Variable | Description |
|---|---|
| Function | GL_WF_CUSTOMIZATION_PKG.CAN_PREPARER_APPROVE |
| Result Type | Yes/No |
Approve Journal Batch (Node 5)
This function activity updates the journal batch's approval status to Approved.
| Variable | Description |
|---|---|
| Function | GL_WF_JE_APPROVAL_PKG.APPROVE_JE |
| Result Type | None |
Set Approver Name (Node 6)
This function activity sets the journal batch's approver name.
| Variable | Description |
|---|---|
| Function | GL_WF_JE_APPROVAL_PKG.SET_APPROVER_NAME |
| Result Type | None |
Set Journal Batch Approver (Node 7)
This function activity sets the journal batch's approver name.
| Variable | Description |
|---|---|
| Function | GL_WF_JE_APPROVAL_PKG.SET_JE_APPROVER |
| Variable | Description |
|---|---|
| Result Type | None |
Notify Preparer of Journal Batch Approval (Node 8)
This activity notifies the preparer that the journal batch has been approved. The message includes 'Send' or 'Respond' attributes that display the batch name, approver's name, monitor URL, enter journals window, and approver's comment.
| Variable | Description |
|---|---|
| Message | Notify Preparer of Approval |
| Result Type | None |
Assign (Node 9)
This function activity resets the SET_OF_BOOKS_ID attribute value.
| Variable | Description |
|---|---|
| Function | WF_STANDARD.ASSIGN |
| Variable | Description |
|---|---|
| Result Type | None |
End (Nodes 10 through 11)
This function activity marks the end of the process. Although the activity itself does not have a result type, each node of this activity in the process must have a process result assigned to it. The process result is assigned in the property page of the activity node. Since the GL Preparer Approval process activity has a result type of GL Preparer Approval Process Result, each End activity node must have a process result matching one of the lookup codes in the GL Preparer Approval Process Result lookup type.
| Variable | Description |
|---|---|
| Function | WF_STANDARD.NOOP |
| Result Type | None |
Related Topics
GL Approval Process
The GL Approval Process finds an appropriate approver, seeks journal batch approval, and sends notifications of approval or rejection.
To determine the appropriate approver, this process will compare each potential approver's authorization limit to the largest net journal line amount for each ledger that requires approval in the entire batch. In determining the largest net journal line amount, the process looks at absolute values. For example, assume the multiple ledger journal batch includes the following three journals:
Ledger A and Ledger C have journal approval enabled.
Ledger B does not have journal approval enabled.
Ledger A:
Journal #1 (Misc Cash Receipt)
Debit 10 Cash 10,000
Credit 20 Misc. Revenue 10,000
Ledger B:
Journal #2 (Accrual Adjustment)
Debit 10 Deferred Income 20,000
Debit 10 Rent Expense 15,000
Credit 30 Misc. Revenue 20,000
Credit 40 Prepaid Expenses 15,000
Ledger C:
Journal #3 (Consolidation Entry)
10 Intercompany Payables 80,000 40,000
20 Intercompany Receivables 15,000 35,000
The largest net absolute amounts for each ledger requiring journal approval are 10,000 for Ledger A and 40,000 for Ledger C. Forty-thousand is the net of the intercompany payables amounts. Therefore, 10,000 and 40,000 are the amounts that will be compared to each potential approver's authorization limit for Ledger A and Ledger C respectively. Authorization limits will not be compared for Ledger B since this ledger does not require approval. The potential approver must have sufficient authorization limits for Ledger A and Ledger C to approve the journal batch.
The process has a result type of Approval that gives one of two results:
-
Approved: The journal batch was approved by all necessary approvers.
-
Rejected: The journal batch was rejected by an approver.
The process consists of 18 unique activities, some of which are reused, to comprise the 19 activity nodes that appear in the workflow diagram:
General Ledger Approval Process

Start (Node 1)
This standard activity marks the start of the process.
| Variable | Description |
|---|---|
| Function | WF_STANDARD.NOOP |
| Result Type | None |
Find Approver (Node 2)
This function activity determines who the next approver is for the journal batch by checking the approval hierarchy and the approver method. If an approver is found, the procedure returns a value of 'Yes'. If an approver is not found, the procedure returns a value of 'No'.
| Variable | Description |
|---|---|
| Function | GL_WF_JE_APPROVAL_PKG.FIND_APPROVER |
| Result Type | Yes/No |
Notify System Administrator - No Approver (Node 3)
This activity notifies your System Administrator if no approver can be found for the journal batch. The message includes 'Send' or 'Respond' attributes that display the batch name, the preparer's name, the monitor URL, and a note by the System Administrator that the problem has been resolved.
| Variable | Description |
|---|---|
| Message | No Approver Found |
| Result Type | GL Problem Has Been Fixed |
Note: This activity's performer is set to the SYSADMIN user when you first install Journal Approval. You can change this to any other user as follows:
-
Using Oracle Workflow Builder, choose File > Load Roles from Database from the main menu, then load your system administrator role.
-
Select the GL Approval Process and open the process detail diagram.
-
Choose the Notify System Administrator - No Approver activity to open the control properties window.
-
Change the Performer as needed.
-
Notify Preparer - No Approver Problem Fixed (Node 4)
This activity notifies the preparer when the no approver problem has been fixed by the system administrator. The message includes a 'Send' or 'Respond' attribute to display the batch name.
| Variable | Description |
|---|---|
| Message | Notify Preparer - No Approver Problem Fixed |
| Result Type | None |
Notify Preparer of No Approver Found (Node 5)
This activity notifies the preparer if no approver can be found for the journal batch. The message includes 'Send' or 'Respond' attributes that display the batch name, the preparer's name, the monitor URL.
| Variable | Description |
|---|---|
| Message | Notify Preparer That No Approver was Found |
| Result Type | None |
Set Journal Batch Approver (Node 6)
This function activity sets the journal batch's approver name.
| Variable | Description |
|---|---|
| Function | GL_WF_JE_APPROVAL_PKG.SET_JE_APPROVER |
| Variable | Description |
|---|---|
| Result Type | None |
Retrieve Ledger Attributes (Node 7)
This function activity retrieves various attributes of the ledgers in the journal batch.
| Variable | Description |
|---|---|
| Function | GL_WF_JE_APPROVAL_PKG.GET_SOB_ATTRIBUTES |
| Result Type | Success/Fail |
Customizable: Verify Authority Process (Node 8)
This activity is a subprocess. If your organization has unique needs, use this activity to customize the process of verifying an approver's authority to approve the journal batch. To view the subprocess, choose Customizable: Verify Authority Process under the Processes branch of the Workflow Builder navigator tree. See: Customizable: Verify Authority Process.
| Variable | Description |
|---|---|
| Result Type | GL Pass or Fail Result Type |
Assign (Node 9)
This function activity resets the SET_OF_BOOKS_ID attribute value.
| Variable | Description |
|---|---|
| Function | WF_STANDARD.ASSIGN |
| Variable | Description |
|---|---|
| Result Type | None |
Record Forward From Information (Node 10)
If a selected approver is not authorized to approve the journal batch, this procedure saves the selected approver's name and other information. The saved information is used internally within Oracle Workflow.
| Variable | Description |
|---|---|
| Function | GL_WF_JE_APPROVAL_PKG.RECORD_FORWARD_FROM_INFO |
| Result Type | None |
GL Request Approval Process (Node 11)
This activity is a subprocess that seeks journal batch approval from the selected approver. To view the subprocess, choose GL Request Approval Process under the Processes branch of the Workflow Builder navigator tree. See: GL Request Approval Process.
| Variable | Description |
|---|---|
| Result Type | Approval |
Reject Journal Batch (Node 12)
This function activity updates the journal batch's approval status to Rejected.
| Variable | Description |
|---|---|
| Function | GL_WF_JE_APPROVAL_PKG.REJECT_JE |
| Result Type | None |
Notify Preparer of Journal Batch Rejection (Node 13)
This activity notifies the preparer that the journal batch was rejected. The message includes 'Send' or 'Respond' attributes that display the batch name, the approver's name, the monitor URL, the Enter Journals window, and the approver's comment.
| Variable | Description |
|---|---|
| Message | Notify Preparer of Rejection of Journal Batch |
| Result Type | None |
Verify Authority (Node 14)
This function activity verifies that a selected approver is authorized to approve the journal batch. If the approver is authorized, the procedure returns a value of 'Pass'. If the approver is not authorized, the procedure returns a value of 'Fail'.
| Variable | Description |
|---|---|
| Function | GL_WF_JE_APPROVAL_PKG.VERIFY_AUTHORITY |
| Result Type | GL Pass or Fail Result Type |
Notify Preparer of Further Approval Required (Node 15)
This activity notifies the preparer that further approval is required beyond the currently selected approver. The message includes 'Send' or 'Respond' attributes that display the batch name, the approver's name, and the monitor URL.
| Variable | Description |
|---|---|
| Message | Verification of approval authority failure |
| Result Type | None |
Approve Journal Batch (Node 16)
This function activity updates the journal batch's approval status to Approved.
| Variable | Description |
|---|---|
| Function | GL_WF_JE_APPROVAL_PKG.APPROVE_JE |
| Result Type | None |
Notify Preparer of Journal Batch Approval (Node 17)
This activity notifies the preparer that the journal batch has been approved. The message includes 'Send' or 'Respond' attributes that display the batch name, approver's name, monitor URL, enter journals window, and approver's comment.
| Variable | Description |
|---|---|
| Message | Notify Preparer of Approval |
| Result Type | None |
End (Nodes 18 through 19)
This function activity marks the end of the process. Although the activity itself does not have a result type, each node of this activity in the process must have a process result assigned to it. The process result is assigned in the property page of the activity node. Since the GL Approval process activity has a result type of Approval, each End activity node must have a process result matching one of the lookup codes in the Approval lookup type.
| Variable | Description |
|---|---|
| Function | WF_STANDARD.NOOP |
| Result Type | None |
Related Topics
Customizable: Verify Authority Process
GL Request Approval Process
The GL Request Approval Process seeks journal batch approval from the selected approver.
The process has a result type of Approval that gives one of two results:
-
Approved: The journal batch was approved by the approver.
-
Rejected: The journal batch was rejected by the approver.
The process consists of 7 unique activities, some of which are reused, to comprise the 8 activity nodes that appear in the workflow diagram:
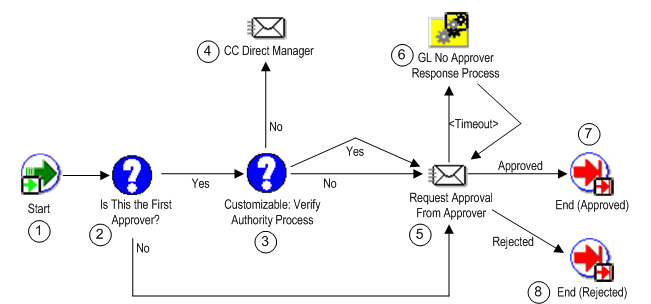
Start (Node 1)
This standard activity marks the start of the process.
| Variable | Description |
|---|---|
| Function | WF_STANDARD.NOOP |
| Result Type | None |
Is This the First Approver (Node 2)
This function activity determines if the selected approver is the first approver, based on the approver method, to whom the journal batch has been sent for approval. If so, the procedure returns a value of 'Yes'. If not, the procedure returns a value of 'No'.
| Variable | Description |
|---|---|
| Function | GL_WF_JE_APPROVAL_PKG.FIRST_APPROVER |
| Result Type | Yes/No |
Is Approver the Direct Manager (Node 3)
This function activity determines if the first approver is also the preparer's direct manager. If so, the procedure returns a value of 'Yes'. If not, the procedure returns a value of 'No'.
| Variable | Description |
|---|---|
| Function | GL_WF_JE_APPROVAL_PKG.MGR_EQUALTO_APRV |
| Result Type | Yes/No |
CC Direct Manager (Node 4)
This activity notifies the preparer's direct manager when he/she is not the first approver for the journal batch. The message includes 'Send' or 'Respond' attributes that display the batch name, total batch amount, ledger currency, preparer's name, approver's name, and monitor URL.
| Variable | Description |
|---|---|
| Message | CC Direct Manager |
| Result Type | None |
Request Approval From Approver (Node 5)
This activity notifies the selected approver that his/her approval is requested. The message includes 'Send' or 'Respond' attributes that display the batch name, total batch amount, ledger currency, preparer's name, monitor URL, and preparer's comment.
| Variable | Description |
|---|---|
| Message | Request Approval from Approver |
| Result Type | Approval |
Note: The default timeout for this activity is 7 days. You can customize this value to meet your organization's specific needs. Use Oracle Workflow Builder to open to activity's property sheet, then select the Node tab. Enter the Timeout value in days, hours, and minutes.
GL No Approver Response Process (Node 6)
This activity is a subprocess that provides handling options and actions to take when the approving manager has not responded to a journal batch approval request. To view the subprocess, choose GL No Approver Response Process under the Processes branch of the Workflow Builder navigator tree. See: GL No Approver Response Process.
| Variable | Description |
|---|---|
| Result Type | None |
End (Nodes 7 through 8)
This function activity marks the end of the process. Although the activity itself does not have a result type, each node of this activity in the process must have a process result assigned to it. The process result is assigned in the property page of the activity node. Since the GL Request Approval process activity has a result type of Approval, each End activity node must have a process result matching one of the lookup codes in the Approval lookup type.
| Variable | Description |
|---|---|
| Function | WF_STANDARD.NOOP |
| Result Type | None |
Related Topics
GL No Approver Response Process
GL No Approver Response Process
The GL No Approver Response Process provides handling options and actions to take when the approving manager has not responded to a journal batch approval request. This includes resending the request until a certain limit is reached, then providing the preparer with the option to resend the approval request to the approver or to send the request to the approver's manager.
The process has no result type.
The process consists of 10 unique activities, some of which are reused, to comprise the 12 activity nodes that appear in the workflow diagram:
General Ledger No Approver Response Process
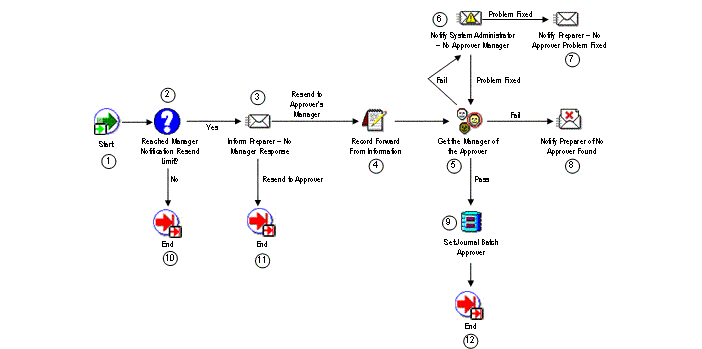
Start (Node 1)
This standard activity that marks the start of the process.
| Variable | Description |
|---|---|
| Function | WF_STANDARD.NOOP |
| Result Type | None |
Reached Manager Notification Resend Limit (Node 2)
This function activity determines if the number of request approval notifications sent to the approver has reached a predetermined limit. If the limit has been reached, the procedure returns a value of 'Yes'. If not, the procedure returns a value of 'No'.
| Variable | Description |
|---|---|
| Function | GL_WF_JE_APPROVAL_PKG.NOTIFYPREP_NOAPRVRESP |
| Result Type | Yes/No |
Note: The default resend limit for this activity is 1 notification. You can customize this value to meet your organization's specific needs. Use Oracle Workflow Builder to open to activity's property sheet, then select the Node Attributes tab. Choose the 'Number of times to notify manager' attribute, then change the Value as needed.
Notify Preparer - No Manager Response (Node 3)
This activity notifies the preparer that the selected approver has not responded to the request for journal batch approval. The message includes 'Send' or 'Respond' attributes that display the batch name, approver's name, the monitor URL, and two options for further action.
| Variable | Description |
|---|---|
| Message | No Manager Response |
| Result Type | Employee Action For Manager |
Record Forward From Information (Node 4)
This function activity saves the approver's name and other information. The saved information is used internally within Oracle Workflow.
| Variable | Description |
|---|---|
| Function | GL_WF_JE_APPROVAL_PKG.RECORD_FORWARD_FROM_INFO |
| Result Type | None |
Get The Manager of The Approver (Node 5)
This function activity determines who is the approver's manager. If the approver's manager is found, the procedure returns a value of 'Pass'. If not, the procedure returns a value of 'Fail'.
| Variable | Description |
|---|---|
| Function | GL_WF_JE_APPROVAL_PKG.GET_APPROVER_MANAGER |
| Result Type | GL Pass or Fail Result Type |
Notify System Administrator - No Approver Manager (Node 6)
This activity notifies your system administrator if the approver's manager cannot be found. The message includes 'Send' or 'Respond' attributes that display the batch name, the approver's name, the monitor URL, and any note by the system administrator that the problem has been resolved.
| Variable | Description |
|---|---|
| Message | Approver's Manager Not Found |
| Result Type | GL Problem Has Been Fixed |
Note: This activity's performer is set to the SYSADMIN user when you first install Journal Approval. You can change this to any other user as follows:
-
Using Oracle Workflow Builder, choose File > Load Roles from Database from the main menu, then load your system administrator role.
-
Select the GL Approval Process and open the process detail diagram.
-
Choose the Notify System Administrator - No Approver Manager activity to open the control properties window.
-
Change the Performer as needed.
-
Notify Preparer - No Approver Problem Fixed (Node 7)
This activity notifies the preparer when the no approver problem has been fixed by the system administrator. The message includes a 'Send' or 'Respond' attribute to display the batch name.
| Variable | Description |
|---|---|
| Message | Notify Preparer - No Approver Problem Fixed |
| Result Type | None |
Notify Preparer of No Approver Found (Node 8)
This activity notifies the preparer if no approver can be found for the journal batch. The message includes 'Send' or 'Respond' attributes that display the batch name, the preparer's name, the monitor URL, and any notification by the System Administrator that the problem has been resolved.
| Variable | Description |
|---|---|
| Message | Notify Preparer That No Approver was Found |
| Result Type | None |
Set Journal Batch Approver (Node 9)
This function activity sets the journal batch's approver name.
| Variable | Description |
|---|---|
| Function | GL_WF_JE_APPROVAL_PKG.SET_JE_APPROVER |
| Result Type | None |
End (Nodes 10 through 12)
This function activity marks the end of the process. The activity does not have a result type and no process result is returned.
| Variable | Description |
|---|---|
| Function | WF_STANDARD.NOOP |
| Result Type | None |
Related Topics
Customizable: Verify Authority Process
This process verifies an approver's authority to approve journal batches. If your organization has unique needs for verifying approver authority, you can customize the process.
The process has a result type of GL Pass or Fail Result Type that gives one of two results:
-
Pass: The approver is authorized to approve the journal batch.
-
Fail: The approver is not authorized to approve the journal batch.
The process consists of 3 unique activities, some of which are reused, to comprise the 4 activity nodes that appear in the workflow diagram:
Customizable: Verify Authority Process
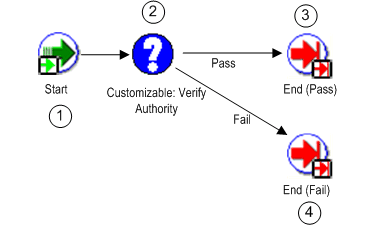
Start (Node 1)
This standard activity that marks the start of the process.
| Variable | Description |
|---|---|
| Function | WF_STANDARD.NOOP |
| Result Type | None |
Customizable: Verify Authority (Node 2)
Customize this function activity as needed to meet your organization's needs. If the approver is authorized to approve the journal batch, the procedure returns a value of 'Pass'. If not, the procedure returns a value of 'Fail'.
| Variable | Description |
|---|---|
| Function | GL_WF_CUSTOMIZATION_PKG. VERIFY_AUTHORITY |
| Result Type | GL Pass or Fail Result Type |
End (Nodes 3 through 4)
This function activity marks the end of the process. Although the activity itself does not have a result type, each node of this activity in the process must have a process result assigned to it. The process result is assigned in the property page of the activity node. Since the Customizable: Verify Authority process activity has a result type of GL Pass or Fail Result Type, each End activity node must have a process result matching one of the lookup codes in the GL Pass or Fail Result Type lookup type.
| Variable | Description |
|---|---|
| Function | WF_STANDARD.NOOP |
| Result Type | None |
Related Topics
Setting Up Journal Approval, Oracle General Ledger Implementation Guide
Oracle General Ledger Journal Approvals Integration with Oracle Approvals Management and Oracle Workflow
Overview
The journal approvals functionality in Oracle General Ledger provides integration with Oracle Approvals Management and Oracle Workflow for journal approval rules definition. You can build your rules using combinations of ledger, entered amount, approval level, and other scenarios. In addition, you can define your rules based upon attributes from the different parts of your journal, such as the ledger, batch, header, or line level. For example, you could use category, source, account, or descriptive flexfield information as selection criteria for journal approval. Oracle Approvals Management enables you to define approval lists that are based on:
-
Supervisory Hierarchy from Oracle Human Resources (HR)
-
Approval Groups
-
Dynamic Approval based on Attributes
You can define the approval process to run sequentially or in parallel routing to multiple approvers. You can define if first responder is sufficient, or if all approvers must approve. Oracle Workflow integrates with Oracle Approvals Management and Oracle General Ledger to route the notifications to the appropriate set of approvers for review, and enables action to be taken to approve or reject a journal. After the approver has responded, the status is sent from Oracle Workflow to Oracle General Ledger and it is reflected in the journal's approval status.
For more information on setting up journal approval with Oracle Approvals Management and Oracle Workflow integration refer to "Setting Up Journal Approval", Oracle General Ledger Implementation Guide and My Oracle Support Knowledge Document 2038960.1, Oracle General Ledger Journal Approvals Integration with Oracle Approvals Management (AME) and Oracle Workflow.
Allocating Amounts with Recurring Journals and MassAllocations
Creating Allocation Entries
You can allocate amounts from any cost pool (revenues, expenses, assets, or liabilities) to various accounts using recurring journals and MassAllocation formulas.
With a recurring journal entry formula, you define a separate journal entry for each allocation. You can group related allocation entries together in a recurring journal batch even if they are for different ledgers.
With MassAllocations, you define one formula to generate allocation journal entries for a group of cost centers, departments, divisions, ledgers, and so on. You define the allocation pool, the allocation formula, and the target and offset accounts for each MassAllocation formula. You can also group related MassAllocation formulas into batches even if they are for different ledgers.
Using recurring journal entry and MassAllocation formulas, you can perform a variety of allocations, including:
-
Net Allocations
-
Step-Down Allocations
-
Rate-Based Allocations
-
Usage-Based Allocations
-
Standard Costing Allocations
Related Topics
Creating Allocations Using Recurring Journal Formulas
Creating Step-Down Allocations
Creating Rate-Based Allocations
Creating Usage-Based Allocations
Using Allocations for Standard Costing
Creating Allocations Using Recurring Journal Formulas
Use recurring journal entries to perform simple or complex allocations. For example, you can allocate a portion of your rent expense to another division, or, you can allocate a pool of marketing costs to several departments based on the ratio of department revenues to total revenues.
You define a separate recurring journal entry formula for each allocation, and you can group related allocation entries even if they are for different ledgers, together in a recurring journal batch. Each line of the recurring journal entry contains a target account, as well as the formula you want to use to calculate the allocation amount.
Reserve the last line of each entry for the offsetting account. Enter line number 9999 and the offsetting account to have General Ledger automatically generate the offsetting amount. You do not need to enter a formula to calculate the offset.
Related Topics
Creating Recurring Journal Formula Batches
Creating Recurring Journal Entries
Entering Recurring Journal Entry Lines
Entering Formulas with EasyCalc
Generating Recurring Journal Batches
Creating Step-Down Allocations
Creating Rate-Based Allocations
Creating Usage-Based Allocations
Using Allocations for Standard Costing
Creating Net Allocations
Net allocations are allocated amounts that reflect changes to the cost pool. Rather than reallocating the entire revised amount, a net allocation allocates only amounts that update the previous allocations. The net effect is the same as reversing the previous allocations and posting the entire new allocation amount. This enables you to rerun the allocations as many times as you want in the same accounting period without overallocating.
You can create net allocations by generating MassAllocation formulas in incremental mode.
Related Topics
Generating MassAllocation Journals
Creating Step-Down Allocations
Step-down allocations distribute amounts from one allocation pool to a subsidiary allocation pool. For example, you might first allocate a portion of your facility costs to your MIS department, then allocate total MIS costs (including the allocated facility costs) to other departments.
To create a step-down allocation, you must create a different recurring entry or MassAllocation formula batch for each allocation step.
Each accounting period, generate and post the first allocation batch, then generate and post each subsequent allocation batch.
Related Topics
Creating Allocations Using Recurring Journal Formulas
Creating Recurring Journal Formula Batches
Generating Recurring Journal Batches
Generating MassAllocation Journals
Creating Rate-Based Allocations
Rate-based allocations use current, historical or estimated rates to allocate costs such as employee benefits, commissions, bad debt, warranty costs and overhead. For example, you might want to allocate warranty costs to each division based on sales revenues and a warranty loss rate.
To create a rate-based allocation, define a recurring journal or MassAllocation formula using the statistical balance of the appropriate accounts to compute the rate.
Alternately, you can enter a formula that uses a fixed rate to represent your best estimate of future costs. Each accounting period, adjust your estimated rate by revising the formula definition.
Related Topics
Creating Allocations Using Recurring Journal Formulas
Creating Recurring Journal Formula Batches
Generating Recurring Journal Batches
Generating MassAllocation Journals
Creating Usage-Based Allocations
Usage-based allocations use statistics such as headcount, units sold, square footage, number of deliveries or computer time consumed to calculate allocation amounts. For example, you might want to allocate your rental expense based on square foot usage.
To create a usage-based allocation, define a recurring journal formula using the appropriate statistical account balance to compute the allocation amount. Each accounting period, adjust the statistical account balance to reflect the correct usage for the period before you generate the usage-based allocation formula.
Related Topics
Creating Allocations Using Recurring Journal Formulas
Creating Recurring Journal Formula Batches
Generating Recurring Journal Batches
Generating MassAllocation Journals
Using Allocations for Standard Costing
You can use statistics such as sales units, production units, number of deliveries or customers served to perform standard costing. For example, you might want to calculate cost of sales based on sales units and a standard cost per unit.
To perform this type of standard costing, define a recurring journal entry formula using the appropriate statistical account and a fixed amount for standard cost. Or, you can maintain the standard cost as a statistic in a different account. Each accounting period, adjust the statistical account balances before generating the recurring journal formula.
Related Topics
Creating Allocations Using Recurring Journal Formulas
Creating Recurring Journal Formula Batches
Generating Recurring Journal Batches
Recurring Journals
About Recurring Journals
Define recurring journal formulas for transactions that you repeat every accounting period, such as accruals, depreciation charges, and allocations. Your formulas can be simple or complex. Each formula can use fixed amounts and/or account balances, including standard, end-of-day, or average balances, actual or budget amounts, statistics, and period-to-date or year-to-date balances from the current period, prior period, or same period last year. When you use account balances in your formulas, you can retrieve total balances, entered currency balances, or statistical balances. You can quickly create new recurring formulas by copying and modifying existing formulas.
You can define single ledger or multiple ledger recurring journal formula batches. For the multiple ledger batch type, you can create a recurring journal formula batch that contains recurring journal entries for different ledgers.
You can define recurring journal formulas for your ledger currencies, entered currencies, and statistical currency.
You can use recurring journals to create three types of journal entries:
-
Skeleton Journal Entries: Skeleton entries affect the same accounts each period, but have different posting amounts. After you generate skeleton journal entries, you can edit the unposted journal batch using the Enter Journals form and enter the journal line amounts.
Skeleton journal entries are useful with statistical information whenever you want to record journals for actual transactions based on statistical amounts, such as headcount, units sold, inflation rates, or other growth factors. For example, if you want to enter headcount for each cost center every period, you can define a skeleton entry with your headcount accounts. After you generate the skeleton entries, enter the actual headcount amounts before posting the batch.
-
Standard Recurring Journal Entries: Standard recurring journal entries use the same accounts and amounts each period.
-
Recurring Journal Formula Entries: Formula entries use formulas to calculate journal amounts that vary from period to period.
Important: If you use summary accounts in your recurring journals, General Ledger maintains references to those summary account templates, even if you delete then recreate the summary accounts.
Related Topics
Creating Recurring Journal Formula Batches
Creating Recurring Journal Entries
Entering Recurring Journal Entry Lines
Creating Recurring Journal Formula Batches
To define a recurring journal formula entry, you must create a recurring journal formula batch. Your batch can contain a single recurring journal entry definition, or you can group related recurring journals into the same batch.
You can create two types of recurring journal formula batches as follows:
-
Single Ledger Recurring Journal Formula Batch: Single ledger batches affect only one ledger in the batch.
-
Multiple Ledger Recurring Journal Formula Batch: Multiple ledger batches can affect multiple ledgers in the batch. You can define recurring journal formulas across ledgers.
Note: You can only define single ledger batch types for budget formulas.
You can create recurring journal formula batches that include ledgers that have the same chart of accounts, calendar, and period type as the data access set of your current responsibility. When you generate the recurring journal formula batches, you must have read or read and write access to the ledger and balancing segment value or management segment value to generate recurring journals. See Generating Recurring Journal Batches.
If you use reporting currencies (journal or subledger level), you can create recurring journal formula batches for single reporting currencies or multiple reporting currencies.
To create a recurring journal batch:
-
Navigate to the Define Recurring Journal Formula window.
-
Enter a Name and optional Description for the recurring journal batch.
-
Choose a Recurring Batch Type.
Note: You can only choose the single ledger batch type for budget formulas.
-
If you chose a single ledger recurring batch type, enter the name of the ledger. For a multiple ledger batch type, the Ledger field is disabled. You can define recurring journal formulas for ledgers that have the same chart of accounts, calendar, and period type as your current responsibility's data access set. See Data Access Sets, Oracle General Ledger Implementation Guide.
If you use reporting currencies (journal or subledger level), and you chose a single ledger recurring batch type, you can enter the name of the ledger.
-
If you want to copy entries from an existing recurring journal batch to your new batch, choose AutoCopy Batch.
-
Create recurring journal entries for the batch. If you copied entries, modify them, if necessary.
-
(Optional) Select the Enable Security checkbox to apply Definition Access Set security to your recurring journal definition. Definition Access Sets are an optional security feature that allows you to control access to your General Ledger definitions. For example, you can prevent certain users from viewing, making changes, or using your recurring journal. If you do not enable security, all users will be able to use, view, and modify your recurring journal.
If the Assign Access function is available for your responsibility, the Assign Access button is enabled once you check the Enable Security checkbox. Choose the Assign Access button to assign the definition to one or more Definition Access Sets with the desired privileges. For more information, see Definition Access Sets, Oracle General Ledger Implementation Guide.
If the Assign Access function has been excluded from your responsibility, you will not be able to view the Assign Access button in the Define Recurring Journal Formula window. You can still secure the recurring journal by checking the Enable Security check box, but only Definition Access Sets that are AutoAssigned will be automatically assigned to this recurring journal. See your System Administrator for more information on Function Security.
-
Save your work.
-
Generate recurring journals.
-
Review and post your generated recurring journal batches.
Tip: You can use Automatic Journal Scheduling to generate your recurring journals according to a specific schedule you define. See: Automatic Journal Scheduling.
Related Topics
Copying Entries from an Existing Recurring Journal Batch
Creating Recurring Journal Entries
Entering Formulas with EasyCalc
Creating Skeleton Journal Entries
Creating Standard Recurring Journal Entries
Defining Summary Accounts, Oracle General Ledger Implementation Guide
Changing a Recurring Journal Entry
Creating Allocations Using Recurring Journal Formulas
Generating Recurring Journal Batches
Securing Recurring Journals
You can secure your recurring journal definition using definition access sets. Definition access sets are an optional security feature that allows you to control use, view, and modify access to your General Ledger definitions.
The following describes what Use, View, and Modify access mean as it pertains to recurring journals:
-
Use Access: Allows specific users to generate the recurring journal and assign them to AutoAllocation Sets. They can also schedule recurring journals from the Define Recurring Journal window if they also have View access. If you have Use privileges only, you will not be able to view or make changes to the recurring journal definition.
-
View Access: Allows you to view the recurring journal definition from the Define Recurring Journal window. You will not be able to generate or make changes to the recurring journal definition.
-
Modify Access: Allows you to view and make changes to the recurring journal definition from the Define Recurring Journal window. You will not be able to generate the recurring journal definition.
Creating Recurring Journal Entries
To create a recurring journal formula entry for a batch:
-
Navigate to the Define Recurring Journal Formula window.
-
Enter or query the batch name.
-
Enter a Name for the recurring journal entry.
-
If you chose a multiple ledger recurring batch type, enter the name of the ledger. If you chose a single ledger recurring batch, the ledger name from the batch header is defaulted in and cannot be changed. You can define recurring journal formulas for ledgers that have the same chart of accounts, calendar, and period type as your current responsibility's data access set. See Data Access Sets, Oracle General Ledger Implementation Guide.
If you use reporting currencies (journal or subledger level), and you chose a multiple ledger recurring batch type, you can enter the name of the reporting currency.
-
Enter the Category.
-
Enter the Currency. You can choose STAT, a ledger currency, or an entered currency.
-
If you entered a foreign currency, enter a Conversion Type, except for User. This information is used to convert foreign currency recurring journals.
-
Enter a range of Effective Dates that includes only those periods for which you want the recurring journal entry to be used.
Note: Recurring journal entries will only be created when you choose to generate them for a date that falls within the Effective Dates range.
-
Choose Lines to enter the account you want General Ledger to update when you generate your recurring journals, as well as the formula to use.
Related Topics
Entering Recurring Journal Entry Lines
Entering Formulas with EasyCalc
Creating Skeleton Journal Entries
Creating Standard Recurring Journal Entries
Defining Summary Accounts, Oracle General Ledger Implementation Guide
Changing a Recurring Journal Entry
Creating Entered Currency Recurring Journal Entries
Entering Recurring Journal Entry Lines
You can define an unlimited number of journal entry lines for each recurring journal entry. The journal entry lines specify the accounts to update with the recurring journals. Each line also contains the amount to post to the designated account, or a formula to calculate the journal amounts.
To enter a recurring journal entry line:
-
Navigate to the Define Recurring Journal Formula window.
-
Enter or query the batch name and the journal entry name.
-
Choose Lines.
-
Enter a Line number to set the order of your recurring journal entry lines. You can indicate an automatic offsetting line for your recurring journal entry by entering the line number 9999.
Note: When using the 9999 automatic offsetting line, the offsetting entry plugs the number to balance the entire journal and not to balance the journal by balancing segment value. If you enter account lines across balancing segment values, the 9999 automatic offset will not create offsets per balancing segment value.
-
Enter the Account you want General Ledger to update when you generate and post your recurring journals.
-
Enter an optional Line Description for the recurring entry line.
-
Enter a Formula for the line.
-
Enter the remaining lines for the recurring journal entry. Remember that you can use line number 9999 as the automatic offsetting line for each recurring journal entry.
-
Save your work.
To enter an automatic offsetting line:
You can enter a recurring journal entry line and have General Ledger calculate and insert the balancing amount for the recurring journal entry automatically. This is useful for allocation-type entries.
-
Enter one or more lines for the recurring journal entry.
-
Enter 9999 as the line number for the automatic offsetting line.
-
Enter an Account for the line but do not enter a formula. General Ledger will automatically calculate the amount for this journal entry line when you generate your recurring journal.
-
Save your work.
Related Topics
Creating Recurring Journal Formula Batches
Creating Recurring Journal Entries
Entering Formulas with EasyCalc
Creating Skeleton Journal Entries
Creating Standard Recurring Journal Entries
Defining Summary Accounts, Oracle General Ledger Implementation Guide
Generating Recurring Journal Batches
Entering Recurring Journal, Budget, and Eliminating Entry Formulas
To enter a formula:
-
Enter a Step number to specify the order in which you want to process the steps in your formula. Each formula can contain an unlimited number of steps.
-
Enter a factor for the formula step. There are two types of factors you can use:
-
Enter a fixed Amount.
-
Specify an Account to use a balance in the formula calculation. You can use standard, end-of-day, or average balances in your formula lines.
-
-
Specify the type of calculation you want to perform by entering a mathematical Operator for the formula step. The valid operators are based on EasyCalc - a General Ledger mathematical notation feature.
To use an account balance in your formula:
-
Enter the Account you want to include in your formula step.
You can enter a summary account, but you cannot use accounts with parent values for which no summary account was created. General Ledger automatically maintains references to summary accounts in your formula lines even after the summary template which created the account is deleted and recreated.
If your batch is a multiple ledger batch type, there will be a ledger segment for the Account. Enter a ledger for the ledger segment to reference the ledger for the account. This can be any ledger that has the same chart of accounts as your current responsibility's data access set. See Data Access Sets, Oracle General Ledger Implementation Guide.
If you use reporting currencies (journal or subledger level), you can enter a reporting currency for the ledger segment.
-
Choose a Balance Type of Actual or Budget. If you choose budget balances, you must specify the budget to use when you generate the recurring journal batch.
-
Choose an Amount Type. Choose PTD to use the period-to-date balance of your account. Choose YTD to use year-to-date balances for income statement accounts and life-to-date totals for balance sheet accounts. If you have average balance processing enabled in your ledger, PATD (period average-to-date), YATD (year average-to-date), and EOD (end-of-day) will also appear in the Amount Type list of values.
Note: You can mix standard and average amount types in the same recurring journal formula.
-
Choose a Ledger Currency to determine which balances to retrieve. If the recurring batch type is for a single ledger, the ledger currency can be the currency of the ledger or an associated balance-level reporting currency. If the recurring batch type is for multiple ledgers, the ledger currency is automatically defaulted to the currency of the ledger specified in the account's ledger segment and cannot be changed.
If you use reporting currencies (journal or subledger level), you can choose the currency of a reporting currency.
-
Choose a Currency Type of Entered, Statistical, or Total. If the balance type is Budget, you can only choose Total or Statistical. If the ledger currency is for a balance-level currency, you can only choose Total. See Balance-Level Reporting Currencies.
-
Choose an Entered Currency. If the specified currency type is Statistical, the entered currency default is the statistical currency and cannot be changed. If the specified currency type is Total, the entered currency field is disabled. If the specified currency type is Entered, the entered currency can be any currency.
The Ledger Currency, combined with Currency Type and Entered Currency fields, determines what type of currency account balance is retrieved for your formula. The following table shows the currency account balance types for each combination of the ledger currency, currency type, and entered currency.
Currency Account Balance Types for each Combination of Ledger Currency, Currency Type, and Entered Currency Ledger Currency Currency Type Entered Currency Meaning Ledger Currency Entered Any Entered balance of the entered currency for the ledger referenced from the ledger currency. Statistical STAT Statistical balance of the ledger of referenced from the ledger currency. Total N/A Cumulative balance of the ledger currency from the ledger referenced from the ledger currency. Balance Level Currency Total N/A Cumulative balance of the balance-level reporting currency -
Choose the relative Period balance you want to use in your formula (Current Period, Same Period a Year Ago, or Previous Period). The relative period, combined with the amount type, determines the type of account balance your formula uses. The following table shows the account balance types for each combination of amount type and period.
Amount Type Period Meaning PTD Current Period Net activity of current period YTD Current Period Ending balance of current period PTD Previous Period Net activity of previous period YTD Previous Period Ending balance of previous period PTD Same Period as a Year Ago Net activity of year-ago period YTD Same Period as a Year Ago Ending balance of year-ago period -
Save your work.
Related Topics
Entering Formulas with EasyCalc
Defining Summary Accounts, Oracle General Ledger Implementation Guide
Generating Recurring Journal Batches
Reporting Currencies
If you are using Currencies (Journal or Subledger Transaction Level), you can create formulas to include reporting currencies that have the same chart of accounts, calendar, and period type as the data access set of your current responsibility. When you generate the recurring journal formulas, you must have at least read access to the reporting currencies you are allocating amounts from and read and write access to the reporting currencies for which you are creating journals.
Entering Formulas with EasyCalc
EasyCalc is a powerful, yet easy-to-use calculation notation, based on the mathematical logic used by Hewlett-Packard calculators. EasyCalc lets you enter complex formulas to calculate journal entries, allocations, budgets and report balances.
To enter an EasyCalc formula:
-
Enter the first factor to use in your calculation. The factor can be a fixed amount, or an account balance.
-
Use the EasyCalc operator Enter to save the value of the first factor in memory. Enter identifies the first factor of each calculation, and separates it from previous calculations in the formula. Using Enter enables you to create a logical sequence of formula steps, and enter nested calculations in a formula.
-
Enter the next factor to use in your calculation.
-
Enter the EasyCalc operator to specify the calculation involving the previous two factors. The following are the valid mathematical operators you can use in an entry formula:
Symbol Operation E Enter + Addition - Subtraction * Multiplication / Division For example, to enter this calculation:
A * B,
Enter the information as shown in the following table:
EasyCalc Formula for a Simple Formula Factor Operator Explanation A Enter Specify the first value A. Next, specify the operator Enter to separate the second value from the first. B * Specify the second value B. Next, specify the operator to perform the multiplication calculation. -
Save your work.
To enter a complex formula:
-
You can use EasyCalc to enter complex nested formulas. When entering a nested formula, remember these rules:
-
Use Enter after the first factor of each separate calculation.
-
The order in which you enter your factors and operators determines the order in which General Ledger performs the calculations.
For example, to enter this formula:
[ ( A + B ) * C ] / ( D + G )
Enter the formula information as shown in the table below:
| Factor | Operator | Explanation |
|---|---|---|
| A | Enter | Specify the first value A. Next, specify the operator Enter to separate the second value from the first. |
| B | + | Specify the second value B. Next, specify the operator to perform the addition calculation with the value A. |
| C | * | Specify the third value C. Next, specify the operator to perform the multiplication calculation with the sum of the values A and B. |
| D | Enter | Specify the fourth value D. Next, specify the operator Enter to start the next calculation. |
| G | + | Specify the fifth value G. Next, specify the operator to perform the addition calculation with the value D. |
| / | Specify the division operator to perform the final calculation. |
Creating Skeleton Journal Entries
Create skeleton journal entries for journal entries that affect the same accounts each period, but have different posting amounts. After you generate skeleton journal entries, edit the unposted journal batch using the Enter Journals window and enter the debit and credit amounts for the journal lines.
To create a skeleton journal entry:
-
Navigate to the Define Recurring Journal Formula window.
-
Enter or query the batch name and the journal entry name.
-
Choose Lines.
-
Enter a Line number to set the order of your recurring journal entry lines.
-
Enter the Account you want General Ledger to update when you generate and post your recurring journals. Do not enter a formula.
-
Enter the remaining lines and accounts for the recurring journal entry.
-
Save your work.
To enter amounts for a skeleton entry:
-
Generate the recurring journal batch that contains your skeleton entry.
Note: You can only generate recurring journals if you have the appropriate data access set privileges. You must have at least read-only access to the ledger and balancing and management segment values in the entry formulas and read and write access to the ledger and balancing and management segment values to the recurring journal entry line.
-
Edit the unposted journal batch using the Enter Journals window, and enter the journal line amounts.
-
Save the revised journals.
-
Post the batch.
Related Topics
Creating Recurring Journal Formula Batches
Creating Recurring Journal Entries
Entering Recurring Journal Entry Lines
Generating Recurring Journal Batches
Creating Standard Recurring Journal Entries
Create standard recurring journal entries for journals that use the same accounts and amounts each period.
To create a standard recurring journal entry:
-
Navigate to the Define Recurring Journal Formula window.
-
Enter or query the batch name and the journal entry name.
-
Choose Lines.
-
Enter a Line number to set the order of your recurring journal entry lines.
-
Enter the Account you want General Ledger to update when you generate and post your recurring journals.
-
For the line Formula, enter a Step number and the fixed Amount to post.
-
Enter the remaining lines with their accounts and posting amounts.
-
Save your work.
-
Generate and post the batch.
Note: You can only generate recurring journals if you have the appropriate data access set privileges. You must have at least read-only access to the ledger and balancing and management segment values in the entry formulas and read and write access to the ledger and balancing and management segment values to the recurring journal entry line.
Related Topics
Creating Recurring Journal Formula Batches
Creating Recurring Journal Entries
Entering Recurring Journal Entry Lines
Entering Formulas with EasyCalc
Generating Recurring Journal Batches
Creating Allocations Using Recurring Journal Formulas
Creating Entered Currency Recurring Journal Entries
Create entered currency recurring journal entries for journals that have a different currency than the ledger currency. After you generate entered currency recurring journal entries, the resulting journals are converted based on the conversion information provided in the recurring journal definition and the rate at generation time.
You can specify a conversion rate type for each foreign currency formula. The conversion rate type you enter can be any conversion rate except for the User rate type.
When you generate the recurring journal entries, the conversion rate type and the journal effective date are used to obtain the appropriate rate to convert the generated entered currency recurring journal entries.
Entered Currency Recurring Journal Entry Example
Assume that you have access to the USD ledger and that for this ledger, you have a balance of 1000 Canadian dollars entered for account 01.110.1110.
You also have the following daily rate defined for the Corporate rate type for the Jan-2004 period: CAD to USD: 0.755.
Suppose you create a multiple ledger recurring journal formula batch with the following journal entry defined:
-
Ledger: US Ledger
-
Journal Currency : CAD
-
Conversion Type: Corporate
| Step | Operator | Amount | Account | Ledger Currency | Currency Type | Entered Currency |
|---|---|---|---|---|---|---|
| 1 | USD Ledger.01.110.1110 | USD | Entered | CAD | ||
| 2 | x | 2 |
| Step | Operator | Amount | Account | Ledger Currency | Currency Type | Entered Currency |
|---|---|---|---|---|---|---|
| 1 | Enter | USD Ledger.01.110.1110 | USD | Entered | CAD | |
| 2 | x | -2 |
When you generate this journal batch with a journal effective date of 05-Jan-2004, the following journal is generated for the US Ledger: Journal Entry:
| Line | Account | Dr Entered (CAD) | Cr Entered (CAD) | Dr Converted (USD) | Cr Converted (USD) |
|---|---|---|---|---|---|
| 10 | 01.110.1410 | 2000 | 1510 | ||
| 20 | 01.110.1510 | 2000 | 1510 |
For the USD Ledger, the CAD journal was converted by multiplying it by the CAD to USD daily rate. The calculation is as follows:
2000 CAD x 0.755 = 1510 USD
The journal entry is converted to the ledger currency using the conversion type and the journal effective date information.
Copying Entries from an Existing Recurring Journal Batch
You can create a new recurring journal formula batch quickly by copying and modifying an existing recurring journal formula batch.
To copy entries from an existing recurring journal batch:
-
Navigate to the Define Recurring Journal Formula window.
-
Enter a Name and Description for the new recurring journal formula batch.
-
Choose AutoCopy Batch.
-
Enter the Source Batch whose recurring journal entries you want to copy.
-
After copying the entries, you can enter or change the recurring journal formulas.
-
(Optional) Select the Enable Security checkbox to apply Definition Access Set security to your recurring journal formula.
-
Save your work.
Related Topics
Creating Recurring Journal Formula Batches
Creating Recurring Journal Entries
Changing a Recurring Journal Entry
Changing a Recurring Journal Entry
To change a recurring journal entry:
If the recurring journal entry does not have security enabled, you can modify the recurring journal entry. However, if the recurring journal entry has security enabled, you can only modify recurring journal entries for which you have modify privileges through your definition access sets.
-
Navigate to the Define Recurring Journal Formula window.
-
Query the name of the recurring journal formula batch you want to change.
-
If you have already generated journals using the batch, General Ledger automatically displays the Period and Date on which you Last Executed the batch.
-
Query the name of the recurring journal entry you want to change.
-
Choose Lines to review or change the recurring journal entry lines.
-
Edit the recurring journal lines.
-
Save your work.
Related Topics
Creating Recurring Journal Formula Batches
Creating Recurring Journal Entries
Entering Recurring Journal Entry Lines
Entering Formulas with EasyCalc
Generating Recurring Journal Batches
Performing Standard Costing with Recurring Journals
Use statistics such as sales units, production units, number of deliveries or customers served to perform standard costing. For example, you might want to calculate cost of sales based on sales units and a standard cost per unit.
To create a formula for standard costing:
-
Define a recurring journal formula using the balance of the appropriate statistical account and a fixed amount for standard cost.
Alternately, you can maintain the standard cost as a statistic in a different account.
-
Each accounting period, adjust the balance of your statistics.
-
Generate your standard cost recurring journal just like any other recurring journal batch.
Generating Recurring Journal Batches
You must generate recurring journals to create unposted journal entries from the recurring journal formulas you defined. After generating the formulas, you can review or edit the recurring journal batches before posting them.
You must have read-only or read and write access to the ledger and the balancing segment value or management segment value used in the recurring journal formula to generate recurring journals. Even though, you defined a recurring journal formula, recurring journals can only be generated for ledgers, balancing, or management segment values you have access to through your current responsibility's data access set. If you have insufficient access to the ledger or segment value, the recurring journal formula will not generate journals. See Data Access Sets, Oracle General Ledger Implementation Guide.
When you generate recurring journals from the recurring journal definition or from the Generate Recurring Journals window for average daily balance ledgers, you can set the profile option, GL: Number of Formulas to Validate for each Recurring Journal Batch, to validate your recurring journal batch before running the generation program for any average balancing processing violations with the calculation effective date or average balance usage. The window checks the number of formulas in the batch based on your profile option setting and displays an error message if any violations are found. The default value for the profile option is 5. Any other violations are detected during the generation program. For additional information, see Setting General Ledger Profile Options, Oracle General Ledger Reference Guide.
Prerequisite
-
Define your recurring journal entry formulas.
Set the profile option, GL: Number of formulas, to validate for each Recurring Journal batch if you are using average daily balance ledgers. See Setting General Ledger Profile Options, Oracle General Ledger Reference Guide.
To generate unposted batches from recurring journal formulas:
-
Navigate to the Generate Recurring Journals window.
-
(Optional) If you have average balance processing enabled and your ledger is a consolidation ledger, select a Usage. Select Standard Balances to create recurring journals that update standard balances only. Select Average Balances to create recurring journals that update average balances only.
-
Choose the Submission Details tab to enter values for the recurring journals you want to generate. Choose the Last Run Details tab to see the values that you used the last time you generated the recurring journals.
-
Select the recurring batches you want to generate. You can only choose to generate recurring batches if you have use privileges to the batch through your definition access sets.
-
For recurring batch type Single Ledger, the recurring batches will only appear if you have access to the ledger (read, read and write) based on your data access set privileges.
-
For recurring batch type Multiple Ledgers, the recurring batches will only appear if you have access to at least one ledger (read, read and write), based on your data access set privileges.
-
-
Enter the accounting Period for which you want to create an unposted journal batch.
-
Enter a Journal Effective Date. General Ledger automatically enters the nearest day of the period. You could enter any date within the specified period for a standard ledger. If you have average balance processing enabled for your ledger, you can enter any valid business day, unless your ledger is a consolidation ledger. In this case, General Ledger automatically enters the first day of the period if and you cannot change the value.
Note: You can also enter non-business days if you have set the profile option Journals: Allow Non-Business Day Transactions to Yes.
-
Enter a Calculation Effective Date. General Ledger automatically enters the nearest day of the period. You can change this to any day in any open, closed, future enterable, or permanently closed period. If you don't have average balance processing enabled, the calculation effective date is ignored for a standard ledger.
-
(Optional) Choose the Recurring Journal button to review the batch definition. You can generate your recurring journal batch from this window.
-
If you have a recurring journal entry formula that uses budget balances to calculate journal amounts, enter the Budget name.
-
(Optional) Schedule your Recurring Journal batch. See: Scheduling your Recurring Journal batch.
-
Choose Generate. General Ledger submits a concurrent process to create unposted journal batches based on the selected recurring journal formula batches. Note the Request ID assigned to the concurrent process.
Review the Recurring Journals Execution Report. General Ledger names the resulting journal batch as follows: <Recurring Batch Name>: <Date> <Time>. For example, Project Expense: 15-JAN-95 16:36.
You can only generate recurring journals for recurring journals formulas that you have read only or read and write access to through your current responsibility's data access set. For the recurring journal line formulas, you must have at least read-only access to the ledger value or balancing and management segment values specified to retrieve its balances. For the ledger value specified at the batch-level or journal line-level or the balancing or management segment value specified at the journal line-level, you must have read and write access to generate recurring journals for the ledgers.
-
If you generated skeleton journal entries, use the Enter Journals window to complete the journal information.
-
Review your generated journals.
The Conversion region of the Enter Journals window displays the conversion information your generated recurring journal. The table below details how your generated journals are displayed.
Currency Recurring Journals Currency Type Rate Description Ledger currency User 1 Journals are based on the ledger currency balances. No conversion is necessary. STAT User 1 No conversion necessary. Entered currency Conversion rate specified The daily rate between the entered transaction currency and the ledger currency for the journal effective date and the conversion rate type The conversion rate used to calculate the accounted amount is the daily rate between the entered transaction currency and the ledger currency. -
Post the generated recurring journal batches to update account balances.
Related Topics
Creating Recurring Journal Formula Batches
Creating Recurring Journal Entries
Overview of Average Balance Processing
Scheduling Your Recurring Journal Batch
You can generate your Recurring Journal Batch according to schedules in Oracle Applications, schedules you define in Oracle Applications, or schedules you define in General Ledger.
To schedule your Recurring Journal Batch:
-
Navigate to the Recurring Journal Parameters window.
-
Complete the following fields:
-
Name: Enter or choose a name for the Recurring Journal you want to schedule from the list of values.
-
Period: Enter an accounting period or choose from the list of values.
-
Budget: Enter a budget or choose from the list of values.
Note: The Budget field is enabled only if a Recurring Journal batch that uses a budget.
-
Journal Effective Date: Enter a journal effective date.
Note: General Ledger automatically enters the nearest day of the period. You can enter any date within the specified period for a standard ledger. If you have average balance processing enabled for your ledger, you can enter any valid business day unless your ledger is a consolidation ledger. In this case, General Ledger automatically enters the first day of the period and you cannot change the value.
-
Calculation Effective Date: Enter a calculation effective date.
Note: General Ledger automatically enters the nearest day of the period. You can change this to any day in any open, closed, future enterable, or permanently closed period. If you don't have average balance processing enabled, the calculation effective date is ignored for a standard ledger.
-
(Optional) Usage: Select a usage if you have average balance processing enabled and the ledger is a consolidation ledger.
The Ledger and Balancing Segment Value fields are disabled for the recurring journals feature. These fields are only applicable to the MassAllocations feature.
-
-
Choose the Schedule button.
The Oracle Applications Submit Request window opens.
-
Choose the Schedule button.
The Schedule window opens.
-
You can create your own schedule by completing the regions in this window. For more information, see: Oracle E-Business Suite User's Guide.
Or, choose the Apply a Saved Schedule button to select from a set of Oracle Applications or General Ledger pre-defined schedules.
-
Return to the Submit Request window and submit your request.
Note: You must post the Recurring Journal batch after it is generated.
Related Topics
Defining Financial Schedules, Oracle General Ledger Implementation Guide
MassAllocations
About MassAllocations
Use a MassAllocation formula to create journals that allocate financial amounts across a group of cost centers, departments, divisions, ledgers, and so on. By including parent values in allocation formulas, you can allocate to the child values referenced by the parent without having to enumerate each child separately. By including ledgers or ledger sets in the formulas, you can allocate amounts from one ledger to another ledger. Hence, a single formula can perform multiple allocations across ledgers. Alternatively, you can create a MassAllocation formula to be reused for more than one ledger set, ledger, or balancing segment value.
To define MassAllocation formulas, you create a MassAllocation batch that contains one or more MassAllocation formula entries. You can also copy an existing MassAllocation batch then modify it as needed for your new batch. Use MassAllocation batches to group your MassAllocation formulas. For example, you might combine all formulas for a single department, division, ledger, or ledger set into one batch, or group all formulas for certain types of calculations into separate entries.
You can create MassAllocations in your ledger currency, an entered currency, or statistical currency. If a MassAllocation definition is defined with no value for the ledger segment in the formula, then the ledger currency designated in the formula is overridden with the ledger currency of the runtime ledger.
Additional Information: When MassAllocation is run for a ledger set, the program overrides the ledger currency of the ledger, for each ledger of the ledger set, with the ledger currency specified in the formula lines. A mass allocation journal is generated for all the ledgers of the ledger set. If the ledger segment is null for all formula lines, then the ledger currency, for each ledger of the runtime ledger set, is replaced with the ledger currency. If the ledger segment is specified in any of the formula lines, then the ledger and ledger currency of that line are not overridden with the runtime ledger and its currency. If a ledger set is specified in any of the formula lines, then the runtime ledger set is not replaced.
Related Topics
Creating MassAllocation Batches
Creating MassAllocation Batches
You can create MassAllocation batches that include ledgers that have the same chart of accounts as the data access set of your current responsibility. When you generate the MassAllocation batches, you must have read-only or read and write access to the ledger and balancing segment value or management segment value to generate MassAllocation journals. For information on generating MassAllocation batches, see Creating MassAllocation Batches.
You can create a new MassAllocation batch or copy an existing batch.
Prerequisites
-
Post journals to ensure that the existing balance for your allocation cost pool is current.
To create a MassAllocation batch:
-
Navigate to the Define MassAllocations window.
-
Enter a Name for the MassAllocation batch.
-
Choose Actual or Encumbrance from the Balance Type poplist, for the types of balances to use in your mass allocation batch.
-
Enter a Description for the MassAllocation batch.
-
Choose Formulas to enter MassAllocation formulas.
-
(Optional) Select the Enable Security checkbox to apply Definition Access Set security to your MassAllocation formula. Definition Access Sets are an optional security feature that enables you to control access to your General Ledger definitions. For example, you can prevent certain users from viewing, making changes, or using your MassAllocation formula. If you do not enable security, all users will be able to use, view, and modify your MassAllocation formula.
If the Assign Access function is available for your responsibility, the Assign Access button is enabled once you check the Enable Security checkbox. Choose the Assign Access button to assign the definition to one or more Definition Access Sets with the desired privileges. For information on defining access sets, see Definition Access Sets, Oracle General Ledger Implementation Guide.
If the Assign Access function has been excluded from your responsibility, you will not be able to view the Assign Access button in the Define MassAllocation window. You can still secure the MassAllocation formula by checking the Enable Security checkbox, but only Definition Access Sets that are AutoAssigned will be automatically assigned to this MassAllocation formula. See your System Administrator for more information on Function Security.
-
After entering the formulas, save your work.
-
Generate unposted journal batches from your MassAllocation formulas.
To copy an existing MassAllocation batch:
-
Navigate to the Define MassAllocations window.
-
Enter a Name for the new MassAllocation batch.
-
Choose the AutoCopy button, then choose the MassAllocation batch that you want to copy.
-
Change the Balance Type as needed.
-
Enter a Description for the new MassAllocation batch.
-
Choose Formulas to modify the MassAllocation formulas that you copied.
-
(Optional) Select the Enable Security checkbox to apply Definition Access Set security to your MassAllocation formula.
-
After modifying the formulas, save your work.
-
Generate unposted journal batches from your MassAllocation formulas.
Securing MassAllocations
You can secure your MassAllocation definition using definition access sets. Definition access sets are an optional security feature that enables you to control use, view, and modify access to your General Ledger definitions.
The following describes what Use, View, and Modify access mean as it pertains to MassAllocations:
-
Use Access: Enables you to generate the MassAllocation and assign them to AutoAllocation Sets. You can also schedule MassAllocations from the Define MassAllocation window if you also have View access. If you have Use privileges only, you will not be able to view or make changes to the MassAllocation definition.
-
View Access: Enables you to view the MassAllocation definition from the Define MassAllocation window. You will not be able to generate or make changes to the MassAllocation definition.
-
Modify Access: Enables you to view and make changes to the MassAllocation definition from the Define MassAllocation window. You will not be able to generate the MassAllocation definition.
Related Topics
Generating MassAllocation Journals
Creating MassAllocation Formulas
Creating MassAllocation Formulas
To enter a MassAllocation formula:
-
Navigate to the Define MassAllocations window.
-
Enter or query the name of the MassAllocation batch to which you want to add the formula.
-
Choose Formulas.
-
Enter the Name, Category, and Description of the MassAllocation formula. Categories help you group journal entries in a convenient manner for reporting and analysis.
-
Enter the Currency for the MassAllocation journal entry. You can choose a ledger currency, or an entered or STAT currency.
-
Choose your Foreign Currency Allocation method to determine how you want entered currency balances converted.
-
If you choose Converted Amount, General Ledger allocates the full balance for the account for both the entered and converted amounts for foreign currency allocations.
-
If you choose Calculated Amount, enter a Conversion Type, except for the User rate type. General Ledger uses the entered conversion method, conversion type, and journal effective date to determine the rate to use to convert the generated MassAllocation journal.
-
-
Choose Full Cost Pool Allocation to have any rounding difference resulting from the MassAllocation computation added to the allocations with the largest relative balance. If you do not choose this option, any rounding differences will remain in the original account.
-
Enter the formula lines.
-
Save your work.
Related Topics
Entering MassAllocation Formula Lines
Entering MassAllocation Formula Lines
All MassAllocation formulas use the following equation to determine allocation amounts:
COST POOL * (USAGE FACTOR / TOTAL USAGE)
General Ledger uses the following format to represent the equation. Each factor in this equation relates to a separate formula line.
A * B / C
You can enter any combination of fixed amounts and accounts in formula lines A, B, or C.
Note: When you create MassAllocation formulas, you can enter specific amounts or specify an account for lines A, B or C.
If you do not choose Full Cost Allocation: you can enter an amount instead or an account in any of lines A, B or C.
If you choose Full Cost Allocation: you can enter an account or amount in line A but lines B and C must contain accounts only.
To enter an account in a MassAllocation formula line:
-
Enter the account for the A, B, or C line of your formula. Enter accounts with parent segment values to create a formula that references accounts with the corresponding child segment values.
Optionally, enter a ledger, ledger set, or balance-level reporting currency in the Ledger segment or a balancing segment value in the balancing segment for the accounts for lines A, B, or C. By leaving these segments blank, you can use the MassAllocation formula for different ledger sets, ledgers, or balancing segment values by indicating them at generation time. The values are the corresponding short names.
You can also enter accounts with parent segment values to create a formula that references accounts with the corresponding child segment values.
When you enter an account, General Ledger ensures that segment values are valid and enabled. For the ledger segment value, you can define formulas with ledgers or ledgers sets that have the same chart of accounts as your current responsibility's data access set.
You can specify a ledger set in the formula line that contains accounts with the Encumbrance balance type if all the ledgers in the ledger set have the same ledger currency.
If you use reporting currencies (journal or subledger level), you can enter a reporting currency in the Ledger segment.
-
Assign a segment Type for each account segment. The combination of segment values and types tells General Ledger which related accounts are affected or used by that portion of the formula.
You can assign one the following segment types to each segment:
Looping (L): Assign this type to a ledger set segment value. The allocation program runs each formula once for each ledger in the ledger set. You can only loop on ledger set segment values.
Assign this type to a parent segment value to include each child value assigned to the parent value in the formula. The allocation program runs each formula once for each corresponding child segment value. You can loop only on parent values.
Summing (S):
Assign this type to a ledger set segment value to sum the account balances of all the ledgers in the ledger set. You can only sum on ledger set segment values.
Assign this type to a parent segment value to sum the account balances of all the child segment values assigned to a parent. For example, if you enter a parent that has five child values, the allocation program adds the account balances of the five child accounts and uses the sum in each MassAllocation formula. You can sum only on parent values.
Constant (C): Assign this type to a single ledger segment value. You can only use this segment type for a single ledger for the ledger segment.
Assign this type to a child segment value to use the detail account balance associated with the child. You can use this type with a parent segment value only if there is a summary account associated with the parent.
Note: To use summary accounts in a mass allocation formula, all segments in the formula must be assigned a segment type of Constant.
-
Enter a Ledger Currency to determine which ledger should be used to retrieve balances. If you specified a single ledger or balance-level reporting currency in the account's ledger segment, the ledger currency automatically defaults to the ledger currency or the balance-level reporting currency and cannot be changed. If you specified a ledger set, the ledger currency can be the currency of a ledger or an associated balance-level reporting currency based on the ledger set. If you left the ledger segment blank, you may specify any currency. The following table summarizes this:
Ledger Segment Ledger Currency Single Ledger or Balance-Level Reporting Currency Defaults to the currency of the ledger currency or balance-level reporting currency and cannot be changed. Ledger Set Can be a currency of a ledger or an associated balance-level reporting currency within the ledger set. Blank Can be any currency. The ledger currency for formula lines that use the Encumbrance balance type should be the ledger currency of the specified ledger set or ledger.
-
Enter a Currency Type of Entered, Statistical, or Total.
If the balance type of the formula line is Encumbrance, you can only select the Total currency type since only total balances is supported for encumbrance balances.
-
Choose an Entered Currency. If the specified currency type is Statistical, the entered currency default is the statistical currency and cannot be changed. If the specified currency type is Total, the entered currency field is disabled. If the specified currency type is Entered, the entered currency can be any currency.
The Ledger Currency, combined with Currency Type and Entered Currency fields, determines what type of currency account balance is retrieved for your formula. The following table shows the currency account balance types for each combination of the ledger currency, currency type, and entered currency.
Ledger Currency Currency Type Entered Currency Type of Account Balance Retrieved Ledger Currency Entered Any Entered balance of the entered currency for the ledger referenced from the ledger currency. Statistical STAT Statistical balance of the ledger referenced from the ledger currency. Total N/A Total balance of the ledger currency for the ledger referenced from the ledger currency. Balance Level Reporting Currency Entered Any Entered balance of the entered currency for the reporting currency referenced from the ledger currency. Total N/A Total balance of the balance level reporting currency. Any (when ledger segment is left blank) Entered Any Entered balance of the entered currency for the ledger referenced from the ledger currency.
The ledger currency of the ledger or of the ledgers in a ledger set indicated at generation time must be the same as the specified ledger currency to have a MassAllocation journal generated. The ledger cannot be a balance-level reporting currency.Statistical STAT Statistical balance of the ledger referenced from the ledger currency.
The ledger currency of the ledger or of the ledgers in a ledger set indicated at generation time must be the same as the specified ledger currency to have a MassAllocation journal generated. The ledger cannot be a balance-level reporting currency.Total N/A Total balance of the ledger currency or balance-level reporting currency from the ledger or balance level reporting currency referenced from the ledger currency.
The ledger currency of the ledger, the ledgers in a ledger set, or the balance-level reporting currency indicated at generation time must be the same as the specified ledger currency to have a MassAllocation journal generated. -
Enter the Amount Type you want to use:
-
Period-to-Date
-
Quarter-to-Date
-
Year-to-Date
-
Project-to-Date
If you have average balance processing enabled in the system, you can also select from the following values, however, your Balance Type must be Actual:
-
Period Average-to-date
-
Quarter Average-to-date
-
Year Average-to-date
-
End-of-day
Note: You can mix standard and average amount types in the same MassAllocation formula.
-
-
Enter the Relative Period for the account balance you want to use:
-
Current Period
-
Previous Period
-
Year Ago, Same Period
-
-
Enter the account Balance Type to use for the formula line. If you enter the Budget balance type, you must also enter a Budget name. If you enter the Encumbrance balance type, you must also enter an Encumbrance Type.
-
Once you have entered your A, B, and C formula lines, enter the Target and Offset accounts.
-
Save your work.
Related Topics
Defining Segment Values, Oracle Applications Flexfields Guide
Entering an Offsetting Account
Generating MassAllocation Journals
Entering a Target Account
Enter an account in the Target line to specify the destination for your allocations.
When the result of your allocation formula is a positive number, the resulting journal entry debits the target account and credits the offset account. When the result of your allocation formula is a negative number, the resulting journal entry credits the target account and debits the offset account.
Note: The target account must conform to the allocation formula rules for target accounts. Be sure to also follow the account segment cross-validation rules.
If you are specifying a ledger set or ledger in the ledger segment of the target account, you can specify any ledger or ledger set that has the same chart of accounts as the data access set assigned to the current responsibility.
Related Topics
Entering MassAllocation Formula Lines
Entering an Offsetting Account
Enter an account in the Offset line to specify the account to use for the offsetting debit or credit from your allocation. The ledger set or ledger of the Offset line must be the same as the ledger set or ledger specified in the target account. Also, the Offset account is usually the same account as formula line A to reduce the cost pool by the allocated amount.
When the result of your allocation formula is a positive number, the resulting journal entry debits the target accounts and credits the offset account. When the result of your allocation formula is a negative number, the resulting journal entry credits the target accounts and debits the offset account.
Note: The offset account must conform to the allocation formula rules for offsetting accounts. Be sure to also follow the account segment cross-validation rules.
Related Topics
Entering MassAllocation Formula Lines
Allocation Formula Rules
Use the following definition rules when creating your allocation formulas. The allocation generation program checks that your formulas adhere to these rules.
For formula lines A, B and C (operand lines):
-
You can enter either an amount or an account in lines A, B and C.
-
If you enter an account and enter a ledger or balance-level reporting currency in the ledger segment, you must have a Constant segment type. If you enter a ledger set in the ledger segment, you can use either the Looping or Summing segment type.
-
If you enter an account, child values must have a Constant segment type.
-
Parent values may have a Constant, Looping or Summing segment type.
-
You can use a Constant segment type with a parent value only if it references a summary account.
-
If you use a Looping segment type on the same segment in more than one of the operand lines, you must use the same parent.
-
If you use a Looping segment type in your Target line, you must use a Looping segment type on the same segment using the same parent in lines A, B or C.
-
To use summary accounts, all segments in your formula must be assigned a segment type of Constant.
-
You must have at least read access to the ledger, ledger set, balancing or management segment values in the lines A, B, and C to allocate those amounts. If you do not have read access, zero amounts are generated.
-
If you enter an entered currency as the transaction currency with the Converted Option, the currency of line A must be the same as the transaction currency.
For target and offset lines (lines T and O)
-
You must enter an account in the Target and Offset lines.
-
You must enter valid account code combinations to generate MassAllocation journals.
-
Ledger, balance-level reporting currencies, and detail values must have a Constant segment type.
-
Ledger set and parent values must have a Looping segment type.
-
Your Target account must be different from your Offset account.
-
Your Target account’s ledger segment value must be the same as the Offset account’s ledger segment. If you leave this segment blank, then it must be blank for the Target and Offset lines.
-
If you enter a ledger or balance level reporting currency in the target or offset lines’ ledger segment, you must have a Constant segment type. If you enter a ledger set in the ledger segment, you can use the Looping or Summing segment type.
-
You must have read and write access to the ledger, ledger set, balancing, or management segment values in the Target and Offset lines to generate MassAllocation journals.
For the target line only (line T)
-
If you use a Looping segment type in lines A, B or C, you must use a Looping segment type on the same segment using the same ledger segment value or parent in your Target line.
For the offset line only (line O)
-
You can only use a Looping segment type in your Offset line if the corresponding segment type in your Target line is Looping.
-
If you use a Looping segment type in your Offset line, you must use the same ledger segment value or parent as in your Target line.
Validation Business Rules
If you choose to use Full Cost Pool Allocation, below are the business rules used to validate your Allocation Formula Rules for lines A, B, and C. If your full cost pool allocation contains violations of the business rules, the execution report will detail the errors.
-
Line A is account or constant based.
-
Line B is account based.
-
Line B has at least one looping segment.
-
Line C is account based and has the same segment values as line B.
-
Line C uses Constant or Summing segment type if line B uses Constant or Summing segment type.
-
At least one Summing or Constant segment in line C corresponds to a looping segment in line B.
Related Topics
Entering MassAllocation Formula Lines
Entering an Offsetting Account
Reporting Currencies
If you are using Currencies (Journal or Subledger Transaction Level), you can create formulas to include additional level currencies that have the same chart of accounts, calendar, and period type as the data access set of your current responsibility. When you generate the MassAllocation formulas, you must have at least read access to the reporting currencies you are allocating amounts from and read and write access to the reporting currencies for which you are creating journals.
Generating MassAllocation Journals
Generate MassAllocations to validate and create unposted journal batches based on your MassAllocation formulas. The generated journal batch contains one entry for each allocation formula in the batch.
Use MassAllocation journals to reverse existing balances, post new allocation amounts, or generate journals that increment the existing balances to match the current allocation amount.
You can generate MassAllocation journal batches for any range of open or future enterable periods. If you are allocating encumbrances, all of the periods must be in open encumbrance years. General Ledger creates one unposted journal batch for each period in the range. If there is a closed period in the range of periods you specify, General Ledger generates a batch that cannot be posted until you open the period.
You must have read-only or read and write access to the ledger, the balancing segment value, or management segment value used in the MassAllocation formula to generate MassAllocation journals. Even though you were able to define a MassAllocation formula, MassAllocation journals are only generated for the ledgers, balancing, or management segment values to which you have access through your current responsibility's data access set. If you have insufficient access to the ledger or segment value, the MassAllocation will not generate journals. See Data Access Sets, Oracle General Ledger Implementation Guide.
When you generate MassAllocation journals from the MassAllocation definition window or from the Generate MassAllocation Journals window for average daily balance ledgers, you can set profile option, GL: Number of Formulas to Validate for each MassAllocation Batch, to validate your MassAllocation batch before running the generation program for any average balancing processing violations such as calculation effective date and average balance usage business rules. The windows only check a certain number of formulas in the batch based on your profile option setting and show an error message if any violations are found. The default value for the profile option is 5. Any other violations are detected during the generation program. For additional information, see Setting General Ledger Applications Profile Options, Oracle General Ledger Reference Guide.
Prerequisite
-
Define MassAllocation formulas.
-
Set the profile option, GL: Number of formulas, to validate for each MassAllocation batch if you are using average daily balance ledgers.
To generate a journal batch from a MassAllocation formula:
-
Navigate to the Generate MassAllocation Journals window.
-
Enter a Ledger Set or Ledger. If you have a default ledger assigned for your data access set, it is automatically defaulted. If the MassAllocation formula does not have any unspecified ledger segment values in the formula, the ledger or ledger set value you enter is ignored. This entry is only applicable when the ledger segment value is left unspecified in the MassAllocation formula.
-
Enter a Balancing Segment Value. If the MassAllocation formula does not have any unspecified balancing segment values in the formula, the balancing segment value you enter is ignored. This entry is only applicable when the balancing segment value is left unspecified in the MassAllocation formula.
-
(Optional) If you have average balance processing enabled and your ledger is a consolidation ledger, select a Usage. Select Standard Balances to create MassAllocation journals that update standard balances only. Select Average Balances to create MassAllocation journals that update average balances only.
-
Specify the Allocation Method for the MassAllocation batches you are generating. Choose Full to reverse previous allocation batches or to post new allocation amounts. Choose Incremental to generate journals that increment the existing balances to match the current allocation amount.
-
(Optional) If you have average balance processing enabled, choose Submission Details from the poplist to enter values for the MassAllocation journals you want to generate. Choose the Last Run Details tab to see the values that you used the last time you generated the MassAllocation journals.
-
Enter the Batch Name for each validated MassAllocation formula batch you want to generate.
-
Enter the Period for which you want to generate MassAllocation journals.
-
Enter a Journal Effective Date. General Ledger automatically enters the nearest day of the chosen period. You can enter any date within the specified period for a standard ledger. If you have average balance processing enabled, you can enter any valid business day, unless your ledger is a consolidation ledger. In this case, General Ledger automatically enters the first day of the period and you cannot change the value.
Note: You can also enter non-business days if you have set the profile option Journals: Allow Non-Business Day Transactions to Yes.
-
Enter a Calculation Effective Date. General Ledger automatically enters the nearest day of the period. You can change this to any day in any open, closed, future enterable, or permanently closed period. If you do not have average balancing processing enabled, the calculation effective date is ignored.
-
(Optional) Schedule your Allocation or MassAllocation batch.
-
Choose Generate to submit a concurrent process that creates an unposted journal batch for the period you specify.
Review the MassAllocations Execution Report.
General Ledger names your MassAllocation journal batches as follows: MA: <Request ID><MassAllocation Batch Name><Period>. The following is an example of a MassAllocation journal batch name: MA: 47566 Rent Budget Allocation JAN–95.
-
Review and change the generated MassAllocation journal batches using the Enter Journals window. General Ledger names your MassAllocation journal batches as follows: MA: <Request ID> <MassAllocation Batch Name> <Period>; for example, MA: 47566 Rent Budget Allocation JAN-95.
The Conversion region in the header of the Enter Journals window displays the conversion information for your MassAllocation journal. The table below details how your generated MassAllocation journals are displayed.
Currency MassAllocations Currency Type Rate Description Ledger currency User 1 No conversion required. Entered currency Conversion rate specified The daily rate between the entered transaction currency and the ledger currency for the journal effective date and conversion rate type. The conversion rate used to calculate the accounted amount is the daily rate between the entered transaction currency and the ledger currency. STAT User 1 No conversion required. -
Post the MassAllocation journal batches using the Post Journals window.
Related Topics
Creating MassAllocation Batches
Creating MassAllocation Formulas
Overview of Average Balance Processing
Reusing MassAllocation Formulas for Different Ledgers and Balancing Segment Values
You can use the same MassAllocation formula for different ledger sets, ledgers, balance-level reporting currencies, and even balancing segment values. You can allocate amounts from different ledger sets, ledgers, balance-level reporting currencies, and balancing segment values, or allocate amounts to different ledger sets, ledgers, balance level reporting currencies, and balancing segment values by specifying them at generation time rather than specifying them in the formula.
To use this feature, do not enter a ledger segment or balancing segment value when defining your MassAllocation formula for lines A, B, C, T, or O. Then, at generation time, specify the ledger set, ledger, balance-level reporting currency, or balancing segment value in the ledger and balancing segment value fields. The ledger or balancing segment value you specify is applied to the formula where the ledger or balancing segment value fields are unspecified.
Choosing an Allocation Method
You can generate journals from allocation formulas using a full or incremental allocation method, depending on whether you want to replace or increment existing account balances.
Generating Journals Using the Full Allocation Method
Choose the Full allocation method to generate journals that reverse previous allocations or to post new allocation amounts. We recommend that you use this method only if you are allocating amounts for the first time, or only once.
To replace a previous allocation requires two steps. First, reverse the original allocation. Second, create a mass allocation for the new amounts.
Generating Journals Using the Incremental Allocation Method
Choose the Incremental allocation method when you want to update allocated balances without reversing the previous allocation batches. Using this method, you can generate allocation journals as many times as you wish, provided there is no activity against the target accounts between runs. Note the Offset account is usually the same account as formula line A to reduce the cost pool by the allocated amount.
We recommend that you do not use the incremental method the first time you generate a MassAllocation entry. However, if you do generate your first MassAllocation entry using this method, your target balance must be zero.
Before generating incremental allocation journals, post all batches you previously generated from the same formula batch.
If you rerun your incremental batches, General Ledger uses cumulative period-to-date, quarter-to-date, year-to-date or project-to-date balances for the accounting period you specify. The first amount type General Ledger encounters in the A*B/C formula is the amount type used for the target account when calculating the incremental allocation amount (A*B/C).
Related Topics
MassAllocation Examples
The following are MassAllocation examples.
Single Ledger Usage–Based Allocation Example
Suppose you want to redistribute your total US dollars (USD) monthly rent expense from department 100 to each department based on the amount of space each department occupies within a single ledger, Vision US. Your account is composed of three segments: Company, Department, and Account.
Department 999 is a parent that includes all departments except 100. Department 100 is the department that stores all rent expenses. Account 5740 is the rent expense account. SQFT is the statistical account used to record square footage for each department.
Usage-Based Allocation Example
The MassAllocation formula transaction currency is USD using the Converted Amount entered currency allocation. Therefore, no currency conversion is required.
The table below shows the MassAllocation formula you can define to allocate the monthly rent expense for company 01 for Vision US ledger. In this table, the account segment type is identified in the next row following each account segment row, where L stands for looping, S for summing, and C for constant.
| Factor | Operator | Account | Ledger Currency | Currency Type | Entered Currency | Amount Type | Relative Period | Balance Type |
|---|---|---|---|---|---|---|---|---|
| A | E | VisionUS-01-100-5740 | USD | Total | PTD | Current Period | A | |
| Type | C-C-C-C | |||||||
| B | * | VisionUS-01-999-SQFT | USD | Statistical | STAT | YTD | Current Period | A |
| Type | C-C-L-C | |||||||
| C | / | VisionUS-01-999-SQFT | USD | Statistical | STAT | YTD | Current Period | A |
| Type | C-C-S-C | |||||||
| T | E | VisionUS-01-999-5740 | PTD | Current Period | A | |||
| Type | C-C-L-C | |||||||
| O | E | VisionUS-01-100-5740 | PTD | Current Period | A | |||
| Type | C-C-C-C |
Row A represents the cost pool that you want to allocate to all departments for the Vision US ledger. Rows B and C compute the relative amount of floor space occupied by each department. These rows access statistical accounts of the form 01-101-SQFT, 01-102-SQFT, and so on. Row B loops through all department segment values. Row C computes the total of all floor space occupied.
Assume there are three other departments besides 100 in the company, 101, 102 and 103 that occupy 45%, 30% and 25% of the company's floor space, respectively. These departments are children to the parent department 999. When you run this MassAllocation formula for an accounting period with $100,000 of rent expense, you produce a journal entry for the Vision US ledger as shown in the table below:
| Account | Entered Debit (USD) | Entered Credit (USD) | Converted Debit (USD) | Converted Credit (USD) | Description |
|---|---|---|---|---|---|
| 01-101-5740 | 45,000.00 | 45,000.00 | Rent Expense - Dept 101 | ||
| 01-102-5740 | 30,000.00 | 30,000.00 | Rent Expense - Dept 102 | ||
| 01-103-5740 | 25,000.00 | 25,000.00 | Rent Expense - Dept 103 | ||
| 01-100-5740 | 100,000.00 | 100,000.00 | Rent Expense - Dept 100 |
You can use more than one looping segment in your formula. For example, you can expand the previous allocation to allocate rent expense across all companies and departments in your organization.
Define a parent Company segment value (99) that is associated with all detail company values for your ledger. Then use Company value 99 instead of 01 in all five rows of the formula. Use the Looping segment type for company 99 in each row except C. This formula is described in the table below:
| Factor | Operator | Account | Ledger Currency | Currency Type | Entered Currency | Amount Type | Relative Period | Balance Type |
|---|---|---|---|---|---|---|---|---|
| A | E | VisionUS-99-100-5740 | USD | Total | PTD | Current Period | A | |
| Type | C-L-C-C | |||||||
| B | * | VisionUS-99-999-SQFT | USD | Statistical | STAT | YTD | Current Period | A |
| Type | C-L-L-C | |||||||
| C | / | VisionUS-99-999-SQFT | USD | Statistical | STAT | YTD | Current Period | A |
| Type | C-S-S-C | |||||||
| T | E | VisionUS-99-999-5740 | PTD | Current Period | A | |||
| Type | C-L-L-C | |||||||
| O | E | VisionUS-99-100-5740 | PTD | Current Period | A | |||
| Type | C-C-C-C |
Row A represents the cost pool that you want to allocate to all departments for the Vision US ledger. Rows B and C compute the relative amount of floor space occupied by each department. These rows access statistical accounts of the form 01-101-SQFT, 01-102-SQFT, and so on. Row B loops through all company and department segment values. Row C computes the total of all floor space occupied.
Entered Currency Allocation Example
The previous example was a non-entered currency allocation example. Let's take the same example and have the MassAllocation formula transaction currency be Canadian dollars (CAD) using the Calculated Amount entered currency allocation. Therefore, currency conversion is required.
Suppose you want to redistribute your entered Canadian dollars (CAD) monthly rent expense from department 100 to each department based on the amount of space each department occupies within a single ledger, Vision US. Your entered Canadian dollar for the account is the amount entered in CAD and excludes amounts entered in any other currency.
The table below shows the MassAllocation formula you can define to allocate the monthly rent expense for company 01 for Vision US ledger in CAD currency.
The transaction currency of CAD uses the Corporate rate type to convert the MassAllocation formula to CAD. The Corporate rate between the USD and CAD currencies for the journal effective date entered at generation time is 0.7566.
| Factor | Operator | Account | Ledger Currency | Currency Type | Entered Currency | Amount Type | Relative Period | Balance Type |
|---|---|---|---|---|---|---|---|---|
| A | E | VisionUS-01-100-5740 | USD | Entered | CAD | PTD | Current Period | A |
| Type | C-C-C-C | |||||||
| B | * | VisionUS-01-999-SQFT | USD | Statistical | STAT | YTD | Current Period | A |
| Type | C-C-L-C | |||||||
| C | / | VisionUS-01-999-SQFT | USD | Statistical | STAT | YTD | Current Period | A |
| Type | C-C-S-C | |||||||
| T | E | VisionUS-01-999-5740 | PTD | Current Period | A | |||
| Type | C-C-L-C | |||||||
| O | E | VisionUS-01-100-5740 | PTD | Current Period | A | |||
| Type | C-C-C-C |
Row A represents the cost pool that you want to allocate to all Departments for the Vision US ledger. It only retrieves the amount entered in CAD for that account. Rows B and C compute the relative amount of floor space occupied by each department. These rows access statistical accounts of the form 01–101–SQFT, 01–102–SQFT, and so on. Row B loops through all department segment values. Row C computes the total of all floor space occupied.
For the three other departments besides 100 in the company, 101, 102 and 103, they occupy 45%, 30%, and 25% of the company's floor space, respectively. These departments are children to the parent department 999. When you run this MassAllocation formula for an accounting period with 100,000 of rent expense where 10,000 of that amount was entered in CAD, you produce a journal entry for the Vision US ledger as shown in the table below:
| Account | Entered Debit (CAD) | Entered Credit (CAD) | Converted Debit (USD) | Converted Credit (USD) | Description |
|---|---|---|---|---|---|
| 01-101-5740 | 4,500.00 | 3,404.70 | Rent Expense - Dept 101 | ||
| 01-102-5740 | 3,000.00 | 2,269.80 | Rent Expense - Dept 102 | ||
| 01-103-5740 | 2,500.00 | 1,891.50 | Rent Expense - Dept 103 | ||
| 01-100-5740 | 10,000.00 | 7,566.00 | Rent Expense - Dept 100 |
The rent expense distributed to the different departments is converted based on the corporate rate type and the journal effective date.
Ledger Set Allocation Example
Suppose you have a ledger set, US Ledger Set, comprised of two ledgers: East US Ledger and West US Ledger. You want to distribute the 600 US dollars to each ledger in the ledger set based on the fraction of the amount they comprise for account 1200.
Your account is composed of three segments: Company, Department, and Account. Department 110 is the department that stores cash for all the ledgers. Account 1120 is the miscellaneous cash account.
Since the MassAllocation formula transaction currency is USD, no currency conversion is required.
The table below shows the MassAllocation formula you can define to allocate the cash for the US Ledger Set. In this table, the account segment type is identified in the next row following each account segment row, where L stands for looping, S for summing, and C for constant.
| Factor | Operator | Account | Ledger Currency | Currency Type | Entered Currency | Amount Type | Relative Period | Balance Type |
|---|---|---|---|---|---|---|---|---|
| A | E | 600 | Current Period | A | ||||
| B | * | USLedgerSet-01-110-1200 | USD | Total | PTD | Current Period | A | |
| Type | L-C-C-C | |||||||
| C | / | USLedgerSet-01-110-1200 | USD | Total | PTD | Current Period | A | |
| Type | S-C-C-C | |||||||
| T | E | USLedgerSet-01-110-1120 | PTD | Current Period | A | |||
| Type | L-C-C-C | |||||||
| O | E | USLedgerSet-01-110-5740 | PTD | Current Period | A | |||
| Type | L-C-C-C |
If both the ledgers in the ledger set have $200 USD total for account 1120, when you run this MassAllocation formula, you produce a journal batch with the following journal entries for the US Ledger Set as shown in the table below:
MassAllocation Batch:
Journal 1 (East US Ledger):
| Account | Entered Debit (USD) | Entered Credit (USD) |
|---|---|---|
| 01-110-1120 | 300.00 | |
| 01-110-5740 | 300.00 |
Journal 2 (West US Ledger):
| Account | Entered Debit (USD) | Entered Credit (USD) |
|---|---|---|
| 01-110-1120 | 300.00 | |
| 01-110-5740 | 300.00 |
Incremental MassAllocation Example
Now assume that you want to reallocate an adjusted cost pool without reversing the posted journal batches created by the previous MassAllocations. You define your MassAllocation with a different offset account from your cost pool, as shown in the following table:
| Factor | Operator | Account | Ledger Currency | Currency Type | Entered Currency | Amount Type | Relative Period | Balance Type |
|---|---|---|---|---|---|---|---|---|
| A | E | VisionUS-01-100-5740 | USD | Total | PTD | Current Period | A | |
| Type | C-C-C-C | |||||||
| B | * | VisionUS-01-999-SQFT | USD | Statistical | YTD | Current Period | A | |
| Type | C-C-L-C | |||||||
| C | / | VisionUS-01-999-SQFT | USD | Statistical | YTD | Current Period | A | |
| Type | C-C-S-C | |||||||
| T | E | VisionUS-01-999-5740 | PTD | Current Period | A | |||
| Type | L-C-C-C | |||||||
| O | E | VisionUS -01-100-5840 | PTD | Current Period | A | |||
| Type | C-C-C-C |
The examples below build upon the same MassAllocation as in the previous example, except the allocation amount is the incremental change for Vision US ledger. The original MassAllocation used a cost pool of $100,000, resulting in a journal entry like the one shown in the following table:
| Account | Entered Debit (USD) | Entered Credit (USD) | Description |
|---|---|---|---|
| 01-101-5740 | 45,000.00 | Rent Expense - Dept 101 | |
| 01-102-5740 | 30,000.00 | Rent Expense - Dept 102 | |
| 01-103-5740 | 25,000.00 | Rent Expense - Dept 103 | |
| 01-100-5840 | 100,000.00 | Allocated Rent |
Now, assume that later you want to reallocate a rent cost pool increased by $10,000 to a total of $110,000. When you run the same MassAllocation formula in incremental mode for an accounting period with a cost pool of $110,000, General Ledger only allocates the adjustment to the cost pool, or $10,000. This produces the journal entry shown in the table below:
| Account | Entered Debit (USD) | Entered Credit (USD) | Description |
|---|---|---|---|
| 01-101-5740 | 4,500.00 | Rent Expense - Dept 101 | |
| 01-102-5740 | 3,000.00 | Rent Expense - Dept 102 | |
| 01-103-5740 | 2,500.00 | Rent Expense - Dept 103 | |
| 01-100-5840 | 10,000.00 | Rent Expense - Dept 100 |
After you post this journal entry, the balances in your rent expense accounts for the Vision US ledger are as shown in the table below:
| Account | Amount (USD) | Description |
|---|---|---|
| 01-101-5740 | 49,500.00 | Rent Expense - Dept 101 |
| 01-102-5740 | 33,000.00 | Rent Expense - Dept 102 |
| 01-103-5740 | 27,500.00 | Rent Expense - Dept 103 |
| 01-100-5740 | 110,000.00 | Rent Expense - Dept 100 |
| 01-100-5840 | (110,000.00) | Allocated Rent |
Now assume that later you want to reallocate a rent cost pool decreased by $30,000 to a total of $80,000 for the Vision US ledger. When you run the same MassAllocation formula in incremental mode for an accounting period with $80,000 of rent expense, General Ledger produces the journal entry shown in the table below:
| Account | Entered Debit (USD) | Entered Credit (USD) | Description |
|---|---|---|---|
| 01-100-5740 | 13,500.00 | Rent Expense - Dept 102 | |
| 01-101-5740 | 9,000.00 | Rent Expense - Dept 102 | |
| 01-102-5740 | 7,500.00 | Rent Expense - Dept 103 | |
| 01–100–5840 | 30,000.00 | Allocated Rent |
After you post this journal entry, the new balances in your rent expense accounts are shown in the following table:
| Account | Amount | Description |
|---|---|---|
| 01-101-5740 | 36,000.00 | Rent Expense - Dept 101 |
| 01-102-5740 | 24,000.00 | Rent Expense - Dept 102 |
| 01-103-5740 | 20,000.00 | Rent Expense - Dept 103 |
| 01-100-5740 | 80,000.00 | Rent Expense - Dept 100 |
| 01-100-5840 | (80,000.00) | Allocated Rent |
Posting the resulting incremental MassAllocation journal entry has a net effect of replacing the existing target balance with the allocated amounts from A*B/C.
Warning: When using MassAllocations or MassBudgeting, use accounts that receive all of their activity solely from incremental and regular MassAllocations and MassBudgeting. This ensures that General Ledger uses an accurate target balance for the incremental allocation.
Reusable MassAllocation for Different Ledgers Example
Let's take one of the previous examples and define the MassAllocation formula so that we can reuse the same formula every time for different ledgers. Suppose you want to redistribute your total US dollars (USD) monthly rent expense for a ledger from department 100 to each department based on the amount of space each department occupies for a single ledger.
Your account is composed of three segments: Company, Department, and Account. Department 999 is a parent that includes all departments except 100. Department 100 is the department that stores all rent expenses. Account 5740 is the rent expense account. SQFT is the statistical account used to record square footage for each department.
The table below shows the MassAllocation formula you can define so that you can reuse the same formula for different ledgers.
| Factor | Operator | Account | Ledger Currency | Currency Type | Entered Currency | Amount Type | Relative Period | Balance Type |
|---|---|---|---|---|---|---|---|---|
| A | E | <blank>-01-100-5740 | USD | Total | PTD | Current Period | A | |
| Type | C-C-C-C | |||||||
| B | * | <blank>-01-999-SQFT | USD | Statistical | STAT | YTD | Current Period | A |
| Type | C-C-L-C | |||||||
| C | / | <blank>-01-999-SQFT | USD | Statistical | STAT | YTD | Current Period | A |
| Type | C-C-S-C | |||||||
| T | E | <blank>-01-999-5740 | PTD | Current Period | A | |||
| Type | C-C-L-C | |||||||
| O | E | <blank>-01-100-5740 | PTD | Current Period | A | |||
| Type | C-C-C-C |
Notice that the ledger segments are left unspecified in the MassAllocation formula. When you generate the MassAllocation formula, you specify a ledger set or ledger in the ledger segment field on the Generate MassAllocation Journals window. The ledger set or ledger you specify is applied to the unspecified ledger segments in the formula.
Suppose in the Generate MassAllocation Journals window, you specify ledger, West US Ledger. When the formula is generated, it generates the formula by applying the West US Ledger as the value for the unspecified ledger segments in the formula.
Suppose you want to use the same MassAllocation formula for a different ledger, East US Ledger. In the Generate MassAllocation Journals window, you specify ledger, East US Ledger. When the formula is generated, it applies the East US Ledger as the value for the unspecified ledger segments in the formula.
Note: The same behavior occurs when you unspecify the balancing segment value in the formula. General Ledger takes the balancing segment value you enter at generation time and applies it where it is left unspecified in the formula.
AutoAllocations
AutoAllocations Overview
AutoAllocations is a powerful feature to automate journal batch validation and generation for MassAllocations, Recurring Journals, MassBudgets, and MassEncumbrances. From the AutoAllocation Workbench you can define AutoAllocation sets and submit them for processing. You can also schedule your AutoAllocation Sets to run in future periods based on General Ledger schedules you create. Use AutoAllocations to process journal batches you generate regularly, such as for month end closing.
You can create two types of AutoAllocation Sets:
-
Parallel: Parallel AutoAllocation validates and generates all the journal batches in your AutoAllocation set simultaneously. You can then post the generated journals to update your balances. Use any combination of MassAllocations, Recurring Journals, MassBudgets, or MassEncumbrances in your parallel AutoAllocation set.
-
Step-Down: You must create journal batches in a specific sequence when using Step-Down AutoAllocations. Order your journal batches so that the posted results of one step are used in the next step of the AutoAllocation set.
You can choose any combination of MassAllocations, Recurring Journals, MassBudgets, and MassEncumbrances. Step-Down AutoAllocation sets automatically validate, generate, and post all journals created by the process.
If you want the Step-Down AutoAllocation process to continue to the next step if a previous step fails to generate a journal batch, set the profile option GL AutoAllocation: Continue to Next Step if No Journal Created to Yes. See: General Ledger Profile Options, Oracle General Ledger Reference Guide.
You can incorporate Oracle Workflow to notify a specific individual or responsibility of AutoAllocation process results. You can also use Oracle Workflow to require approval from a specific individual or responsibility before the process posts generated journal batches. You can change the individual or responsibility contact for each step of the AutoAllocation set.
Note: Journal Approval, which also uses Oracle Workflow for notifications and approvals, is an independent subprocess that can be launched by AutoAllocations. The contact you specify for a step in the AutoAllocation Workbench is the Journal Approval contact. For more information, see Journal Approval Overview.
If the Step-Down AutoAllocation process fails, Oracle Workflow gives the contact individual or responsibility the option to roll back the process. Rollback cancels any generated journal batches and reverses any posted journal batches.
Note: You must enable the user profile option, AutoAllocation Rollback Allowed, for rollback to be an option if the AutoAllocation process fails.
The AutoAllocation Workbench gives you extended functionality in one window. You can:
-
Secure access to your AutoAllocation set definition with definition access set security. This excludes Oracle Projects Allocations.
-
Query defined Allocations or Recurring Journals batches to use in your Parallel or Step-Down AutoAllocation set if you have view access to the AutoAllocation set through your definition access sets or if the AutoAllocation set does not have definition access set security enabled.
-
Define your AutoAllocation set with allocations that contain multiple ledgers, as long as they share the same chart of accounts, calendar, and period type as your current data access set.
-
Drill down to view any batch definition form and create new journal batches to use in your AutoAllocation set.
-
Submit your AutoAllocation set.
-
Schedule your AutoAllocation set.
-
View the process status of your submitted AutoAllocation sets.
Note: Customizable processes are included in the Step-Down AutoAllocation process to meet your organization's specific needs. Should your organization change any workflow processes that are not designated customizable, Oracle support will be limited.
Related Topics
Creating Recurring Journal Formula Batches
Creating Recurring Journal Entries
Entering Recurring Journal Entry Lines
Creating MassAllocation Batches
Definition Access Sets, Oracle General Ledger Implementation Guide
Data Access Sets, Oracle General Ledger Implementation Guide
Oracle Projects and Oracle General Ledger
Please note the following constraints when using AutoAllocations:
-
Only a Projects responsibility can create and launch AutoAllocation sets containing Projects and General Ledger steps.
-
A General Ledger responsibility can view only General Ledger AutoAllocation steps.
-
Any Step-Down AutoAllocation set that includes a Projects Allocation Rule does not have the rollback option. If your AutoAllocation set fails, choose the View Status button in the AutoAllocation Workbench window to determine which steps completed.
-
Project Allocations do not use definition access set security.
Parallel Allocation Sets
Create Parallel Allocation sets in the AutoAllocation Workbench window.
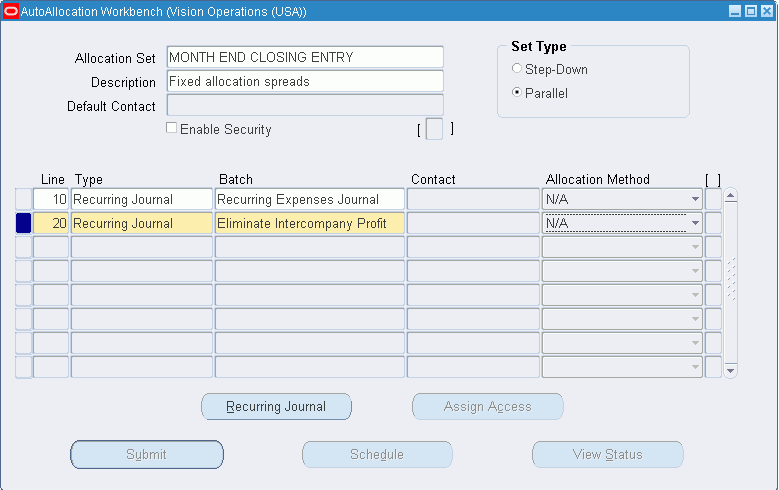
To Create a Parallel AutoAllocation Set:
-
Navigate to the AutoAllocation Workbench window.
-
Enter an AutoAllocation set name.
-
Enter a description for the AutoAllocation set.
-
Choose Parallel as the Allocation Set Type.
Note: Once you save your AutoAllocation set, you cannot change the Allocation Set Type.
-
Enter a line number in the Step column.
-
In the Type column, choose the Type of AutoAllocation you want to use from the list of values: MassAllocations, MassBudgets, Recurring Journals, or MassEncumbrances.
Note: The Definition Drilldown button (lower left) is a dynamic button. The label changes with your choice of Type. Use this button to query and edit existing or create new Mass Allocations, Mass Budgets, Recurring Journals, or MassEncumbrances. You can drill down to the Batch Definition Form to view the details of your batch. See the table below.
You can only drill down to those definitions that you have at least view privileges to through your definition access sets or definitions that do not have definition access set security enabled.
-
In the Batch column, enter a batch or choose from the list of values. Batches are predefined and are derived from the Type of allocation you specified in the Type column.
For recurring journals, you can only select from recurring journal definitions that have ledgers that have the same chart of accounts, calendar, and period type as your current data access set and that you have at least use privileges to through your definition access sets or that do not have definition access set security enabled.
For MassAllocations, including MassBudgets and MassEncumbrances, you can only select from allocations that have ledgers with the same chart of accounts as your current data access set and that you have at least use privileges to through your definition access sets or that do not have definition access set security enabled.
-
Choose the Allocation Method.
The default method of recurring batches is N/A. Your choices are Full, Incremental, or N/A.
-
(Optional) Select the Enable Security checkbox to apply Definition Access Set security to your AutoAllocation set definition. Definition Access Sets are an optional security feature that enables you to control access to your General Ledger definitions. For example, you can prevent certain users from viewing, making changes, or using your AutoAllocation set. If you do not enable security, all users will be able to use, view, and modify your AutoAllocation set.
If the Assign Access function is available for your responsibility, the Assign Access button is enabled once you check the Enable Security checkbox. Choose the Assign Access button to assign the definition to one or more Definition Access Sets with the desired privileges. For more information, see Definition Access Sets, Oracle General Ledger Implementation Guide.
If the Assign Access function has been excluded from your responsibility, you will not be able to view the Assign Access button in the AutoAllocation Workbench window. You can still secure the AutoAllocation set by checking the Enable Security check box, but only Definition Access Sets that are AutoAssigned will be automatically assigned to this AutoAllocation set. See your System Administrator for more information on Function Security.
-
Save your work.
-
When you have entered all your lines, choose any of the three buttons at the bottom of the window: Submit, Schedule, or View Status. See the table below for a list of these buttons and their corresponding actions.
Note:
-
Parallel AutoAllocation sets are not integrated with Workflow. You are not required to complete contact information for Workflow notifications.
-
Submitted Parallel AutoAllocation sets create generated journal entries. You must post the generated journals to update General Ledger balances.
| Button | Type | Dependency | Label | Action |
|---|---|---|---|---|
| Definition Drilldown | Dynamic | Batch Type: MassAllocation |
MassAllocation | Define MassAllocation window |
| Definition Drilldown | Batch Type: MassBudget |
MassBudget | Define MassBudgets window | |
| Definition Drilldown | Batch Type: MassEncumbrances |
MassEncumbrances | Define MassAllocation window | |
| Definition Drilldown | Batch Type: Recurring Journals |
Recurring Journals | Define Recurring Journal Formula window |
| Button | Action |
|---|---|
| Assign Access | When definition access set security is enabled, displays the Assign Definition Access Sets window. |
| Submit | Navigate to submission parameter window |
| Schedule | Navigate to SRS form to schedule Step-Down or Parallel AutoAllocation |
| View Status | Navigate to view status window. If more than one request exists for an allocation set, data for latest request is queried. |
Step-Down AutoAllocation Sets
Create Step-Down AutoAllocation sets in the AutoAllocation Workbench window. For more information see: Step-Down AutoAllocation Approval Process
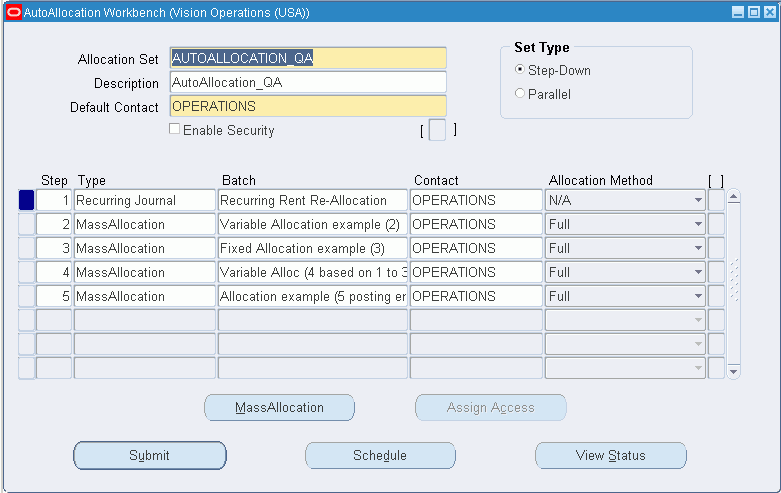
To Create a Step-Down AutoAllocation Set:
-
Navigate to the AutoAllocation Workbench window.
-
Enter an AutoAllocation set name.
-
Enter a description for the AutoAllocation set.
-
Define the Default Contact. Specify the person or responsibility to be notified by Workflow in the event of process error or process completion, or if approval is required. You can choose from the list of values or enter the user ID. The default contact appears below in the contact field for each Type you specify.
-
Choose Step-Down as the Allocation Set Type
Note: Once you save your AutoAllocation set, you cannot change the Allocation Set Type.
-
Enter the Step number in the Step column.
-
In the Type column, choose the type of AutoAllocation you want to use from the list of values: MassAllocations, MassBudgets, Recurring Journals, or MassEncumbrances. Link the execution of these allocations to the sequence number specified previously.
Note: The Definition Drilldown button (lower left) is a dynamic button. The label changes with your choice of Type. Use this button to query and edit existing or create new MassAllocations, MassBudgets, Recurring Journals, or MassEncumbrances. You can drill down to the Batch Definition Form to view the details of your batch. See the table titled AutoAllocation Definition Drilldown Button under Parallel Allocation Sets.
You can only drill down to those definitions that you have at least view privileges to through your definition access sets or definitions that do not have definition access set security enabled.
-
In the Batch column, enter a batch or choose from the list of values. Batches are predefined and are derived from the Type of allocation you specified in the Type column.
For recurring journals, you can only select from recurring journal definitions that have ledgers that have the same chart of accounts, calendar, and period type as your current data access set and that you have at least use privileges to through your definition access sets or that do not have definition access set security enabled.
For MassAllocations, including MassBudgets and MassEncumbrances, you can only select from allocations that have ledgers with the same chart of accounts as your current data access set and that you have at least use privileges to through your definition access sets or that do not have definition access set security enabled.
-
Choose a contact from the List of Values if you do not want the Default Contact. Workflow notifications and approvals are sent to the user ID or responsibility you specify when the AutoAllocation program processes this step. If Workflow fails to reach this contact, Workflow attempts to notify or gain approval from the Default Contact, if different.
Note: If Journal Approval is launched as part of your AutoAllocation step, Workflow sends two notifications: one to the step contact and one to the contact as specified in Journal Approval. For more information, seeJournal Approval Overview.
-
Choose the Allocation Method. The default method of recurring batches is N/A. Your choices are: Full, Incremental, or N/A.
-
(Optional) Select the Enable Security checkbox to apply Definition Access Set security to your AutoAllocation set definition. Definition Access Sets are an optional security feature that enables you to control access to your General Ledger definitions. For example, you can prevent certain users from viewing, making changes, or using your AutoAllocation set. If you do not enable security, all users will be able to use, view, and modify your AutoAllocation set.
If the Assign Access function is available for your responsibility, the Assign Access button is enabled once you check the Enable Security checkbox. Choose the Assign Access button to assign the definition to one or more Definition Access Sets with the desired privileges. For more information, see Definition Access Sets, Oracle General Ledger Implementation Guide.
If the Assign Access function has been excluded from your responsibility, you will not be able to view the Assign Access button in the AutoAllocation Workbench window. You can still secure the AutoAllocation set by checking the Enable Security check box, but only Definition Access Sets that are AutoAssigned will be automatically assigned to this AutoAllocation set. See your System Administrator for more information on Function Security.
For more information, see Securing AutoAllocation Sets.
-
Save your work.
-
When all of your lines are entered, choose any of the three buttons at the bottom of the window: Submit, Schedule, or View Status. See the table titled AutoAllocation Workbench Buttons under Parallel Allocation Sets for a list of these buttons and their corresponding actions.
Note: When you submit an AutoAllocation that includes Mass Budgets, leave the Budget field in the Parameters window blank as the budget has already been specified for MassBudgets. When you submit an AutoAllocation that includes Recurring Budgets, specify a budget in the Budget field.
Securing AutoAllocation Sets
You can secure your AutoAllocation Set definition using definition access sets. Definition access sets are an optional security feature that enables you to control use, view, and modify access to your General Ledger definitions.
The following describes what Use, View, and Modify access mean as it pertains to AutoAllocation Sets:
-
Use Access: Enables you to generate and schedule AutoAllocation Sets. With Use privileges only, you will not be able to view or make changes to the AutoAllocation Set definition.
-
View Access: Enables you to view the AutoAllocation Set definition in the AutoAllocation Workbench window. You will not be able to generate or make changes to the AutoAllocation Set definition.
-
Modify Access: Enables you to view and make changes to the AutoAllocation Set definition in the AutoAllocation Workbench window. You will not be able to generate the AutoAllocation Set definition.
Submitting AutoAllocation Set Requests
Before you submit your AutoAllocation set, complete the Parameters window, which you must access only from the AutoAllocation Workbench window. Parallel and Step-Down AutoAllocation sets can be submitted immediately, scheduled for a later time, or scheduled to run at specified intervals.
You can submit requests two ways:
-
Choose the Submit button in the AutoAllocation Workbench window to open the Parameters window and submit your request immediately.
-
Choose the Schedule button in the AutoAllocation Workbench window to schedule Parallel and Step-Down AutoAllocation sets. You can navigate to define an AOL schedule or choose from defined AOL or General Ledger schedules. To define your own schedule in General Ledger see: Defining Financial Schedules., Oracle General Ledger Implementation Guide
Note: If you want the Step-Down AutoAllocation process to continue to the next step if a previous step fails to generate a journal batch, set the profile option GL AutoAllocation: Continue to Next Step if No Journal Created to Yes. See: GL Profile Options, Oracle General Ledger Reference Guide.
When you submit AutoAllocation sets that have definition access set security enabled and if you have at least use privileges to the AutoAllocation set, it does not matter what privileges you have to the allocation definitions assigned to the AutoAllocation set. The definition access set privileges you have for an AutoAllocation set takes precedence over the privileges you have for the individual allocation definitions assigned to the AutoAllocation set.
To schedule your AutoAllocation set:
-
In the AutoAllocation Workbench window, choose the Schedule button.
The Parameters window appears.
-
Complete the following fields:
-
Name: The AutoAllocation set name defaults from the workbench window.
-
Ledger/Ledger Set: If the AutoAllocation set contains any MassAllocation or MassEncumbrance formulas, enter a ledger or ledger set to be applied to the formulas if the ledger segment value was not defined. If the allocation formula does not have any undefined ledger segment values in the formula, the ledger or ledger set is ignored. This entry is only applicable to where the ledger segment value is undefined in the formula.
This is not supported for MassBudgets, Recurring Journals, and Project Allocations. The AutoAllocation set ignores the ledger/ledger set value for these batches.
-
Balancing Segment Value: If the AutoAllocation set contains any MassAllocation or MassEncumbrance formulas, enter a balancing segment value to be applied to the formulas if the balancing segment value was not defined. If the allocation formula does not have any undefined balancing segment values in the formula, the balancing segment value you enter is ignored. This entry is only applicable to where the balancing segment value is undefined in the formula.
This is not supported for MassBudgets, Recurring Journals, and Project Allocations. The AutoAllocation set ignores the ledger/ledger set value for these batches.
-
Period: Enter an accounting period or choose from the list of values.
-
Budget: Enter a budget or choose from the list of values.
-
-
Complete the Average Balance Options region when Average Balances are enabled in an ADB non-consolidation ledger.
-
Journal Effective Date: Enter a journal effective date. General Ledger defaults the nearest day of the chosen period. You can enter any date within the specified period for a standard ledger. If you have average balance processing enabled for your ledger, you can enter any valid business day, unless your ledger is a consolidation ledger. In this case, General Ledger automatically enters the first day of the period and you cannot change the value.
Note: If the profile option GL: Allow Non-Business Day Transactions is set to Yes, then you can specify any business or non-business date. If this profile option is set to no, you must specify a business date.
-
Calculation Effective Date: Enter a calculation effective date. General Ledger automatically enters the nearest day of the chosen period. You can change this to any day in any open, closed, or permanently closed period. If you don't have average balance processing enabled, the calculation effective date is ignored for a standard ledger.
Note: You can specify a date in any open, future enterable, closed, or permanently closed period.
-
Usage: This field appears only when Average Balances are enabled in an ADB consolidation ledger. Select one of the following from the poplist:
-
Standard
-
Average
-
-
-
Complete the Projects regions if you are in a Projects responsibility and setting the submission parameters for an allocation set using Projects Allocation Rules. See: Oracle Projects.
-
Choose the Schedule button.
The Oracle Applications Submit Request window appears.
-
You can create your own schedule by completing the regions in this window. For more information, see: Oracle E-Business Suite User's Guide.
Or, choose the Apply a Saved Schedule button to select from a set of pre-defined Oracle Applications or General Ledger schedules.
-
Return to the Submit Request window and submit your request.
Note: Scheduled Parallel AutoAllocation sets create generated journal entries. You must post the generated journals to update General Ledger balances.
Note: Scheduled AutoAllocation sets are governed by Workflow processes. You are not required to post generated journals to update General Ledger balances.
Related Topics
Oracle E-Business Suite User's Guide
Defining Financial Schedules, Oracle General Ledger Implementation Guide
Reviewing the status of your AutoAllocation Sets
To review the status of your AutoAllocation set, choose the View Status button in the AutoAllocation Workbench window. If more than one AutoAllocation set is pending, you can query the set you want to find. You can only query AutoAllocation sets that you have view privileges to through your definition access sets or definitions that do not have definition access set security enabled.
Step-Down AutoAllocation Approval Process
Step-Down AutoAllocation invokes an automated process managed by Oracle Workflow. The process initiates the GL Allocation process and directs batches to the GL MassAllocation process or the GL Recurring Journals process. If Journal Approval is enabled for your ledger, then these processes will validate your batches, determine if approvals are required for a batch, and submit the batch(es) to approvers if required, then notify individuals of the approval results.
If you are not using Journal Approval but have set the profile option, GL: Journal Review Required to Yes, you will need to review journal batches generated from AutoAllocation before posting can be performed. This process does not produce a notification. It simply allows you to post the batches upon review.
If errors occur, the contact or responsibility may choose to roll back the Step-Down AutoAllocation process. The rollback reverses all journal entries. When a rollback occurs, no notification is sent.
Step-Down AutoAllocation Process
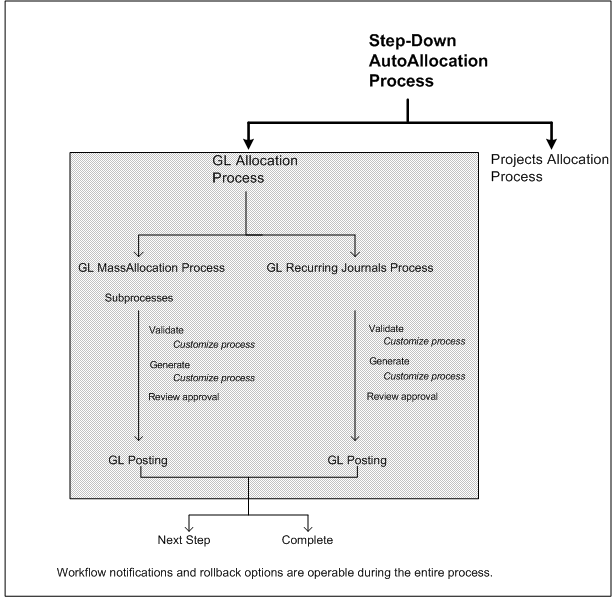
The Step-Down AutoAllocation process consists of five main processes:
-
Automatic Step-Down Allocation Process
-
GL Allocation Process
-
GL MassAllocation Process
-
GL Recurring Journal Process
-
GL Posting Process
Batch validation, generation, rollback, and workflow notifications are all subprocesses that can be launched at various stages of these main processes.
If Journal Approval is required for a generated batch before posting, AutoAllocations launches Journal Approval and sends two notifications: an advisory notification to the AutoAllocation step contact and a notification to the Journal Approval contact. Once the journal is approved, the AutoAllocation process proceeds. For more information, see Journal Approval Overview.
Customizing Step-Down AutoAllocations
You can customize the Step-Down AutoAllocation process to meet your organization's unique requirements.
Profile options: The following profile options affect how Step-Down AutoAllocation operates:
-
AutoAllocation Rollback Allowed: Enables the contact, when notified, to roll back the AutoAllocation set, reversing all journal entries. Rollback is available only for General Ledger AutoAllocation sets. When this profile option is enabled, the rollback option is not available to AutoAllocation sets containing Projects Allocation Rules. For more information, see: Oracle Projects.
-
GL AutoAllocation: Continue to Next Step if No Journal Created: Allows the Step-Down AutoAllocation process to continue to the next step if a previous step fails to generate a journal batch. See: General Ledger Profile Options, Oracle General Ledger Reference Guide.
-
Journal Review Required: Requires the contact to review a generated journal batch before posting.
-
Debug Directory: Enables the database to create a Workflow debug file in a specified directory.
To set these profile options, See: Setting General Ledger Profile Options, Oracle General Ledger Reference Guide.
Workflow activity settings: You can change the default settings for the following:
-
Request Approval from Approver Timeout: The standard setting is 3 days. After this time has expired, AutoAllocation notifies the preparer that no owner response has been received.
-
Reached Manager Notification Resend Limit: The standard setting is 3 notifications. AutoAllocation resends notifications to the owner until the limit is reached.
Note: If you decide to change these settings, be careful when selecting your new values; the settings work together with a compounding effect: The owner timeout is processed for each notification sent.
For example, if the owner timeout is 7 days and the notification resend limit is 3, a journal batch remains in the approval cycle for 21 days if the owner does not respond.
-
Default Error Notification: AutoAllocation uses Oracle Workflow's standard error processing to handle runtime errors. You can choose to send a notification to your system administrator whenever such errors occur. Open the AutoAllocation workflow file in Oracle Workflow and set the Performer for the Default Error Notification, in the Default Error process, to your system administrator's user ID.
Note: If you enable the profile option, Journal Review Required and you also enable Journal Approval, the Workflow processes and notifications launched by Journal Approval take precedence over notifications initiated by Journal Review Required.
Customizable processes: Four processes can be modified to suit your organization's needs.
-
Generated MassAllocation Batch Validation Process: Customizes validation of a generated MassAllocation journal batch.
-
Generated Recurring Journal Batch Validation Process: Customizes validation of generated Recurring Journal batch.
-
Select and Validate Journal Batch Process: Customizes validation of a journal batch before posting.
Note: Modify these activities and processes only when customizing the AutoAllocation Approval Process.
Additional Information:
Include all customizations in the GL_AUTO_ALLOC_WF_CUST_PKG defined in the file admin/sql/glcwfals/pls.
This package contains the PL/SQL template of procedures and functions that you modify to customize the GL AutoAllocation Process for your specific needs.
When you customize, you may want to use the existing workflow item attributes that General Ledger provides. For a list of these attributes, load the GL AutoAllocation definition file from the database into Oracle Workflow Builder and refer to the attributes section.
Result types for the customizable processes are:
COMPLETE:PASS indicates the process completed.
COMPLETE:FAIL indicates the process failed and has been terminated.
COMPLETE:ROLLBACK indicates the process failed and the rollback option has been selected.
AutoAllocation Processes
Following are Workflow diagrams, graphically illustrating the higher level processes used by AutoAllocations. You can create all the components for an activity in the graphical Oracle Workflow Builder except for the PL/SQL stored procedures that the activities call. Processes you can customize are listed below the high level processes.
You can view a workflow process in a Process window using Oracle Workflow Builder. See: Oracle Workflow.
Automatic Step-Down Allocation Process
Automatic Step-Down Allocation Process
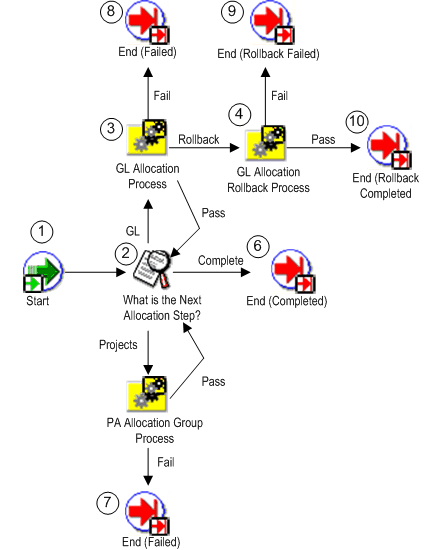
This process checks each step of your AutoAllocation set to determine whether the batch is forwarded to the PA Allocation Group Process or the GL Allocation Process. If an error occurs during the GL Allocation Process, rollback is allowed.
GL Allocation Process
General Ledger Allocation Process
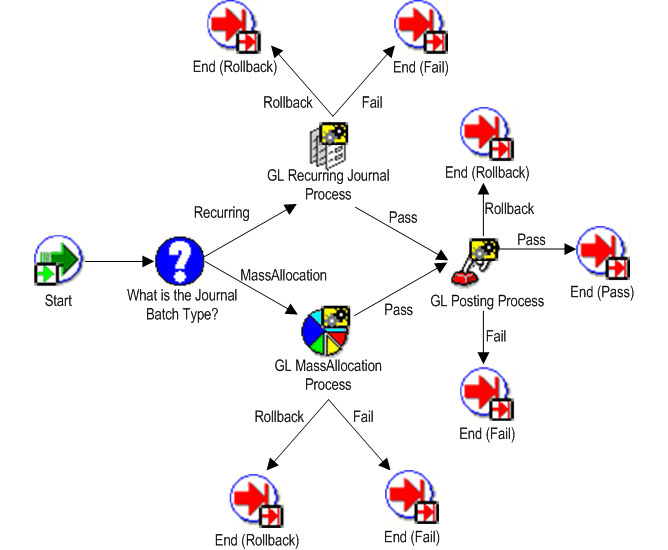
This process checks the Journal Batch Type and then forwards the step to the MassAllocation Process or the Recurring Journal Process. If a process error occurs, rollback is allowed.
GL MassAllocation Process
General Ledger MassAllocation Process
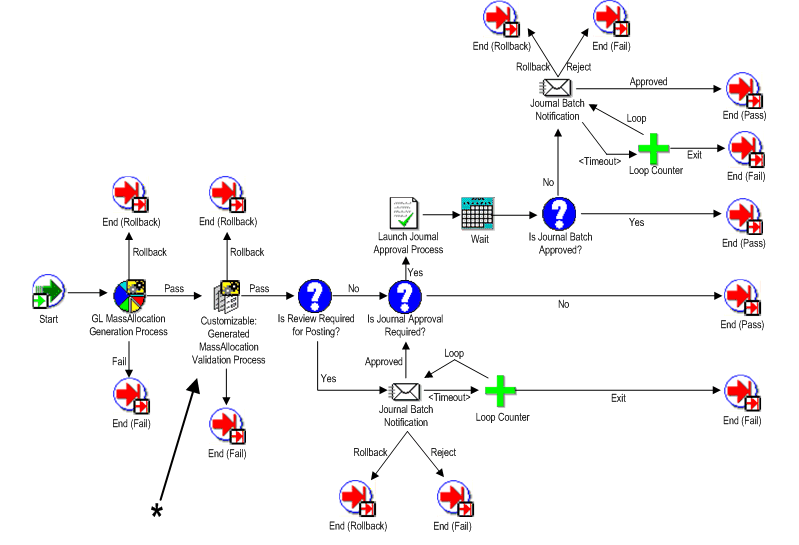
This process invokes subprocesses to generate and validate AutoAllocation set batches incorporating approvals and notifications at various points in the process. If the generation of a batch requires approvals, Workflow launches the batch approval process. If the process completes, the batch is forwarded to the GL Posting process. If an error occurs during the GL MassAllocation Process, rollback is allowed.
*Customizable: Generated MassAllocation Batch Validation Process
You can design your own process to perform additional validation to generated MassAllocation batches.
| Variable | Description |
|---|---|
| Function | GL_GEN_BATCH_VAL_CUST_PROCESS |
| Result Type | GL Process Result Pass, Fail, Rollback |
GL MassAllocation Generation Process
General Ledger MassAllocation Generation Process
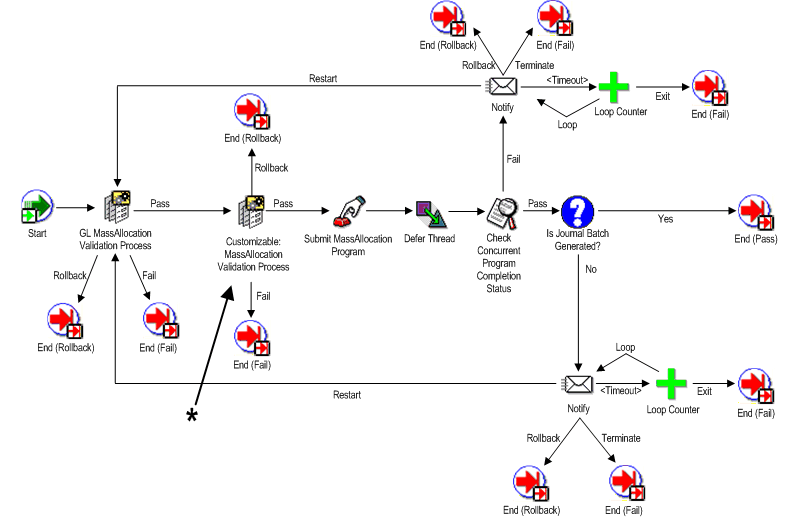
This process creates a MassAllocation batch, notifies the owner of completion status and forwards the batch to the MassAllocation process for validation, approvals, and posting. If errors occur, rollback is allowed.
*Customizable: MassAllocation Validation Process
You can design your own additional validation processes for MassAllocation batches before they are generated.
| Variable | Description |
|---|---|
| Function | GL_MA_BATCH_VAL_CUST_PROCESS |
| Result Type | GL Process Result Pass, Fail, Rollback |
| Function | WF_STANDARD.NOOP |
| Result Type | None |
GL Posting Process
General Ledger Posting Process
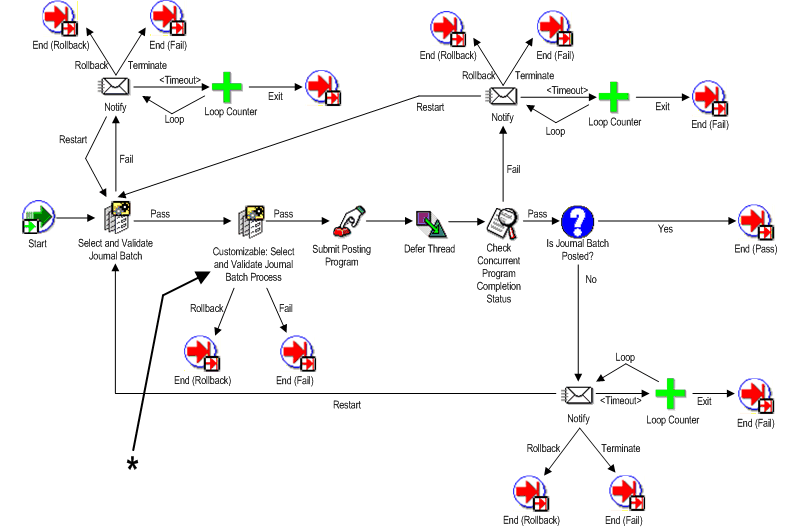
This process validates a generated MassAllocation batch. Approvals and notifications are integrated with this process. Successful completion forwards the batch to the MassAllocation Generation Process to generate a journal batch. If errors occur, rollback is allowed.
*Customizable: Select and Validate Journal Batch Process
You can design your own additional processes to select and validate batch status before posting.
| Variable | Description |
|---|---|
| Function | GL_SEL_AND_VAL_CUST_PROCESS |
| Result Type | GL Process Result Pass, Fail, Rollback |
GL Recurring Journal Process
General Ledger Recurring Journal Process

This process launches subprocesses to generate and validate Recurring Journal batches incorporating approvals and notifications at various points in the process. If the generation of a batch requires approvals, Workflow launches the batch approval process. If the process completes, the batch is forwarded to the GL Posting process. If errors occur, rollback is allowed.
*Customizable: Generated Recurring Journal Batch Validation Process
You can design a process to validate generated recurring journal batches before posting.
| Variable | Description |
|---|---|
| Function | GL_GEN_BATCH_VAL_CUST_PROCESS |
| Result Type | GL Process Result Pass, Fail, Rollback |
GL Recurring Journal Generation Process
General Ledger Recurring Journal Generation Process
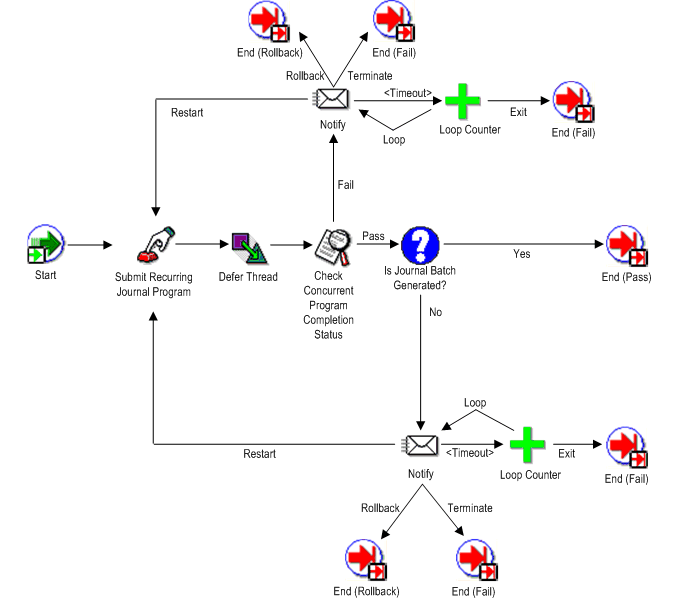
This process creates a Recurring Journal batch, notifies the owner of completion status and forwards the batch to the Recurring Journal process for validation, approvals and posting. If errors occur, rollback is allowed.
Example of Customizable Process
Example of Customizable Process
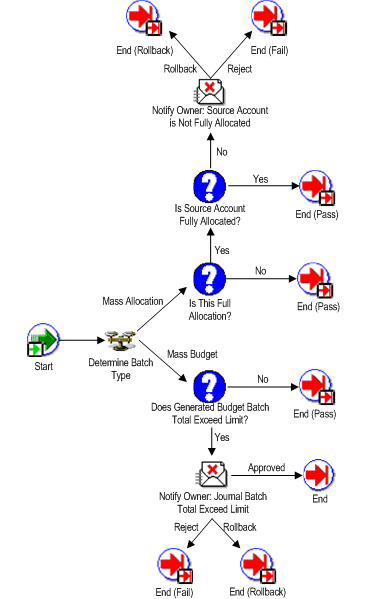
This is an example of the customizable workflow process, Generated MassAllocation Validation Process. You can use this process to verify additional customer business requirements after a batch has been generated.
Journal Import
The following sections describe how to import journals.
Integrating General Ledger Using Journal Import
Use Journal Import to integrate information from other applications such as payroll, accounts receivable, accounts payable and fixed assets with your General Ledger application. For each accounting period, you can import accounting data from these feeder systems, then review, update and post the journal entries. You can also use Journal Import to import historical data from your previous accounting system.
General Ledger lets you import data from multiple interface tables. This allows you to customize interface tables to your specific requirements. Each particular source/group ID combination will only have data in one interface table at a time. Journal import will process data from one table at a time.
Data Access Set
The data access set assigned to your user responsibility controls what journal data you can import into your ledger as follows:
-
Full Read and Write Access: You can import all valid journal lines into your ledger if your data access set provides full read and write access. The types of full access are as follows:
-
Full Ledger data access set type that provides read and write access to the full ledger.
-
Balancing Segment Value data access type that provides read and write access to all balancing segment values for the ledger using the All Values checkbox.
-
Management Segment Value data access type that provides read and write access to all management segment values for the ledger using the All Values checkbox.
-
-
Partial Read and Write Access: If you have read and write access to some balancing segment values and management segment values, your access is as follows:
-
Partial read and write access to specific balancing segment values or management segment values allows you to import journal lines for those balancing segment values or management segment values.
-
-
Read Only Access: If you have read-only access to a ledger, balancing segment values, or management segment values, you cannot import journal data for that ledger.
-
Read-only access to the ledger prevents you from importing data for that ledger.
-
Read-only access to balancing segment values or management segment values prevents you from importing data for that ledger. Journal import completes with an error message.
-
To import subledger and feeder system data to General Ledger:
-
Set up General Ledger to accept Journal Import data by defining your ledger, currencies, accounts, journal sources, and categories. You should also run the Optimizer program, and define your concurrent program controls.
-
Export data from your feeder system and populate the GL_INTERFACE table.
-
Run Journal Import.
If your import program converts your journal entries from other sources into the required data format, and all of the data is valid in your General Ledger application, then Journal Import should run successfully. However, if you load data into the GL_INTERFACE table which is not valid in your General Ledger application, Journal Import informs you of the specific errors on the Journal Import Execution Report.
You must have read and write access to the ledger, or read and write access to the balancing or management segment values in the interface table to run import.
Note: If you are importing from subledgers that are integrated with Subledger Accounting and have chosen not to run Journal Import automatically when transferring amounts to General Ledger from your subledgers, you must run Journal Import manually in your ledgers and in each of your subledger level reporting currencies if you use subledger level reporting currencies.
-
Use the Journal Import Execution Report to review the status of all import journal entries. The Journal Import Execution Report prints a line for each journal entry source from which you are importing journal entries.
-
If you encounter relatively few Journal Import errors, you can correct the data in the GL_INTERFACE table.
-
If you encounter several Journal Import errors, you should delete the Journal Import data from the GL_INTERFACE table, and correct the information in your feeder system before rerunning Journal Import.
-
Review the journal entries created by Journal Import before you post them.
-
Post your Journal Import journal entries. You must have read and write access to the ledger or read and write access to the balancing segment values or management segment values in the journal lines to post the journal batch.
Note: If you use subledger level reporting currencies or subledger level secondary ledgers, make sure the Journal Conversion rules have been correctly defined in Accounting Setup Manager. General Ledger Posting uses the Journal Conversion rules to determine the journals that match a particular source and category combination to be replicated to the reporting currencies and secondary ledgers during posting. The Journal Conversion rules must not allow subledger sources that integrate with Subledger Accounting to be converted to subledger level reporting currencies or transferred to subledger level secondary ledgers. This prevents the double counting of subledger journals; once by Subledger Accounting and again by General Ledger Posting.
Note: You can only import data from a single ledger for a single journal import run.
Related Topics
Exporting Data from Your Feeder System
Running the Optimizer Program, Oracle General Ledger Implementation Guide
GL: Archive Journal Import Data, Oracle General Ledger Reference Guide
GL: Number of Records to Process at Once, Oracle General Ledger Reference Guide
Setting the Journal Import Run Options
Correcting Journal Import Data
Running Reports and Programs, Oracle Applications User's Guide
Preparing to Import Journals
Before using Journal Import, prepare your General Ledger application to ensure that your Journal Import run goes smoothly.
To prepare for importing journals:
-
Define all account segment values used in your feeder systems.
-
Define your ledger using Accounting Setup Manager. The accounting setup must have a Complete status to use its ledgers.
-
Define or enable all currencies used in your feeder systems.
-
Define the journal entry sources used in your feeder systems. You can also specify whether you want General Ledger to store journal reference information from your feeder systems for a particular source.
-
Define journal entry categories used in your feeder systems.
-
If you want Journal Import to assign sequential numbers to your journal entries, enable sequential numbering, specifying Automatic as both your numbering and document generation method.
-
Open periods used in your feeder system. You can only import journals into Open or Future-Enterable periods in General Ledger.
-
Run the Optimizer program to create indexes on your account segments.
-
Define the concurrent program controls to improve the performance of Journal Import by setting the amount of disk space and memory it uses. The Journal Import program requires approximately 1.4 megabytes of memory to run.
You can also specify whether to save your Journal Import data each time you run Journal Import. Journal Import runs faster if you do not archive your data.
-
Disable dynamic insertion. Journal Import runs much faster when it does not have to create new account combinations dynamically.
-
Define any accounts used in your feeder systems that you have not yet defined in General Ledger.
Related Topics
Overview of Setting Up, Oracle General Ledger Implementation Guide
Defining Segment Values (Segment Values Window), Oracle Applications Flexfields Guide
Defining Ledgers, Oracle General Ledger Implementation Guide
Defining Journal Sources, Oracle General Ledger Implementation Guide
Defining Journal Categories, Oracle General Ledger Implementation Guide
Defining Document Sequences, Oracle General Ledger Implementation Guide
Assigning Document Sequences, Oracle General Ledger Implementation Guide
Exporting Data From Your Feeder System
Journal Import receives accounting data from the GL_INTERFACE table. For non-Oracle applications, you must import data from your feeder systems to this table. Use an import utility, or have your on-site MIS personnel or Oracle consultant develop an import program for you.
Your import program should convert data from your feeder system into a standard data format that Journal Import can read from the GL_INTERFACE table. Journal Import can then convert your import data into your General Ledger application journal entries. You can write an import program to import data from a non-Oracle system, or you can write an import program to import historical data from your previous accounting system.
Related Topics
Assigning Values for Additional Required and Conditionally Required Columns
Assigning Values for Currency Conversion
Assigning Values to Optional Columns
Required NULL Columns in the GL_INTERFACE Table
About Journal Import Validation
The GL_INTERFACE Table
The GL_INTERFACE table is where Journal Import receives accounting data that you import from other systems. When Journal Import receives this data, it validates and converts your import data into journal entries within your General Ledger application. The GL_INTERFACE table is organized by columns in which your General Ledger application categorizes and stores specific accounting data. For example, journal entry source information is stored in the column called USER_JE_SOURCE_NAME. GL_INTERFACE contains the columns shown in the following table.
| Column Name | Null? | Type |
|---|---|---|
| STATUS | NOT NULL | VARCHAR2 (50) |
| LEDGER_ID | NOT NULL | NUMBER (15) |
| USER_JE_SOURCE_NAME | NOT NULL | VARCHAR2 (25) |
| USER_JE_CATEGORY_NAME | NOT NULL | VARCHAR2 (25) |
| ACCOUNTING_DATE | NOT NULL | DATE |
| CURRENCY_CODE | NOT NULL | VARCHAR2 (15) |
| DATE_CREATED | NOT NULL | DATE |
| CREATED_BY | NOT NULL | NUMBER (15) |
| ACTUAL_FLAG | NOT NULL | VARCHAR2 (1) |
| ENCUMBRANCE_TYPE_ID | NUMBER | |
| BUDGET_VERSION_ID | NUMBER | |
| CURRENCY_CONVERSION_DATE | DATE | |
| USER_CURRENCY_CONVERSION_TYPE | VARCHAR2 (30) | |
| CURRENCY_CONVERSION_RATE | NUMBER | |
| SEGMENT1 through SEGMENT30 | VARCHAR (25) | |
| ENTERED_DR | NUMBER | |
| ENTERED_CR | NUMBER | |
| ACCOUNTED_DR | NUMBER | |
| ACCOUNTED_CR | NUMBER | |
| TRANSACTION_DATE | DATE | |
| REFERENCE1 | VARCHAR2 (100) | |
| REFERENCE2 | VARCHAR2 (240) | |
| REFERENCE3 | VARCHAR2 (100) | |
| REFERENCE4 | VARCHAR2 (100) | |
| REFERENCE5 | VARCHAR2 (240) | |
| REFERENCE6 through REFERENCE9 | VARCHAR2 (100) | |
| REFERENCE10 | VARCHAR2 (240) | |
| REFERENCE11 through REFERENCE20 | VARCHAR2 (100) | |
| REFERENCE21 through REFERENCE30 | VARCHAR2 (240) | |
| GROUP_ID | NUMBER (15) | |
| JE_BATCH_ID | NUMBER (15) | |
| PERIOD_NAME | VARCHAR2 (15) | |
| JE_HEADER_ID | NUMBER (15) | |
| JE_LINE_NUM | NUMBER (15) | |
| CHART_OF_ACCOUNTS_ID | NUMBER (15) | |
| FUNCTIONAL_CURRENCY_CODE | VARCHAR2 (15) | |
| CODE_COMBINATION_ID | NUMBER (15) | |
| DATE_CREATED_IN_GL | DATE | |
| WARNING_CODE | VARCHAR2 (4) | |
| STATUS_DESCRIPTION | VARCHAR2 (240) | |
| DESCR_FLEX_ERROR_MESSAGE | VARCHAR2 (240) | |
| STAT_AMOUNT | NUMBER | |
| REQUEST_ID | NUMBER (15) | |
| SUBLEDGER_DOC_SEQUENCE_ID | NUMBER | |
| SUBLEDGER_DOC_SEQUENCE_VALUE | NUMBER | |
| USSGL_TRANSACTION_CODE | VARCHAR2 (30) | |
| ATTRIBUTE1 through ATTRIBUTE20 | VARCHAR2 (150) | |
| CONTEXT | VARCHAR2 (150) | |
| CONTEXT2 | VARCHAR2 (150) | |
| CONTEXT3 | VARCHAR2 (150) | |
| INVOICE_DATE | DATE | |
| INVOICE_AMOUNT | NUMBER | |
| INVOICE_IDENTIFIER | VARCHAR2 (20) | |
| TAX_CODE | VARCHAR2 (15) | |
| JGZZ_RECON_REF | VARCHAR2(240) | |
| AVERAGE_JOURNAL_FLAG | VARCHAR2(1) | |
| ORIGINATING_BAL_SEG_VALUE | VARCHAR2(25) | |
| GL_SL_LINK_ID | NUMBER | |
| GL_SL_LINK_TABLE | VARCHAR2(30) | |
| REFERENCE_DATE | DATE | |
| SET_OF_BOOKS_ID | NUMBER(15) | |
| BALANCING_SEGMENT_VALUE | VARCHAR2(25) | |
| MANAGEMENT_SEGMENT_VALUE | VARCHAR2(25) | |
| FUNDS_RESERVED_FLAG | VARCHAR2(1) |
Note: The FUNDS_RESERVED_FLAG column is optional
Related Topics
Assigning Values for Additional Required and Conditionally Required Columns
Assigning Values for Currency Conversion
Assigning Values to Optional Columns
Required NULL Columns in the GL_INTERFACE Table
About Journal Import Validation
Assigning Values for Accounts
You can specify your accounts in the GL_INTERFACE table in one of two ways: segment specification or code combination ID specification.
Segment Specification
Assign an account value for each segment that you enabled in your General Ledger application. For example, if you enabled four account segments, you need to first determine into which columns of the GL_INTERFACE table you should enter data. This can be done by looking at the Column field of each segment in the Key Flexfield Segments window. In this example we find that:
-
Segment 1 corresponds to the column SEGMENT1
-
Segment 2 corresponds to the column SEGMENT2
-
Segment 3 corresponds to the column SEGMENT4
-
Segment 4 corresponds to the column SEGMENT5
Note: The column named SEGMENT3 is not used.
Given the above information above, you should load the data as shown in the following table:
| Data for Flexfield | Load Into: |
|---|---|
| Segment 1 | GL_INTERFACE.SEGMENT1 |
| Segment 2 | GL_INTERFACE.SEGMENT2 |
| Segment 3 | GL_INTERFACE.SEGMENT4 |
| Segment 4 | GL_INTERFACE.SEGMENT5 |
Load valid enabled segment values for your enabled segments into the GL_INTERFACE table. The segment values must already be defined in your General Ledger application.
For example, value 01 is not the same as value 1. You can specify Maximum Size and Right-justify Zero-fill Numbers when you define your value sets in the Value Sets form. Maximum Size indicates the maximum width of each segment value that Journal Import expects. Right-justify Zero-fill Numbers indicates whether your account should right justify and zero-fill numbers when you enter values for a particular value set. If you have the Right-justify Zero-fill Numbers option enabled, and your Maximum Size is three, then your segment value would be 001. However, if your Maximum Size is four, then your segment value would be 0001. Journal Import does not allow null values in enabled segments.
Code Combination ID Specification
Alternatively, you can enter a code combination ID to identify your account segments. You can find a list of valid account code combinations and their corresponding code combination IDs in the GL_CODE_COMBINATIONS table. If you want Journal Import to use the code combination ID to create your journal entries, enter the appropriate code combination ID in the CODE_COMBINATION_ID column of the GL_INTERFACE table and do not enter values in the SEGMENT1 through SEGMENT30 columns.
If you enter values for your account segments in the SEGMENT1 through SEGMENT30 columns and enter a value in the CODE_COMBINATION_ID column, Journal Import uses the Segment column values to create your journal entries.
If you enter segment values for an invalid account in the GL_INTERFACE table, General Ledger prints the invalid account in your Journal Import Execution Report. If you enter a code combination ID and if suspense posting is disabled, General Ledger prints the invalid code combination ID in your Journal Import Execution Report. If you enter a code combination ID and if suspense posting is enabled, General Ledger prints only the segment value separators in your Journal Import Execution Report. Therefore, we recommend that you disable suspense posting if entering code combination IDs.
Related Topics
Overview of Setting Up, Oracle General Ledger Implementation Guide
Defining Accounts, Oracle General Ledger Implementation Guide
Assigning Values for Additional Required and Conditionally Required Columns
Assigning Values for Currency Conversion
Assigning Values to Optional Columns
Required NULL Columns in the GL_INTERFACE Table
About Journal Import Validation
Assigning Values for Additional Required and Conditionally Required Columns
You must enter values in all columns of the GL_INTERFACE table that require values, which includes all of the not null columns, in order for Journal Import to successfully convert your import data into journal entries.
Enter values in the following required columns of the GL_INTERFACE table:
STATUS: Enter the value NEW to indicate that you are bringing new data into your General Ledger application.
LEDGER_ID: Enter the appropriate ledger ID for your transaction. You define your ledger using Accounting Setup Manager. You can find a list of valid values in the LEDGER_ID column of the Ledgers table (GL_LEDGERS. LEDGER_ID).
Tip: You may use the following SQL*Statement to access the appropriate ledger ID:
 SELECT LEDGER_ID, NAME
 FROM GL_LEDGERS;
USER_JE_SOURCE_NAME: Enter the journal entry source name for your transaction. You define journal sources in the Journal Sources form of your General Ledger application. You can find a list of valid values in the USER_JE_SOURCE_NAME column of the Journal Entry Sources table (GL_JE_SOURCES.USER_JE_SOURCE_NAME).
If you have the Import Using Key option enabled for the journal source, enter the journal source key instead of the journal source name. You can find a list of valid values in the JE_SOURCE_KEY column of the Journal Entry Sources table (GL_JE_SOURCES.JE_SOURCE_KEY).
USER_JE_CATEGORY_NAME: Enter the journal category name for your transaction. You define journal categories in the Journal Categories form of your General Ledger application. You can find a list of valid values in the USER_JE_CATEGORY_ NAME column of the Journal Entry Categories table (GL_JE_CATEGORIES.USER_JE_ CATEGORY_NAME).
If you have the Import Using Key option enabled for the journal source, enter the journal category key instead of the journal category name. You can find a list of valid values in the JE_CATEGORY_KEY column of the Journal Entry Categories table (GL_JE_CATEGORIES.JE_CATEGORY_KEY).
ACCOUNTING_DATE: Enter the accounting date on which your transaction occurred. Your General Ledger application automatically assigns your journal batch to the non-adjusting accounting period that includes your accounting date. If you have average balance processing enabled, General Ledger uses your defined Effective Date Rules to validate the accounting date against your transaction calendar to determine the transaction's effective date.
CURRENCY_CODE: Enter the currency code for your transaction. You define new currency codes in the Currencies form of your General Ledger application. You can find a list of valid values in the CURRENCY_CODE column of the Currencies table (FND_CURRENCIES.CURRENCY_CODE).
DATE_CREATED: Enter the date your import journal entry line was created. The information you enter here is for your own records, and does not appear in your General Ledger application.
CREATED_BY: Enter an ID that you can use to identify the data coming from your feeder system. The ID you enter provides you with an audit trail from Journal Import data to your feeder system. However, your Journal Import data will be removed from the GL_INTERFACE table after it is successfully imported, and this ID will not appear in your General Ledger application.
ACTUAL_FLAG: Enter the value A for actual amounts, B for Budget amounts, or E for encumbrance amounts.
ENCUMBRANCE_TYPE_ID: If you entered the value E in the ACTUAL_FLAG column of the GL_INTERFACE table, you must enter the appropriate encumbrance ID. You define new encumbrance types in the Encumbrance Types form of your General Ledger application. You can find a list of valid values in the ENCUMBRANCE_TYPE_ID column of the Encumbrance Types table (GL_ ENCUMBRANCE_TYPES. ENCUMBRANCE_ TYPE_ID).
Tip: We recommend you use the following SQL*Statement to identify the appropriate encumbrance type ID:
 SELECT ENCUMBRANCE_TYPE_ID,
 ENCUMBRANCE_TYPE
 FROM GL_ENCUMBRANCE_TYPES
 WHERE ENABLED_FLAG = 'Y';
BUDGET_VERSION_ID: If you entered the value B in the ACTUAL_FLAG column of the GL_INTERFACE table, you must enter the appropriate budget ID. You define new budget versions in the Define Budget form of your General Ledger application. You can find a list of valid values in the BUDGET_ VERSION_ID column of the Budget Versions table (GL_BUDGET_VERSIONS.BUDGET_VERSION_ ID).
Tip: We recommend you use the following SQL*Statement to identify the appropriate budget version ID:
 SELECT BUDGET_VERSION_ID,
 BUDGET_NAME
 FROM GL_BUDGET_VERSIONS
 WHERE STATUS IN ('C','O');
PERIOD_NAME: To import actual and encumbrance journals, specify the period name and an accounting date within that period. Journal Import will import journals into adjusting and non-adjusting periods.
To import budget transactions, enter a period name for your budget transactions (ACTUAL_FLAG = B) and an accounting date. The accounting date is the effective date of the journal. The accounting date for budget amounts will be ignored by the Journal Import process, which uses the accounting period instead. The period name is required when you are importing budget data using Journal Import and it must be associated with an open budget fiscal year. Journal Import will import budget journals into adjusting and non-adjusting periods.
ENTERED_DR: Enter the debit amount for each line of your transaction. You can enter a value for the ENTERED_DR and the ENTERED_CR in one row.
ENTERED_CR: Enter the credit amount for each line of your transaction. You can enter a value for the ENTERED_DR and the ENTERED_CR in one row.
Related Topics
Defining Ledgers, Oracle General Ledger Implementation Guide
Defining Journal Sources, Oracle General Ledger Implementation Guide
Defining Journal Categories, Oracle General Ledger Implementation Guide
Assigning Values for Currency Conversion
Assigning Values to Optional Columns
Required NULL Columns in the GL_INTERFACE Table
About Journal Import Validation
Overview of Average Balance Processing
Assigning Values for Currency Conversion
You can enter values for your actual entered currency data in one of two ways. You can specify the entered amount along with a conversion rate type and date and let your General Ledger application calculate the converted amount for you. Or, you can directly specify the entered and converted amounts and not specify the conversion rate, type and date.
Do not enter values in the following columns for encumbrance and budget entered currency data. Enter values for your actual entered currency data only in the following columns of the GL_INTERFACE table:
System-Calculated Conversion
USER_CURRENCY_CONVERSION_TYPE: Enter a currency conversion type for your actual entered currency transactions. Acceptable values are User, Spot, Corporate, or any other type you define in the Conversion Rate Types form. If you enter a rate type of User, then you must also enter a conversion rate in the CURRENCY_CONVERSION_ RATE column. For all other conversion types you must enter a conversion date in the CURRENCY_ CONVERSION_DATE column.
You can find a list of valid values in the USER_CURRENCY_CONVERSION_TYPE column of the Conversion Types table (GL_DAILY_ CONVERSION_TYPES.USER_CURRENCY_ CONVERSION_TYPE).
CURRENCY_CONVERSION_DATE: Enter a currency conversion date for your actual entered currency transactions. If you enter a conversion type other than User in the USER_CURRENCY_CONVERSION_TYPE column, you must enter a value in this column. If your conversion type is User, the default value for this column is the accounting date.
CURRENCY_CONVERSION_RATE: Enter a currency conversion rate for your actual entered currency transactions. If you enter a conversion type of User in the USER_CURRENCY_ CONVERSION_TYPE column, you must enter a value in this column. If you enter a conversion type other than USER, do not enter anything in this column.
User-Entered Conversion
ACCOUNTED_DR: Enter a converted debit amount for your actual entered currency transactions. You can enter a value for the ACCOUNTED_DR and ACCOUNTED_CR in one row. You must enter a value for ENTERED_DR if you entered a value for ACCOUNTED_DR.
ACCOUNTED_CR: Enter a converted credit amount for your actual entered currency transactions. You can enter a value for the ACCOUNTED_DR and ACCOUNTED_CR in one row. You must enter a value for ENTERED_CR if you entered a value for ACCOUNTED_CR.
Related Topics
Assigning Values to Optional Columns
Required NULL Columns in the GL_INTERFACE Table
About Journal Import Validation
Assigning Values to Optional Columns
You can enter values for many optional columns in the GL_INTERFACE table. Enter values in these columns for maximum control over the way Journal Import groups the journal entry lines it creates into journal entries.
If you have enabled average balance processing, Journal Import will group transactions by Accounting Date. Transactions are grouped before they are validated and, if the Effective Date Rule is Roll Date, rolled to the nearest valid business day within the period.
If you do not enter a value in an optional column and a default value exists for that particular column, Journal Import automatically enters the default value.
Enter values in the following optional columns of the GL_INTERFACE table:
REFERENCE1 (Batch Name): Enter a batch name for your import batch. Journal Import creates a default batch name using the following format. Take the first 85 characters of: (Source) (Balance type- A, B, or E) (Group ID) then add a space followed by the concurrent request ID. If the above results in multiple batches in same Journal Import run with the same name, then additional characters are chopped off, and a 2, 3, 4, and so on, is added for the second, third, fourth, batches with the same name.
The batch name must be unique for each combination of charts of accounts, accounting calendar, and period type.
REFERENCE2 (Batch Description): Enter a description for your batch. If you do not enter a batch description, Journal Import automatically gives your batch a description using the format: Journal Import (Source) (Request Id).
REFERENCE4 (Journal entry name): Enter a journal entry name for your journal entry. Journal Import creates a default journal entry name using the following format: (Category Name) (Currency) (Encumbrance Type ID, if applicable) (Currency Conversion Rate, if applicable) (Currency Conversion Date, if applicable) (Originating Balancing Segment Value), chopped to the first 100 characters. If the above results in multiple journals in the same batch with the same name, then additional characters are chopped off, and a 2, 3, 4, and so on, is added for the second, third, fourth, journals with the same name.
REFERENCE5 (Journal entry description): Enter a description for your journal entry. If you do not enter a journal entry description, Journal Import automatically gives your journal entry a description using the format: Journal Import - Concurrent Request ID.
REFERENCE6 (Journal entry reference): Enter a reference name or number for your journal entry. If you do not enter a journal entry reference, Journal Import automatically creates a journal entry reference called Journal Import Created.
REFERENCE7 (Journal entry reversal flag): Enter Yes to mark your journal entry for reversal. If you do not enter Yes, Journal Import automatically defaults to No.
REFERENCE8 (Journal entry reversal period): Enter the name of the period to which you want to reverse your journal entry. If you enter Yes in the REFERENCE7 column, you must enter a value in this column.
If you have enabled average balance processing, enter the effective date for the reversal. General Ledger will determine the appropriate reversal period based on the date you supply.
You can specify adjustment and non-adjustment reversal periods.
Note: The effective date only applies to Actual balances, not Budget or Encumbrance balances.
Note: If you enter Yes in the REFERENCE7 column, you must enter a value in this column.
REFERENCE9 (Journal reversal method): Enter Yes to use the change sign method, No to use the switch debit/credit method.
REFERENCE10 (Journal entry line description): Enter a description for your journal entry line. If you do not enter a journal entry line description, Journal Import uses the subledger document sequence value. If there is no document sequence value, Journal Import creates a journal entry description called Journal Import Created.
REFERENCE21 through REFERENCE30: Enter a reference name or number to further identify your import journal entry lines. Columns REFERENCE21 through REFERENCE30 map into columns REFERENCE_1 through REFERENCE_10, respectively, of the GL_JE_LINES table.
Once in the GL_JE_LINES table, your General Ledger application prints the value stored in REFERENCE_1 in standard reports run with Line detail, and prints the value stored in REFERENCE_4 in standard reports run with Source detail. The other reference columns are for descriptive or tracking purposes only. The values in these columns are not used in your General Ledger application.
GROUP_ID: Enter a unique group number to distinguish import data within a source. You can run Journal Import in parallel for the same source if you specify a unique group number for each request.
STAT_AMOUNT: Enter the statistical amount associated with your journal entry line data. You define statistical units of measure in the Statistical Units of Measure form of your General Ledger application. You must use this column when you want to see statistical and monetary amounts in the same journal entry line.
USSGL_TRANSACTION_CODE: Enter a valid USSGL transaction code for your journal entry line. Journal Import validates and imports the USSGL transaction codes when you have the profile option Enable Transaction Code set to Yes, and you have defined your USSGL transaction codes using the Public Sector Transaction Codes window.
Note: This column is ignored for commercial installations of General Ledger.
ATTRIBUTE1 through ATTRIBUTE 10: Enter values for your descriptive flexfield "Journals - Journal Entry Line". The values you enter depend on how you defined your descriptive flexfield in the Descriptive Flexfield Segments form.
ATTRIBUTE11 through ATTRIBUTE 20: Enter values for your descriptive flexfield "Journals - Captured Information". The values you enter depend on how you defined your descriptive flexfield in the Descriptive Flexfield Segments form. The context for Journals - Captured Information is the natural account value of the account used on each line.
CONTEXT: Enter the context field value for the descriptive flexfield "Journals - Journal Entry Line" that identifies the structure of your descriptive flexfield. If you enter a value, you can also enter some combination of values in the columns ATTRIBUTE1 through ATTRIBUTE10.
CONTEXT2: Enter Yes to identify your Value Added Tax Descriptive Flexfield structure. You must use this column if you import data for the Value Added Tax Descriptive Flexfield. Enter No to indicate that your journal entry line is not a tax item. If you enter No, the four Value Added Tax Descriptive Flexfield related columns must be null.
CONTEXT3: Enter the context field value (natural account) for the descriptive flexfield "Journals - Captured Information" that identifies the structure of your descriptive flexfield. Enter a value only if you are importing the descriptive flexfield "Journals - Captured Information" without validation. If you enter a value, you can also enter some combination of values in the columns ATTRIBUTE11 through ATTRIBUTE20.
INVOICE_DATE: Enter the date on which you paid or collected tax on your tax journal entry line. Enter the date in the format DD-MON-YY or the default date format for your language. Your invoice date should correspond to the date when tax amounts were paid or received for this invoice. You must use this column if you import data for the Value Added Tax Descriptive Flexfield.
INVOICE_AMOUNT: Enter an invoice amount. Enter the net invoice amount that relates to your tax journal entry line amount. You must use this column if you import data for the Value Added Tax Descriptive Flexfield.
TAX_CODE: Enter a valid tax code that identifies the type of tax paid for this invoice. You define a list of valid tax codes for this field when you define your descriptive flexfield values. You must use this column if you import data for the Value Added Tax Descriptive Flexfield.
REFERENCE_DATE: Enter a date to capture additional date information about your journal. The Reference Date column satisfies Libro Giornale requirements in Italy, but can be used to capture any other date information you want to store at the journal header level. This column is not used to group journal lines. If multiple rows in the GL_INTERFACE table use different reference dates, they can be grouped into the same journal entry which will choose a reference date from one of the rows to use as a reference date for the journal entry.
JGZZ_RECON_REF: Enter a reconciliation reference to identify a group of journal lines that need to net to zero.
AVERAGE_JOURNAL_FLAG: Set to Y (Yes) when importing average balance journals into an average balances consolidation ledger. The flag indicates whether this journal affects the average balances and not the standard balances.
ORIGINATING_BAL_SEG_VAL: Enter a clearing balancing segment value. You can use this column if you are entering an intercompany transaction and want to override the default clearing balancing segment.
INVOICE_IDENTIFIER: Enter an invoice identifier. Enter reference information about the source document or invoice upon which you paid or collected tax. You must use this column if you import data for the Value Added Tax Descriptive Flexfield.
LEDGER_ID: Enter the appropriate ledger ID for your transaction. Use this column if you need to import data from applications on Release 11i or earlier that use the set of books ID.
Related Topics
Assigning Values for Currency Conversion
Required NULL Columns in the GL_INTERFACE Table
About Journal Import Validation
Overview of Average Balance Processing
Required NULL Columns in the GL_INTERFACE Table
Some columns in the GL_INTERFACE table must be NULL as Journal Import uses them for internal processing or does not use them in the current release. The following columns must be NULL in your General Ledger application:
-
REFERENCE3: Do not enter a value in this column.
-
REFERENCE11 through REFERENCE20: Do not enter a value in this column.
-
TRANSACTION_DATE: Do not enter a value in this column.
-
JE_BATCH_ID: Do not enter a value in this column.
-
JE_HEADER_ID: Do not enter a value in this column.
-
JE_LINE_NUM: Do not enter a value in this column.
-
CHART_OF_ACCOUNTS_ID: Do not enter a value in this column.
-
FUNCTIONAL_CURRENCY_CODE: Do not enter a value in this column.
-
DATE_CREATED_IN_GL: Do not enter a value in this column.
-
WARNING_CODE: Do not enter a value in this column.
-
STATUS_DESCRIPTION: Do not enter a value in this column.
-
DESC_FLEX_ERROR_MESSAGE: Do not enter a value in this column.
-
REQUEST_ID: Do not enter a value in this column.
-
SUBLEDGER_DOC_SEQUENCE_ID: Do not enter a value in this column.
-
SUBLEDGER_DOC_SEQUENCE_VALUE: Used for communication between General Ledger and the subledgers. Do not populate with your own data.
-
GL_SL_LINK_ID: Populated by Oracle Subledger Accounting (SLA) to indicate the link to the subledger transaction.
-
GL_SL_LINK_TABLE: Populated by Oracle Subledger Accounting (SLA) to indicate the subledger table that contains the originating transaction.
-
BALANCING_SEGMENT_VALUE: Used internally for Journal Import. Do not enter a value in this column.
-
MANAGEMENT_SEGMENT_VALUE: Used internally for Journal Import. Do not enter a value in this column.
-
FUNDS_RESERVED_FLAG: Used internally for Journal Import. Do not enter a value in this column.
Related Topics
Overview of Setting Up, Oracle General Ledger Implementation Guide
Overview of Multi-Currency Accounting
The General Ledger Accounting Cycle
Defining Conversion Rate Types
Defining Statistical Units of Measure, Oracle General Ledger Implementation Guide
Defining Descriptive Flexfield Segments, Oracle Applications Flexfields Guide
Defining Segment Values, Oracle Applications Flexfields Guide
Assigning Values for Currency Conversion
Assigning Values for Optional Columns
About Journal Import Validation
Importing Specialized Data
To import multi-currency data:
Load multi-currency data into the GL_INTERFACE table the same way you load regular data. If you want your General Ledger application to calculate your conversion, you must enter a value in the CURRENCY_CODE, CURRENCY_CONVERSION_DATE and USER_CURRENCY_CONVERSION_TYPE columns of the GL_INTERFACE table. If the conversion type is User, you must also enter a value in the CURRENCY_CONVERSION_RATE column of the GL_INTERFACE table. Or, you can directly specify the converted amounts by entering values in the ACCOUNTED_DR and ACCOUNTED_CR columns. If you choose to enter your converted amounts, do not specify the conversion rate, type and date.
To import intercompany data:
Load intercompany data into the GL_INTERFACE table the same way you load regular data. Journal Import creates intercompany journal entries from the data you import. And, if you want, your General Ledger application automatically balances your intercompany journal entries during posting to an intercompany account you specify when you define your ledger.
To import statistical data:
Load statistical data into the GL_INTERFACE table the same way you load regular data. The only difference is that you enter the value STAT in the CURRENCY_CODE column of the GL_INTERFACE table. Do not enter values in the STAT_AMOUNT column.
Alternatively, if you choose to use units of measure, you can enter a positive amount for a debit or a negative amount for a credit in the STAT_AMOUNT column of the GL_INTERFACE table for each monetary journal entry line amount. In this case, enter a monetary currency, not STAT, in the CURRENCY_CODE column.
To import encumbrance data:
Load encumbrance data into the GL_INTERFACE table the same way you load regular data. The only difference is that you must enter the value E in the ACTUAL_FLAG column and the appropriate encumbrance type ID in the ENCUMBRANCE_TYPE_ID column of the GL_INTERFACE table.
Note: All encumbrance journals in a batch must have the same ledger.
To import budget data:
Load budget data into the GL_INTERFACE table the same way you load regular data. The only difference is that you must enter the value B in the ACTUAL_FLAG column and the appropriate budget version ID in the BUDGET_VERSION_ID column of the GL_INTERFACE table.
-
You must enter a valid period name for budget journal batches created by Journal Import. Use the PERIOD_NAME column to enter a valid batch period whenever you specify the value B in the ACTUAL_FLAG column of the GL_INTERFACE table.
Note: All budget journals in a batch must have the same ledger.
Related Topics
Assigning Values for Currency Conversion
Assigning Values for Optional Columns
About Journal Import Validation
About Journal Import Validation
Journal Import validates all of your data before it creates journal entries in your General Ledger application. If you allow suspense posting for your ledger, Journal Import will assign lines with invalid accounts to that account. Journal Import rejects all other invalid lines, and they remain in the GL_INTERFACE table where you can correct them online in the Correct Journal Import Data form or in your feeder system. Journal Import also prints your error lines in the Journal Import Execution Report.
Batch Level Validation
Journal Import validates to ensure that a batch with the same name does not already exist for the same period in the same ledger in your General Ledger application.
Journal Import also checks to ensure that more than one journal entry with the same name does not exist for a batch.
Journal Level Validation
Journal Import validates the following attributes to ensure that your journals contain the appropriate accounting data and adheres to the data access set security:
-
Ledger
-
Period name
-
Source name
-
Journal entry name
-
Currency code
-
Category name
-
Actual flag
-
Encumbrance type ID
-
User conversion type
-
Accounting date
-
Budget version ID
-
Reversal period (GL_INTERFACE.REFERENCE8)
You must have read and write access to the ledger or to the balancing or management segment values for all of the journal lines for that ledger.
Journal Entry Line Level Validation
Journal Import validates the following attributes to ensure that your journal entry lines contain the appropriate accounting data and adheres to the data access set security.
Account Validation
Journal Import validates your account code combinations in a number of ways. Journal Import will successfully import your accounting data if your code combinations meet the following validation requirements:
-
You allow detail posting to segment combinations.
-
You have enabled your code combinations for the accounting date you specify.
-
Your code combinations do not include summary accounts.
-
You have read and write access to the ledger or read and write access to the balancing or management segment values for all of the journal lines.
Effective Date Validation (Average Balance Processing only)
Journal Import validates each transaction's Accounting Date to be sure it is a valid business day. If the date is a valid business day, General Ledger uses it as the transaction's effective date. If the Accounting Date is not a valid business day, Journal Import uses your defined Effective Date Rules to determine how to handle the transaction. If the Effective Date Rule is:
-
Fail: Journal Import will reject transactions when the Accounting Date is not a valid business day (no posting takes place). The Accounting Date is considered the effective date.
-
Leave Alone: Journal import will accept all transactions regardless of the Accounting Date. The Accounting Date is considered the effective date.
-
Roll Date: Journal Import will accept the transaction, but roll the Accounting Date back to the nearest valid business day (within the same period) to determine the transaction's effective date. If there is no prior valid business day within the same period, the Accounting Date is rolled forward to determine the effective date.
Note: If you specify a reversing effective date, Journal Import will validate the date using the same process and rules noted above for accounting dates.
Effective Date Rules are defined in the Journal Sources window. See: Defining Journal Sources, Oracle General Ledger Implementation Guide.
Descriptive Flexfield Validation
Journal Import validates your descriptive flexfield segments in a number of ways depending on the particular descriptive flexfield. If any one of the descriptive flexfield segments is populated, then Journal Import will validate the entire descriptive flexfield. Journal Import will successfully import your descriptive flexfield data if your descriptive flexfield segments meet the following validation requirements:
Journals - Journal Entry Line Descriptive Flexfield
-
The descriptive flexfield global segments have valid values.
-
The descriptive flexfield context is a valid value.
-
The descriptive flexfield context dependent segments have valid values.
Journals - Captured Information Descriptive Flexfield
-
The descriptive flexfield global segments have valid values.
-
The descriptive flexfield context dependent segments have valid values.
Value Added Tax Descriptive Flexfield
-
The descriptive flexfield context is set to Yes or No.
-
The descriptive flexfield context dependent segments have valid values.
USSGL Transaction Code
If you use transaction codes to produce both proprietary and budgetary accounting entries for a given transaction, which are typically used by U.S. federal government customers, Journal Import validates the USSGL Transaction Code to ensure that it has been defined in the Define Transaction Codes window. This feature is currently only available in public sector installations.
Multi-Table Journal Import
General Ledger lets you import data from multiple interface tables. This allows you to customize alternative interface tables to your specific data requirements. Using alternative tables can help you improve performance since Journal Import more efficiently processes high volumes of data from multiple tables than from the single GL_INTERFACE table. Professionals creating data load routines can choose which interface table to put the data in, and whether the table should be dropped when Journal Import completes successfully.
If Journal Import fails, you can correct your data using the Correct Journal Import window, or you can use the Delete Journal Import Data program to delete your data. Once your data is corrected, you can run Journal Import again.
Multi-Table Journal Import does not affect the operation of Journal Import using the GL_INTERFACE table.
Prerequisites
-
To use alternative interface tables, data you are importing must have both a source and group ID. The group ID tells Journal Import in which of your alternative tables the data you want to import resides.
Each particular source/group ID combination can only have data in one interface table at a time. Each journal import run will process data from one table at a time.
To use Multi-Table Journal Import
General Ledger provides you with the Journal Import Package (GL_JOURNAL_IMPORT_PKG) to create a new interface table and populate the GL_INTERFACE_CONTROL table. In addition, you can create your own procedures to populate your interface table with data and to launch Journal Import. This allows you to automate the entire procedure.
Below are the steps to follow to use Multi-Table Journal Import:
-
Create a new interface table. New interface tables must have the same columns as the GL_INTERFACE table but you can add more if your needs require.
-
Populate the new interface table with data.
-
Populate the GL_INTERFACE_CONTROL table with one record for each source/group ID combination that was put into the interface. Specify a tablename that the data is to be retrieved from for each combination. Specify what should be done with the data once it has been processed.
-
Start Journal Import using the Import Journals window. Specify each of the source/group ID combinations for the ledgers that you want to import. If there are multiple tables, Journal Import will be launched multiple times.
-
If Journal Import indicates that the data is erroneous, then correct the data using the Correct Journal Import Data window or delete it using the Delete Journal Import Data program. If you choose to correct it, then start Journal Import again using the Import Journals window.
See the following pertinent references:
Correcting Journal Import Data
Creating Tables
The Create_Table routine, in the GL_JOURNAL_IMPORT_PKG package, creates a copy of the GL_INTERFACE table with the given name and storage parameters. You can add more columns if your requirements dictate. The table is created in the GL schema. This procedure will also create the n1 and n2 indices if specified. Create the n1 index if, on average, less than 10% of the data in the table will be processed by each journal import run. Create the n2 index if you are running journal import in summary mode. The following table lists the parameters of the Create_Table routine:
| Parameter Name | Required Y/N | Example | Comments |
|---|---|---|---|
| table_name | Y | GL_CUSTOM_INTERFACE | Name to use for new table |
| tablespace | N | USER_TAB | Tablespace the table should use. If none is specified, defaults to default tablespace. |
| physical_attributes | N | PCTFREE 10 STORAGE (INITIAL 500K NEXT 1M) | Physical attribute clause to use in creating the new table. If none is specified, uses the defaults. |
| create_n1_index | N | TRUE | Indicates whether or not the n1 index should be created. If this parameter is not specified, the index will be created. |
| n1_tablespace | N | USER_IND | Tablespace the n1 index should use. If none is specified, defaults to the default tablespace. |
| n1_physical_attributes | N | STORAGE (INITIAL 10K Next 50K) | Physical attribute clause to use in creating the n1 index. If none is specified, uses the defaults. |
| create_n2_index | N | TRUE | Indicates whether or not the n2 index should be created. If this parameter is not specified, the index will be created. |
| n1_tablespace | N | USER_IND | Tablespace the n2 index should use. If none is specified, defaults to default tablespace. |
| n2_physical_attributes | N | STORAGE (INITIAL 10K NEXT 50K) | Physical attribute clause to use in creating the n2 index. If none is specified, uses the defaults. |
If you want to drop a table from the GL schema, the DROP_TABLE routine is included in the GL_JOURNAL_IMPORT_PKG package. The parameters for the Drop_Table routine are shown in the table below:
| Parameter Name | Required Y/N | Example | Comments |
|---|---|---|---|
| table_name | Y | GL_CUSTOM_INTERFACE | Name of the table to drop |
Populate your Newly Created Table with Data
Create a procedure to load data into your newly created interface table.
Populate the GL_INTERFACE_CONTROL table
The POPULATE_INTERFACE_CONTROL routine, in the GL_JOURNAL_IMPORT_PKG package, inserts a new row in the GL_INTERFACE_CONTROL table. This row can be used to keep track of the interface table that contains the data for a particular source/group ID, or it can be used to seed interface control data for a Journal Import run.
The group ID and interface run parameters must be of variable type number. If the group ID and interface run ID's have values other than null, then the values specified will be used. Otherwise, the group ID and interface run ID will be generated and returned in the variables.
If you are planning to launch Journal Import using the Journal Import window, then the Interface Run ID parameter is not significant. You should specify a null value for the interface run ID parameter.
If you are planning to launch Journal Import yourself without using the Journal Import window, save the interface run ID and use it as a parameter for Journal Import. Journal Import will process all source/group ID combinations in the GL_INTERFACE_CONTROL table that have the same value for the interface run ID.
Once Journal Import has processed one or more source/group ID combinations successfully, parameters in the GL_INTERFACE_CONTROL table let you specify what will happen to the data:
-
Drop Table
-
Delete Successfully Processed Data
-
Save Successfully Processed Data
If no action is specified for the data, Journal Import will delete successfully processed data.
Note:
-
If you specify that a table should be dropped, the table will be dropped only if all the data in the table has been successfully processed, if all of the source/group ID combinations currently in the table have rows in GL_INTERFACE _CONTROL indicating that table should be dropped, and if all of the data currently in this table was processed by the current run of Journal Import.
If all of these criteria are not satisfied, the table will not be dropped, but the successfully processed data for that source/group ID combination will be deleted from the interface table.
-
If you specify that successfully processed data should be deleted, all of the successfully processed data for the source/group ID combination will be deleted from the table. If all of the data currently in the table is to be deleted, Journal Import will detect this and truncate the table.
-
If you specify that successfully processed data should be saved, Journal Import will leave the data in the interface table. The data will have a status of PROCESSED, and will not be picked up by later runs of Journal Import.
The parameters for the GL_INTERFACE_CONTROL are listed in the table below:
| Parameter Name | Required Y/N | Example | Comments |
|---|---|---|---|
| user_je_source_name | Y | Payables | Journal entry source name of data in interface table. |
| group_id | Y | group_id | Group ID of data in interface table. This parameter must be a variable of type number. If this variable has a value other than null, then that value will be used as the group ID. Otherwise, a group ID will be automatically generated and stored in this variable. |
| ledger_id | Y | 2 | Ledger ID of data in interface table. |
| interface_run_id | Y | run_id | Interface run id for the new created gl_interface_control record. This parameter must be a variable of type number. If this variable has a value other than null, then that value will be used as the interface run ID. Otherwise, an interface ID will be automatically generated and stored in this variable. |
| table_name | N | GL_INTERFACE | Name of table that contains the data. If a null value is specified, then Journal Import will assume the data is in the GL_INTERFACE table. |
| processed_data_action | N | gl_journal_import_pkg.save_data | Indicates what is to be done with the data when it is successfully processed. Valid values are gl_journal_import_pkg.save_data to leave the data in the interface table, gl_journal_import_pkg.delete_data to delete the data from the interface table, and gl_journal_import_pkg.drop_table to drop the interface table. If no value is specified, then Journal Import will delete the data. |
Start Journal Import
You can start Journal Import from the Import Journals window or you can create your own routine to launch Journal Import. If you use the Journal Import window, then one Journal Import request will be launched for each interface table from which data is to be processed.
In the Import Journals window, choose from the following options from the Selection Criteria poplist:
-
Enter All Group IDs: to import all data for that source that has a group ID.
-
Enter Specific Group ID: to import data for a specific source/group ID combination. Enter a group ID in the Specific Value field.
Note: Each Journal Import request will process at most 20 sources/group ID combinations. If you more need to be processed, additional Journal Import Requests will need to be launched.
Caution: Avoid using start and end dates when importing journals. If the data in the interface table uses different dates, then importing using start and end dates could result in only importing a subset of the data thereby creating out of balance journals.
-
Enter No Group ID: to import all data for that source that has no group ID.
See the following pertinent references:
Correcting Journal Import Data
Correcting Journal Import Data
When you correct your data through the Correct Journal Import window, use the Find Journal Import window to locate your data. If you use the Find Journal Import Data window, and you are entering a query with a specified source that has data in alternative tables, you must specify a group ID.
The Correct Journal Import window verifies your data access set at the ledger level only. Your data access set must minimally provide read and write access to the ledger or read and write access to one or more of the balancing segment values or management segment values.
Related Topics
Importing Journals
Journal Import creates journal entries from accounting data you import from Oracle and non-Oracle feeder systems. You can review, change, and post imported journal entries the same as any other journal entry. Journal Import supports multiple charts of accounts, as well as foreign currency, intercompany, statistical, budget, and encumbrance journals.
Journal Import creates journal entries from data in the GL_INTERFACE table. Oracle feeder systems automatically populate this table. If you are using a non-Oracle feeder system, you must populate this table yourself.
General Ledger validates all data in the interface table before creating journal entries.
Note: For increased security and faster processing, Journal Import only processes accounting data when you have read and write access to the entire ledger or read and write access to all of the import data's balancing segment values, or management segment values when you submit your request.
Caution: Make sure that you have the correct access rights for a particular journal before making any modifications using Journal Import. If you do not have adequate access rights, any modifications you make using Journal Import will be lost.
Note: The Oracle Workflow Business Event System, introduced in Release 2.6, allows products to seed business events and event subscriptions.
Journal Import Started and Journal Import Completed are seeded business events. See: Business Events, Oracle General Ledger Implementation Guide.
Data Access Set
The data access set assigned to your user responsibility controls what journal data you can import into your ledger as follows:
-
Full Read and Write Access: You can import all valid journal lines into your ledger if your data access set provides full read and write access. The types of full access are as follows:
-
Full Ledger data access set type that provides read and write access to the full ledger.
-
Balancing Segment Value data access type that provides read and write access to all of the balancing segment values for the ledger using the All Values checkbox.
-
Management Segment Value data access type that provides read and write access to all of the management segment values for the ledger using the All Values checkbox.
-
-
Partial Read and Write Access: If you have read and write access to some of its balancing segment values and management segment values, you have the following privileges:
-
Read and write access to specific balancing segment values or management segment values allows you to import journal lines for those balancing segment values or management segment values.
-
-
Read-Only Access: If you have read-only access to a ledger, balancing segment values, or management segment values, you cannot import journal data for that ledger.
-
Read-only access to the ledger prevents you from importing data for that ledger.
-
Read-only access to balancing segment values or management segment values prevents you from importing data for that ledger. Journal import completes with an error message.
-
Importing by Accounting Date
Journal Import groups lines within the same period into the same journal, even if the lines have different accounting dates except for average balance processing enabled ledgers (ADB). Journal Import places lines with different accounting dates into separate journals for ADB enabled ledgers.
If you set the profile option GL Journal Import: Separate Journals by Accounting Date to Yes, Journal Import will place journal lines with different accounting dates into separate journals.
Reporting Currencies
If you use Subledger level Reporting Currencies and you have chosen not to run Journal Import automatically when transferring amounts to General Ledger from your subledgers that are integrated with Subledger Accounting, you must run Journal Import manually in your source ledger and in each subledger level reporting currency.
Note: Make sure the Journal Conversion rules have been defined correctly in Accounting Setup Manager. General Ledger Posting uses the Journal Conversion rules to determine the journals that match a particular source and category combination to be replicated to reporting currencies. The Journal Conversion rules must not allow subledger sources that integrate with Subledger Accounting to be converted to subledger level reporting currencies. This prevents double counting of subledger journals; once by Subledger Accounting and again by General Ledger Posting.
Journal Import Currency End Date Bypass
You can bypass currency end date validation during journal import. Transactions denominated in a currency that has been assigned an end date will be imported into Oracle General Ledger if the currency is enabled.
To use this feature, you must define the profile option GL Journal Import: Currency Bypass End Date and set it to Yes.
Below is a list of Journal Import results depending on whether the profile option GL Journal Import: Currency Bypass End Date is set to Yes or No in combination with enabled and disabled currencies.
-
Set the profile option to Yes and the currency is enabled: The journal import process will skip the end date validation process. Journal import will ignore the assigned effective end date for the currency.
-
Set the profile option to Yes and the currency is disabled: Batches with a disabled currency will fail during journal import.
-
Set the profile option to No or Null and the currency is enabled: Journal Import will validate the end date of currencies against the system date.
-
Set the profile option to No or Null and the currency is disabled: Batches with a disabled currency will fail during journal import.
To define the profile option GL Journal Import: Bypass Currency End Date:
-
Sign on to Oracle Applications as an Application Developer.
-
Navigate to the Define User Profile Option window.
-
Complete the following:
-
Name: GL_JI_IGNORE_CURRENCY_DATE
-
Applications: Oracle General Ledger
-
User Profile Name: GL Journal Import: Bypass Currency End Date
-
Description: To bypass journal import's currency end date validation.
-
SQL:
SQL="select meaning IGNORE_DATE, lookup_code
into :visible_option_value,
                :profile_option_value
from fnd_lookups
where lookup_types='YES_NO'"COLUMN="IGNORE_DATE(*)"
-
-
Set the profile option, GL Journal Import: Bypass Currency End Date to Yes at the site, application, responsibility, or user level.
-
Save your work.
Note: The default value of this profile option is Null. You must set it to Yes to enable the Journal Import Currency End Date Bypass feature.
How to Import Journals
To import journal entries into General Ledger, you can use the following methods:
-
import journal entries using the Import Journals window
-
import journal entries by running the Journal Import program from Standard Report Submission (SRS)
To import journal entries using the Import Journals window, see the procedure entitled To import journal entries to General Ledger.
To import journal entries by running the Journal Import program from Standard Report Submission (SRS), see the section in this chapter entitled Running the Journal Import Program from Standard Report Submission (SRS).
Prerequisites
-
Populate the interface table if you are importing from non-Oracle feeder systems.
-
Define the Journal Import setup options to optimize performance for each ledger.
To import journal entries to General Ledger:
-
Navigate to the Import Journals window.
-
Enter the Source from which you want Journal Import to create journal entries.
-
Select a ledger in the ledger field.
You must have read and write access to the ledger, or read and write access to the balancing or management segment values for all of the journal lines.
If you do not have adequate access rights, any modifications you make using Journal Import will be lost.
If you use reporting currencies (journal or subledger level), then you may choose a reporting currency.
-
Enter one of the following Selection Criteria:
-
No Group ID: To import all data for that source that has no group ID. Use this option if you specified a NULL group ID for this source.
-
All Group IDs: To import all data for that source that has a group ID. Use this option to import multiple journal batches for the same source with varying group IDs.
-
Specific Group ID: To import data for a specific source/group ID combination. Choose a specific group ID from the List of Values for the Specific Value field.
If you do not specify a Group ID, General Ledger imports all data from the specified journal entry source, where the Group_ID is null.
You can import data for the same or different sources in parallel by specifying a unique Group ID for each request.
Note: If there is a value in the Group_ID field in the GL_INTERFACE table, either intentionally populated by the user, or populated by the subledger creating these transactions, then to import these transactions into GL, you must specify All Group IDs or Specific Group ID and enter a Specific Value.
Caution: Do not specify more than 20 Source/Group ID combinations per import. Journal Import cannot process more than 20 Source/Group ID combinations at once.
Caution: Avoid using start and end dates when importing journals. If the data in the interface table uses different dates, then importing using start and end dates could result in only importing a subset of the data thereby creating out of balance journals.
-
-
(Optional) Define the Journal Import Run Options.
Choose Post Errors to Suspense if you have suspense posting enabled for your ledger and you want to replace any erroneous accounts in the data with suspense accounts. This will allow data with erroneous accounts to be imported and posted successfully. You can then later move the data from the suspense accounts to whatever account should have been used instead of the erroneous account.
Choose Create Summary Journals to have journal import create the following:
-
one journal line for all transactions that share the same account, period, and currency and that has a debit balance
-
one journal line for all transactions that share the same account, period, and currency and that has a credit balance
For more information on creating summary import journals, see: Setting the Journal Import Run Options.
-
-
Enter a Date Range to have General Ledger import only journals with accounting dates in that range. If you do not specify a date range, General Ledger imports all journals data.
-
Choose whether to Import Descriptive Flexfields, and whether to import them with validation.
If you choose not to create summary journals, you can Import Descriptive Flexfields along with your journal information. You can import descriptive flexfields With Validation and generate journals only when validation succeeds. Or, you can import descriptive flexfields Without Validation and generate all journals.
Note: Importing descriptive flexfields without validation may cause problems when modifying journal lines. If you import descriptive flexfields with errors, you may corrupt the journal lines to which they refer.
-
Choose Import to submit a concurrent process to import journals. General Ledger names the resulting batch as follows: <REFERENCE1> <Source> <Request ID>: <Actual Flag> <Group ID>; for example, 587-C Payables 18944: A 347.
-
Review the Journal Import Execution Report to determine the number of errors in the import data, and how to correct any Journal Import errors.
-
If you have only a few Journal Import errors, correct the errors from the Correct Journal Import Data window, then rerun Journal Import on the corrected data.
-
If the number of Journal Import errors is high, delete all of the import data for your journal entry source and group ID from the interface table. Correct the errors then repopulate the GL_INTERFACE table before rerunning Journal Import.
-
You must have read and write access to the ledger, or read and write access to the import data's balancing or management segment values to import the journals.
-
Only data for ledgers in your data access set can be imported.
-
Related Topics
Integrating General Ledger Using Journal Import
Setting the Journal Import Run Options
Journal Sources, Oracle General Ledger Implementation Guide
Journal Import Execution Report
Correcting Journal Import Data
GL: Archive Journal Import Data, Oracle General Ledger Reference Guide
GL: Number of records to Process at Once, Oracle General Ledger Reference Guide
Setting the Journal Import Run Options
To post account errors to a suspense account:
If you allow suspense posting in your ledger, you can Post Errors to Suspense. With this option, Journal Import creates journal entries with suspense journal lines for account errors in the source data. If you choose not to post errors to suspense, Journal Import rejects any source/group ID combination that contains account errors.
If you define suspense accounts for each journal source and category, Journal Import assigns the appropriate suspense account to unbalanced journal line amounts or journal lines containing account errors. Journal Import assigns suspense accounts based on the journal source and category for the suspense journal line.
If you allow suspense posting, Journal Import creates a suspense line for the following errors:
EF01: This account is disabled for this accounting date.
EF02: Detail posting is not allowed for this account.
EF03: Disabled account.
EF04: These segment values are not a valid account. Check your cross validation rules.
EF05: You provided a code combination ID, but there is no account with this ID.
Additional Information: With regard to errors EF01 and EF03, if you specify an alternate account for an account combination that is disabled or end-dated in the GL Accounts window, Journal Import will use the alternate account to replace the original account combination instead of the suspense account. The suspense account is only used if you choose to post errors to suspense and the alternate account is not specified or invalid (i.e. error EF02, EF04, EF05)
Also refer to Defining Accounts, Oracle General Ledger Implementation Guide
To create summary import journals:
Choose Create Summary Journals to have journal import create the following:
-
one journal line for all transactions that share the same account, period, and currency and that has a debit balance
-
one journal line for all transactions that share the same account, period, and currency and that has a credit balance
This makes your reports more manageable in size, but you lose the one-to-one mapping of your detail transactions to the summary journal lines created by Journal Import.
-
If you create summary journals, you can still maintain a mapping of how Journal Import summarizes your detail transactions from your feeder systems into journal lines. The journal source definition contains a setting to keep import journal references.
Note: If you choose to create summary journals, you cannot import descriptive flexfields.
Running the Journal Import Program from Standard Report Submission (SRS)
You can submit the Journal Import program from Standard Report Submission (SRS).
To run the Journal Import program from SRS:
-
In the Name field of the Submit Request window, choose Program - Import Journals. The Parameters window appears.
-
In the Parameters window, select values from the list of values for the following fields: Source, Ledger, Group ID, Post Errors To Suspense, Create Summary Journals, and Import Descriptive Flexfields.
Note: For the Group ID parameter, select one of the following options:
-
select a specific Group ID
-
leave the field empty to import data for a source that has no group ID. Note that if the import is from an Oracle Subledger, the Group ID will be automatically populated and therefore no data will be imported.
-
-
Choose OK.
See: Oracle E-Business Suite User Guide for more information on grouping runs into request sets and scheduling.
Related Topics
Integrating General Ledger Using Journal Import
Defining Journal Sources, Oracle General Ledger Implementation Guide
Correcting Journal Import Data
If your Journal Import run resulted in relatively few errors, you can correct the data that was rejected by Journal Import. After making your corrections, you can rerun Journal Import to create journals from your corrected accounting data.
If you encountered a high number of Journal Import errors, you should instead delete all of the import data for your journal entry source and group ID, correct the errors, and repopulate the GL_INTERFACE table before rerunning Journal Import.
Prerequisite
-
Review the Journal Import Execution Report and note the Request ID and Group ID of the Journal Import process that encountered invalid import data
To correct Journal Import data:
-
Navigate to the Correct Journal Import Data window.
Each of the fields in this window corresponds to a column in the GL_INTERFACE table.
-
Query journal import data that you want to correct. You can only query journal import lines that have a Status of Error or Corrected. You must enter a Source name to locate your journal import error lines. You can also enter a Category, Accounting Date, Group ID, or Currency to help filter your search.
The Correct Journal Import window verifies your data access set at the ledger level only. Your data access set must minimally provides read and write access to the ledger, or read and write access to one or more of the balancing segment values or management segment values.
-
Use the tabs to choose the type of information in the journal import line you want to correct.
-
Choose Batches/Journals to correct journal batch and journal entry data.
-
Choose Accounts to correct the segment values for your account segments.
-
Choose Journal Lines to correct journal entry line data, including the Value-Added Tax descriptive flexfield.
-
Choose Descriptive Flexfields to correct segment values for the descriptive flexfields Journals - Journal Entry Line and Journals - Captured Information.
-
Choose References to correct reference information for your Journal Import data.
-
-
Correct the invalid accounting data.
-
Save your changes. After you correct an error journal line and save your changes, the Status changes to Corrected.
-
Choose Import Journals to return to the Import Journals window.
Related Topics
Correcting Accounts in Journal Import Data
Integrating General Ledger Using Journal Import
Correcting Accounts in Journal Import Data
To correct accounts in Journal Import data:
-
Navigate to the Correct Journal Import Data window.
-
Query the journal import data you want to correct. You must enter a Source to perform the search.
-
Select the Accounts tab.
-
Correct the data for account Segment1 through Segment30. You must enter an account segment value for each enabled segment. You can also enter a valid Code Combination ID. However, segment values override a code combination ID, so you must first erase all displayed segment values before changing the displayed code combination ID.
Account segment values are not necessarily stored in the first segment columns of the GL_INTERFACE table. For more information on Journal Import account data, see: Integrating General Ledger Using Journal Import.
The Correct Journal Import window verifies that your data access set provides read and write access to the ledger only. Your must have at least read and write access to the ledger, or read and write access to one or more of the balancing segment values or management segment values.
-
If you want, choose another information type by selecting one of the tabs, to correct other journal import data.
-
Save your changes. Once you correct an error journal line and save your changes, the Status changes to Corrected.
-
Choose Import Journals to return to the Import Journals window.
Related Topics
Integrating General Ledger Using Journal Import
Correcting Journal Import Data
Troubleshooting
If your Journal Execution Report displays the error, Unbalanced Journal Entry, review the following guidelines to correct the problem:
-
If this is not a subledger journal, navigate to Setup > Journal > Source. Uncheck Freeze Journals and save your work. Navigate to Journal > Import Correct. Query the journal batch and correct the imbalance.
-
If this is a subledger journal, determine why the imbalance was created. Correct the problem in the subledger.
-
If you enabled Rounding Differences Tracking by assigning a Rounding Differences Tracking Account to your ledger, rounding imbalances are automatically balanced against the account you specified. See: Defining Ledgers, Oracle General Ledger Implementation Guide.
-
To avoid some unbalanced journal entries, enable suspense posting in your ledger. See: Defining Ledgers, Oracle General Ledger Implementation Guide.
Deleting Journal Import Data
If you have many Journal Import errors for a specific journal entry source and group ID, you can delete all erroneous data for the source and group ID from the journal import table, GL_INTERFACE. You can then repopulate the import table with corrected data and rerun Journal Import.
If you reserved funds for any transaction in a feeder system, you cannot delete the incorrect data. Instead, you must correct each Journal Import error using the Correct Journal Import Data window.
Prerequisite
-
Review your Journal Import Execution Report and note the Request ID and Group ID of the Journal Import process that encountered invalid import data
To delete journal import data from the Submit Request window:
-
Navigate to the Submit Request window.
-
Choose to run a Single Request.
-
Select Program – Delete Journal Import Data. Provide the following parameters:
-
Source: Identify the data you want to delete from the General Ledger import table by entering a journal entry Source for which you have imported data.
-
Request ID: Enter the Request ID corresponding to the Journal Import run.
-
Group ID: Enter a Group ID to delete all Journal Import data that corresponds to the specified source and group ID.
Leave the Group ID blank to delete all Journal Import data that corresponds to the specified source, but has no corresponding Group ID.
-
-
Submit your request.
Note: You must have read and write access to the ledger or read and write access to all of the import data's balancing segment values or management segment values to delete the journal import data.
Note: Do not delete subledger data from the GL_INTERFACE table. If you do, your subledger and General Ledger will not reconcile. Instead, correct the data in your subledger, repopulate the GL_INTERFACE table and rerun journal import.
Related Topics
Integrating General Ledger Using Journal Import
Defining Journal Sources, Oracle General Ledger Implementation Guide
Correcting Journal Import Data
Journal Import Execution Report
Posting Journals
Posting Journal Batches
Post journal batches to update the account balances of your detail and summary accounts. You can post actual, budget, or encumbrance journal batches.
In the Enter Journals window, select a batch row and choose the Review Batch button to view, update, or create journal batches. In the Batch window, choose the Journals button to view the journal lines in the Journals window.
You can select and post journal batches from the Post Journals window. In addition, you can post a journal batch by choosing the Post button from the Enter Journals, Batch, or Journals window when you are entering or reviewing journal batches or journal entries.
Note: If you have added detail accounts to your summary accounts since your last posting operation, run the Maintain Summary Templates program before you post your journal batches. This can improve performance of the posting program. See: Running the Maintain Summary Templates Program, Oracle General Ledger Implementation Guide
When you post an encumbrance batch imported from Oracle Payables or Oracle Purchasing, General Ledger automatically balances the encumbrance entries to the Reserve for Encumbrance account.
When you post to an earlier open period, actual balances roll forward through the latest open period; budget balances roll forward through the end of the latest open budget year; and encumbrance balances roll forward through the end of the latest open encumbrance year.
If you post a journal entry into a prior year, General Ledger adjusts your retained earnings balance for the effect on your revenue and expense accounts.
Tip: Run a Trial Balance Report whenever you post to a previous fiscal year to ensure that your Retained Earnings account is properly reconciled.
You can automate your posting process by scheduling the Automatic Posting program to periodically select and post batches.
Note: Once you post a journal batch, its contents, including descriptive flexfields, cannot be modified. Reversal information within a posted unreversed journal batch can be modified.
Note: The Oracle Workflow Business Event System, introduced in Release 2.6, allows products to seed business events and event subscriptions.
Posting is a seeded business event. See: Business Events, Oracle General Ledger Implementation Guide.
Reporting Currencies
If you use Reporting Currencies (Journal or Subledger Level), General Ledger automatically generates converted journals for your reporting currencies when you post the original journals in the source ledger if you have set up the appropriate journal conversion rules in Accounting Setup Manager.
Note: You must define appropriate daily rates for the currencies assigned to your reporting currencies before you post journals in your source ledger.
Suspense, rounding imbalances, and intracompany balancing lines are generated independently for each reporting currency (journal and subledger level).
Secondary Ledgers
If you use secondary ledgers (Journal or Subledger Level), General Ledger automatically generates converted journals for your secondary ledgers when you post the original journals in the source ledger or source reporting currency if you have setup the appropriate journal conversion rules in Accounting Setup Manager.
Note: You must define appropriate daily rates for the currencies assigned to your secondary ledgers before you post journals in your source ledger or reporting currency.
Suspense, rounding imbalances, and intracompany balancing lines are generated independently for each secondary ledger.
See: Generating Reporting Currency Journals
Posting and the Secondary Tracking Segment
If you enabled the Track by Secondary Segment option for the ledger, posting to revenue and expense accounts will update the retained earnings account specific to each primary balancing segment value and secondary tracking segment value pair. This applies to the entered amount balance, as well as its corresponding converted balance in the ledger currency.
When journals are backposted to an earlier period that has an income statement impact, posting will update the detail retained earnings account affected.
For a full discussion of this feature, see: Secondary Tracking Segment.
Prerequisites
-
Enter or generate actual journal batches.
-
Enter or generate budget journal batches.
-
Import journal batches from subledgers.
-
Enter or generate encumbrance journal batches.
To post journal batches:
-
Navigate to the Post Journals window.
Note: You can also post a journal batch by choosing the Post button from the Enter Journals, Batch, or Journals window when you are entering or reviewing journal batches or journal entries. This will post the entire batch containing the journal you are entering or reviewing.
-
From the Find Journal Batches window, query the journal Batch you want to post. You can only query unposted journal batches where you have sufficient read and write access to the ledger or to all of the balancing segment values or management segment values.
From the Post Journals window, you see the Batch name and the posting Period, as well as the Balance Type indicating whether your batch affects Budget, Actual, or Encumbrance balances.
-
Choose the Review Batch button to review the details of your journal batch.
The Batch widow appears.
-
Review the Period Status and Post Status to determine if a batch is available for posting.
You can post actual batches to open periods, budget batches to periods in an open budget year, and encumbrance batches to any period up to the last period in the latest open encumbrance year.
-
Check the Control Total for the journal entry batch, if you entered one. If the control total does not equal Total Entered Debits and Total Entered Credits, you cannot post the batch.
-
Choose Post to return to the Post Journals window.
-
Select the journal batches you want to post by checking the box next to each batch.
-
Choose Post to submit a concurrent request to post the selected journal batches.
You must have read and write access to the ledger or read and write access to all of the balancing or management segment values to post the selected batches.
If you are using budgetary control and have not approved a journal batch before posting, the Posting program will attempt to reserve funds and if successful, post the batch. If the funds reservation is unsuccessful, the Posting program will mark the batch with an appropriate error.
-
After the concurrent process completes, review the Posting Execution Report to determine if there were any errors during posting.
Note: Posting will end in a warning if any one of the requested batches were not successfully posted.
Related Topics
Reviewing the Batch Posting Status
Using Budgetary Control and Online Funds Checking
Opening and Closing Accounting Periods, Oracle General Ledger Implementation Guide
Generating Recurring Journal Batches
Generating MassAllocation Journals
Generating MassBudget Journals
Posting Journal Batches Automatically
Overview of Reporting Currencies
Generating Reporting Currency Journals
Cancelling a Batch Posting
To cancel a journal batch posting request:
Verify that the concurrent request for the batch has a Status of Pending, then cancel the concurrent request. The batch status resets to Postable.
Related Topics
Posting to a Suspense Account
You can decide whether to allow posting of any journal entry when its total debits do not equal the total credits. If you enabled suspense posting when you defined the ledger or any time after the creation of the ledger, General Ledger automatically balances each out-of-balance journal entry against a suspense account you specify for your ledger.
You can define additional suspense accounts if you want to balance journal entries with specific sources and categories to corresponding suspense accounts automatically.
Note: If you are using Reporting Currencies (Journal or Subledger Level), General Ledger independently calculates the suspense lines for each of your reporting currencies.
Related Topics
Defining Ledgers, Oracle General Ledger Implementation Guide
Defining Suspense Accounts, Oracle General Ledger Implementation Guide
Reviewing the Batch Posting Status
Review the batch posting status to determine whether your batch has posted successfully. If a batch is not posted, you can make changes to the batch and its entries. Once a batch is posted, you cannot change any information that affects your balances, such as accounts or debit and credit amounts. You can, however, change the reversal period for entries in the batch.
To review the batch posting status:
-
Navigate to the Enter Journals window.
-
Query the batch whose status you want to review. You must minimally have read access to the ledger or read access to one or more of the balancing segment values or management segment values to query the batch. You can only view the journal lines to which you have read access.
-
Choose Review Batch.
-
General Ledger automatically displays the Posting Status for your journal batch. Batches can remain Unposted for a number of reasons, including control total violations and posting to closed periods. General Ledger may also indicate that your batch is Processing, or has been Selected for posting but has not yet run.
-
Your batch may not have posted due to an Error, such as an invalid journal entry line.
Correcting Batch Posting Errors
Follow the steps below to correct batch posting errors.
To correct batch posting errors:
-
Navigate to the Enter Journals window.
-
Query the batch whose status you want to review.
-
Select the batch you want to review and choose Review Batch.
The Batch window appears.
-
Identify the error using the Posting Execution Report. See: Reviewing the Batch Posting Status.
For information on the Posting Execution Report, see Posting Execution Report.
-
Correct the specific error.
Note: When you correct the error, the error status and error number do not change until you post the batch. If you eliminate all your errors, the status changes to Posted after the batch is successfully posted.
You need read and write access to the ledger or read and write access to all the balancing segment values or management segment values in the journal batch to make corrections to the journal batch.
-
Post the batch by choosing the Post button.
You need read and write access to the ledger or read and write access to the balancing segment values or management segment values in the journal batch to post.
Note: If your system administrator did not assign the function security, Enter Journals: Post, to your responsibility, you cannot post your journals from the Enter Journals window or Enter Encumbrances window.
Posting Journal Batches Automatically (AutoPost)
You can automatically post journal batches that meet specific criteria that you defined in an AutoPost criteria set. You can define multiple criteria sets that include a range of journal effective dates and multiple AutoPost priorities. AutoPost priorities include combinations of ledger or ledger set, journal source, journal category, balance type, and period.
AutoPost criteria sets are defined for combinations of chart of accounts and calendar. The data access set that is assigned to your responsibility determines the combination of chart of accounts and calendar that you can define for your criteria set.
Once you define an AutoPost criteria set, run the AutoPost program to select and post any journal batches that meet the criteria defined by the criteria set. You can also schedule the AutoPost program to run at specific times and submission intervals. You can submit the AutoPost program or schedule AutoPost runs directly from the AutoPost Criteria Sets window. Alternatively, you can use the Submit Request window.
When you enter the AutoPost priorities for a criteria set, you can enter All for one or more of the selection fields. Use this feature to select all ledgers and/or ledger sets in your data access set, journal sources or categories, all balance types, or all accounting periods. For example, suppose you enter journals every period that adjust your budget balances for subsequent periods. You can define a criteria set that selects all unposted journal batches with a source of Manual and a balance type of Budget for all periods. You can then schedule the AutoPost program to run at the beginning of every period, automatically post your budget adjustments, and update your budget balances.
If you use budgetary control, you can define a criteria set that posts the encumbrance journal batches that are created after the funds have been successfully reserved.
Note: If you recently upgraded from a version of General Ledger earlier than Release 11, any AutoPost criteria you had previously defined will be grouped together and saved in a new criteria set named Standard.
Prerequisites
-
Define your ledgers and ledger sets.
-
Define your journal sources and categories.
-
Define your calendar periods.
To define an AutoPost criteria set:
-
Navigate to the AutoPost Criteria Set window.
-
Enter a Criteria Set name and Description.
-
Mark the Enabled check box if you want to enable the criteria set now. Otherwise, leave the check box unmarked.
-
(Optional) Select the Enable Security checkbox to secure the AutoPost criteria set to prevent some users from viewing, making changes, or submitting it. See: Definition Access Sets, Oracle General Ledger Implementation Guide.
If you do not enable security, all users who have access to this criteria set will be able to use, view, and modify the criteria set.
If the Assign Access function is available for your responsibility, the Assign Access button is enabled once you check the Enable Security check box. Choose the Assign Access button to assign the criteria set to one or more Definition Access Sets with the desired privileges. For more information, see Definition Access Sets, Oracle General Ledger Implementation Guide.
If the Assign Access function has been excluded from your responsibility, you will not be able to view the Assign Access button in the AutoPost Criteria Set window. You can still secure the criteria set by checking the Enable Security check box, but only Definition Access Sets that are AutoAssigned will be automatically assigned to this criteria set. See your System Administrator for more information on Function Security.
-
Set your Posting Submission Options. If you choose the Submit Only Priorities with Batches in Order option, be sure to also enter the Number of Priorities.
-
Enter the range of Journal Effective Dates:
From: starting effective date of the range, entered as the number of days before the AutoPost submission date. This must be a number from 0 to 1000.
To: ending effective date of the range, entered as the number of days after the AutoPost submission date. This must be a number from 0 to 1000.
AutoPost will only select journals whose effective date is within the range of days before and after the AutoPost submission date.
-
Enter your AutoPost priorities for this criteria set. Each priority includes a Priority number, ledger or ledger set, journal Source, journal Category, Balance Type, and Period. For each criteria set, you can only select ledgers and ledger sets that share the same chart of accounts and calendar. The data access set of your responsibility determines which batches are selected for automatic posting when the criteria set is submitted. See: Ledger and Ledger Set Options and Balance Types.
Note: The priority number must be a value from 1 to 99, where 1 is the highest priority and 99 is the lowest. Batches with higher priorities are posted first. You can use the same priority number more than once.
You can enter All in any field (except Priority number) to select all ledgers and ledger sets, journal sources or categories, balance types, or accounting periods.
Note: If you are using Reporting Currencies (Journal or Subledger Level), you can define AutoPost priorities for your reporting currencies by selecting your reporting currency or selecting a ledger set that includes your reporting currency in the Ledger/Ledger Set field.
-
Save your work.
To run the AutoPost program:
-
Navigate to the AutoPost Criteria Set window.
-
Query the AutoPost criteria set for which you want to run the AutoPost program. You can query on any AutoPost criteria set that has the same chart of accounts and calendar as your data access set and that is not secured using Definition Access Sets or for which you have been granted View privilege.
-
Choose the Submit AutoPost button. You can submit any AutoPost criteria set that is not secured using Definition Access Sets or for which you have been granted Use privilege.
Note: Optionally, you can submit the AutoPost program from the Submit Request window. Enter the AutoPost criteria set name in the Parameters window. You can submit any AutoPost criteria set that is not secured using Definition Access Sets or for which you have been granted Use privilege.
-
Review the AutoPost Execution Report after the program completes successfully. Use this report to review the journal batches selected for posting.
To schedule an AutoPost run:
-
Navigate to the AutoPost Criteria Set window.
-
Query the AutoPost criteria set for which you want to schedule the AutoPost program. You can query on any AutoPost criteria set that has the same chart of accounts and calendar as your data access set and that is not secured using Definition Access Sets or for which you have been granted View privilege.
-
Choose the Schedule AutoPost button. The Submit Request window displays.
You can schedule any AutoPost criteria set that is not secured using Definition Access Sets or for which you have been granted Use privilege.
Note: Optionally, you can submit the AutoPost program from the Submit Request window. Enter the AutoPost criteria set name in the Parameters window. You can submit any AutoPost criteria set that is not secured using Definition Access Sets or for which you have been granted Use privilege.
-
Set the scheduling options on the Submit Request window.
See: Running Reports and Programs, Oracle Applications User's Guide
-
Select the Submit button.
Definition Access Sets
The following describes what Use, View, and Modify access mean as it pertains to AutoPost Criteria Sets:
Use Access: Allows you to submit criteria sets from the AutoPost Criteria Set window or Standard Requests Submission window. Also enables you to schedule criteria sets from the Standard Requests Submission window. You cannot view or modify criteria sets from the AutoPost Criteria Set window.
Note: To schedule criteria sets from the AutoPost Criteria Set window, you must have both View and Use privileges to the AutoPost Criteria Set.
View Access: Allows you to only view the AutoPost Criteria Set from the AutoPost Criteria Set window.
Modify Access: Allows you to view and make changes to the AutoPost Criteria Set from the AutoPost Criteria Set window. This includes making changes to the definition access set security assigned if the Assign Access button is available. You cannot submit or schedule the AutoPost Criteria Set from the AutoPost Criteria Set window.
Use, View, and Modify Access: Allows unlimited access to the AutoPost Criteria Set from the AutoPost Criteria Set window.
See Definition Access Sets, Oracle General Ledger Implementation Guide.
Posting Submission Options
Submit All Priorities in Order: Select this option to submit the batches for all of your AutoPost priorities in the same AutoPost run. Note that priorities are processed in order, based on the Priority number.
Submit Only Priorities with Batches in Order: Select this option to submit batches only from the specified Number of Priorities in the same AutoPost run. If a priority results in no selected batches it is not included in the count of the number of priorities whose batches are processed. For example, if the number of priorities is 2 and your first priority has no selected batches, AutoPost will process priorities 2 and 3. If you submit AutoPost again, it will process priorities 4 and 5, and so on for each priority that has selected batches.
Note: Use this option when you need to balance the load on your concurrent manager. This may be necessary since a single AutoPost request that contains multiple priorities can result in numerous instances of the Posting program running concurrently. The load on the concurrent manager is increased further if a large number of journal batches are selected by your AutoPost priorities.
Ledger and Ledger Set Options
The Ledger/Ledger Set field determines the ledger or ledger set from which you want AutoPost to select journal batches for posting.
If the AutoPost criteria set priority has a specific ledger defined, AutoPost only considers those journal batches in which all journals in the batch belong to that ledger.
If the AutoPost criteria set priority has a specific ledger set defined, AutoPost only considers those journal batches in which all journals in the batch belong to the ledgers in that ledger set.
If the AutoPost criteria set priority has All defined in the Ledger/Ledger Set field, AutoPost considers those journal batches in which all journals in the batch belong to the ledgers and ledgers sets of your data access set.
The data access set of your responsibility determines which batches are selected for automatic posting when the criteria set is submitted.
If you use reporting currencies (journal or subledger level), you can specify your reporting currency in the Ledger/Ledger Set field.
Balance Types
Actual: Journal batches with actual balance type are only available for selection by AutoPost if the following are true:
-
The periods for the ledgers of all journals in the journal batch are open.
-
The batch control amount is equal to the sum of all debit and credit amounts of all journals in the journal batch if the batch control amount is entered.
-
The journal batch is taxed if tax is required.
-
The journal batch is approved if journal approval is required.
Budget: Journal batches with budget balance type are only available for selection by AutoPost if the following are true:
-
The batch control amount is equal to the sum of all debit and credit amounts of all journals in the journal batch if the batch control amount is entered.
-
The journal batch is approved if journal approval is required.
Encumbrance: Journal batches with encumbrance balance type are only available for selection by AutoPost if the following are true:
-
The batch control amount is equal to the sum of all debit and credit amounts of all journals in the journal batch if the batch control amount is entered.
-
The journal batch is approved if journal approval is required.
Related Topics
Defining Calendars, Oracle General Ledger Implementation Guide
Defining Journal Sources, Oracle General Ledger Implementation Guide
Running Reports and Programs, Oracle Applications User's Guide
Generating Reporting Currency Journals
If you use Reporting Currencies (Journal or Subledger Level), General Ledger will generate converted journal batches in your reporting currencies automatically. You must define appropriate daily rates for the currencies of your reporting currencies before you can post the journals in your source ledger.
Related Topics
Overview of Reporting Currencies
Reversing Journals
Defining Reverse Journal Entries
Use reversing journal entries to reverse accruals, estimates, errors, or temporary adjustments and reclassifications.
Assign a reversal period and, if average balances is enabled, a reversal effective date to a journal entry if you want to generate a reversing entry from the Enter Journals window, or later from the Reverse Journals window. You can enter a reversal period and effective date at any time, even after the journal is posted. However, you cannot reverse batches and journals that you have already reversed.
You can also reverse a journal or batch from the Enter Journals window, even if you have not assigned a reversal period and effective date.
Reporting Currencies
If you use Reporting Currencies (Journal or Subledger Level) and reverse a journal entry in your source ledger, General Ledger also reverses the corresponding entry in your reporting currencies if they are in the same batch as the source ledger's journal entry. The journal in your reporting currency is reversed using the same conversion rate that was used to create the original journal entry.
Ledgers with reporting currencies (journal and subledger level) assigned must post the original journal in the ledger before the journal can be reversed.
The reversing journals for the reporting currencies are created in the same batch as the reversed primary ledger's batch.
To assign a reversal period and effective date to a journal entry:
-
Navigate to the Enter Journals window.
-
Query the batch and journal within the batch for which you want to assign a reversal period.
You must have read and write access to the ledger or read and write access to the journal's balancing segment values or management segment values.
-
From the Enter Journals window, choose Review Journal.
The Journals window appears.
-
In the Reverse region, select a period from the Period list of values for the reversing entry. If average balances is enabled, you must also enter the Effective Date.
-
In the Reverse region, select a reversal method from the Method drop-down list.
Switch Dr/Cr: General Ledger creates your reversing journal by switching the debit and credit amounts of the original journal entry. This method is often used when reversing accruals.
Change Sign: General Ledger creates your reversing journal by changing the sign of your original journal amounts from positive to negative. This reversal method is often used when reversing journals to correct data entry mistakes.
Once you enter the effective date, reversing period, and reversal method, the journal entry is marked for reversal and will appear in the Reverse Journals window.
-
Generate the reversing entry from the Enter Journals window by choosing Reverse Batch or from the Reverse Journals window by choosing Reverse.
Note: You must have read and write access to the ledger or read and write access to all of the journal's balancing segment values or management segment values to reverse the journal.
Related Topics
Generating Reversing Journal Batches
Overview of Average Balance Processing
Overview of Reporting Currencies
Generating Reversing Journal Batches
You can generate reversing entries from the Enter Journals window, or you can use the Reverse Journals window to reverse any unreversed journals. The unreversed journals must have an assigned reversing period and reversal method. Also, if average balances are enabled, the unreversed journals must have an assigned reversing effective date.
You can reverse a single journal or an entire batch from the Enter Journals window. You can even reverse a journal entry or batch if you have not assigned it a reversal period and, if average balances are enabled, a reversal effective date.
If you reverse a journal batch, General Ledger creates a reversing journal entry for each journal entry in your batch. Note that this also generates a separate reversal batch for each reversed journal. General Ledger automatically names the reversal batchReverses [Original Journal Entry Name] [Date] [Time].
Prerequisites
-
Enter journals.
You must post the journal in the ledger before you can reverse the journal.
If the journal has a Subledger Accounting (SLA) source and the journal source is frozen, you must unfreeze the source before you can reverse the journal.
-
If you want to reverse journals from the Reverse Journals window, assign a reversing period to the journals. If average balances are enabled, you must also assign a reversing effective date.
To reverse a journal entry from the Enter Journals window when the journal entry has a defined reversal period, effective date (average balances enabled), and reversal method:
-
Navigate to the Enter Journals window.
-
Query the batch and journal within the batch that you want to reverse.
The Enter Journals window appears.
You must have read and write access to the ledge, or read and write access to the journal's balancing segment values or management segment values.
-
Choose Review Journal.
The Journals window appears.
-
Choose Reverse.
Note: The Reverse button is enabled only if the journal batch has been posted.
General Ledger names the reversal batch Reverses [Original Journal Entry Name] [Date] [Time]
-
Review the unposted reversing journal batch.
-
Post the reversing journal batch.
You must have read and write access to the ledger or read and write access to all of the journal's balancing segment values or management segment values to reverse the journal.
To reverse a journal entry that does not have a defined reversal period, effective date (average balances enabled), and reversal method:
-
Navigate to the Enter Journals window.
-
Query the batch and journal within the batch that you want to reverse.
The Enter Journals window appears.
You must have read and write access to the ledger or read and write access to the journal's balancing segment values or management segment values.
-
Choose Review Journal.
The Journals window appears.
-
In the Reverse region, select a period from the Period list of values.
If average balances are enabled, you must also select a date from the Date calendar list of values.
-
In the Reverse region, select a reversal method for your journal from the Method drop-down list.
Switch Dr/Cr: General Ledger creates your reversing journal by switching the debit and credit amounts of the original journal entry. This method is often used when reversing accruals.
Change Sign: General Ledger creates your reversing journal by changing the sign of your original journal amounts from positive to negative. This reversal method is often used when reversing journals to correct data entry mistakes.
General Ledger will display your concurrent request ID. The reversal batch will be named Reverses [Original Journal Entry Name] [Date] [Time].
-
Review the unposted reversing journal batch.
-
Post the journal batch.
-
Requery the journal.
-
Choose Reverse.
-
Post the reversing journal batch.
You must have read and write access to the ledger or read and write access to all of the journal's balancing segment values or management segment values to reverse the journal.
To reverse an entire journal batch:
-
Navigate to the Enter Journals window.
-
Query the batch you want to reverse.
You must have read and write access to the ledger or read and write access to the journal's balancing segment values or management segment values.
-
Choose Review Batch.
The Batch window appears.
-
Select the batch you wish to reverse.
-
Choose Reverse Batch to generate unposted reversal batches for each entry.
Note: The Reverse Batch button is enabled only if the journal batch has been posted.
If you did not assign a reversal period (and effective date, if average balances are enabled) for one or more journal entries, General Ledger prompts you for a default reversal period (and effective date).
-
Choose OK.
General Ledger will submit concurrent requests to reverse the journals in your batch.
-
Review the unposted reversing journal batch.
-
Post the reversing journal batches.
You must have read and write access to the ledger or read and write access to all of the journal's balancing segment values or management segment values to reverse the journal.
To generate reversing journals from the Reverse Journals window:
-
Navigate to the Reverse Journals window.
-
Query the journals you want to reverse. Only posted journal batches can be retrieved. For each journal, you see the Period Entered and Period Reversing which indicate the accounting period of the original journal entry and the accounting period you specified as the reversing period.
If you have enabled average balances, there is an Effective Dates tab. This tab displays Effective Dates, and for each journal you see the effective date Entered and Reversing, which indicate the effective dates of the original journal entry and the specified reversing period. Optionally, select the Periods tab to see the Period Entered and Period Reversing.
-
Select each Journal Entry you want to reverse. Note that even though a journal may have a reversing period and effective date (average balances enabled), it may not be reversible for several reasons, such as the reversal period or effective date is closed or General Ledger is checking funds.
-
Choose Reverse to generate an unposted reversing batch for each selected journal. This launches the Reverse Journal program.
General Ledger names the reversal journal batch as follows: Reverses [Original Journal Entry Name] [Date] [Time]. For example, Reverse Accruals 01-JAN-95 12:00:00 55379.
You must have read and write access to the ledger or read and write access to all of the journal's balancing segment values or management segment values to reverse the journal.
-
Post the reversing journal batches.
Related Topics
Defining Reverse Journal Entries
Overview of Average Balance Processing
Automatic Journal Reversal
This section discusses how to use automatic reversing journals.
Automatic Journal Reversal Overview
If you routinely generate and post large numbers of journal reversals as part of your month end closing and opening procedures, you can save time and reduce entry errors by using Automatic Journal Reversal to automatically generate and post your journal reversals.
You define journal reversal criteria sets for journal categories. Journal reversal criteria lets you specify the reversal period, date, and method for each journal category. You assign journal reversal criteria sets to ledgers. The same journal reversal criteria set can be shared and assigned to multiple ledgers. A ledger that does not have a journal reversal criteria set assigned to it will not be able to automatically reverse journals. You can assign and change the journal reversal criteria set assignment to a ledger at any time. Changes only impact journals that are created after the change.
Note: The reversal method for a journal is defaulted from the method defined for the journal category in the Journal Reversal Criteria Set that is attached to the corresponding ledger.
You can also choose to enable automatic posting of reversed journals.
In a ledger that has a journal reversal criteria set assigned, once you have posted journals using journal categories that have AutoReverse enabled, you can:
-
automatically generate reversals when a new period is opened.
-
manually launch a reversal program which finds and generates all journals marked for reversal for a specific period, including any journals that were manually selected for reversal.
-
automatically post any reversal journals including reversals that were not automatically generated.
Note: Automatic Journal Reversal reverses posted journals of the balance type Actual. You cannot use this feature to automate budget or encumbrance journal reversals.
Prerequisites
General Ledger generates and posts reversals for journals that satisfy the following conditions:
-
The journal balance type is Actual.
-
The journal category is enabled to be Autoreversed.
-
The journal is posted but not yet reversed.
-
The journal reversal period is open or future enterable.
To create a Journal Reversal Criteria Set:
To create a Journal Reversal Criteria Set, perform the following steps.
-
Navigate to the Journal Reversal Criteria Set window.
-
Enter a Criteria Set name and Description.
-
(Optional) Select the Enable Security checkbox to secure the Journal Reversal Criteria Set to prevent some users from viewing or making changes to it. For information on definition access sets, see: Definition Access Sets, Oracle General Ledger Implementation Guide.
If you do not enable security, all users who have access to this journal reversal criteria set will be able to use, view, and modify the criteria set.
If the Assign Access function is available for your responsibility, the Assign Access button is enabled once you check the Enable Security check box. Choose the Assign Access button to assign the journal reversal criteria set to one or more Definition Access Sets with the desired privileges. For information on definition access sets, see Definition Access Sets, Oracle General Ledger Implementation Guide.
If the Assign Access function has been excluded from your responsibility, you will not be able to view the Assign Access button in the Journal Reversal Criteria Set window. You can still secure the Journal Reversal Criteria Set by checking the Enable Security check box, but only Definition Access Sets that are AutoAssigned will be automatically assigned to this Journal Reversal Criteria Set. See your System Administrator for more information on Function Security.
-
Save the new journal reversal criteria set. This automatically displays all of the journal categories with their default values in the Journal Reversal Criteria region. For information on journal reversal criteria sets, see: Default Reversal Criteria for Seeded Journal Categories.
-
Select a journal category for which you want to modify the reversal criteria. For each journal category defined in General Ledger, you can select journal reversal criteria to control how and when your journals are reversed.
Note: You can query and modify the AutoReverse attributes for existing categories, but you cannot create new journal categories in this window. For information on defining journal categories, see: Defining Journal Categories, Oracle General Ledger Implementation Guide.
-
Select a Reversal Period from the poplist. Choose from No Default, Same Period, Next Period, Next Non–Adjusting, or Next Day.
Note: The Next Day option is only applicable to average daily balance ledgers. Non-average daily balance ledgers and consolidation average daily balance ledgers with a journal reversal criteria set that includes the Next Day option will ignore the reversal period information and treat the Next Day option in the same manner as the No Default option.
Use the following table as a guide for selecting an appropriate reversal period.
Periods with Corresponding Reversal Periods When you select this period... The reversal period is... No Default the reversal period you define when you manually enter your original journal entry Same Period the same period of the original journal entry Next Period the period following the period of the original journal entry Next Non–Adjusting the non–adjusting period following the period of the original journal entry Next Day the period into which the effective date of the journal entry falls; this option is only applicable for average daily balance ledgers -
Select a Reversal Date from the poplist if you have an average daily balance ledger. The Reversal Date is only applicable to average daily balance ledgers. Non-average daily balance ledgers and consolidation average daily balance ledgers with a journal reversal criteria set that includes a Reversal Date will ignore the Reversal Date information
Note: The available choices in the Reversal Date field are dependant on the Reversal Period selected. See the table below for available options and exception cases for non-consolidation ledgers with average daily balance enabled.
The following table describes how AutoReversal determines the reversal date based on the Reversal Period, Reversal Date, and Effective Date Rule defined for journal sources other than Manual.
Note: AutoReversal will always roll the reversal date to a valid business day for Manual journal sources, regardless of the Effective Date Rule assigned.
Journal Reversal - Average Daily Balance Non-Consolidated Ledger When you select this reversal period and this reversal date the period of your journal reversal is the date of your journal reversal is if the Effective Date Rule in the Journal Sources form is set to and the reversal date is not a business day....
the following action will take placeSame Period Next Day same as the journal's period the day after the journal's effective day Fail no default will be provided for the reversal date Leave Alone the reversal date will remain as is Roll the reversal date will roll forward to the next business day within the reversal period Last Day same as the journal's period the last day of the reversal period Fail no default will be provided for the reversal date Leave Alone the reversal date will remain as is Roll the reversal date will roll backward from the last day of the reversal period to find a valid business day Next Period/Next Non-Adjusting Period First Day the period (or non-adjusting period) after the journal's period the first day of the reversal period Fail no default will be provided for the reversal date Leave Alone the reversal date will remain as is Roll the reversal date will roll forward to find the next business day within the reversal period Last Day The period (or non-adjusting period) after the journal's period the last day of the reversal period Fail no default will be provided as the reversal date Leave Alone the reversal date will remain as is Roll the reversal date will roll backward from the last day of the reversal period to find a valid business day Next Day N/A refer to last column the day after the journal's effective date Fail no default will be provided for the reversal date Leave Alone the reversal date will remain as is Roll the reversal date will roll forward to find the next business day (may go into the next period) -
Select a reversal method from the poplist:
-
Switch DR/CR: reverses journals by changing the debits and credits of your originating journals.
-
Change Sign: reverses journals by changing the sign of your originating journals.
-
-
Mark the AutoReverse checkbox to enable AutoReversal for this category. The default is disabled.
-
Mark the AutoPost checkbox to enable AutoPost for this category. The default is disabled.
Note: AutoPost will operate only if AutoReverse is enabled. Even reversal journals that were manually reversed (not automatically generated) are selected for automatic posting when this option is selected.
-
Save your work.
Definition Access Sets
The following describes what Use, View, and Modify access mean as it pertains to Journal Reversal Criteria Sets:
-
Use Access: The use privilege is not enforced for Journal Reversal Criteria Sets.
-
View Access: Allows you to only view the Journal Reversal Criteria Set from the Journal Reversal Criteria Set window.
-
Modify Access: Allows you to view and make changes to the Journal Reversal Criteria Set from the Journal Reversal Criteria Set window. This includes making changes to the definition access set security assigned if the Assign Access button is available.
-
Use, View, and Modify Access: Allows you unlimited access to the Journal Reversal Criteria Set from the Journal Reversal Criteria Set window.
For information on setting up definition access sets, see Definition Access Sets, Oracle General Ledger Implementation Guide.
Default Reversal Criteria for Seeded Journal Categories
The following are the default reversal criteria for the seeded journal categories:
| Seeded Journal Categories | Reversal Period | Reversal Date | Method | AutoPost Reversal/ AutoReverse |
|---|---|---|---|---|
| Balance Sheet Close | Next Period | First Day | Switch Dr/Cr | |
| Income Offset | Same Period | Last Day | Change Sign | |
| Income Statement Close | Same Period | Last Day | Change Sign | |
| MRC Open Balances | No Default | Change Sign | ||
| Revalue Profit/ Loss | No Default | Change Sign | ||
| For all the other seeded Journal Categories | No Default | Switch Dr/Cr |
For new journal categories defined in the system, the default journal reversal criteria are as follows:
-
Reversal Period: No Default
-
Method: Switch Dr/Cr
You can modify journal reversal criteria at any time. Non-average daily balance ledgers, average daily balance consolidation ledgers, and average daily balance non-consolidation ledgers share the same seeded journal category reversal criteria defaults. If a journal reversal criteria set containing only the seeded journal category reversal defaults is used by a non-average daily balance ledger or an average daily balance non-consolidation ledger, the ledgers will do the following:
-
Treat the Reversal Period value of Next Day as No Default
-
Ignore values under the Reversal Date column
This occurs because these options are only applicable to average daily balance ledgers.
To assign a Journal Reversal Criteria Set:
To assign a Journal Reversal Criteria Set, perform the following steps:
-
Navigate to the Ledger page in the Accounting Setup Manager.
-
Create a new ledger or query an existing ledger.
-
In the Journal Reversal Criteria Set field, enter the Journal Reversal Criteria Set that you want to assign to the ledger. The list of values includes the Journal Reversal Criteria Sets that are not secured by definition access sets or that have been assigned to the definition access sets belonging to your responsibilities.
Note: You can unassign or change the Journal Reversal Criteria Set that is assigned to a ledger at any time. Only journals that are created after the change are affected.
Note: If you are using Reporting Currencies (Journal or Subledger Level), you can assign a Journal Reversal Criteria Set to your reporting currency in the Accounting Setup Manager.
To automatically reverse journals:
To automatically reverse journals, perform the following steps.
-
Enter and post Actual journals in a ledger that has a journal reversal criteria set assigned. Ensure that the journal category is enabled for AutoReverse.
-
Choose one of the following to reverse your journals:
-
Run the Open Period program to launch the Automatic Reversal program.
-
Navigate to the Submit Request window and select the program, Automatic Reversal. You can submit the Automatic Reversal program for a ledger if you have read and write access to some or all of the balancing or management segment values assigned to the ledger and if the ledger has a Journal Reversal Criteria Set assigned.
All reversal journals with AutoReverse enabled are generated according to the reversal criteria you defined if the reversal period is open or future enterable, and if you have read and write access to all of the balancing segment or management segment values in the journal. All reversal journals with AutoPost enabled are posted if the reversal period is open.
Note: General Ledger automatically submits the AutoReverse program when a new period is first opened in the Open and Close Periods window. You can also launch AutoReverse at any time through the Submit Request window. If you do not want reversals generated when a period is opened, set the Profile Option, GL: Launch AutoReverse After Open Period, to No.
-
-
Review the AutoReverse Execution Report after the program completes successfully. Use this report to review the journal batches selected for reversal.
To schedule an AutoReverse run:
To schedule an AutoReverse run, perform the following steps.
-
Navigate to the Submit Request window and select the program, Automatic Reversal. You can schedule the Automatic Reversal program for a ledger if you have read and write access to some or all of the balancing or management segment values assigned to the ledger and if the ledger has a Journal Reversal Criteria Set assigned.
-
Choose the Schedule button and set the scheduling options. For information on submitting a request, see: Submitting a Request.
-
Select the Submit button.
Setting up an Automated Reversal in a Secondary Ledger
(for Journals Reversed Manually in the Primary Ledger)
You can set up the automation of manual journal reversals from the primary ledger to the secondary ledger in the Accounting Setup Manager. Upon setup, when a journal in the primary ledger is manually reversed, the corresponding journal in the secondary ledger is automatically reversed.
-
The effective date of the reversed journal in the primary ledger determines the period for the reversed journal in the secondary ledger.
-
The reversal method for the journal reversal in the secondary ledger should be taken from the journal reversal criteria set attached to the secondary ledger. If the journal reversal criteria set is not attached to the secondary ledger, then the reversal method should be taken from the primary ledger.
To set up automated reversal for journals in a secondary ledger:
Enable the Synchronize Reversals between Primary and Secondary Ledger(s) check box in the Ledger Options of Accounting Setup Manager.
Note: If you select the Synchronize Reversals between Primary and Secondary Ledger(s) option in the Accounting Setup Manager, then a manual reversal in the primary ledger creates a reversal of the corresponding journal in the secondary ledger. However, if journals coming from the subledgers are reversed in the primary ledger, then the corresponding journals will not be reversed in the secondary ledger, even if you select the Synchronize Reversals between Primary and Secondary Ledger(s) option.
Overview of Journal Reconciliation
General Ledger Entry Reconciliation lets you reconcile transactions in General Ledger accounts that should balance to zero, such as a VAT control account. You can enable reconciliation either for natural account segment values or for complete accounting code combinations. Journal reconciliation is available for journals of the balance type of Actual, and journal type of Standard.
With General Ledger Entry Reconciliation, you can selectively cross-reference transactions in General Ledger with each other by entering reconciliation reference information at journal line level. When the balance for a group of transactions is zero, you can mark the transactions as reconciled.
You can perform account reconciliation either automatically with the General Ledger Automatic Reconciliation report, or manually in the Reconciliation Lines window.
-
Use automatic reconciliation to reconcile journal lines that have matching balancing segments, account segments, and reconciliation references, or optionally where the reconciliation reference is blank.
-
Use manual reconciliation to reconcile journal lines with different code combinations (including different balancing segments or account segments) or different reconciliation references.
For both automatic and manual reconciliation, the balance for the journal lines that you want to reconcile must be zero. Reconciliations can be performed between transactions entered in the same or different currencies.
The Reconciliation Lines window also lets you reverse a reconciliation to disassociate transactions that you previously reconciled with each other. You can reverse both automatic and manual reconciliations.
Entering Reconciliation References
You can enter a reconciliation reference for a journal line with an account that has reconciliation enabled. Use the Reconciliation Reference column in the Journals window to enter reconciliation references. Enter the same reconciliation reference for all the transactions that you want to group together in one reconciliation.
Alternatively, use the Reconciliation Reference at the journal header level under the Other Information tab in the Journals window to apply the same reference to all journal lines that include a reconciliation account.
You can also import reconciliation references from Subledger Accounting.
Oracle General Ledger uses the reconciliation references to determine which transactions to reconcile with each other when you perform automatic reconciliation with the General Ledger Automatic Reconciliation report. For more information, see Automatic Reconciliation Report.
You can also use the reconciliation references to help you decide which transactions to reconcile with each other when you perform manual reconciliation in the Reconciliation Lines window. For more information, see Performing Manual Account Reconciliation.
To enter reconciliation references for journal lines at journal line level:
-
Navigate to the Enter Journals window.
-
Query an existing, unposted journal and press the Review Journals button, or press the New Journals button to open a new journal. The Journals window appears.
-
Query or enter the journal lines that you want.
-
Navigate to the Reconciliation Reference field for the first journal line.
-
Enter a reference in the Reconciliation Reference field.
-
Repeat steps 4 through 5 for each journal line that you want.
-
Save your work.
To enter reconciliation references for journal lines at journal header level:
-
Navigate to the Enter Journals window.
-
Select the New Journals button to open a new journal. The Journals window appears. Complete the header information for your journal.
-
Select the Other Information tab in the Journals window.
-
Enter the value in the Reconciliation Reference field that you wish to assign to all lines in the JE that are for reconciliation accounts.
-
Enter a reference in the Reconciliation Reference field. This reference will be assigned to all lines in the journal that use a reconciliation account.
Note: The header level reconciliation reference must already be provided before the reconciliation journal line is created for the reference value to apply to the line. Changing this header level reconciliation reference will not automatically update existing reconciliation JE lines, but will apply to new journal lines added after the change. You can manually update the reconciliation reference of the individual journal lines anytime before the journal is posted.
Performing Automatic Account Reconciliation
Perform automatic account reconciliation when you want to reconcile transactions that have matching balancing segments, account segments, and reconciliation references, or optionally where the reconciliation reference is blank. You also have the option to run the process in a preliminary mode to preview the reconciliation matching, or have the automatic reconciliation matching completed and the reconciliation ID assigned.
Important: Ensure that the account balances are zero before running the automatic reconciliation program.
Submit the request by selecting the program named Reconciliation - Automatic Reconciliation. Selections can be made for the following parameters:
Ledger- Name of the ledger for which you wish to perform automatic reconciliation.
Currency- Select a specific entered currency or All Currencies. All Currencies does not include STAT.
Reconciliation Rule- Choose from the following options:
-
By Account and Reference- to match reconciliation transactions that share the same account code combination and reconciliation reference
-
By Balancing Segment and Reference- to match reconciliation transactions that share the same balancing segment value and reconciliation reference
-
By Balancing Segment, Natural Account and Blank Reference- to match transactions that share the same balancing segment value, natural account and have no reconciliation reference
-
By Balancing Segment, Natural Account and Reference- to match transactions that share the same balancing segment value, natural account and have no reconciliation reference
Perform Reconciliation- Choose from the following options:
-
Yes- to complete the reconciliation matching
-
No- to get a preview of the reconciliation matching
Period From- Earliest accounting period for transactions to be included in the reconciliation
Period To- Latest accounting period for transactions to be included in the reconciliation
Start Date- Earliest accounting date for transactions to be included in the reconciliation
End Date- Latest accounting date for transactions to be included in the reconciliation
Flexfield From/Low- First accounting flexfield in the accounting flexfield range for transactions to be included in the reconciliation
Flexfield To/High- Last accounting flexfield in the accounting flexfield range for transactions to be included in the reconciliation
Performing Manual Account Reconciliation
Perform manual account reconciliation when you want to reconcile transactions with different balancing segments, account segments, or reconciliation references. Use the Reconciliation Lines window to perform manual account reconciliation.
In the Reconciliation Lines window, you can query the transactions that are available for reconciliation and select the transactions that you want to reconcile with each other. If the sum total of the selected transactions is equal to zero when you save the reconciliation, then General Ledger marks the journal lines as reconciled.
You can reconcile transactions by the entered debit or credit amounts.
General Ledger assigns a unique ID to each reconciliation that you perform. You can use the reconciliation ID to query the reconciliation in the Reverse Reconciled Lines window, or to identify the reconciliation on the Reconciled Transactions report.
To perform a manual reconciliation:
Choose from the following selection criteria to retrieve the unreconciled records in the Reconcile Journal Lines window:
-
Accounting Period - an accounting period or accounting period range
-
Date - a date or date range
-
Journal Category - a journal category
-
Reference - a journal reference
-
Sequence Name - a document sequence name
-
Sequence Number - a document sequence number or document sequence number range
Note: If you do not specify any accounts, General Ledger displays all accounts that have reconciliation enabled. It is recommended that you provide an account filter to narrow your search to improve the query performance.
Select the Find button. The Reconciliation Lines window displays the transactions that meet your selection criteria, including the journal, account, currency, debit or credit amount, and reconciliation reference for each transaction.
Use folder tools to display additional information for the current transaction.
Select the transactions that you want to reconcile by checking the Reconcile check box for each transaction. In the Totals region, General Ledger displays the total debits, total credits, and total balance for the transactions you have selected.
When you have selected all the transactions that you want to include in this reconciliation, save your work.
If the sum total of the selected transactions is equal to zero, General Ledger marks the journal lines as reconciled and displays the reconciliation ID for this reconciliation.
If the sum total of the selected transactions is not equal to zero, General Ledger displays an error message and prevents these transactions from being reconciled.
Performing Manual Account Reconciliation Reversal
Perform manual account reconciliation reversal to disassociate transactions that you previously reconciled with each other. Use the Reverse Reconciliations window to perform manual account reconciliation reversal.
In the Reverse Reconciliations window, you can query transactions that you previously reconciled and select the transactions that you want to disassociate from each other. If the sum total of the selected transactions is equal to zero when you save the reconciliation reversal, then General Ledger marks the journal lines as unreconciled. These transactions then become available for reconciliation again.
To perform a manual reconciliation reversal:
Choose from the following selection criteria to retrieve the reconciled records in the Reverse Reconciliation window:
-
Reconciliation ID - the reconciliation ID assigned by General Ledger
-
Reconciliation Reference - the reconciliation reference you entered in the journal
-
Reconciliation Date - the date range when you performed the reconciliation
Select the Find button. The Reconciliation Lines window displays the transactions for the reconciliations you selected, including the journal, account, currency, debit or credit amount, reconciliation reference, and reconciliation ID for each transaction.
Use folder tools to display additional information for the current transaction.
Select the transactions for which you want to reverse reconciliation by checking the Unreconcile check box for each transaction. In the Totals region, General Ledger displays the total debits, total credits, and total balance for the transactions you have selected.
When you have selected all the transactions that you want to include in this reconciliation reversal, save your work.
If the sum total of the selected transactions is equal to zero, then General Ledger marks the journal lines as reversed.
If the sum total of the selected transactions is not equal to zero, General Ledger displays an error message and prevents the reconciliations from being reversed.
Reconciliation of Transactions with Single or Multiple Currencies
When reconciling transactions, users have the ability to match transactions that are only of a specific currency, or match transactions of different currency.
When reconciling transactions in a single currency, the amounts that are matched to determine if the reconciliation lines net to zero are based on the entered currency amounts.
When reconciling transactions in multiple currencies, the amounts that are matched to determine if the lines net to zero are based on the converted currency amounts in the ledger's functional currency.
Automatic Journal Scheduling
Automatic Journal Scheduling lets you generate Recurring Journals, AutoAllocation sets, MassAllocations, MassBudgets and Budget Formulas according to a schedule you define. For example, you can schedule the same journal and allocation sets to be generated every month as part of your month-end closing procedures.
If you have business cycles that do not coincide with monthly calendars, you can define your own schedule in General Ledger. General Ledger schedules are based on your General Ledger calendar.
You can also choose any defined schedule in the Application Object Library (AOL). AOL schedules are based on a standard monthly calendar. You can define a new AOL schedule or re-use a schedule you previously defined and saved. You can define your AOL schedule to run a request as soon as possible, at a specific time, or repeatedly at specific intervals, on a specific day and time of the week or month.
Create or define recurring journals, autoallocation sets, massallocations, budget formulas, or massbudgets, enter submission parameters, and select a schedule to automate the generation of your journals.
You then review and post your generated journals.
Prerequisites
-
Defining Financial Schedules, Oracle General Ledger Implementation Guide.
To use Automatic Journal Scheduling:
-
Navigate to any one of the following definition windows:
AutoAllocation Workbench
Define Recurring Journal Formula
Define MassAllocation
Define Budget Formula
Define MassBudgets
-
Create a new entry or query a definition you previously defined.
Note: If using Definition Access Sets to secure your General Ledger definitions, you must have Use and View privileges to the definition to use Automatic Journal Scheduling.
-
Choose the submit or generate button. For AutoAllocation Sets, choose the Schedule button. For Budget Formulas, choose the Calculate button.
A Decision window displays.
-
Choose the Schedule button.
The Oracle Applications standard submission Parameter window appears.
-
Complete the window according to your specific requirements.
Name: enter the name of your definition.
Ledger: enter the name of your ledger. This field is not required for Budget Formulas or MassBudgets.
Balancing Segment Value: enter the balancing segment value. This field is not required for Budget Formulas or MassBudgets.
Period: enter the period you wish to first submit your definition.
Budget: Applies only to Budget Formulas and MassBudgets.
Note: If you are using a ledger with average balance processing enabled, the following fields are displayed:
Journal Effective Date: This must be a business day if the profile option, Journals: Allow Non-Business Day Transactions is set to No.
Calculation Effective Date: The calculation effective date used by Recurring Journals and Allocation formulas. This must be a business day if you plan to increment your submissions.
Usage: Select Standard or Average.
Note: If you are scheduling an autoallocation set from a Projects responsibility, the following fields are displayed:
GL Period:
PA Period:
Expenditure Item Date:
See: Submitting an AutoAllocation Set, Oracle Project Costing User Guide for more information.
You can choose the Submit button to submit your request immediately.
-
Choose the Schedule button on the Parameter window.
The Submit Request window appears.
-
Choose the Schedule button to open the Schedule window.
-
Choose the Apply a Saved Schedule button and select one of the following:
-
A General Ledger or AOL defined schedule
-
A new AOL schedule
See: Defining Financial Schedules, Oracle General Ledger Implementation Guide
See: Defining a Submission Schedule, Oracle Applications User's Guide
-
-
(Optional) You can choose to automatically increment the General Ledger period and date parameters for resubmissions. To enable, check the Increment Date Parameters Each Run check box. See: Incrementing Submissions.
-
Choose OK to confirm your selections in the Schedule window then choose Submit to submit your scheduled request.
Related Topics
Defining Financial Schedules, Oracle General Ledger Implementation Guide
Defining a Submission Schedule, Oracle Applications User's Guide
Incrementing Submissions
You can choose to increment your scheduled submissions. General Ledger increments the period and date parameters for subsequent submissions based on the definitions below.
Prerequisites
-
Your ledger calendar must include all the schedule start dates for the schedule you are using.
-
You must enter a non-adjusting period when you first submit your scheduled request.
-
You must enter a business day for both journal and calculation effective dates when you submit a request in an Average Daily Balance, Non-Consolidation ledger .
Note: If you are incrementing submissions, the ledger Accounting Calendar and Period Type should match the GL Schedule Calendar and Period Type.
Incrementing the Journal Period for Non Average Daily Balance Ledgers
General Ledger calculates the journal period for subsequent scheduled submissions based on the initial period offset for Non-ADB ledgers. General Ledger assigns the date closest to the start date as the journal effective date.
The initial period offset is the number of non-adjusting periods between the journal period and the initial run period.
Suppose you want to establish a monthly schedule to book month end rent allocation entries for calendar year 1999. You schedule General Ledger to run a rent allocation on the 1st of every month from January 1999 to December 1999. You submit your rent allocation on the start date of February 1, 1999 and enter January 1999 as the Journal Period. The period offset is calculated to be -1.
When the rent allocation set is automatically resubmitted on March 1, 1999, General Ledger sets the Journal Period to February 1999. Each subsequent submission has a journal date of the prior month.
Incrementing the Journal Period for Average Daily Balance Non-Consolidation Ledgers
General Ledger calculates the journal effective date based on the initial business date offset for ADB Non-Consolidation Ledgers. The journal effective date determines the journal period. The initial business date offset is the number of business days between the schedule start date and the journal effective date at the time of your program submission.
For example, you schedule a recurring journal to run every business day, effective the prior business day. You submit your first request on Monday and specify the previous Friday as the effective date. The initial business date offset is -1.
When recurring journals is automatically submitted on Tuesday, journals are generated with a journal effective date of Monday.
The calculation effective date is determined in a similar manner. General Ledger determines an offset based on the number of business days between the journal effective date and the calculation effective date. The offset is then used to determine the calculation effective date in subsequent submissions.
Incrementing the Journal Period for Average Daily Balance Consolidation Ledgers
General Ledger always assigns the first day of the period as the journal and calculation effective date for ADB Consolidation Ledgers.
Suppose you want to schedule month end closing entries for the 1999 calendar year. For example, you choose to submit a recurring journal on the 1st of every month from January 1, 1999 to December 31, 1999. You submit your recurring journal on February 1, 1999 and enter January 15, 1999 as the journal effective date, and January 20, 1999 as the calculation effective date.
When General Ledger automatically submits your scheduled recurring journal on March 1, 1999, the journal period is set to February 1999 and the calculation and journal effective dates are set to February 1, 1999.
Reviewing Your Submission Results
Navigate to the View Requests window to view the results of your scheduled submission.
Your initial scheduled submission has two results. The submission is complete with a status of normal. General Ledger schedules the next submission automatically. This has a phase of pending with a status of scheduled.
Note: If your initial scheduled submission fails, the scheduled journal submission will complete with an error status. General Ledger does not schedule and generate the next submission in the event of an error.
Related Topics
Posting Journal Batches Automatically
Defining Financial Schedules, Oracle General Ledger Implementation Guide
Defining a Submission Schedule
Year-End Closing Journals
Many organizations follow specific procedures to generate special journal entries to close and open fiscal years. These closing entries apply to both the income statement and balance sheet. Auditable closing procedures vary considerably, depending on country reporting requirements, generally accepted accounting practices in a country, and organization business needs.
General Ledger is equipped to create actual closing journals for year-end and other closing periods. If your organization has multiple legal entities, you can create closing journals for multiple ledgers simultaneously with ledger sets. You also have added security through data access sets because you can only run the closing journals programs against ledgers you have full read and write access to through your data access set. To process year-end closing journals, we recommend you:
-
Set up the last day of your fiscal year as an adjusting period.
-
Set up the first day of your new fiscal year as an adjusting period.
-
Ensure the period you are closing is an Open period.
-
Complete your routine accounting before the last day of the year.
-
Post your adjustments and closing entries in the adjusting period.
-
Define your ledger set if you plan to submit the closing journals programs for multiple ledgers simultaneously.
In the last adjusting period of the fiscal year you want to close:
-
Run the Create Income Statement Closing Journals process to transfer income statement year-end account balances of your revenue and expense accounts to the retained earnings account.
-
Run the Create Balance Sheet Closing Journals process to close and zero out the year-to-date balances of all balance sheet accounts: assets, liabilities, and owner's equity.
In the first adjusting period of your new fiscal year:
-
Run the Open Period program to open the first period of the new year.
-
Reverse and post the balance sheet closing journals to reopen those balances.
Note: You are closing actual journals. You cannot close budget or encumbrance balances.
Data Access Sets
The Data Access Set assigned to your responsibility controls whether or not you can run the closing journals programs against a ledger.
-
Full Ledger Access: You must have Read and Write access to the ledger and all of its balancing segment values or management segment values in order to run the closing journals programs for a ledger.
To obtain full ledger access, your data access set must be one of the following types:
-
The Full Ledger data access set type that provides read and write access to the ledger.
-
The Balancing Segment Value data access set type that provides read and write access to all balancing segment values for a ledger using the All Values checkbox.
-
The Management Segment Value data access set type that provides read and write access to all management segment values for a ledger using the All Values checkbox.
-
-
Partial Access:If you have Read Only access to a ledger or read and write access to some of its balancing segment values and management segment values, you will not be able to run the closing journals programs against a ledger.
If you use reporting currencies (journal or subledger level), be sure to include the proper access to your reporting currencies in your data access set to be able to run the closing journals programs.
Related Topics
Income Statement Closing Journals
General Ledger provides two options for the Income Statement Closing Journals. You can choose to zero out each income statement account, and post the balance to the retained earnings account. Alternatively, you can post the reciprocal of the net income balance to an income statement offset account instead of zeroing out each revenue and expense account.
-
The Income Statement Closing Journals program generates journals to close out the year–to–date (YTD) actual balances of a range of revenue and expense accounts. This program can be submitted for any open period for a single ledger, or ledgers in a ledger set, so long as you have read and write access the entire ledger through your data access set.
The Income Statement Closing Journals program can accept two account templates as parameters for the closing journal.
-
The Retained Earnings account template
-
The Income Statement Offset account template
The Retained Earnings account template is a required parameter. The Income Offset account template is an optional parameter.
Option 1: Income Statement Close
When you run the process, Create Income Statement Closing Journals, and you enter an account for the field, Closing Account in the Parameters window, entries are posted against each revenue and expense account in the account range processed. It is the reciprocal of the account's YTD balance and zeroes out each account. The amount posted to the retained earnings account is effectively the net sum of the revenue and expense accounts' YTD balances.
If there are income statement balances in both the ledger currency and entered currencies of a ledger, the closing process produces a journal batch that contains separate journals for each currency processed. For the ledger currency, the journal will only have entered amounts as converted amounts do not apply. For entered currencies, the journal will have both entered and converted amounts.
Stat account balances are not processed by the program.
Option 2: Income Statement Offset
When you run the process, Create Income Statement Closing Journals, and you enter an account for the fields, Closing Account and Income Offset Account in the Parameters window, the journal generated will be similar to that described above except for the following:
The revenue and expense accounts included in the specified account range will not be zeroed out. Instead, the program will take the net sum of the revenue and expense accounts. This sum includes the balance in the income statement offset account. It will then post the reciprocal of the net sum to the income offset account, in the appropriate debit (DR) or credit (CR) column.
The amount posted to the retained earnings account will be the reciprocal of the amount posted to the income offset account. This retained earnings amount will then also be equal to the net sum of the revenue and expense accounts processed.
Examples
The examples that follow show the two types of journals that are generated by the Income Statement Closing Journals program. Scenario A shows the resulting Income Statement Closing Journals if only the retained earnings template is specified. Scenario B shows the resulting Income Statement Closing Journals if both the retained earnings and optional income statement offset templates are supplied.
For these examples, assume the following transactions, shown in the tables below, are posted for the period to a ledger whose ledger currency is GBP.
Transaction 1
Currency: GBP
| Account | Entered DR | Entered CR |
|---|---|---|
| Cash | 6,000 | |
| Revenue | 6,000 | |
| COGS | 2,000 | |
| Inventory | 2,000 |
Transaction 2
Currency: CAD, Rate Type: Spot, Exchange Rate: .125
| Account | Entered DR | Entered CR | Converted DR | Converted CR |
|---|---|---|---|---|
| Cash | 10,000 | 1,250 | ||
| Revenue | 10,000 | 1,250 | ||
| COGS | 3,000 | 375 | ||
| Inventory | 3,000 | 375 |
Transaction 3
Currency: CAD, Rate Type: Spot, Exchange Rate: .1
| Account | Entered DR | Entered CR | Converted DR | Converted CR |
|---|---|---|---|---|
| Cash | 4,000 | 400 | ||
| Revenue | 4,000 | 400 | ||
| COGS | 1,000 | 100 | ||
| Inventory | 1,000 | 100 |
Balance Summary
| Account | Entered GBP | Entered CAD | Total GBP |
|---|---|---|---|
| Cash | 6,000 DR | 14,000 DR | 7,650 DR |
| Revenue | 6,000 CR | 14,000 CR | 7,650 CR |
| COGS | 2,000 DR | 4,000 DR | 2,475 DR |
| Inventory | 2,000 CR | 4,000 DR | 2,475 CR |
Scenario A - Income Statement Mode
If only the retained earnings account is specified, the following income statement closing journal batch will be generated. The Income Statement Close Journal Batch will have two journals, shown in the tables below:
Scenario A, Journal 1
Source: Closing Journals, Category: Income Statement Close, Currency: GBP
| Account | Entered DR | Entered CR |
|---|---|---|
| Revenue | 6,000 | |
| COGS | 2,000 | |
| Retained Earnings | 4,000 |
Scenario A, Journal 2
Source: Closing Journals, Category: Income Statement Close, Currency: CAD, Rate Type: User, Exchange Rate: 1
| Account | Entered DR | Entered CR | Converted DR | Converted CR |
|---|---|---|---|---|
| Revenue | 14,000 | 1,650 | ||
| COGS | 4,000 | 475 | ||
| Retained Earnings | 10,000 | 1,175 |
Scenario B - Income Offset
If the income offset and retained earnings accounts are both specified, the following income statement closing journal batch will be generated.
The Income Statement Close Journal Batch will have two journals, shown in the tables below:
Scenario B, Journal 1
Source: Closing Journals, Category: Income Offset, Currency: GBP
| Account | Entered DR | Entered CR |
|---|---|---|
| Income Offset | 4,000 | |
| Retained Earnings | 4,000 |
Scenario B, Journal 2
Source: Closing Journals, Category: Income Offset, Currency: CAD, Rate Type: User, Exchange Rate: 1
| Account | Entered DR | Entered CR | Converted DR | Converted CR |
|---|---|---|---|---|
| Income Offset | 10,000 | 1,175 | ||
| Retained Earnings | 10,000 | 1,175 |
Running the Create Income Statement Closing Journals Program
Before running the process, Create Income Statement Closing Journals, review the following activities for the ledgers you plan to close. If you use reporting currencies (journal and subledger level), review the following activities for the reporting currencies you plan to close.
-
Post all revenue and expense adjustment entries to the appropriate periods.
-
Print General Ledger accounting and analysis reports.
-
Ensure the period you are closing is an Open period.
-
If you have accounts you want to process that have any of the following attributes:
-
Enabled flag was disabled
-
Allow Posting flag was disabled
-
Effective date is out of range
Temporarily re-enable the account to post the generated closing journal. The Segment Value Inheritance program can help you temporarily re-enable these accounts. Use the Segment Value Inheritance program to disable these accounts once the closing journal has been posted.
-
-
Run the close process, Create Income Statement Journals in the adjusting period that represents the last day of your fiscal year or the period you want to close for your ledger or ledger set.
Note: If you want to run the close process for your primary ledger and the associated secondary ledgers simultaneously, create a ledger set that contains all of the ledgers. Then run the close program for the ledger set so that all of the ledgers are processed from a single submission
In the Parameters window, enter an account in the Closing Account field. The Category field below defaults to display Income Close.
If you are closing a period and you entered an account for the Closing Account and Income Offset Account fields in the Parameters window, submit your request to generate closing journals. The category field below defaults to display Income Offset.
-
Post the income statement closing journals to update year-to-date actual balances or period to date actual balances. If you chose the Income Statement Offset option, proceed to your next open period.
Note: Should you need to make adjustments for your ledger after their income statement closing journals are posted, reverse and post the original closing entries, make your adjustments, then rerun the closing process to capture the new adjustments for that ledger .
-
Run the Open Period program to open the first period of the new fiscal year. This program closes out all revenue and expense accounts to the Retained Earnings account. However, because posting of the closing journals has already zeroed out the revenue and expense accounts to the Retained Earnings account, there are no balances to transfer and no further effect on Retained Earnings.
-
If revenue and expense adjustments need to be made after opening the new fiscal year for your ledger, posting those back–dated adjustments will automatically update the beginning balances of the Retained Earnings account for all open periods in the new year. However, amounts in the closing journal will not reflect the adjustments. For accuracy, you must reverse the closing journals, post, enter your adjustments, run the Create Income Statement Closing Journals, and post for your ledger.
Income Statement Closing Journal Attributes
-
General Ledger automatically creates a separate journal batch for each ledger in a ledger set if the closing program is submitted for that ledger set.
-
The effective date of your closing journal entries is the last day of the period you specify in the parameters window, typically the adjusting period on the last day of your fiscal year.
-
The closing journals you generate are marked for reversal in the same period the journals were generated. The reversal method defaults to Change Sign. To change the default reversal method, see Changing The Default Reversal Method, below.
-
General Ledger closes the ledger currency and entered currency balances with different journal entries within a ledger's journal batch:
-
Ledger Currency: Journal entries reflect only entered amounts. Journal entries do not address entered converted or accounted amounts. General Ledger closes functional and foreign currency balances with different journal entries:
-
Foreign Currency: Journal entries reflect both entered amounts as well as the converted amounts. You journal will display a conversion Type of User and a Rate of 1.
Capturing Changes
If you experience accounting changes you want to capture after you have run the Create Income Statement Closing Journals program for a particular ledger, consider the following options:
-
Option 1, Retained Earnings Account Template: If you are only using the Retained Earnings Account Template, reverse all the journals created by the last run of the Create Income Statement Closing Journals program, then run the program again to capture your changes.
-
Option 2, Income Statement Offset Account template: If you are using the Retained Earnings Account Template and the Income Statement Offset Account Template, run the Create Income Statement Closing Journals program to capture the accounting changes made since the last run of the program. Note the following conditions:
-
The account range you specify can be a different range but it must include the original account range you submitted before accounting changes were realized.
-
The account range you specify must include the income offset account.
-
Changing the Default Reversal Method
Choose the reversal method you want to use for your journal category before you run the Create Income Statement Closing Journals process.
If you are using a journal reversal criteria set, choose the reversal method in the Journal Criteria Set window. If you are using the default reversal method for your category, you can change the reversal method by creating a journal reversal criteria set with the reversal method you want and assign it to your ledger.
OR
After you run the Create Income Statement Closing Journals process, navigate to the Journal Entry window, query your generated journals and change the reversal method.
Additional Information:
Journal and Subledger Transaction Level Reporting Currencies: You need to run the Create Income Statement Closing Journals program separately for the ledger and for each of the reporting currencies (journal or subledger level). However, you can run the program simultaneously for a ledger and its associated reporting currencies (journal or subledger level) by grouping them together in a ledger set and running the program for the ledger set. This results in a journal batch for each ledger and for each reporting currency (journal or subledger level) and entered currency. You need to post your generated closing journals separately as well.
Average Balance Ledgers: The Create Income Statement Closing Journals program creates journal entries for standard account balances for ledgers with average balancing enabled. Companies using average balance processing should create an accounting calendar with two adjusting periods at the end of the fiscal year you want to close. The first adjusting period, representing the last day of the fiscal year, is used to generate the Closing Journals program. The second adjusting period, also representing the last day of the fiscal year, is used to reverse the closing journal. This ensures that average balance calculation is unaffected.
-
Non-Consolidating Ledger: The effective date of the closing journal entries is the last day of the specified period unless you assign effective date rules for the journal source called Closing Journals in the Journal sources window. See: Journal Sources, Oracle General Ledger Implementation Guide. When the closing journals are posted, the standard and average balances are both updated.
-
If the closing account is specified as an income statement account, the revenue and expense account balances are transferred to this closing account. There is no effect on average balances.
-
If the closing account is specified as a balance sheet account, and the defined period is the last period of the fiscal year, the average balance of the closing account is updated. The average balance of the Net Income account and the net average of all income statement accounts is also updated.
-
Consolidating Ledger: The Create Income Statement Closing Journals will only create closing journals for standard account balances, not average account balances.
To create income statement closing journals:
-
Navigate to the Submit Request window.
-
Choose to Submit a single request.
The Submit Request Window appears.
-
In the Request Name field, select Close Process: Create Income Statement Closing Journals program.
-
Complete the following parameters:
Ledger/Ledger Set: Enter a ledger or ledger set. If your data access set has a default ledger and you have full access to the default ledger, this ledger is defaulted. You can only select from ledgers or ledger sets where you have read and write access to the entire ledger through the responsibility's data access set.
If you use reporting currencies (journal or subledger level), you can enter a reporting currency in the Ledger/Ledger Set field.
Period: General Ledger defaults with the latest open period when a ledger is specified. You can only select from periods that are open for your ledger or ledger set. Typically, you specify an adjustment period that represents the last day of your fiscal year.
Account From: Enter the starting account range.
Account To Range: Enter the ending account range.
The range can span multiple balancing segments and include your entire chart of accounts listing. General Ledger only extracts balances of revenue and expense accounts within the range you specify.
Closing Account: Specify a closing account, typically the retained earnings account on the balance sheet. If you are closing multiple balancing segments, General Ledger creates separate closing accounts for each balancing segment.
Note: If the balance sheet closing account is within the range you specified, General Ledger ignores this account when extracting balances.
Income Offset Account (optional): Enter an income statement account for your offset account.
Category: Two default categories can be displayed:
Income Statement Close: If you entered a closing account for the field, Closing Account only.
Income Offset: If you entered a closing account for the field Closing Account and an offset account for the field Income Offset Account.
You can change the default category setting displayed.
-
Choose OK to close the Parameters window.
-
Submit the program.
The process generates journal entries that you can view in the Enter Journals and Post Journals windows. The journal source, Closing Journals, and the journal category, Income Statement Offset, are assigned to this closing journal. You can specify different names in the Journal Sources and Journal Categories windows.
When the program is submitted for a single ledger, a single request is submitted and a single journal batch is created.
When the program is submitted for a ledger set, a parent request is submitted and a child request is submitted for every ledger in the ledger set. A journal batch is created for every ledger and entered currency. You may review the Ledger Set Submission Report of the parent request to see what ledgers or reporting currencies (journal or subledger level) were submitted or not submitted.
If you use reporting currencies (journal or subledger level), and you submit the program for a reporting currency or a ledger set that includes reporting currencies, a separate request is submitted for every reporting currency and a journal batch is created for every reporting currency.
-
Post your generated closing journals to update balances before closing the period.
New Fiscal Year Income Statement Account Balances
If you do not need to close your balance sheet, you can close the current period and open the new fiscal year.
To populate new fiscal year income statement account balances:
-
Navigate to the Open and Close Period window.
General Ledger displays the Latest Open accounting period.
-
Change the Latest Open accounting period if necessary.
-
Choose the Open Next Period button to open the new year. Or you can alternatively run the Open Period program from the Submit Request window to open periods.
The Open Period program automatically transfers the Y-T-D income statement balances to Retained Earnings.
Related Topics
Opening and Closing Accounting Periods, Oracle General Ledger Implementation Guide
Balance Sheet Closing Journals
When you run Create Balance Sheet Closing Journals, journal entries are created to reverse debits and credits of ending year-to-date actual balances for the period you want to close. The balance, which is the net of the reversed asset and liability accounts, is transferred to the closing account you specify.
Note: Your balance sheet should be balanced if you completed the Close Process: Create Income Statement Closing Journals to update the retained earnings account. If the range of balance sheet accounts is balanced, then there is no transfer of balances.
Before running this program, review the following activities for the ledgers you plan to close.
If you use reporting currencies (journal or subledger level), review the following activities for the reporting currencies you plan to close.
-
Create an accounting calendar that includes two adjusting periods: one for the last day of the fiscal year you are closing, and one for the first day of the new fiscal year. This does not affect account balances in periods used for reporting.
-
Post any adjustment entries to the appropriate periods.
-
Print General Ledger accounting and analysis reports.
-
Ensure the period you are closing is an Open period.
-
Run the close process, Create Balance Sheet Closing Journals in the last adjusting period of the fiscal year you want to close for your ledger or ledger set.
Note: If you want to run the close process for your primary ledger and the associated secondary ledgers simultaneously, create a ledger set that contains all of the ledgers . Then run the close process for the ledger set so that they can all be processed from a single submission.
-
Post the balance sheet closing journals to zero-out balance sheet account balances.
Note: Should you need to make adjustments for your ledger after their balance sheet closing journals are posted, reverse and post the original closing entries, make your adjustments, then rerun the closing process to capture the new adjustments for that ledger .
-
In the first adjusting period of the new fiscal year, reverse the balance sheet closing journals to repopulate the balance sheet accounts.
-
Post the generated reversing journals.
Balance Sheet Closing Journal Attributes
The journal entry that closes the balance sheet has the following attributes:
-
Only actual balance types are closed out. Budget or encumbrance balances are ignored.
-
The effective date of your closing entries is the last day of the period you select in the Parameters window, typically an adjusting period representing the last day of the fiscal year.
-
General Ledger automatically creates a separate journal batch for each ledger in a ledger set if the closing program is submitted for that ledger set.
-
General Ledger automatically creates a separate closing account for each balancing segment if you specify an account range that includes multiple balancing segments.
-
Closing journals are marked for reversal in the period following the period the closing journals were generated. To change the reversal method default, see Changing The Default Reversal Method, below.
-
General Ledger closes the ledger currency balances only. Foreign currency balances are ignored.
Changing the Default Reversal Method
To change the default reversal method:
Choose the reversal method you want to use in the Journal Reversal Criteria window before you run the Create Balance Sheet Closing Journals process.
OR
After you run the Create Balance Sheet Closing Journals process, navigate to the Journal Entry window, query your generated journals and change the reversal method.
Additional Information:
Journal and Subledger Transaction Level Reporting Currencies: You need to run the Create Balance Sheet Closing Journals program separately for the ledger, and for each of the reporting currencies (journal or subledger level). However, you can run the program simultaneously for a ledger and its associated reporting currencies (journal or subledger level) by grouping them together in a ledger set and running the program for the ledger set. This results in a journal batch for each ledger and for each reporting currency (journal or subledger level ) and entered currency. You need to post your generated closing journals separately as well.
Average Balance Ledgers: The Create Balance Sheet Closing Journals program creates journal entries for standard account balances for ledgers with average balancing enabled. Companies using average balance processing should create an accounting calendar with two adjusting periods at the end of the fiscal year you want to close. The first adjusting period, representing the last day of the fiscal year, is used to generate the Closing Journals program. The second adjusting period, also representing the last day of the fiscal year, is used to reverse the closing journal. This ensures that average balance calculation is unaffected.
To create balance sheet closing journals:
-
Navigate to the Submit Request window.
-
Choose to Submit a Single Request.
The Submit Request window appears.
-
In the Request Name field, select Close Process: Create Balance Sheet Closing Journals program.
-
Complete the following parameters:
Ledger/ Ledger Set: Enter a ledger or ledger set. If your data access set has a default ledger and you have full access to the default ledger, this ledger is defaulted. You can only select from ledgers or ledger sets where you have read and write access to the entire ledger through the responsibility’s data access set.
If you use reporting currencies (journal or subledger level), you can enter a reporting currency in the Ledger/Ledger Set field.
Period: General Ledger defaults with the latest open period when a ledger is specified. You can only select from periods that are open for your ledger or ledger set. Typically, you specify an adjustment period that represents the last day of your fiscal year.
Account From: Enter the starting account range.
Account To Range: Enter the ending account range. The range can span multiple balancing segments and include your entire chart of accounts listing. General Ledger only extracts balance sheet account balances within the range you specify.
Closing Account: You must specify a balance sheet closing account. If you are closing multiple balancing segments, General Ledger creates a separate closing account for each balancing segment.
Category: Balance Sheet Close appears automatically in this field.
Note: If the balance sheet closing account is within the range you specified, General Ledger ignores this account when extracting balances.
-
Choose OK to close the Parameters window.
-
Submit the program.
The process generates journal entries that you can view in the Enter Journals and Post Journals windows. The journal source, Closing Journals, and the journal category, Balance Sheet Close, are assigned to this closing journal. You can specify different names in the Journal Sources and Journal Categories windows.
When the program is submitted for a single ledger, a single request is submitted and a single journal batch is created.
When the program is submitted for a ledger set, a parent request is submitted and a child request is submitted for every ledger in the ledger set. A journal batch is created for every ledger and entered currency. You may review the Ledger Set Submission report of the parent request to see what ledgers or reporting currencies (journal or subledger-level) were submitted or not submitted.
If you use reporting currencies (journal or subledger level), and you submit the program for a reporting currency or a ledger set that includes reporting currencies, a separate request is submitted for every reporting currency and a journal batch is created for every reporting currency.
-
Post the generated closing journals to update balances before closing the period.
New Fiscal Year Balance Sheet Account Balances
If you do not need to close your balance sheet, you can close the current period and open the new fiscal year.
To populate new fiscal year balance sheet accounts:
-
Navigate to the Open and Close period window.
General Ledger displays the Latest Open accounting period.
-
Change the Latest Open accounting period if necessary to close the last period of the year.
-
Choose the Open Next Period button to open the new year or you can alternatively run the Open Period program from the Submit Request window to open periods.
The Open Period program automatically transfers the Y-T-D income statement balances to Retained Earnings.
-
Navigate to the Enter Journals window.
-
Query the Balance Sheet closing journals you generated at the end of the year.
-
Reverse the closing journals in the first period of the new fiscal year.
-
Post the generated reversing journals.
The Open Period program automatically opens beginning account balances for your balance sheet accounts.
Secondary Tracking Segment
You can use an additional segment in your chart of accounts to track more detail when General Ledger performs posting, year-end closing, translation, and revaluation activities.
To use the secondary tracking segment, identify one of your flexfield segments in your chart of accounts as the secondary tracking segment.
The balancing, intercompany, and natural account segment cannot be used as the secondary tracking segment. In the Ledger Options page in Accounting Setup Manager, enable the Track by Secondary Segment option. General Ledger tracks retained earnings, cumulative translation adjustment, and revaluation unrealized gain/loss specific to the balancing segment and secondary tracking segment value pair.
Note: Secondary tracking segment support does not apply to suspense adjustments, intercompany segment values balancing, and rounding imbalance processing. Posting balances suspense, intercompany, and rounding imbalance adjustments using the primary balancing segment value only. Secondary tracking segment support also does not apply to average balance enabled ledger.
Below is a summary of the GL processes affected for each secondary tracking segment option in the Ledger Options page.
Closing and Translation
-
Retained Earnings Update Process and the Open Period Program: Balances for all income statement account combinations for a given pair of primary balancing segment and secondary tracking segment values are closed out to a retained earnings account combination bearing the same primary balancing segment value and secondary tracking segment value at the beginning of a new fiscal year.
-
Posting: When prior period posting occurs for income statement items, posting updates the corresponding retained earnings account using both the primary balancing segment value and the secondary tracking segment value.
-
Translation: Translation for the retained earnings account is processed according to a primary balancing and secondary tracking segment value pair. The cumulative translation adjustment (CTA) account is also updated for each primary balancing and secondary tracking segment value pair.
Revaluation
-
Revaluation: Revaluation gain or loss amounts will be posted to the balancing segment value and secondary tracking segment value pair.
Note: Previously, secondary tracking segment support is enabled with two options. One option controlled closing and translation and another option controlled revaluation. The present secondary tracking option enables all these features together.
For information on revaluation for average balance-enabled ledgers, see Revaluation.
For information on upgraded ledgers, see Overview of Reporting Currencies.
The following table provides an example of how the primary balancing segment and secondary tracking segment is used to close out the profit and loss accounts to retained earnings using the Open Period process at the beginning of the fiscal year. Adjustments to the CTA account by Translation are also depicted. The example assumes:
-
Chart of Accounts Structure: Company . Cost Center . Natural Account
-
Primary Balancing Segment: Company
-
Secondary Tracking Segment: Cost Center
-
YTD Equity Translation Method
Year-End PD 12/04 P/L Balances
-
| Account | Account Name | USD Func Curr DR | USD Func Curr CR | Rate | YEN Trans DR | YEN Trans CR | Comments |
|---|---|---|---|---|---|---|---|
| 01.000.4000 | Revenue | 1,000 | 135 | 135,000 | Cum Avg Rate | ||
| 01.000.5000 | Expense | 500 | 120 | 60,000 | " | ||
| 01.100.4000 | Revenue | 300 | 140 | 42,000 | " | ||
| 01.100.5000 | Expense | 200 | 125 | 25,000 | " |
Year Beginning PD 1-05, closing of P/L to main retained earnings account: without Secondary Tracking Segment.
| 01.100.4000 | Revenue |
| Account | Account Name | USD Func Curr DR | USD Func Curr CR | Rate | YEN Trans DR | YEN Trans CR | Comments |
|---|---|---|---|---|---|---|---|
| 01.000.4000 | Revenue | ||||||
| 01.000.5000 | Expense | ||||||
| 01.100.5000 | Expense | ||||||
| 01.000.3000 | Retained Earnings | 600 | 153.33 | 92,000 | Calculated Historical Rate |
Year Beginning PD 1-05, closing of P/L to detail retained earnings account: Secondary Tracking Segment enabled.
| Account | Account Name | USD Func Curr DR | USD Func Curr CR | Rate | YEN Trans DR | YEN Trans CR | Comments |
|---|---|---|---|---|---|---|---|
| 01.000.4000 | Revenue | ||||||
| 01.000.5000 | Expense | ||||||
| 01.100.4000 | Revenue | ||||||
| 01.100.5000 | Expense | ||||||
| 01.000.3000 | Retained Earnings | 500 | 150 | 75,000 | Calculated Historical Rate | ||
| 01.100.3000 | Retained Earnings | 100 | 170 | 17,000 | Calculated Historical Rate |
To activate tracking by secondary segment:
-
Assign the Flexfield Qualifier, Secondary Segment, to a segment in your chart of accounts.
Note: Identify one flexfield segment (cannot be the balancing, intercompany, or natural account segment) from your chart of accounts as the secondary tracking segment.
-
Update the Ledger in Accounting Setup Manager and open the Ledger Options page. Enable the Track by Secondary Segment option.
Note: Secondary tracking segment support is not available for average daily balance enabled ledgers. To track revaluation using the cost center segment as the secondary tracking segment in an average balance enabled ledger, set the profile option GL Revaluation: Tracking by Cost Center to Yes.
Below are the descriptions of the related General Ledger processing behaviors when secondary tracking segment option is enabled for your ledger.
Warning: If secondary segment tracking support is enabled for your ledger and the profile option GL: Revaluation by Cost Center Tracking is set to Yes or No, the profile option may produce unexpected results and your revaluation process will end with a warning. To properly use the secondary tracking segment functionality, ensure that no value is set for this profile option at every profile option security level.
Closing and Translation
Retained Earnings/Open Period: The open period program subtotals revenue and expense accounts to update the detailed retained earnings account maintained for each primary balancing and secondary tracking segment value pair at the beginning of each fiscal year. This applies to the entered amount balance for each transacted currency, as well as its corresponding ledger currency accounted amount.
Posting: When journals are backposted to an earlier period that has an income statement impact, posting updates the detail retained earnings account affected.
The Posting process subtotals revenue and expense balances to update the retained earnings account maintained for each primary balancing and secondary tracking segment value pair. This applies to the entered amount balance for each transacted currency, as well as its corresponding ledger currency accounted amount.
Translation: Retained earnings is translated by summing the translated revenue and expense accounts by a combination of primary balancing and secondary tracking segment value pair. This amount is closed to the matching detailed retained earnings account. For the YTD equity method of translation, the system also calculates a historical rate for the detail retained earnings account.
This behavior assumes you did not define an historical amount for the retained earnings account. Otherwise, translation uses the user-defined rate or amount.
When a cumulative translation adjustment is required to balance the translation, the CTA account is tracked by a primary balancing and secondary tracking segment value pair.
We recommend that you translate each period sequentially when using the Track by Secondary Segment option for your ledger.
Note: The detailed CTA account represents a granular breakdown of the CTA by balancing segment value. Note that while the translated currency trial balance report indicates a balanced subtotal by balancing segment/secondary tracking segment pair because of the CTA account, the ledger currency trial balance report will not indicate a balanced subtotal by balancing segment/secondary tracking segment pair, since there is no such balancing account for the ledger currency balance.
Warning: Once you have enabled the Track by Secondary Segment option for your ledger, you can no longer enable the Average Balances option. However, you can use the profile option GL Revaluation: Tracking by Cost Center to enable tracking revaluation gains and losses by the cost center segment.
To enable tracking revaluation gain and losses by the cost center segment.
Warning: Once enabled for a ledger, the Track by Secondary Segment option cannot be disabled.
Note: If you wish to enable the Track by Secondary Segment option, we recommend that you enable the option when you create a new ledger. To upgrade this functionality for an existing ledger, see: Documentation on My Oracle Support.
Revaluation
Resulting gain or loss amounts are posted to the unrealized gain/loss accounts you specify, tracked by each primary balancing and secondary tracking segment value pair.
Note: The profile option, GL: Revaluation by Cost Center Tracking, must only be used where revaluation is the only aspect that requires secondary segment tracking. You will be limited to using the cost center segment as the secondary tracking segment. This applies to standard ledgers that do not have the Track by Secondary Segment option enabled, as well as average balance ledgers, which are not eligible for the Track by Secondary Segment option.
Year-End Close Checklist
Use the following checklist as a guideline to perform year-end processing in Oracle General Ledger for your ledgers.
Note: If using Encumbrances, additional steps are required. See: Year End-Encumbrance Processing.
-
Set the status of the first accounting period in the new fiscal year to Future Entry.
Note: It is advisable not to open the first period of the new fiscal year until all of the year-end processing for the last period of the current year has completed.
-
(Optional) If your business rules require you to create reversing entries at the beginning of every period, generate and post accruals from the prior period now.
-
Transfer data from all of your subledgers and feeder systems to the GL_INTERFACE table.
-
Run the Journal Import process to populate the GL_JE_BATCHES, GL_JE_HEADERS, and the GL_JE_LINES tables. This can be done automatically from the subledger systems, or manually from Oracle General Ledger.
Note: If you allow suspense posting in your ledger, you can choose a Journal Import Run Option that will post any journal import errors to a suspense account. If you do not choose this run option, Journal Import will reject any source/group ID combination that contains account errors. See: Setting the Journal Import Run Options
Note: Posting from the sub-ledger systems transfers data to the general ledger interface and journal entry tables but does not update general ledger balances. You must run the posting process from General Ledger to update the GL_BALANCES table.
-
Review the Journal Import Execution Report to check the status of all imported journal entries. See: Importing Journals.
-
Delete any error journal entry batches. Determine the source(s) for these error batches, and retrieve the run ID from the Journal Import Execution Report.
-
if you encounter a small number of errors, make the necessary corrections in the GL_INTERFACE table using the Correct Journal Import Data window. Run Journal Import.
-
If you encounter a large number of errors, delete the Journal Import data from the GL_Interface table, correct the information in the feeder or subledger system and run Journal Import. See: Importing Journals
-
-
Close the period for each subledger. This prevents future subledger transactions from being posted to General Ledger in the same period.
-
Review the imported journal entries in Oracle General Ledger. You can review them online or in reports. Reviewing journal entries before posting minimizes the number of corrections and changes that need to be made after posting.
Below is a list of useful reports:
-
Journal Batch Summary Report
-
General Journals Reports
-
Journal Entry Reports
-
Journal Line Report
-
Journal Source Report
-
Journals Document Number Report (when document sequencing is used)
-
Unposted Journals Report.
-
-
Post the imported journal entries.
-
Perform reconciliations of subsidiary ledgers by reviewing and correcting balances. The following reports are useful to help you reconcile:
-
General Ledger Report
-
Posted Journals Report
-
Other Reports
-
-
Generate all recurring journals and step-down allocations.
-
(Optional) If you did not generate and post your prior period reversals at the beginning of this period, be sure to generate reversals now.
Note: Although it is customary to post reversing entries at the beginning of a new period, many companies will leave this step as a period-end procedure.
-
Revalue balances to update foreign currency journals to your ledger currency equivalents.
-
Post all journal entries, including: manual, recurring, step-down allocations, and reversals.
Note: Be sure to generate and post the step-down allocations in the correct order.
-
Review your posting results. The following reports are helpful:
-
Posting Execution Report
-
Error Journals Report
-
-
Update any unpostable journal entries and then post them again. Common reasons for unpostable batches include:
-
Control total violations
-
Posting to unopened periods
-
Unbalanced journal entries
-
-
Run General Ledger reports, such as the Trial Balance reports, Account Analysis reports, and Journal reports. It is recommended you create standard report sets that are run at the end of every period. This will help you maintain a consistent audit trail.
-
Translate balances to any defined currency if you need to report in foreign currencies.
-
Consolidate your subsidiary ledgers if you have multiple companies.
To consolidate entities sharing the same ledger, see: Accounting Operations Using a Single Ledger.
To consolidate entities using multiple ledgers, see:The Global Consolidation System.
-
If using a calendar with an adjusting period that represent the last day of the fiscal year, close the current period and open the adjusting period. See: Opening and Closing Accounting Periods, Oracle General Ledger Implementation Guide.
-
Create and post adjusting entries and accruals in the adjusting period.
-
Run Trial Balance reports and other General Ledger Reports in the adjusting period after adjustments are made.
-
(Optional) If you are required to have an actual closing journal entry that shows the closing of your income statement accounts to retained earnings, submit the Create Income Statements Closing Journals program. This program creates an auditable closing journal entry. See: Income Statement Closing Journals.
-
(Optional) If you submitted the Create Income Statement Closing Journals program, post the closing journals to update account balances. Your income statement will reflect zero balances.
-
(Optional) If your local accounting rules require you to close your balance sheet, submit the Create Balance Sheet Closing Journals program. See: Balance Sheet Closing Journals.
-
Post the Balance Sheet Closing Journal by submitting the Create Balance Sheet Closing Journals program. Your balance sheet will now reflect zero balances.
-
Close the last period of the fiscal year using the Open and Close Periods window.
Note: If you need to track retained earnings as well as the CTA account with more detail, enable the Track by Secondary Segment option for your ledger. See: Secondary Tracking Segment.
-
Open the first period of the new fiscal year to launch a concurrent process to update account balances. Opening the first period of a new year automatically closes out your income statement and posts the difference to your retained earnings account specified for your ledger in the Accounting Setup Manager.
Note: If you have already run the Create Income Statement Closing Journals program, where the closing account specified was the retained earnings account, opening the new fiscal year has no further impact on retained earnings because the income statement accounts now have zero balances.
-
(Optional) Perform Year-End Encumbrance Procedures. See: Year-End Encumbrance Processing.
-
Run FSG reports for the last period of the year.
-
(Optional) If you closed your balance sheet at year-end, reverse the Balance Sheet Closing Journals or repopulate balances of your balance sheet accounts for the new year.
To consolidate entities sharing the same ledger:
-
Enter eliminating journal entries.
-
Post eliminating journal entries.
-
Define a reporting hierarchy that consolidates all your companies.
-
Define financial statements with the reporting hierarchy.
-
Use the automatic intercompany eliminations to generate elimination sets. If your elimination entries require complex formula calculations, use recurring journal entry formulas to generate eliminating journal entries.
-
Use the Financial Statement Generator (FSG) to produce financial reports that show consolidated totals. Enter the eliminating entries to a separate company and build reports with a separate column for consolidating entries. See: Accounting Operations Using a Single Ledger.
To consolidate entities using multiple ledgers:
-
Use the Global Consolidation System (GCS) to transfer data from subsidiaries into the consolidated parent.
-
From the parent ledger, post the consolidation journals for each subsidiary to update balances.
-
Use automatic intercompany eliminations to generate elimination sets. If your eliminating entries require complex formula calculations, use recurring journal entry formulas to generate eliminating journal entries.
-
Use the Financial Statement Generator (FSG) to create a consolidated report in the parent ledger. See: The Global Consolidation System.