Creating Contracts
This chapter details the process of creating, managing, and importing a contract.
This chapter covers the following topics:
- Overview of Oracle Service Contracts
- Elements of a Service Contract
- Managing the Service Contract Life Cycle
- Creating a Contract
- Copying Information Between Contracts
- Searching for a Contract or Template
- Creating a Template from a Contract
- Importing Service Contracts
- Merging Contracts
Overview of Oracle Service Contracts
Oracle Service Contracts provides a complete contract authoring execution solution to manage warranties, extended warranties, usage, and subscription services, as well as complex service agreements. With Oracle Service Contracts you can:
-
Sell multiple types of service
-
Define pricing and billing schedules
-
Ensure timely service entitlement checks
-
Automate renewals for recurring revenue opportunities
-
Simplify change management
-
Minimize service revenue leakage
Elements of a Service Contract
A contract in Oracle Service Contracts comprises:
Header
The header is where you enter a brief description and specify the contract duration. You can default values from the header of a contract down to the lines and, if applicable, to sublines as well.
The header level is composed of the fields at the top of the Service Contracts Authoring form as well as the Summary tab. The Summary tab also includes several secondary tabs. The following list briefly describes these pages:
-
Parties: Enter information about the customer, including the bill to and ship to information for the contract.
-
Pricing/Billing: Assign a price list and various accounting rules for pricing and billing contracts. In most cases, Oracle Service Contracts retrieves the contractual prices of services or usage from Oracle Advanced Pricing, however, pricing is done manually in some situations.
-
Renewals: Define the renewal rules that are applied during manual or automatic renewal of the contract.
-
Administration: Define administrative components that are used to process the contract, such as the QA checklist, contract groups, and workflow.
-
Security/Text: Grant contract access by the resource group or user level.
Lines
Lines list the individual service, usage, and subscription items that are included in the contract. A single contract can have multiple lines.
Each line inherits certain information from the contract header such as effectivity dates, bill to and ship to information, and billing rules and schedules. These can be changed as appropriate to allow the contract to conform to the customer requirements. A contract line may be related to one or more sublines.
Three line types are available:
-
Service lines: Cover a broad category of items that can include activities such as field service, depot repair, call center, technical support, or any other user-defined business activities.
Each service line can cover one or more items that a customer owns.
See Entering Service Lines for more information about service lines.
-
Usage lines: Charge customers for usage. For example, a photo copier company might wish to charge for the number of copies that are made within a period.
See Entering Usage Lines for more information about usage lines.
-
Subscription lines: Cover subscriptions for both tangible and intangible items. Tangible items include magazines, collateral, or any other physical item that can be shipped through Oracle Order Management. Intangible items can be collateral sent through e-mail.
See Entering Subscription Lines for more information about subscription lines.
Additional Information: Subscription lines do not have sublines.
The Lines tab includes several secondary tabs, which include:
-
Accounts
-
Effectivities
-
Pricing/Products
-
Exemption/Payment Options
-
Counters
-
Events
Note: The fields within each secondary tab are unique to the line type that you select.
For details on entering lines, refer to the specific line type topics.
Sublines
Sublines specify what the service covers or the counters where the usage is tracked. You can access this information from the Pricing/Products subtab of the Lines tab.
The following list describes how each line type uses sublines:
-
Service lines: Sublines for service lines specify what the service covers. A service line can cover a party, a customer, a site, a system, a product, or an item. See Levels of Coverage and Their Uses.
-
Usage lines: Sublines for usage lines specify the counters where the usage is tracked. See Entering a Counter.
-
Subscription lines: Subscription lines do not have sublines. See About Subscriptions.
Managing the Service Contract Life Cycle
Oracle Service Contracts enables you to manage the entire contract life cycle, including contract creation, renewal, and termination. For detailed information refer to the following procedures:
Creating a Contract
You can create a contract manually. In addition, a contract can be created automatically through Oracle Order Management or by creating a product that has a warranty in Oracle Install Base. See About Ordering Service in Oracle Order Management.
You can author service contracts in multiple operating units without changing responsibility. You must select an operating unit for each contract.
Note: This procedure covers how to create a contract by navigating from the Launchpad. You can also open the Service Contracts Authoring form from the Administrator Workbench. For more information about the Administrator Workbench, see Overview of the Administrator Workbench.
To create a contract:
-
Log in under the Service Contracts Manager or Service Contracts User responsibility.
-
Navigate to Contract Administration, and then select Launchpad.
The Oracle Contracts window appears.
-
Select New from the Tools menu.
The Create a New Contract window appears.
-
To create a contract manually:
-
Select the Create Contract Manually radio button.
-
Select an operating unit using the list of values (LOV).
Note: The Operating Unit LOV shows operating units that are available to the security profile that is specified in MO: Security Profile. If a default operating unit is specified in MO: Default Operating Unit, the application uses the default operating unit.
-
Select a category using the LOV:
-
If you are creating a contract with service agreements for individual items (covered products) in the customer's install base, then select Warranty and Extended Warranty or Service Agreement. Warranty and Extended Warranty category does not permit you to add usage lines or to sell service to other levels of coverage (a party, site, or system).
-
If you are creating a usage contract or a service agreement for levels other than items in the customer's install base (Products), then you must select Service Agreement.
-
If your contract includes subscriptions, then select Subscription Agreement. Subscription agreements permit you to enter subscriptions, service, and usage lines.
-
-
-
To create a contract using a template:
-
Select the Create Contract From Template radio button.
-
Select a template using the Template LOV. If you do not know the template name you can search for the template by description and other criteria by clicking Find. See Searching for a Contract or Template.
-
-
Click Create.
The Service Contracts Authoring window appears. The category that you selected appears in the Category field at the top of the window. The start date becomes today's date.
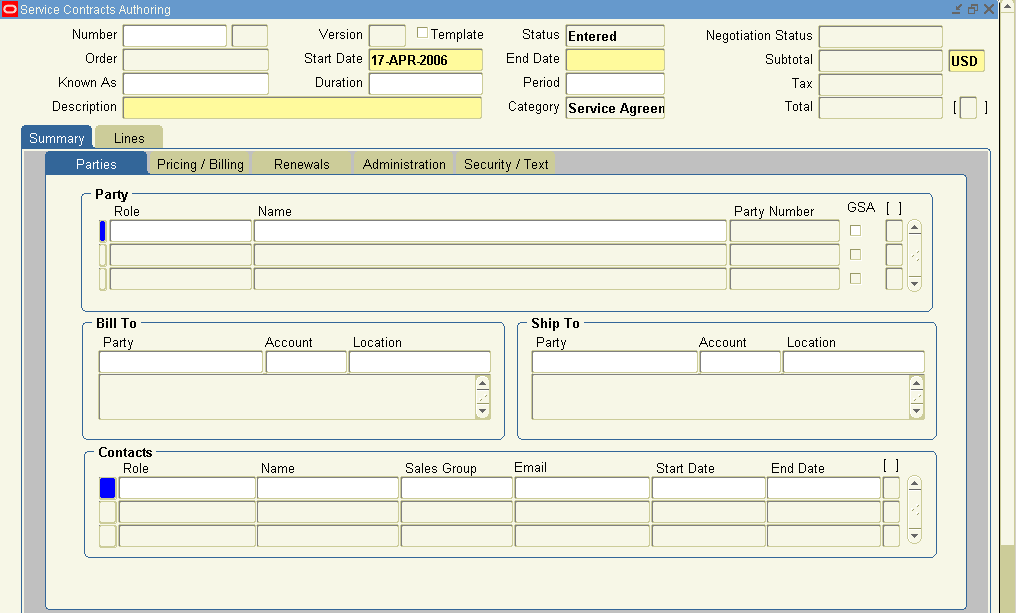
The application supplies a contract number for you automatically after you first save the contract, but you can instead enter a number of your own. The contract number can be a combination of any characters, but it must be unique.
-
Optionally, enter another short identifier in the Known As field to help you identify the contract later.
-
Specify the dates that the contract is effective by entering:
-
The start date or end date
-
Duration and period
The dates that you enter here are automatically passes to each new line in the contract. The dates that individual lines are effective cannot fall outside this range; they cannot have a start date earlier than the contract start date or an end date later than the contract end date. If you enter dates that are outside this range in a contract line, then you must extend the contract dates accordingly for your contract to pass Quality Assurance (QA).
-
-
To help you identify the contract later, enter a description in the Description field.
-
In the Party region, the operating unit entered in the Create Contract window defaults as the Vendor Operating Unit (or the Merchant Operating Unit for Subscription Agreements).
-
Save.
-
You are now ready to enter the rest of the contract information that is required for your contract to become active:
Note: To speed up entry, you can copy information from an existing contract. See Copying Information from an Existing Contract.
-
General contract information, including the vendor and customer, what quality check the contract must pass to become active, and how the contract will be renewed.
-
Contract lines according to procedures described in:
-
-
You can create different versions of the contract for your customer and at different price points and send them out for review. See Creating Different Contract Versions for Your Customer.
-
Check to see whether you have entered all the required information in the contract or whether some external reason exists why the contract cannot be implemented, by running the QA check.
-
The QA check alerts you of any issues with your contract.
Following are examples of issues that are tracked in the QA check:
-
Failure to create a billing schedule for the customer.
-
Failure to include an e-mail address for the customer contact.
-
Absence of sales credits for contract lines.
-
Customer credit on hold.
Your contract becomes active only after it passes the QA check list and obtains the approvals that are required by the Oracle Workflow process.
Note: The application uses a common workflow for new and renewed contracts. Each new contract, whether a renewal or new, initiates a workflow process. See Overview of Managing Contract Negotiation.
The standard contract approval workflow integrates with Oracle Approval Management Engine (AME). Standard AME features support rules based approval routing and definition of approval groups. Key attributes have been seeded in AME for approval setup, such as Contract ID, Operating Unit, Customer Party, Contract Category, and Contract Amount.
Your administrator can define additional attributes through AME. For more information see the Oracle Service Contracts Implementation Guide.
See About the Quality Assurance Check (QA Check) and Approving Contracts.
-
Copying Information Between Contracts
You can copy information from an existing contract into a new contract, an existing contract, or to a new modifier of the existing contract.
Note: For existing contracts, you cannot copy the components of a contract across categories. For example, you cannot copy the components from a Warranty into a Service Agreement.
You can copy from Contract Navigator as well as the results table in the Search Templates and Contracts window. In this case, you select the Source Contract and then search for a target contract to which you can copy the information.
You can also initiate copy from within the contract itself. In this case, the selected contract is the target contract and you search for a source contract from which you intend to copy components. You will typically use this method to copy service lines and covered level into the contract you have open.
To copy information from an existing contract:
-
From the Contract Navigator or Search Results region of the Search Templates and Contracts window, right-click a contract and select Copy.
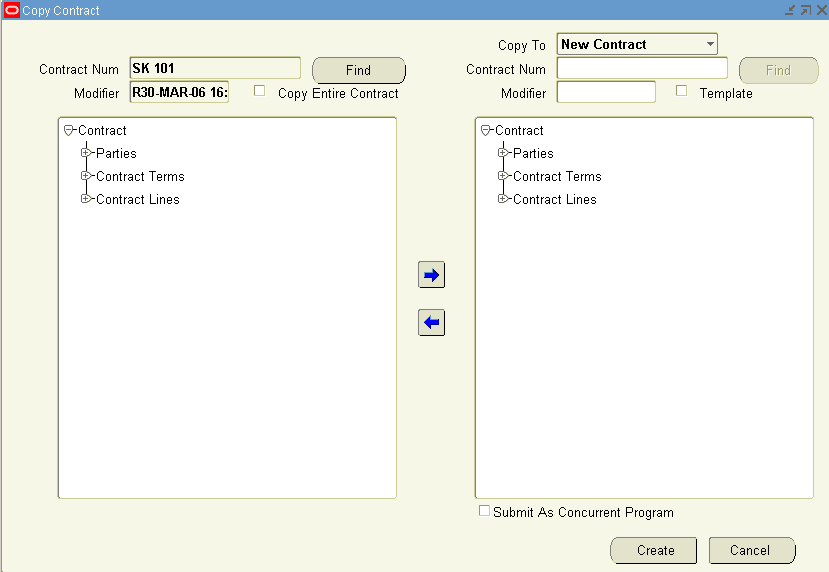
The Copy window appears and the selected contract number supplied in the upper left region.
-
Select the information that you want to copy in the left half of the window.
You can make multiple selections by holding down the Shift and Ctrl keys on your keyboard. You can expand the tree outlining the information by clicking any of the nodes.
-
Use the right arrow button to copy information from the left-side of the window to the right (the new contract).
Note: To copy the entire contract, select the Copy Entire Contract check box. After you select this check box you can no longer use the left and right panels to make selections.
-
From the Copy To field, select New Contract. The lines and sublines are renumbered after a contract is copied. For example, if a contract has line 1 and 3; line 2 is deleted; contract has sublines 1.1 through 1.5 with 1.3 deleted. When the contract is copied, in the new contract, line numbers are 1 and 2; sublines for line 1 are now 1.1 through 1.4.
Note: To copy into an existing contract select Existing Contract. To copy into a new contract that has the same contract number as the source contract but with a new modifier select New Modifier.
-
To copy into a new contract, and make that contract a template, select the Template check box.
When you create a new contract, you will see that template in the list of available template contracts.
-
If you are copying a large contract and you do not want to use too many system resources, you can select the Submit as Concurrent Program check box.
-
Click Create.
The application confirms the copy with a message.
-
From the message window, select OK to view the new contract.
Note: Your administrator can set the profile OKS: Copy Notes to control whether notes are copied. If this profile is set to yes, the notes within the existing contract are copied into the new contract.
Within the Notes window, the Entered By field indicates ANONYMOUS if the note was copied from an existing contract.
To copy information from within the contract:
-
Open a contract.
-
From the Action menu, select Copy from Contract/Template.
The Copy window appears and the contract number of the contract you are in appears in the upper right region. The Copy To field is set to Existing Contract and cannot be changed. In addition, the Copy Entire Contract check box is disabled.
-
Click Find to find a contract or template from which to copy. The Search Templates and Contracts window appears.
You must search for a contract, highlight the contract in the results region, and select OK.
-
Select the information to copy in the left panel.
You can make multiple selections by holding down the Shift and Ctrl keys on your keyboard. You can expand the tree outlining the information by clicking any of the nodes.
-
Use the right arrow button to copy information from the left-side to the right (the new contract).
-
Click Create.
The application confirms the copy with a message.
-
From the message window, select OK to view the new contract.
Effect of copying a contract on Pricing and Scheduling
The effect of copying a contract on pricing and scheduling are as follows:
-
Copying a contract will not effect the reprice action. To recalculate the price, you must click the Reprice button.
-
If the source line has a start or end date that is within the start or end dates of the target contract:
-
It retains the start or end dates for the original line
-
It retains the billing schedule for the original line
-
-
If the start date for the source line is before the start date of the target contract or the end date for the source line is after the end date of the target contract:
-
If the start and end dates of the source line lie within the effectivity of the target contract then the effectivity is retained else, the target contract effectivity is maintained.
-
If the start and end dates of the source line are retained then the billing schedule is the same as the source line. If the effectivity is changed then a single billing stream with the complete duration is created.
-
Searching for a Contract or Template
To search for a contract or template:
-
From the Navigator, navigate to Contract Administration, and then select Launchpad. The Oracle Contracts window appears.
-
From the View menu, select Find.
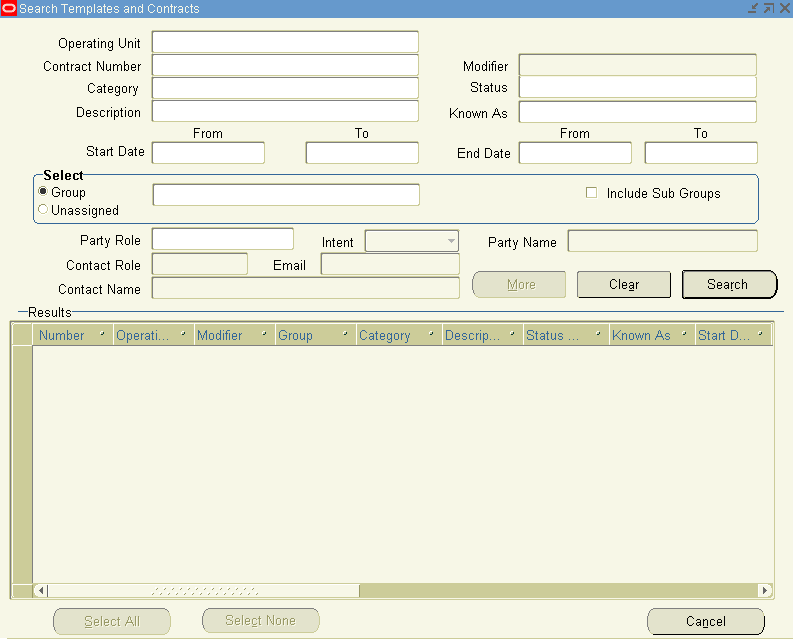
The Search Templates and Contracts window appears.
-
Enter your search criteria.
Narrow your search by:
-
Searching for contracts within a particular operating unit by choosing a value from the LOV.
-
Selecting either a contract number or template name from the Contract Number LOV.
-
-
If you have selected Service Agreement, Warranty and Extended Warranty, or Subscription Agreement for the category parameter, click the More button for additional search criteria for finding contracts.
-
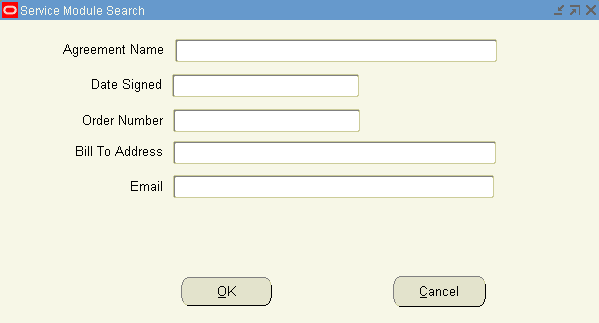
When you click the More button, the application displays the Service Module Search window. This window enables you to search on specific attributes for service contracts, such as agreement names, date signed, order number, bill to address, and e-mail.
-
Click OK to return to the Search Templates and Contracts window.
-
-
Select Search.
A list of contracts that match your search criteria appear in the Results region.
-
Select a contract, right-click and select Open.
Creating a Template from a Contract
A template makes it possible for you to speed up the contract creation process by filling in frequently used values.
Prerequisite
Display a contract.
To create a template from a contract:
-
From the Actions menu, select Save as Template.
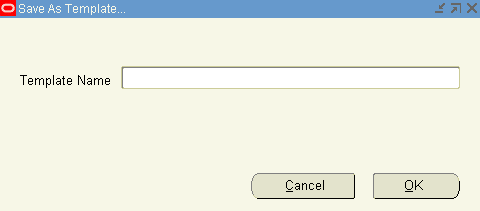
The Save As Template window appears.
-
Enter a template name.
-
Click OK.
The application responds with a note informing you that the template has been created.
Note: You can save any contract as a template.
When you create a new contract from a template, the application creates a new contract in the Entered status. The header, lines, and sublines from the template are copied into the new contract.
See Creating a Contract.
Importing Service Contracts
You can import contracts from legacy or external systems by running the Service Contracts Import concurrent program.
Service Contracts provides an open interface that allows bulk import of standard warranties, extended warranties, service contracts and intangible subscription contracts.
Using this concurrent program, you can perform the following tasks:
-
Import from multiple sources in a scalable fashion
-
Import draft, cancelled, signed, active or expired contracts
-
Import contracts as fully billed or fully unbilled
-
Import any covered level
-
Import contracts with third party role
After you successfully import contracts, you can purge the records from the interface tables by running the Service Contracts Import Purge concurrent program.
For more information on the concurrent programs, log in to the application using the Integrated SOA Gateway responsibility. Access the Integration Repository and navigate to Service Contracts in the Contracts Suite.
Merging Contracts
You can merge a source contract with a target contract to transfer assets. You can reprice the subline moved to the target contract using the OKS: Pricing Method for Contract Merge profile option. This profile has the following three values: Target, Source, and Manual.
You can only merge contracts with status as Entered and Negotiation Status as Draft, Publish QA Failed, or Publish Failed.
You can select source contract and target contract belonging to the same operating unit but, with different inventory organizations during the contract merge process. The system validates whether the items to be moved are assigned to the Inventory Organizations of the target contract's Operating Unit.
If the source contract start date is before the target contract start date then, the start date of the target contract is replaced with the start date of the source contract. For example, if the source contract start date is 10-Nov-2014 and target contract start date is 11-Nov-2014 then, the target contract start date is changed to 10-Nov-2014.
During merging of contracts the target contract's end date takes precedence. For example, if two different source contract lines have end dates as 10-Oct-2014 and 10-Dec-2014 respectively, and the target contract's end date is 10-Nov-2014, then, after merging the end date of both lines is changed to 10-Nov-2014.
To merge a contract perform the following steps:
-
From the Navigator, navigate to Contract Administration, and then select Launchpad.
The Oracle Contracts window appears.
-
From the View menu, select Find.
The Search Templates and Contracts window appears.
-
Enter search criteria and click the Search button.
-
Select a contract that will be the source contract, right-click and select Merge.
The Merge Contract window appears.
-
You can search for the target contract number.
-
Move assets from source to target contract.
-
Click the Merge button.
The status of the contract changes to Merged after all the lines are merged to one or more target contracts. The status of the contract line changes to Merged after all the sublines are merged to one or more target contracts.