Ordering Service in Oracle Order Management
This chapter describes the process of adding service agreements to a sales order, generating contracts automatically, and troubleshooting any errors.
This chapter covers the following topics:
- Overview of Ordering Service in Oracle Order Management
- Overview of Ordering Subscription in Oracle Order Management
- About Ordering Service in Oracle Order Management
- Ordering Service in a Sales Order
- Adding Service Lines to an Existing Contract
- Specifying Renewal and Other Details for a New Contract Created for Your Order
- Running Concurrent Programs to Generate Contracts Automatically
- Reprocessing Orders That Did Not Create Contracts
- Viewing Created Contracts by Sales Order Number
- Viewing Contracts by Sales Order Number in Oracle Service Contracts
- Viewing Contracts by Sales Order in Oracle Install Base
- Modifying the Dates That a Warranty Is Effective
- Changing the Effective Dates for a Warranty
- Changing Both the Warranty Dates and Installed Date
- Setting Up New Contract Defaults for Oracle Order Management
- Understanding the Impact of Contingencies on Revenue Recognition
Overview of Ordering Service in Oracle Order Management
You can order service using Oracle Order Management and have the application create the appropriate contracts automatically.
Your administrator can define the profile OKS: Category for Order Management Originated Contracts, which determines the contract category for Order Management-originated contracts.
This group of topics covers both sales agent and application administrator procedures for adding service agreements to a sales order, generating contracts automatically, and troubleshooting any errors.
This group of topics covers only steps relating to service contracts. For detailed information about how to create and manage orders, see the Oracle Order Management User's Guide.
Overview of Ordering Subscription in Oracle Order Management
You can order subscription using Oracle Order Management and have the application create the subscription contracts automatically. The value of the OKS: Category for Order Management Originated Contracts profile option is not considered during subscription contracts creation.
The Oracle Order Management attributes required for creating subscription contracts are as follows:
-
Subscription Template: Contains either the subscription template attached to the item in the Item Master window or a customized template.
-
Duration and Period: Based on the installation date of the item shipped and the duration period mentioned in the sales order, the contract Start Date and End Date are calculated.
-
Service Start Date and Service End Date: The start and end dates mentioned in the sales order are considered as the contract effectivity.
-
Service Billing Profile: This value is set for a sales order and lets you bill using multiple periods. If this value is not set for a sales order, then the service or subscription lines consider the Service Billing Option value as Full Billing from Order Management.
-
Service Billing Option: Contains the following three values: Full Billing from Service Contracts, Full Billing from Order Management, and First Period Billing from OM, Subsequent from Contracts.
If the Service Billing Option value is Full Billing from Order Management then Oracle Service Contracts does not consider the Service Billing Profile specified in Oracle Order Management and creates a one-time billing schedule in Oracle Service Contracts.
If the Service Billing Option value is Full Billing from Service Contracts or First Period Billing from OM, Subsequent from Contracts, then Service Billing Profile must be specified in Oracle Order Management.
-
Subscription Service: This check box is enabled to create a subscription contract.
-
Grouping and Merging Rules: When creating subscriptions or services from Oracle Order Management, the grouping and merging rules will consider the warehouse information, such as, the ship from organization. This information is stored in the created contract lines and used for calculating tax in Oracle Service Contracts.
If no rules are specified in the Service Contracts Details page, when subscription agreements or service agreements are created from Oracle Order Management, the subscription lines or service lines are grouped by the ship from organization. The subscription lines or service lines with the same ship from organization are grouped into the same service contract.
The warehouse information, such as, ship from organization is included as a parameter to determine whether to merge a subscription line or service line with an existing service contract line or create a service contract line.
During the creation of a subscription contract, the item instance is created from Oracle Service Contracts, which is used as a reference for the Service to Subscription item. If there are no details specified in the Service Contracts Details window, the services offered from subscription in OM will be added to the same subscription agreement. The Service Contracts Details window where contract merging rules are specified lists the subscription contracts if the item is a subscription item. During merging to an existing contract, if there is a service line with the same service, bill to, ship to, accounting rule, invoicing rule, customer account, billing profile, billing option, and coverage template, then the covered product is added as a new subline.
About Ordering Service in Oracle Order Management
-
Selling services in Oracle Order Management
-
What contracts are created from your Order
-
When a service contract is created
-
Understanding warranties
-
Selling service through Oracle Order Management or Oracle Service Contracts
-
Understanding what is passed from the order to the contract
Selling Services in Oracle Order Management
You can sell services in an Oracle Order Management sales order just as you do any physical product. However, a few differences exist.
Each service line must refer to either an item that is already in a customer's install base or an item that is in an order (the item can be either in the same order or in a different order altogether). For steps detailing how to add service lines, see Ordering Service in a Sales Order.
For a service, you must enter the service duration. If you are ordering service for an item in an order, then you can have the application automatically calculate the start date of that item based on the expiration of the warranty for that item. (You supply the duration of the service, but omit the start and end dates.)
However, the application does not supply a start date for an item a customer already owns. If you are ordering service for an install base item, you must enter the start date manually, taking the length of any existing warranty into account.
What Contracts Are Created from Your Order
By default, the application automatically creates a single contract for all the service lines in your order. You can add renewal and contact information for the new contract using the procedure that is outlined in Specifying Renewal and Other Details for a New Contract Created for Your Order.
The contract becomes effective on the earliest start date and expires on the latest end date.
Suppose that your order has the following three lines:
-
Service 1: One year contract starting January 1, 2005
-
Service 2: Two year contract starting February 1, 2005
-
Service 3: Two year contract starting January 15, 2005
In this case, the application creates a contract with a start date of January 1, 2005 and an end date of January 31, 2007.
Alternatively, by using the Contract Details window, you can instead choose to merge the service lines in your order into an existing contract. See Adding Service Lines to an Existing Contract.
When a Service Contract Is Created
The application generates a new contract from the service lines in your order, or appends the lines to an existing contract only when the item that the service covers is entered into the install base. For tangible items, this means that the order must be booked, picked, and shipped.
To generate contracts from sales orders, your application administrator must also:
-
Run the Service Contracts Order Processing Program and Workflow Background Process concurrent programs at regular intervals.
See Running Concurrent Programs to Generate Contracts Automatically.
-
Reprocess any contracts that were generated with errors. See Reprocessing Orders that did not Create Contracts.
You can view the generated contracts by sales order number from within Oracle Service Contracts or Oracle Install Base. See Viewing Created Contracts by Sales Order Number.
Warranties
Warranties, which are offered to customers free of charge, are created by the application automatically when the item is shipped to a customer based on an entry that the application administrator makes in the bill of materials (BOM).
Warranties go into effect on the shipment date. The administrator can add an automatic delay to the warranty start date to account for the shipment or installation delay and ensure that the customer receives the full benefit of the warranty. You can specify a different date for the warranty to become effective by following the procedure Modifying the Dates a Warranty is Effective.
Selling Service Through Oracle Order Management or Oracle Service Contracts
If you have the application create a new contract from your order (rather than adding the lines to an existing order), you should be aware of some key differences between the contract that was created for you automatically and one that you create in Oracle Service Contracts application.
Contracts created in Oracle Order Management:
-
Are restricted to service that covers products that the customer owns (Oracle Install Base item instances) or products that the customer is in the process of buying (items in Oracle Inventory). You cannot use them to sell service that covers larger sets of inventory items or to sell service at the system, site, or party levels.
-
Are automatically created in the Active status.
-
Do not have to pass the usual quality assurance check list and approval process as contracts created in Oracle Service Contracts.
-
Are billed through Oracle Order Management and Oracle Service Contracts. This means that the customer is billed with multiple invoices and you can take advantage of the flexible billing schedules that you set up in Oracle Service Contracts using the billing profile. (To add flexibility, you can instead set up Payment Terms in Oracle Receivables to set up incremental billing over time.)
-
Cannot have their coverage modified. Agents can modify the coverage for only contracts that are created in Oracle Service Contracts.
-
Do not contain usage lines, because no way is available to create a usage line in the sales order itself.
For renewals, the contracts that are generated in Oracle Order Management become just like any contract that is created in Oracle Service Contracts.
Understanding What Is Passed from the Order to the Contract:
The following information passes from the order to the contract:
| Order Field | Contract Field |
| Bill To Customer | Bill To Party |
| Ship To Customer | Ship To Party |
| Bill To | Bill To Location |
| Ship To | Ship To Location |
| Sales Person | Vendor Contact Name |
| Currency | Currency |
| Price List | Price List |
| Accounting Rule | Accounting Rule |
| Invoicing Rule | Invoicing Rule |
| Payment Type | Payment Type |
| Payment Terms | Payment Terms |
| Tax | Tax |
| Sales Credits | Sales Credits |
| Order Number | Order Number |
| Order Field | Contract Field |
| Service Duration | Duration |
| Service Period | Period |
| Ordered Item | Line Item |
| Service Start Date | Start Date |
| Service End Date | End Date |
| Ordered Item | Item |
| Quantity | Quantity |
| Unit Selling Price | Price |
| Sales Credits | Sales Credits |
| Currency | Currency |
| Service Item | Item Instance |
Note: The application does not support non seeded contract types.
Ordering Service in a Sales Order
You can order service for an item that a customer has on order or already owns. You can use it to order service for:
-
An item in the same order
-
An item in a different order
-
An item in the customer's install base
Prerequisites
-
If you are ordering service for an item in a separate order, then you must know:
-
That order's number.
-
The line number and shipment number for the item to cover.
-
The date to start the service, taking into account any other existing service agreements and warranties.
-
-
If you are ordering service for an item that the customer already owns, then the item must be already entered in your customer's install base and you must know the item instance number (referred to in Oracle Order Management as the Reference Number) or its serial number.
The item instance number is automatically generated by the Oracle Install Base application when the item is added to a customer's install base.
If the item does not exist in the customer's install base, then you must create it using procedures that are described in the Oracle Install Base User's Guide.
To order service in a sales order:
-
Under the Order Management Super User responsibility, navigate to Orders, Returns and then Sales Orders.
The Sales Orders window appears.
Note: If you are tracking sales credits, and your organization is using Oracle Service Contracts territories to assign sales agents to service contracts, then the application does not use the sales agent that you enter in the Salesperson field on the Order tab, Main subtab to the contract itself. If your organization is not using territories for sales agent assignment, then the agent that you enter is entered as a vendor contact in the new contract.
Note: Oracle Service Contracts carries sales credits from the order header to the contract header and the order line to the contract line. Because Oracle Order Management generates the invoice, the information proceeds directly to Oracle Receivables. During credit generation, information is sent by way of Oracle Service Contracts.
-
If you are ordering a service agreement for an item in the same order, then enter that item first.
-
In the Sales Order window, select the Line Items tab and the Main subtab.
-
Use the Ordered Item LOV to enter the inventory item number of the service that you are ordering.
-
Leave the Qty field blank. The application supplies the correct quantity automatically:
-
If you are ordering service for a line in an order.
The application copies the quantity from that line. For example, if you are ordering service for an order line with three widgets, then the service quantity is 3.
-
If you are ordering service for an item in the customer's install base.
Note: The quantity field specifies the number of services that you are ordering. It is not related to the length of the agreement that is specified in the UOM (Unit of Measure) field. If you enter 5 as the quantity and the UOM field shows YR (year), you are not ordering one five-year contract.
-
-
Select the Services tab.
-
If the service is for an item either in this or another customer order, then:
-
Select Order from the Service Reference Type LOV.
-
Use the Service Order Type LOV to enter the order type of the sales order. If you are ordering service for an item in this order, then enter the same type that you entered in the Main tab of the Sales Order form.
-
In Service Ref Order Number, enter the number of the sales order. If you are ordering service for an item in this order, then enter the sales order number that appears in the title bar of the Sales Order window.
-
Use the Service Ref Line Number LOV to select the line number and shipment number. (The shipment number appears in the Service Ref Shipment Number field.)
Note: You must scroll to view all required fields.
-
-
If you are ordering service for an item the customer already owns, then:
-
Select Customer Product from the Service Reference Type LOV.
-
Scroll to the Service Ref Cust Product field and use the LOV to enter the customer product instance to cover with the service. You can search either by the Oracle Install Base instance number (labeled Reference Number in this LOV) or, if the item is serialized, by the item's serial number.
Note: The application automatically checks to determine whether the service is valid for the item that you just entered. If the application informs you that it is not, then you must go back and enter another service.
-
-
To simplify renewals, a customer can end all contracts on a single day each year (called the cotermination day). Selecting the Service Coterminate Flag check box sets the end date to that day. If the application administrator has set up the cotermination day for the customer, that entry overrides any end date that you enter for this agreement. See About Cotermination for more information.
-
Enter service dates and duration:
-
If you are ordering service (an extended warranty) for an item in an order, you can have the application automatically fill in the start and end dates by entering the duration only. The application starts the service the day after any warranty for the product expires. The application provides the dates only after the order is fulfilled and the contracts are created.
-
If you are ordering service for an install base item, then enter either:
-
The service start and end date: The application calculates the duration.
-
The start date and duration: The application calculates the end date.
Note: If you selected the Service Coterminate Flag check box, the application may override the end date that you enter here.
-
-
-
Save.
-
To add the services in the order to an existing contract or specify renewal information for a new contract, click Actions and select Service Contract Details from the LOV. See Adding Service Lines to an Existing Contract or Specifying Renewal and Other Details for a New Contract Created for Your Order for details.
-
Book the order.
-
If you have created a mixed order, then you must also pick and fulfill the order for a new contract to be created or an existing contract to be modified.
-
You can view any new contracts that were created for the customer by following the procedure described in Viewing Created Contracts by Sales Order Number.
Note: Contracts are created by concurrent processes that are set up by the application administrator to run on a periodic basis, and so may not be available for viewing immediately.
Adding Service Lines to an Existing Contract
By default, the application creates a new contract for the service lines in your order. You can have an individual line, or all the lines in your order, added to an existing contract instead. The destination contract must be:
-
For the same customer.
-
Active or signed.
-
Of the contract category that is specified by the application administrator in the profile option OKS: Category for Order Management Originated Contracts.
When service agreements are created from Oracle Order Management, if no rules are specified in the Service Contracts Details page, the service lines are grouped by the ship from organization. The service lines with the same ship from organization are grouped into the same service contract.
Prerequisites
-
Create your order first and open it in the Oracle Order Management Sales Order window.
-
Confirm the contract number.
To add service lines to an existing contract:
-
In the Sales Order window, select the service line to add to an existing contract. To add all lines in the order to the same contract, select the first service line in the order.
-
Click Actions.
-
Select Service Contract Details.
The Contract Details window appears.
-
To apply all the rules that are selected in the Contract Details form to all the service lines, select the Apply All check box. Leaving this check box cleared adds only the current line.
If it is selected for one service line, you cannot select it for other service lines.
-
Use the Line Renewal Type list to specify how to renew the contract line:
-
Do Not Renew: The line will not be renewed when the contract is renewed.
-
Full Duration: The line will be renewed for the duration of the whole contract.
If your order includes multiple service lines, the contract duration begins on the earliest start date and ends on the latest end date from all the lines.
-
Keep Duration: The duration of this line will remain the same in a renewed contract. Use this setting for intermittent or seasonal service lines. For example, a mountain resort may want to order special service for peak periods in winter and summer. Using this setting, you ensure that the renewed contract retains the same structure. See Seasonal or Peak Period Service.
-
-
Select the Existing radio button.
-
To restrict the choice of available contracts to those that are already entered in this order, select Order from the Type list.
-
Otherwise, select Contract. This displays all active (entered) contracts in the Contract Number LOV.
-
Use the Contract Number LOV to enter the contract number.
Note: If a contract has already been renewed, then its number appears more than once in the Contract Number column. In this case, pay attention to entry in the Contract Number Modifier column to select the correct contract.
-
To have all remaining service lines in the order added to the same contract, select the Apply All check box. This setting does not affect any service lines that already have a contract specified for them.
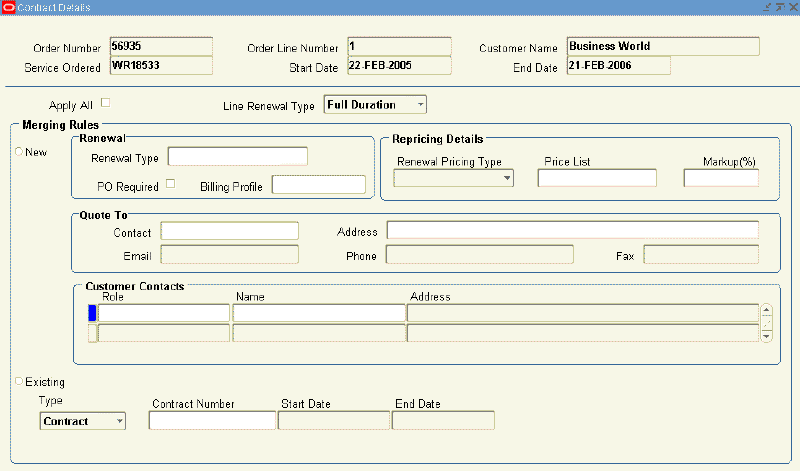
Specifying Renewal and Other Details for a New Contract Created for Your Order
You can choose to specify the information for a single service line or for all service lines in the order. Your administrator can set up default renewal settings for different customers or organizations within your enterprise. The entries that you make here override those defaults.
Prerequisite
Create your order and open it in the Oracle Order Management Sales Order window.
To specify renewal and other details for a new contract created for your order:
-
In the Sales Order window, select the service line for which you to create a new contract. To have the information apply to the whole order, select the first service line.
-
Click Actions.
-
Select Service Contract Details from the menu.
The Contract Details window appears.
-
If you plan to permit contract renewal, then use the Line Renewal Type list to specify how to renew the current service line:
-
Do Not Renew: The line will not be renewed when the contract is renewed.
-
Full Duration: The line will be renewed for the whole duration of the contract.
If your order includes multiple service lines, the contract duration is as long as the length of the longest service line.
-
Keep Duration: The duration of this line will remain the same in a renewed contract. Use this setting for intermittent or seasonal service lines. For example, a mountain resort may order special service for peak periods in winter and summer. Using this setting you ensure that the renewed contract retains the same structure.
-
-
To add the information that you enter here to all lines in the order, select the Apply All check box.
-
Select the New radio button.
-
Select the Renewal Type for the contract:
-
Manual: Requires manual action for all process steps.
-
Online: Submits contract to customer.
-
Evergreen: Activates without customer acceptance.
-
Do Not Renew: Does not renew upon expiry.
For information about renewals, see Understanding Contract Renewals.
-
-
If a purchase order is required for the contract to be renewed, then select the PO Required check box. This selection is available only for the Notify Salesrep and Submit For Approval renewal options.
-
To specify a billing schedule for the renewed contract, then select a billing profile using the Billing Profile LOV.
-
Specify how to price the renewed contract by making a selection from the Renewal Pricing Type list in the Repricing Details region:
-
Price List: Charges the customer based on the price list that you enter in the Price List field. The price charged is the current price that is listed in the price list at the time the contract is renewed.
-
Manual: The application charges the customer the same price for the renewed contract as they paid for the original contract.
-
Markup Percent: Automatically adjusts the price up or down by a percentage that you enter. Optionally, you can cap the maximum adjustment based on a price list.
-
-
If you have selected Markup Percent, then:
-
Enter the percentage that you want the price to be adjusted. Entering a positive number marks up the price. A negative number discounts the contract renewal.
-
If you are marking up the contract price and want to put a limit on the maximum price that the customer will pay, then enter a price list in the Price List field. The price of the renewed contract cannot go over the price that is listed in the price list.
For example, if you enter 20% as your markup and the current list price of the service is $100, then the renewed contract is priced at $120. If you enter a price list that lists the service at $110, however, then this price list caps the maximum price for the service at $110. The customer pays a maximum of $110 for the renewal.
Note: The price cap works only for markups and not for discounts.
-
-
If you have selected an electronic renewal, then in the Quote to region, enter the contact to be notified by e-mail:
Note: The contact must have an existing e-mail address. You cannot add new addresses here.
-
Enter the contact using the Contact LOV.
-
If the contact has multiple e-mail addresses, then select the address where you want to send the notification.
Note: The application administrator must enter a return (From:) e-mail address in the Global Contracts Defaults window as described in Setting Up New Contract Defaults for Oracle Order Management.
-
-
Optionally, enter customer contacts for this contract in the Customer Contacts region.
-
Select the Apply All check box to have all of the remaining service lines in the order added to the same contract. This setting does not affect any service lines that already have a contract specified.
-
Save.
Running Concurrent Programs to Generate Contracts Automatically
You must run the following two concurrent programs to generate contracts from Oracle Order Management sales orders:
-
Service Contracts Order Processing Program
Contracts are created based on the OKS: Contracts Validation Source profile option.
-
Workflow Background Process
For more information about running and troubleshooting concurrent programs see the Oracle E-Business Suite User's Guide.
To run concurrent programs to generate contracts automatically:
-
Under the Order Management Super User responsibility, select Requests from the View menu.
The Find Requests window appears.
-
Click Submit a New Request.
The Submit a New Request window appears.
-
Select the Single Request radio button.
-
Click OK.
The Submit Request window appears.
-
In the Name field, enter
Workflow Background Processand press the tab key.The Parameters window appears.
-
Enter the following parameters:
Prompt Entry Item Type OM Order Line Process Deferred Yes Process Timeout Yes Process Stuck No -
Click OK.
-
Click Submit.
-
Change responsibility to Service Contract Manager.
-
Submit the Service Contracts Order Processing Program concurrent program.
No parameters are required for this program.
Reprocessing Orders That Did Not Create Contracts
Run the Workflow Background Process and Service Contracts Order Processing Program concurrent processes as described in Running Concurrent Programs to Generate Contracts Automatically.
To reprocess orders that did not create contracts:
-
From the Navigator, navigate to Workflow, and then selectReprocess Order.
The Reprocess Order window appears.
Note: The Reprocess Order form displays order details and product history in a Multi Org Access Control (MOAC) context. The MOAC feature allows you to access secured data in one or more operating units from a single responsibility.
Your system administrator defines the scope of access privilege with the following profile options:
-
MO: Security Profile
-
MO: Default Operating Unit (Optional)
-
-
Use the Query By Example in the View menu to query all errors:
-
From the View menu, select Query By Example then Enter.
-
Enter Error in the Status field.
-
From the View menu, select Query By Example then Run.
The window displays all errors.
-
-
Click Select All.
-
Click Submit.
The application displays a note informing you of the process number.
Viewing Created Contracts by Sales Order Number
You can view the contracts that are generated by the application from your sales orders in either Oracle Service Contracts or Oracle Install Base.
Viewing Contracts by Sales Order Number in Oracle Service Contracts
To view contracts by sales order number in Oracle Service Contracts:
-
From the Navigator, navigate to Contract Administration, and then select Launchpad.
-
Click Search in the toolbar.
The Search Templates and Contracts window appears.
-
From the Category LOV, select the contract category that is set in the profile OKS: Category for Order Management Originated Contracts, for example Warranty and Extended Warranty.
-
Click More.
The Service Module Search window appears.
-
Enter the order number using the Order Number field LOV.
-
Click OK to return to the Search Templates and Contracts window.
-
Click Search.
-
Select the warranty to display in the authoring window.
-
Right-click and select Open from the shortcut menu.
Viewing Contracts by Sales Order in Oracle Install Base
To view contracts by sales order in Oracle Install Base:
-
Switch responsibility to Oracle Install Base Agent User.
-
Double-click the Oracle Install Base Agent User to find the Install Base Navigation Menu.
-
Select the Item Instance menu.
-
Under Item Instance main menu, double-click Item Instances to open a search page.
The Search Item Instances page appears in a separate browser window.
-
Select Sales Order Number from the Quick Find list. Sales Order Number is one of many search attributes that are available.
-
Enter the Sales Order number.
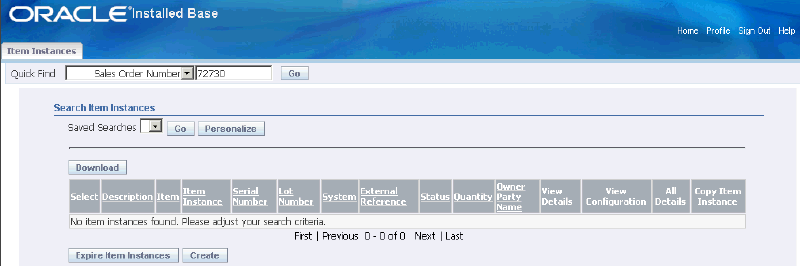
-
Click Go.
The application displays all of the instances that are included in the sales order.
-
Using the Select radio button, select an Instance for which you want to see the Contact details.
-
Select Contracts from the View Details list.
-
From the Actions LOV, select Contracts.
-
Click Go.
The application displays contracts that apply to that instance.
Modifying the Dates That a Warranty Is Effective
Oracle Service Contracts calculates the start date of a warranty date by adding an optional delay to the shipment date. The same date is also used by Oracle Install Base as the installed date of the product.
The purpose of the delay, which the application administrator enters at the time the item is created in Oracle Inventory, is to account for the time that the item is in transit and being installed. This ensures that customers receive the full benefit of the warranty.
Your organization can instead specify the actual warranty start date to ensure that customers are charged for all of the services they receive.
Note: Oracle Service Contracts does not allow a change in warranty dates if a service request is opened during the period.
You can:
-
Change the warranty start and end dates only
Use this procedure for products, such as toasters or cameras, that do not require installation or for which the installed date is not important.
If a user changes the installed date in Oracle Install Base, the warranty does not get updated automatically.
-
Change the installed date and have the application adjust the warranty accordingly.
Use this method if your organization records and tracks installed dates. When you change the installed date in Oracle Install Base, Oracle Service Contracts automatically adjusts the start date of the warranty for you. This method ensures that installed date and warranty start date remain synchronized. However, the install date will not synchronize with the warranty start date if changing the effective dates causes an open service request to be outside the new coverage period.
Note: For the installed date to automatically change the warranty start date, the application administrator must select the Synchronize Date Installed check box in the Warranty region of the Coverage template. You can check whether this check box has been selected in any warranty by clicking the Details button on the Lines tab and Effectivities subtab.
Changing the Effective Dates for a Warranty
This procedure does not change the installed date for the item in Oracle Install Base.
Prerequisites
-
Confirm that the order is processed and that a warranty is created by the concurrent processes run by the administrator.
-
Confirm that the order number.
To change the effective dates for a warranty:
-
Find the warranty by order number using the Search Templates and Contracts window and display it in the Service Contracts Authoring window. See Viewing Contracts by Sales Order Number in Oracle Service Contracts.
-
Select Cascade Attributes from the Actions menu.
The Cascade Attributes window appears.
Alternatively, open a contract and select Cascade Attributes from the Actions list.
The Cascade Attributes page appears.
-
Enter the new dates for the warranty in the Effective Dates fields in the Header Attributes region.
-
Select the Effective Dates check box.
-
Verify that Header to Lines is selected for Cascade.
-
Click Submit.
The Transaction Log appears.
-
Click Apply.
Changing Both the Warranty Dates and Installed Date
-
Confirm that a warranty has been created before you modify the installed date.
-
Confirm the order number.
To change both the warranty dates and installed date:
-
Switch responsibility to Oracle Install Base Agent User.
-
Double-click the Oracle Install Base Agent User to find the Install Base Navigation Menu.
-
Click the Item Instance menu.
-
Under Item Instance main menu, double-click Item Instances to open a search page.
The Search Item Instances page appears in a separate browser window.
-
Select Sales Order Number from the Quick Find list. Sales Order Number is one of many search attributes that are available.
-
Enter the Sales Order number.
-
Click Go.
The application displays all of the instances created from the sales order.
-
Using the select radio button, select an instance for which you want to change the warranty dates or installed date.
-
Click the Update icon.
An update Item Instance page appears.
-
Scroll to the Install Date and change the date.
-
Save.
Setting Up New Contract Defaults for Oracle Order Management
Application administrators must use this procedure to enter information that is required to create new contracts from orders in Oracle Order Management. This information is required for contracts to be created successfully and is not entered by the agent in the order. For information about the Global Contracts Defaults, see Entering Contract Defaults.
You can also default renewal information for these contracts. See Specifying How a Contract Will Be Renewed.
To set up new contract defaults for Oracle Order Management:
-
Log in to the Service Contracts Manager responsibility. Navigate to Setup: Service Contracts, and then select Global Contracts Defaults.
The Global Contracts Default window appears.
-
In the upper half of the window, make the following entries:
-
Renewal region:
-
Select the contract group where new contracts will appear within the Contracts Navigator from the Renewal Contract Group LOV.
-
Select the Renewal Process from the Renewal Process LOV.
-
Select the Approval method from the Approval LOV.
-
Select the Layout Template from the Layout Template Set LOV.
-
If the Purchase Order details need to be fetched, check the PO Required check box.
-
-
Pricing /Billing region: Select the Pricing Method from the Pricing Method LOV.
-
Thresholds region: Select the Ledger Currency from the Ledger Currency LOV.
-
Integration region:
-
Select a QA checklist to test contract completeness before the contract can become active from the QA Checklist LOV .
-
Select the workflow for processing contract approvals from the Approval Worklflow LOV.
-
Select
Third Partyfrom the Role LOV. This entry defines the party role when the sold-to party is not the same as the ship to party for contracts that are created from Oracle Order Management. -
Select the Interface Price Break check box to send price break details to Oracle Receivables during billing. This includes quantity, unit price, and amount.
-
Select the credit that a customer receives if service is terminated from the Return Credit LOV. The options are:
-
Full: The customer receives full credit.
-
Calculated: The credit is prorated based on the date terminated.
-
None: The customer does not receive credit.
-
-
-
Online Acceptance region:
-
Select the return e-mail address for electronic renewals from the Help Desk LOV. This address appears on the From: field of the e-mail notification that is sent to customers.
-
Select the Payment Terms from the Payment Terms LOV.
-
-
-
Save.
Understanding the Impact of Contingencies on Revenue Recognition
With the revenue management feature you can automatically time revenue recognition in accordance with the removal of revenue deferral reasons as required by US Generally Accepted Accounting Principles (GAAP) and International Accounting Standards (IAS). To leverage the features of the Revenue Management module, Oracle Service Contracts has modified the billing process to send the order line id relating to the covered goods to Oracle Receivables (AR). The AR interface contains a new column to accept the order line ID, which is also referred to as the parent line ID. If the application passes an order line ID, AR uses it to check the acceptance contingencies on that order line, to determine whether to defer revenue on the service. The application does not send an order line to AR in the following cases:
-
Goods covered in a contract, which were not sold in Oracle Order Management
-
Usage lines
-
Subscription lines
-
Services with covered levels other than covered product
-
Services with summary level billing
AR does not defer revenue without an order line ID. The application treats the service as if no contingencies are defined for the goods that are covered by the service.
Note: Administrators can select variable accounting rules to recognize revenue based on any duration (for example, daily, weekly or quarterly). Accounting rules are set up in Oracle General Ledger.
-
With Receivables responsibility navigate to the Setup, Transactions, Accounting Rule and create the appropriate accounting rule.
-
Use the Period field and the Number of Periods field within the Accounting Rule form to define revenue recognition.
-
Select the Deferred Revenue check box to ensure that the application does not use the existing accounting rule.
-
If you check the Deferred Revenue box and you want to manually recognize revenue, navigate to Oracle Receivables, then select Control, then select Accounting, and then select Revenue Accounting
The Revenue Accounting and Sales Credits form appears.
-
The Number is the Invoice Number.
-
The Reference is the Order Number.
You can schedule or unscheduled revenue here.
-