Release 1.2
Part Number E36379-01
Contents
Previous
Next
| Oracle Pedigree and Serialization Manager Process Guide Release 1.2 Part Number E36379-01 | Contents | Previous | Next |
This chapter covers the following topics:
Oracle Pedigree and Serialization Manager (OPSM) enables you to manage and maintain transactions that have occurred for a product. Transactions provide visibility into the events that occur for a serial number. OPSM supports these types of transactions:
Commission Serials
Decommission Serials
Edit Serials
Import Serials
Reserve Serials
Return
Serial Generation
Shipment
Serials Transmission
Records the commission of serials into the OPSM application through the Serials Service (editSerialStatusAndUsageByPrimaryDocument, editSerialStatusAndUsageByLabel, and editSerialStatusAndUsageByList operations) web service from an external transactional system.
The Serials Service web service uses the system parameter (Serial Batch Processing Size) value you specify to determine the batch processing size for the serials on the edit serial and usage transactions. As the edit serial and usage records are processed, they are counted. When the count reaches the size you specified for the Serial Batch Processing Size the processed records are posted to the database and the cache is cleared. When these records are posted to the database (they go from the cache to the database) they still are not committed and can be rolled back. Once all the records are processed and no errors are found, the records are committed to the database. If errors are found, the changes are rolled back and the errors are inserted into the transactions errors table and committed.
For more information on the OPSM Web Services, see the Web Services Overview.
For more information on defining the system parameters, see Maintaining System Parameters.
Records the decommission of serials into the OPSM application through the Serials Service (editSerialStatusAndUsageByPrimaryDocument, editSerialStatusAndUsageByLabel, and editSerialStatusAndUsageByList operations) web service from an external transactional system.
The Serials Service web service uses the system parameter (Serial Batch Processing Size) value you specify to determine the batch processing size for the serials on the edit serial and usage transactions. As the edit serial and usage records are processed, they are counted. When the count reaches the size you specified for the Serial Batch Processing Size the processed records are posted to the database and the cache is cleared. When these records are posted to the database (they go from the cache to the database) they still are not committed and can be rolled back. Once all the records are processed and no errors are found, the records are committed to the database. If errors are found, the changes are rolled back and the errors are inserted into the transactions errors table and committed.
For more information on the OPSM Web Services, see the Web Services Overview.
For more information on defining the system parameters, see Maintaining System Parameters.
Records the modification of attributes on serials coming into the OPSM application through the Serials Service (editSerialStatusAndUsageByPrimaryDocument, editSerialStatusAndUsageByLabel, and editSerialStatusAndUsageByList operations) web service from an external transactional system. These transactions occur when attributes are updated on serials but these updates do not cause the serial status to be updated. For example, counterfeit status.
The Serials Service web service uses the system parameter (Serial Batch Processing Size) value you specify to determine the batch processing size for the serials on the edit serial and usage transactions. As the edit serial and usage records are processed, they are counted. When the count reaches the size you specified for the Serial Batch Processing Size the processed records are posted to the database and the cache is cleared. When these records are posted to the database (they go from the cache to the database) they still are not committed and can be rolled back. Once all the records are processed and no errors are found, the records are committed to the database. If errors are found, the changes are rolled back and the errors are inserted into the transactions errors table and committed.
For more information on the OPSM Web Services, see the Web Services Overview.
For more information on defining the system parameters, see Maintaining System Parameters.
Records the import of serials into the OPSM application through the Transaction (createTransaction operation) web service from an external transactional system.
The Transaction (createTransaction operation) web service uses the system parameter (Serial Commit Size) value you specify to determine the database commit size. For example, let's say the Serial Commit Size is 1,000. Serial import requests that result in more than 1,000 serials will be processed in groups. A serial import request for 10,000 serials will be processed in 10 groups assuming the value has not been changed. When the first 1,000 serials are imported, the system will create the Import Serial transaction and commit those serials to the database. The remaining serials will be imported in groups of 1,000 and the Import Serials transaction will be updated as each group successfully completes.
For more information on the OPSM Web Services, see the Web Services Overview.
For more information on defining the system parameters, see Maintaining System Parameters.
Records the reservation of serials into the OPSM application through the Serials Service (editSerialStatusAndUsageByPrimaryDocument, editSerialStatusAndUsageByLabel, and editSerialStatusAndUsageByList operations) web service from an external transactional system.
The Serials Service web service uses the system parameter (Serial Batch Processing Size) value you specify to determine the batch processing size for the serials on the edit serial and usage transactions. As the edit serial and usage records are processed, they are counted. When the count reaches the size you specified for the Serial Batch Processing Size the processed records are posted to the database and the cache is cleared. When these records are posted to the database (they go from the cache to the database) they still are not committed and can be rolled back. Once all the records are processed and no errors are found, the records are committed to the database. If errors are found, the changes are rolled back and the errors are inserted into the transactions errors table and committed.
For more information on the OPSM Web Services, see the Web Services Overview.
For more information on defining the system parameters, see Maintaining System Parameters.
Records the return transaction into the OPSM application through the Transaction (createTransaction operation) web service from an external transactional system.
The Transaction web service uses the system parameter (Serial Batch Processing Size) value you specify to determine the batch processing size for serials on the return transactions. As the return records are processed, they are counted. When the count reaches the size you specified for the Serial Batch Processing Size the processed records are posted to the database and the cache is cleared. When these records are posted to the database (they go from the cache to the database) they still are not committed and can be rolled back. Once all the records are processed and no errors are found, the records are committed to the database. If errors are found, the changes are rolled back and the errors are inserted into the transactions errors table and committed.
For more information on the OPSM Web Services, see the Web Services Overview.
For more information on defining the system parameters, see Maintaining System Parameters.
Records the generation of serials by the OPSM application. Serial Generation transactions are created from the Serial Generation Request program. Serial Generation Requests can be created in OPSM in these ways:
Using the Maintain Serial Generation Requests page in OPSM.
Through the Work Order Serialization process work order information can be merged from the Work Order Interface table.
For more information on the Work Order Serialization process, see Performing Work Order Serialization with an Integrated Transactional System.
Through the Transaction (createTransaction operation) web service from an external transactional system.
For more information on the OPSM Web Services, see the Web Services Overview.
When the serial generation request is submitted, a business event triggers the processing of your request and a background process is executed to generate the serials and create the Serial Generation transaction. The background process uses the system parameter (Serial Commit Size) value you specify to determine the database commit size. For example, let's say the Serial Commit Size is 1,000. Serial generation requests that result in more than 1,000 serials will be processed in groups. A serial generation request for 10,000 serials will be processed in 10 groups assuming the value has not been changed. When the first 1,000 serials are generated, the system will create the Serial Generation transaction and commit those serials to the database. The remaining serials will be created in groups of 1,000 and the Serial Generation transaction will be updated as each group successfully completes.
For more information on defining the system parameters, see Maintaining System Parameters.
Records the transmission of serials to an external transactional system. Serial Transmission transactions can be created from serial generation, import of serials, a shipment of serials, or from the return of serials. The information you define on the Maintain Serial Destinations page drives the processing of the Serial Transmission transactions for the serial generation, import serials, shipment, and return transactions.
Serial transmission transactions can be created using a couple of different methods. The methods are:
You can manually create the serial transmission transaction by using the Maintain Transactions page in OPSM. Select the Transmit Serials action or the Transmit Serials icon for a transaction in the search results table of the Maintain Transactions page.
The system automatically creates the serial transmission transaction when a transaction (shipment, return, import serial, and serial generation) is successfully processed and destination rules exist in OPSM to transmit the transaction information.
The serial transmission processing supplies an outbound XML message that uses the Electronic Product Code Information System (EPCIS) standard schema (Version EPC 1.0) that can be used to transmit the details of the transaction and its associated serials. Optionally, you can create your own XML message format to meet your own business needs.
The web service uses the system parameter (Serial Batch Processing Size) value you specify to determine the batch processing size for the serials on the serial transmission transactions. As the serial transmission records are processed, they are counted. When the count reaches the size you specified for the Serial Batch Processing Size the processed records are posted to the database and the cache is cleared. When these records are posted to the database (they go from the cache to the database) they still are not committed and can be rolled back. Once all the records are processed and no errors are found, the records are committed to the database. If errors are found, the changes are rolled back and the errors are inserted into the transactions errors table and committed.
For information on defining serial destinations and destination rules, see Maintaining Serial Destinations and Destination Rules and Setting Up WebLogic Components for Serial Destinations in the Oracle Pedigree and Serialization Manager Installation Guide.
For information on manually creating serial transmission transactions, see Transmitting Serials.
For more information on defining the system parameters, see Maintaining System Parameters.
Records the shipment transaction into the OPSM application through the Transaction (createTransaction operation) web service from an external transactional system.
The Transaction web service uses the system parameter (Serial Batch Processing Size) value you specify to determine the batch processing size for serials on the shipment transactions. As the shipment records are processed, they are counted. When the count reaches the size you specified for the Serial Batch Processing Size the processed records are posted to the database and the cache is cleared. When these records are posted to the database (they go from the cache to the database) they still are not committed and can be rolled back. Once all the records are processed and no errors are found, the records are committed to the database. If errors are found, the changes are rolled back and the errors are inserted into the transactions errors table and committed.
For more information on the OPSM Web Services, see the Web Services Overview.
For more information on defining the system parameters, see Maintaining System Parameters.
The Oracle Serialization and Tracking Integration Pack for Oracle Pedigree and Serialization Manager and Oracle E-Business Suite 3.1 can be used to synchronize shipment and return transaction information from Oracle E-Business Suite to OPSM using one of the following methods:
Captures and records return transactions from Oracle E-Business Suite. Return transactions can be created from receipts from external customers as well as returns from internal customers.
Return transactions can be created in OPSM through the integration with Oracle E-Business Suite. When the shipping receipt (return) transaction is processed in Oracle E-Business Suite, the returned product information is transmitted to OPSM through the Shipment Receipt. The return receipt transaction records the details of the return in OPSM including the returned items, serials, product information, reference documents, transaction quantity, date, and trading partners. If the shipment receipt contains the returned serials, the serials validation is performed to verify the serials were previously shipped, have not been decommissioned, and have not been flagged as counterfeit. If the shipment receipt is from a customer where a change of ownership occurs, the serials states are updated to indicate they have been returned. Optionally, returns with no change of ownership can be recorded in OPSM. If no change of ownership occurs, the serials will remain in their current state.
When an OPSM integrated item is returned in Oracle E-Business Suite, the transaction information for the receipt along with the serials are sent to the OPSM system. This integration is achieved through the Serialized Item Tracking Process Integration (business events and AIA integration).
For more information on the integration between OPSM and Oracle E-Business Suite, see the Oracle Serialization and Tracking Integration Pack for Oracle Pedigree and Serialization Manager and Oracle E-Business Suite 3.1 - Implementation Guide.
Captures and records shipment transactions from Oracle E-Business Suite. External (and internal) customer shipment transactions can be associated with serial data in OPSM for the products on those shipments. A shipment will also import externally generated serials for the transaction if configured to allow serials to be created at shipment. The system will also record the lot in OPSM if configured to allow lot creation at shipment.
Shipment transactions can be created in OPSM through the integration with Oracle E-Business Suite. When a delivery is ship confirmed in Oracle E-Business Suite, the outbound Advance Shipment Notice (ASN) is published from Oracle E-Business Suite to OPSM. The ASN contains the transaction details including the transaction date, transaction quantity, shipped item, lot, trading partners (sold to, shipped by, shipped to, and sold by), and supporting document information. It may also include the shipped item serials, component serials (genealogy), and the container packaging hierarchy. Based on the shipped to customer, the shipment transaction may be flagged to indicate whether a change of ownership has occurred or not.
OPSM processes the ASN recording the details of the shipment along with the serials, packaging hierarchy, and item genealogy. If OPSM has been configured to create serials at shipment, the shipped item serials and component serials created in Oracle E-Business Suite are uploaded into OPSM at the time of shipment. The packaging hierarchy from Oracle E-Business Suite is also updated in OPSM at the time of shipment. Optionally, the lot can be created as part of the shipment transaction as well. OPSM validates the serials associated with the transaction to verify the status, state, lot expiration date, existence of the serial, along with other edits. If the shipment is to a customer where a change of ownership occurs, the serials states are updated to indicate they have been shipped. Optionally, shipments with no change of ownership can be recorded in OPSM. If no change of ownership occurs, the serials will remain in their current state.
When the transaction has been successfully processed, it contains the details of the transaction including transaction details, shipped items, serials, reference documents, trading partners, lot information and product information, container packaging hierarchy, and the shipped item genealogy.
For more information on the integration between OPSM and Oracle E-Business Suite, see the Oracle Serialization and Tracking Integration Pack for Oracle Pedigree and Serialization Manager and Oracle E-Business Suite 3.1 - Implementation Guide.
Using the Maintain Transactions page in OPSM you can:
Search for the different types (Serial Generation, Import Serials, Shipment, Return, Serial Transmission, Commission Serials, Decommission Serials, Reserve Serials, and Edit Serials) of transactions.
For information, see Searching for Transactions.
View transaction detail information for the different types of transactions.
For information, see Viewing Transaction Detail Information.
View transaction exception information for a transaction that did not process successfully.
For information, see Viewing Transaction Exception Information.
View initiating transaction detail information for a serial transmission transaction.
For information, see Viewing Initiating Transaction Detail Information.
Process Shipment, Return, Commission, Decommission, Reserve, Edit Serials, and Import Serials transactions that have previously failed processing.
For information, see Processing Transactions.
Disregard transactions that have an Exception Status of Errors.
For more information, see Disregarding Transactions.
Maintain transaction serials for shipment and return type transactions coming from Oracle E-Business Suite.
For more information, see Adding Containers and/or Product Serials to a Transaction, Viewing Containers and/or Product Serials for a Transaction, Deleting Containers and/or Product Serials from a Transaction, and Updating Containers and/or Product Serials for a Transaction.
Transmit serials or retransmit serials for a transaction.
For information, see Transmitting Serials.
Create, digitally sign, view, and print a Pedigree document for a non-internal shipment transaction.
For more information, see:
Use the Maintain Transactions page in Oracle Pedigree and Serialization Manager (OPSM) to search for transactions. You can view the transactions in a multitude of ways by using the search criteria fields that include exception status, transaction type, transaction date, transaction status, transaction location, lot number, item number, product code, Pedigree number, document, source name, destination name, and serial number.
Using the advanced search functionality you can search for transactions by using the operator field (equals, contains, ends with, starts with, and so on) associated with the search criteria fields.
Transactions provide visibility into the events that occur for a serial number. The types of transactions are:
Commission Serials (Serials that have been commissioned using the Serials Service (SerialsServiceAMService) web service)
Decommission Serials (Serials that have been decommissioned using the Serials Service (SerialsServiceAMService) web service)
Edit Serials (Serials that have been edited using the Serials Service (SerialsServiceAMService) web service)
Import Serials
Reserve Serials (Serials that have been reserved using the Serials Service (SerialsServiceAMService) web service)
Return
Serial Generation
Serial Transmission
Shipment
For more information on the different types of transactions, see Understanding Transactions.
Using the Maintain Transactions page you can view:
Transaction history for one or more serials, lots, or products.
Transaction document information including Document Type, Number, Date, and more.
Transactions with and without exceptions requiring attention, as well as resolved exceptions.
Use these procedures to search for transactions:
To Search for Transactions (Basic Search)
Navigate to the Maintain Transactions page.
Maintain Transactions page (Basic Search)
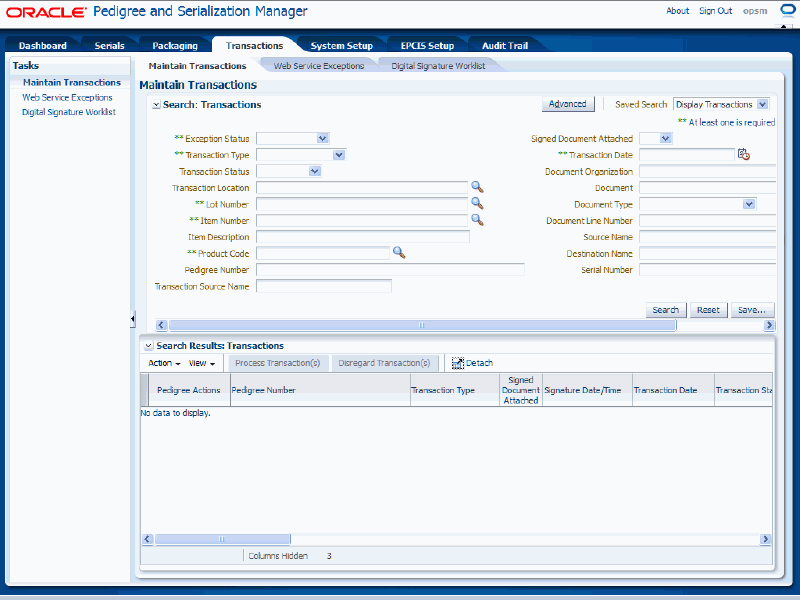
In the Search: Transactions region enter one or more of these fields:
| Field Name | Description |
|---|---|
| Exception Status | Select the exception status for the transactions. Statuses are:
|
| Transaction Type | Select the type of transaction. Types are:
|
| Lot Number | Select the lot number associated with the transactions. If you select the lot number using the Search and Select dialog box, after you select the lot number the Product Code field will appear by default from the lot number selected. |
| Item Number | Select the item number associated with the transactions. |
| Product Code | Select the product code associated with the transactions. |
| Transaction Date | Select the date for the transactions. |
(Optional) In the Search Transactions region enter one or more of these fields to further specify the search criteria:
| Field Name | Description |
|---|---|
| Transaction Status | Select the transaction status associated with the transaction. Transaction Statuses are:
Note: Pending status is only used when doing an upgrade of the software. If the old status is UNPROCESSED it is changed to PENDING. Transactions with a Pending transaction status can be processed using the Process Transaction(s) button. The transaction statuses progress in this fashion. When a transaction is created the transaction status is Submitted. Once the transaction starts to process the transaction status changes to In Progress, and finally after the process completes to Processed. The transaction status can be manually changed to Disregarded by using the Disregarding Transaction process. For more information on disregarding transactions, see Disregarding Transactions. For more information on processing transactions, see Processing Transactions. |
| Transaction Location | Select the location associated with the transactions. |
| Item Description | Enter the item description for the item associated with the transactions. |
| Pedigree Number | Enter the Pedigree number associated with the transactions. |
| Transaction Source Name | Enter the source for the transactions. This is the system from which the transaction originated. |
| Signed Document Attached | Select whether you want to search for transactions where the associated Pedigree document is digitally signed or not signed. Values are:
|
| Document Organization | Enter the organization for the document that is associated with the transactions. |
| Document | Enter the document associated with the transactions. |
| Document Type | Enter the document type for the document associated with the transactions. Document Types are user defined using Lookup Type PAS_DOCUMENT_TYPE. |
| Document Line Number | Enter the document line number for the document associated with the transaction. |
| Source Name | Enter the name of the source associated with the transactions. For example, a Shipment transaction will have a source address and a destination address. This Source Name is the identifier for that address. |
| Destination Name | Enter the name of the destination associated with the transactions. For example, a Shipment transaction will have a source address and a destination address. This Source Name is the identifier for that address. |
| Serial Number | Enter the serial number associated with the transaction. |
Click the Search button.
Maintain Transactions page (Basic Search) (1 of 2)
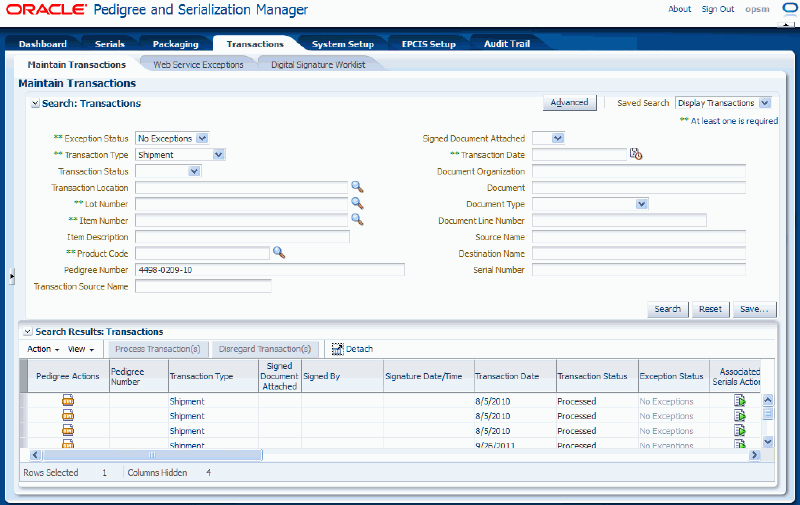
Maintain Transactions page (Basic Search) (2 of 2)
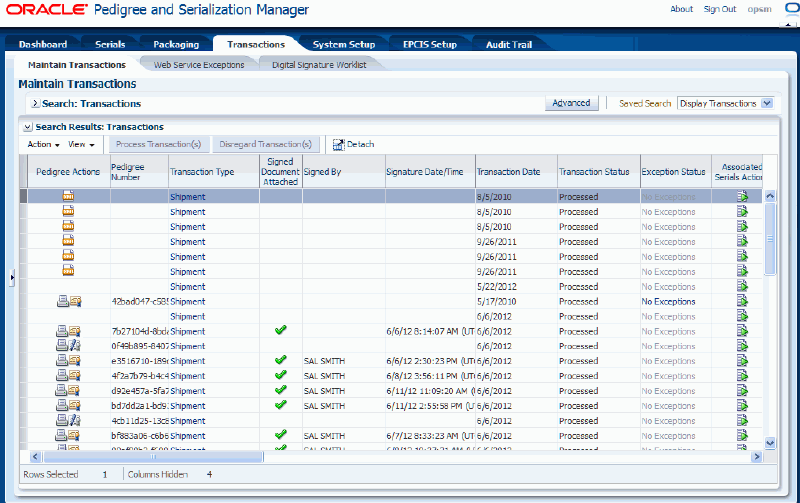
All of the transactions that match the search criteria appear in the Search Results: Transactions region in a table format. For each transaction the following information displays:
| Field Name | Description |
|---|---|
| Pedigree Actions | Displays the available Pedigree Actions. Actions are:
|
| Pedigree Number | Displays the Pedigree number associated with the transaction. |
| Transaction Type | Displays the type of transaction. This field contains a link for all transactions. |
| Signed Document Attached | Displays a green check mark icon if the Pedigree document for the transactions has been digitally signed. |
| Signed By | Displays the individual that digitally signed the Pedigree document. |
| Signature Date/Time | Displays the date and time the Pedigree document was digitally signed. |
| Transaction Date | Displays the transaction date. |
| Transaction Status | Displays the transaction status. Transaction Statuses are:
|
| Exception Status | Displays the exception status for the transaction. This field contains a link when the exception status for the transaction is Errors or Warnings. It will also have a link to previous exceptions if the status is No Exceptions but errors existed when the transaction was previously processed. |
| Reprocessable | Displays a green check mark icon when a transaction is available to be processed. |
| Associated Serials Actions | Displays the Transmit Serials icon. This icon is available for transactions that have a No Exceptions or Warnings exception status. Displays the Maintain Transaction Serials icon. This icon is available for Shipment and Return type transactions that have an Errors exception status. |
| Primary Document Type | Displays the primary document type for the document associated with the transaction. Document Types are user defined using Lookup Type PAS_DOCUMENT_TYPE. |
| Primary Document | Displays the primary document for the transaction. |
| Transaction Quantity | Displays the quantity for the transaction. |
| Item Number | Displays the item number for the transaction. |
| Product Code | Displays the product code for the transaction. |
| Transaction Location | Displays the location for the transaction. |
| Primary Document Line Number | Displays the primary document line number for the document associated with the transaction. |
| Initiating Transaction | Displays the transaction that initiated the transaction. This field contains a link when there is an initiating transaction for the transaction. |
| Serial Destination | Displays the serial destination for the transaction. |
| Transaction Unit of Measure | Displays the unit of measure for the quantity associated with the transaction. |
| Item Description | Displays the description of the item associated with the transaction. |
| Lot Number | Displays the lot number for the transaction. |
| Parent Lot | Displays the parent lot for the lot associated with the transaction. |
| Transaction Source Name | Displays the transactional source name for the transaction. |
| Message Severity | Displays an icon to represent the severity of the messages that were generated for the transaction. A red circle with an X indicates the transaction was unsuccessful and contains error messages and may also contain warning messages. A yellow triangle with an exclamation point indicates the transaction was successful but it contains warning messages. A blue circle with an i in it indicates an informational message for the transaction. |
Click the Advanced button to perform an advanced search.
To Search for Transactions (Advanced Search)
Use the Advanced Search functionality to perform a more detailed search for specific transactions. Field operators associated with the search criteria fields can be used during an Advanced Search so that a range of transactions can be easily retrieved.
Navigate to the Maintain Transactions page.
Click the Advanced button located at the top of the page.
Note: Clicking the Advanced or Basic button will keep the values in the base criteria fields.
Maintain Transactions page (Advanced Search)
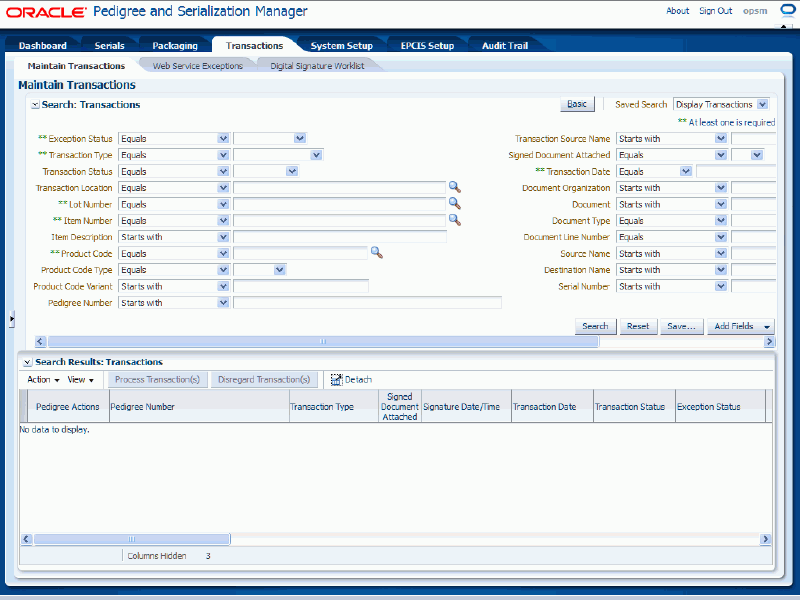
In the Search: Transactions region enter one or more of these fields:
| Field Name | Description |
|---|---|
| Exception Status | Select the field operator and then select the exception status for the transactions. Exception Statuses are:
Operators are:
|
| Transaction Type | Select the field operator and then select the type of transaction. Types are:
The field operators are the same as that for the Exception Status field. |
| Lot Number | Select the field operator and then select the lot number associated with the transactions. The field operators are the same as that for the Exception Status field. If you select the lot number using the Search and Select dialog box, after you select the lot number the Product Code, Product Code Type, and Product Code Variant fields will appear by default from the lot number selected. |
| Item Number | Select the field operator and then select the item number associated with the transactions. When you select an item number, the Item Description appears by default from the item you selected. The field operators are the same as that for the Exception Status field. |
| Product Code | Select the field operator and then select the product code associated with the transactions. When you select the product code, the Product Code Type and Product Code Variant appear by default from the product code you selected. The field operators are the same as that for the Exception Status field. |
| Transaction Date | Select the field operator and then select the date for the transactions. Operators are:
|
(Optional) In the Search Transactions region enter one or more of these fields to further specify the search criteria:
| Field Name | Description |
|---|---|
| Transaction Status | Select the field operator and then select the transaction status. Transaction Statuses are:
The field operators are the same as that for the Exception Status field. |
| Transaction Location | Select the field operator and then select the location associated with the transactions. The field operators are the same as that for the Exception Status field. |
| Item Description | Select the field operator and then enter the item description for the item associated with the transactions. If you select an item number this field appears by default from the item number selected. The field operators are the same as that for the Exception Status field. |
| Product Code Type | Select the field operator and then select the product code type for the product associated with the transactions. If you select a product code this field appears by default from the product code selected. The field operators are the same as that for the Exception Status field. |
| Product Code Variant | Select the field operator and then enter the product code variant for the product associated with the transactions. If you select a product code this field appears by default from the product code selected. The field operators are the same as that for the Exception Status field. |
| Pedigree Number | Select the field operator and then enter the Pedigree number associated with the transactions. The field operators are the same as that for the Exception Status field. |
| Transaction Source Name | Select the field operator and then enter the source for the transactions. The field operators are the same as that for the Exception Status field. |
| Signed Document Attached | Select the field operator and then select whether you want to search for transactions where the associated Pedigree document is digitally signed or not signed. Values are:
The field operators are the same as that for the Exception Status field. |
| Document Organization | Select the field operator and then enter the organization for the document that is associated with the transactions. The field operators are the same as that for the Exception Status field. |
| Document | Select the field operator and then enter the document associated with the transactions. The field operators are the same as that for the Exception Status field. |
| Document Type | Select the field operator and then enter the document type for the document associated with the transactions. Document Types are user defined using Lookup Type PAS_DOCUMENT_TYPE. The field operators are the same as that for the Exception Status field. |
| Document Line Number | Select the field operator and then enter the document line number for the document associated with the transactions. The field operators are the same as that for the Exception Status field. |
| Source Name | Select the field operator and then enter the name of the source associated with the transactions. The field operators are the same as that for the Exception Status field. |
| Destination Name | Select the field operator and then enter the name of the destination associated with the transactions. The field operators are the same as that for the Exception Status field. |
| Serial Number | Select the field operator and then enter the serial number associated with the transactions. The field operators are the same as that for the Exception Status field. |
(Optional) To enter additional search criteria fields, click the Add Fields button and select the field you would like to add to the search criteria.
The selected field appears as a search criteria field.
Note: To remove the additional field, click the Remove icon next to the field. The field will be removed from the search criteria.
(Optional) Enter search criteria for the additional fields.
Click the Search button.
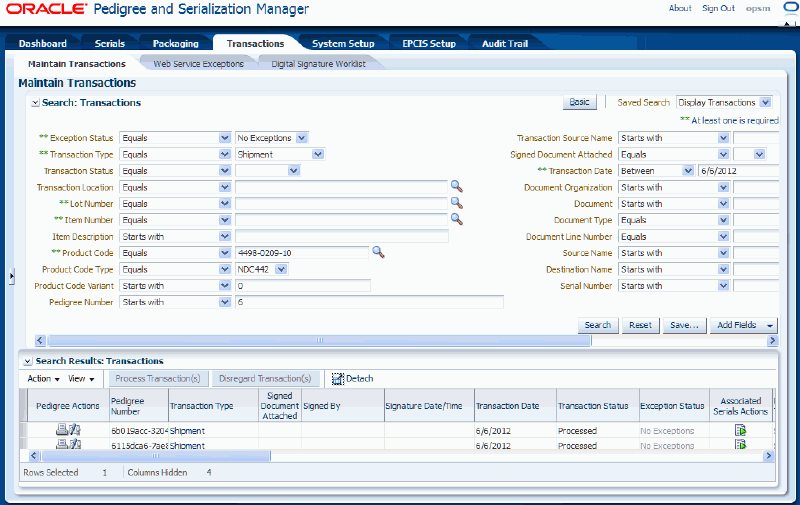
Maintain Transactions page (Advanced Search) (1 of 2)
Maintain Transactions page (Advanced Search) (2 of 2)
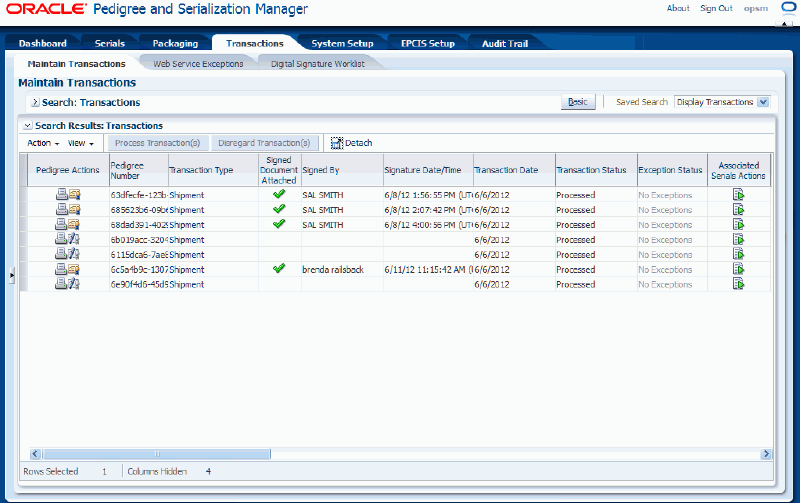
All of the transactions that match the search criteria appear in the Search Results: Transactions region in a table format.
For information on the fields that appear for each transaction, see Procedure: To Search for Transactions (Basic Search).
Click the Basic button to have the page hide the advanced search criteria fields and re-display the basic search criteria fields.
Note: Clicking the Reset button clears the values in all of the search criteria fields.
Oracle Pedigree and Serialization Manager (OPSM) can be integrated with transactional systems to search for transactions based on the transaction type and the primary document reference information from the transactional system.
From the external system, you can call the OPSM Maintain Transactions page. If you have not previously signed in to OPSM, you will be prompted for user authentication. After successful authentication, you can use the Maintain Transactions page to view your transaction, maintain transaction serials, process exception transactions, and other actions.
For more information on the transaction search process, see Searching for Transactions.
For more information on integrating Oracle E-Business Suite with OPSM, see the Oracle Serialization and Tracking Integration Pack for Oracle Pedigree and Serialization Manager and Oracle E-Business Suite 3.1 - Implementation Guide.
Use this procedure to search for transactions from integrated transactional systems:
To Search for Transactions from Integrated Transactional Systems
To Invoke the Maintain Transactions page in OPSM
Call the URL to invoke the Maintain Transactions page passing the parameter values:
| Parameter Name | Description |
|---|---|
| page | ‘shipmentTxn’ or ‘returnTxn’ |
| docOrg | The organizational identifier for the document in the external system that is the document organization on the primary reference document on the transaction in OPSM. |
| doc | The document identifier for the document in the external system that is the document identifier on the primary reference document on the transaction in OPSM. |
| docType | The document type for the document in the external system that is the document type on the primary reference document on the transaction in OPSM. |
| docLine | The document line number for the document in the external system that is the document line number on the primary reference document on the transaction in OPSM. |
| src | The identifier for the external system that invoked OPSM (for example, EBIZ_01). |
If prompted for user authentication, enter your user ID and password.
To Complete the Transaction Search in OPSM
Upon entry, the Maintain Transactions page will be displayed.
Maintain Transactions page
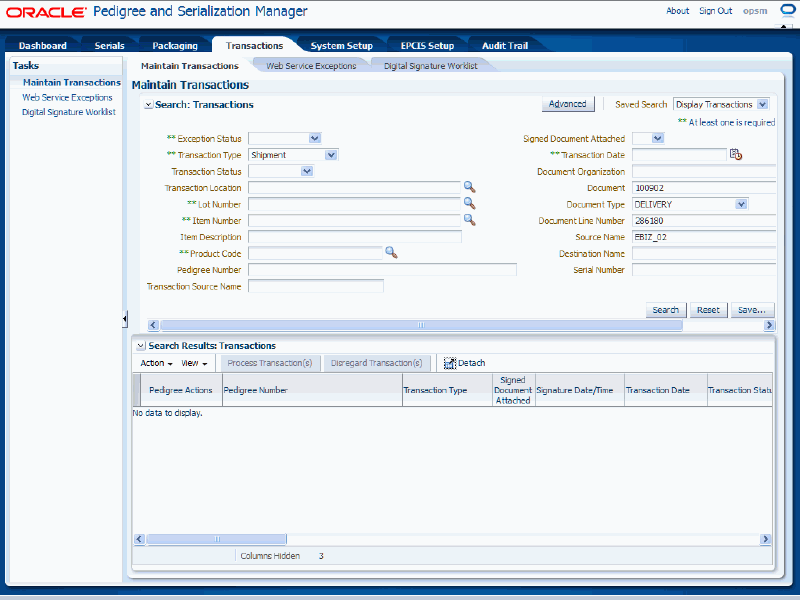
The Maintain Transactions page is called asynchronously. The Maintain Transactions page appears displaying the Transaction Type, Document, Document Type, Document Line Number, and Source Name in the Search: Transactions region of the page.
Click the Search button to display the transactions based on the search criteria.
Use the View Transaction page in Oracle Pedigree and Serialization Manager (OPSM) to view all the detailed information for a transaction. The type of transaction you are viewing determines the type of information that will display on the View Transaction page.
Use this procedure to view transaction detail information:
Prerequisites
To View Transaction Detail Information
Navigate to the Maintain Transactions page.
Enter search criteria for the transactions you want to view the details for and click the Search button.
All of the transactions that match the search criteria appear in the Search Results: Transactions region in a table format.
Select the transaction in the table you want to view.
Select View Transaction Detail in the Actions menu or click the Transaction Type link.
The View Transaction page appears displaying information for the transaction. There are six tabs (Transaction Details, Associated Documents, Product Details, Associated Serials, Packaging Hierarchy, and User Defined Fields).
Select the Transaction Details tab to the view transaction details for the transaction.
View Transaction page - Transaction Details tab (1 of 2)
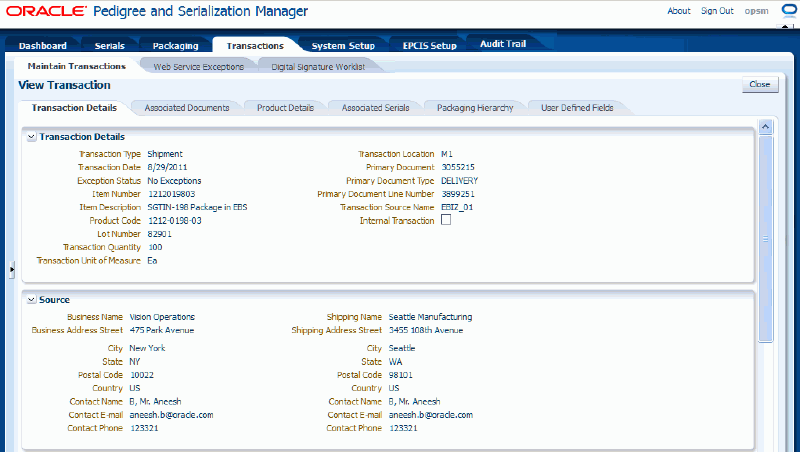
View Transaction page - Transaction Details tab (2 of 2)

The Transaction Details tab appears displaying the transaction details for the transaction.
In the Transaction Details region of the page the transaction detail information displays for the transaction.
For Shipment and Return transactions, the Source and Destination regions display on the page. The Source region displays the source details for the business and shipping information (name, address, and contact information). The Destination region displays the destination details (name, address, and contact information).
Select the Associated Documents tab to view the documents associated with the transaction.
View Transaction page - Associated Documents tab
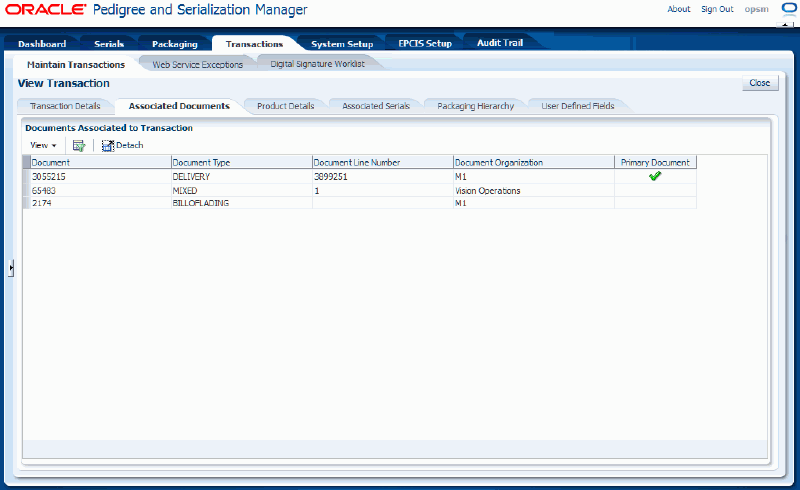
The Associated Documents tab appears displaying the associated documents for the transaction in a table format.
Select the Product Details tab to view the product and lot details associated with the transaction.
View Transaction page - Product Details tab
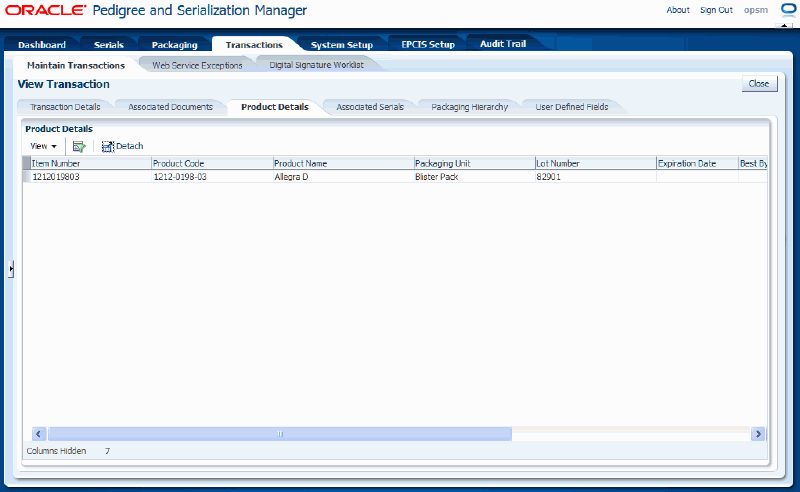
The Product Details tab appears displaying the product and lot information associated with the transaction in a table format. This tab may show multiple products that are associated with the transaction. For example, Shipment transactions may have multiple products.
Select the Associated Serials tab to view the serials associated with the transaction.
View Transaction page - Associated Serials tab
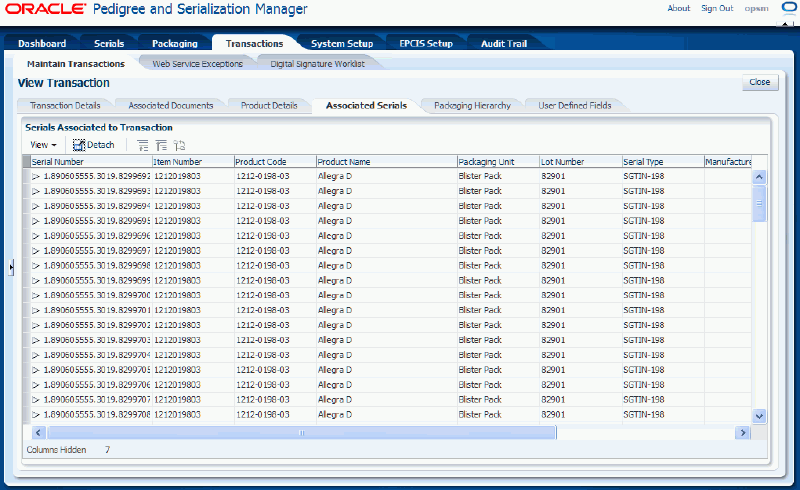
The Associated Serials tab appears displaying the associated serials for the transaction in a tree and table format.
Expand the Serial Number field to view the lower level serial numbers in the tree.
Select the Packaging Hierarchy tab to view the packaging hierarchy associated with the transaction.
View Transaction page - Packaging Hierarchy tab
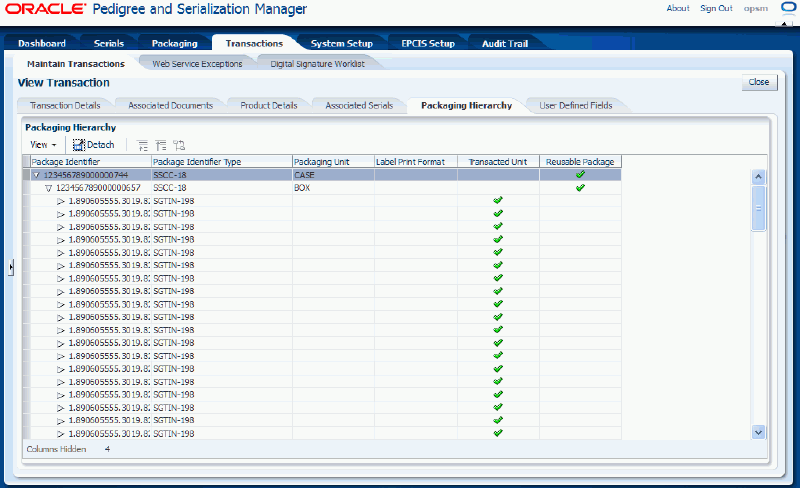
The Packaging Hierarchy tab appears displaying the packaging hierarchy for the transaction in a tree and table format. The packaging hierarchy displays the transacted item and any higher level packaging levels in a parent/child structure which illustrates the relationship of the packaging levels.
Expand the Package Identifier field to view the lower level packaging units in the tree.
Select the User Defined Fields tab to view the user-defined fields associated with the transaction.
View Transaction page - User Defined Fields tab
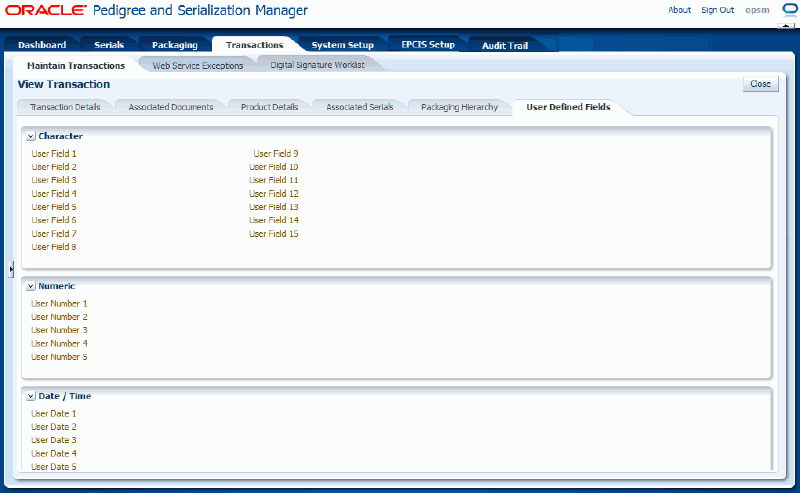
The User Defined Fields tab appears displaying the character, numeric, and date and time user defined fields for the transaction.
Click the Close button to return back to the Maintain Transactions page.
Use the View Transaction Exceptions page in Oracle Pedigree and Serialization Manager (OPSM) to view the exceptions (errors and warnings) for a transaction.
For transactions that have an exception status of Errors or Warnings you can access this page to view all the exceptions (errors or warnings) that occurred in processing the transaction and whether the exceptions have been resolved.
The View Transaction Exceptions page is only available for transactions that have exceptions.
Use this procedure to view transaction exception information:
Prerequisites
To View Transaction Exception Information
Navigate to the Maintain Transactions page.
Enter search criteria for the transactions you want to view the exception information for and click the Search button.
All of the transactions that match the search criteria appear in the Search Results: Transactions region in a table format.
Select the transaction in the table you want to view the exception information for.
Transactions that have an Exception Status of Errors or Warnings can access the View Transaction Exceptions page.
Transactions that have an Exception Status of No Exceptions can access the View Transactions Exceptions page if the transactions have informational messages or if the transactions previously processed with errors and warnings and have been corrected and reprocessed. You will still be able to view the exception information that occurred for the transactions when they had errors or warnings.
Select View Transaction Exceptions in the Actions menu or click the Exception Status link.
View Transaction Exceptions page
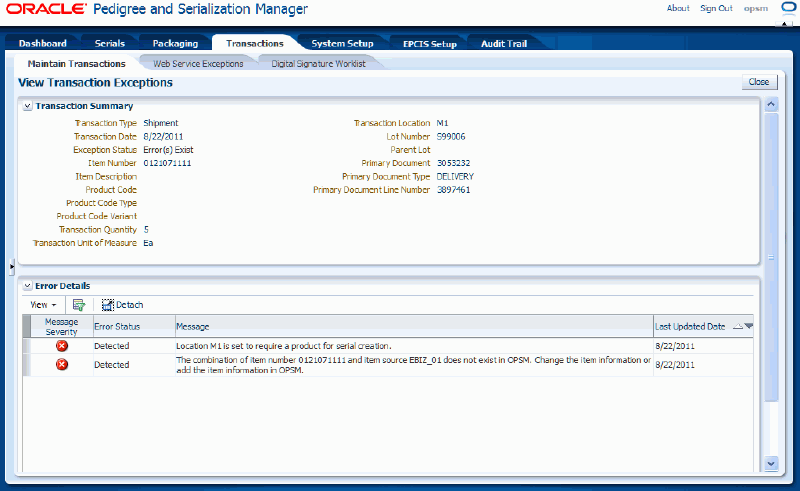
The View Transaction Exceptions page appears. In the Transaction Summary region of the page, transaction summary details display for the transaction. In the Error Details region, all the error messages and associated error statuses that occurred in processing the transaction display in a table format.
The error messages that display in the table state the reason for the error and then give some instruction on how to correct the error. Messages with an Error Status of Cleared have been previously corrected. Messages with an Error Status of Detected still exist.
Click the Close button to return back to the Maintain Transactions page.
Use the View Transaction page in Oracle Pedigree and Serialization Manager (OPSM) to view the initiating transaction detailed information for a Serial Transmission transaction. This is the source transaction that initiated the transmission. For example, if destination rules are set up to transmit serial data upon shipment, a serial transmit transaction will automatically occur. The Serial Transmissions transaction will have the Shipment transaction as its initiating transaction.
Use this procedure to view initiating transaction detail information:
To View Initiating Transaction Detail Information
Navigate to the Maintain Transactions page.
Enter search criteria for the Serial Transmission transactions you want to view the initiating transaction details for and click the Search button.
All of the transactions that match the search criteria appear in the Search Results: Transactions region in a table format.
Select the transaction in the table you want to view the initiating transaction for.
Select View Initiating Transaction's Detail in the Actions menu or click the Initiating Transaction link.
The View Transaction page appears displaying the information for the initiating transaction. There are six tabs (Transaction Details, Associated Documents, Product Details, Associated Serials, Packaging Hierarchy, and User Defined Fields).
Select the Transaction Details tab to the view transaction details for the transaction.
The Transaction Details tab appears displaying the transaction details for the transaction.
In the Transaction Details region of the page the transaction detail information displays for the transaction.
For Shipment and Return type of transactions the Source and Destination regions display on the page. The Source region displays the source details for the business and shipping information (name, address, and contact information). The Destination region displays the destination details (name, address, and contact information).
Select the Associated Documents tab to view the documents associated with the transaction.
The Associated Documents tab appears displaying the associated documents for the transaction in a table format.
Select the Product Details tab to view the product and lot details associated with the transaction.
The Product Details tab appears displaying the product and lot information associated with the transaction in a table format.
Select the Associated Serials tab to view the serials associated with the transaction.
The Associated Serials tab appears displaying the associated serials for the transaction in a tree and table format.
Select the Packaging Hierarchy tab to view the packaging hierarchy associated with the transaction.
The Packaging Hierarchy tab appears displaying the packaging hierarchy for the transaction in a tree and table format. The packaging hierarchy displays the transacted item and any higher level packaging levels in a parent/child structure which illustrates the relationship of the packaging levels.
Select the User Defined Fields tab to view the user-defined fields associated with the transaction.
The User Defined Fields tab appears displaying the character, numeric, and date and time user defined fields for the transaction.
Click the Close button to return back to the Maintain Transactions page.
Use the Maintain Transactions page in Oracle Pedigree and Serialization Manager (OPSM) to process transactions that have previously failed processing or to process transactions with a Pending transaction status.
Note: Pending status is only used when doing an upgrade of the software. If the old status is UNPROCESSED it is changed to PENDING.
When exceptions occur on a transaction, in some cases, you can manually correct the data in OPSM and then process the transaction again. After the processing is complete, you can search for the processed transactions and verify the exception statuses of those transactions.
The system processes Shipment, Return, Commission Serials, Decommission Serials, Reserve Serials, Edit Serials, and Import Serials transactions that have an Errors exception status or transactions with a Pending transaction status. The system will not process Serial Transmission transactions or transactions that have no exceptions. There are no Serial Generation transactions with exceptions because the transaction itself will not be created for this transaction type when the system encounters problems.
Note: Serial Transmission transactions can be “retransmitted” instead of processed.
Use this procedure to process transactions:
Prerequisites
Navigate to the Maintain Transactions page.
Enter search criteria for the transactions you want to process and click the Search button.
All of the transactions that match the search criteria appear in the Search Results: Transactions region in a table format.
Select one or more transactions in the table you want to process.
Note: When selecting multiple transactions in the table they must all be available for processing or the system will not provide you with the capability to process the transactions. The Process Transaction(s) button and the Process Transaction(s) Action menu option will be grayed and unavailable until you have selected only transactions that can be processed. Transactions eligible for processing will have a green check mark in the table under the Reprocessable heading.
Select Process Transaction(s) in the Action menu or click the Process Transaction(s) button located at the top of the Search Results: Transaction region.
A message appears asking if you are sure you want to process these transactions.
Click the Yes button.
The system starts to process the transactions again.
After the processing is complete, you can search for the processed transactions using the No Exceptions exception status (assuming that all of the processing errors were corrected) and verify the new exception statuses for those transactions.
Use the Maintain Transactions page in Oracle Pedigree and Serialization Manager (OPSM) to disregard transactions.
When you no longer need to pay attention to a transaction with exceptions you may elect to disregard the transaction. This action does not clear the exception. Only transactions with an exception status of Errors can be disregarded. After a transaction has been disregarded you cannot change it back to have an exception status of Errors.
Use this procedure to disregard transactions:
Navigate to the Maintain Transactions page.
Enter search criteria for the transactions you want to disregard and click the Search button.
All of the transactions that match the search criteria appear in the Search Results: Transactions region in a table format.
Select one or more of the transactions in the table you want to disregard.
You can only disregard transactions that have an exception status of Errors.
Note: When selecting multiple transactions in the table to disregard they must all have an exception status of Errors. The Disregard Transaction(s) button and the Disregard Transaction(s) Action menu option will be grayed and unavailable until you have selected only transactions that have an Errors exception status.
Select Disregard Transaction(s) in the Action menu or click the Disregard Transaction(s) button located at the top of the Search Results: Transactions region.
A message appears asking if you are sure you want to disregard these transactions.
Note: After a transaction has been disregarded you cannot change it back to an Errors exception status.
Click the Yes button.
The system updates the transaction statuses for each transaction selected to Disregarded. The system will not process these transactions again.
Use the Maintain Transaction Serials page in Oracle Pedigree and Serialization Manager (OPSM) to add containers and/or product serials to a shipment or return transaction that was created in an external transactional system.
The serials numbers associated with the transacted item can be identified directly or by use of inference. When the transacted items serials are identified, you can enter the serial number of the item directly in the Maintain Transaction Serials page. When inference is used, the serial number for an outer container is identified for the transaction using the Maintain Transaction Serials page. The system uses the packaging hierarchy to identify the transacted item serials. In either case, when entering the serials for a transaction the quantity of serials associated to the transaction must match the quantity of transacted item serials associated to the transaction.
If a transacted item contains serialized components or lower level packaging units, the serials associated to those items will also be associated to the transaction unless the Include Packed Transacted Units check box is clear in the Select and Add dialog box. When the lower level serials are associated, they will retain their association with the higher level component or packaging unit. This parent/child relationship will display in the Maintain Transaction Serials page.
Use this procedure to add containers and/or product serials to a transaction:
Prerequisites
For more information on Shipment and Return type transactions, see Understanding Transactions.
For more information on the integration between OPSM and EBS, see the Oracle Serialization and Tracking Integration Pack for Oracle Pedigree and Serialization Manager and Oracle E-Business Suite 3.1 - Implementation Guide.
To Add Containers and/or Product Serials to a Transaction
Navigate to the Maintain Transactions page.
Enter search criteria for the transactions you want to maintain serials for and click the Search button.
Enter at least an Exception Status of Errors and a Transaction Type of Shipment or Return.
For transactions that are coming from an external transactional system, you may optionally select a value for the Transaction Source Name field and enter a value for the Document field.
Maintain Transactions page
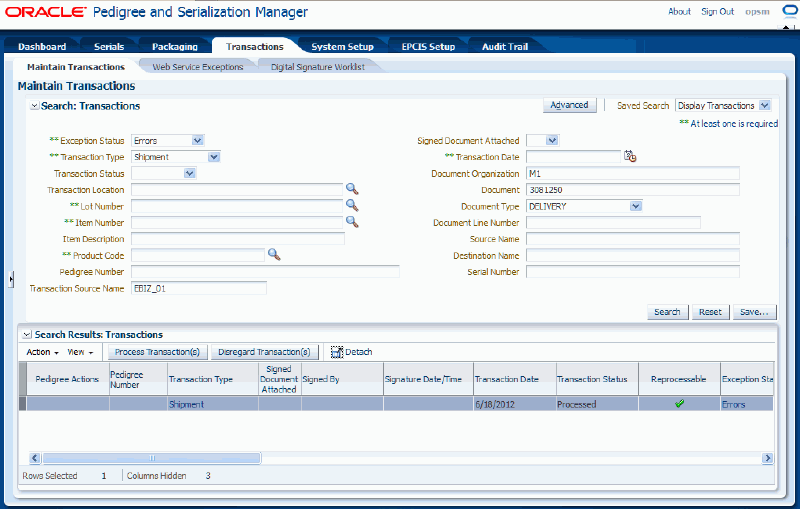
All of the transactions that match the search criteria appear in the Search Results: Transactions region in a table format.
Select the transaction in the results table that you want to add containers and/or product serials to.
Select Maintain Transaction Serials in the Actions menu or click the Maintain Transaction Serials icon in the Associated Serials Actions column of the table.
Maintain Transaction Serials page
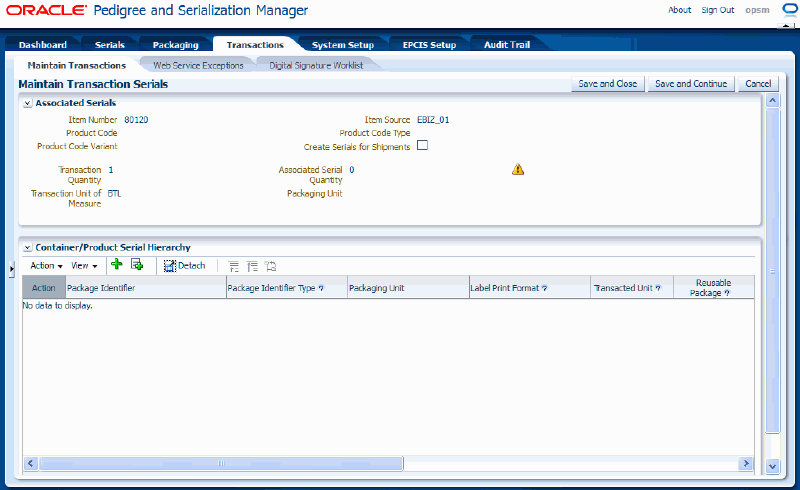
The Maintain Transaction Serials page appears. In the Associated Serials region of the page, information displays related to the transaction including the Create Serials for Shipments check box setting (if the transacted product is set to Create Serials for Shipments, then the Create Serials for Shipments check box will be selected), Transaction Quantity, and Associated Serial Quantity. If these two quantity fields do not match a yellow warning icon displays indicating that they do not match.
In the Container/Product Serial Hierarchy region of the page, all of the package identifiers representing the container and product serial hierarchy details display in a tree format for the transaction. The Container and Product Serial Hierarchy tree displays with none of the child nodes expanded. The tree nodes can represent a container or a product serial. If this is the first time you are adding containers or product details to a transaction no data will display in this region.
Note: If the product on the transaction cannot be identified in OPSM, you will not be able to maintain the transaction serials. If an item is identified, but the product is not shown, verify that the item is cross referenced to a product in OPSM.
Add containers and/or product serials (nodes) to the transaction using one of these methods:
To Add a Container/Product Serial to a Transaction
Select a node where you want to add a container or product serial.
If this is the first time you are adding containers or product details to a transaction no data will display in the Container/Product Serial Hierarchy region.
Select Add a Container/Product Serial from the Action menu or click the Add a Container/Product Serial icon located at the top of the Container/Product Serial Hierarchy region.
If no node is selected, the system will add a blank row as a sibling to the top level of the tree in the Container/Product Serial Hierarchy region.
If a node is selected, the system adds a blank row as a child to the selected node. However, if the selected node has the Transacted Unit check box selected, the Add a Container/Product Detail icon or action will not be available. You will not be able to enter another container or product serial under a Transacted Unit.
Enter the following information:
| Field Name | Description |
|---|---|
| Package Identifier | Enter the package identifier for the container or the product serial. A package identifier can represent a container or a product serial. When the Package Identifier represents a container, the following applies:
When the Package Identifier represents a product serial, the following applies:
The Package Identifier will become read-only after update. |
| Package Identifier Type | Enter the Package Identifier Type associated with the Package Identifier. Package Identifier Types are user defined using extensible Lookup Type PAS_LABEL_TYPE. Only a subset of the values from PAS_LABEL_TYPE are available for selection. Label Types that are also Serial Types are omitted. If the Transacted Unit check box is selected, the Package Identifier Type will default from the Serial Type on the Product Detail record that is identified on the transaction and the Package Identifier Type field will be disabled. The Package Identifier Type will become read-only after update. |
| Packaging Unit | Select a packaging unit. A packaging unit can represent a container or a specific product serial. Packaging Units are user defined using Lookup Type PAS_PACKAGE_UNIT. |
| Label Print Format | Select the label print format for the packaging unit. The value entered for the Label Print Format will be used for creation of new containers and product serials when the transaction is processed. The value of an existing container or product serial will not be updated when the transaction is processed. The Label Print Format will become read-only after update. Label Print Formats are user defined using Lookup Type PAS_LABEL_PRINT_FORMAT. |
| Transacted Unit check box | Select this check box if this packaging identifier represents the transacted unit on the transaction. The item being shipped or returned. This check box appears clear by default. |
| Reusable Package check box | Select this check box if this package is reusable. The value entered for the Reusable Package check box will be used for creation of new containers when the transaction is processed. The value of an existing container will not be updated when the transaction is processed. This check box appears clear by default. |
| Serial Usage | This field becomes available if you select the Transacted Unit check box. Select the serial usage for the product serial. If a value is entered for Serial Usage, the serial will be created or updated when the transaction is processed. If no value is entered, the serial will not be updated. Serial Usages are user defined using Lookup Type PAS_SERIAL_USAGE. |
| Saleable Unit check box | This field becomes available if you select the Transacted Unit check box. If Saleable Unit is selected, the serial will be created or updated when the transaction is processed. If it is clear, the serial will not be updated. Select the Saleable Unit check box for the product serial if this is a saleable product. This check box appears selected by default. |
| Created By | The system displays the individual that added the container or product serial. |
| Creation Date | The system displays the date that a container or product serial was added. |
| Last Updated By | The system displays the individual that last updated the container or product serial. |
| Last Updated By Date | The system displays the date that a container or product serial was last updated. |
Maintain Transaction Serials page
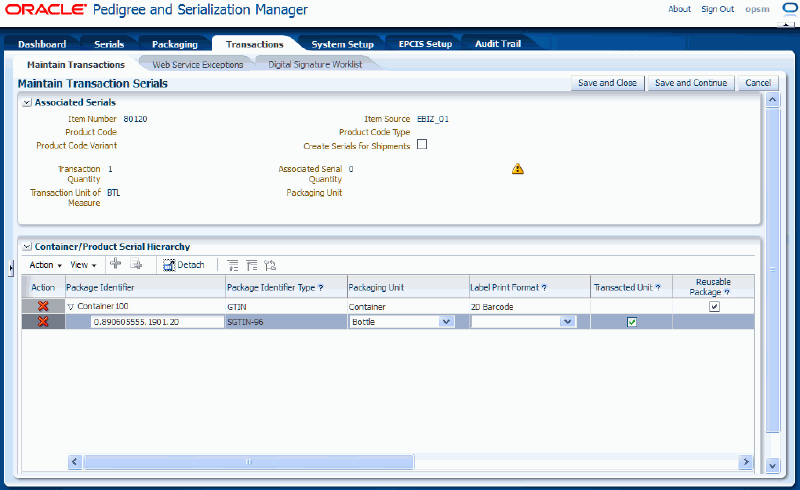
For a Shipment transaction, if the Create Serials for Shipments check box is clear (meaning that the serials must already exist in OPSM), the system will issue a warning message that the product serial entered does not exist in OPSM when you enter a product serial in a new row and the serial record does not exist in OPSM. You will still be able to save the new row. When the transaction is reprocessed, it will fail with exceptions unless the serial is created in OPSM by the time of reprocessing. This validation is performed when the Transacted Unit check box is selected or the Package Identifier is changed while the Transacted Unit check box is already selected.
To Select and Add Existing Container/Product Serial to a Transaction
Select Select and Add Containers/Product Serials from the Action menu or click the Select and Add Containers/Product Serials icon located at the top of the Container/Product Serial Hierarchy region.
Select and Add dialog box
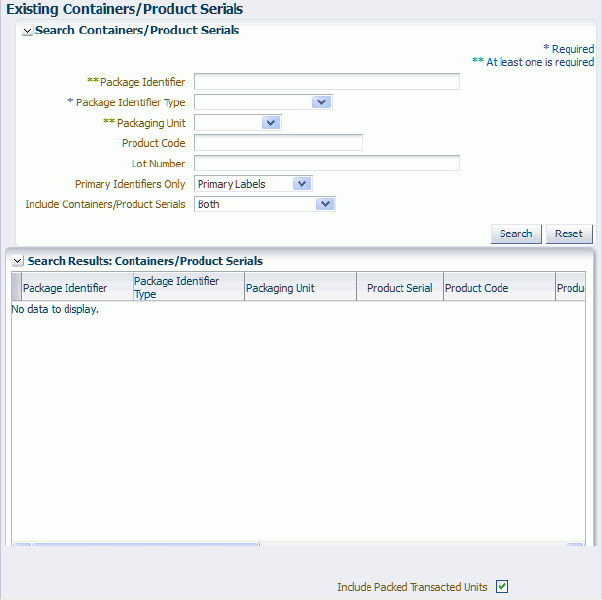
The Select and Add dialog box appears.
Enter the following search criteria and then click the Search button:
| Field Name | Description |
|---|---|
| Package Identifier | Enter the package identifier for the container or the product serial. A package identifier can represent a container or a product serial. |
| Package Identifier Type | Select the package identifier type. Package Identifier Types are user defined using extensible Lookup Type PAS_LABEL_TYPE. |
| Packaging Unit | Select a packaging unit. A packaging unit can represent a container or a specific product serial. Packaging Units are user defined using Lookup Type PAS_PACKAGE_UNIT. |
| Product Code | (Optional) Enter the product code associated with the package identifier. |
| Lot Number | (Optional) Enter the lot number associated with the package identifier. |
| Primary Identifiers Only | Select Primary Labels if you only want to view the primary identifiers for a packaging unit. Select Non-Primary Labels if you want to view all identifiers for a packaging unit (primary and alternate). Primary Labels appears by default. |
| Include Containers/Product Serials | Select if you want to view package identifiers for containers, product serials, or both containers and product serials. Options are:
For Shipment transactions, if the Create Serials for Shipment check box is selected, Labels for Containers appears by default. If the Create Serials for Shipment check box is clear, Both appears by default. For Return transactions, Labels for Product Serials appears by default. |
Select and Add dialog box
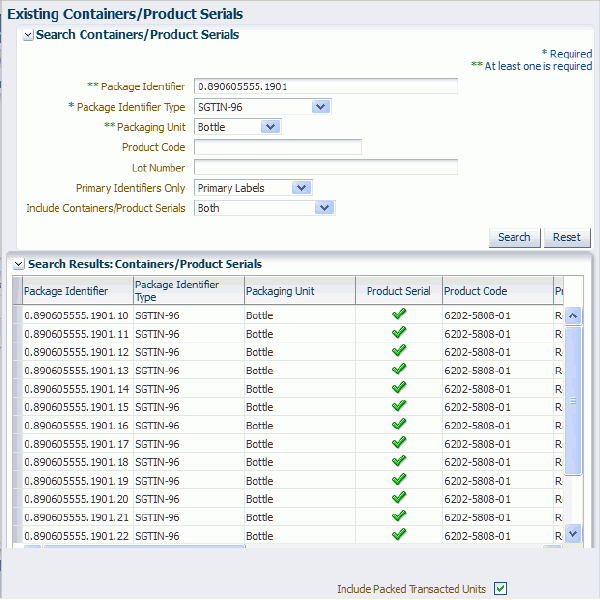
All available package identifiers that match the search criteria appear in the Search Results: Containers/Product Serials table.
Select the container or product serial package identifier in the Search Results: Containers/Product Serials table.
(Optional) Select Include Packed Transacted Units check box at the bottom of the table if you want to automatically select the lower level containers and product serials contained in the selected container. This check box only applies if you are selecting a container packaging unit.
Note: Lower level product serials (item genealogy) associated to the transacted item serials will be associated to the transaction when the transaction is processed assuming this information has already been established in OPSM through the packaging hierarchy.
For shipment transactions, if the Create Serials for Shipment check box is selected, the Include Packed Transacted Unit check box is clear by default. If the Create Serials for Shipment check box is selected, then the Include Packed Transacted Unit check box is selected by default.
For return transactions, the Include Packed Transacted Unit check box will be selected by default.
Click the OK button.
After you click the OK button, the system will perform several validations on the product serial or container you selected related to the transaction. These validations include the following:
Product Serial Validation
If you select a product serial and click the OK button, the system validates the following:
The selected product serial must be the transacted items product serial.
If a lot number is assigned to the product serial, then the lot number must match the lot number for the transaction.
For Shipment transactions, the serials Serial State must not be Shipped. However, if the Create Serials for Shipment check box is selected, then the Serial State must be Returned.
For Return transactions (not internal), the serials Serial State must be Shipped.
For Return transactions (internal), the serials Serial State must not be Shipped.
The serials Serial Status must be Commissioned.
The serials Counterfeit Status must not be Counterfeit.
The serial cannot already be associated to the transaction (for example, in a lower level).
Container (Include Transacted Unit check box Not Selected) Validations
If you select a container and do not select the Include Transacted Unit check box and click the OK button, the system will perform no validations. The container will be added to the Containers/Product Serials Hierarchy Tree.
Container (Include Transacted Unit check box Selected) Validations
If you select a container and select the Include Transacted Unit check box and click the OK button, the system validates the following against the packaging hierarchy of the branch (the top node of the branch is the selected container):
The branch must include the transacted items product serials.
The direct container of a transacted items product serial must not be serialized.
If lot numbers are assigned to the included transacted items serials, then the lot numbers must match the lot number of the transaction.
For Shipment transactions, the included transacted items serials Serial State must not be Shipped. However, if the Create Serials for Shipment check box is selected, then the Serial State must be Returned.
For Return transactions (not internal), the included transacted items serials Serial State must be Shipped.
For Return transactions (internal), the included transacted items serials Serial State must not be Shipped.
The included transacted items serials Serial Status must be Commissioned.
The included transacted items serials Counterfeit Status must not be Counterfeit.
Any package identifier included in the branch shall not already exist in the transaction.
Maintain Transaction Serials page
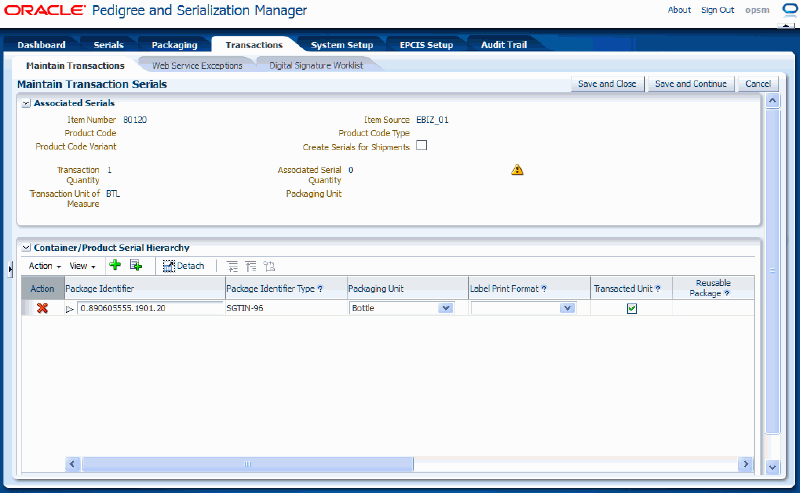
If the selected product serial and/or container that you selected passes all of the validation checks, then the Maintain Transaction Serials page reappears with the information you selected added to the Containers/Product Serials Hierarchy tree. If any validation fails, the system will issue an error message and you will not be able to add the product serial or container to the transaction.
Repeat Step 5 using one or both of the methods to add a container and/or product serial to the transaction until all of the serials are associated to the transaction.
Save your work. Choose one of these options:
Click the Save and Close button to save the information and return back to the Maintain Transactions page.
Click the Save and Continue button to save the information and to stay on this page so you can continue to edit the information.
In the Associated Serial region of the page, the Associated Serial Quantity field is updated with the quantity that was transacted and the yellow warning icon is removed if the Transaction Quantity equals the Associated Serial Quantity. The yellow warning icon will display as long as the quantities do not match.
The serials are associated to the transaction. If the Create Serials for Shipment check box is selected for the transaction and you enter a brand new container or product serial package identifier the system will also created the package identifier and packaging hierarchy in OPSM.
For more information, see Searching for Packages and Searching for Packaging Hierarchies.
Process the transaction again.
For information on how to process a transaction, see Processing Transactions.
Use the Maintain Transaction Serials page in Oracle Pedigree and Serialization Manager (OPSM) to view the containers and/or product serials associated with a shipment or return transaction created in an external transactional system.
Use this procedure to view containers and/or product serials for a transaction:
Prerequisites
For information, see Adding Containers and/or Product Serials to a Transaction.
To View Containers and/or Product Serials for a Transaction
Navigate to the Maintain Transactions page.
Enter search criteria for the transactions you want to view containers and/or product serials for and click the Search button.
Enter at least an Exception Status of Errors and a Transaction Type of Shipment or Return.
For transactions that are coming from an external transactional system, you may optionally select a value for the Transaction Source Name field and enter a value for the Document field.
Maintain Transactions page

All of the transactions that match the search criteria appear in the Search Results: Transactions region in a table format.
Select the transaction in the table that you want to view the containers and/or product serials for.
Select Maintain Transaction Serials in the Actions menu or click the Maintain Transaction Serials icon in the Associated Serials Action column of the table.
Maintain Transaction Serials page
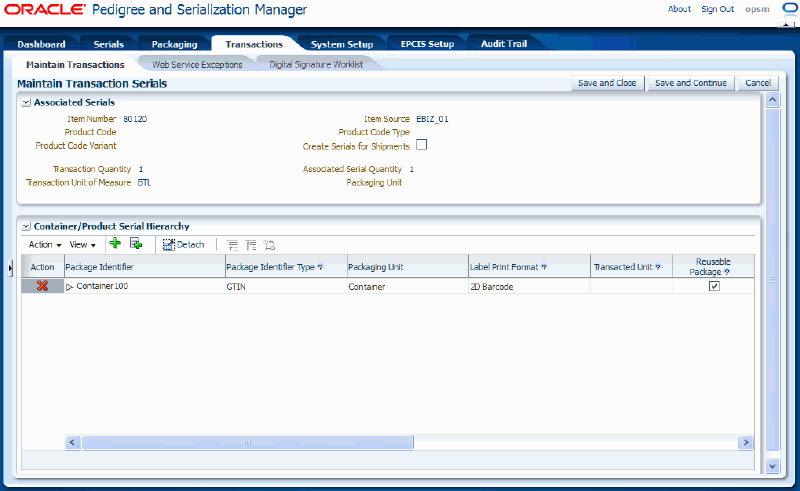
The Maintain Transaction Serials page appears displaying all of the package identifiers representing the container and product serial hierarchy details in a tree format for the transaction.
The Container and Product Serial Hierarchy tree displays with none of the child nodes expanded.
The tree nodes can represent a container or a product serial.
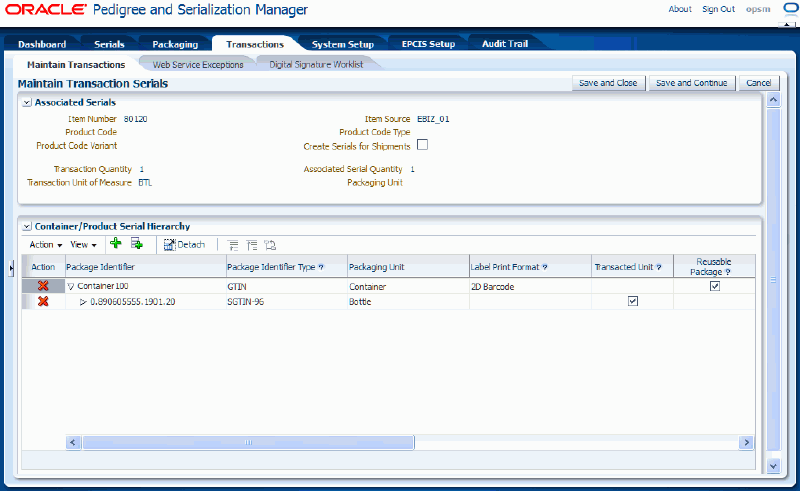
Expand or collapse the nodes in the tree to view the all the package identifiers in the Container and Product Serial Hierarchy tree.
Maintain Transaction Serials page
Use the Maintain Serial Transactions page in Oracle Pedigree and Serialization Manager (OPSM) to delete containers and/or product serials from a shipment or return type of transaction that was created in an external transactional system.
Use this procedure to delete containers and/or product serials from a transaction:
Prerequisites
For information, see Adding Containers and/or Product Serials to a Transaction.
To Delete Containers and/or Product Serials from a Transaction
Navigate to the Maintain Transactions page.
Enter search criteria for the transactions you want to delete associated serials from and click the Search button.
Enter at least an Exception Status of Errors and a Transaction Type of Shipment or Return.
If you are working with transactions that are coming from an external transactional system, you may optionally enter a value for the Transaction Source Name field and the Document field.
All of the transactions that match the search criteria appear in the Search Results: Transactions region in a table format.
Select the transaction in the table that you want to delete the container or product serials from.
Select Maintain Transaction Serials in the Actions menu or click the Maintain Transaction Serials icon in the Associated Serials Action column of the table.
The Maintain Transaction Serials page appears displaying all of the package identifiers representing the container and product serial hierarchy details in a tree format for the transaction.
The Container and Product Serial Hierarchy tree displays with none of the child nodes expanded.
The tree nodes can represent a container or a product serial.
Expand the nodes in the tree until you locate the node you want to delete.
To expand a node in the Container and Product Serial Hierarchy tree use one of these methods:
Click the Expand icon next to the node in the tree you want to expand.
Select the node in the tree you want to expand and select Expand, Expand All, or Expand All Below from the View menu.
The nodes are expanded to display the container or product serial information below the node selected.
Select the node (package identifier) representing the container or product serial in the Container and Product Serial Hierarchy tree that you want to delete.
Select Delete a Container/Product Serial from the Action menu or click the Delete a Container/Product Serial in the Action column of the results table.
A message appears asking if you are sure you want to delete the container or product serial.
Click the Yes button.
The node (package unit identifier) is deleted from the tree. If you select a container node all nodes below that container will also be deleted.
Note: The containers or product serials are deleted from the transaction; they are not removed from OPSM.
Use the Maintain Transaction Serials page in Oracle Pedigree and Serialization Manager (OPSM) to update containers and/or product serials associated with a shipment or return transaction created in an external transactional system. After containers and/or products serials have been associated to a transaction, you can use the Maintain Transaction Serials page to edit associated product serial information, add additional containers and/or product serials (child nodes) to the transaction, or delete containers and/or product serials (child nodes) from the transaction.
Use this procedure to update containers and/or product serials for a transaction:
Prerequisites
For information, see Adding Containers and/or Product Serials to a Transaction.
To Update Containers and/or Product Serials for a Transaction
Navigate to the Maintain Transactions page.
Enter search criteria for the transactions you want to update containers and/or product serials for and click the Search button.
Enter at least an Exception Status of Errors and a Transaction Type of Shipment or Return.
For transactions that are coming from an external transactional system, you may optionally enter a value for the Transaction Source Name field and the Document field.
All of the transactions that match the search criteria appear in the Search Results: Transactions region in a table format.
Select the transaction in the table that you want to update the containers and/or product serials for.
Select Maintain Transaction Serials in the Actions menu or click the Maintain Transaction Serials icon in the Associated Serials Action column of the results table.
The Maintain Transaction Serials page appears displaying all of the package identifiers representing the container and product serial hierarchy details in a tree format for the transaction.
The Container and Product Serial Hierarchy tree displays with none of the child nodes expanded.
The tree nodes can represent a container or a product serial.
(Optional) Expand and collapse the nodes (containers or product serials) until you locate where in the tree you want to update child nodes, add additional child nodes to, or where you want to remove child nodes from in an existing Container and Product Serial Hierarchy tree.
(Optional) Update the Serial Usage and Saleable Unit check box fields associated with a transacted unit packaging identifier node.
You can only update the Serial Usage and Saleable Unit fields for a transacted unit package identifier node that was created using the Add a Container/Product Serial action or icon. No fields can be updated for a node that was created using the Select and Add Containers/Product Serials action or icon.
(Optional) Add additional containers and/or product serials (nodes) to the Container and Product Serial Hierarchy tree.
For information on how to add additional containers and/or product serials (nodes) to a Container and Product Serial Hierarchy tree, see Adding Containers and/or Product Serials to a Transaction.
(Optional) Delete containers and/or product serials (nodes) from the Container and Product Serial Hierarchy tree.
For information on how to remove containers and/or product serials (nodes) from a Container and Product Serial Hierarchy tree, see Deleting Containers and/or Product Serials from a Transaction.
Use the Maintain Transactions page in Oracle Pedigree and Serialization Manager (OPSM) to transmit serials.
Use this procedure to transmit serials:
Prerequisites
Serial destination and destination rules have been set up.
For more information on serial destinations and destination rules, see Maintaining Serial Destinations and Destination Rules.
Transactions (Shipment, Return, Serial Generation, or Import Serials) have been created that require the transmitting of serials.
Navigate to the Maintain Transactions page.
Enter search criteria for the transactions you want to transmit serials for and click the Search button.
All of the transactions that match the search criteria appear in the Search Results: Transactions region in a table format.
Select the transaction in the table you want to transmit serials for.
Select Transmit Serials in the Action menu or click the Transmit Serials icon for the transaction in the table.
Serial Destinations page
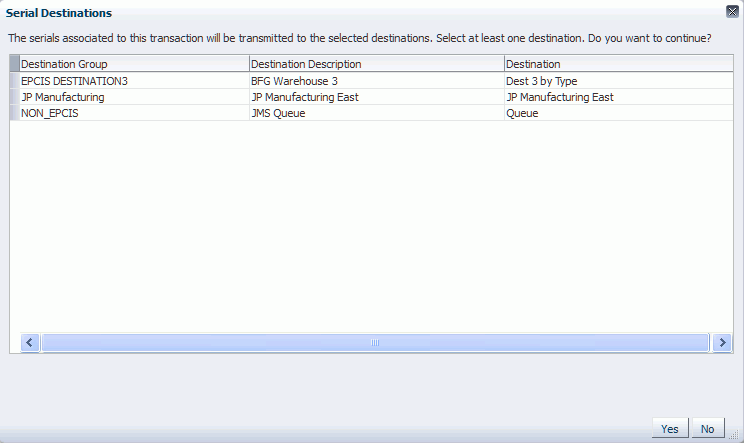
If the transaction type selected is Shipment, Return, Serial Generation, or Import Serials, the Serial Destinations page will appear displaying the serial destinations.
If the transaction type selected is Serial Transmission, a popup page will appear confirming that you wish to transmit these serials.
If the transaction type is Shipment, Return, Serial Generation, or Import Serials then select one or more destinations in the table that you want to transmit the serials to.
For more information on creating serial destinations, see Maintaining Serial Destinations and Destination Rules.
Click the Yes button on the Serial Destinations page for Shipment, Return, Serial Generation, or Import Serials transactions or click the Yes button on the popup page for Serial Transmission transactions.
The system will transmit the serials to the selected destinations. New Serial Transmission transactions will be created for each destination.
Oracle Pedigree and Serialization Manager (OPSM) uses a JMS Queue for asynchronous processing of inbound createTransaction messages. When a message is placed into the JMS Queue by the producer, the message is picked up and processed by the OPSM BPEL composite (consumer). The BPEL composite calls the createTransaction web service. If the web service call fails or returns an error, a Job Instance along with a Job Instance Message is created in OPSM. Errors related to createTransaction messages that fail to process successfully can be viewed in the Web Service Exceptions page.
This diagram illustrates the createTransaction Web Service process flow:
createTransaction Web Service Process Flow
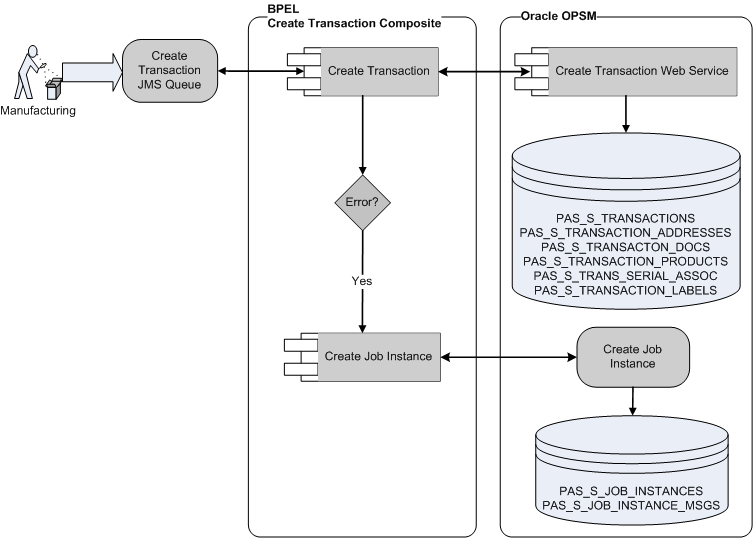
You will use the Web Service Exceptions page to view exception messages that are generated when messages are processed by the mergeLot, createTransaction, captureEpcisDoc, Edit Serial by Primary Doc, Edit Serial By Label, Edit Serial By List, and HTTP Post web services. Exception messages are only created for exceptions or errors that are detected by the web service. If the web service processes successfully during the integration process no message is recorded.
The Web Service Exceptions page is located under the Serials section and the Transactions section of the Task menu. The page is the same in both locations.
Important: If you call the OPSM Web Services directly without using the JMS Queue you are not able to view exception messages using the OPSM Web Service Exceptions page.
For more information on integrating Oracle E-Business Suite with OPSM, see the Oracle Serialization and Tracking Integration Pack for Oracle Pedigree and Serialization Manager and Oracle E-Business Suite 3.1 - Implementation Guide.
Use this procedure to view web service exceptions:
Prerequisites
The Oracle Serialization and Tracking Integration Pack for Oracle Pedigree and Serialization Manager and Oracle E-Business Suite 3.1 provides the JMS Producer as part of the integration pack.
To View Web Service Exceptions
Navigate to the Web Service Exceptions page.
For more information on how to view web service exceptions, see Merging Lots Using JMS Queue.
![]()
Copyright © 2013, Oracle and/or its affiliates. All rights reserved.