Replace An Existing NVMe Storage Drive (CRU)
Replace an Oracle 1.6 TB NVMe SSD if the drive fails or the usable drive life has been exceeded.
 | Caution - Possible component damage. Different server platforms place NVMe-capable bays in different locations. To identify a server’s NVMe-capable bay, observe that the orange silk screen on the server is labeled NVMe# before inserting an NVMe storage drive into a server NVMe-capable slot. Your server chassis must contain an NVMe capable configuration including Oracle NVMe Switch Controller Cards and cables. |
 | Caution - Possible component damage. Circuit boards and drives contain electronic components that are extremely sensitive to static electricity. Ordinary amounts of static electricity from clothing or the work environment can destroy the components located on these boards. Do not touch the components along their connector edges. These procedures require that you handle components that are sensitive to electrostatic discharge. This sensitivity can cause the components to fail. To avoid damage, ensure that you follow anti-static practices as described in ESD Safety Measures. |
The following task describes an example procedure. Follow the server's service manual instructions.
-
Prepare the server operating system, as required, before you remove
drives.
Follow the server's service manual instructions for orderly shutdown during NVMe storage drive insertion and removal service actions.
Unmount the NVMe storage drives.
-
Identify the physical location of the NVMe drive that you want to
remove.

Caution - Possible component damage. While using a 2.5-inch form factor drive, locate a server slot on the server's front panel labeled NVMe (with SFF-8639 disk backplane and connector) that is capable of supporting the Oracle 1.6 TB NVMe SSD that is labeled as shown in the following figure. Never insert an NVMe storage drive into a non-NVMe capable slot that supports HDD only (labeled HDD).

-
Observe the status indicators on the front panel of the drive to verify
which drive in the server requires replacement.
-
Verify that the Blue OK to Remove status indicator (LED) on the NVMe storage drive is lit.
-
Green (operational), Amber (faulty disk), Blue (SSD has been prepared for removal)
-
See Status Indicators.
-
-
Remove the NVMe storage drive from the server.
-
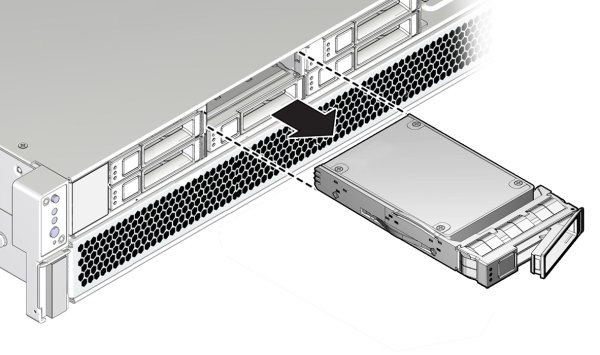
On the drive you plan to remove, push the latch release button to
open the drive latch.
Press the release lever button on the drive front panel and then tilt the lever into a fully opened position.
- Grasp the opened release lever and gently slide the drive toward you.
-
If you are not immediately replacing the drive, insert a filler
panel into the empty drive slot on the server.
If you are not replacing the drive, install a filler panel in the empty drive slot to maintain proper airflow and perform administrative tasks to configure the server to operate without the drive.

-
On the drive you plan to remove, push the latch release button to
open the drive latch.
-
Verify removal of the NVMe storage drive.
Follow the server's service manual instructions for NVMe storage drive identification.
-
Install (or replace) the NVMe storage drive.
The drive is physically addressed according to the slot in which it is installed. It is important to install a replacement drive in the same slot as the drive that was removed.
-
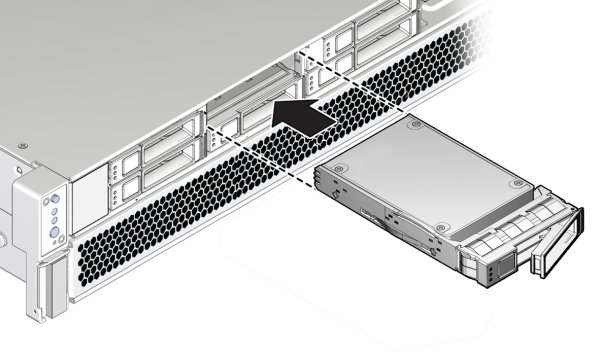
Slide the drive into the vacant slot by pressing the middle of the
drive faceplate with your thumb or finger.
Slide the drive into the slot until the drive is fully seated.
-
Close the drive latch to lock the drive in place.
Using your thumb or finger, press on the middle of the drive faceplate until the release lever engages with the chassis. Close the release lever until it clicks into place and is flush with the front of the server.


Caution - Possible component damage. While using a 2.5-inch form factor drive, locate a server slot on the server's front panel labeled NVMe (with SFF-8639 disk backplane and connector) that is capable of supporting the Oracle 1.6 TB NVMe SSD. Never insert an NVMe storage drive into a non-NVMe capable slot (HDD).
-
Slide the drive into the vacant slot by pressing the middle of the
drive faceplate with your thumb or finger.
-
For hot plug service actions, configure the NVMe storage drive and verify
drive availability.
-
Follow the server's service manual instructions for NVMe storage drive configuration and identification.
-
Use appropriate software commands to return the system to an operational state:
-
Power on the NVMe storage drive as required.
-
Attach a device driver as required.
-
Re-activate mirror if manual intervention is required.
-
Re-sync mirror if manual intervention is required.
-
-