Oracle® Enterprise Manager Ops Center
Discover and Manage Hardware
12c Release 3 (12.3.0.0.0)
E59999-01
June 2015
This guide provides an end-to-end example for how to use Oracle Enterprise Manager Ops Center.
Introduction
Oracle Enterprise Manager Ops Center manages and monitors a variety of data center assets, including server hardware, chassis, racks, network equipment, operating systems, virtualization software, and clustering software. Discovering assets is a prerequisite for almost every other operation. You can discover assets using a discovery profile, which specifies the discovery targets, protocols, and credentials for accessing and managing them.
This guide explains how to discover existing hardware using a discovery profile created for a configured service processor of one of the following types:
-
Embedded Lights-Out Manager (ELOM)
-
Advanced Lights-Out Manager (ALOM)
-
Integrated Lights-Out Manager (ILOM)
-
eXtended Service Control Facility (XSCF)
For new hardware without an operating system or service processor firmware, you can discover the asset by declaring servers for Operating System (OS) provisioning and declaring servers for service processor configuration.
The following sections are covered in this document:
What You Will Need
You will need the following:
-
Access to a system running Oracle Enterprise Manager Ops Center.
-
Ops Center Admin role to discover assets, and Ops Center Security Admin role to create credentials in Oracle Enterprise Manager Ops Center.
-
One or more hardware assets and the admin credentials needed to access the service processors. You must include a combination of Telnet, Intelligent Platform Management Interface (IPMI), or SSH credentials in the discovery profile to allow the discovery job to access the servers.
-
A server with a configured ELOM, ALOM, ILOM, or XSCF service processor.
Discovering Existing Hardware
You can discover existing hardware with configured service processors using a discovery profile. A discovery profile is a combination of an asset type, a set of host names or IP addresses, and a set of credentials.
This guide exemplifies the discovery of servers with ELOM, ALOM, ILOM, and XSCF service processors following three steps:
-
See Creating Credentials to determine the set of credentials you need to generate for your type of server.
-
See Creating a Discovery Profile to generate a profile for your type of server including the proper set of credentials. You can also include a range of IP addresses in the discovery profile.
-
Conclude with Adding the Hardware Using the Discovery Profile. You can include the IP address of the service processor in this step.
Creating Credentials
You must use a set of credentials to discover assets. You can create a new set of credentials or use existing credentials to connect with assets. Based on the choice of server type during the creation of a discovery profile, Oracle Enterprise Manager Ops Center displays only those protocols that are relevant to the asset.
Note:
Ensure you have service permissions in the ILOM user management configuration.Table 1 lists the required credentials for each type of server that you can create before generating a discovery profile. Alternatively, you can create the credentials using the discovery profile wizard.
Table 1 Server Types and Required Credentials
| Service Processor | Required Credentials | Server Examples |
|---|---|---|
|
ELOM |
IPMI, SSH |
Sun Fire X4150 |
|
ALOM |
Telnet or SSH |
Sun Fire T2000 |
|
ILOM |
IPMI, SSH |
Sun Fire X4150, Oracle SPARC T-Series, Oracle SPARC M5-32 |
|
XSCF |
SSH or Telnet |
Oracle M-Series, Fujitsu M10 |
Before continuing with the creation of a discovery profile, identify the credentials that you need for your server and follow the instructions to create them:
Creating Telnet Credentials
To create Telnet credentials, perform the following steps:
-
Click Plan Management on the Navigation pane, then click Credentials.
-
Click Create Credentials on the Actions pane. The Create Credentials wizard appears.

Description of the illustration create_telnet_cred.png
-
Select Telnet from the drop-down list in the Protocol field.
-
Enter a name for the discovery credentials in the Name field.
-
Enter a description in the Description field.
-
Enter the user name in the Login User field.
-
Enter a password for the user in the Password field. Retype the same password in the Confirm Password field.
-
Click Create. The system creates the credentials for Telnet.
Creating SSH Credentials
To create SSH credentials, perform the following steps:
-
Click Plan Management on the Navigation pane, then click Credentials.
-
Click Create Credentials on the Actions pane. The Create Credentials wizard appears.
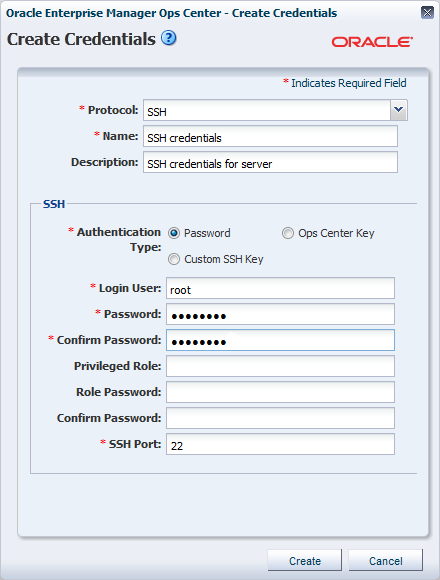
Description of the illustration create_ssh_cred.png
-
Select SSH from the drop-down list in the Protocol field.
-
Enter a name for the credentials in the Name field.
-
Enter a description in the Description field.
-
Enter a user name to login, in the Login User field.
-
Type a password in the Password field. Retype the same password in the Confirm Password field.
Note:
If a non-privileged user logs in, Oracle Enterprise Manager Ops Center runs the ”su” command to elevate the user to a root/privileged user. The privileged role of the user role and password must be entered in the respective fields. -
Change the SSH port number as needed. The default port number is 22.
-
Click Create. The system creates the credentials for SSH.
Creating IPMI Credentials
To create IPMI credentials, perform the following steps:
-
Click Plan Management on the Navigation pane, then click Credentials.
-
Click Create Credentials on the Actions pane. The Create Credentials wizard appears.
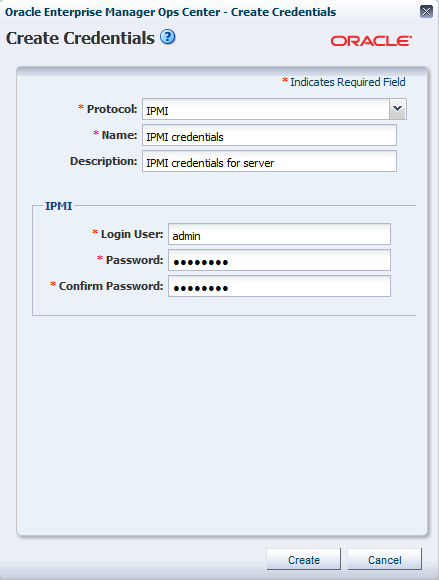
Description of the illustration create_ipmi_cred.png
-
Select IPMI from the drop-down list in the Protocol field.
-
Enter a name for the discovery credential in the Name field.
-
Enter a description in the Description field.
-
Enter the user name in the Login User field.
-
Enter a password for the user in the Password field. Retype the same password in the Confirm Password field.
-
Click Create. The system creates the credentials for IPMI.
Creating a Discovery Profile
The asset discovery job requires a discovery profile. Discovery profiles simplify managing multiple sets of discovery criteria and offer persistent storage of access credentials. You can provide discovery information, such as the discovery credentials during profile creation or when you run a discovery job using the profile.
Creating a Discovery Profile for an ELOM Service Processor
Perform the following steps to create a discovery profile for a ELOM service processor:
-
Click Plan Management on the Navigation pane.
-
Under Profiles and Policies, click Discovery.
-
Click Create Profile in the Actions pane.
-
Enter a name and description for the discovery profile.
-
In the Asset Type, under Server Hardware, select ELOM Service Processor. Click Next.
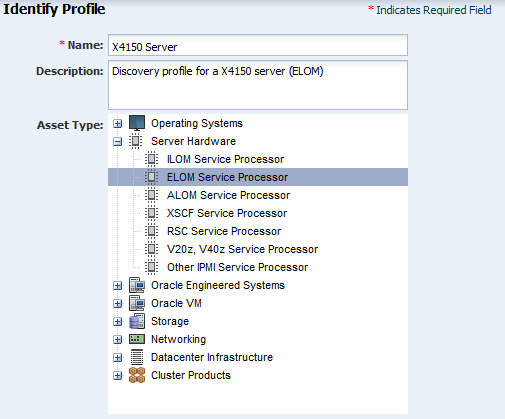
Description of the illustration id_profile_elom1.png
-
Click Next. In this example, tag information is not used.
-
Click Next. You can add the IP address or IP ranges when you discover the asset.
-
In the Discovery Credentials wizard, click the Select button for SSH. The wizard to select SSH credentials appears.
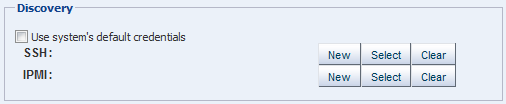
Description of the illustration id_prof_elom_creds1.png
-
Select the SSH credentials that you have created, then click OK.
-
Repeat the same operation for the IPMI credentials.
-
Review the summary information, then click Finish. Oracle Enterprise Manager Ops Center creates the discovery profile.
Creating a Discovery Profile for an ALOM Service Processor
Perform the following steps to create a discovery profile for an ALOM service processor:
-
Click Plan Management on the Navigation pane.
-
Under Profiles and Policies, click Discovery.
-
Click Create Profile in the Actions pane.
-
Enter a name and description for the discovery profile.
-
In the Asset Type, under Server Hardware, select ALOM Service Processor. Click Next.
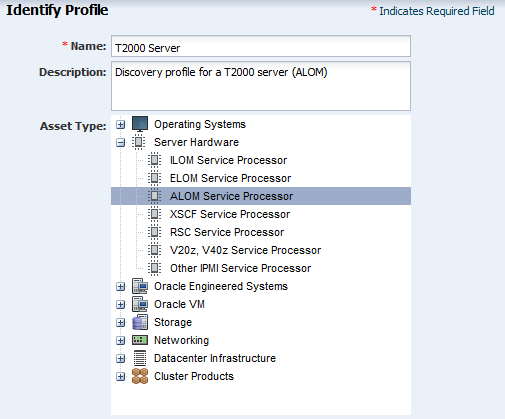
Description of the illustration id_profile_alom1.png
-
Click Next. In this example, tag information is not used.
-
Click Next. You can add the IP address or IP ranges when you discover the asset.
-
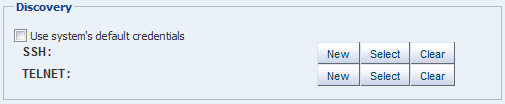
In the Discovery Credentials wizard, click the Select button against Telnet. The SSH protocol is not used in this example discovery profile, only the Telnet credentials for the service processor are used instead. The wizard to select Telnet credentials appears.
Description of the illustration id_prof_alom_creds1.png
-
Select the Telnet credentials that you have created, then click OK.
-
You can repeat the operation to add SSH credentials to the discovery profile.
-
Review the summary information, then click Finish. Oracle Enterprise Manager Ops Center creates the discovery profile.
Creating a Discovery Profile for an ILOM Service Processor
Perform the following steps to create a discovery profile for an ILOM service processor:
-
Click Plan Management on the Navigation pane.
-
Under Profiles and Policies, click Discovery.
-
Click Create Profile in the Actions pane.
-
Enter a name and description for the discovery profile.
-
In the Asset Type, under Server Hardware, select ILOM Service Processor. Click Next.
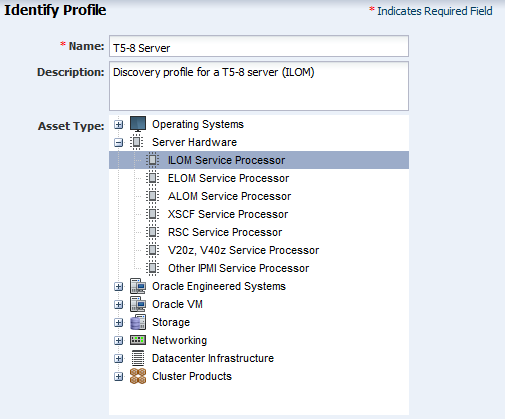
Description of the illustration id_profile_ilom1.png
-
Click Next. In this example, tag information is not used.
-
Click Next. You can add the IP address or IP ranges when you discover the asset.
-
In the Discovery Credentials wizard, click the Select button for SSH. The wizard to select SSH credentials appears.
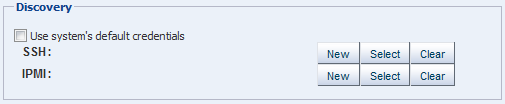
Description of the illustration id_prof_ilom_creds1.png
-
Select the SSH credentials that you have created, then click OK.
-
Repeat the operation for the IPMI credentials.
-
Review the summary information, then click Finish. Oracle Enterprise Manager Ops Center creates the discovery profile.
Creating a Discovery Profile for an XSCF Service Processor
Perform the following steps to create a discovery profile for an XSCF service processor:
-
Click Plan Management on the Navigation pane.
-
Under Profiles and Policies, click Discovery.
-
Click Create Profile in the Actions pane.
-
Enter a name and description for the discovery profile.
-
In the Asset Type, under Server Hardware, select XSCF Service Processor. Click Next.
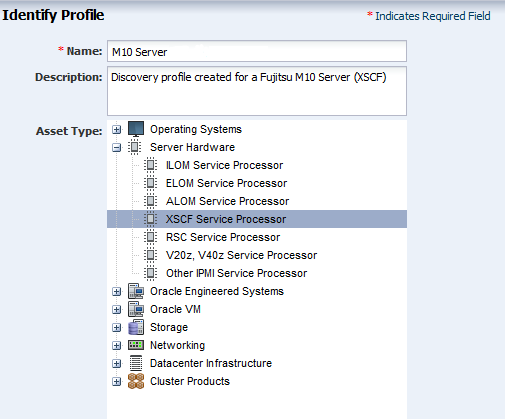
Description of the illustration id_profile_xscf1.png
-
Click Next. In this example, tag information is not used.
-
Click Next. You can add the IP address or IP ranges when you discover the asset.
-
In the Discovery Credentials wizard, click the Select button for SSH. The wizard to select SSH credentials appears.
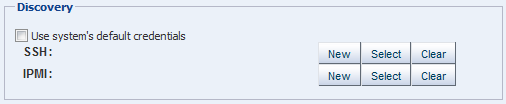
Description of the illustration id_prof_xscf_creds.png
-
Select the SSH credentials that you have created, then click OK.
-
You can repeat the operation to add TELNET credentials to the discovery profile.
-
Review the summary information, then click Finish. Oracle Enterprise Manager Ops Center creates the discovery profile.
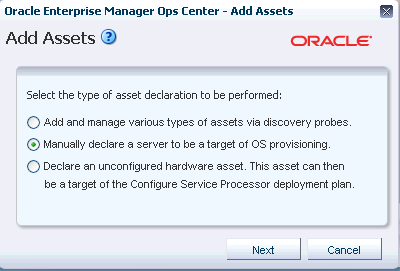
Adding the Hardware Using the Discovery Profile
After you have created the discovery profile, you can run an Add Assets job using the profile to discover and manage the server.
-
Click All Assets in the Assets section of the Navigation pane.
-
Click Add Assets in the Actions pane.
-
Select Add and Manage Various Types of Assets via Discovery Probes, then click Next.
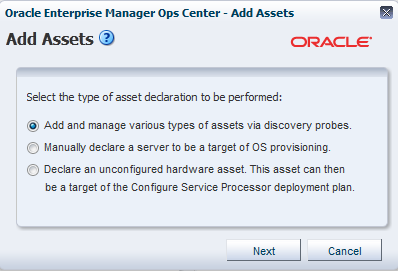
Description of the illustration add_assets.png
-
Select the discovery profile.
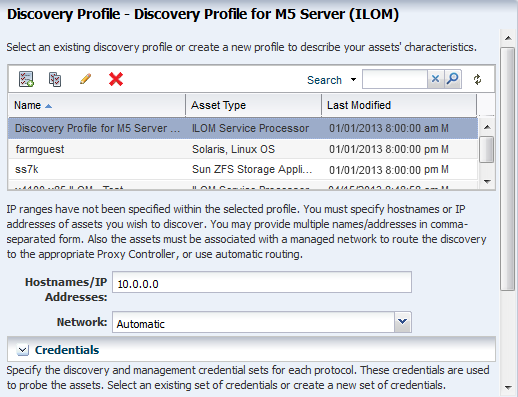
Description of the illustration using_disc_profile.png
-
Enter the host name or IP address of the service processor, then click Add Now to launch the discovery. The system launches the discovery job. This might take a few minutes to complete.
After the discovery job completes successfully, the service processor is visible in the Navigation pane under Servers as shown in the following figure.
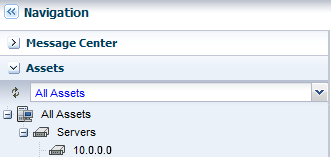
Description of the illustration ilom_added.png
Discovering New Hardware
You can discover new hardware that does not have a configured service processor or operating system.
The following tasks are covered in this section:
Declaring Servers for OS Provisioning
The Manually declare a server to be a target of OS provisioning option enables you to declare one or more bare metal systems in preparation for OS provisioning, even if the systems have no configured service processors.
You can declare a single server by entering the server information directly into the wizard, or declare multiple servers using a discovery file containing the information for all of the servers.
This option also allows Oracle Enterprise Manager Ops Center to configure a virtual server for OS provisioning. The asset does not need to have a service processor connected to the discovery network. Oracle Enterprise Manager Ops Center uses the OS interface for net boot provisioning.
To declare a single server for OS Provisioning, perform the following steps:
-
Click All Assets in the Assets section of the Navigation pane.
-
Click Add Assets in the Actions pane.
-
Select Manually Declare a Server to be a Target of OS Provisioning, then click Next.
Description of the illustration add_asset_manually.png
-
Select Declare a Single Server and enter the server information in the respective fields.
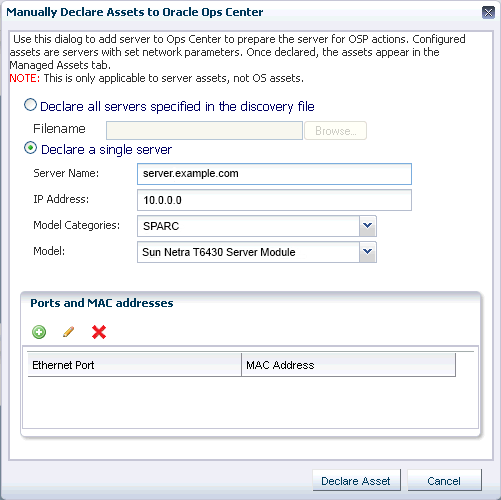
Description of the illustration declare_server_os.png
-
Server Name: The name of the server that should appear in the UI.
-
IP Address: Specify an IP address to route the discovery to the correct Proxy Controller. You do not need to use the actual IP address of a server. You can use an IP address that is on the same subunit as the server to be discovered.
-
Model Category: Select the category in which the asset model appears.
-
Model: The model of the asset.
-
MAC Address and Port combination: Used to connect to the server once it is available on the network. Click the Add or Edit icons to add or edit a MAC Address/Port combination, then select the combination.
Enter a logical port name for each network interface. One of these logical port names must be GB_0. Available logical port names are GB_0 through GB_11. You can also use ”mgmt” as a management port. These logical port names are mapped to network interfaces after the asset has been provisioned, according to the MAC addresses that you specify. If the server has only one network interface, use GB_0.
Enter the MAC addresses of the network interfaces on the server that you want to declare.
-
-
Click Declare Asset. The system discovers the new hardware which is now ready for the OS to be provisioned on it.
Declaring Servers for Service Processor Configuration
The Declare an unconfigured hardware asset option lets you declare one or more bare metal systems in preparation for service processor configuration.
The assets being declared do not need to be physically connected to the network at the time of the discovery, because the assets produced by an asset declaration are skeletal representations of the real assets. These assets can then be targeted with service processor configuration jobs. Once the real assets are connected to the network, provisioned, and discovered, they will be correlated with the declared version into complete assets.
The service processors need to be connected to the discovery network, and need to have temporary IP addresses assigned. The job searches a range of IP addresses for the entered MAC addresses and represents the result as servers. The discovered service processors can subsequently be configured, assigned to permanent IP addresses and administrative passwords.
To declare unconfigured assets for service processor configuration, perform the following steps:
-
Click All Assets in the Assets section of the Navigation pane.
-
Click Add Assets in the Actions pane.
-
Select Declare an Unconfigured Hardware Asset, then click Next.
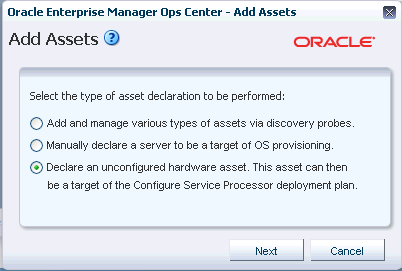
Description of the illustration add_asset_unconfigured.png
-
Enter data for the servers to be declared in the respective fields.
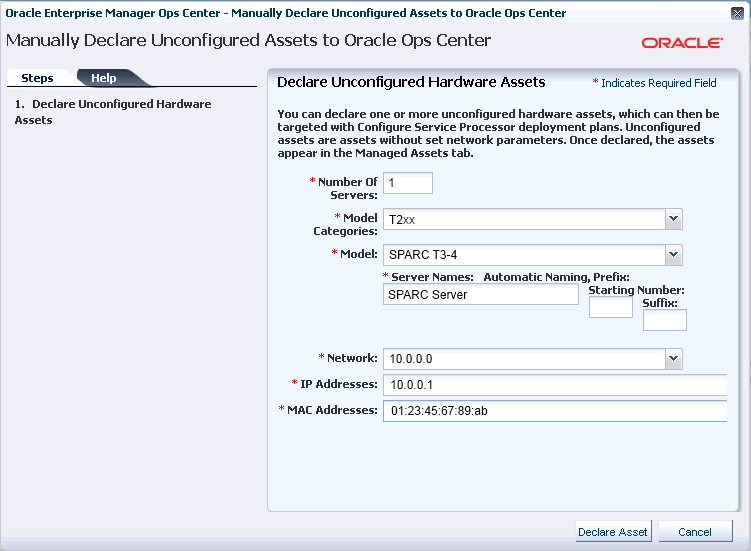
Description of the illustration dec_server_sp.png
-
Number of Servers: The total number of servers to be discovered.
-
Model Categories: The model category of the servers.
-
Model: The specific model of the servers.
-
Server Names: The names of the servers, including:
-
Prefix: A prefix that appears before each server name. This field is required.
-
Starting Number: The number of the first server. The number will be increased by one for each additional server. This field is required.
-
Suffix: A suffix that appears after each server name.
-
-
Network: The network on which the server or servers will be added.
-
IP addresses: The IP addresses to be used for the servers.
-
MAC Addresses: The MAC Addresses of the servers.
-
-
Click Declare Asset. The system discovers the new hardware prepares it for the OS to be provisioned on it.
What's Next?
After you have added the hardware, you can discover and manage the operating system on the hardware. See the Deploy Operating Systems Workflow in the Deploy How To library at http://docs.oracle.com/cd/E59957_01/nav/deploy.htm.
Related Articles and Resources
See the following for more information:
-
Manage Assetsof the Oracle Enterprise Manager Configure Reference for information about discovery procedures for different types of servers. -
Hardwareof the Oracle Enterprise Manager Operate Reference for information about managing and monitoring hardware assets. -
Operating Systems Provisioningof the Oracle Enterprise Manager Operate Reference for information about provisioning operating systems on hardware servers.
These documents contain examples and information about discovering different types of servers:
Documentation Accessibility
For information about Oracle's commitment to accessibility, visit the Oracle Accessibility Program website at http://www.oracle.com/pls/topic/lookup?ctx=acc&id=docacc.
Oracle customers that have purchased support have access to electronic support through My Oracle Support. For information, visit http://www.oracle.com/pls/topic/lookup?ctx=acc&id=info or visit http://www.oracle.com/pls/topic/lookup?ctx=acc&id=trs if you are hearing impaired.
Oracle Enterprise Manager Ops Center Discover and Manage Hardware, 12c Release 3 (12.3.0.0.0)
E59999-01
Copyright © 2007, 2015, Oracle and/or its affiliates. All rights reserved.
This software and related documentation are provided under a license agreement containing restrictions on use and disclosure and are protected by intellectual property laws. Except as expressly permitted in your license agreement or allowed by law, you may not use, copy, reproduce, translate, broadcast, modify, license, transmit, distribute, exhibit, perform, publish, or display any part, in any form, or by any means. Reverse engineering, disassembly, or decompilation of this software, unless required by law for interoperability, is prohibited.
The information contained herein is subject to change without notice and is not warranted to be error-free. If you find any errors, please report them to us in writing.
If this is software or related documentation that is delivered to the U.S. Government or anyone licensing it on behalf of the U.S. Government, then the following notice is applicable:
U.S. GOVERNMENT END USERS: Oracle programs, including any operating system, integrated software, any programs installed on the hardware, and/or documentation, delivered to U.S. Government end users are "commercial computer software" pursuant to the applicable Federal Acquisition Regulation and agency-specific supplemental regulations. As such, use, duplication, disclosure, modification, and adaptation of the programs, including any operating system, integrated software, any programs installed on the hardware, and/or documentation, shall be subject to license terms and license restrictions applicable to the programs. No other rights are granted to the U.S. Government.
This software or hardware is developed for general use in a variety of information management applications. It is not developed or intended for use in any inherently dangerous applications, including applications that may create a risk of personal injury. If you use this software or hardware in dangerous applications, then you shall be responsible to take all appropriate fail-safe, backup, redundancy, and other measures to ensure its safe use. Oracle Corporation and its affiliates disclaim any liability for any damages caused by use of this software or hardware in dangerous applications.
Oracle and Java are registered trademarks of Oracle and/or its affiliates. Other names may be trademarks of their respective owners.
Intel and Intel Xeon are trademarks or registered trademarks of Intel Corporation. All SPARC trademarks are used under license and are trademarks or registered trademarks of SPARC International, Inc. AMD, Opteron, the AMD logo, and the AMD Opteron logo are trademarks or registered trademarks of Advanced Micro Devices. UNIX is a registered trademark of The Open Group.
This software or hardware and documentation may provide access to or information about content, products, and services from third parties. Oracle Corporation and its affiliates are not responsible for and expressly disclaim all warranties of any kind with respect to third-party content, products, and services unless otherwise set forth in an applicable agreement between you and Oracle. Oracle Corporation and its affiliates will not be responsible for any loss, costs, or damages incurred due to your access to or use of third-party content, products, or services, except as set forth in an applicable agreement between you and Oracle.