16 Discovering, Promoting, and Adding System Infrastructure Targets
This chapter describes how you can use Cloud Control to discover, promote, and add system infrastructure targets. This chapter covers the following:
-
About Discovering, Promoting, and Adding System Infrastructure Targets
-
Related Resources for Discovering and Promoting System Infrastructure Targets
16.1 About Discovering, Promoting, and Adding System Infrastructure Targets
Cloud Control enables you to monitor a variety of system infrastructure targets, including Oracle VM Server for SPARC, Oracle Solaris Zones, Oracle SuperClusters, servers, operating systems, storage, networks, racks, and power distribution units (PDUs). The steps to add System Infrastructure targets is the same for most targets. However, a few targets do require special procedures.
When fully managed, systems infrastructure targets provides monitoring and an enterprise-wide view of the bottom half of the stack, including Oracle Solaris and Linux operating systems, virtualized operating systems (zones) and virtual machines (logical domains), servers, storage appliances, storage for a host, and network resources.
Note:
To monitor ILOM servers or virtualization targets, deploy the EM Agent withsudo privileges or manually install and run the root.sh script.
Monitoring requires that the root.sh script is executed and installs the nmr binary. When you deploy an EM Agent with sudo privileges, the root.sh script is executed.
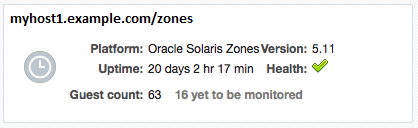
How long it takes to begin monitoring all discovered targets varies, depending on your environment, configuration, and the number of guests. For virtualization targets, the Summary dashlet on the Virtualization Platform includes the total number of guests being monitored. When guests are discovered and configured on the platform, but not yet monitored, an icon appears in the dashlet along with the number of guests that are pending monitoring. For example, in Figure 16-1 there are 63 guests configured on the host and 16 of those guests are not yet being monitored. The icon will not appear in the dashlet when all guests are monitored.
Figure 16-1 Summary Dashlet Showing the Number of Guests to be Monitored
Description of ''Figure 16-1 Summary Dashlet Showing the Number of Guests to be Monitored''
16.2 Discovering and Promoting Operating Systems
Oracle Solaris and Linux operating systems are discovered and promoted as part of the host discovery and promotion process. See Discovering and Adding Host and Non-Host Targets for more about discovery, promotion, and the steps to discover and promote a host target.
16.3 Discovering and Promoting Oracle Solaris Zones
Discovering and promoting Oracle Solaris Zones relies on the host discovery. When a host on a global zone is promoted, it triggers the discovery and monitoring of the zones.
Note:
To take advantage of all supported Oracle Solaris Zone monitoring, the Oracle Solaris release on the global zone must be Oracle Solaris 10 Update 11 or later.To discover and monitor zone targets, deploy the EM Agent with sudo privileges or manually install and run the root.sh script.
When a host is in a zone, you should discover the global zone before you add the virtual server targets. If you see a message stating that there is not a virtual platform associated with this virtual server, discover and add the virtual server's global zone as a managed target.
Oracle Solaris Zones are displayed with the following target display names:
-
Virtualization Platform: <Oracle Solaris Global Zone OS Host Name> (Solaris Zones Virtual Platform)
-
Virtual Server: <Oracle Solaris Zone Name>
You can change the display name of a discovered Oracle Solaris Zone using the CLI. For example, to change a Virtualization Platform display name:
emcli modify_target -name="Virtual Platform Target Name" -type="oracle_si_virtual_platform_map" -display_name="New Display Name"
To change a Virtual Server display name:
emcli modify_target -name="Virtual Server Target Name" -type="oracle_si_virtual_server_map" -display_name="New Display Name"
See Discovering and Adding Host and Non-Host Targets for more about discovery, promotion, and the steps to add a host.
16.4 Discovering and Promoting Oracle VM Server for SPARC
Discovering and promoting Oracle VM Server for SPARC relies on the host discovery. When a host on a control domain is promoted, it triggers the discovery and monitoring of the other domains.
Note:
To discover and monitor targets, deploy the EM Agent withsudo privileges or manually install and run the root.sh script.When an agent is deployed to a control domain or logical domain OS, related targets including the ILOM server, virtual platform, and virtual server are automatically promoted.
When a host is in a logical domain, you should discover the control domain before you add the virtual server targets. If you see a message stating that there is not a virtual platform associated with this virtual server, discover and add the virtual server's primary domain as a managed target.
An Oracle VM Server for SPARC must meet the following prerequisites to be discovered and added:
-
The Oracle Solaris release on the control domain must be Oracle Solaris 11.1 or later.
-
The Oracle VM Server for SPARC software must be version 3.1 or later.
-
The non-privileged user used to install and run the Enterprise Manager agent must be granted the
solaris.ldoms.readandsolaris.ldoms.ldmpowerauthorizations and be assigned the LDoms Power Mgmt Observability rights profile. For example:/usr/sbin/usermod -A solaris.ldoms.read,solaris.ldoms.ldmpower oracle /usr/sbin/usermod -P 'LDoms Power Mgmt Observability' oracle
If other software is consuming a lot of resources on the system or control domain, it might take longer to discover and monitor the target.
Oracle VM Server for SPARC are displayed with the following target display names:
-
Virtualization Platform: <Control Domain OS Host Name> (OVM SPARC Virtual Platform)
-
Virtual Server: <Domain Name>
You can change the display name of a discovered Oracle VM Server for SPARC using the CLI. For example, to change a Virtualization Platform display name:
emcli modify_target -name="Virtual Platform Target Name" -type="oracle_si_virtual_platform_map" -display_name="New Display Name"
To change a Virtual Server display name:
emcli modify_target -name="Virtual Server Target Name" -type="oracle_si_virtual_server_map" -display_name="New Display Name"
See Discovering and Adding Host and Non-Host Targets for more about discovery, promotion, and the steps to promote a host.
16.5 Discovering and Promoting Servers
Discovering and adding servers can be performed separately or as part of the host discovery. When a host is promoted, it triggers the discovery and auto promotion of the server supporting the host. See Discovering and Adding Host and Non-Host Targets for more about discovery, promotion, and the steps to promote a host.
To discover and promote an ILOM server, see the following:
To change the display name after you have discovered an ILOM server, see Change the Display Name of a Discovered ILOM Server.
Note:
To auto-promote targets, deploy the EM Agent withsudo privileges or manually install and run the root.sh script.
A Systems Infrastructure Server is displayed with the ILOM server name if the ILOM is discovered before the host, and if the HMP package is installed on the host. Otherwise, the Systems Infrastructure Server is displayed with the name "<host name>/server".
For some servers, a minimum firmware version is recommended to improve performance.
Note:
For SPARC M6-32 servers, system firmware 9.4.2.E or higher is recommended.16.5.1 Discover an ILOM Server Using the User Interface
To discover an ILOM server, perform the following steps:
-
From the Setup menu, select Add Target.
-
Click Add Targets Manually.
-
Click Add Using Guided Process listed under Add Non-Host Targets Using Guided Process.
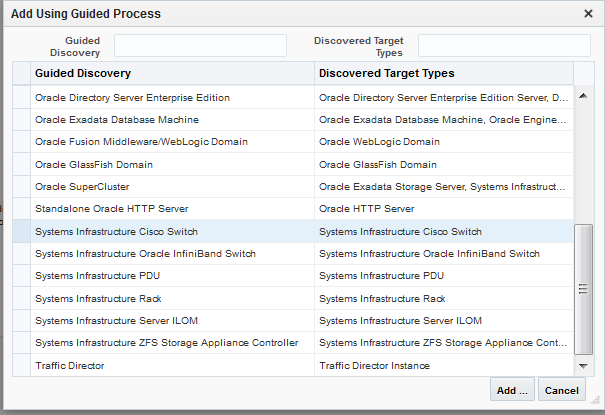
The Add Using Guided Process window is displayed with the list of Guided Discovery and Discovered Target Types.
-
Select Systems Infrastructure Server ILOM from the list in the Add Using Guided Process window and click Add.
-
For Target, enter the following details:
-
Target Name: Enter the name of the ILOM server.
-
Server ILOM DNS Name or IP Address: Enter the Server DNS Name or IP Address.
-
-
For Monitoring Agents, enter the following details:
-
Enter the Monitoring Agent EMD URL.
-
(Optional): Enter the Backup Agent EMD URL.
-
-
For Monitoring Credentials, enter the following SSH monitoring credentials:
-
Select the Credential type as ILOM SSH Credentials.
-
Enter the root user name in the Username field.
-
Enter the root password in the Password and Confirm Password fields.
-
-
Click Add.
A confirmation window appears when the target is successfully added.
16.5.2 Discover an ILOM Server Using the Command Line Interface
You can discover a server using the emcli command line tool. You must configure the command line interface before you can issue commands. For more information, click the Setup menu, then click Command Line Interface. Follow the Download and Deploy instructions.
To discover a server using the emcli, perform the following steps:
-
Open your command line on the host where OMS is running.
-
Login to emcli using command
emcli login –username=<Your user name>. -
Type the password when prompted.
-
Execute command
emcli sync. -
Discover a new server using the
emcli add_targetcommand and define the following options:-
-name=Name of the server to be displayed within Enterprise Manager -
-type=oracle_si_server_map -
-host=Host name from which you discover the server target for monitoring -
-access point name=Access point name to be displayed within EM -
-access_point_type=oracle_si_server_ilom -
-properties=key:ILOM IP address that will be used in discovery. For example, -properties='dispatch.url=ilom-ssh://<ILOM_IP_ADDRESS>'. -
-subseparator=properties with sub separator string, For example, you can use=as a separator between key value pairs. Alternatively, you can use the-separatoroption when there are multiple properties (key value pairs) that need to be separate. -
-monitoring_cred=The credentials of the server ILOM to be discovered
-
Example 16-1 Example CLI command to Discover ILOM Server
The following command discovers and manages an ILOM server, sets the host name, defines the access point name and type, identifies the monitoring properties and credentials.
emcli add_target -name=<TARGET_NAME> -type=oracle_si_server_map -host=<AGENT_HOST_NAME> -access_point_name='<ACCESS_POINT_NAME>' -access_point_type='oracle_si_server_ilom' -properties='dispatch.url=ilom-ssh://<ILOM_IP_ADDRESS>' -subseparator=properties='=' -monitoring_cred='ilom_creds_set;oracle_si_server_ilom;ilom_creds;username:<ROOT_USER>;password:<ROOT_PWD>' -monitoring_cred='ssh_creds_set;oracle_si_server_ilom;ssh_creds;username:<ROOT_USER>;userpass:<ROOT_PWD>'
16.5.3 Change the Display Name of a Discovered ILOM Server
You can change the display name of a discovered server using the CLI by running the emcli command to modify the target name. For example:
emcli modify_target -name="Server Target Name" -type="oracle_si_server_map" -display_name="New Display Name"
16.6 Discovering and Promoting Oracle SuperCluster
Before you begin the discovery process, there are several checks you should perform to ensure a smooth discovery.
16.6.1 Prerequisites
A discovery pre-check script is available to automatically verify a proper configuration of the system required for smooth discovery.
Some of Oracle SuperCluster discoveries on Oracle Enterprise Manager 13c may run into issues due to configuration mismatches in the software setup. The discovery pre-check script helps you resolve most common configuration problems. Run the script before the Oracle SuperCluster discovery and examine the output before proceeding with the discovery in Oracle Enterprise Manager.
For the best possible discovery result, run the script and resolve all issues even though some of them might be ignored to successfully finish the process.
The script is part of Enterprise Manager Agent bundle.
16.6.2 Obtain the Discovery Precheck Script
You can obtain the script in one of the following ways:
-
Access the script as part of Systems Infrastructure plug-in 13.1.1.0.0 after the plug-in is deployed to the agent:
<agent installation directory>/plugins/oracle.sysman.si.discovery.plugin_13.1.1.0.0/discover/sscDiscoveryPreCheck.pl
-
Check My Oracle Support for the latest version of the prerequisites script.
If you run the script downloaded from My Oracle Support, make sure you run it on a compute node (CDOM) where the Enterprise Manager Agent bundle is deployed.
16.6.3 Run the Discovery Precheck Script
Type the following commands to run the script:
-
$ cd <agent installation directory>/plugins/oracle.sysman.si.discovery.plugin_13.1.1.0.0/discover
-
$ perl ./sscDiscoveryPrecheck.pl
Type the following command to check the help for optional parameters:
-
$ perl ./sscDiscoveryPrecheck.pl --help
As the script runs, you are prompted for various inputs. The script executes all the built-in checks and displays important messages on standard output. Detailed information is stored in a log file and can be used to debug execution errors.
The discovery pre-check script performs the following checks:
-
Execution environment and network
-
Network configuration (IP, host name validity, ping)
-
Hardware monitoring credentials (optional)
-
Detailed hardware or software checks (may require credentials)
-
Correct ILOM versions of the monitored targetsExadata Cell management and cell server version and status
-
PDU firmware version, Trap and NMS table availability
-
Oracle SuperCluster version
-
IPMI tool version
16.6.4 Credentials Required for Oracle SuperCluster Discovery
The following are the credentials required for the discovery of Oracle SuperCluster.
Table 16-1 Credentials for SSC Discovery
| Target Type | Credentials |
|---|---|
|
Systems Infrastructure Server |
ILOM Monitoring Credentials |
|
Systems Infrastructure InfiniBand Switch |
ILOM Monitoring Credentials, SNMP Credentials |
|
Systems Infrastructure CISCO Switch |
Cisco Switch IOS Credentials, SNMP Credentials |
|
Systems Infrastructure ZFS Storage Appliance Controller |
ZFS SA Storage Controller SSH Credentials |
|
Systems Infrastructure PDU |
HTTP Monitoring Credentials, SNMP Credentials |
|
Oracle Exadata Storage Server |
Exadata Privileged Credentials, SNMP Community String. Allows SNMP subscription and can be used once only. Use other lower privileged credentials for monitoring. |
|
Host |
Agent Host User Credentials. This credential is required to setup passwordless access to the storage cell. |
16.6.5 Manual Prerequisite Verification
Ensure that the host names of compute nodes and Exadata cells in each individual Oracle SuperCluster system have a unique prefix.
16.6.6 Oracle SuperCluster Discovery
It is recommended to use multiple Enterprise Manager Agents to manage targets. Deploy the agents prior to the Oracle Supercluster discovery process. The Enterprise Manager Agent has to be deployed to each of the virtualization platforms that is planned to be managed.
Figure 16-2 is a pictorial representation of Oracle SuperCluster discovery workflow.
Figure 16-2 Oracle SuperCluster Discovery Workflow
Description of ''Figure 16-2 Oracle SuperCluster Discovery Workflow''
To discover the Oracle SuperCluster system, perform the following steps:
-
Log in to Enterprise Manager.
-
Under Setup, click Add Target, then click Add Targets Manually.
-
In the Overview section, click Add Targets using Guided Process.
-
In the Add Using Guided Process screen, scroll down to Oracle SuperCluster and click Add. The Oracle SuperCluster Discovery wizard opens.
-
The Introduction wizard guides you through the steps required to discover Oracle SuperCluster in Oracle Enterprise Manager. Click Next to continue with the discovery process.
Note:
The guided discovery process assumes that Oracle Enterprise Manager Agents are already deployed to Compute Nodes. The Enterprise Manager agent must be deployed in order to monitor a virtualization stack on compute nodes.Note:
If you want to monitor database instances running on a DB domain, you must install the Enterprise Manager Agents on all the Zones and Guest LDOMs where the databases are installed. -
In the Discovery Input screen, enter the required information.
-
In the Agent EMD URL field, click the search icon and select an agent.
Note:
The agent must be on the same network where one of the Oracle SuperCluster InfiniBand switches is located. -
In the Primary Domain Host name field, specify the host name of the primary domain that was used for OneCommand execution during setup of the Oracle SuperCluster system.
Note:
The domain is used to discover system targets. This is a one-time operation. Discovery requires privileged user (root) credentials to discover details of the system and presence of catalog.xml or databasemachine.xml file in OneCommand directory located in /opt/oracle.SupportTools/onecommand. -
In the Credential field, select New to create credentials.
-
Click Named if you already have existing credentials.
-
-
In the User Name field, enter the name of the user with root privileges.
-
In the Password field, enter the password of the compute node.
-
Click Save As to save the credentials for later use.
-
In the InfiniBand Switch Host name field, enter the DNS name or IP address of the InfiniBand switch.
-
In the Credential field, select New to create credentials.
-
Click Named if you already have existing credentials.
-
-
In the Username field, enter the user name to connect to the InfiniBand switch ILOM.
-
In the Password field, enter the password for the InfiniBand switch ILOM.
-
In the Run Privilege field, select None.
-
Click Save As to save the credentials for later use.
-
-
(Optional) Click Test Connection to test your connection.
-
-
Click Next to proceed to the next step. The Oracle SuperCluster discovery process is started. When the discovery is completed, a confirmation window displays the number of targets discovered. Click Close to close the window.
-
The Discovery Prerequisites screen opens. It displays basic information of the discovery. It also displays any warnings and errors found during the discovery process. Click Next to continue.
Note:
If you receive errors, you must fix the errors before you can proceed to the next step. To continue with warnings, read the warnings carefully and then acknowledge them. -
The Discovered Targets screen lists all the targets discovered in the Oracle SuperCluster system. All targets are selected by default. The Managed column indicates if the targets have already been discovered and managed by Enterprise Manager. Deselect the targets that you do not want to be discovered and monitored.
-
Click Next to proceed.
-
The Monitoring Agents screen allows you to assign monitoring and backup agents to targets selected in the previous step. The discovery wizard assigns available agents automatically to achieve best possible performance and reliability. For targets that are not already managed by Enterprise Manager you can manually select other agents than the default ones if necessary. Click Next.
Note:
The agent must be on the same network and be able to reach the target. -
The Monitoring Credentials screen lists the credentials that are used to monitor the targets. Click Edit to change or provide monitoring credentials for targets that do not have the information. Click Next.
Note:
Use the root username and password to discover an InfiniBand network switch.Note:
For the Monitoring Agent Hosts section, enter the user name and password of the user under which the EM agent is running on a given host.Note:
Select the Use for all option to use the same credentials for all targets of the same target type. -
In the System Review screen, review the system information.
Click Test Connection to check whether the specified credentials are correct for all selected targets. -
Click Promote Targets to create and manage targets. This may take few minutes to complete. You are informed about any errors that occur during the process. In case there is at least one error, no targets are created. Fix all errors and rerun the discovery. Once the process completes without any errors, the targets are managed and you can view the Oracle SuperCluster system with all its targets.
Note:
In the Oracle SuperCluster discovery wizard, if any hardware target is not discovered, you can return to any screen, correct the input data or deselect the problematic hardware, and then rerun the discovery. You can rerun the discovery later and discover any missing targets of the system.16.7 Discovering and Promoting PDUs
Before you run the PDU discovery, verify that the NMS table and Trap Hosts Setup table of the PDU have an empty row for monitoring agent and an empty slot for backup agent, if you plan to use backup monitoring agent.
16.7.1 Verify PDU v1 NMS Table and Trap Hosts Setup Table
To verify and modify the NMS table and Trap Hosts setup table on a PDU v1, perform the following steps in the PDU user interface:
-
Open the PDU Management Interface in the web browser.
-
In the PDU User Interface, click Net Configuration.
-
Login with your user name and password.
-
Locate the NMS table and make sure there are enough empty slots for IP addresses of EM agents that will monitor the PDU.
-
Empty slot contains 0.0.0.0 value in the IP address field and empty string in the Community string field.
-
-
Enter 0.0.0.0 value in the IP address field and empty Community string field if there are not enough empty slots.
-
Click Submit.
-
Locate the Trap Hosts Setup table on the same page and make sure there are enough empty slots for IP addresses of EM agents that will monitor the PDU.
-
Empty slot contains 0.0.0.0 value in the IP address field and empty string in the Community string field.
-
-
Enter 0.0.0.0 value in the IP address field and empty Community string field if there are not enough empty slots.
-
Click Submit.
-
Logout from the PDU interface.
16.7.2 Verify PDU v2 NMS Table and Trap Hosts Setup Table
To verify and modify the NMS table and Trap Hosts setup table on a PDU v2, perform the following steps in the PDU user interface:
-
Open the PDU Management Interface in the web browser.
-
In the PDU User Interface, click Net Configuration.
-
Login with your user name and password.
-
Click SNMP Access tab.
-
Make sure there are enough empty slots in NMS (SNMP v1/v2) table for IP addresses of EM agents that will monitor the PDU.
-
Empty slot is a slot where the Enable check box is deselected.
-
-
Deselect the Enable check boxes if there are not enough empty slots.
-
Click Submit.
-
Click SNMP Traps tab.
-
Make sure there are enough empty slots in Trap Remote Host Setup table for IP addresses of EM agents that will monitor the PDU.
-
Empty slot is a slot where the Enable check box is deselected.
-
-
Deselect Enable check boxes if there are not enough empty slots.
-
Click Submit.
-
Logout from the PDU interface.
16.7.3 PDU Discovery in the Enterprise Manager
To discover the PDU, perform the following steps:
-
Log in to Enterprise Manager.
-
Under Setup, click Add Target, then click Add Targets Manually.
-
In the Overview section, click Add Targets using Guided Process.
-
In the Add Using Guided Process screen, scroll down to Systems Infrastructure PDU, then click Add.
-
In the Systems Infrastructure PDU Discovery screen, enter the required information.
-
In the Target Name field, enter a name for the target.
-
In the PDU DNS Name or IP Address field, enter the IP address or DNS name of the PDU.
-
In the Monitoring Agent EMD URL field, click the search icon and select a monitoring agent. The agent must be able to communicate with the PDU over the network.
(Optional) You can select backup monitoring agent for the PDU. In the Backup Agent EMD URL field, click the search icon and select a monitoring agent. The agent must be able to communicate with the PDU over the network.Note:
Backup agent is used to monitor a target and collect its metrics when the primary agent is not reachable or is in maintenance state. -
Enter credentials for the PDU Management Interface in the HTTP Monitoring Credentials section.
-
In the Credential Type field, choose the SNMPV1 Creds option.
Note:
Currently PDU monitoring supports SNMPv1 credentials only. -
Enter the SNMP Community String to be used to communicate with the PDU using SNMP protocol.
The agent IP address and community string is added to the NMS table and the Trap Hosts Setup table of the PDU when the PDU is discovered.
-
-
(Optional) The Properties section is populated by default. Enter the SNMP Port and Timeout value if you want to change the port and timeout setting.
-
-
It is highly recommended to test all entered values and PDU reachability and configuration correctness using the Test Connection button in the right corner of the screen. Once the test connection is successfully completed, you can continue to add the target.
-
Click Add in the top right corner of the screen. Once the job is successfully run, the PDU is discovered and the Add Targets Manually screen is displayed. It might take a few minutes for the data to load before you open the PDU target landing page to view.
16.7.4 Discovering a PDU Using Command Line Interface
You can discover a power distribution unit using the emcli command line tool.
To discover PDU using the emcli, perform the following steps:
-
Open the command line on the host where OMS is running.
-
Login to emcli using command emcli login –username=<Your user name>.
-
Type the password when prompted.
-
Execute command emcli sync.
-
Discover a new PDU using the following command:
emcli add_target \
-name='Name of you PDU' \
-type=oracle_si_pdu \
-host="Host on which the deployed agent is used to monitor the PDU" \
-subseparator=properties='=' \
-separator=properties=';' \
-properties='dispatch.url=http://PDU IP or DNS name' \
-monitoring_cred='http;oracle_si_pdu;http;username:PDU admin user username;password:PDU admin user password' \
-monitoring_cred='snmp_v1v2_v3;oracle_si_pdu;SNMPV1Creds;COMMUNITY:SNMP community string'
Set the following in the emcli add_target command:
-
Replace Name of your PDU with the name of your PDU.
-
To host, set the Monitoring Agent EMD URL without port, that is, the host name of host where agent is deployed, the agent must be able to communicate with the PDU over the network.
-
Replace PDU IP or DNS name with the IP address or DNS name of the PDU.
-
Replace PDU admin user username with the user name of the admin user that can manage the PDU using the PDU Web Management Interface.
-
Replace PDU admin user password with the password of the admin user that can manage the PDU using the PDU Web Management Interface.
-
Replace SNMP community string with the SNMP Community String to be used to communicate with the PDU using SNMP protocol.
The following is a sample command to create a generic PDU:
emcli add_target \
-name=pdu.example.com \
-type=oracle_si_pdu \
-host=host.example.com \
-subseparator=properties='=' \
-separator=properties=';' \
-properties='dispatch.url=http://pdu.example.com'\
-monitoring_cred='http;oracle_si_pdu;http;username:admin;password:password123' \
-monitoring_cred='snmp_v1v2_v3;oracle_si_pdu;SNMPV1Creds;COMMUNITY:public'
16.8 Discovering and Promoting Oracle ZFS Storage
This section describes the manual storage discovery procedure for the Oracle ZFS Storage Appliance target and Oracle ZFS Storage Appliance Cluster.
The ZFS Storage Server target is a multi access point (MAP) target that supports two access points, AKCLI and REST/WebSvc access points. The discovery user interface supports only the AKCLI access point. However, you can add the REST/WebSvc access point through EMCLI.When the REST/WebSvc access point is added, it can implement most of the metrics except the metrics that are not supported through AKCLI. Both the REST/WebSvc and AKCLI access points are available, but only the metrics from the REST/WebSvc access point are uploaded. The following command can be used to add the REST/WebSvc access point:
emcli add_target -name=<name> -type=oracle_si_zfssa_storage_server -host=<emagent name>
-access_point_name=<any name> -access_point_type='oracle_si_zfssa_storage_server_websvc'
-properties='dispatch.url=https://<applianceURL>:215/api/' -subseparator=properties='='
-monitoring_cred='ZfssaHttpCredentialSet;oracle_si_zfssa_storage_server_websvc;AliasCredential;Alias:root;Password:<password>'
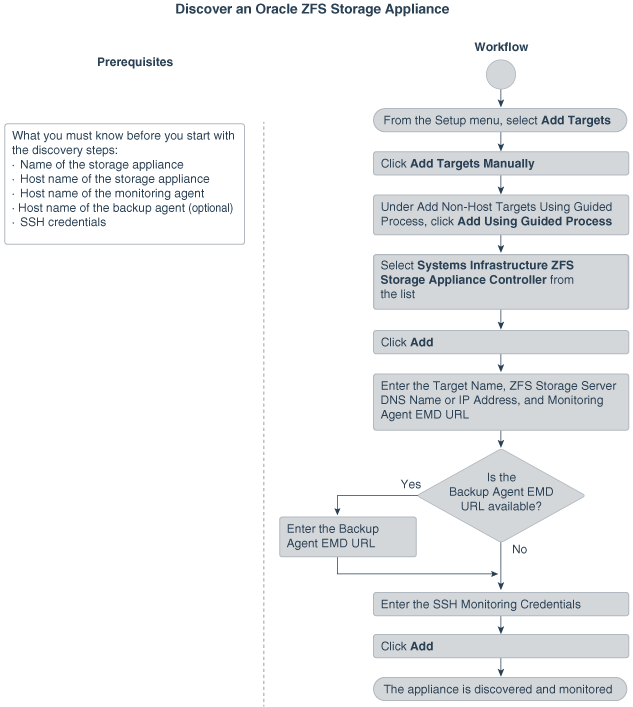
The below flowchart is a visual for the procedure to discover an Oracle ZFS Storage Appliance.
Figure 16-3 Discovering an Oracle ZFS Storage Appliance
Description of ''Figure 16-3 Discovering an Oracle ZFS Storage Appliance''
16.8.1 Discovering an Oracle ZFS Storage Appliance
To discover an Oracle ZFS Storage Appliance, perform the following steps:
-
From the Setup menu, select Add Target.
-
Click Add Targets Manually.
-
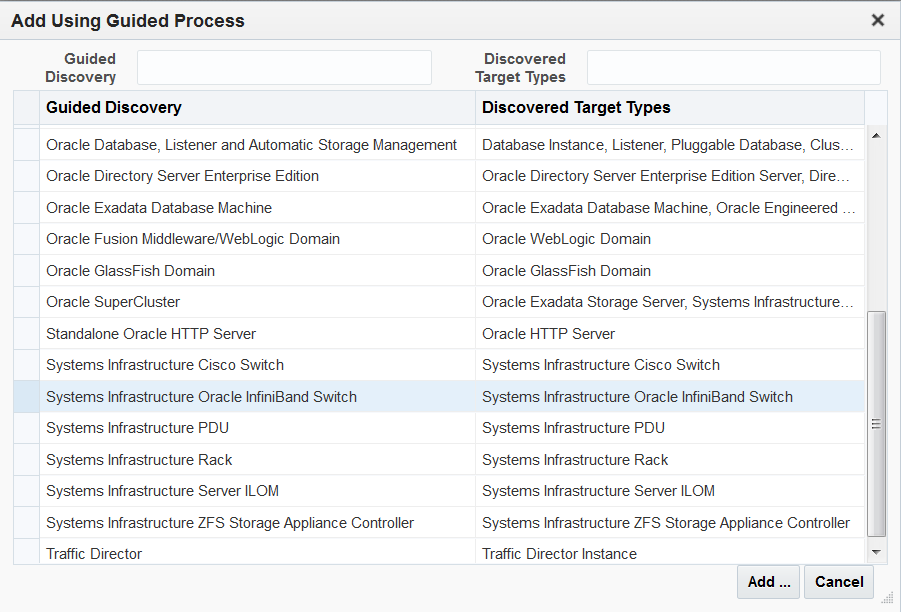
Click Add Using Guided Process listed under Add Non-Host Targets Using Guided Process.
The Add Using Guided Process window is displayed with the list of Guided Discovery and Discovered Target Types.
-
Select Systems Infrastructure ZFS Storage Appliance Controller from the list in the Add Using Guided Process window.
-
Click Add.
-
For Target, enter the following details:
-
Enter the Target Name.
-
Enter the ZFS Storage Server DNS Name or IP Address.
-
-
For Monitoring Agents, enter the following details:
-
Enter the Monitoring Agent EMD URL.
-
(Optional): Enter the Backup Agent EMD URL.
-
-
For Monitoring Credentials, enter the following details:
-
Select the Credential type as SSH Credentials.
-
Enter the User name and Password in the respective fields.
-
Retype the password in the Confirm Password field.
-
(Optional): You can enter the Role Name, Role Password and retype the password in the Confirm Role Password field.
-
-
Click Add.
16.8.1.1 Target Members of an Oracle ZFS Storage Appliance
The following target members are automatically promoted when you add an Oracle ZFS Storage Appliance Controller target through the discovery wizard:
-
ZFS Storage Server
Target Type: Oracle ZFS Storage Server
-
Diskshelf
Target Type: ZFS Diskshelf Storage
16.8.1.2 Target Members of an Oracle ZFS Storage Appliance Cluster
When you add two ZFS Storage Appliance nodes, which are setup as cluster nodes, then the ZFS Storage Appliance Cluster is auto-discovered.
The following targets are added when two ZFS Storage Servers have cluster configuration setup:
-
ZFS Storage Server
Target Type: Oracle ZFS Storage Server
-
Diskshelf
Target Type: ZFS Diskshelf Storage
-
ZFS Storage Appliance Cluster
Target Type: Oracle ZFS Storage Server - Cluster
16.9 Discovering Fabrics
Enterprise Manager discovers and manages Ethernet fabrics and InfiniBand fabrics. A network switch contributes its ports, datalinks, and networks to a fabric.
After discovery, you can manage the components of these fabrics and view their attributes and metrics, according to the procedures in Chapter 32, "Managing Networks".
16.9.1 Discover an InfiniBand Network Switch
-
Click Add Targets Manually.
-
In the Add Non-Host Target Using Guided Process section, click Add Using Guided Process.
-
Scroll to Systems Infrastructure Oracle InfiniBand Switch and then click the Add... button.
Figure 16-4 InfiniBand Switch Target Type
Description of ''Figure 16-4 InfiniBand Switch Target Type''
-
In the Target section, enter a name for the new target and its DNS name or IP address.
Figure 16-5 Discovery Specifications for InfiniBand Switches
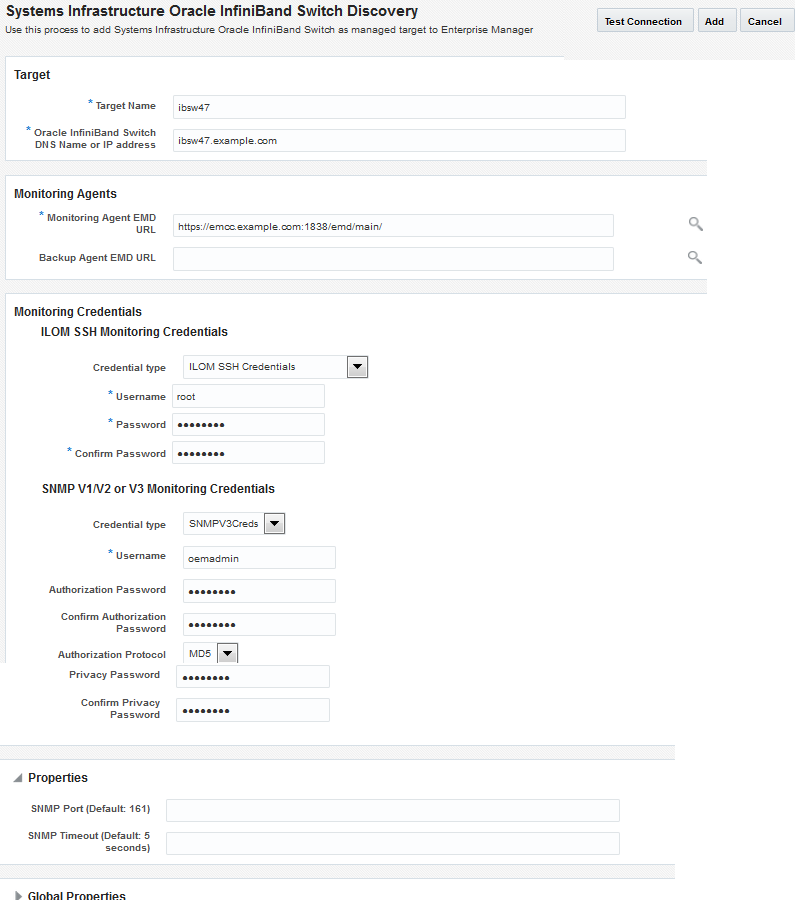
Description of ''Figure 16-5 Discovery Specifications for InfiniBand Switches''
-
In the Monitoring Agents section, enter the URL of the monitoring system and the URL of a backup system.
-
In the ILOM SSH Monitoring Credentials section, select the type of credentials and enter the username and the password. The credentials enable Enterprise Manager to monitor the switch's service processor.
Note:
Use therootusername and password to discover an InfiniBand network switch. -
In the SNMP Monitoring Credentials section, specify the SNMP version number that Enterprise Manager uses to monitor the hardware components. Version 2c is the default version and requires only a community string. Version 3 requires a username, a password of exactly eight characters, and the encryption type. Version 1 is supported but not recommended, as described in About Performance of Fabrics.
-
In the Properties section, you can accept the default port number and timeout interval or change them.
-
In the Global Properties section, you can specify site-specific values, such as the Oracle Customer Support Identifier (CSI).
-
Click Add, located at the top of the window.
16.9.2 Discover an Ethernet Network Switch
-
Click Add Targets Manually.
-
In the Add Non-Host Target Using Guided Process section, click Add Using Guided Process.
-
Scroll to Systems Infrastructure Cisco Switch and then click the Add... button.
Figure 16-6 Cisco Ethernet Switch Target Type
Description of ''Figure 16-6 Cisco Ethernet Switch Target Type''
-
In the Target section, enter a name for the new target and provide its DNS name or IP address.
Figure 16-7 Discovery Specifications for Cisco Ethernet Switches
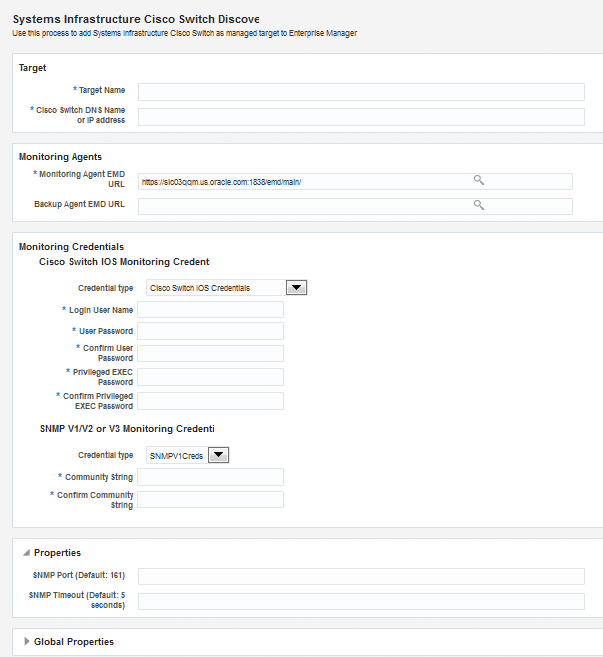
Description of ''Figure 16-7 Discovery Specifications for Cisco Ethernet Switches''
-
In the Monitoring Agents section, enter the URL of the monitoring system and the URL of a backup system.
-
In the Cisco Switch IOS Monitoring Credential section, specify the type of credentials and enter the username and password. Also, enter the Cisco EXEC password. The credentials enable Enterprise Manager to monitor the switch's service processor.
-
In the SNMP Monitoring Credential section, specify the SNMP version number that Enterprise Manager uses to monitor the hardware components. Version 3 requires a username, a password of exactly eight characters, and the encryption type. Version 1 is supported but not recommended, as described in About Performance of Fabrics.
-
In the Properties section, you can change the default configuration details such as port number and timeout interval.
-
In the Global Properties section, you can specify site-specific values, such as the Oracle Customer Support Identifier (CSI).
-
Click Add, located at the top of the window.
16.9.3 Use the Command Line To Discover a Switch
These examples use the Command Line Interface to discover and manage a network switch. You must configure the command line interface before you can issue commands. For more information, click the Setup menu, then click Command Line Interface. Follow the Download and Deploy instructions.
Example 16-2 Command to Discover an InfiniBand Switch Using SNMP Version 3
The following command discovers and manages an InfiniBand switch named MY_SWITCH and sets the SNMP version to Version 3.
emcli add_target -name=MY_SWITCH -type=oracle_si_netswitch -host=AGENT_HOST -access_point_name=MY_SWITCH -access_point_type=oracle_si_switch_oracle_ib -properties='dispatch.url=ilom-ssh://MY_SWITCH_IP_ADDR' -subseparator=properties='=' -monitoring_cred='ilom_creds_set;oracle_si_switch_oracle_ib;ilom_creds;username:PRIV_USER;password:PASSWORD' -monitoring_cred='snmp_v1v2_v3;oracle_si_switch_oracle_ib ;SNMPV3Creds;authUser:PRINCIPAL;authPwd:AUTHCRED;authProtocol:MD5;privPwd:PRIV_CREDS'
Example 16-3 Command to Discover a Cisco Ethernet Switch Using SNMP Version 3
The following command discovers and manages a Cisco Ethernet switch named MY_SWITCH and sets the SNMP version to Version 3.
emcli add_target -name=MY_SWITCH -type=oracle_si_netswitch -host=AGENT_HOST -access_point_name=MY_SWITCH -access_point_type=oracle_si_switch_cisco_ios -properties='dispatch.url=ios-ssh://MY_SWITCH_IP_ADDR' -subseparator=properties='=' -monitoring_cred='cisco_creds_set;oracle_si_switch_cisco_ios;cisco_creds;username:PRIV_USER;userpass:USER_PASSWORD;privpass:PRIV_PASSWORD' -monitoring_cred='snmp_v1v2_v3;oracle_si_switch_cisco_ios;SNMPV3Creds;authUser:PRINCIPAL;authPwd:AUTHCRED;authProtocol:MD5;privPwd:PRIV_CREDS'
Example 16-4 Command to Discover an InfiniBand Switch Using SNMP Version 1
The following command discovers and manages an InfiniBand switch named MY_SWITCH, sets the SNMP version to Version 1, and changes the time interval for the SNMP property.
emcli add_target -name=MY_SWITCH -type=oracle_si_netswitch -host=AGENT_HOST -access_point_name=MY_SWITCH -access_point_type=oracle_si_switch_oracle_ib -properties='dispatch.url=ilom-ssh://MY_SWITCH_IP_ADDR;SNMPTimeout=180' -subseparator=properties='='-monitoring_cred='ilom_creds_set;oracle_si_switch_oracle_ib;ilom_creds;username:PRIV_USER;password:PASSWORD' -monitoring_cred='snmp_v1v2_v3;oracle_si_switch_oracle_ib;SNMPV1Creds;COMMUNITY:<COMMUNITY>'
16.10 Related Resources for Discovering and Promoting System Infrastructure Targets
See the following for more information: