12 General Oracle Key Vault Management
General management consists of system and audit management tasks. You must be an administrative user with the System Administrator and Audit Manager role to perform these tasks.
12.1 About General Oracle Key Vault Management
System administrators configure system settings, remote monitoring, email notification, backup, and recovery. Audit managers configure alerts, and download system diagnostics for further debugging and analysis.
12.2 Remote Monitoring Using SNMP
With SNMP enabled, system administrators can remotely monitor the Key Vault appliance and its services. The collected data can be further processed and presented for the needs of the enterprise.
- About Using SNMP for Oracle Key Vault
- Granting SNMP Access to Users
- Changing the SNMP User Name and Password
- Changing SNMP Settings on the Standby Server
- Remotely Monitoring Oracle Key Vault Using SNMP
- SNMP Management Information Base Variables for Oracle Key Vault
- Example: Simplified Remote Monitoring of Oracle Key Vault Using SNMP
Parent topic: General Oracle Key Vault Management
12.2.1 About Using SNMP for Oracle Key Vault
You can use the Simple Network Management Protocol (SNMP) to monitor devices on a network for resource usage.
Monitoring Oracle Key Vault is an important aspect how critical Oracle Key Vault's availability is when hundreds or thousands of Oracle and MySQL databases store their TDE master encryption keys in Oracle Key Vault. The types of resource usage that you should monitor include memory, CPU utilization, and processes.
You can use Simple Network Management Protocol (SNMP) third-party tool to monitor remote systems that access Oracle Key Vault. The benefits of using SNMP to monitor Oracle Key Vault are as follows:
- There is no need to allow SSH access to Oracle Key Vault. (SSH access should only be enabled for the window of time in which it is being used.)
- You do not need to install additional tools to perform an SNMP monitoring operation.
Oracle Key Vault uses SNMP version 3 for user authentication and data encryption features. Unlike SNMP versions 1 and 2 that communicate in readable, insecure plaintext, SNMP 3 authenticates users and encrypts data on the communication channel between the monitoring server and the target. The information from Oracle Key Vault is unreadable to an intruder, even if the communication channel is intercepted.
In addition, with SNMP enabled on Oracle Key Vault, you can determine whether the key management server (KMIP daemon) is running. To track this information, you must use a third-party SNMP client to poll the Oracle Key Vault instance, because Oracle Key Vault does not provide SNMP client software.
Oracle Key Vault audits the creation and modification of SNMP credentials.
You must be a user with the System Administrator role to configure the SNMP account with a user name and password. These SNMP credentials are needed to access SNMP data.
Note:
You must ensure that the SNMP username and password is not the same username and password as any of the Oracle Key Vault administrative user accounts with the System Administrator, Key Administrator, or Audit Manager role.
Parent topic: Remote Monitoring Using SNMP
12.2.2 Granting SNMP Access to Users
Parent topic: Remote Monitoring Using SNMP
12.2.3 Changing the SNMP User Name and Password
- Log in to the Oracle Key Vault management console as a user who has the System Administrator role.
- Select the System tab, and then select Monitoring Settings.
- In the Username, Password, and Reenter Password fields, enter the user name and password information.
- Click Save.
Parent topic: Remote Monitoring Using SNMP
12.2.4 Changing SNMP Settings on the Standby Server
You change the SNMP settings from the command line on the standby server. To add SNMP support in a primary-standby environment, you should configure SNMP on both the primary and standby servers before pairing them. This is because the standby server is no longer accessible from the Oracle Key Vault management console because all requests are forwarded to the primary server. However, you can change SNMP settings on the standby server in a primary-standby environment.
The following examples show how to change SNMP settings on a standby server:
snmpuser and password password:
./stdby_snmp_enable -a "all" -u "snmpuser" -p "password"
./stdby_snmp_enable -a "disabled"
snmpuser and password password:
./stdby_snmp_enable -a "192.0.2.1 192.0.2.3 192.0.2.3" -u "snmpuser" -p "password"
Parent topic: Remote Monitoring Using SNMP
12.2.5 Remotely Monitoring Oracle Key Vault Using SNMP
snmpwalk and snmpget from the command line on a remote computer that has a network connection into the SNMP account in Oracle Key Vault.Parent topic: Remote Monitoring Using SNMP
12.2.6 SNMP Management Information Base Variables for Oracle Key Vault
Oracle Key Vault provides a set of SNMP Management Information Base (MIB) variables that you can track.
The following table lists the MIB variables that are supported.
Table 12-1 MIBs That SNMP Tracks for Oracle Key Vault
| MIB Variable | Object ID | Description |
|---|---|---|
|
|
1.3.6.1.2.1.25.1.1 |
Tracks the amount of time that an Oracle Key Vault instance has been running |
|
|
1.3.6.1.2.1.2.2.1.7 |
Tracks if the Oracle Key Vault network interface (
|
|
|
1.3.6.1.4.1.2021.4.6 |
Tracks the available RAM |
|
|
1.3.6.1.4.1.2021.4.5 |
Tracks the total amount of RAM being used |
|
|
1.3.6.1.4.1.2021.11.53 |
For CPU monitoring; tracks the number of ticks (typically 1/100s) spent idle |
|
|
1.3.6.1.4.1.2021.11.56 |
For CPU monitoring; tracks the number of ticks (typically 1/100s) spent processing hardware interrupts |
|
|
1.3.6.1.4.1.2021.11.55 |
For CPU monitoring; tracks the number of ticks (typically 1/100s) spent processing kernel-level code |
|
|
1.3.6.1.4.1.2021.11.51 |
For CPU monitoring; tracks the number of ticks (typically 1/100s) spent processing reduced-priority code |
|
|
1.3.6.1.4.1.2021.11.52 |
For CPU monitoring; tracks the number of ticks (typically 1/100s) spent processing system-level code |
|
|
1.3.6.1.4.1.2021.11.50 |
For CPU monitoring; tracks the number of ticks (typically 1/100s) spent processing user-level code |
|
|
1.3.6.1.4.1.2021.11.54 |
For CPU monitoring; tracks the number of ticks (typically 1/100s) spent waiting for input-output (IO) |
|
|
1.3.6.1.4.1.2021.2 |
Tracks the number of processes running under a certain name. Names we monitor are |
See Also:
For more information refer to the Net-SNMP documentation at http://www.net-snmp.org
Parent topic: Remote Monitoring Using SNMP
12.2.7 Example: Simplified Remote Monitoring of Oracle Key Vault Using SNMP
In Linux, you can simplify the SNMP commands you manually enter to find Oracle Key Vault information, yet still have useful and detailed output.
The configuration in this section assumes that you have granted SNMP access to a trusted user. It also assumes that the you have installed the SNMP Management Information Base (MIB) variables on the remote host that will monitor Oracle Key Vault.
For example, a lengthy version of the snmpwalk command for an SNMP user named snmp_admin is as follows:
snmpwalk -v3 OKV_IP_address -n "" -l authPriv -u snmp_admin -a SHA -A snmp_user_password -x AES -X snmp_user_password
This command lists the vital services that are running on Oracle Key Vault. However, you can modify the command (and other SNMP commands) to be not only shorter, but to show additional information, such as whether the services are running or not running.
To simplify this type of command, you can edit the /etc/snmp/snmp.conf configuration file so that the SNMP commands you enter will automatically include commonly used settings, such as the default user or the default security level. The example in this topic omits password parameters so that users can enter the password at the command line interactively.
- Log in to the remote host that will monitor Oracle Key Vault.
- Edit the
/etc/snmp/snmp.conf, which appears as follows:# As the snmp packages come without MIB files due to license reasons, # loading MIBs is disabled by default. If you added the MIBs you # can reenable loading them by commenting out the following line. mibs :
- Comment out the
# mibs :line and then add the following lines, as follows:# loading MIBs is disabled by default. If you added the MIBs you # can reenable loading them by commenting out the following line. # mibs : defSecurityName snmp_admin defSecurityLevel authPriv defAuthType SHA defPrivType AES
In this example:
defSecurityName: Enter the name of the user to whom you granted SNMP access. This example usessnmp_admin.defSecurityLevel: Enter the default security level to use. This example usesauthPriv, which enables communication with authentication and privacy.defAuthType: Enter the default authorization type. This example usesSHA.defPrivType: Enter the default privilege type. This example usesAES.
- Restart
snmpdto load the configuration file.For example, for Linux 7:
systemctl restart snmpd
For Linux 6:
service snmpd restart
- To run the simplified version of the
snmpwalkcommand that was shown earlier, enter the following command:snmpwalk okv_ip_address prNames -A snmp_user_pwd -X snmp_user_pwd
In this command,
prNamesrefers to "process names", which displays the names of processes instead of numbers. For example:$ snmpwalk 192.0.2.254 prNames -A snmp_user_pwd -X snmp_user_pwd UCD-SNMP-MIB::prNames.1 = STRING: mwecsvc UCD-SNMP-MIB::prNames.2 = STRING: httpd UCD-SNMP-MIB::prNames.3 = STRING: kmipd UCD-SNMP-MIB::prNames.4 = STRING: ora_pmon_dbfwdb
snmptable command now becomes the following.
snmptable okv_ip_address prTable -A snmp_user_pwd -X snmp_user_pwd
Output similar to the following appears.
SNMP table: UCD-SNMP-MIB::prTable
prIndex         prNames prMin prMax prCount prErrorFlag prErrMessage prErrFix prErrFixCmd
      1         mwecsvc     1     1       1     noError      noError
      2           httpd     1    20       9     noError      noError
      3           kmipd     1     2       2     noError      noError
      4 ora_pmon_dbfwdb     1     1       1     noError      noError
The next example shows how you would now run the snmpdf command:
snmpdf okv_ip_address -A snmp_user_pwd -X snmp_user_pwd
Output similar to the following appears.
Description                Size (kB)  Used    Available   Used%
/                              20027260   7249732 12777528      36%
/dev/shm                        8174120         0  8174120       0% < –- not used by Oracle Key Vault
/usr/local/dbfw                  999320    251180   748140      25% < –- not used by Oracle Key Vault
/usr/local/dbfw/tmp             6932408     15764  6916644       0%
/var/tmp                        5932616     15848  5916768       0% < –- not used by Oracle Key Vault
/opt/dbfw                        999320      1544   997776       0% < –- not used by Oracle Key Vault
/home                            999320      6416   992904       0% < –- not used by Oracle Key Vault
/var/log                        5932616     22992  5909624       0%
/tmp                            1999184      3072  1996112       0%
/var/dbfw                       2966224      4524  2961700       0% < –- not used by Oracle Key Vault
/usr/local/dbfw/volatile        1048576         0  1048576       0% < –- not used by Oracle Key Vault
/var/lib/oracle               143592160  45620964  97971196      31%
Parent topic: Remote Monitoring Using SNMP
12.3 Email Notification
Email notifications can be used to communicate Key Vault status changes directly to administrators without logging into the management console.
To enable email notification you must set your email preferences in Key Vault. You can choose the events that you want updates to. The events include Key Vault system status like disk utilization, backup, and high availability, or user and endpoint status like expiration of user passwords, endpoint certificates, and keys.
- About Email Notification
- Configure Email Settings
- Test the Email Configuration
- Disable Email Notifications for a User
Parent topic: General Oracle Key Vault Management
12.3.1 About Email Notification
In addition to alerting users on status changes in Oracle Key Vault, email notifications enable administrators to complete the processes of endpoint enrollment and user password reset.
For example:
-
The enrollment token generated during endpoint enrollment can be mailed directly to the endpoint administrator from Oracle Key Vault.
-
An Oracle Key Vault system administrator can send the random temporary password directly to the user when the user password is reset.
To enable email notifications successfully, there must be a direct connection between Oracle Key Vault and the SMTP server.
You can disable email notifications at any time.
Parent topic: Email Notification
12.3.2 Configure Email Settings
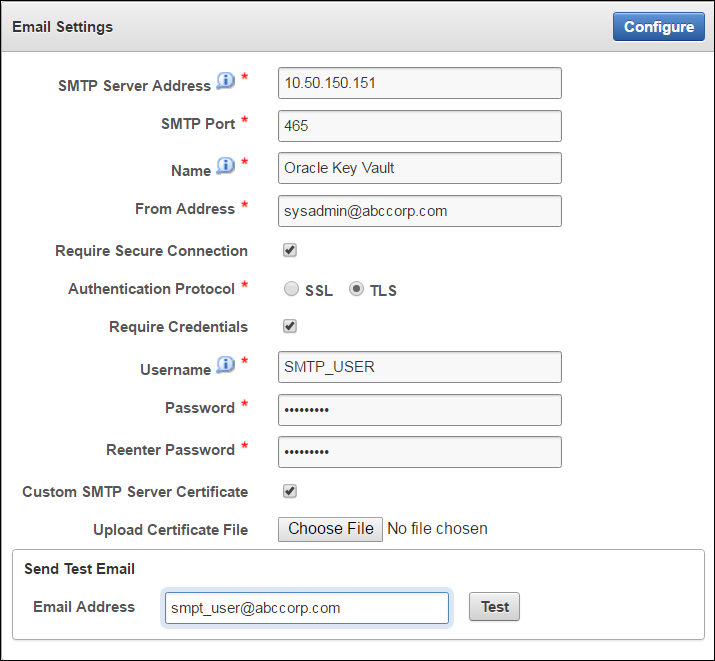
You can enable email notification by configuring the Simple Mail Transfer Protocol (SMTP) server properties of the user's email account. Oracle Key Vault supports anonymous and insecure connections to the SMTP server.
By default, the default Java truststore packaged with Key Vault's Java library is used to validate the server certificate. Optionally, you can upload a custom truststore in order to use a specific certificate or certificate chain at the same time you configure SMTP settings.
The SMTP server configuration can be modified at any time. If a custom SMTP certificate was used initially, and the user later decides to use the default, you simply have to modify the trust store setting to default, instead of custom.
To configure email settings follow these steps:
Parent topic: Email Notification
12.3.3 Test the Email Configuration
You can test the email configuration of the SMTP user account any time after saving the configuration. If you change an existing SMTP configuration, you must save the configuration in order to test it.
To test the email configuration:
See Also:
Parent topic: Email Notification
12.3.4 Disable Email Notifications for a User
An Oracle Key Vault user may elect not to receive email alerts. Only a user with the System Administrator role, or a user managing his own account can disable email notifications.
To disable email notifications:
Parent topic: Email Notification
12.4 Oracle Key Vault System Administration
The System Administrator is the only administrative user who can access the System tab and menus. This user configures system settings, recovers the system when no other administrative users are present, and downloads the system diagnostics file for further analysis.
- Configure System Settings
- System Recovery
- Download System Diagnostics
- View the Oracle Key Vault Dashboard
- Status Panes in the Dashboard
Parent topic: General Oracle Key Vault Management
12.4.1 Configure System Settings
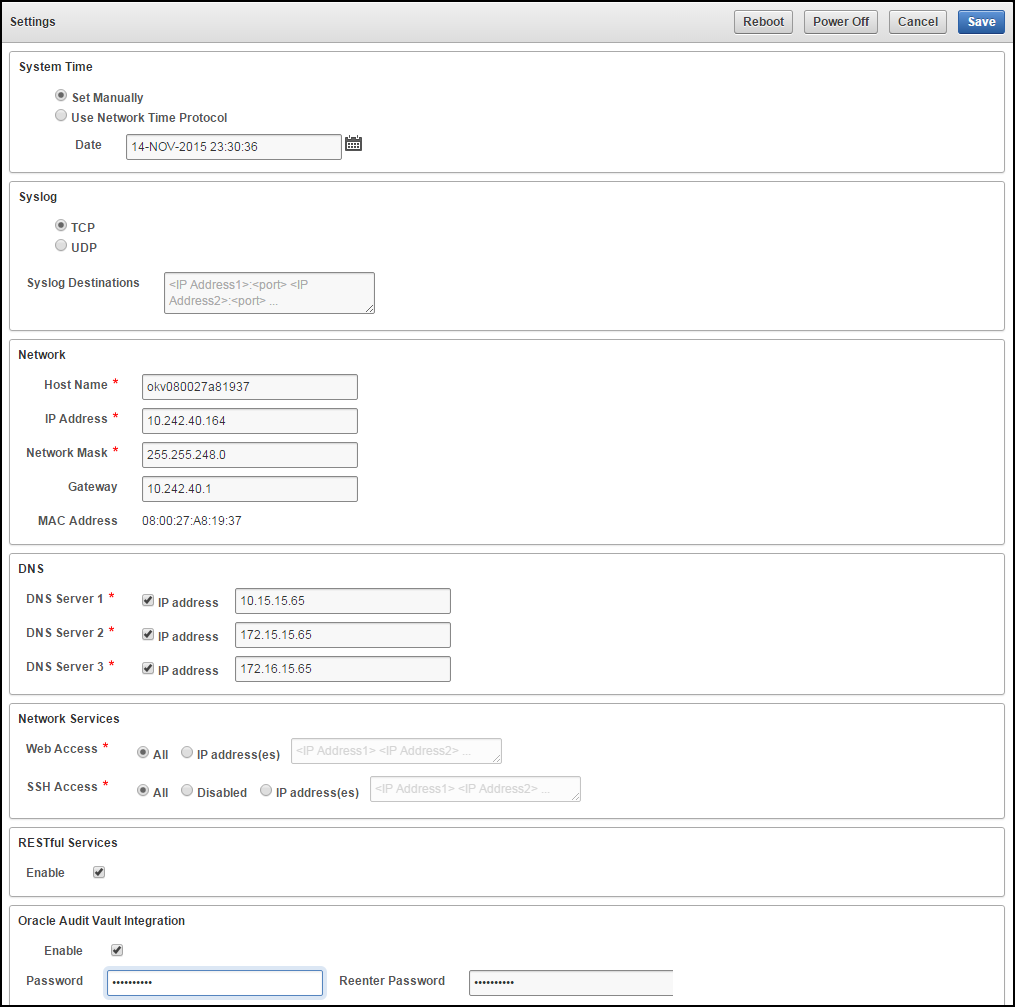
You can configure the system time, syslog, DNS, network services, RESTful services and Oracle Audit Vault Integration. In addition you can reboot and power off Oracle Key Vault.
On the system Settings page, you can configure the system time, syslog, DNS, network services, RESTful services and Oracle Audit Vault Integration. Click System, then System Settings in the left side bar to arrive at this page.
To configure system settings:
Parent topic: Oracle Key Vault System Administration
12.4.2 System Recovery
In an emergency when no administrative users are available, or you need to change the password of administrative users, you can recover the system with the recovery passphrase that was created during Key Vault installation. In addition, you can change the recovery passphrase to keep up with security best practices.
- Recovering Credentials for Administrators
- Change the Recovery Passphrase
- Change the Installation Passphrase
Parent topic: Oracle Key Vault System Administration
12.4.2.1 Recovering Credentials for Administrators
You can recover the system by adding credentials for administrative users.
Related Topics
Parent topic: System Recovery
12.4.2.2 Change the Recovery Passphrase
Oracle highly recommends that a user with the System Administrator role perform a new backup whenever the recovery passphrase changes, so that there is always a backup protected with the current recovery passphrase. This ensures that you will have at least one backup with the latest data.
To change the recovery passphrase:
Parent topic: System Recovery
12.4.2.3 Change the Installation Passphrase
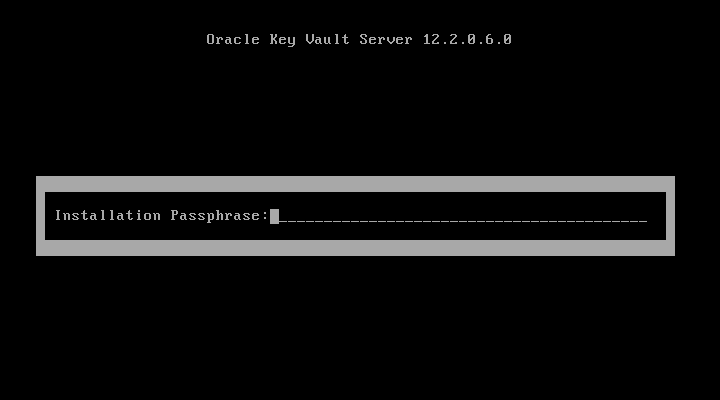
The Installation Passphrase is specified during installation. The Installation Passphrase is used to log in to Oracle Key Vault and complete the post-installation tasks.
The installation passphrase must have 8 or more characters and contain at least one of each of the following: an uppercase letter, a lowercase letter, number, and special character from the set: period (.), comma (,), underscore (_), plus sign (+), colon (:), space.
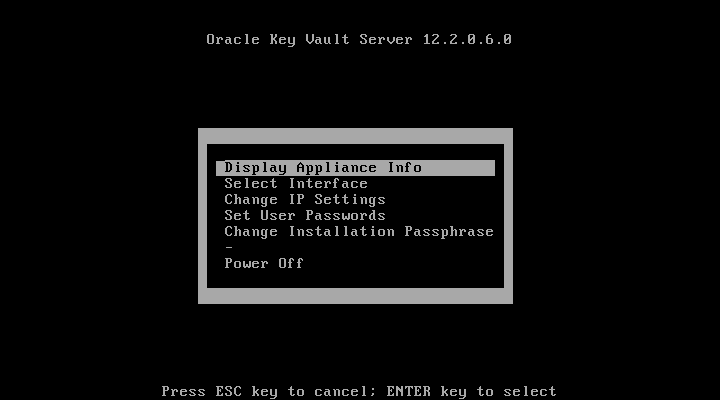
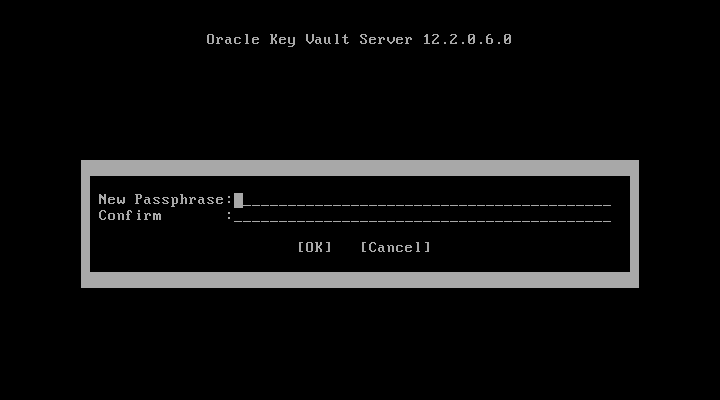
If you forget the installation passphrase, you can specify a new installation passphrase.
It is important to store the installation passphrase securely.
To change the Installation Passphrase:
The Installation Passphrase is changed.
Parent topic: System Recovery
12.4.3 Download System Diagnostics
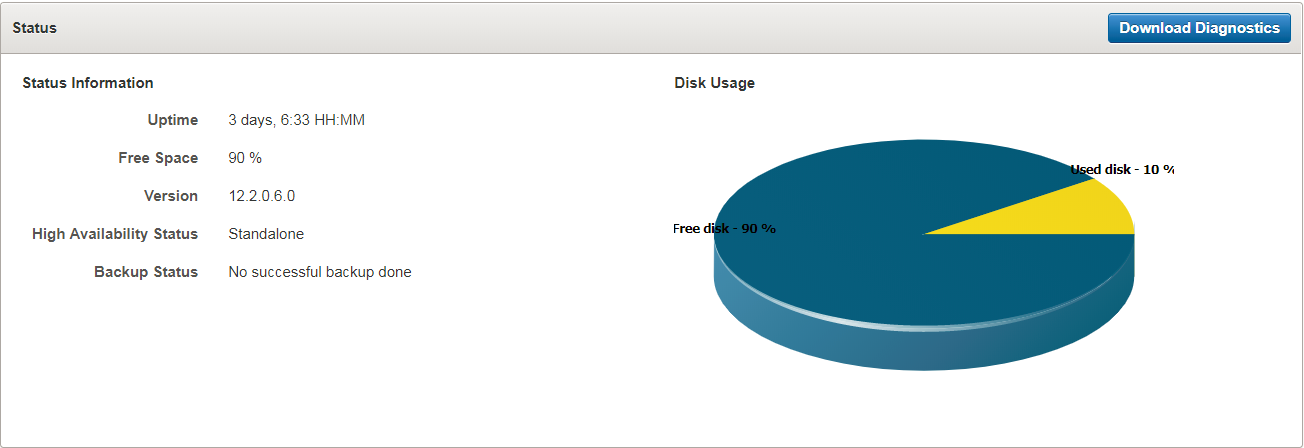
You can view status information about disk usage, server uptime, version, high availability, and backup on the Status page. Further, you can download the diagnostics file and provide it to Oracle support for further analysis and debugging. This feature provides advanced debug and troubleshooting capability for problems you may encounter.
In Oracle Key Vault 12.2.0.6.0 and later, diagnostics reporting is not enabled by default. The user must enable the feature to generate diagnostics reports. Once enabled, the user can configure the necessary information to be captured in diagnostics reports. The user can customize and package diagnostics reports with flexibility.
If you plan to upgrade Oracle Key Vault, then you must remove the diagnostics generation utility before performing the upgrade.
To download the diagnostics file:
You can customize the dbfw-diagnostics-package.yml file in the /usr/local/dbfw/etc/ directory to include and exclude a combination of files in multiple categories. Each section of dbfw-diagnostics-package.yml contains options to enable and disable a specific category by setting the value to true or false.
For more information about installing, enabling, and running the diagnostics generation utility, refer to the help:
/usr/local/dbfw/bin/priv/dbfw-diagnostics-package.rb --help
To free up disk space, you can remove dbfw-diagnostics-package.rb after installing the diagnostics generation utility. You must also remove the diagnostics generation utility before you upgrade Oracle Key Vault.
/usr/local/dbfw/bin/priv/dbfw-diagnostics-package.rb --remove
Related Topics
Parent topic: Oracle Key Vault System Administration
12.4.4 View the Oracle Key Vault Dashboard
The Home tab of the management console displays the dashboard when you log into the management console. The dashboard presents the current status of the Oracle Key Vault at a high level and is visible to all users.
Alerts and Managed Content are the first sections you will see on logging in.
Figure 12-7 Alerts and Managed Content Panes
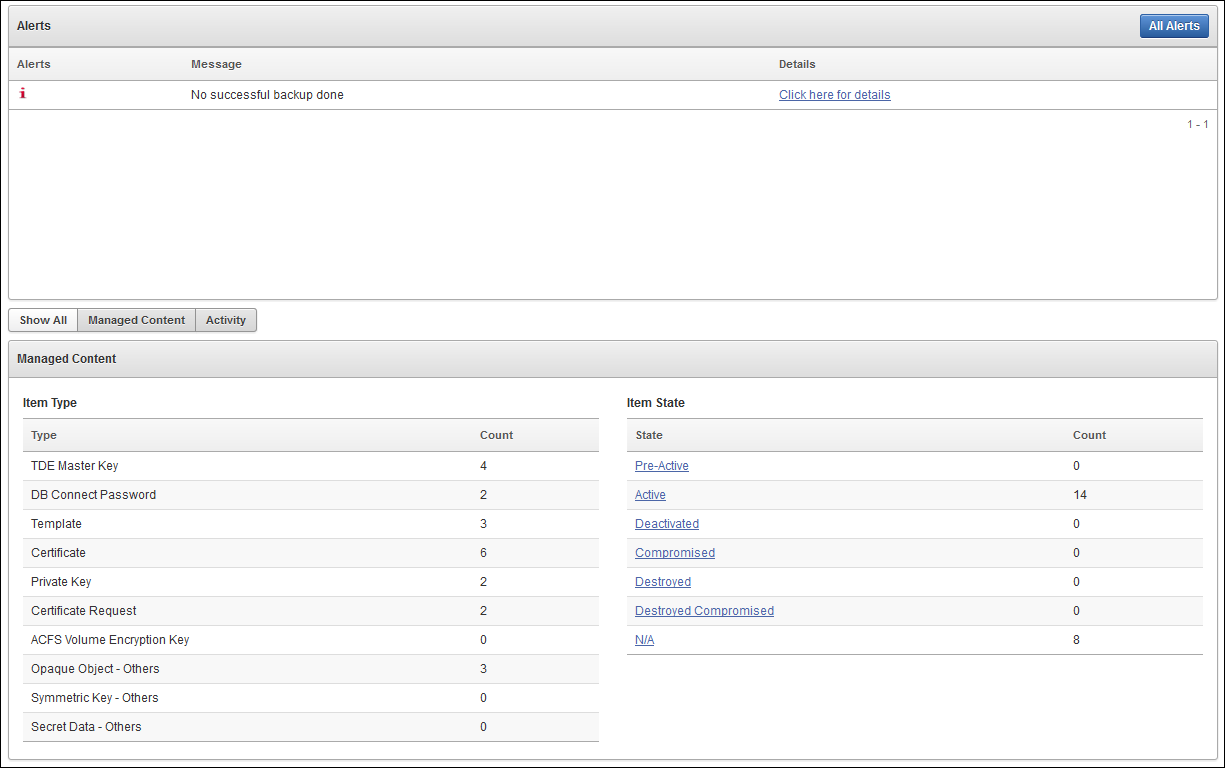
Description of "Figure 12-7 Alerts and Managed Content Panes"
The Data Interval, Operations, Endpoint Activity, and User Activity panes of the Home page follow Alerts and Managed Content.
Figure 12-8 Data Interval, Operations, Endpoint Activity, and User Activity Panes
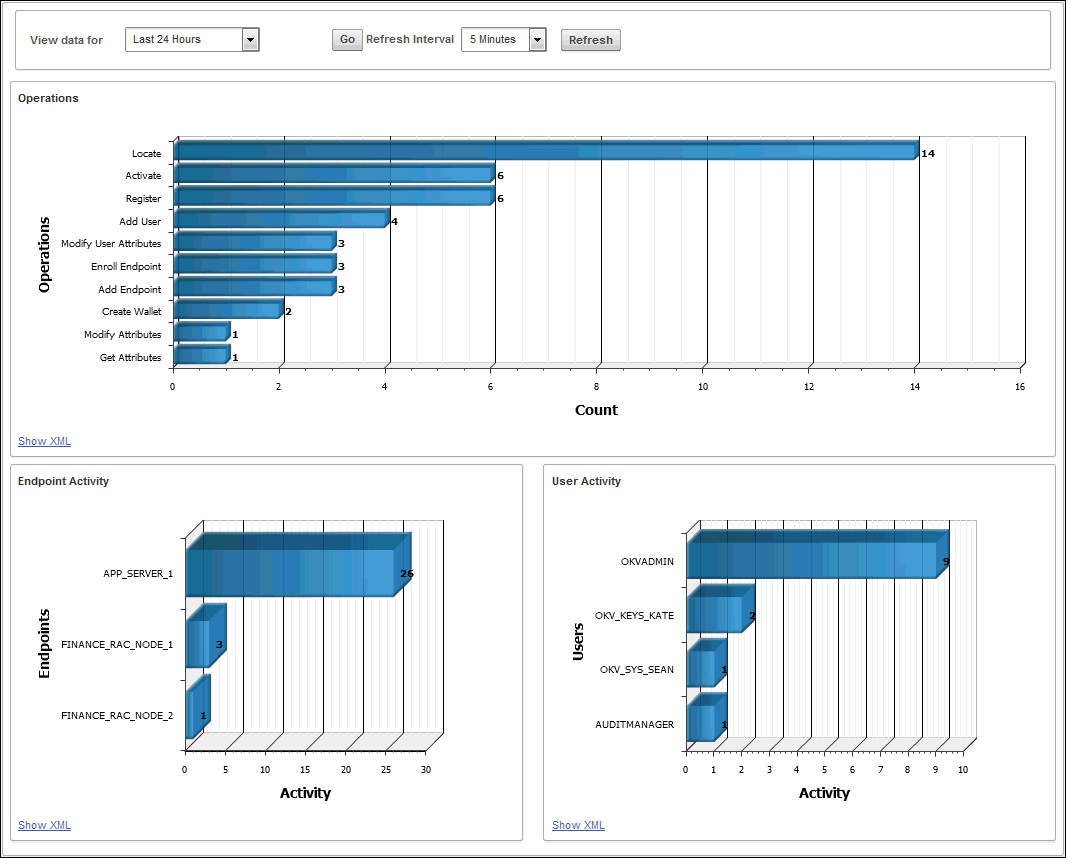
Description of "Figure 12-8 Data Interval, Operations, Endpoint Activity, and User Activity Panes"
Parent topic: Oracle Key Vault System Administration
12.4.5 Status Panes in the Dashboard
The status panes on the dashboard provide useful high level information as follows:
-
Alerts
To take corrective action on a particular alert:
-
Click the link in the Details column corresponding to the alert. The appropriate page appears.
-
Take corrective action appropriate to the alert.
To configure the alerts you want to see on the dashboard:
-
Click the Reports tab, then Alerts from the left side bar.
The Alerts page appears.
-
Click Configure from the top right, or Configure Alerts from the left sidebar under ALERTS.
The Configure Alerts page appears.
-
Select the Alert Type and click Save.
-
-
Managed Content
The Managed Content pane of the dashboard displays aggregated information about security objects currently stored and managed in Oracle Key Vault.
This status pane categorizes the aggregate information based on the item type such as keys, certificates, opaque objects, private keys, and TDE master keys, as well as the item state such as pre-active, active, and deactivated.
In the Managed Content pane, the item type and item state are displayed at the last time refreshed, which is set by the refresh interval described in the Data Interval status pane.
-
Data Interval
This pane shows the length of the time period.
This time period can be Last 24 hours, Last week, or Last Month, or a user-defined date range. It also shows the refresh interval for the Operations, Endpoint Activity, and User Activity sections described later.
-
Operations
The Operations pane contains a bar graph with bars for key-related operations such as locate, activate, add endpoint, and assign default wallet.
-
Endpoint Activity
The Endpoint Activity pane contains a bar graph for tracking the number of operations performed by each endpoint.
-
User Activity
The User Activity pane contains a three-dimensional bar graph for tracking the number of operations performed by each user.
See Also:
"Search for Security Object Items" for details of Item Types and Item States
Parent topic: Oracle Key Vault System Administration
12.5 Oracle Key Vault Alert Configuration
You can select the type of alerts that you want to see in the Oracle Key Vault dashboard. The dashboard is the first page you see on logging into to the management console. You can navigate to this page by clicking the Home tab. All users can see the alerts on security objects they have access to, but only users with the System Administrator role can configure alerts.
Parent topic: General Oracle Key Vault Management
12.5.1 About Configuring Alerts
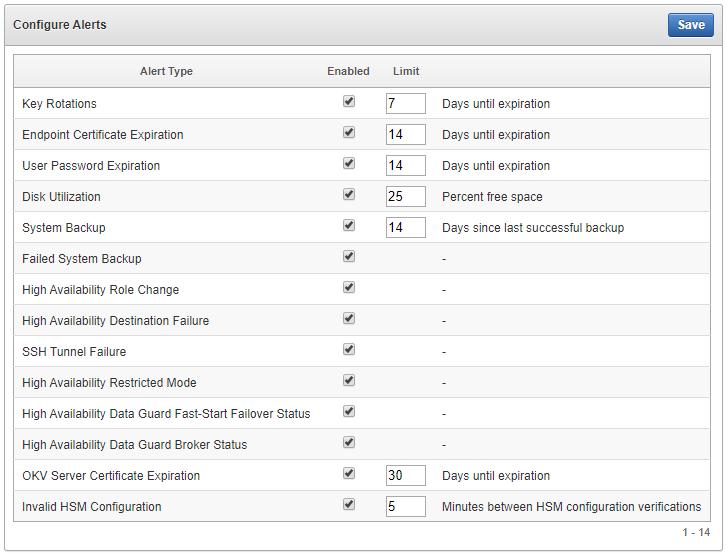
Oracle Key Vault has a variety of alerts that you can configure with appropriate thresholds according to your requirements. You can configure the following alerts:
-
Disk Utilization
-
Endpoint Certificate Expiration
-
Failed System Backup
-
High Availability Data Guard Broker Status
-
High Availability Data Guard Fast-Start Failover Status
-
High Availability Destination Failure
-
High Availability Restricted Mode
-
High Availability Role Change
-
Key Rotations
-
SSH Tunnel Failure
-
System Backup
-
User Password Expiration
-
Invalid HSM Configuration
12.5.2 Configuring Alerts
To configure alerts:
See Also:
Parent topic: Oracle Key Vault Alert Configuration
12.5.3 Viewing Open Alerts
Users with the System Administrator role can view all alerts. Users without system administrator privileges can only view alerts related to objects they can access.
To view open alerts follow these steps:
Parent topic: Oracle Key Vault Alert Configuration
12.6 Oracle Key Vault Auditing
Oracle Key Vault records and time-stamps all endpoint and user activity, with details on who initiated which action, with what keys and tokens, and the result of the action.
- About Auditing in Oracle Key Vault
- Configuring Syslog to Store Audit Records
- View Audit Records
- Export or Delete Audit Records
- Audit Consolidation with Audit Vault and Database Firewall
Parent topic: General Oracle Key Vault Management
12.6.1 About Auditing in Oracle Key Vault
Oracle Key Vault records all endpoint and user activity including endpoint groups and user groups from endpoint enrollment and user password reset, to the management of keys and wallets, and changes to system settings and SNMP credentials. In addition, it records the success or failure of each action.
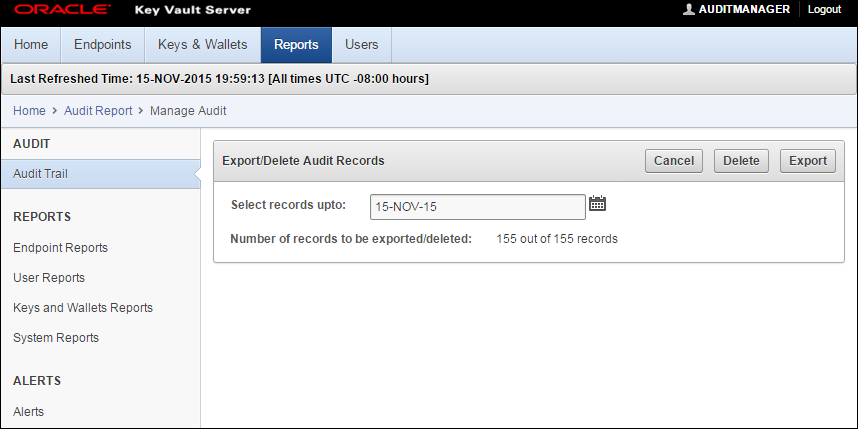
This recording of comprehensive system activity is presented in an audit trail, which, while visible to all users, can only be managed by a user with the Audit Manager role. This user alone has the privilege to export or delete audit records up to a given date.
Auditing in Oracle KeyVault is enabled by default.
A user with the Audit Manager role can see all the audit records and manage them. Other users can see only those audit records, which pertain to security objects that they have created, or have been granted access to.
You can export audit records to view system activity off line. After exporting the records, you can delete them from the system to free up resources.
See Also:
"Overview of Administrative Roles" for more on Audit Manager privileges
Parent topic: Oracle Key Vault Auditing
12.6.2 Configuring Syslog to Store Audit Records
You can configure the Oracle Key Vault system log to store audit records if the System Administrator has enabled this functionality.
To configure the Oracle Key Vault system log to store audit records:
Parent topic: Oracle Key Vault Auditing
12.6.3 View Audit Records
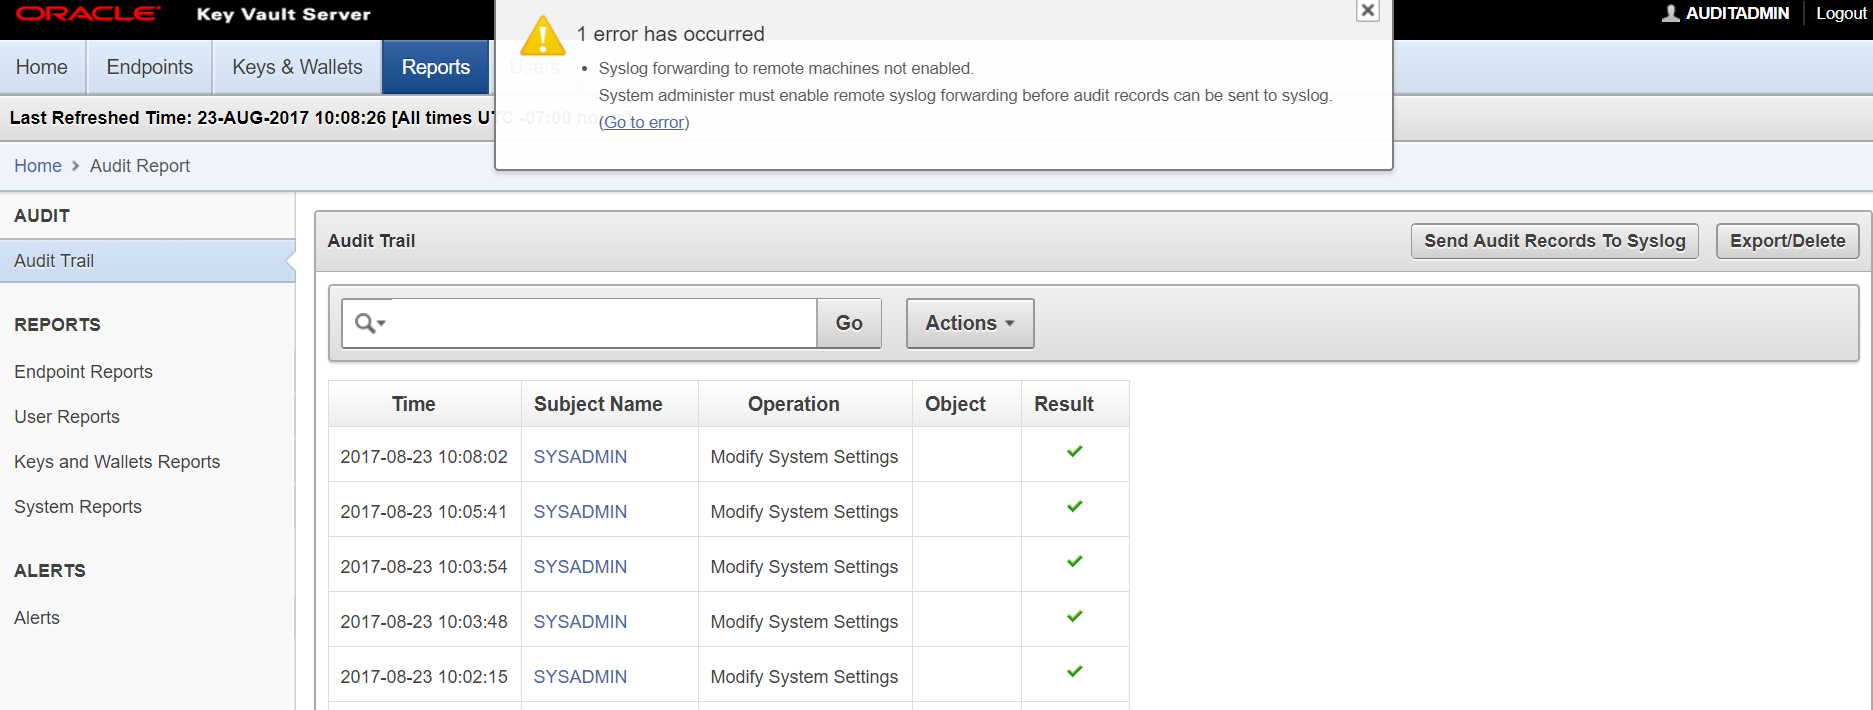
The reports page shows the Audit Trail by default. The Audit Trail page lists all system activity with details on who (Subject Name) performed what (Operation), when (Time), using what (Object), and the result of the action (Result).
To view the audit trail follow these steps:
Parent topic: Oracle Key Vault Auditing
12.6.4 Export or Delete Audit Records
A user with the Audit Manger role may export or delete the audit trail as needed. Audit records are exported in a .csv file that can be downloaded to the user's local system. The .csv file contains the same details found in the Audit Trail on the Reports page.
Note, that the timestamp in the .csv file will reflect the time zone of the particular Key Vault server, whose records were exported.
To export or delete the audit trail:
Parent topic: Oracle Key Vault Auditing
12.6.5 Audit Consolidation with Audit Vault and Database Firewall
Oracle Key Vault audit data can be forwarded to Audit Vault and Database Firewall (AVDF) for audit consolidation.
To enable audit consolidation with AVDF:
See Also:
-
Figure 12-2 for Key Vault System Settings
Parent topic: Oracle Key Vault Auditing
12.7 Oracle Key Vault Reports
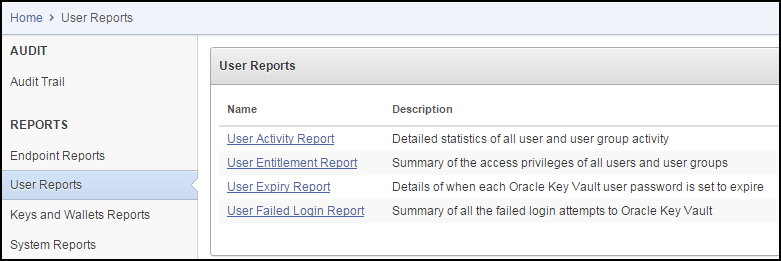
Oracle Key Vault collects statistical information on system activity, the expiration of certificates, keys, and passwords, entitlement status, and metadata in four report categories: endpoints, users, keys, and system.
Parent topic: General Oracle Key Vault Management
12.7.1 About Oracle Key Vault Reports
Oracle Key Vault provides four types of reports for endpoints, users, keys and wallets, and system.
The four report types and their description are:
-
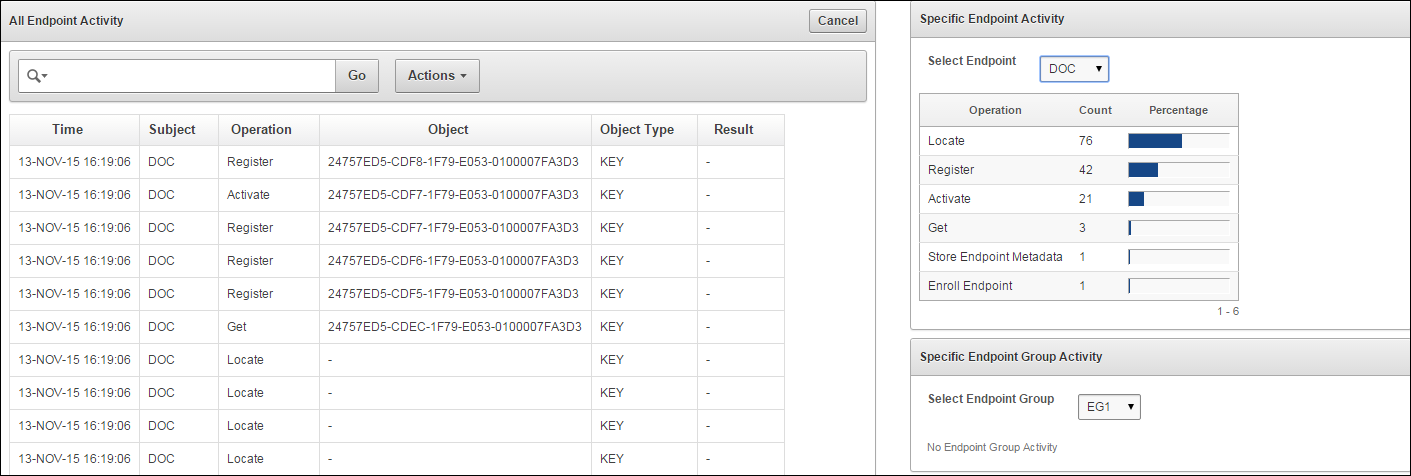
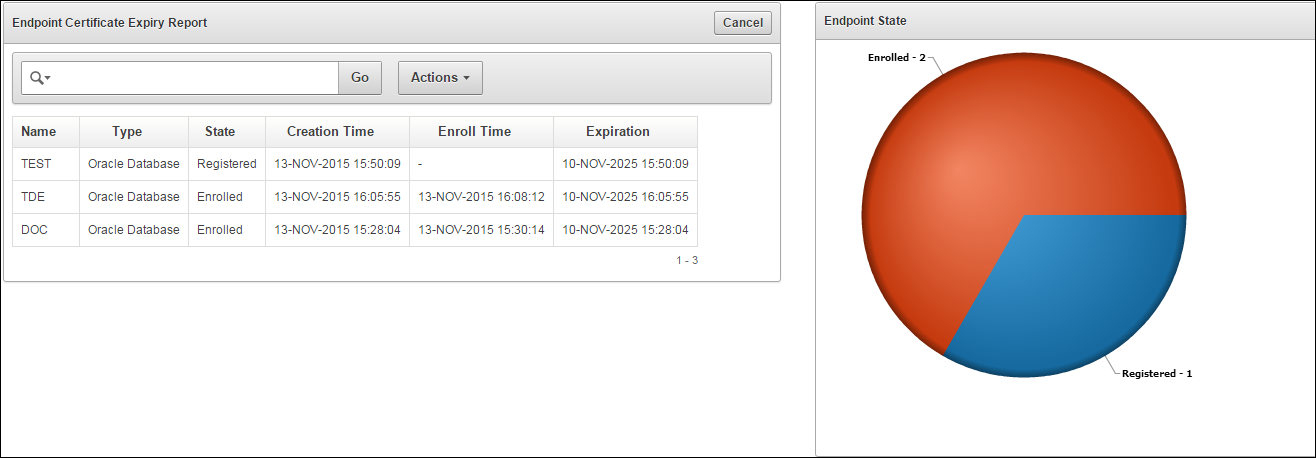
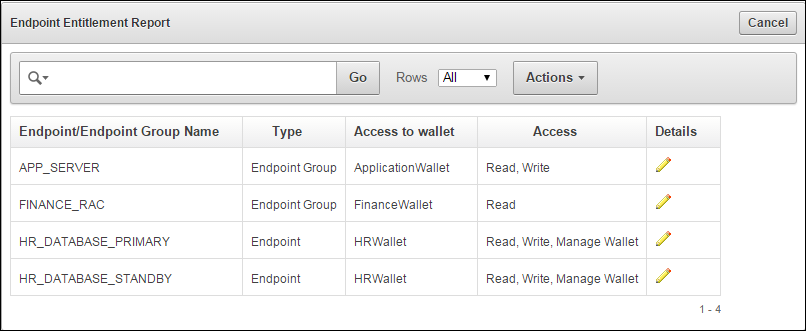
Endpoint reports contain details of all endpoint and endpoint group activity, certificate and password expiration, and access privileges.
-
User reports contain details of all user and user group activity, their certificate and password expiration, and access privileges.
-
Keys and wallets reports list the access privileges granted to all keys and wallets, and the details of TDE master keys managed by Key Vault.
-
System reports contain a history of system backups taken and scheduled, details of remote restoration points, and RESTful API usage.
The Audit Manager can view all reports. The Key Administrator can view User reports and Keys and Wallets reports. Users with System Administrator privileges can view Endpoint, User, and System reports.
See Also:
"Oracle Key Vault Auditing" for more on audit reports
Parent topic: Oracle Key Vault Reports
12.7.2 View Reports for Endpoint, User, Keys and Wallets, and System
The Reports page list the four report types in the left side bar under the heading REPORTS.
To view the reports for endpoints, users, keys and wallets, and system:
- Log in to the Oracle Key Vault management console as a user who has the Audit Manager role.
- Click the Reports tab to get to the Reports page.
- The REPORTS heading displays four reports: Endpoint Reports, User Reports, Keys and Wallets Reports, System Reports.
See Also:
Figure 12-14 shows the Key Vault Audit Trail
Parent topic: Oracle Key Vault Reports
12.7.2.1 View Endpoint Reports
Key Vault offers four endpoint reports for Endpoint Activity, Endpoint Certificate Expiry, Endpoint Entitlement, and Endpoint Metadata.
To view endpoint reports:
12.7.2.2 View User Reports
Key Vault offers four user reports for User Activity, User Entitlement, User Expiry, and User Failed Login.
To view user reports:
12.7.2.3 View Keys and Wallets Reports
Key Vault offers two reports for keys and wallets: Entitlement and TDE Key Metadata.
To view reports for keys and wallets:
12.8 Upgrade Oracle Key Vault Server Software
When you upgrade the Key Vault server software appliance, it is recommended that you also upgrade the endpoint software to get the latest enhancements. However, the previous version of endpoint software will continue to function with the upgraded Oracle Key Vault Server.
- How an Oracle Key Vault Server Software Upgrade Works
- Step 1: Backup the Server before Upgrade
- Step 2: Pre-Upgrade Tasks for Release 12.2.0.0.0
- Step 3: Upgrade the Oracle Key Vault Server or Server Pair
- Step 4: Upgrade Endpoint Software
- Step 5: Backup Just Upgraded Server
Parent topic: General Oracle Key Vault Management
12.8.1 How an Oracle Key Vault Server Software Upgrade Works
You must upgrade in the step order shown: first perform a full backup of Key Vault, upgrade the Key Vault server or server pair in the case of a high availability deployment, the endpoint software, and last, perform another full backup of the upgraded server. Note that upgrading requires a reboot of the Oracle Key Vault appliance.
The Oracle Key Vault server is not available to endpoints for a limited duration during the upgrade. You can enable the persistent cache feature to enable endpoints to continue operation during the upgrade process.
Parent topic: Upgrade Oracle Key Vault Server Software
12.8.2 Step 1: Backup the Server before Upgrade
Before you upgrade the Key Vault server we recommend that you backup the server you are upgrading. This step ensures that you can recover in case the upgrade fails unexpectedly.
Caution:
Do not skip this step. Back up the server before you perform the upgrade so your data is safe and recoverable.
Parent topic: Upgrade Oracle Key Vault Server Software
12.8.3 Step 2: Pre-Upgrade Tasks for Release 12.2.0.0.0
To ensure a smooth upgrade to Oracle Key Vault 12.2.0.0.0, the following steps are recommended:
-
Ensure that the minimum disk space requirement for an upgrade is met.
-
Ensure that no full or incremental backup jobs are running. Delete all scheduled full or incremental backup jobs before the upgrade.
-
Plan for downtime according to the following specifications:
Oracle Key Vault Usage Downtime required Wallet upload or download
NO
Java Keystore upload or download
NO
Transparent Data Encryption (TDE) direct connect
YES
Primary Server Upgrade in a high availability deployment
YES
If an online master key (formerly known as TDE direct connect) is used with Oracle Key Vault, then plan for a downtime of 15 minutes during the Oracle Database endpoint software upgrades. Database endpoints can be upgraded in parallel to reduce total downtime.
For a primary server upgrade in a high availability deployment plan for a downtime of 1 hour.
- If the Oracle Key Vault system has a syslog destination configured, ensure that the remote syslog destination is reachable from the Oracle Key Vault system, and that logs are being correctly forwarded. If the remote syslog destination is not reachable from the Oracle Key Vault system, then the upgrade process can become much slower than normal.
Related Topics
Parent topic: Upgrade Oracle Key Vault Server Software
12.8.4 Step 3: Upgrade the Oracle Key Vault Server or Server Pair
How you upgrade the Oracle Key Vault server depends on whether you are using a standalone environment or a high availability deployment.
- About the Upgrade of an Oracle Key Vault Server or Server Pair
- Upgrade a Standalone Key Vault Server
- Upgrade a Pair of Key Vault Servers in a High Availability Deployment
Parent topic: Upgrade Oracle Key Vault Server Software
12.8.4.1 About the Upgrade of an Oracle Key Vault Server or Server Pair
Oracle Key Vault may be deployed as a standalone appliance in test and development environments or in a high availability configuration in production environments. In a standalone deployment you must upgrade a single Key Vault server, but in a high availability deployment you must upgrade both primary and standby Key Vault servers. Note that persistent caching enables endpoints to continue to be operational during the upgrade process.
Note:
-
Ensure that the system you are upgrading has 8 GB memory. From release 12.2.0.2.0 and onwards you must have 8 GB memory. In a high availability deployment both primary and standby servers must have 8 GB system memory.
-
If you are upgrading from a system with 4 GB memory, first add an additional 4 GB memory to the system before upgrading.
12.8.4.2 Upgrade a Standalone Key Vault Server
This procedure is for upgrading a single Key Vault server in a standalone deployment, the most typical deployment in test and development environments.
To upgrade to Oracle Key Vault 12.2.0.0.0:
12.8.4.3 Upgrade a Pair of Key Vault Servers in a High Availability Deployment
Note:
-
Allocate 1 hour to upgrade the primary server after upgrading the standby. You must upgrade standby and primary servers in one session with as little time between the standby and primary upgrade. Note that the upgrade time is approximate and a function of the volume of data stored and managed by Oracle Key Vault. For large volumes of data the upgrade time may be greater than an hour.
-
While the upgrade is in progress, do not change any settings or perform any other operations that are not part of the upgrade instructions below.
-
Upgrade the Oracle Key Vault Server during a planned maintenance window because the upgrade process requires the endpoints to be shutdown during the upgrade.
-
Ensure that both the primary and standby systems have 8 GB memory.
-
With persistent cache enabled endpoints will continue to be operational during the upgrade process.
To upgrade a pair of Oracle Key Vault Servers configured for high availability:
12.8.5 Step 4: Upgrade Endpoint Software
To upgrade the endpoint software:
-
Ensure that you have upgraded the Key Vault server(s) outlined in Step 1. If you are upgrading the endpoint software for an Oracle database configured for direct-connect, then shutdown the database.
-
Download the endpoint software (
okvclient.jar) for your platform from the Oracle Key Vault Server as follows:-
Go to the Oracle Key Vault management console login screen.
-
Click the Endpoint Enrollment and Software Download link.
-
Go to the Download Endpoint Software section, and select the appropriate platform from the drop down list.
-
Click the Download button.
-
-
Identify the path to your existing endpoint installation which is about to be upgraded. For example,
/home/oracle/okvutil -
Install the endpoint software by executing the following command:
java -jar okvclient.jar -d<path to the existing endpoint directory>For example,
java -jar okvclient.jar -d /home/oracle/okvutil -
On UNIX platforms, run
root.shfrom thebindirectory of endpoint installation directory to copy the latestliborapkcs.sofile for Oracle Database endpoints. On Windows platforms, runroot.batfrom thebindirectory of endpoint installation directory to copy the latestliborapkcs.dllfile for Oracle Database endpoints. This step is needed only for online TDE master key management by Oracle Key Vault. For example,$ sudo ./$OKV_HOME/bin/root.sh
bin\root.bat
Or,
$ su -
# bin/root.sh
On Windows platforms, you are prompted for the version of the RDBMS in use when you execute root.bat.
-
Restart the endpoint if it was shutdown in Step 1.
Parent topic: Upgrade Oracle Key Vault Server Software
12.8.6 Step 5: Backup Just Upgraded Server
You must perform the following tasks after completing a successful upgrade:
-
Take a full backup of the upgraded Oracle Key Vault Server Database to a new remote destination. Avoid using the old backup destination for the new backups.
-
Schedule a new periodic incremental backup to the new destination defined in the step above.
-
Password hashing has been upgraded to a more secure standard starting at version 12.1.0.2. This change affects the operating system passwords, support and root. You must change Oracle Key Vault administrative passwords after the upgrade to take advantage of the more secure hash if you have not done so already.
Password hashing is applicable only when upgrading from Oracle Key Vault 12.1.0.0.0 to Oracle Key Vault 12.2.0.0.0 directly or from Oracle Key Vault 12.1.0.1.0 to Oracle Key Vault 12.2.0.0.0 directly. This fix was included in Oracle Key Vault 12.1.0.2.0 and onwards.
Parent topic: Upgrade Oracle Key Vault Server Software
