7 Managing Oracle Key Vault Endpoints

Oracle Key Vault endpoints are computer systems like database servers, application servers, and other information systems, where keys and credentials are used to access encrypted data and other systems. Endpoints must be registered and enrolled to communicate with Oracle Key Vault, after which they can upload their keys to Key Vault, share them with other endpoints, and download them to access their data.

7.1 About Managing Endpoints

Endpoints must be registered and enrolled to communicate with Oracle Key Vault. Only a user with the System Administrator role can add an endpoint to Key Vault. Once the endpoint is added, the endpoint administrator can enroll the endpoint by downloading and installing the endpoint software at the endpoint. The endpoint can then use the utilities packaged with the endpoint software to upload and download security objects to and from Key Vault.

All users can create virtual wallets but only a user with Key Administrator privileges can grant endpoints access to security objects contained in virtual wallets. The Key Administrator can also create endpoint groups to enable shared access to virtual wallets. When you grant an endpoint group access to a virtual wallet, all the member endpoints will have access to the virtual wallet. For example, you can grant all the nodes in an Oracle RAC access to a virtual wallet by putting them in an endpoint group. This saves you the step of granting each node access to the virtual wallet.

An Oracle Key Vault user name cannot be the same as an Oracle Key Vault endpoint name.

Below is a summary of the two administrative roles as they pertain to endpoints.

A user with the System Administrator role:

  • Manages the endpoint meta-data like the name, type, platform, description, and email

  • Manages the endpoint lifecycle which consists of enrolling, deleting, suspending, and reenrolling endpoints

A user with the Key Administrator role:

  • Manages the endpoint group lifecycle which consists of creating, modifying, and deleting endpoint groups

  • Manages the lifecycle of security objects, which consists of creating, modifying and deleting security objects

  • Grants, modifies, and revokes access mappings on shared virtual wallets to endpoints and endpoint groups

  • Associates an endpoint with a default wallet

7.2 Managing Endpoints

You can enroll new endpoints, reenroll existing endpoints, delete them when no longer integrated with Oracle Key Vault, and disable them temporarily for security reasons.

7.2.1 Types of Endpoint Enrollment

The first step to enrolling an endpoint is to add the endpoint to Key Vault. There are two methods for adding or registering an endpoint:

  • Administrator-initiated

    An Oracle Key Vault user who has the System Administrator role initiates the enrollment from the Key Vault side by adding the endpoint to Key Vault. When the endpoint is added, a one-time enrollment token is generated. This token may be communicated to the endpoint administrator in two ways:

    1. Directly from Key Vault by email. To use email notification you must configure SMTP in email settings.

    2. Out-of-band method such as email or telephone.

    The endpoint administrator uses the enrollment token to download the endpoint software and complete the enrollment process on the endpoint side.

    Once the enrollment token is used to enroll an endpoint, it cannot be used again for another enrollment. If you need to reenroll an endpoint, the reenrollment process will generate a new one-time enrollment token for this purpose.

  • Self-enrolled

    Endpoints may enroll themselves during specific times without human administrative intervention. Endpoint self-enrollment is useful when the endpoints do not share security objects, and use Oracle Key Vault primarily to store and restore their own security objects. Another use for endpoint self-enrollment is testing.

    A self-enrolled endpoint is created with a generic endpoint name in this format: ENDPT_001. Initially, a self-enrolled endpoint has access only to the security objects that it uploads or creates. It does not have access to any virtual wallets. You can later grant the endpoint access to virtual wallets after verifying its identity.

    Endpoint self-enrollment is disabled by default, and must be enabled by a user with the System Administrator role. A best practice is to enable self-enrollment for short periods, when you expect endpoints to self enroll, and disable it when the self-enrollment period ends.

See Also:

"Email Notification"

7.2.2 Add an Endpoint as a Key Vault System Administrator

To add an endpoint as a Key Vault System Administrator follow these steps:

  1. Log in to the Oracle Key Vault management console as a user who has the System Administrator role.
  2. Click the Endpoints tab.

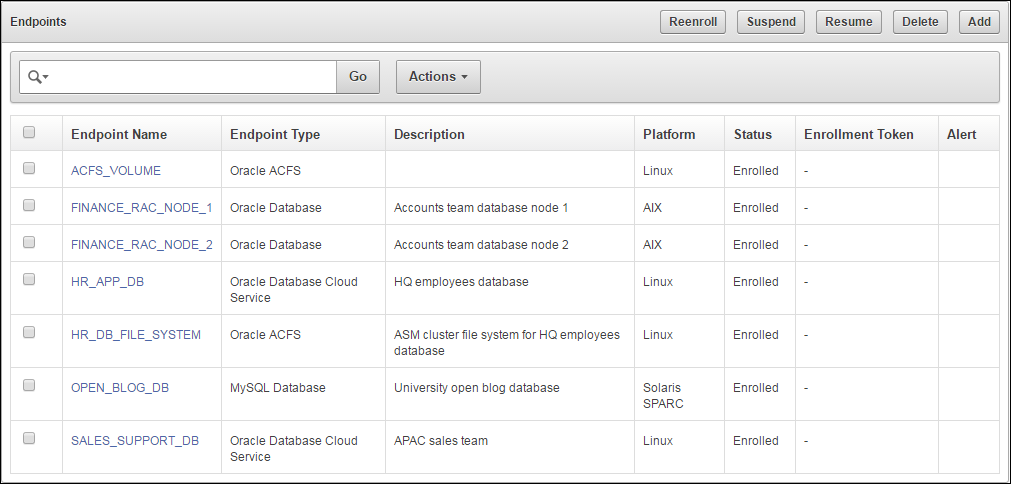
    The Endpoints page appears listing all the Key Vault endpoints.

    The Endpoints page displays the list of registered and enrolled endpoints with the following endpoint details: name, type, description, platform, status, enrollment token, and alert. The endpoint status can be either Registered or Enrolled:

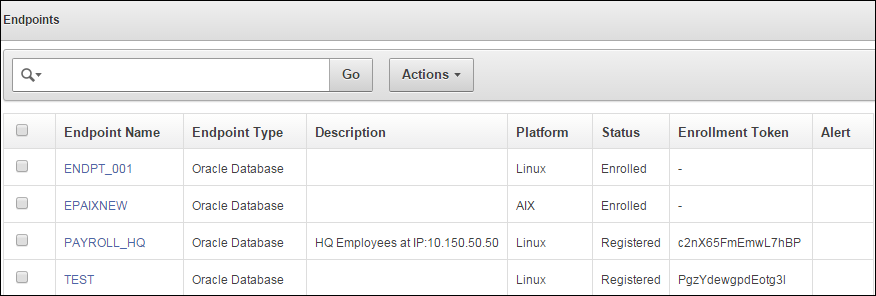
    • Registered Status: The endpoint has been added and the one-time enrollment token has been generated. This token will be displayed in the corresponding Enrollment Token column.

    • Enrolled Status: The one-time enrollment token has been used to download the endpoint software. The Enrollment Token column displays a dash ('-') to indicate that the enrollment token has been used.

  3. Click Add on the Endpoints page.

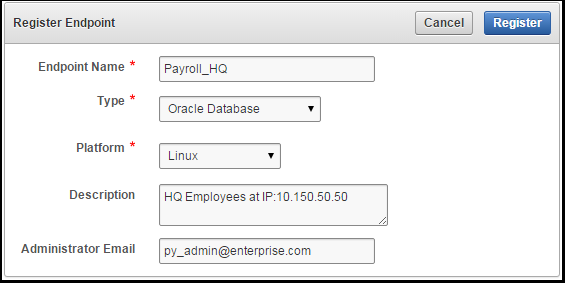
    The Register Endpoint page appears.

    Figure 7-2 Register Endpoint Page

    Description of Figure 7-2 follows
    Description of "Figure 7-2 Register Endpoint Page"
  4. Enter information for the new endpoint as follows:
    • Endpoint Name (required): The name can have letters, numbers, and underscores. The endpoint name is not case-sensitive. For example, a name entered as "app_server1" will show up "APP_SERVER1" in the endpoints table. The endpoint will be referred to by this name throughout.

    • Type (required): Supported types are Oracle Database, Oracle Database Cloud Service, Oracle (non-database), Oracle ACFS, MySQL Database, and Other. An example of Other is a third-party KMIP endpoint.

      Note:

      If you are using Oracle Advanced Security Transparent Data Encryption (TDE) and want to use Oracle Key Vault to manage a TDE master key or wallet, then you must set Type to Oracle Database.

    • Platform (required): Supported platforms are Linux, Solaris SPARC, Solaris x64, AIX, HP-UX, Windows.

    • Description (optional but recommended): Enter useful identifying description like the host name, IP address, function, or location of the endpoint.

    • Administrator Email (optional but recommended): Enter the email address of the endpoint administrator to have the enrollment token and other endpoint related alerts sent directly from Key Vault. Note that you must have configured SMTP to use the email notification feature.

  5. Click Register.

    The Endpoints page appears listing the new endpoint with a status of Registered. The Enrollment Token column displays the one-time enrollment token.

    Figure 7-3 Endpoint in Registered Status

    Description of Figure 7-3 follows
    Description of "Figure 7-3 Endpoint in Registered Status"
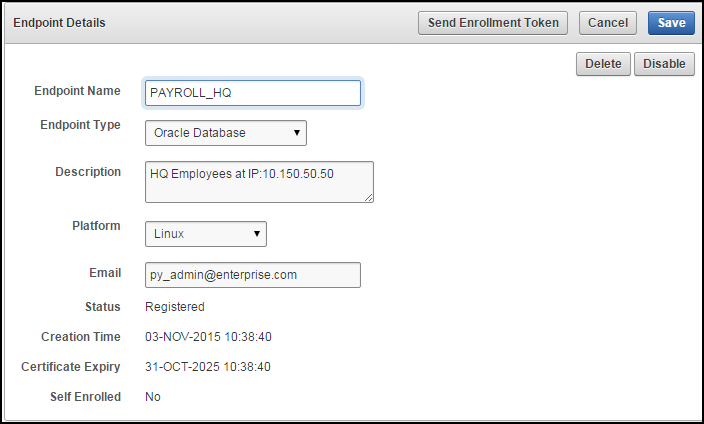
  6. Click the Endpoint Name to see details for the endpoint.

    The Endpoint Details page appears.

    Note:

    The Send Enrollment Token button on the Endpoint Details page only appears for an endpoint whose Status is Registered.

    There are two ways to send the one-time enrollment token to the endpoint administrator:

    1. If you configured SMTP and entered the email address, you can have Key Vault send the enrollment token directly to the endpoint administrator, shown in Step 7.

    2. If you did not configure SMTP or enter the email address, you must use an out-of-band method to send the enrollment token to the endpoint administrator.

  7. Click Send Enrollment Token.

    A confirmation message appears, saying that the email was sent.

    Now it is up to that endpoint’s administrator to complete the enrollment process for the endpoint.

    When the enrollment token is used to download and install the endpoint software on the endpoint side, the endpoint status changes from Registered to Enrolled.

7.2.3 Add an Endpoint Using Self-Enrollment

Endpoint self-enrollment is disabled by default and must be enabled by a user who has the System Administrator role.

A best practice is to enable endpoint self-enrollment for limited periods when you expect endpoints to enroll. After the expected endpoints have enrolled, you should disable endpoint self-enrollment.

Oracle Key Vault associates a self-enrolled attribute with all endpoints that are enrolled through endpoint self-enrollment. Self-enrolled endpoints go directly to Enrolled status without the intermediate Registered status when they download the endpoint software. You can recognize self-enrolled endpoints by their system generated names in the form ENDPT_001.

To enable endpoint self-enrollment follow these steps:

  1. Log in to the Oracle Key Vault management console as a user who has the System Administrator role.
  2. Select the Endpoints tab, and then Settings from the left side bar.

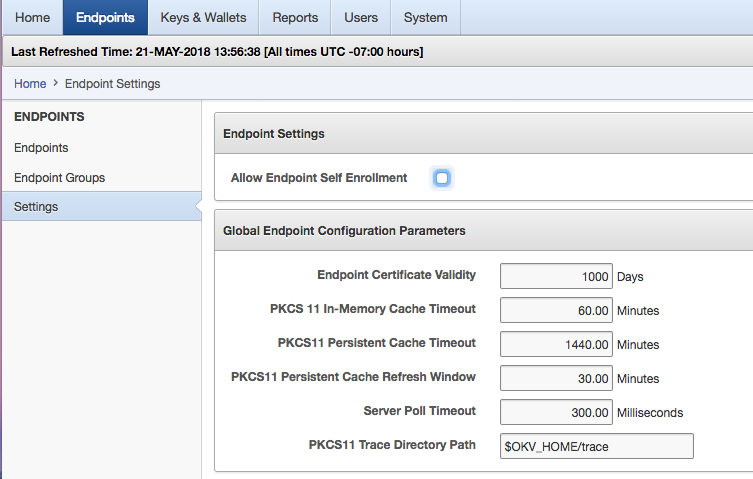
    The Endpoint Settings page appears.

    Figure 7-5 Endpoint Settings for Self-Enrollment

    Description of Figure 7-5 follows
    Description of "Figure 7-5 Endpoint Settings for Self-Enrollment"
  3. Check the box to the right of Allow Endpoint Self-Enrollment.
  4. Click Save.

    Figure 7-6 Self-Enrolled Endpoint

    Description of Figure 7-6 follows
    Description of "Figure 7-6 Self-Enrolled Endpoint"

7.2.4 Configuring Endpoint Configuration Parameters

Users with system administrator role can centrally update certain endpoint configuration parameters in the Oracle Key Vault Management Console. This feature enables system administrators to set certain endpoint configuration parameters globally, that is, for all endpoints, or on a per-endpoint basis. It simplifies the process of managing multiple endpoints for system administrators.

Endpoint specific parameters if set take precedence over global parameters. Global parameters, if set will take effect when endpoint-specific parameters are cleared. OKV will use the default system parameters if both global and endpoint specific parameters are cleared or not set from OKV management console.

The configuration parameter values set in the OKV management console are pushed to endpoints dynamically. After configuration parameters have been set in the OKV Management Console, the next time the endpoint contacts the OKV server, it will get the configuration parameters update. Endpoint configuration parameter update is best-effort. In case of error, the update is not applied. Both okvutil and PKCS11 library can get and apply the endpoint configuration updates.

To configure endpoint configuration parameters:
  1. Log in to the Oracle Key Vault management console as a user who has the System Administrator role.
  2. Select the Endpoints tab.

    The Endpoints page is displayed.

  3. On the Endpoints page, click the Endpoint Name.
    The Endpoint Details page is displayed.
  4. In the Endpoint Configuration Parameters section, configure the following settings:
    • PKCS 11 In-Memory Cache Timeout

      Specify the duration for which the master key is available after it is cached in the in-memory cache. The value is specified in minutes. For more information about the PKCS 11 In-Memory Cache Timeout setting, see PKCS11_CACHE_TIMEOUT Parameter.

      PKCS 11 Persistent Cache Timeout

      Specify the duration for which the master key is available after it is cached in the persistent master key cache. The value is specified in minutes. For more information about the PKCS 11 Cache Persistent Timeout setting, see PKCS11_PERSISTENT_CACHE_TIMEOUT Parameter.

    • PKCS 11 Persistent Cache Refresh Window

      Specify the duration to extend the period of timefor which the master key is available after it is cached in the persistent master key cache. The value is specified in minutes. For more information about the PKCS 11 Persistent Cache Refresh Window setting, see PKCS11_PERSISTENT_CACHE_REFRESH_WINDOW Parameter.

    • Server Poll Timeout

      Specify a timeout for a client's attempt to connect to an Oracle Key Vault server, before trying the next server in the list. The default value is 300 (milliseconds).

    • PKCS 11 Trace Directory Path

      Specify a directory to save the trace files.

  5. Click Save.
The endpoint configuration settings are saved.

7.2.5 Delete, Suspend or Reenroll Endpoints

When endpoints are no longer using Oracle Key Vault to store security objects, System Administrators can delete them, and then reenroll them when they are needed again. Endpoints may also be temporarily suspended and later enabled.

7.2.5.1 About Deleting Endpoints

Deleting an endpoint removes it permanently from Oracle Key Vault. However, security objects previously created or uploaded by that endpoint will remain in Oracle Key Vault. Likewise, security objects associated with that endpoint will also remain. To permanently delete or reassign these security objects, you will need to be a user with the Key Administrator role or authorize to merge these objects by managing wallet privileges. The endpoint software previously downloaded at the endpoint also remains on the endpoint until the endpoint administrator removes it.

7.2.5.2 Delete One or More Endpoint(s)

The Endpoints page provides the mechanism to delete a group of endpoints from Key Vault at one time. You can also delete a single endpoint from this page.

To delete one or more endpoints do the following:

  1. Log in to the Oracle Key Vault management console as a user who has the System Administrator role.
  2. Select the Endpoints tab to get to the Endpoints page.

    The Endpoints page lists all the endpoints currently registered or enrolled.

  3. Select the check box(es) to the left of the endpoint(s) you want to delete. You may select more than one.
  4. Click Delete.
  5. Click OK in the confirmation dialog box that appears.

7.2.5.3 Delete one Endpoint

The Endpoint Details page provides a consolidated view for the selected endpoint including a mechanism to delete the endpoint from Key Vault..

To delete an endpoint follow these steps:

  1. Log in to the Oracle Key Vault management console as a user who has the System Administrator role.
  2. Select the Endpoints tab to get to the Endpoints page.
  3. The Endpoints page lists all the endpoints currently registered or enrolled.
  4. Click on the endpoint name you want to delete. The Endpoint Details page appears.
  5. Click Delete.
  6. Click OK to confirm.

7.2.5.4 Suspend one Endpoint

You can suspend an endpoint temporarily for security reasons, and reinstate the endpoint once the threat has passed. When you suspend an endpoint, its status will change from Enrolled to Suspended.

To suspend an endpoint do the following:

  1. Log in to the Oracle Key Vault management console as a user who has the System Administrator role.
  2. Select the Endpoints tab to get to the Endpoints page.
  3. The Endpoints page lists all the endpoints currently registered or enrolled.
  4. Click on the endpoint name you want to suspend. The Endpoint Details page appears.
  5. Click Suspend.
  6. A confirmation message appears asking if you are sure. Click OK.
  7. When you suspend an endpoint, its Status on the Endpoints page will be Suspended.
  8. To enable the endpoint, perform Steps 1-4. From the Endpoint Details pane click Enable. The endpoint Status on the Endpoints page will now read Enrolled.

7.2.5.5 Reenroll an Endpoint

You must reenroll an endpoint to upgrade the endpoint software on the endpoint. You would also reenroll an endpoint to accommodate changes in an Oracle Key Vault deployment, for example, you need to pair a primary Oracle Key Vault server with a new secondary server in a high availability configuration.

The following procedure describes how to reenroll an endpoint:

  1. Log in to the Oracle Key Vault management console as a user who has the System Administrator role.
  2. Select the Endpoints tab to get to the Endpoints page.
  3. The Endpoints page lists all of the endpoints in Key Vault.
  4. Check the boxes to the left of the endpoints you want to reenroll.
  5. Click Reenroll.

    A confirmation message appears, saying that the endpoints were reenrolled successfully.

    Note:

    In Oracle Key Vault 12.2.0.5.0 and earlier, the symlink reference to okvclient.ora is not updated during re-enrollment. In Oracle Key Vault 12.2.0.6.0, new okvclient.jar option -o allows you to overwrite the symlink reference pointing to okvclient.ora in the new directory.

    A new enrollment token will be generated for each reenrolled and appear in the corresponding Enrollment Token column.

    You can use this one-time token to reenroll the endpoint.

7.3 Manage Endpoint Access to a Virtual Wallet

You can grant an endpoint access to a virtual wallet, and revoke or modify access when it is no longer necessary. Note, that the endpoint must be granted Read and Modify and Manage Wallet access privileges on the wallet in order to upload and download security objects to and from Key Vault.

7.3.1 Grant an Endpoint Access to a Virtual Wallet

You can grant an endpoint access to a virtual wallet as soon as the endpoint has been added to Oracle Key Vault, when it is still in registered status.

To grant an endpoint access to wallets already added to Oracle Key Vault:

  1. Log in to the Oracle Key Vault management console as an administrator who has the Key Administrator role.
  2. Select the Endpoints tab to get to the Endpoints page.
  3. On the Endpoints page, select the endpoint that must have access to the virtual wallet. The Endpoint Details page appears with the Access to Wallets pane.

    Figure 7-7 Endpoint Details - Access to Wallets

    Description of Figure 7-7 follows
    Description of "Figure 7-7 Endpoint Details - Access to Wallets "
  4. The Access to Wallets pane lists the wallets the endpoint already has access to. Click Add to add another wallet to this list.

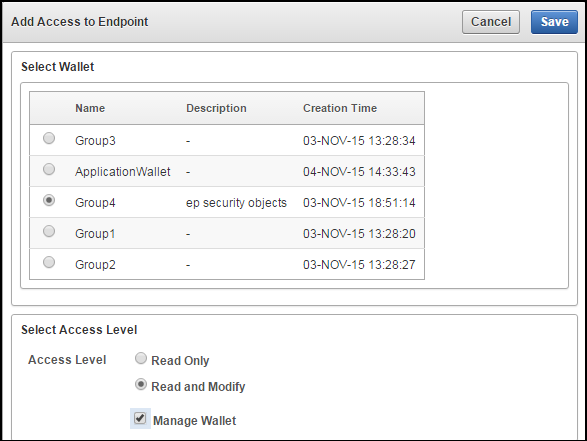
    The Add Access to Endpoint page appears.

    Figure 7-8 Add Access to Endpoint

    Description of Figure 7-8 follows
    Description of "Figure 7-8 Add Access to Endpoint "
  5. Select a wallet from the available list of wallets shown on the Add Access to Endpoint page.
  6. Select the desired Access Level in the Select Access Level pane.
  7. Click Save.

    You will see a confirmation message indicating that the access mapping succeeded.

7.3.2 Revoke Endpoint Access to a Virtual Wallet

Use the following procedure to revoke access to a virtual wallet for an endpoint:

  1. Log in to the Oracle Key Vault management console as an administrator who has the Key Administrator role.
  2. Select the Endpoints tab to get to the Endpoints page.
  3. On the Endpoints page, select the endpoint name, which will bring you to the Endpoint Details page. Look for the Access to Wallets pane on this page.

    The Access to Wallets pane shows a list of wallets that the endpoint has access to.

  4. Select the wallet, you want to revoke access to.
  5. Click Remove.
  6. When the confirmation dialog box asks if you want to remove this access, click OK.

    A confirmation message appears, indicating that the access mapping was removed.

7.3.3 View Wallet Items

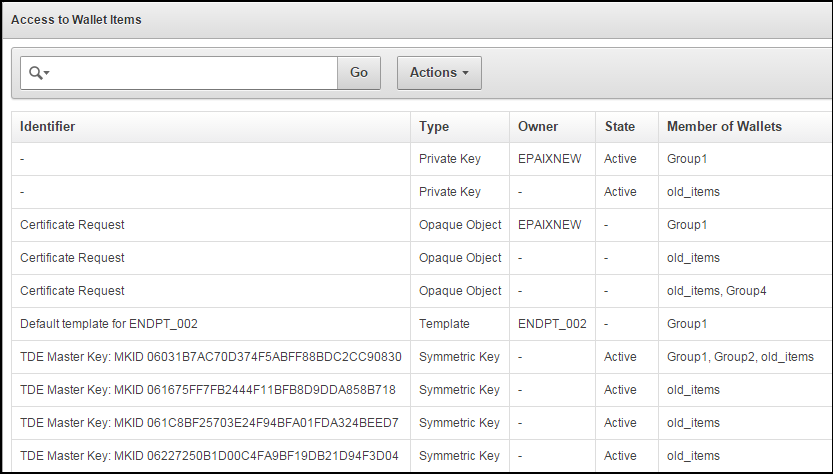
Wallet items refers to the security objects that the endpoint has access to.

To view these follow these steps:

  1. Log in to the Oracle Key Vault management console as an administrator who has the Key Administrator role.
  2. Select the Endpoints tab to get to the Endpoints page,
  3. Click the Endpoint Name to get to Endpoint Details.
  4. The Access to Wallet Items pane in Endpoint Details lists the wallet items that the endpoint has access to.

    Figure 7-9 Endpoint Details - Access to Wallet Items

    Description of Figure 7-9 follows
    Description of "Figure 7-9 Endpoint Details - Access to Wallet Items"

7.4 Associate a Default Wallet with an Endpoint

A default wallet is a type of virtual wallet that security objects are uploaded to when a wallet is not explicitly specified. Default wallets are useful for sharing with other endpoints such as nodes in an Oracle RAC, or primary and standby nodes in Dataguard (DG) by having all endpoints use the same default wallet.

The default wallet must be set during the registration process to ensure that the downloaded endpoint software is configured to use the default wallet.

An enrollment status of registered means that the endpoint has been added to Oracle Key Vault, but the endpoint software has not yet been downloaded and installed. This is when you must associate the default wallet with the endpoint.

The endpoint's enrollment status becomes enrolled when you download and install the endpoint software to the endpoint. If you set the default wallet after you enroll the endpoint, then you must re-enroll the endpoint to ensure that all future security objects created by the endpoint are automatically associated with that wallet.

7.5 Set the Default Wallet for an Endpoint

When you set the default wallet for an endpoint, all the endpoint's security objects will be automatically uploaded to this wallet if a wallet is not explicitly specified. Oracle requires that you set the default wallet right after registering the endpoint, and before downloading the endpoint software.

To set the default wallet follow the steps below:

  1. Log in to the Oracle Key Vault management console as an administrator who has the Key Administrator role.
  2. Select the Endpoints tab, then click on the endpoint name.

    The Endpoint Details page appears.

  3. Select Choose Wallet in Default Wallet.

    Figure 7-10 Endpoint Details - Default Wallet

    Description of Figure 7-10 follows
    Description of "Figure 7-10 Endpoint Details - Default Wallet "

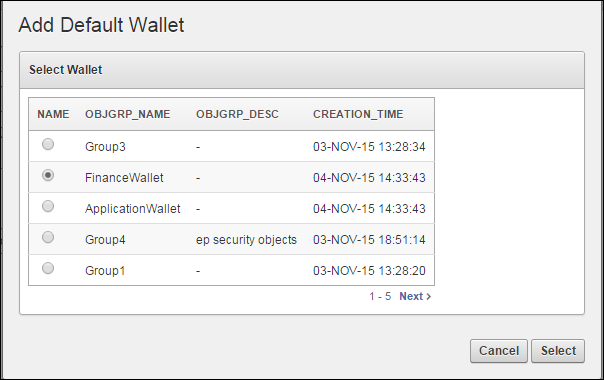
    The Add Default Wallet page appears displaying a list of available wallets.

    Figure 7-11 Add Default Wallet

    Description of Figure 7-11 follows
    Description of "Figure 7-11 Add Default Wallet"
  4. Select a wallet from the list to be the default wallet by clicking the radio button to the left of the wallet. Click Select.

    The selected wallet name appears in the Default Wallet pane.

    Figure 7-12 Post Default Wallet Selection

    Description of Figure 7-12 follows
    Description of "Figure 7-12 Post Default Wallet Selection"
  5. Click Save.

    A confirmation message appears saying that the update has been made.

7.6 Manage Endpoint Groups

An endpoint group is a group of endpoints that share a common set of wallets.

7.6.1 Create an Endpoint Group

Endpoints that must share a common set of security objects stored in wallets can be grouped into an endpoint group. For example, endpoints using Oracle RAC, Oracle GoldenGate, or Oracle Active Data Guard may need to share keys for access to shared data.

To create an endpoint group:

  1. Log in to the Oracle Key Vault management console as a user who has the Key Administrator role.

  2. Select the Endpoints tab, then Endpoint Groups.

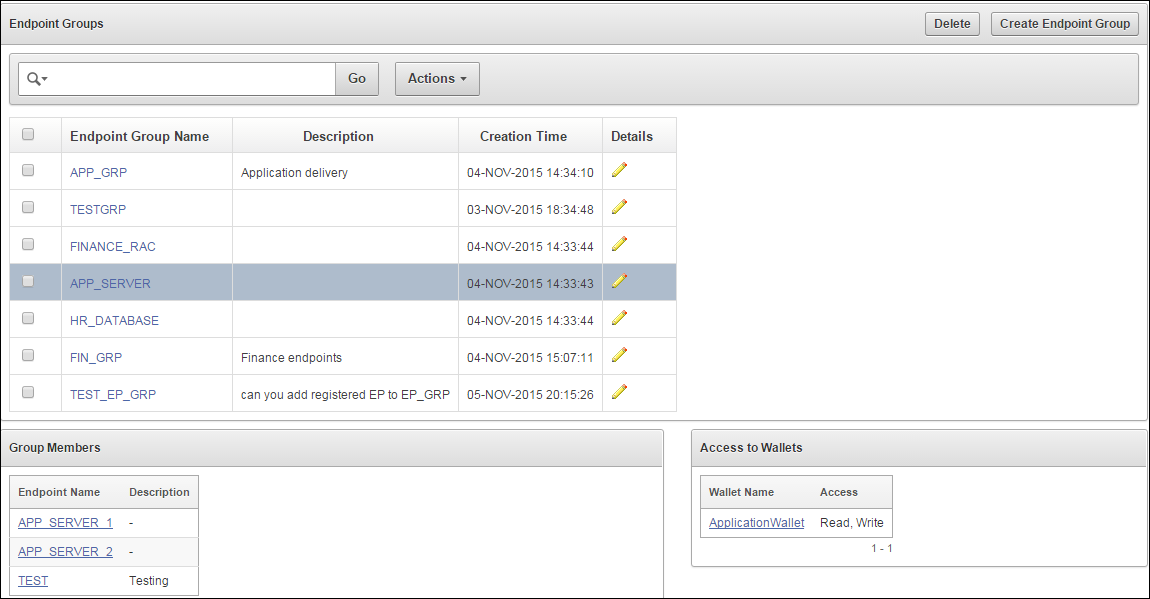
    The Endpoint Groups page appears.

    Figure 7-13 Endpoint Groups Page

    Description of Figure 7-13 follows
    Description of "Figure 7-13 Endpoint Groups Page"
  3. Click Create Endpoint Group. The Create Endpoint Group page appears.

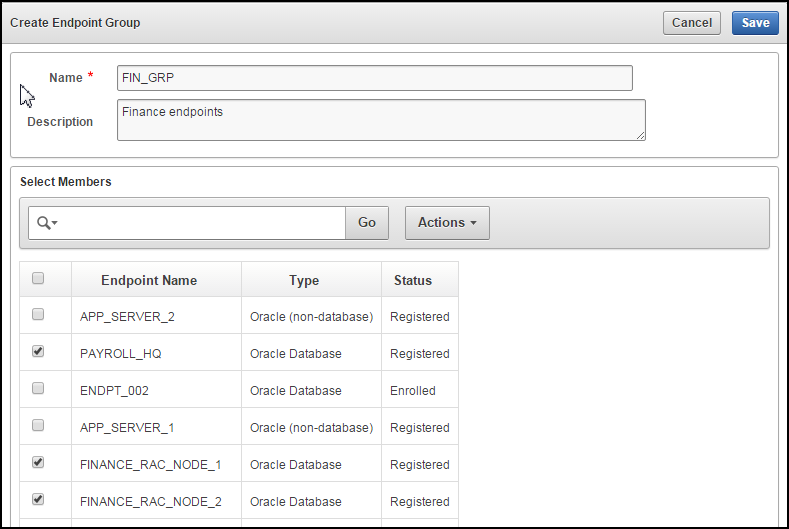
    Figure 7-14 Create Endpoint Group Page

    Description of Figure 7-14 follows
    Description of "Figure 7-14 Create Endpoint Group Page"
  4. Enter the name of the new group and a brief description. You can add members to the group right away, from the list in the Select Members pane, just below Create Endpoint Group.

  5. The Select Members pane lists all the endpoints. To add endpoints to the endpoint group, check the boxes to the left of each endpoint.

  6. Click Save to complete creating the endpoint group.

    A message appears indicating that the endpoint group has been successfully saved. The new endpoint group now appears in the Endpoint Groups page.

7.6.2 Modify Endpoint Group Details

You can add endpoints and access mappings to an endpoint group after creating the endpoint group. An endpoint can belong to more than one endpoint group. You cannot add one endpoint group to another endpoint group.

To modify an endpoint group after creating it, follow these steps:

  1. Log in to the Oracle Key Vault management console as a user who has the Key Administrator role.
  2. Select the Endpoints tab, and then select Endpoint Groups.

    The Endpoint Groups page appears.

  3. Click the edit pencil icon in the Details column corresponding to the endpoint group.

    The Endpoint Group Details page appears.

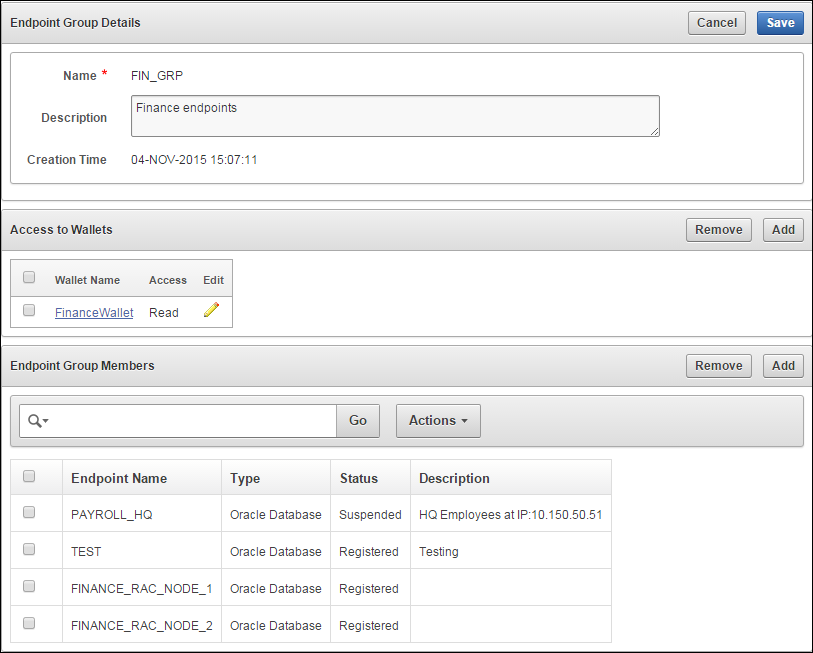
    Figure 7-15 Endpoint Group Details Page

    Description of Figure 7-15 follows
    Description of "Figure 7-15 Endpoint Group Details Page"
  4. Modify the description as needed.

    Add or remove access to wallets endpoint group members by clicking Add.

  5. Click Save.

7.6.3 Grant an Endpoint Group Access to a Virtual Wallet

The following procedure grants an endpoint group access to an existing virtual wallet:

  1. Log in to the Oracle Key Vault management console as a user who has the Key Administrator role.
  2. Select the Endpoints tab, and then Endpoint Groups.
  3. Click the pencil icon in the Details column corresponding to the endpoint group. The Endpoint Group Details page appears.
  4. In the Access to Wallets pane, click Add.
  5. Select a virtual wallet from the available list.
  6. Select an Access Level:
    • Read Only: This level grants the endpoint group read access to the virtual wallet and its items.

    • Read and Modify: This level grants the endpoint group read and write access to the virtual wallet and its items.

  7. Select the Manage Wallet check box if you want endpoints to:
    • Add or remove objects from the virtual wallet.

    • Grant other endpoints or endpoint groups access to the virtual wallet.

  8. Click Save.

    A message appears, indicating that the access mapping was successful.

7.6.4 Remove an Endpoint from an Endpoint Group

You can remove an endpoint from an endpoint group. This will remove all access to wallets associated with that endpoint group unless the endpoint has been separately granted access to the wallet(s) directly or through another endpoint group. You may remove more than one endpoint at the same time.

To remove an endpoint from an endpoint group, follow these steps:

  1. Log in to the Oracle Key Vault management console as a user who has the Key Administrator role.
  2. Select the Endpoints tab, and then select Endpoint Groups.

    The Endpoint Groups page appears.

  3. Click the edit pencil icon next in the Details column corresponding to the endpoint group.

    The Endpoint Group Details page appears.

  4. In the Endpoint Group Members pane, check the box(es) to the left of the endpoint names to be removed.
  5. Click Remove.
  6. When the confirmation dialog box asks if you want to remove the endpoint from the group, click OK.

    A dialog box appears, indicating that the endpoint has been successfully removed from the group.

7.6.5 Delete Endpoint Groups

You can delete endpoint groups, if their member endpoints no longer require access to the same virtual wallets. This action removes the shared access of member endpoints to wallets, not the endpoints themselves.

The following procedure describes how to delete an endpoint group from Key Vault:

  1. Log in to the Oracle Key Vault management console as a user who has the Key Administrator role.
  2. Select the Endpoints tab, and then select Endpoint Groups.

    This brings up the Endpoint Group page.

  3. Check the box(es) to the left of the endpoint group name.
  4. Click Delete.
  5. When the confirmation dialog box asks if you want to delete the endpoint group(s), click OK to confirm.

7.7 Manage Endpoint Details
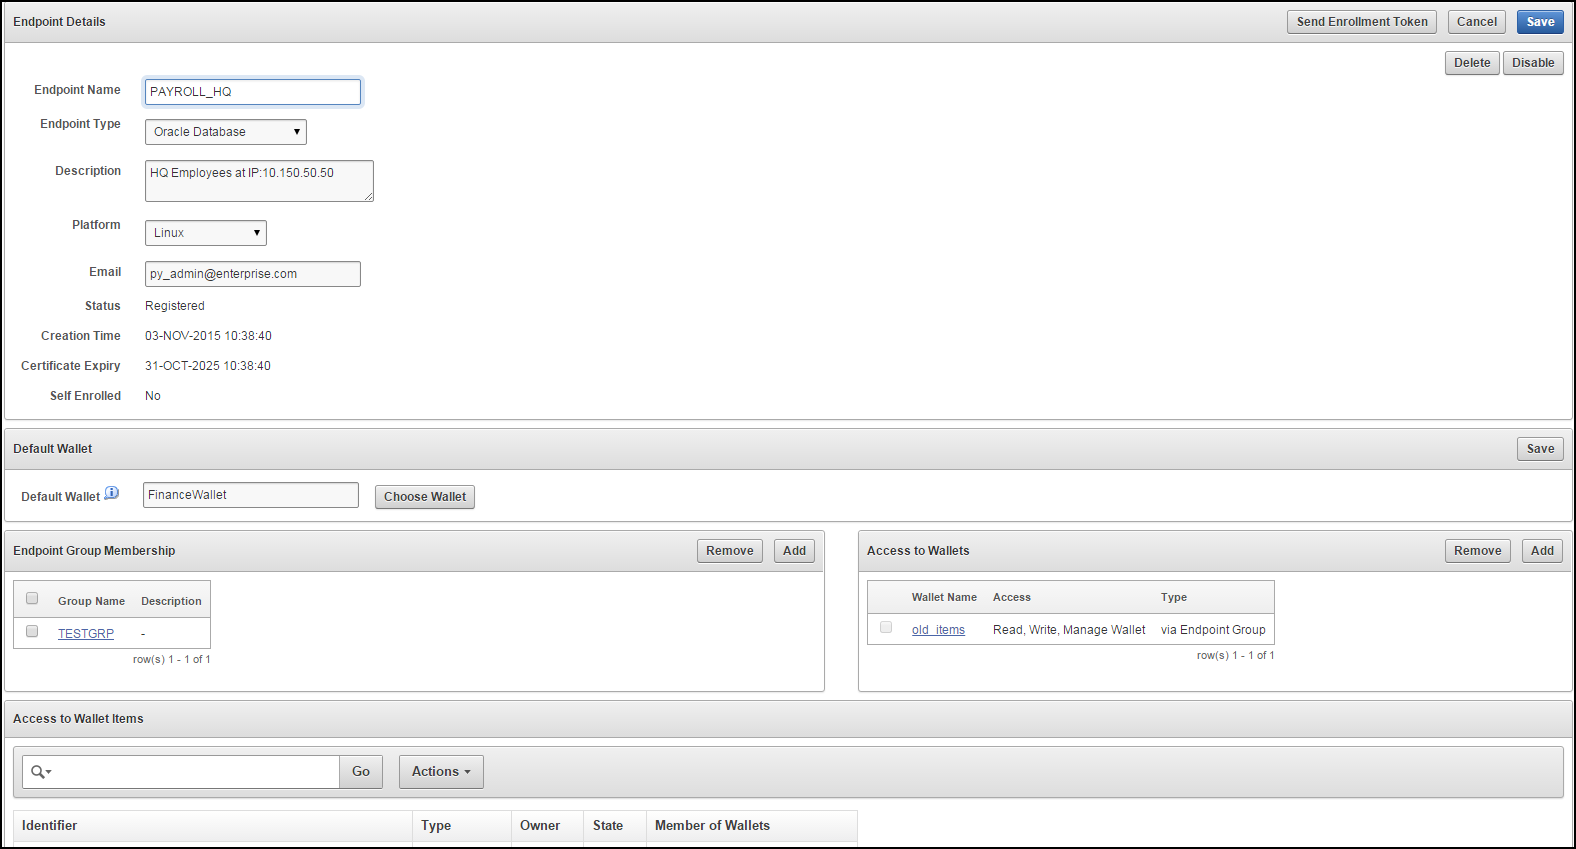
After registering or enrolling the endpoint you can modify the endpoint name, type, description, platform, and email as needed. You can add the endpoint to an endpoint group, and upgrade the software on the endpoint.

7.7.1 About Endpoint Details

The endpoint details page provides a consolidated view of the endpoint. From here you can modify endpoint details and complete endpoint management tasks.

Figure 7-16 Endpoint Details Page

Description of Figure 7-16 follows
Description of "Figure 7-16 Endpoint Details Page"

See Also:

7.7.2 Modify Endpoint Details

You can modify the endpoint name, type, platform and email from the Endpoint Details page as follows:

  1. Log in to the Oracle Key Vault management console as a user who has the System Administrator role.
  2. Select the Endpoints tab to get to the Endpoints page.
  3. Click the name of the endpoint to get to the Endpoint Details page.

    Figure 7-17 Endpoint Details Pane

    Description of Figure 7-17 follows
    Description of "Figure 7-17 Endpoint Details Pane "
  4. Modify any of the following: endpoint name, endpoint type, description, platform, email as needed.
  5. Click Save.

7.7.3 Add an Endpoint to an Endpoint Group

You can add an endpoint to an endpoint group if you want shared access to wallets as follows:

  1. Log in to the Oracle Key Vault management console as an administrator who has the Key Administrator role.
  2. Select the Endpoints tab.

    The Endpoints page appears.

  3. Select the endpoint you want to add to a group.

    The Endpoint Details page appears.

  4. Click Add in Endpoint Group Membership.

    The Add Endpoint Group Membership page appears.

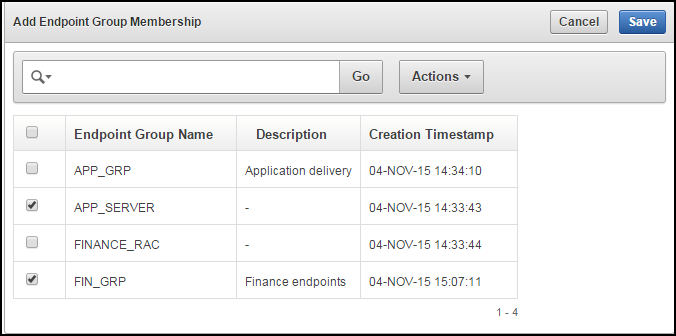
    Figure 7-18 Adding Endpoint to Endpoint Group

    Description of Figure 7-18 follows
    Description of "Figure 7-18 Adding Endpoint to Endpoint Group "

    A list of endpoint groups is displayed under Endpoint Group Name.

  5. Check the box(es) to the left of the endpoint group(s) you want to add the endpoint to.
  6. Click Save.

    A message appears saying that the endpoint has been added to the group.

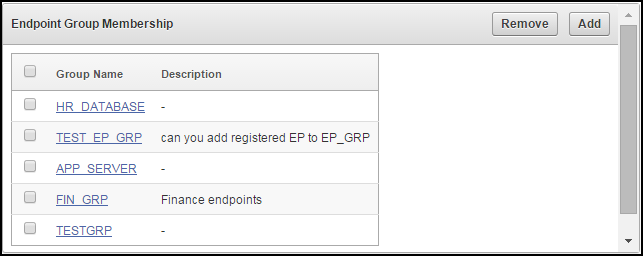
    You will see the checked endpoint groups in the Endpoint Group Membership pane.

    Figure 7-19 Endpoint Details - Endpoint Group Membership

    Description of Figure 7-19 follows
    Description of "Figure 7-19 Endpoint Details - Endpoint Group Membership "

See Also:

Add endpoint to group Figure 7-18

Create an endpoint group described in "Create an Endpoint Group"

7.7.4 Configuring Global Endpoint Configuration Parameters

Users with system administrator role can centrally update certain endpoint configuration parameters in the Oracle Key Vault Management Console. This feature enables system administrators to set certain endpoint configuration parameters globally, i.e. for all endpoints, or on a per-endpoint basis. It simplifies the process of managing multiple endpoints for system administrators.

Endpoint specific parameters if set take precedence over global parameters. Global parameters, if set will take effect when endpoint-specific parameters are cleared. OKV will use the default system parameters if both global and endpoint specific parameters are cleared or not set from OKV management console.

The configuration parameter values set in the OKV management console are pushed to endpoints dynamically. After configuration parameters have been set in the OKV Management Console, the next time the endpoint contacts the OKV server, it will get the configuration parameters update. Endpoint configuration parameter update is best-effort. In case of error, the update is not applied. Both okvutil and PKCS11 library can get and apply the endpoint configuration updates.

To configure global endpoint configuration parameters:
  1. Log in to the Oracle Key Vault management console as a user who has the System Administrator role.
  2. Select the Endpoints tab, and then Settings from the left side bar.

    The Endpoint Settings page is displayed.

    Figure 7-20 Endpoint Settings

    Description of Figure 7-20 follows
    Description of "Figure 7-20 Endpoint Settings"
  3. In the Global Endpoint Configuration Parameters section, configure the following settings:
    • Endpoint Certificate Validity

      Specify the number of days for which the current endpoint certificate is valid.

    • PKCS 11 In-Memory Cache Timeout

      Specify the duration for which the master key is available after it is cached in the in-memory cache. The value is specified in minutes. For more information about the PKCS 11 In-Memory Cache Timeout setting, see PKCS11_CACHE_TIMEOUT Parameter.

      PKCS 11 Cache Persistent Timeout

      Specify the duration for which the master key is available after it is cached in the persistent master key cache. The value is specified in minutes. For more information about the PKCS 11 Cache Persistent Timeout setting, see PKCS11_PERSISTENT_CACHE_TIMEOUT Parameter.

    • PKCS 11 Persistent Cache Refresh Window

      Specify the duration to extend the period of timefor which the master key is available after it is cached in the persistent master key cache. The value is specified in minutes. For more information about the PKCS 11 Persistent Cache Refresh Window setting, see PKCS11_PERSISTENT_CACHE_REFRESH_WINDOW Parameter.

    • Server Poll Timeout

      Specify a timeout for a client's attempt to connect to an Oracle Key Vault server, before trying the next server in the list. The default value is 300 (milliseconds).

    • PKCS 11 Trace Directory Path

      Specify a directory to save the trace files.

  4. Click Save.
The endpoint configuration settings are saved.

7.7.5 Delete an Endpoint from an Endpoint Group

You can delete an endpoint from an endpoint group if the endpoint no longer needs shared access to wallets as follows:

  1. Log in to the Oracle Key Vault management console as an administrator who has the Key Administrator role.
  2. Select the Endpoints tab.

    The Endpoints page appears.

  3. Select the endpoint you want to delete from a group.

    The Endpoint Details page appears.

  4. Check the box(es) in Endpoint Group Membership to the left of the endpoint group(s) you want to remove the endpoint from.
  5. Click Remove.

    A confirmation message will ask if you want to delete the endpoint from the selected endpoint group(s). Click OK.

See Also:

7.7.6 Upgrade Endpoint Software

To upgrade to the latest endpoint software for an enrolled endpoint, you can download the endpoint software without having to reenroll the endpoint.

To download the latest version of the endpoint software follow Steps 1-4 of "Task 1: Enroll Endpoint and Download Software".

Step 4 brings up the Enroll Endpoint & Download Software page.

On the Enroll Endpoint & Download Software page, do the following:

  1. Log in to the endpoint server as the endpoint administrator.
  2. Connect to the Oracle Key Vault management console.

    For example:

    https://192.0.2.254

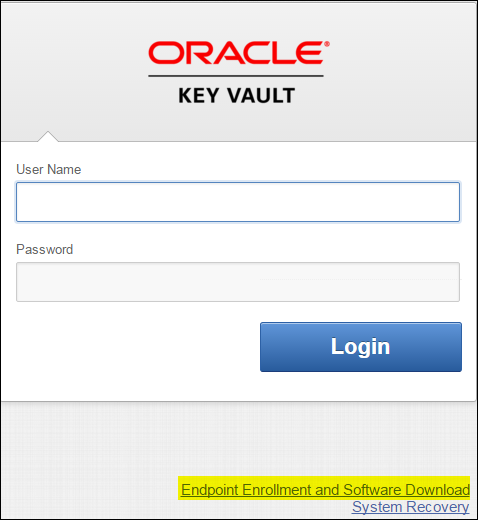
  3. The login page to the Oracle Key Vault management console appears.

    Do not log in.

    Figure 7-21 Key Vault Management Console Login Screen

    Description of Figure 7-21 follows
    Description of "Figure 7-21 Key Vault Management Console Login Screen"
  4. Click the highlighted link Endpoint Enrollment and Software Download below Login.

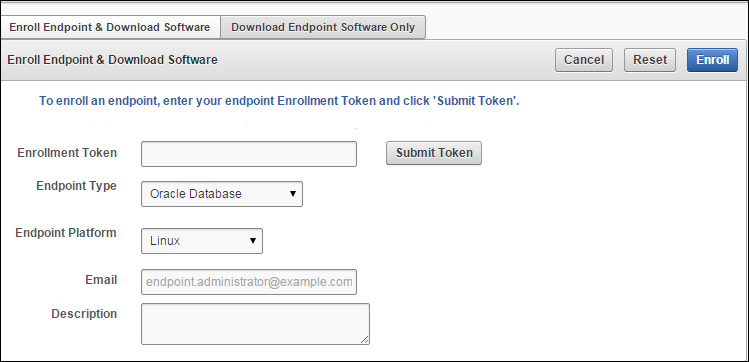
    The Enroll Endpoint & Download Software page appears with two tabs:

    • Enroll Endpoint & Download Software

    • Download Endpoint Software Only

    Figure 7-22 Enroll Endpoint & Download Software Page

    Description of Figure 7-22 follows
    Description of "Figure 7-22 Enroll Endpoint & Download Software Page"

    Note that Figure 8-2 has been trimmed and contains the following text between Download Endpoint Software and the Cancel, Reset, and Enroll buttons on the right:

    To enroll an endpoint, enter your endpoint Enrollment Token and click 'Submit Token'. Update the endpoint details if necessary and click 'Enroll' to complete the enrollment. Download the endpoint package when prompted."

  5. Click the Download Endpoint Software Only tab.

    The Download Endpoint Software Only page appears.

  6. Select the endpoint platform from the drop down Platform menu and click Download.
  7. Save the file:okvclient.jar to a desired location.
  8. Ensure that you have the necessary administrative privileges to install software on the endpoint.
  9. Ensure that you have JDK 1.5 or later installed, and that the PATH environment variable includes the java executable (in the JAVA_HOME/bin directory).

    Oracle Key Vault supports JDK versions 1.5, 1.6, 7, and 8.

  10. Run the Shell utility ORAENV or source ORAENV command to set the correct environment variables on Oracle Database servers.
  11. Check that the environment variables ORACLE_BASE and ORACLE_HOME are correctly set.

    If you used ORAENV to set these variables, you must verify that ORACLE_BASE points to the root directory for Oracle Databases, and that ORACLE_HOME points to a sub-directory under ORACLE_BASE where an Oracle Database is installed.

  12. Navigate to the directory in which you saved the okvclient.jar file.
  13. Run the java command to install the okvclient.jar file.
    java -jar okvclient.jar -d /home/oracle/okvutil -v
    

    In this specification:

    • The -d argument specifies the directory location for the endpoint software and configuration files, in this case /home/oracle/okvutil.

      The environment variable $OKV_HOME refers to the directory where the endpoint software is installed, in this case /home/oracle/okvutil.

    • The -v argument writes the installation logs to the $OKV_HOME/log/okvutil.deploy.log file at the server endpoint.

    Note:

    -o is an optional argument that allows you to overwrite the symlink reference to okvclient.ora, when okvclient.jar is deployed in a directory other than the original directory. This argument is used only when re-enrolling an endpoint.
  14. The installation process prompts for a password. You can enter a password to create a password-protected wallet or create an auto-login wallet without a password as described below:
    • A password-protected wallet is an Oracle wallet file that store the endpoint's credentials to access Oracle Key Vault. This password will be required whenever the endpoint connects to Oracle Key Vault.

      Create a password-protected wallet by entering a password between 8 and 30 characters. Then press Enter.

    • Create an auto-login wallet by simply clicking Enter.

      No password will be required when the endpoint connects to Oracle Key Vault. An auto-login wallet enables endpoint provisioning without human intervention.

    Enter new Key Vault endpoint password (<enter> for auto-login): Key_Vault_endpoint_password
    Confirm new endpoint password: Key_Vault_endpoint_password
    

    The installation proceeds and completes with the following message:

    The Oracle Key Vault endpoint software installed successfully.
    

    A successful installation of the endpoint software creates the following directories:

    • bin: contains the okvutil program, the root.sh and root.bat scripts, and the binary files okveps.x64 and okveps.x86

    • conf: contains the configuration file okvclient.ora

    • jlib: contains the Java library files

    • lib: contains the file liborapkcs.so

    • log: contains the log files

    • ssl: contains the TLS-related files and wallet files. The wallet files contain the endpoint credentials to connect to Oracle Key Vault.

      The ewallet.p12 file refers to a password-protected wallet. The cwallet.sso file refers to an auto-login wallet.

  15. On UNIX platforms, the liborapkcs.so file contains the library that the Oracle database uses to communicate with Oracle Key Vault. On Windows platforms, the liborapkcs.dll file contains the library that the Oracle database uses to communicate with Oracle Key Vault.

    If you are planning to use a TDE direct connection, then run root.sh on Oracle Linux x86-64, Solaris, AIX, and HP-UX (IA) installations. The liborapkcs.so file is copied to the following directory: /opt/oracle/extapi/64/hsm/oracle/1.0.0

    On Windows installations, run root.bat. The liborapkcs.dll file is copied to C:\oracle\extapi\64\hsm\oracle\1.0.0

    Log in as the root user and run the root.sh script. On Windows installations, run root.bat.

    $ sudo bin/root.sh
    
    bin\root.bat
    

    Or:

    $ su -
    # bin/root.sh
    

    On Windows platforms, you are prompted for the version of the RDBMS in use when you execute root.bat. Switch out of user root after completing this step.

  16. Run the okvutil list command to verify that the endpoint software installed correctly, and that the endpoint can connect to the Oracle Key Vault server.

    If the endpoint is able to connect to Key Vault, a No objects found message appears:

    $ ./okvutil list
    No objects found
    

    If a Server connect failed message appears at any time, you must troubleshoot the installation for possible issues. First check that environment variables are correctly set.

  17. You can get help on the endpoint software with the -h option:
    java -jar okvclient.jar -h


    The following output appears:

    Oracle Key Vault Release 12.2.0.12.0 (2020-03-15 15:36:49.839 PDT)
    Production on Fri Mar 15 19:55:31 PDT 2018
    Copyright (c) 1996, 2020 Oracle. All Rights Reserved.
    Usage: java -jar okvclient.jar [-h | -help] [[-v | -verbose] [-d <destination directory>] [-o]]
    
  18. After installation Oracle recommends that you securely delete the endpoint software file okvclient.jar.