19 Implement Attachments
This chapter includes the following sections:
For general information about Oracle Fusion Middleware user interface (UI) components, see:
-
Working with Page Definition Files for an Integrated Excel Workbook Oracle ADF chapter in the Developing Fusion Web Applications with Oracle Application Development Framework
-
Introduction to ADF Faces Rich Client chapter in the Developing Web User Interfaces with Oracle ADF Faces
19.1 Introduction to Attachment Components
Attachment components provide a declarative programming mechanism for you to add attachments to the user interface (UI) pages that you create for Fusion web applications. After it is added to a UI page, the component gives users the ability to associate a URL, desktop file, repository file or folder, or text with a business object, such as an expense report, contract, or purchase order.
There are four Attachment components available for use in your page. Attachment Views, Attachment Link, Attachment, and Attachments Carousel. The Attachment Views and Attachment Link components incorporate the latest design concepts. The Attachment component was the original component available.
Note:
The Attachment and Attachments Carousel components are still supported. Any UI enhancements being delivered will not be applied to these components.
Note:
All Attachments of type File, Folder or Text are stored on a WebCenter Content Server. You will be asked to establish a connection to that server in the pre-requisite configuration steps.
19.1.1 About the Attachment Views Component
The attachment views component is a declarative component designed specifically for use with Fuse+. It can be shown in a page or page segment.
The following figure shows what the component looks like, before the advanced features are enabled.
Note:
When first accessed, the component displays in table format. Clicking the icons in the top right-hand corner toggles among the table, list and card views.
Figure 19-1 Attachment Views Component

The following element is rendered:
-
Toolbar
-
Add button - opens the Add Attachments pane
-
Delete button - deletes the selected rows
Note:
There is no concept of a selected card in the Cards view. Therefore, Delete Attachment will not appear in the Actions menu for that view.
-
-
Views
There are three views available:
-
Table view - shows the Attachments in a table format. Currently showing columns for Type (icon), Title, and Description. Title will be shown as a link when there is a preview version of the Attachment to view.**INTERNAL XREF ERROR** shows the table view.
-
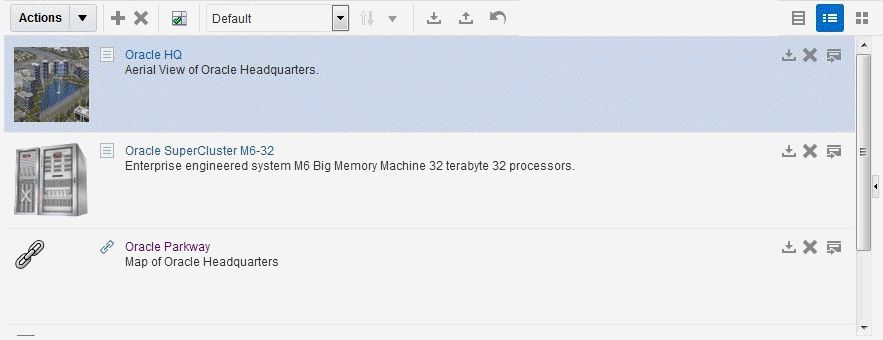
List view - shows the Attachments in a list format. Currently showing Attachment values of Thumbnail, Type (icon), Title, Description, Actions. You can click Type to download the Attachment. Title will be shown as a link when there is a preview version of the Attachment to view.
Figure 19-2 Attachments List View
-
Cards View — Shows the Attachments in a card format. Currently showing Attachment values of Thumbnail, Title, and Actions. Title will be shown as a link when there is a preview version of the Attachment to view.
-
-
-
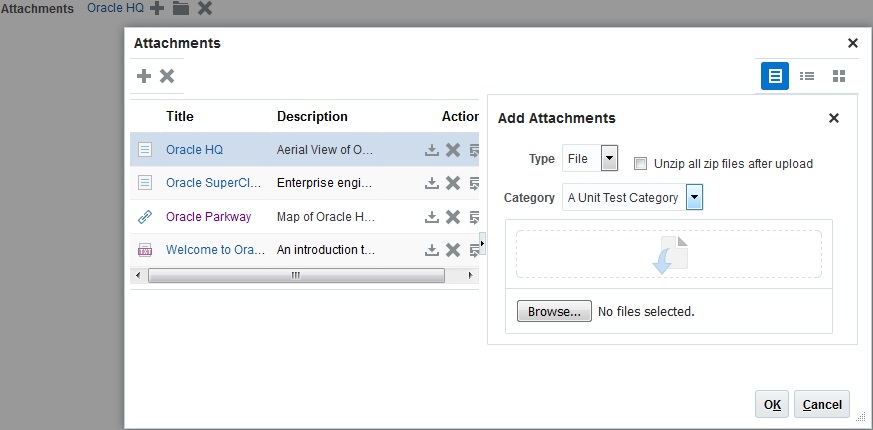
Add Attachments pane - allows the user to provide the minimum details required to create an Attachment (Attachment Type, Category and File, Text or URL)
Figure 19-3 Add Attachments Pane
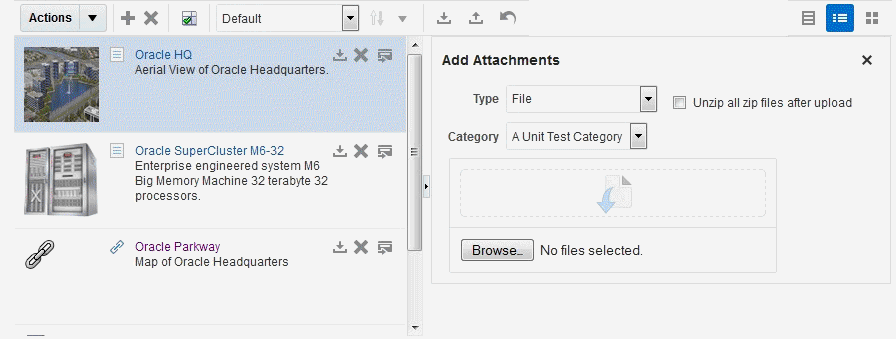
The Add Attachments pane stays open to allow the user to continue to add attachments. When finished, the user can hide the pane by clicking the close icon (X), located in the top right-hand corner of the pane.
Valid Attachment Types are File (default), Text, URL, and Repository File/Folder.
– File: The user can select multiple files can be selected either through file browser, or by dragging and dropping onto the drop area. The selected files will automatically be uploaded and added. The contents of a compressed file can now also be added automatically by checking the Unzip all compressed files after upload checkbox. By default the checkbox is unchecked allowing the compressed files to be uploaded, but not extracted.
– Text or URL: The user enters the text or URL and then clicks Add to create the Attachment.
– Repository File/Folder: The same document picker used with the Attachments component is shown in the Add Attachments pane. The user navigates through the virtual folder structure to find files or folders. When a file is found the user selects it and then clicks Select at the bottom of the table to add it as an Attachment. There is also the option to search for files using a query. It is initiated by clicking on the Advanced link at the top of the table. This opens the Advanced Search dialog, as shown in the following figure.
Figure 19-4 Repository File/Folder Advanced Search Dialog
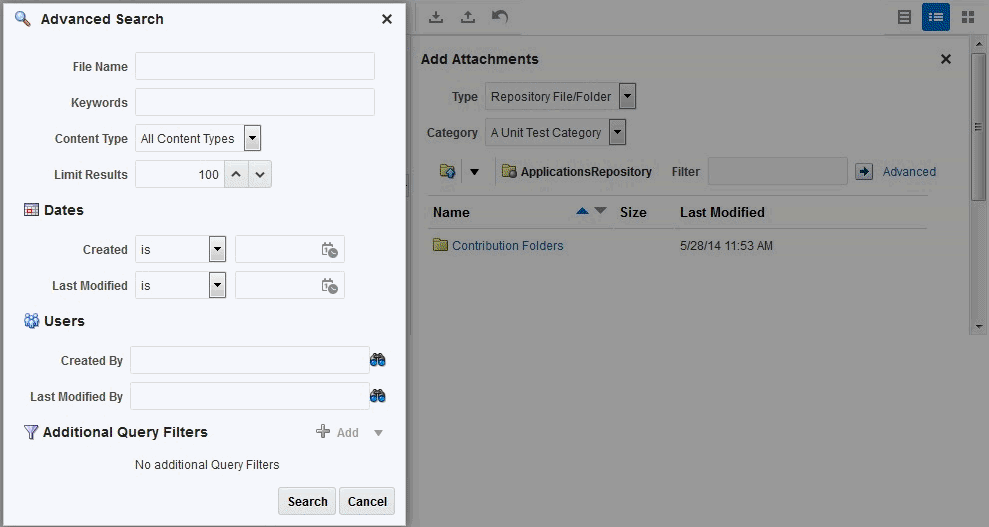
Use the keywords field to perform a search on the contents of the files in Oracle WebCenter Content. In order for this search to be successful, the Content Server must be configured for a full content search. See "Managing Search Tools" in the Oracle WebCenter Content System Administrator’s Guide for Content Server for options.
Additional query filters are enabled when a content type other than "All Content Types" is selected. The other options in the list are all Oracle WebCenter Content profiles. These profiles allow an administrator to control the fields that appear, and the order in which they appear. Selecting this option determines the fields that you can add as additional query filters. A targeted profile limits the number of fields from which to choose to only those that are relevant. A global profile showing all fields is also available.
-
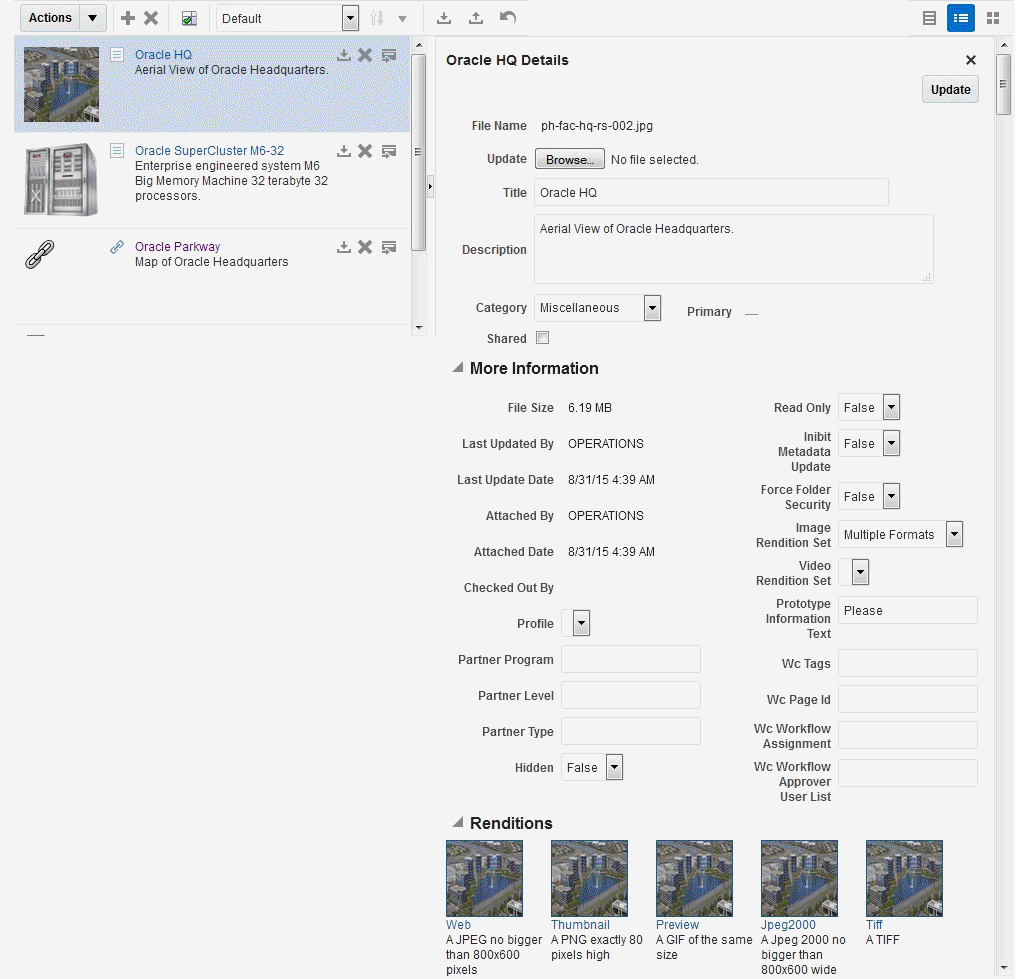
Details pane - provides additional details about the current Attachment. You can edit any updateable value of the Attachment in this pane.
Figure 19-5 Details Pane
-
Open the pane by clicking the right-arrow button associated with the Attachment. Close the pane by clicking the right-arrow button again, or by clicking the "X" in the top-right corner.
-
The user controls the changes made. Clicking Update saves the edits. Changes are discarded when the pane is closed (by clicking X), or when the current Attachment is changed.
-
File Attachment types are updateable. If a file is already checked out, it will be checked out again after it has been updated. To ensure against file loss in the event of a high-availability failover, a file updates immediately. Discarding changes does not apply to file updates.
-
The "More Information" section displays extra attributes from the Content Server that are not already in use by Attachments.
-
When files are stored on the Content Server, it may be necessary to include different formats of the original document for distribution purposes. For example, an Adobe PDF version of a Word file or images that are uploaded in various sizes. Content Server supports this through renditions. The "Rendition" section displays all of the different renditions that have been added to the original file on the Content Server.
-
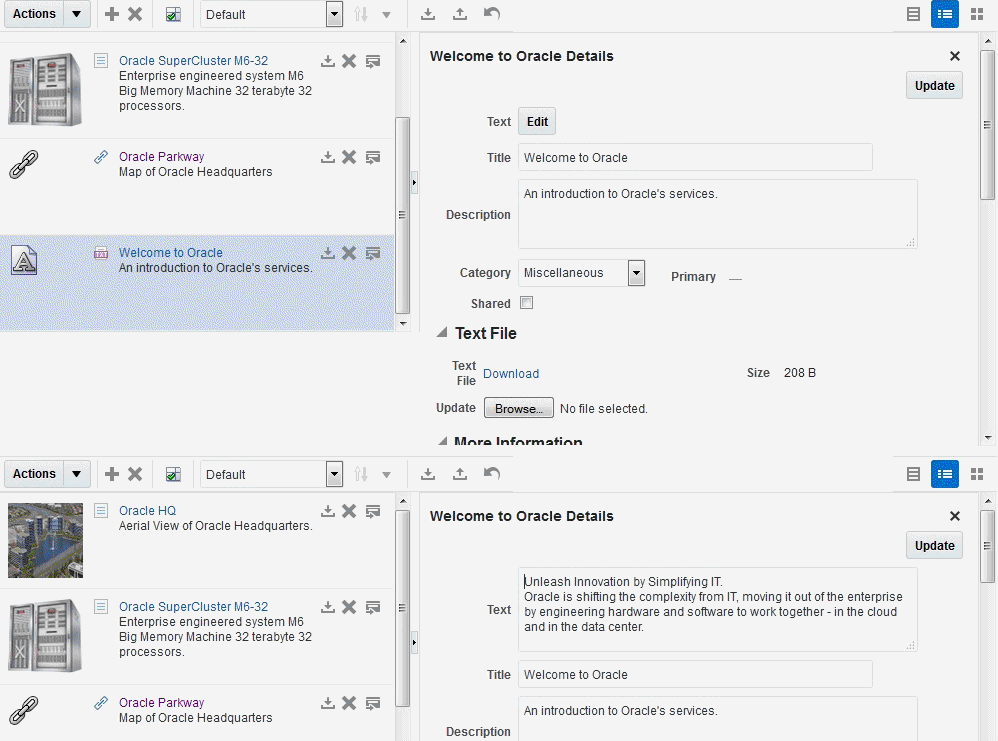
Edit text button (text Attachments only) - downloads and displays the text for the Attachment. The text is editable for the remainder of the session. A warning displays when text files are larger than 1 MB.
Editable text displays when you click Edit, as shown in the following figure.
Figure 19-6 Edit Text Attachment Text
-
19.1.2 About the Attachment Link Component
The Attachment Link component renders these elements on the page or page segment:
Figure 19-7 Elements Rendered by the Attachment Link Component
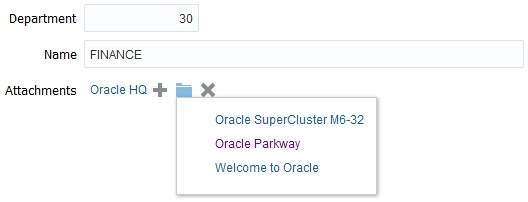
The Attachment Link component provides a link to the most recently attached document or URL. Where there is a preview version of the attachment, this will show when clicking this link. Hovering your mouse on the link supplies a detail window with attachment information. The detail window contains the following information about the most recent attachment:
-
Type – represented by an icon for File/URL/Text/Folder
-
link to the most recently attached document or URL
-
Preview, where a preview view is available.
-
Last Updated By
-
Last Updated Date
If there are no attachments, the value of this field will be None.
The Add Attachment icon. When clicked, the Attachments window is launched showing any existing attachments. The Add pane will be displayed allowing the user to start adding attachments.
Figure 19-8 Add Attachments Pane
When there are one or more attachments, a folder icon will be displayed. Clicking this link opens the Attachments window, which displays the attachments.
Hovering over the folder icon will display a small dialog with a list of up to the next three most recent attachments. When clicked, the link (by default) will prompt the user to download the file. If there is only one attachment, there will be an entry indicating No More. If there are more than four attachments, the last bullet is a link with the format " <# of remaining attachments> more...". The number of attachments shown in the small dialog list is be configured. Clicking this link opens the Attachments window, which displays the full list of attachments in a table.
The Delete Attachments icon. This is shown only when there is an attachment. It allows the most recent attachment to be deleted without having to launch the Attachment window.
Note: The Attachment label originates from outside the Attachment component to allow the Attachment component to correctly align with the other components in the page layout.
The Attachment Window displays the Attachments Views component. The popup includes an OK button, which closes the popup, and a Cancel button. On opening the popup, a savepoint in the transaction will be created. Clicking Cancel will initiate a rollback to that point and revert any changes made to Attachments on the database.
Abridged Mode
The Attachment Link component also can display with a smaller footprint on the page. In Abridged mode, the component will show a single icon dependent on the number of attachments.
-
No attachments: The Add Attachment icon will display. Clicking the icon will open the Attachment window with the Add panel displayed.
-
One attachment: A document icon will display.
-
More than one attachment: A folder icon will display. Clicking the file or folder icon will display the Attachment window.
19.1.3 About the Attachment Component
The component can be displayed in a UI page in any of the following ways:
-
Attachment field in a page or page segment:
The following elements are rendered on the page or page segment:
-
A link to the most recently attached document or URL. Hovering your mouse on a link supplies a detail window with attachment information. The detail window contains the following information about the most recent attachment:
-
Type - File/URL/Text
-
Attached By
-
Attached Date
When clicked, the link (by default) will prompt the user to download the file.
If there are no attachments the value of this field will be None.
-
-
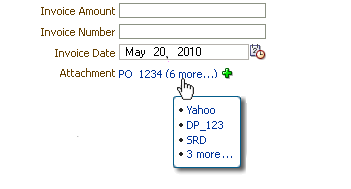
When there are more attachments, a link will be displayed in the format "<# of additional attachments> more...". Clicking this link opens the Attachments window, which displays the full list of attachments in a table.
Hovering over this link will display a small dialog with a list of up to the next three most recent attachments. When clicked, the link (by default) will prompt the user to download the file. If there are more than four attachments the last bullet is a link with the format " <# of remaining attachments> more...". The number of attachments shown in the small dialog list is configurable. Clicking this link opens the Attachments window, which displays the full list of attachments in a table.
-
The Manage Attachments icon. When clicked, the Attachments window is launched showing any existing attachments as well as a new empty row at the top of the list to allow the user to add new attachments.
-
The Delete Attachments icon. Only shown when there is only one attachment added. Allows the one attachment to be deleted without having to launch the Attachment window.
Figure 19-9 shows an example of an attachment field in a page or page segment with attachments.
Figure 19-9 Attachment Field in a Page or Page Segment
Note:
The Attachment label originates from outside the Attachment component to allow the Attachment component to correctly align with the other components in the page layout.
-
-
Attachment column in a table:
The following elements are rendered in the table:
-
A column header titled Attachments
-
A link to the most recently attached document or URL. Hovering your mouse on a link supplies a detail window with attachment information. The detail window contains the following information about the most recent attachment:
-
Type - File/URL/Text
-
Attached By
-
Attached Date
When clicked, the link (by default) will prompt the user to download the file.
If there are no attachments the value of this field will be None.
-
-
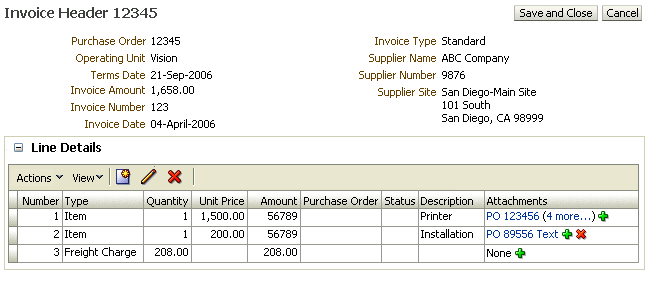
When there are more attachments, a link will be displayed in the format "<# of additional attachments> more...". Clicking this link opens the Attachments window, which displays the full list of attachments in a table.
Hovering over this link will display a small dialog with a list of up to the next three most recent attachments. When clicked, the link (by default) will prompt the user to download the file. If there are more than four attachments the last bullet is a link with the format " <# of remaining attachments> more...". The number of attachments shown in the small dialog list is configurable. Clicking this link opens the Attachments window, which displays the full list of attachments in a table.
-
The Manage Attachments icon. When clicked, the Attachments window is launched showing any existing attachments as well as a new empty row at the top of the list to allow the user to add new attachments.
-
The Delete Attachments icon. Only shown when there is only one attachment added. Allows the one attachment to be deleted without having to launch the Attachment window.
Figure 19-10 shows an example of an attachment column in a table.
Figure 19-10 Attachment Column in a Table
-
-
Attachment table:
The Attachment table can be shown in:
-
A page or page segment
This occurs when you choose to display all attachments for the current record in a table.
-
A dialog
Occurs when:
-
The user clicks the Manage Attachments icon associated with an attachment field either on a page or page segment, or an attachment column in a table
-
The user clicks Add or Edit in the toolbar of the Attachments Carousel component
-
The following elements are rendered in the Attachment table:
-
Table Toolbar
-
Add button, which adds a new row at the top of the table
Note:
A new row will not be added if this mandatory field is determined to be invalid.
-
Delete button, which deletes the selected rows from the table
-
Set Primary button, which sets the selected row to be the primary attachment for its category. Displays when the setting the
enablePrimaryCategoryproperty attribute for the Attachment component to true (this button is optional)
-
-
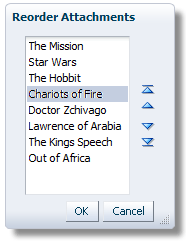
Reorder Attachments (Actions Menu)
Launches a window that allows you to modify the order of the Attachments. It displays when the
enableOrderingattribute has been set to true. The objects being ordered are defaulted from the label attribute.Figure 19-11 shows an example of the window.
Figure 19-11 Reorder Attachments
-
Set Primary (Actions Menu)
Sets the selected row to be the primary attachment for its category. It displays when you set the
enablePrimaryCategoryproperty attribute for the Attachment component to true. -
Type (required field that determines the type of Attachment)
-
File (default)
-
Text
-
URL
-
Repository File/Folder
-
-
Category
Category values are defined at implementation time. Make sure to use functionally relevant category names. If two or more categories are defined, the category column is displayed. If only one category is defined, the column is not displayed.
One attachment out of all the attachments that have the same category value can be designated as the primary. This is option can be enabled by setting the
enablePrimaryCategoryproperty to true. By default it is off. When enabled a new column title Primary will appear before the Category column. The primary attachment will be indicated by a tick mark. -
File Name or URL (required field)
If the value is an existing attachment, a link is shown. When clicked, the link (by default) will prompt the user to download the file. For new rows:
-
If Type is File, will show a file upload field
-
If Type is Text, will show a text field
-
If Type is URL, will show a text field
-
If Type is Repository File/Folder, will show a text field and browse button. Clicking on Browse will launch a document picker for finding files in the repository.
-
-
Title
The user name for the attachment, as the file name or URL may not adequately convey the contents of the attachment. If users do not enter a title, it defaults to the value in the File Name or URL field.
-
Description
The field to include additional information on the attachment.
-
Attached By
Shows the name of the user that last updated the attachment relationship.
-
Attached Date
Shows the date on which the attachment relationship was updated.
Figure 19-12 is an example of an Attachments table with the
repositoryModeattribute set to false.Figure 19-12 Attachments Table

-
19.1.4 About the Attachments Carousel
The attachments carousel is a popular component for browsing through images. It integrates the attachments and carousel components, simplifying the uptake work for pages that have a heavy image usage with attachments. It can be shown in a page or page segment.
Figure 19-13 Attachments Carousel
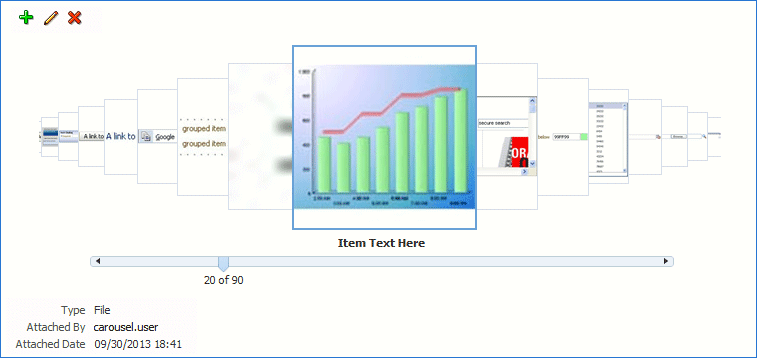
The following elements are rendered in the Attachment table:
-
Toolbar
-
Add button - opens the Attachment Table in a dialog with a new row.
-
Edit button - opens the Attachment Table in a dialog
-
Delete button - deletes the current attachment item shown in the carousel
The toolbar can be hidden by setting the carouselToolbarRendered property to false.
-
-
Carousel and CarouselItem
The carousel controls the display of the attachments. The CarouselItem stamps out the same display settings for each attachment item. All of the properties for the standard Carousel and CarouselItem components are available for you to control the display and behavior of the Carousel.
Any attachment that cannot be displayed as an image will show as its title. The current item in the carousel is also linked. When clicked, the link (by default) will prompt the user to download the file.
Note:
The current implementation is showing the actual file and not a thumbnail or preview version. Until thumbnail support can be introduced, it is recommended that users consider the size of the files that are adding for display inside the carousel.
-
Detail
The detail section contains the following information about the most current attachment:
-
Type - File/URL/Text
-
Attached By
-
Attached Date
The detail section is hidden by default. However, it can be displayed by setting the attachmentsDetailsRendered property to
true. -
19.2 About Creating Attachments
This section provides information about creating attachments and describes how to set up your model project for attachments, how to create an attachment field or an attachments table, and an attachments column in an Applications table. Also included is how to set up required properties, as well as information about what happens when you implement attachments and what happens at runtime.
19.2.1 Performing Prerequisite Tasks
Before you start creating attachments, do the following:
-
Add the Applications Core (Attachments Model) library to your Model project:
-
After adding the library to your model, navigate to Application Navigator >Application Resources >Descriptors >META-INF and add the following xml snippet to your
jazn-data.xmlfile:Note:
Be aware that the URLs and <class> entries cannot contain any spaces or line breaks.
-
Create the view object representation of the business object that requires attachments in your model project.
-
Create a Content Repository connection in JDeveloper.
Note:
-
Attachments stores the name of the Content Repository connection used when creating a new attachment. This value is then used when retrieving the attachments. It is important to co-ordinate the naming and registration of Content Repository connections. So that the Attachments code can connect to the correct server to retrieve the requested file.
-
Developers need to create a Content Repository connection with the name "FusionAppsContentRepository". This connection should used jaxws as the socket type and Identity Propagation for Authentication.
For information about how to create a Content Repository connection in JDeveloper, see Creating a Content Repository Connection.
For additional information see the Oracle Fusion Middleware Developing WebCenter Portal Assets and Custom Components with Oracle JDeveloper guide.
-
-
Do the following to add libraries and configurations that are required to support working with the Content Repository connection:
-
Select a JSF page in the View Controller project that is being enabled for Attachments. Changes made to this page must be manually removed at the completion of this pre-installation step.
-
Navigate to Application Navigator > Application Resources > Content Repository and select the Content Repository connection defined in Step 4. Then, drag it onto the page you selected in Step a.
-
On the context menu that is displayed, choose Document Library and remove the changes made to the page.
Note:
-
An alternative to modify an existing page is to create a new JSF page in the project, and then delete the page when you get to Step 5.
-
At the time this process was documented, these steps changed the following files in a typical Application. If these files were not been changed, it might have to check them out manually and repeat Steps a through c.
–
Application Resources/Descriptors/ADF META-INF/adf-config.xml–
Application Resources/Descriptors/META-INF/orion-application.xml–
Projects/View Controller(that is, the name of your ViewController.jprfile)–
Projects/View Controller/Web Content/WEB-INF/orion-web.xml–
Projects/View Controller/Web Content/WEB-INF/web.xml
-
-
-
Log onto the Content Repository and confirm that the following has been created:
-
Attachments folder under the Contribution Folders folder
-
Attachments security group used for unshared attachments
-
SharedAttachments security group used for shared attachments
-
AttachmentsUser role with no permissions set
-
AttachmentsRead user role with read (R) permission to the Attachments security group for unshared attachments
-
AttachmentsWrite user role with write (W) permission to the Attachments security group for unshared attachments
-
AttachmentsDelete user role with delete (D) permission to the Attachments security group for unshared attachments
-
AttachmentsAdmin user role with read, write, delete, and admin (RWDA) permissions to the Attachments security group for unshared attachments
-
SharedAttachmentsWrite user role with write (W) permission to the SharedAttachments security group - for shared attachments
-
SharedAttachmentsDelete user role with delete (D) permission to the SharedAttachments security group - for shared attachments
-
SharedAttachmentsAdmin user role with read, write, delete, and admin (RWDA) permissions to the SharedAttachments security group - for shared attachments.
Note:
This setup is required for Attachments to function correctly. You must log in to the Content Server as a user with System Administrator privileges to see the above information. If you cannot see these details in your Content Server, please contact your system administrator to ensure that they have enabled the FusionAppsAttachments component in the Content Server.
-
-
Set the maximum size for files that can be uploaded. This setting is made to your Application and will apply to any page that uses a multi-part form to upload from the desktop to the Oracle WebLogic Server, not just Attachments.
This step does not need to be completed before continuing with the rest of the implementation. By default the maximum size is defaulted to 2MB, which allow an end-to-end implementation to be completed. However, it is important to modify this setting before deployment. When deciding on the maximum size, considering the type of files that your typical customer will be uploading with your Application will help you determine a value.
For information about how to apply the settings, see "Setting Parameters to Upload Files to Content Repositories" in Developing WebCenter Portal Assets and Custom Components with Oracle JDeveloper.
Related Links
The following document provides additional information related to subjects discussed in this section:
-
For more information, see the chapter on managing security groups, roles, and permissions in Administering Oracle WebCenter Content.
Example 19-1 Snippet for jazn-data.xml File
grant>
   <grantee>
      <principals/>
      <codesource>
          <url>file:${atgpf.oracle.home}/atgpf/modules/oracle.applcore.attachments_11.1.1/Attachments-Model.jar</url>
      </codesource>
    </grantee>
    <permissions>
          <permission>
                <class>oracle.security.jps.service.credstore.CredentialAccessPermission</class>
                <name>context=SYSTEM,mapName=oracle.wsm.security,keyName=*</name>
                <actions>read</actions>
          </permission>
          <permission>
                <class>oracle.security.jps.service.keystore.KeyStoreAccessPermission</class>
                <name>stripeName=owsm,keystoreName=keystore,alias=*</name>
                <actions>read</actions>
          </permission>
    </permissions>
</grant>
<grant>
    <grantee>
          <principals/>
          <codesource>
               <url>file:${atgpf.oracle.home}/atgpf/modules/oracle.applcore.attachments_11.1.1/ContentServer-Model.jar</url>
          </codesource>
    </grantee>
    <permissions>
          <permission>
                <class>oracle.security.jps.service.credstore.CredentialAccessPermission</class>
                <name>context=SYSTEM,mapName=oracle.wsm.security,keyName=*</name>
              <actions>read</actions>
          </permission>
          <permission>
                <class>oracle.security.jps.service.keystore.KeyStoreAccessPermission</class>
                <name>stripeName=owsm,keystoreName=keystore,alias=*</name>
                <actions>read</actions>
          </permission>
    </permissions>
</grant>
19.2.2 Understanding Content Repository Prerequisites
The attachment views component can display more detail from the Oracle WebCenter Content repository. Enabling this functionality, however, requires additional configuration of the repository. Since the attachment views component is not dependent on this configuration, you can do it when required.
Thumbnails
Thumbnails are small preview images. The attachment views component shows thumbnails in the list view, and for any renditions generated in the Details pane. For information about generating thumbnails, see setup steps for "Setting Up Thumbnails" in Managing Oracle WebCenter Content.
By default, thumbnails are displayed as 100 x 100 pixels. For information about how to change the default size, see "Changing the Size of Thumbnails" in Managing Oracle WebCenter Content.
Digital Asset Management
Digital asset management defines and provides specified formats and sizes from the original file for images, video and audio. A defined rendition set determines all of the conversions that must be performed. When an Attachment is added, or updated, the default rendition set is applied.
Rendition sets can be defined to create a thumbnail rendition. Consider this before enabling thumbnails and renditions for file formats that will also be processed by rendition sets.
For more information about digital asset management, see "Working With Image and Video Conversions" in Managing Oracle WebCenter Content.
For information about how to change the default image rendition set (DefaultPackedConversionSet) see "Modifying the Content Repository Configuration File" in Managing Oracle WebCenter Content.
19.2.3 About Setting Up Your Model Project for Attachments
The Model project must be set up correctly before you can add attachments to your page.
Part of the Model setup involves creating an attachment view link between the business object view object and the attachments view object. When defining this attachment view link, you must select Primary Key values and enter an Attachment Entity Name. This unique name is used to identify all attachments for your business object.
The first time you create an attachment view link for your business object, the unique attachment entity name is stored in the database. If you need to link the same set of attachments to another view object on a different page, reselect the existing attachment entity name when creating the attachment view link.
After creating the attachment view link, you will need to assign a set of categories to your attachment entity. When creating the attachment view link, you can choose to show all of the categories assigned to your entity in your UI, or a subset of these categories. If you do not need to reduce the list of categories that will be displayed in your UI, you can select to "Show All Categories" on the Categories step in the Attachment View Link Wizard. This will make all categories that are assigned to your attachment entity available in your UI. For more information, see How to Create Attachment View Links.
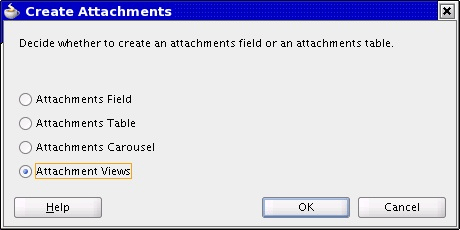
After you have finished setting up your Model project, you must decide how you would like to display the attachments in your page: As an attachment field, as a table of attachments, an attachment column in an applications table, or as an attachment carousel. This design-time setup is performed in your ViewController project. For more information about setting up your ViewController project for attachments, see How to Create an Attachments Field_ Attachments Table_ Attachments Carousel_ or Attachment Views, How to Create an Attachments Column in an Applications Table, and About Displaying Attachments for Multiple Entities in the Same Table.
After adding attachments to your UI page, you must complete the required steps to ensure that the attachments functionality works correctly at runtime. For more information about these setup steps, see What Happens When You Implement Attachments and What Happens at Runtime.
19.2.4 How to Create Attachment View Links
Attachment view links are used to establish master-detail relationships between your view objects and the attachments view object. Attachment view links are created using the Attachment View Link wizard.
To create an attachment view link, do the following
-
In JDeveloper, choose Application Navigator > Model Project. Right-click and choose New from the menu to open the New Gallery.
-
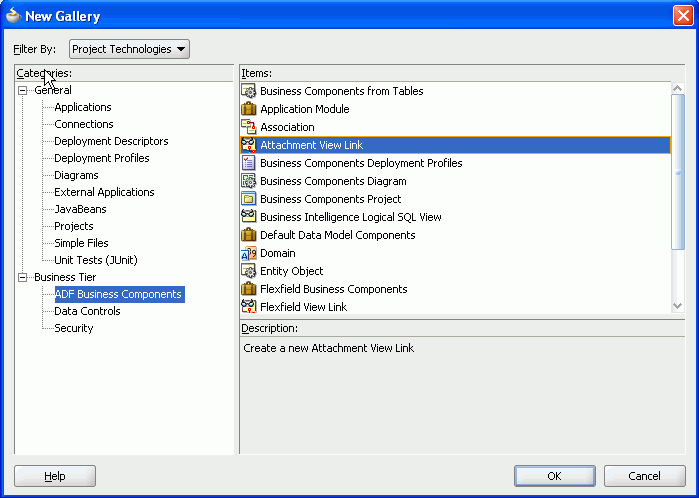
Choose the Business Tier > ADF Business Components category. Select the Attachment View Link item, as shown in Figure 19-14.
Figure 19-14 New Gallery Dialog
-
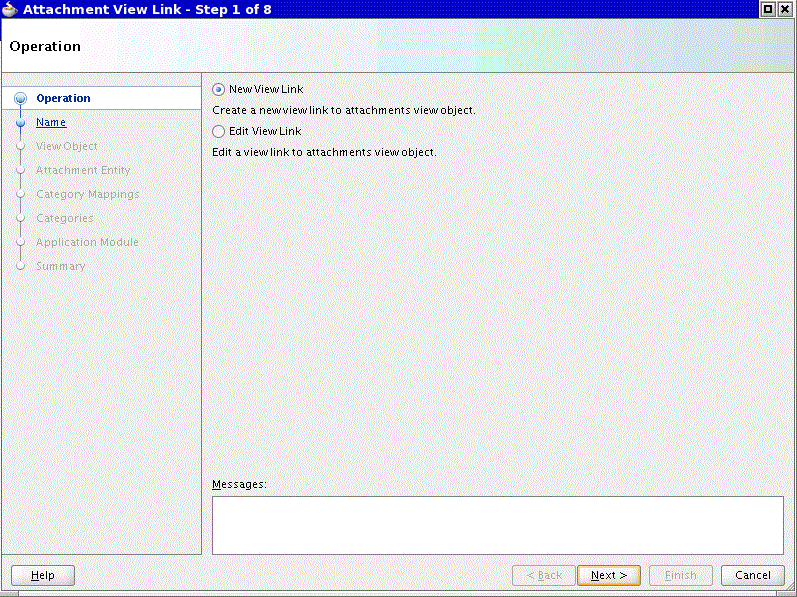
Click OK to access Step 1 of the Create Attachment View Link wizard, as shown here.
Figure 19-15 Create Attachment View Link Wizard — Operation (Step 1)
-
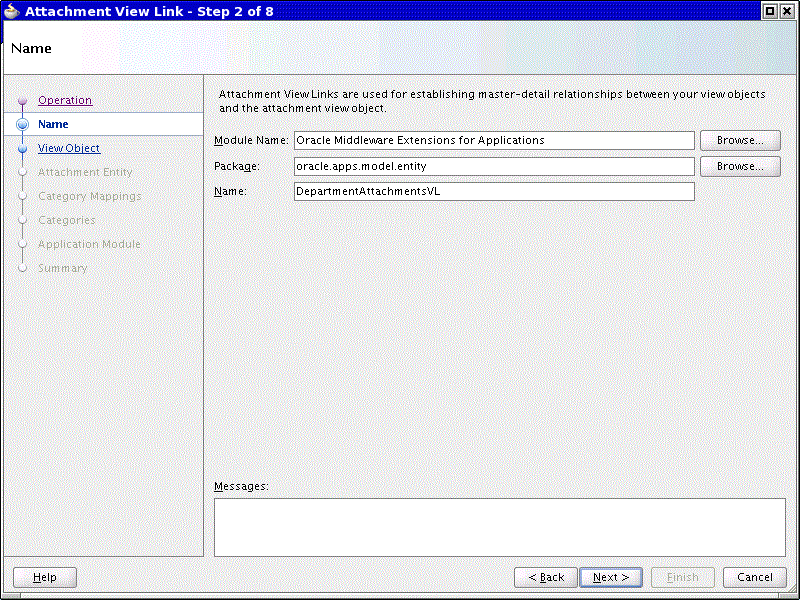
Select the New View Link option to Create a New View Link. Click Next. The Name dialog appears as shown here.
Figure 19-16 Create Attachment View Link Wizard — Name (Step 2)
-
Complete the following information:
-
Select the name of the module that your view object belongs to.
Seed data can be created as part of the Wizard flow. Any seed data created will be striped by the provided module so that it can be extracted and shipped as part of deploying your Application. Any existing seed data belonging to your module will also be displayed in the wizard steps.
-
Select the package where the attachment view link will reside.
The new View Link will be created in this package.
-
Enter a unique name for the attachment view link.
-
-
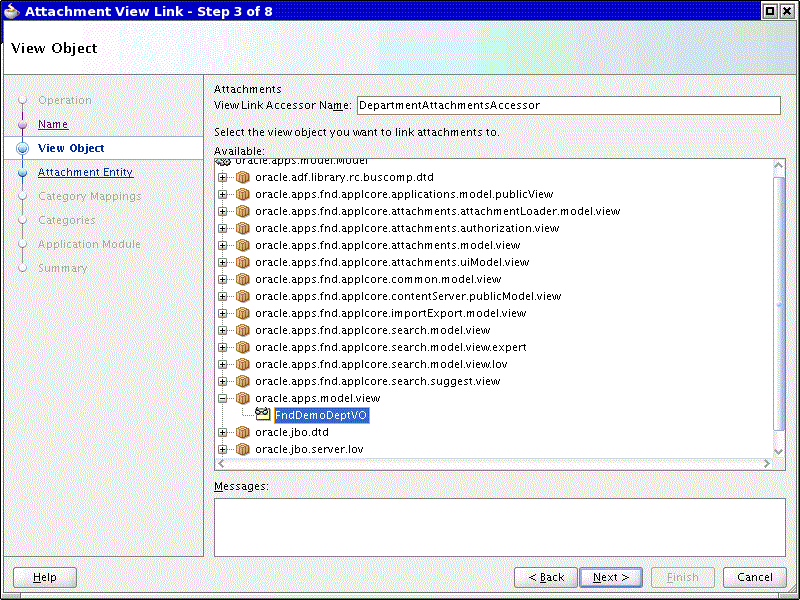
Click Next to access Step 3. The View Object dialog appears, as shown here.
Figure 19-17 Create Attachment View Link Wizard — View Object (Step 3)
-
Enter the name for the view link accessor that will be added to the data control of selected view object. Then, from the Available column, select the view object that you want to create attachments for.
Tip:
There is no need for you to select a destination view object because the Attachment view link always uses the Attachments view object as the destination view object.
-
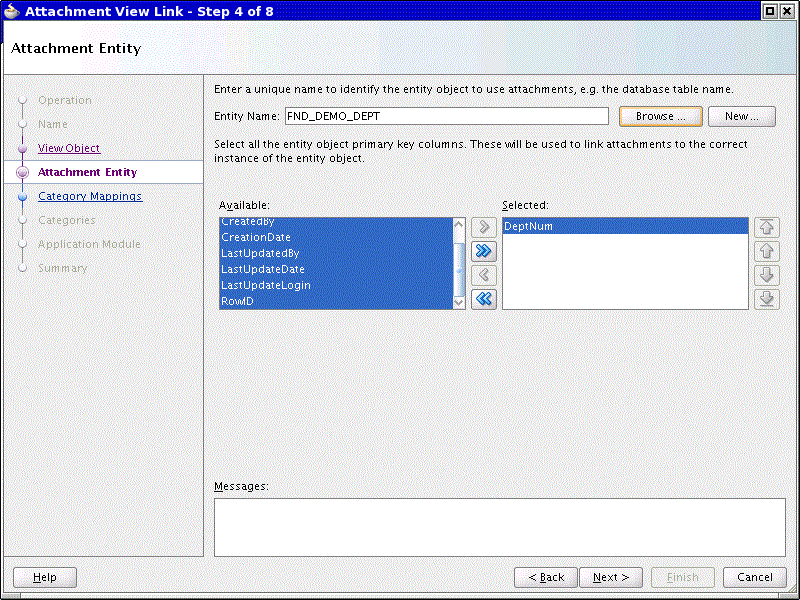
Click Next to access Step 4. The Attachment Entity dialog appears, as shown here. The Attachment Entity is used to uniquely identify your business object.
Figure 19-18 Create Attachment View Link Wizard — Attachment Entity (Step 4)
-
Select an existing Entity Name or create a new Entity Name.
Note:
The Entity Name is used to map an entity object to its attachments. An entity object can be used across many business objects. In the figures the business object is for a Department. If there were a Department to Employee business object. A View Link could also be created for that business object as well. As the Department Number is also in that table as a foreign key. That View Link would also use the same Entity Name.Note:
Historically the name of the primary database table the business object is based on is used.Where the Entity Name has already been created, click Browse… to open the List of Values to search and select. The Selected column will be automatically updated with the stored primary key values from the selection.
For a new Entity Name, click New…. You will be prompted to supply an Entity Name, User Entity Name and Data Object Code. The Data Object Code ideally should be the database table. Use the data object code, primary keys and the data collected to create an Attachment. A SQL query could be generated to return the row. Click OK to close the window.
Available / Selected: Select only those columns that make up the primary key of the entity object by shuttling them from the Available column to the Selected column. Making changes to the Selected columns for an existing Entity Name will update the stored entries.
-
Click Next to access Step 5. The Categories Mapping dialog appears, as shown in here. An Entity Name must have at least one Category assigned. This dialog will facilitate mapping Categories to the Entity Name from Step 4.
Figure 19-19 Create Attachment View Link Wizard — Category Mappings (Step 5)
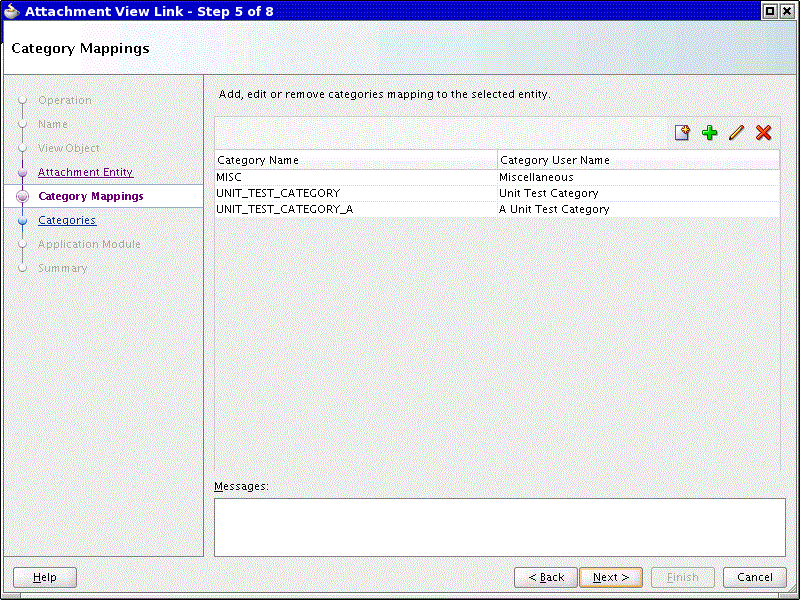
Click New… to create a new Category. A popup will appear to provide the Category Name and Category User Name. This new Category will be stored in the database and striped by the Module provided in Step 2.
Click Add… to choose from other Category values that have already been created for your Module. This list will also include a Miscellaneous category that is centrally-seeded by Attachments. If you cannot anticipate the Category values a customer may want to use with Attachments, choose the Miscellaneous category.
Click Edit… to modify the Category User Name for a Category.
Click Remove… to remove a Category from being mapped to the Entity Name.
Note:
It is not necessary to re-enter the wizard to make changes to the categories or mapping. Management pages are available for administering this information during development and production. For more information, see About Assigning Categories to the Attachment Entity. -
Click Next to access Step 6. The Categories dialog appears, as shown here. (The Display All Available Categories checkbox is not selected when you first enter this page.) The View Link created can be restricted to a subset of the categories mapped to the entity name in Step 5. This is useful where your functionality needs to ensure that only Attachments of a specific category will be shown and managed using this View Link.
Figure 19-20 Create Attachment View Link Wizard — Categories (Step 6)
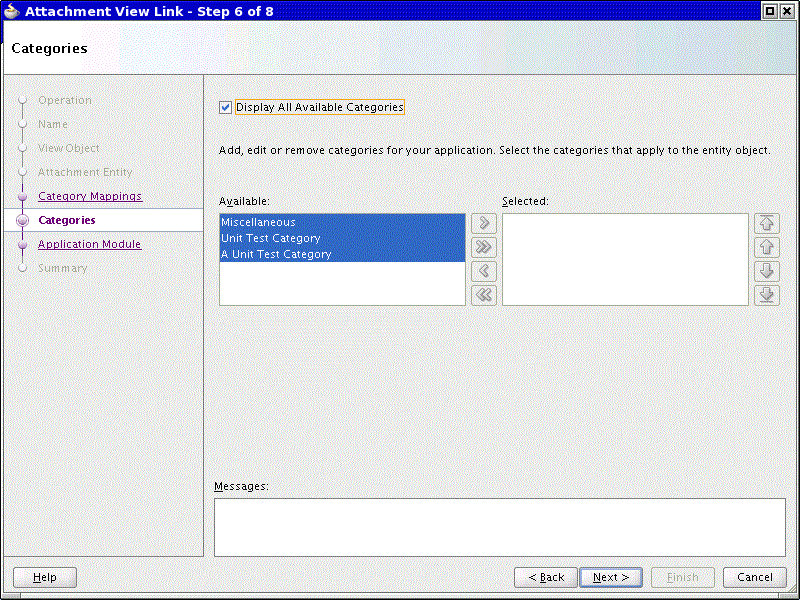
Select the Display All Available Categories checkbox to place no restrictions on the categories the View Link can use.
To control which categories are available to the View Link, deselect the Display All Available Categories checkbox. Then move the mapped categories required in the Available column to the Selected column.
The selected list of categories will be stored as a custom property on the newly created attachment view link. The value will consist of a concatenated string of values. All the selected categories are concatenated in a comma-separated list.
Note:
The custom property on the view link cannot be customized. A customer can map custom categories to your entity name in production. But the new category won’t be seen in any UI that uses a view link with the custom property set.Note:
If the all of the categories in the custom property are removed from the mapping, the view link will no longer return any results.You should choose the Display All Available Categories option to allow for customization of the Category list without code changes. Additionally, be aware that the list of available categories, and the list of Attachments displayed, can be further controlled using Category data security. For more information, see About Attachment Category Data Security
-
Click Next to open the Application Module dialog, as shown here. For the attachments view object to be available to include in your pages, it needs to be registered in the Application Module Data Model. Select Add or Modify an Application Module to create a new instance of the view object that you selected on the View Object page, and create an instance of the attachments view object as a child of the new instance.
Figure 19-21 Create Attachment View Link Wizard — Application Module (Step 7)
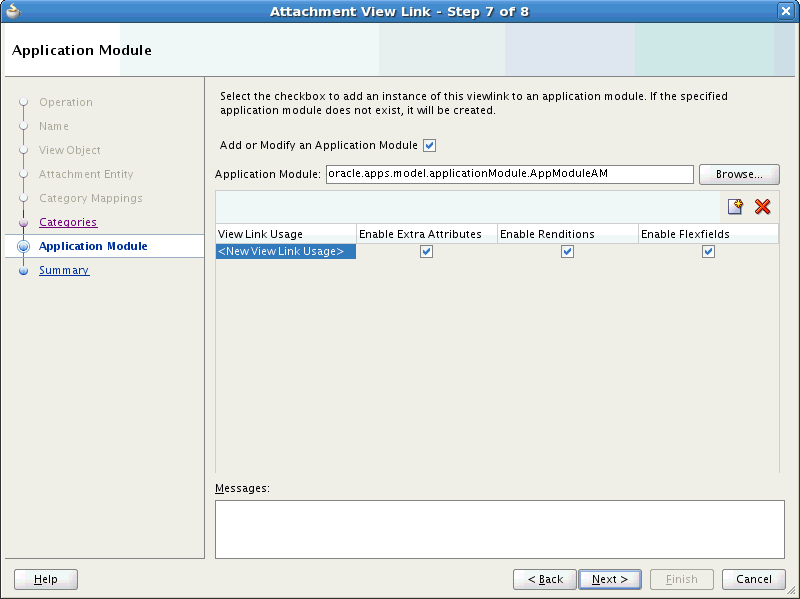
Click Browse… to open a popup to help select the Application Module to update.
Click New… to create a new entry in the table. The attachments view object also includes its own child collections for Extra Attributes and Renditions. These collections are required for showing additional information in the Attachment Views and Attachment Link components. Select Enable Extra Attributes or Enable Renditions based on whether it is required to show this information. If additional custom metadata is to be stored with the attachment then select the Enable Flexfields option.
Click Remove to remove the selected View Link Usage from the Application Module.
-
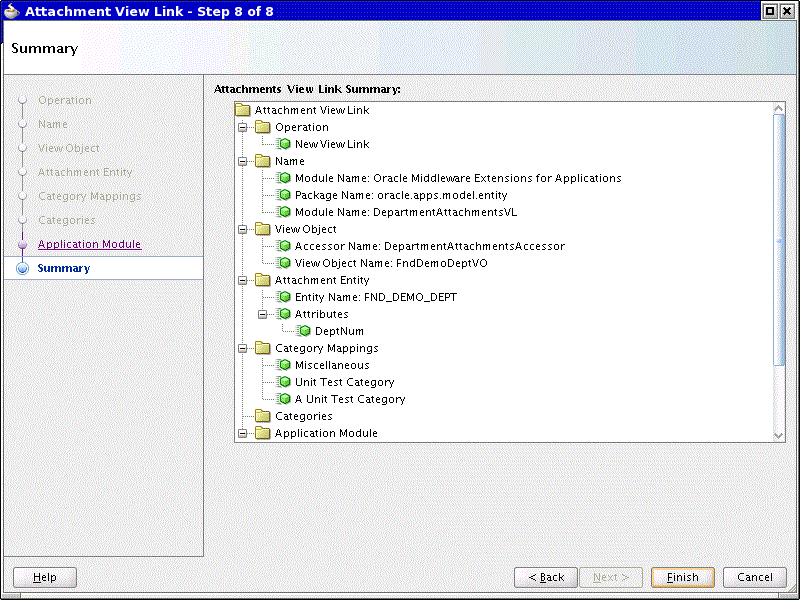
Click Next to access the Summary page, shown here. Review your selections and click Finish to create your attachment view link.
Figure 19-22 Create Attachment View Link Wizard — Summary (Step 8)
-
If you chose to keep the Application Module option unselected in Step 10, you need to add your newly—created attachments view link to your application module data model as follows:
-
Choose Application Navigator > AM name. Right-click and choose to open the application module in the editor.
-
Choose Data Model from the list of categories to open the Data Model Components dialog.
-
Select the newly created Attachment View Link located in the left column and select the view object that you created the view link for in the right column. Shuttle the Attachment View Link over to the right column.
-
To enable Extra Attributes, select the Attachments Extra Attribute view object located in the Available View Objects (left column). Select AttachmentsExtraAttributeVO, by opening oracle.apps.model.Model > oracle.apps.fnd.applcore.attachments.Model > oracle.apps.fnd.applcore.attachments.uiModel.view > AttachmentsVO. In the Data Model (right column), select the Attachments View. Shuttle the AttachmentsExtraAttribute View Link over to the right column.
-
To enable Renditions, select the Attachments Attachments Rendition view object located in the Available View Objects (left column). Select AttachmentsRenditionVO, by opening oracle.apps.model.Model > oracle.apps.fnd.applcore.attachments.Model > oracle.apps.fnd.applcore.attachments.uiModel.view > AttachmentsVO. In the Data Model (right column), select the Attachments View. Shuttle the AttachmentsRenditionVO View Link over to the right column.
-
Save your changes.
Note:
To enable the Flexfield at a later point in time it is recommended that the Attachments View Link be edited and selected during that wizard flow. -
What Happens When You Create an Attachment View Link
After you have completed all the steps in the wizard by clicking Finish to create your Attachment view link:
-
The Attachment view link is created, using the Name and Package provided in Step 2.
-
If the view link was selected to display only a subset of the categories in Step 6. A custom property (OAF_ATTACHMENT_CATEGORY) is created on the Attachments view link, with a comma separated list of the categories that you selected in Step 6 of the wizard. If the decision was to show all categories. The custom property will still be created, but with an empty list.
-
The AttachmentEntityName transient attribute is created on the Entity view object. Its value is the entity name that you entered in Step 4 of the wizard.
Note:
This transient attribute should not be included in your UI.
-
An Accessor is created on the Entity view object, using the View Link Accesor Name supplied in Step 3.
-
New Attachment Entity information (Step 4) is stored to the FND_DOCUMENT_ENTITIES and FND_DOCUMENT_ENTITIES_TL tables.
-
All new or changed category information (Step 5) is stored to the FND_DOCUMENT_CATEGORIES and FND_DOCUMENT_CATEGORIES_TL tables.
-
All new or changed mapping information (Step 5) between the Entity Name and the Categories is stored in the FND_DOC_CATEGORIES_TO_ENTITIES table.
-
New Entries defined will be added to the Data Model of the Application Module selected in Step 7.
The WHERE clause that links the Entity view object to the Attachments view object is derived based on the selected entity primary key columns. For example, if the entity primary key for the FND_DEMO_DEPT entity is made up of the column DEPT_NUM then the view link query would be as follows:
Example Source WHERE Clause
(:Bind_DeptNum = PK1_VALUE) AND
(:Bind_AttachmentEntityName = ENTITY_NAME)
Example Destination WHERE Clause
(:Bind_Pk1Value = FndDemoDeptEO.DEPT_NUM) AND
(:Bind_EntityName = ‘FND_DEMO_DEPT’)
where FND_DEMO_DEPT is the value that you entered in the Entity Name field in Step 4 of the wizard.
To Edit an attachment view link:
-
In JDeveloper, choose Application Navigator > Model Project. Right-click and choose New from the menu to open the New Gallery.
-
Choose the Business Tier > ADF Business Components category. Select the Attachment View Link item, as shown in Figure 3.
-
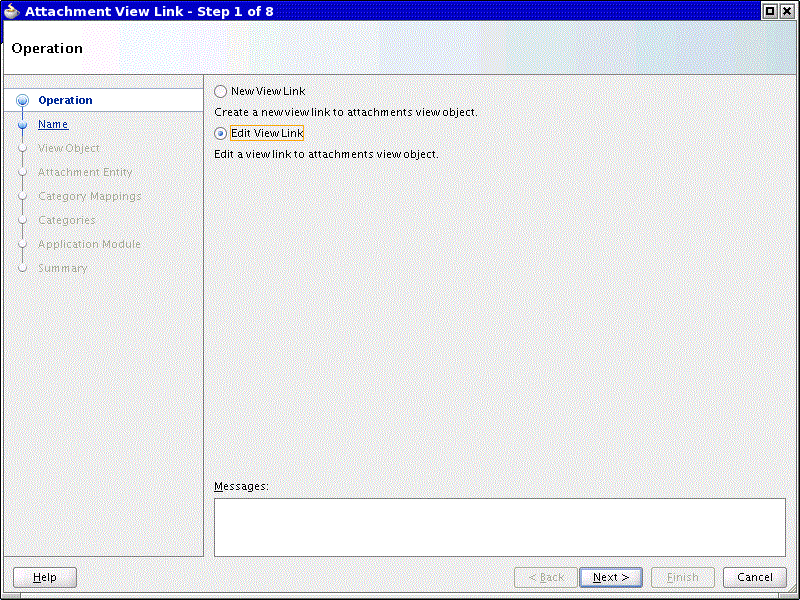
Click OK to access Step 1 of the Attachment View Link wizard, as shown here.
Figure 19-23 Attachment View Link - Edit (Step 1)
-
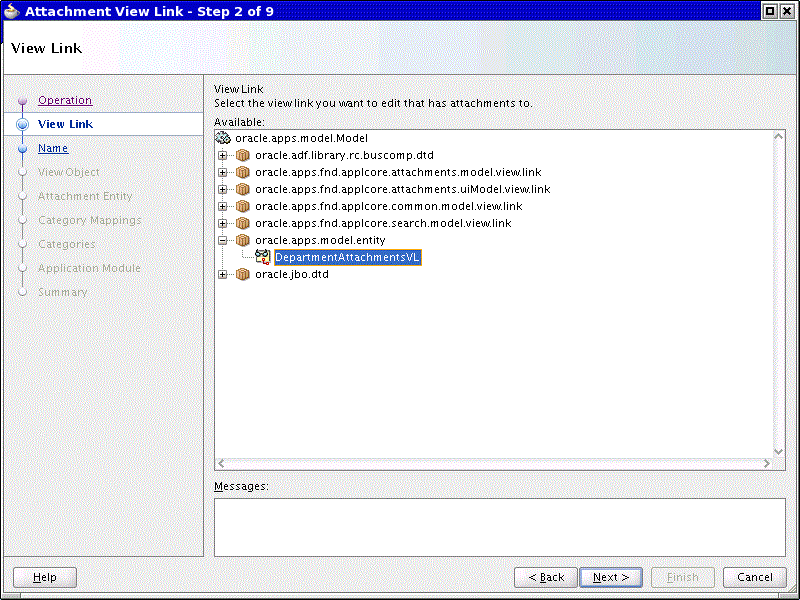
Select Edit View Link, click Next to move to Step 2 View Link, as shown here. Select the attachment view link to edit from the available list.
Figure 19-24 Attachment View Link - View Link (Step 2)
-
Click Next to access Step 3. The Name dialog will appear.
Note:
The steps from this point mirror their similarly named counterparts in the Edit flow. The rest of this section will focus on what modifications are allowed.Note:
The edits to each step are currently independent. For example, changing the Entity Name will not move the categories mapped to the old Entity Name to the new Entity Name. This will still need to be performed on subsequent steps. -
Step 3 – Name. The Module can be changed at this step. The new module will be used in any queries against stored data. Any changes to Entity Name or Categories will be stored using the module.
-
Step 4 – View Object. Change the View Object.
Note:
Changing the View Link Accessor Name currently has no effect. -
Step 5 – Attachment Entity. Create a New Entity, or select a different existing Entity.
-
Step 6 – Category Mappings. Create Categories, Add existing Categories, Modify mapped Categories, Remove Categories from being mapped to the Entity Name.
-
Step 7 – Categories. Switch whether the View Link is to Display All Categories, manage which Categories to show if the View Link isn’t displaying all.
-
Step 8 – Application Module. After selecting the Application Module, the table will show the existing usages for the View Link in the Application Module Data Model. Use Add to create additional View Link Usages, or Remove to delete any existing View Link Usages.
Selecting from the Content Server Configuration Step
Setting the RefreshCondition property is only required when the repositoryMode property is set to true on the Attachment component. Setting this property for the taskflow allows the Document Picker to be used more than once within the Attachments table or popup in the same session.
-
Go to the Bindings tab for that page.
-
Click the link to the Page Definition File, which is located at the top of the page.
-
Select the attachmentRepositoryBrowseTaskFlow1 task flow from the list of Executables.
-
Go to the Property Inspector and set the RefreshCondition property based on the component in use. For the Attachments and Attachments Carousel components, use #{AttachmentsTaskflowListener.refreshTaskflow}. For Attachment Views and Attachment Link components, use #{AttachmentsV2TaskflowListener.refreshTaskflow}.
-
Save your changes.
Update Page Bindings (recommended)
Page Bindings need to be manually created to include AttachmentsExtraAttributes, AttachmentsRendition and Attachments DFF. They are not essential to the operation of any of the Attachment components. They are required for the Details Pane of the Attachments View component to show More Information or Renditions sections.
Note:
Ensure that the Update Application Module steps have already been completed first. Otherwise there will be no child entries available in Step 3. This step can be completed by using the Edit View Link option in the Attachments View Link Wizard in Step 8 – Application Module. Manual instructions are included in step 14 of To Create an Attachment View Link.Reviewing the Bindings tab of a page will indicate whether the following steps are necessary. Check for entries in the Executables list starting with AttachmentsExtraAttributes and AttachmentsRenditions.
-
Open the page that contains the Attachment Views component.
-
In the Data Controls section of JDeveloper find the Attachments Data Control entry which was used to create the Attachment Views component. (Step 2 of To create an Attachment Views).
-
Expand the Attachments entry, drag the AttachmentsExtraAttribute child onto the page and choose a Read-Only table with all columns.
-
Remove the af:table just created from the page.
-
Back in the Data Controls drag the AttachmentsRendition child onto the page and choose a Read-Only table with all columns.
-
Remove the af:table just created from the page.
-
Back in the Data Controls, drag the AttachedDocumentsDFF child onto the page and choose Applications > Oracle Descriptive Flexfield.
-
Remove the fnd:descriptiveFlexfield just created from the page.
-
Open the page definition of the Page and go to the Source.
Add the following source inside the <tree> node for the Attachments definition:
<Properties> <CustomProperties> <Property Name="ExtraAttributes" Value="<ExtraAttributesId>" /> <Property Name="Renditions" Value="<RenditionTreeId>" /> <Property Name="DFF" Value="<DffIteratorId>" /> </CustomProperties> </Properties> -
Replace <ExtraAttributesId> with the Id of the tree node for the Attachments Extra Attribute that was created in step 3.
-
Replace <RenditionTreeId> with the Id of the tree node for the Attachments Rendition that was created in step 5.
-
Replace <DffIteratorId> with the Id of the iterator node for the Attachments DFF that was created in step 7.
-
Save the page definition.
The Attachments View component will detect these exist properties have been configured and will start to use them.
About Attachments Descriptive Flexfield
The Attachment Views component has the ability to display additional custom metadata in the details pane using a descriptive flexfield. There is a new flexfield definition, FND_ATTACHED_DOCUMENTS_DFF, which can be customized to allow additional custom metadata values to be entered and stored with each individual attachment. The structure of the descriptive flexfield can be configured using instructions from the Descriptive Flexfields chapter. The Attachments descriptive flexfield is context sensitive to the Attachments Category. Any change to the category in the details panel triggers the panel to refresh with the updated flexfield segments displayed. By default, the Attachment Views component does not show the descriptive flexfield, unless the page bindings have been updated. The flexfield is shown in the More Information section of the Attachment Views detail panel, if the correct view links and bindings have been created
Note:
There is a limitation to the use of the attachments descriptive flexfield. Only one instance of an attachment descriptive flexfield can be within an application module. This instance must be a child of a single attachments view object instance, and the descriptive flexfield instance must be namedAttachedDocumentsDFF1.Note:
Most environments will have the Attachment DFF automatically patched. Some standalone environments may require the DFF to be manually deployed. A manual deployment is required where the following message is displayed:Definition oracle.apps.flex.fnd.applcore.attachments.model.view.AttachedDocumentsDFFVO of type View Definition is not found.
Sign on to Fusion Applications and perform the following
-
Navigate to Setup And Maintenance
-
Search for task Manage Applications Core Descriptive Flexfields
-
Perform a Blind Search
-
Click Attached Documents DFF
-
Click the Deploy Flexfield button
See Deploying Flexfields in a Standalone WebLogic Server Environment for more details.
Custom Actions
Attachment Views provides the capability of overriding the default items rendered in the List, Card and Carousel views with your own. A facet is provided for each View for product teams to develop their own item. The actions and any custom actions for the item will still be included in the same spot. To activate, set the value of the Rendering Property to “custom”.
| View | Facet | Rendering Property |
|---|---|---|
|
List |
customListItem |
listItemViewer |
|
Card |
customCardItem |
cardItemViewer |
|
Carousel |
customCarouselItem |
carouselItemViewer |
19.2.4.1 How to Create an Attachment View Link Without Selecting an Application Module
If you chose to keep the Application Module option unselected in Step 10, you need to add your newly created attachments view link to your application module data model as follows:
- Choose Application Navigator > AM name. Right-click and choose to open the Application Module in the editor.
- Choose Data Model from the list of categories to open the Data Model Components dialog.
- Select the newly created Attachment View Link located in the left column and select the view object that you created the view link for in the right column. Shuttle the Attachment View Link over to the right column.
- Save your changes.
19.2.4.2 How to Update the Application Module
Dragging and dropping the Attachments collection automatically adds the Attachments collection as a page binding. These page bindings are required to make Attachment views function. There are additional child collections that also must be added to the page binding to provide support for renditions in the "More Information" and "Renditions" sections of the Details pane. To make the child collections available, you must add them to the Application Module's data model.
To add the child collections to the Application Module, do the following:
- In the Application Navigator, find the Application Module in the Model project in which the Attachment View Link for the attachment views component is found. Right-click and choose to open the Application Module in the editor.
- Select Data Model from the list of categories to open the Data Model Components dialog.
- From the Available View Objects list, go to oracle.apps.model.Model > oracle.apps.fnd.applcore.attachments.Model > oracle.apps.fnd.applcore.attachments.uiModel.view > AttachmentsVO and select AttachmentsExtraAttributeVO.
- In the Data Model list, select the attachments view. Then, shuttle the AttachmentsExtraAttribute view link over to the right column.
- Repeat this process for any other attachment views in the data model that must be included the extra attributes.
- Repeat Steps 4 and 5 for the AttachmentsRenditionVO, which is located in the same package as AttachmentsExtraAttributeVO.
- Save your changes.
19.2.5 What Happens When You Create an Attachment View Link
After you have completed all the steps in the wizard by clicking Finish to create your Attachment view link:
-
The Attachment view link is created, including generating the Accessor in the source view object.
-
All new or changed category information is stored to the
FND_DOCUMENT_CATEGORIESandFND_DOCUMENT_CATEGORIES_TLtables. -
A custom property (
OAF_ATTACHMENT_CATEGORY) is created on the Attachments view link, which is a list of all the categories that you select in Step 4 of the wizard.The custom property stores an empty list when you select the Display All Available Categories checkbox. When this checkbox is not selected, the custom property stores a comma-separated list of categories (using the
CATEGORY_NAMEfrom theFND_DOCUMENT_CATEGORIEStable) that you manually selected from the list of available categories. -
The
AttachmentEntityNametransient attribute is created on the Entity view object. Its value is the entity name that you entered in Step 3 of the wizard.Note:
This transient attribute should not be included in your UI.
-
New Attachment Entity information is stored to the
FND_DOCUMENT_ENTITIESandFND_DOCUMENT_ENTITIES_TLtables.
The WHERE clause that links the Entity view object to the Attachments view object is derived based on the selected entity primary key columns. For example, if the entity primary key for the PO_INVOICES entity is made up of the columns INVOICE_HEADER_ID and INVOICE_LINE_ID then the view link query would be as follows:
where PO_INVOICES is the value that you entered in the Entity Name field in Step 3 of the wizard.
Example 19-2 Source WHERE Clause
(:Bind_InvoiceHeaderId = PK1_VALUE) AND
(:Bind_InvoiceLineId = PK2_VALUE) AND
(:Bind_AttachmentEntityName = ENTITY_NAME)
Example 19-3 Destination WHERE Clause
(:Bind_Pk1Value = PoInvoiceLines.INVOICE_HEADER_ID) AND
(:Bind_Pk2Value = PoInvoiceLines.INVOICE_LINE_ID) AND
(:Bind_EntityName = PO_INVOICES)
19.2.6 About Deleting the Business Object
Deleting the business object from the database does not automatically apply to any of its Attachments. Subsequently, if your business functionality calls for the deletion of the business object (as opposed to a programmatic deletion, where the record is flagged as deleted but is kept around for auditing purposes), you also must delete all of its Attachments. Otherwise, these records will continue to persist in the Attachments tables. If another business object for your entity is created with the same primary key values, these Attachments will immediately be attached to the new record.
What you do depends on the method or methods you used to delete the business object in your own functionality. The programmatic method to delete the attachments will be the same. Typically, overriding the remove() method of the business object view object will allow you to programmatically access the Attachments detail collection via the View Link Accessor. When you have access to this collection, you can loop through calling the remove() method of the collection, shown in Example 19-4.
Example 19-4 remove() Method
public void remove() {
      Row currRow = this.getCurrentRow();
      RowSet attachedItems = (RowSet) currRow.getAttribute("Attachments1");
      while (attachedItems.hasNext()) {
        Row currAttachment = attachedItems.next();
        currAttachment.remove();
      }
      super.remove();
 }
19.2.7 About Assigning Categories to the Attachment Entity
It is necessary to assign one or more attachment categories to your attachment entity.
The "Manage Attachment Categories" setup UI can be used to create and update the relationships between your categories and entities. You can search for a particular attachment category, then search and select the attachment entities to assign to the category. For more information, see About Integrating Attachments Task Flows into . Relationships between categories and entities can also be maintained using the Manage Attachment Entities setup UI.
The Entity-Category relationships are stored in the FND_DOC_CATEGORIES_TO_ENTITIES table. There is a many-to-many relationship between Entities and Categories, allowing one category to be assigned to multiple Entities.
The relationships stored in this table are striped by MODULE_ID for seeding purposes, and the seed data loader can be used to seed this data for your product.
Note:
It is important to ensure that you seed your attachment entities and attachment categories before you seed the data in the FND_DOC_CATEGORIES_TO_ENTITIES table when extracting and uploading the data.
See the " Available Seed Data Loaders" table in Chapter 65 for information about Attachments Seed Data Loaders.
19.2.8 How to Create an Attachments Field, Attachments Table, Attachments Carousel, or Attachment Views
This section describes how to create an Attachments field, table, carousel, or views.
Example 19-5 Adding Event IDs to the PartialTriggers
<af:panelLabelAndMessage label="Attachment"
      partialTriggers="btnNext btnPrevious">
  <fnd:attachment mode="link" repositoryMode="true"
    attachmentModel="#{bindings.Attachments1}/>
</af:panelLabelAndMessage>
When using attachments in link mode, the Attachment component must be displayed inside a panelLabelAndMessage component and a partialTrigger must be added as an attribute. You must then add the IDs for the appropriate events on the page to the partialTriggers that cause the underlying business object record to change, which in turn requires the Attachments data to change. For example, the navigation buttons Next and Previous as shown here:
19.2.9 What Happens When You Implement Attachments
The following are examples of the generated source code:
Example 19-6 Source Code for an Attachment Field
<fnd:attachment mode="link" id="a1"
   attachmentModel="#{bindings.AttachmentsIterator}"/>
Example 19-7 Source Code for an Attachment Table
<fnd:attachment mode="table" id="a1"
   attachmentModel="#{bindings.AttachmentsIterator}"/>
Example 19-8 Source Code for an Attachments Carousel
<fnd:AttachmentsCarousel id="ac1"
   attachmentModel="#{bindings.AttachmentsIterator}"/>
Example 19-9 Source Code for an Attachment View
<fnd:attachmentView id="aView"
   attachmentModel="#{bindings.AttachmentsIterator}"/>
19.2.10 How to Create an Attachments Column in an Applications Table
You can create an attachments column in an applications table by dragging a Master Data Collection (your business object data collection) onto your drop target.
Note:
-
The mode attribute is automatically set to columnLink on the Attachment component when creating an attachment column.
-
The bindings, shown in Example 19-10, only show when the Attachments are bound to a data control.
-
In columnLink mode, the
columnModelattribute also must be set with the value of the Attachments Accessor.
To create an attachments column when creating your applications table, do the following:
19.2.11 How to Create an Attachments Column in an Existing Applications Table
You can create an attachments column in an existing applications table by dragging a Detail Master Collection (the Attachments data collection) onto your drop target.
Example 19-10 Source Code for an Attachment Column
<af:column sortable="false"
   headerText="#{applcoreBundle.ATTACHMENTS_COLUMN_HEADER}"
   width="200">
<fnd:attachment mode="columnLink"
   attachmentModel="#{bindings['Attachments1']}"
   columnModel="#{row.attachments}"/>
   columnLinkTableModel="#{bindings.AuEmployee1.collectionModel}"/>
</af:column>
19.2.12 About Setting Up Required Properties
To implement your attachments successfully you must set the following required properties:
-
usesUploadfor a standard JSPX page -
usesUploadon the UI ShellNote:
usesUploadmust be set using either of the above methods when uptaking either a taskflow or component that contains the attachments component. Ensure that your uptake document includes this instruction.This property serves as a reminder for anyone including Attachments as part of an "object" being provided that the destination JSPX page or UIShell must have the same settings so that the users can upload.
-
RefreshConditionfor the task flow
19.2.12.1 About Setting the usesUpload Property for a Standard JSPX Page
To be able to upload files from the desktop to the Content Server, you must set the usesUpload property to true.
For a standard JSPX page, you must set the usesUpload property on the af:form that contains your attachment component. For example:
<af:form usesUpload="true">
19.2.12.2 Set the usesUpload Property on the UI Shell
To set the usesUpload property value on the UI Shell's af:form, you need to set the Form Uses Upload property on the itemNode that represents the JSPX in the appropriate menu XML file.
- Go to the Application Navigator and select the menu XML file.
- Go to the Structure pane and select the item node representing the JSPX page.
- Go to the Property Inspector > Advanced Properties > Page tab and set the
Form Uses Uploadproperty to true. - Save your changes.
19.2.12.3 Set the RefreshCondition Property for the Taskflow
Setting the RefreshCondition property is only required when the repositoryMode property is set to true on the Attachment component. Setting this property for the taskflow allows the Document Picker to be used more than once within the Attachments table or popup in the same session.
- Go to the Bindings tab for that page.
- Click on the link to the Page Definition File, which is located at the top of the page.
- Select the
attachmentRepositoryBrowseTaskFlow1task flow from the list of Executables. - Go to the Property Inspector and set the
RefreshConditionproperty to#{AttachmentsTaskflowListener.refreshTaskflow}. - Save your changes.
19.2.13 What Happens at Runtime
Users have the ability to associate a URL, desktop file, repository file or folder, or text with a business object, such as an expense report, contract, or purchase order.
Note:
The ability to associate repository files or folders is available when the repositoryMode property is set to true.
When a user chooses to attach a repository file or folder, they are presented with the Document Picker dialog from which they can select one or more repository files or folders. After a repository file or folder has been attached, the type is displayed as either File or Folder.
The ability for a user to add, update, view, or delete an attachment is programmatically controlled using the addAllowed, updateAllowed, viewAllowed, deleteAllowed, and ReadOnly attributes on the Attachment component.
The ability to control what type of attachments can be added in the Attachments UI is controlled by the following attributes on the Attachment component: fileTypeEnabled, textTypeEnabled, urlTypeEnabled, and attachFolderAllowed.
The type of attachment that is used determines how the attachment is displayed when the user clicks the attachment link. The browser and client configuration determines what desktop application is used to display the attachment. When clicking on the link to access the content of a File or Text type Attachment, the user will be prompted to save the file. For their protection, users should be encouraged not to open files inside the browser.
Repository files are viewed in the same way as desktop files. However, if you click the link in the File Name/URL column in the Attachments table for an attached folder, a browser window/tab opens and displays the list of files and folders within the attached folder.
19.2.14 How to Update Page Bindings for the Attachment Views Component
Page bindings must be manually created to include AttachmentsExtraAttributes and AttachmentsRendition. They are not required for the operation of any of the Attachment components. However, in order to display the "More Information" and "Renditions" sections in the Details pane of the Attachments View component, page bindings are required.
Note:
-
Review the Bindings tab of a page to determine if the following procedure is necessary. Check for entries in the list of executables, starting with AttachmentsExtraAttributes and AttachmentsRenditions.
-
Before you update page bindings, ensure that you have updated the Application Module so that child entries will be available when you perform Step 3 in the procedure that follows. For more information, see How to Update the Application Module.
To update page bindings, do the following:
-
Open up the page that contains the Attachment Views component.
-
In the Data Controls section of Oracle JDeveloper, find the Attachments Data Control entry that was used to create the Attachment Views component.
-
Expand the Attachments entry, drag the AttachmentsExtraAttribute child onto the page, and select a read-only table with all columns.
-
Remove the
af:tablejust created from the page. -
In the Data Controls section, drag the AttachmentsRendition child onto the page and choose a Read-Only table with all columns.
-
Remove the
af:tablejust created from the page. -
In the Data Controls, drag the AttachedDocumentsDFF child onto the page and choose Applications > Oracle Descriptive Flexfield.
-
Remove the
fnd:descriptiveFlexfieldjust created from the page. -
Open the page definition of the page and go to the source. Add the following source inside the tree node for the Attachments definition:
<Properties> <CustomProperties> <Property Name="ExtraAttributes" Value="<ExtraAttributesId>" /> <Property Name="Renditions" Value="RenditionTreeId" /> <Property Name="DFF" Value="<DffIteratorId>" /> </CustomProperties> </Properties> -
Replace
ExtraAttributesIdwith the Id of the tree node for the Attachments extra attribute that was created in Step 3. -
Replace
RenditionTreeIdwith the Id of the tree node for the Attachments Rendition that was created in Step 5. -
Replace
<DffIteratorId>with the Id of the iterator node for the Attachments DFF that was created in step 7. -
Save the page definition.
The Attachments View component will detect that these properties have been configured and will start using them.
19.3 About Displaying Attachments for Multiple Entities in the Same Table
For a user interface that shows information for more than one business object, the Attachments component can be configured to display the attachments for two or more of these business objects.
For example, when opening up the Attachments from the Department section of your UI page, you might want to display attachments for all Employees that exist in that Department. This example will be used throughout this section to help clarify the instructions.
This configuration is only possible when the underlying view object for your page contains the primary keys for each of the business objects whose attachments you want to show in your page. For example, the DeptEmpVO would need to include attributes for both the Department primary key and the Employee foreign key. In this example, the Department is considered to be the primary business object and the Employee is the secondary business object. The example uses only two business objects, but it is possible to display the attachments for more than two business objects using this feature.
Your primary business object is the one that you linked to the AttachmentsVO at design time, when you created your Attachment view link. Attachments can only be added to the primary business object when using this feature.
The actionEntity property can be used to set the primary business object and controls which attachments can be updated and deleted. When set, any document attached to a different entity is displayed for reference purposes only. It cannot be updated or deleted.
19.3.1 About Configuring the Attachments Component to Display Attachments for Multiple Entities
This section provides details on how to configure your data model to display attachments for two or more business objects. These instructions assume that you have already created the Attachments view link between one business object view object and the Attachments view object, as described in How to Create Attachment View Links.
19.3.1.1 How to Configure the Attachments Component to Display Attachments for Two or More Business Objects
Do the following:
- Open the page that contains the Attachment component that is bound to the ViewLink modified above.
- Select the Attachment component.
- Set the
actionEntityproperty to theENTITY_NAMEof the primary business object. By setting this property, you are allowing users to update and delete attachments belonging to the primary business object whilst disabling the ability for users to update and delete attachments for the secondary and all subsequent business objects.
19.3.1.2 How to Configure the Data Model to Display Attachments for Two or More Business Objects
Do the following:
-
Open the view object for your business object.
-
Navigate to the Attributes tab. Add a new transient attribute for the secondary business object for which you want to display attachments. Use the existing
AttachmentEntityNameattribute as an example, naming the new attributeAttachmentEntityName1. -
Change the Expression value in the View Attribute screen to be the Attachment
ENTITY_NAMEas defined for your business object in theFND_DOCUMENT_ENTITIESandFND_DOCUMENT_ENTITIES_TLtables -
Repeat Steps 2 and 3 for any subsequent business objects for which you want to show attachments. Make sure that you modify the attribute name and expression value for each.
Close the view object.
-
Open the attachment view link.
-
Link your secondary business object to the Attachments view object.
-
Navigate to the Relationship tab and click the Attributes Edit icon.
-
Select the foreign key reference column in your view object from the Source Attribute list and then select the corresponding
PknValuecolumn in the Attachments view object (starting withPk1Vlaue) from the Destination Attribute list. Click Add to add this pair.Repeat this for each column that makes up the foreign key, which identifies your secondary business object.
-
Select the
EntityNameattribute (created in Step 2) in the Attachments view object from the Destination Attribute list. Click Add to add this pair.Repeat this for each of the
AttachmentEntityNametransient attributes. -
Navigate to the Query tab, and click the Source Edit icon.
-
Modify the auto-generated Source and Destination queries to match the appropriate Entity Names and Primary Key values Put parentheses around the criteria that pertain to one business object and change the
ANDto anORin between each business object. Make sure your parentheses are matched correctly, as shown in examples Example 19-11 and Example 19-12.
-
-
Navigate to the Source view for the view link and edit the source XML to include the extra attributes in the Destination array. Make sure you include attributes for each additional business object for which you want to display attachments.
The
AttrArrayfor thedestEnd ViewLinkDefEndmust map to theAttrArrayfor thesourceEnd ViewLinkDefEnd.The design time code inserts an array of unique items where the runtime code needs a matching item list, as shown in Example 19-13. (The added items are in bold).
-
Navigate back to the General tab and expand the Custom Properties section. Modify the value of the
OAF_ATTACHMENT_CATEGORYcustom property to control the attachments that are displayed in your page, based on category and to control the Category droplist values.Note:
This can be further controlled using data security.
-
Save all your changes.
Example 19-11 Source Query
((:Bind_EmployeeId = PK1_VALUE) AND (:Bind_AttachmentEntityName = ENTITY_NAME))
OR
((:Bind_DeptNum = PK1_VALUE) AND (:Bind_AttachmentEntityName1 = ENTITY_NAME))
Example 19-12 Destination Query
((:Bind_Pk1Value = FndDemoDeptEmpEO.EMPLOYEE_ID) AND (:Bind_EntityName = 'FND_DEMO_EMP'))
OR
((:Bind_Pk1Value = FndDemoDeptEmpEO.DEPT_NUM) AND (:Bind_EntityName = 'FND_DEMO_DEPT'))
Example 19-13 Source and Destination Attribute Arrays
<ViewLinkDefEnd
  Name="sourceEnd"
  Cardinality="1"
  Owner="oracle.apps.model.FndDemoDeptEmpVO"
  Source="true">
  <AttrArray Name="Attributes">
    <Item Value="oracle.apps.model.FndDemoDeptEmpVO.DeptNum"/>
    <Item Value="oracle.apps.model.FndDemoDeptEmpVO.AttachmentEntityName"/>
    <Item Value="oracle.apps.model.FndDemoDeptEmpVO.AttachmentEntityName1"/>
    <Item Value="oracle.apps.model.FndDemoDeptEmpVO.EmployeeId"/>
  </AttrArray>
</ViewLinkDefEnd>
<ViewLinkDefEnd
  Name="destEnd"
  Cardinality="-1"
  Owner="oracle.apps.fnd.applcore.attachments.uiModel.view.AttachmentsVO">
  <AttrArray Name="Attributes">
    <Item Value="oracle.apps.fnd.applcore.attachments.uiModel.view.AttachmentsVO.Pk1Value"/>
    <Item Value="oracle.apps.fnd.applcore.attachments.uiModel.view.AttachmentsVO.EntityName"/>
    <Item  Value="oracle.apps.fnd.applcore.attachments.uiModel.view.AttachmentsVO.EntityName"/>
    <Item Value="oracle.apps.fnd.applcore.attachments.uiModel.view.AttachmentsVO.Pk1Value"/>
  </AttrArray>
19.4 About Configuring Attachments Component Properties
You can use properties to change the default behavior of the Attachments, Attachments Carousel, and Attachment Views components user interfaces.
For a complete list of these properties, see Configuring Attachments Component Properties.
19.4.1 About Using FUSE
Support has been included for using Attachments in pages built for Oracle Fusion Applications User Simplified Experience (FUSE). When using Attachments in a FUSE page, you will need to adhere to the following rules in order to implement a FUSE compliant design:
Table 19-1 FUSE Implementation Rules
| Rule | Description |
|---|---|
|
fuse |
Boolean: true / false. True renders the attachment component for a FUSE UI page. Only link mode is supported for FUSE. |
|
mode="link" |
Link mode is the only supported mode of operation. |
|
repositoryMode="false" textTypeEndabled="false" |
Only Attachments of type File or URL are allowed. The Repository File/Folder and Text attachment types need to be disabled. |
|
confirmDelete="false" |
You will not be prompted for confirmation before an Attachment is deleted. |
|
DefaultCategory |
String. Value selected as the default in the Category poplist when adding new attachments. |
The following properties are not used when in FUSE mode:
-
ApprovalEnabled
-
DeleteMessage
-
UpdateAllowed
-
UpdateEnabled
-
InsertMultiple
-
ShowCategory
-
SecondaryToolbarRendered
-
AddAllowed
-
AddEnabled
-
ActionEntity
-
DeleteAllowed
-
DeleteEnabled
-
UpdateCategoryList
The following is example source code for a FUSE Attachment:
Example 19-14 Source Code for a FUSE Attachment
<fnd:attachment mode="link"
   fuse="true" id="a1Fuse"
   AttachmentModel="#{bindings.Attachments1}
   textTypeEnabled="false"
   confirmDelete="false"
   DefaultCategory="MISC"/>
19.5 About Working with Attachments Programmatically
To support headless or automated processing of Attachments, methods have been provided in the oracle.apps.fnd.applcore.attachments.attachmentService.applicationModule.AttachmentServiceAM class.
Before you begin:
-
If the Application or Project has not already been configured to use Attachments, follow the instructions in Performing Prerequisite Tasks.
-
Find or create an instance of the
AttachmentServiceAM:
Working with streams:
The Attachment APIs use the stream type for receiving and sending the actual files. When implementing your designs, keep the following rules in mind to avoid common issues that can occur.
-
Ensure that Response Streams are always closed (
is.close()) in afinallyblock. -
Ensure responses are processed immediately in full, and in order, prior to beginning the next request in the context of a thread. A delay in processing might result in a time out.
An example of this would be when downloading a stream that contains a set of instructions that are processed from the stream one line at time with each requiring several seconds before the next line is processed. With enough instructions lines, this might cause the stream to time out. The better approach would be to process the stream and store the instructions in another memory structure.
-
Do not attempt to work with the Attachment API with two steams open in the context of a thread.
Example 19-15 AttachmentServiceAM
// Enable the Attachments Service AM
AttachmentServiceAMImpl attachmentServiceAMImpl =
   (AttachmentServiceAMImpl) am.findApplicationModule("attachmentsServiceAM");
if (attachmentServiceAMImpl == null)
{
  attachmentServiceAMImpl =
   (AttachmentServiceAMImpl)am.createApplicationModule("attachmentsServiceAM",
   "oracle.apps.fnd.applcore.attachments.attachmentService.applicationModule.
   AttachmentServiceAM");
}
19.5.1 About Creating New Attachment Types
Methods have been provided for programmatically creating the File, Text and URL types. There is also an additional type, ManagedURL.
A managed URL attachment is intended for use with pages that are hosted on internal servers that are administered by Topology Manager. Since changes made by the Topology Manager might invalidate the scheme://domain:port portion of a URL resulting in a dead link, support for this variation of the URL type was created. To the end-user, this link will still appear as a URL. Internally, however, this Attachment will be created with a different Attachment type, TMURI.
Methods for attaching files that have been uploaded from a third-party application are also available. In this case, the developer has gotten the required information returned from uploading the file to complete the attachment. Where the file is already attached to another record, using the copyAttachments method to attach the file to the require record is recommended.
Table 19-2 summarizes the available methods for Attachments APIs.
Table 19-2 Method Summary for Attachment APIs
| Class | Method |
|---|---|
|
|
Updates the supplied attachments row with the information to attach a file. A new version is checked in if the file has already been uploaded. |
|
|
Creates a new row from the internal attachments view object and populates the attributes to attach a file. |
|
|
For the given attachment row, it populates the attributes for the attachment type |
|
|
Creates a new row from the internal attachments view object and calls |
|
|
Updates the supplied attachments row with the information to attach text. A new version is checked in if the file has already been uploaded. |
|
|
Creates a new row from the internal attachments view object and populates the attributes to attach text. |
|
|
Updates the supplied attachments row with the information to attach a static URL. |
|
|
Creates a new row from the internal attachments view object and populates the attributes to attach URL. |
|
|
Sets the sequence number for the row that is passed in. Should be used where end user ordering has been enabled. |
|
|
Upload a rendition to the Content Server. |
|
|
Upload a rendition to the Content Server. |
|
|
Upload a rendition to the Content Server. |
|
|
Upload a rendition to the Content Server. |
When end-user ordering has been enabled in the view for the attachment component, any programmatically created rows for the entity must have their sequence value set as well. Calling the method setAttachmentSequence, passing in the newly created row, will set the correct sequence value.
All methods are overloaded, providing two options for creating a new Attachment. The first option creates the new Attachment row from the Attachment collection linked to the parent view object. This is illustrated in Example 19-16.
The second option is to allow the method to create the Attachment row at the same time, as shown in Example 19-17.
If you use the second option, it is essential for the Entity and Primary Key values to be set programmatically as well. Getting any of these values wrong may result in the Attachment being lost or assigned to the wrong record. While the second type looks like less work it would be a better practice to use the first approach for creating new Attachments.
Note:
Assigning an Attachment to the wrong record could allow an end-user to view a document they would not normally be able to view.
It will also be necessary to set the Category value for the new row before committing the transaction as shown in both examples. The value expected is the CATEGORY_NAME from the FND_DOCUMENT_CATEGORIES table. Since the value is not validated, use the following method to ensure that you are providing a category value that is mapped to your Document Entity Name:
newAttachment.setCategoryName("MISC");
Example 19-16 Code for Creating a New Attachment Row: Option 1
// Retrieve the department for adding the new Attachment row to
ViewObject vo = am.findViewObject("FndDemoDept1");
vo.setWhereClause("DEPT_NUM = :deptNum");
vo.defineNamedWhereClauseParam("deptNum", null, null);
vo.setNamedWhereClauseParam("deptNum", departmentNumber);
vo.executeQuery();
Row currDepartment = vo.next();
// Retrieve the Attachments Collection
RowSet attachments = (RowSet) currDepartment.getAttribute("Attachments");
// Create new Attachment Row
AttachmentsVORowImpl newAttachment = (AttachmentsVORowImpl)
  attachments.createRow();
// Add Managed Link
attachmentServiceAMImpl.attachManagedUrl(newAttachment,
  textEntAppShortName, textURI);
// Set the Category Value
newAttachment.setCategoryName("MISC");
Example 19-17 Code for Creating a New Attachment Row: Option 2
// Add Managed Link
newAttachment = attachmentServiceAMImpl.attachTopologyManagedUrl(textEntAppShortName, textURI);
newAttachment.setEntityName("FND_DEMO_DEPT");
newAttachment.setPk1Value(departmentNumber);
// Set the Category Value
newAttachment.setCategoryName("MISC");
19.5.2 About Retrieving Attachments
The InputStream and OutputStream methods have been supplied for retrieving Attachment types of FILE or TEXT. The URL or TMURI types are not stored on the content server. Their URL values can be retrieved with the getAttachmentUrl() method, which is described in Table 19-3.
Table 19-3 Methods for Retrieving Attachments
| Class | Method |
|---|---|
|
|
This method is deprecated. Use |
|
|
Retrieve the attachment content for the supplied attachment row as a stream. Unlike |
|
|
Retrieve the attachment content for the supplied attachment row as a stream. |
|
|
Retrieve URL for the attachment content for the supplied attachment. |
|
|
Retrieve the named rendition for the attachment content for the supplied attachment row as a stream. Rendition name is case sensitive. Setting |
Note:
InputStream and OutputStream provide a handle to a file on the Content Server. The connection to the Content Server can only support one Stream at a time. Ensure that you have finished all processing on the current Stream before starting the next. Otherwise you may experience a loss of data in the first Stream. If it is important to have two open Streams. Create a second thread and open the second Stream there.
19.5.3 About Using Attachment Utilities
Two utility methods are provided enable a list of Attachments to be copied to another record as identified by the unique combination of the Document Entity Name and Primary Key values. The list is constructed of the Attachment rows from one or more other records.
The copyAttachments utility does not duplicate the files on the content server. When the method is complete, the destination record will point to the same files in the content server as the source record.
The duplicateAttachments utility does duplicate the files on the content server. When the method is complete, the destination record will point to the new content on the content server.
When constructing the list of Attachments, consider whether Category Data Security has been implemented (see About Attachment Category Data Security). If implemented, the list of Attachments available may not be the full list depending on the permissions granted to the current user. If the full list is required it will be necessary to bypass Category Data Security by setting the dataSecurityDisabled flag on AttachmentsVOImpl to true, as shown in Example 19-18.
Note:
If order is important, the list is processed in the order it is received. Based on the default ordering the UI, this would place the first attachment in the list last when viewed.
Table 19-4 AttachmentsVORowImpl
| Class | Method |
|---|---|
|
|
Creates copies of the supplied attachment rows assigning them to the entity values as provided. |
|
|
Creates copies of the supplied attachment rows assigning them to the entity values as provided. Content on the content server is also copied. |
Example 19-18 AttachmentsVOImpl
AttachmentsVOImpl attachmentVO = attachmentServiceAMImpl.getAttachments1();
attachmentVO.setDataSecurityDisabled(true);
// assign where clause conditions
attachmentVO.executeQuery;
19.5.4 About Managing Attachments HTTP Sessions
Generally, the Attachments component handles resources effectively; there is normally no need to manage resources programatically. However, if the Attachments component is holding a large number of HTTP sessions open for a long time, you might need to dispose of the unnecessary sessions. You can do this by calling the dispose method, which is described in Table 19-5.
Table 19-5 Method Summary for Handling a Large Number of Sessions
| Class | Method |
|---|---|
|
|
Cleans up resources held by the Oracle WebCenter Content connection. |
19.5.5 About Creating Third-Party Attachments
By default, the Attachment files on the Content Server are locked down. When a request is made using the Attachments functionality, it includes additional parameters that are processed on the Content Server. The user's privileges are temporarily elevated so that the request can be performed.
Note:
These requests are always made in the security context of the application that owns the Attachment. Access to Attachments is through the View Link defined in the model. A user that is unable to access your business record cannot access that record's Attachments. In using the Attachments programmatically it is important that the implementation does not circumvent this design.
Methods that support attaching files to business-object records using third-party applications are described in the table that follows.
Table 19-6 Methods Supporting Third-Party Attachments
| Class | Method |
|---|---|
|
j |
Creates a digital signature to allow documents to be checked into the Attachments security group on the Content Server. |
|
|
Creates a new attachment pointing to an existing file on the Content Server. |
|
|
Creates a new attachment pointing to an existing file on the Content Server. |
The process to create an Attachment using a third-party application is the following:
-
The third-party application makes a request to the business object to retrieve a signature for uploading a file with a provided title to a record in the business object.
-
The business object evaluates whether the requesting user is allowed to attach a file to the record.
-
The business object makes a call to the
signUploadmethod, which returns an array of name value pairs that make up the signature. -
The business object returns the array to the third-party application.
-
The third-party application creates the request to create the new file. The request includes the array of name value pairs returned from the business object.
-
The third-party application sends the request to the Content Server.
-
The response from the Content Server includes the document ID and version number of the new document.
-
The third-party application makes a request to the business object to create a new Attachment for the record using the new document ID and version number.
-
The business object calls the
attachRepositoryFilemethod for its record to create the new Attachment record.
Since the attachRepositoryFile method validates that the user making the request to create the attachment is the same user that created the file on the Content Server, all of the steps in this process must be performed by the same user.
The service call made to create the file on the Content Server (Step 5) is the CHECKIN_UNIVERSAL service. For more information, see the Services Reference for Oracle WebCenter Content.
When setting parameters, you must use the guidelines described in the table that follows.
Table 19-7 Service-Call Parameter Guidelines
| Parameter | Guideline |
|---|---|
|
|
The current username |
|
|
Must match the title passed in when requesting the signature |
|
|
Document |
|
|
Attachments or SharedAttachments. Assigning the file to the SharedAttachments security group makes the file readable by anyone that has access to the Attachments functionality in the organization. |
|
|
Do not set this parameter. Documentation implies that an account value is required if Accounts are enabled. Accounts are enabled in a standard deployed Oracle Fusion Applications environment. Attachments does not use Accounts, and does not set this parameter when performing a call to this service. |
|
|
The file that is to be uploaded |
|
|
If the primary file cannot be rendered into a web-viewable format by the Content Server, use this parameter to upload a file that is in a format that can be rendered. Validation checks to ensure that the primary and alternative files do not have the same format. |
|
|
Do not set this parameter. Auto-generation is enabled by default on Oracle Fusion Applications installations. |
19.5.6 About Implementing Attachments with PL/SQL
PL/SQL equivalents exist for some of the Java methods described in About Creating New Attachment Types and About Using Attachment Utilities. These PL/SQL operations appear in the following table.
Note:
There can be no PL/SQL equivalents of the Java APIs that interact with the Content Server. PL/SQL is limited to working with the information stored in the Application Database only. There are no options available to access or create files stored on the Content Server.
Table 19-8 PL/SQL Attachments Implementation
| Method | PL/SQL Implementation |
|---|---|
|
attachManagedURL |
PROCEDURE ATTACH_MANAGED_URL ( X_ENTITY_NAME in VARCHAR2, X_PK1_VALUE in VARCHAR2, X_PK2_VALUE in VARCHAR2 DEFAULT NULL, X_PK3_VALUE in VARCHAR2 DEFAULT NULL, X_PK4_VALUE in VARCHAR2 DEFAULT NULL, X_PK5_VALUE in VARCHAR2 DEFAULT NULL, X_CATEGORY_NAME in VARCHAR2, X_ENT_APP_SHORT_NAME in VARCHAR2, X_URI in VARCHAR2, X_TITLE in VARCHAR2 DEFAULT NULL, X_DESCRIPTION in VARCHAR2 DEFAULT NULL ); |
|
attachURL |
PROCEDURE ATTACH_URL (
  X_ENTITY_NAME in VARCHAR2,
  X_PK1_VALUE in VARCHAR2,
  X_PK2_VALUE in VARCHAR2 DEFAULT NULL,
  X_PK3_VALUE in VARCHAR2 DEFAULT NULL,
  X_PK4_VALUE in VARCHAR2 DEFAULT NULL,
  X_PK5_VALUE in VARCHAR2 DEFAULT NULL,
  X_CATEGORY_NAME in VARCHAR2,
  X_URL in VARCHAR2,
  X_TITLE in VARCHAR2 DEFAULT NULL,
  X_DESCRIPTION in VARCHAR2 DEFAULT NULL );
Updates the supplied attachments row with the information to attach a static URL. |
|
copyAttachments |
PROCEDURE COPY_ATTACHMENTS (
  X_SRC_ENTITY_NAME in VARCHAR2,
  X_SRC_PK1_VALUE in VARCHAR2,
  X_SRC_PK2_VALUE in VARCHAR2 DEFAULT NULL,
  X_SRC_PK3_VALUE in VARCHAR2 DEFAULT NULL,
  X_SRC_PK4_VALUE in VARCHAR2 DEFAULT NULL,
  X_SRC_PK5_VALUE in VARCHAR2 DEFAULT NULL,
  X_SRC_CATEGORY_NAME in VARCHAR2 DEFAULT NULL,
  X_DST_ENTITY_NAME in VARCHAR2,
  X_DST_PK1_VALUE in VARCHAR2,
  X_DST_PK2_VALUE in VARCHAR2 DEFAULT NULL,
  X_DST_PK3_VALUE in VARCHAR2 DEFAULT NULL,
  X_DST_PK4_VALUE in VARCHAR2 DEFAULT NULL,
  X_DST_PK5_VALUE in VARCHAR2 DEFAULT NULL,
  X_DST_CATEGORY_NAME in VARCHAR2 DEFAULT NULL );
Creates copies of the supplied attachment rows assigning them to the entity values as provided. This utility does not copy the content on the server; it creates a copy of the reference to the content. |
|
copyAttachment |
PROCEDURE COPY_ATTACHMENT (
  X_ATTACHED_DOCUMENT_ID in VARCHAR2,
  X_ENTITY_NAME in VARCHAR2,
  X_PK1_VALUE in VARCHAR2,
  X_PK2_VALUE in VARCHAR2 DEFAULT NULL,
  X_PK3_VALUE in VARCHAR2 DEFAULT NULL,
  X_PK4_VALUE in VARCHAR2 DEFAULT NULL,
  X_PK5_VALUE in VARCHAR2 DEFAULT NULL,
  X_CATEGORY_NAME in VARCHAR2 DEFAULT NULL );
Creates a copy of the supplied attachment row. This utility does not copy the content on the server; it creates a copy of the reference to the content. |
|
deleteAttachment |
PROCEDURE DELETE_ATTACHMENT (
  X_ATTACHED_DOCUMENT_ID in FND_ATTACHED_DOCUMENTS.ATTACHED_DOCUMENT_ID%TYPE );
Deletes an attachment from the database for the |
|
deleteAttachments |
PROCEDURE DELETE_ATTACHMENTS (
   X_ENTITY_NAME in FND_ATTACHED_DOCUMENTS.ENTITY_NAME%TYPE,
   X_PK1_VALUE in FND_ATTACHED_DOCUMENTS.PK1_VALUE%TYPE,
   X_PK2_VALUE in FND_ATTACHED_DOCUMENTS.PK2_VALUE%TYPE DEFAULT NULL,
   X_PK3_VALUE in FND_ATTACHED_DOCUMENTS.PK3_VALUE%TYPE DEFAULT NULL,
   X_PK4_VALUE in FND_ATTACHED_DOCUMENTS.PK4_VALUE%TYPE DEFAULT NULL,
   X_PK5_VALUE in FND_ATTACHED_DOCUMENTS.PK5_VALUE%TYPE DEFAULT NULL );
Deletes all the attachments from the database for the specified parent record. This does not delete any files in the content repository. |
Note:
The Attachments procedures listed in About Creating New Attachment Types and About Using Attachment Utilities, but not listed in Table 19-8, cannot be implemented in PL/SQL.
A debugging utility is also included. When enabled, messages are written to the console. This feature is not enabled by default. At runtime the same messages will be written as log messages if logging is set to FINEST for the applcore.db.plsql.attachments.FND_ATTACHMENTS module.
To begin writing log messages to the console, use the PROCEDURE START_DEBUG command.
To stop writing log messages to the console, use the PROCEDURE STOP_DEBUG command.
Example 19-19 displays sample code for implementing Attachments with PL/SQL with debugging enabled.
Example 19-19 Implementing Attachments with PL/SQL
SET SERVEROUTPUT ON;
DECLARE
  BAD_ENTITY_NAME_EXCEPTION EXCEPTION;
  PRAGMA EXCEPTION_INIT(BAD_ENTITY_NAME_EXCEPTION, -20001);
  P_ENTITY_NAME VARCHAR2(40)  := 'FND_DEMO_DEPT1';
  P_PK1_VALUE   VARCHAR2(150) := '10';
BEGIN
  BEGIN
  FND_ATTACHMENTS.START_DEBUG;
  FND_ATTACHMENTS.ATTACH_URL (P_ENTITY_NAME,
             P_PK1_VALUE, NULL, NULL, NULL, NULL,
             'MISC',
             'http://www.oracle.com', 'Oracle Corportation',
             NULL);
  FND_ATTACHMENTS.END_DEBUG;
  EXCEPTION
    WHEN BAD_ENTITY_NAME_EXCEPTION THEN
        DBMS_OUTPUT.PUT_LINE ('The entity name supplied, ' || P_ENTITY_NAME || ', is not a registered document entity.');
  END;
END;
19.6 About Setting Up Miscellaneous Attachments Features
Custom actions include the following:
-
Custom actions for the attachments component
-
Custom actions for the attachment views components
-
Approvals
-
Redlining
19.6.1 About Custom Actions for the Attachments Component
Four facets (placeholders) are provided on the attachments component for product teams to add toolbar buttons to the toolbar and actions to the Action menu of the attachments table.
The facet tableAppsTableSecondaryToolbar is provided to add toolbar buttons to the Attachments Table toolbar.
The facet linkAppsTableSecondaryToolbar is provided for Link mode.
Note:
When using the tableAppsTableSecondaryToolbar or linkAppsTableSecondaryToolbar facets, you must also set the SecondaryToolbarRendered property on the attachments component to true to expose this facet in the Attachments table.
The facet tableAdditionalActionItems is provided to add action items to the Action menu in the attachments table menus.
The facet linkAdditionalActionItems is provided for Link mode.
19.6.2 About Custom Actions for the Attachment Views and Attachment Link Component
Facets are provided on the Attachment Views component to add custom actions.
The following facets are provided:
-
appsTableSecondaryToolbar: adds toolbar buttons to the Attachment Views toolbar. Three buttons, Sel, All, and One, are shown in the following figure. -
additionalActionItems: adds action items to the Action menu in the Attachment Views menu. Five menu options, Show Selected Items, Show All Items, Show One Item, Selected Row Count, and All Row Count, are shown in the following figure.
Figure 19-26 Custom Actions and Facets

You can also use facets inline for adding icons or action items. These facets are incorporated into the actions section of the attachment, as shown in the previous figure. There is no central facet for the inline facets. As Oracle Application Development Framework rules do not allow this type of sharing, you must add each icon and item that must be identical for each view. This provides the flexibility for icons or actions to change from view to view for any implementation.
The rendering of the facets are controlled with properties. By default, the facets are not rendered.
Table 19-9 Facet-Rendering Properties
| View | Facet | Rendering Property |
|---|---|---|
|
Table |
additionalTableInlineActionItems |
additionalTableInlineActionItemsRendered |
|
Table |
additionalTableInlineIconItems |
additionalTableInlineIconItemsRendered |
|
List |
additionalListInlineIconItems |
additionalListInlineIconItemsRendered |
|
List |
additionalListInlineActionItems |
additionalListInlineActionItemsRendered |
|
Card |
additionalGridInlineActionItems |
additionalGridInlineActionItemsRendered |
|
Card |
additionalGridInlineIconItems |
additionalGridInlineIconItemsRendered |
19.6.2.1 About Working with Custom Actions Programmatically
In support of developing the custom action functionality, utility methods are provided in the oracle.apps.fnd.applcore.attachments.v2.uiPublic.utils.AttachmentPublicUtils class.
Two methods return an array of Attachment rows. One method returns all of the rows; the other returns only the selected rows. The rows contain all of the information that the Attachments component uses to display itself. The data is for reference purposes only, and the row returned by the method cannot be modified.
Two methods return either the total number of attachments, or the number of attachments that are currently selected.
Table 19-10 Custom Actions Utility Methods
| Class | Method |
|---|---|
|
|
Finds the list of rows selected in the attachment component from which the event originated. If the event is null or its source is not from a sub-component of an attachments component, or if an exception occurs during processing, an empty list is returned. |
|
|
Finds the list of rows selected in the attachment component from which the event originated. If the event is null or its source is not from a sub-component of an attachments component, or if an exception occurs during processing, an empty list is returned. |
|
long |
Finds the list of rows selected in the attachment component from which the event originated. If the event is null or its source is not from a sub-component of an attachments component, or if an exception occurs during processing, -1 is returned. |
|
long |
Finds the list of rows selected in the attachment component from which the event originated. If the event is null or its source is not from a sub-component of an attachments component, or if an exception occurs during processing, -1 is returned. |
19.6.3 About Approvals
Approval functions are added to the Attachments component using the Custom Actions feature, which is documented in the previous section of this chapter.
The approvalEnabled property on the Attachments component can be used to control whether the Status column (from the FND_DOCUMENTS_TL table) is displayed in the Attachments Table. This column indicates the status of the attachment relationship between the business object and the file, not the status of the file in the content repository.
Product teams are responsible for programmatically setting the status as necessary, but are required to set this value using a lookup code provided in the FND_ATTACHMENT_STATUSES lookup. The following table has the full list of valid values found in this lookup table. (Null is also a valid value):
| Lookup Code | Meaning |
|---|---|
|
APPROVED |
Approved |
|
REJECTED |
Rejected |
|
REVIEWED |
Reviewed |
|
SUBMITTED_FOR_APPROVAL |
Submitted for Approval |
|
SUBMITTED_FOR_REVIEW |
Submitted for Review |
|
UNAPPROVED |
Unapproved |
Note:
The Status column is a read-only column when displayed in the Attachments Table.
19.6.4 About Redlining
Redlining is a function that shows the changes to an attachment from one version of the parent record to another. It gets its name from the format applied to the attachments that were deleted between the versions.
Redlining requires the following:
-
Your business object must be tracking different versions of the same record
-
There can be only one current record. All previous versions of the record are no longer editable.
At runtime, attachment views compare the attachments of the current record with that of its nominated predecessor.
-
New attachments have their line prefixed with the word "Added". The Title, Description, and Category fields are formatted in green.
-
Modified attachments have their line prefixed with the word "Edited". The Title, Description, and Category fields are formatted in blue. Previous values are formatted in red with a strikethrough.
-
Deleted attachments have their line prefixed with the word "Removed". The Title, Description, and Category fields are formatted in red with a strikethrough. Deleted Attachments cannot be modified.
-
Attachments that are unchanged have no prefix. The Title field displays in blue text.
The following figure shows an example of redlining.
Figure 19-27 Attachment Redlining
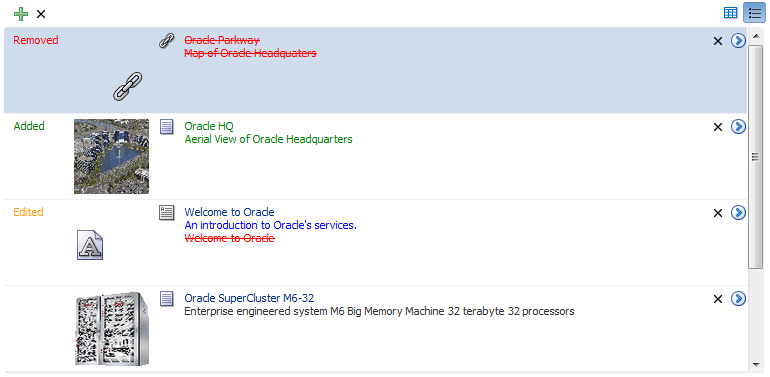
Note:
Attachments always retrieve the latest version of a file from the Content Server server. Subsequently, it is necessary to set the predecessor attachments to point to the current version of the file at the time their parent was superseded by the new parent record.
19.7 About Integrating Attachments Task Flows into Oracle Fusion Functional Setup Manager
Every application registers task flows with a product called Oracle Fusion Functional Setup Manager. The Functional Setup Manager provides a single, unified user interface that allows customers and implementers to configure all Oracle Fusion applications by defining custom configuration templates or tasks based on their business needs.
The Functional Setup Manager UI enables customers and implementers to select the business processes or products that they want to implement.
Function Security controls your privileges to a specific task flow, and users who do not have the required privilege cannot view the task flow. For more information about how to implement function security privileges and roles, see Implementing Function Security .
Table 19-12 lists the task flows and their parameters.
Table 19-12 Attachments Task Flows and Parameters
| Task Flow Name | Task Flow XML | Parameters Passed | Behavior | Comments |
|---|---|---|---|---|
|
Manage Attachment Entities |
/WEB-INF/oracle/apps/fnd/applcore/attachments/publicUi/flow/ManageAttachmentEntities.xml#ManageAttachmentEntities |
[moduleType] [moduleKey] [pageTitle] |
Search and edit Attachment entities. |
NA |
|
Manage Attachment Categories |
/WEB-INF/oracle/apps/fnd/applcore/attachments/publicUi/flow/ManageAttachmentCategories.xml#ManageAttachmentCategories |
[moduleType] [moduleKey] [pageTitle] |
Search and edit Attachment categories. |
NA |
|
Manage Attachment File Formats |
/WEB-INF/oracle/apps/fnd/applcore/attachments/publicUi/flow/ManageAttachmentFileFormats.xml#ManageAttachmentFileFormats |
None |
Search and edit Attachment file formats |
NA |
For information about implementing your specific product family, do the following:
-
Access the Oracle Fusion Applications library.
-
See the Implementing Common Features guides for your product family.
19.8 About Securing Attachments
All attachments users must be assigned the "AttachmentsUser" role to use attachments. This role gives users read access to all shared file attachments. Depending on the security defined for attachments, further access privileges will be assigned to users on a per-file basis at the time of accessing the attachments.
Attachments can be secured using the Attachment Category data-security method.
A user can choose whether to Share a file when creating a file attachment. File sharing impacts the way in which files are secured. For more information, see About File Sharing.
19.8.1 About Entity Instance-Level Security
Many product teams define data security on their business objects. This data security controls which instances of that business object each user can access. Oracle Fusion attachments reuses this data security when users try to access documents directly, either via a URL or via the Content Server user interface, to ensure that users can only access files that are attached to the business object instances that they have permission to access. This security is important for controlling access to attached files when accessed directly.
19.8.1.1 About Setting Up Attachments to Uphold Entity Instance-Level Security
To enable attachments to reuse the data-security setup for your business object, you need to seed data in the DATA_OBJECT_CODE column in the FND_DOCUMENT_ENTITIES table. The value in the DATA_OBJECT_CODE column must match the value stored in the OBJ_NAME column in the FND_OBJECTS table for database resource for your business object.
Note:
Oracle Fusion attachments require product teams to have used and seeded the standard read, update, and delete functions when setting up the data security on their business objects.
For more information about Oracle Fusion Data Security, see Implementing Oracle Fusion Data Security.
19.8.2 About Attachment Category Data Security
Attachments can be secured using attachments categories. This security determines which attachments a user has access to, and what actions they can perform on that attachment, based on the Category that is assigned to it. Uptaking this security is not a mandatory requirement for product teams.
Before uptaking category data security, ensure you have assigned one or more categories to the attachment entity defined for your business object. For more information, see About Assigning Categories to the Attachment Entity.
To incorporate category data security, you need to seed data security for your attachment categories to control which roles have access to each of the categories.
The following seed data has been provided and must be used when you set up category data security:
-
"FND_DOCUMENT_CATEGORIES": The seeded database resource for attachment categories data security
-
Three actions (form functions) seeded for attachments. These are listed in Table 19-13.
Table 19-13 Actions Seeded for Attachments
Action FUNCTION_NAME USER_FUNCTION_NAME Seeded Read Action
FND_READ_APPLICATION_ATTACHMENT_DATA
Read Application Attachment
Seeded Update Action
FND_UPDATE_APPLICATION_ATTACHMENT_DATA
Update Application Attachment
Seeded Delete Action
FND_DELETE_APPLICATION_ATTACHMENT_DATA
Delete Application Attachment
19.8.2.1 How to Set Up Category Data Security
Do the following to set up category data security:
For more information, see Implementing Oracle Fusion Data Security.
19.8.3 About File Sharing
File sharing impacts the way in which your files are secured. Files are stored on the Content Server as either Shared or Not Shared. Users can choose which option to use when they attach files to their business objects. For more, see About Using Attachments File-Level Security.
Shared files are files that are stored in virtual folders within the Content Server and are available to all attachments users. An attachments user is any user who has been assigned the "AttachmentsUser" role. Shared files are exempt from data security.
Unshared files are only available to those users who have access to the file via data security. Therefore, if an Oracle Fusion Applications user has privileges to access to an attachment through a business object instance and they have privileges to access attachments with a particular category, then they have access to the file in the Content Server.
Users are defined on a single Lightweight Directory Access Protocol (LDAP) server. Each of these users can log in to both Oracle Fusion Applications and Oracle Content Server using the same username and password. Users will be given appropriate privileges to each system based on their assigned roles.
19.8.4 About File Format Filtering
Most complex file formats include scripting support to assist users with automating common tasks. This has led to the rise of Cross Site Scripting (XSS attacks, where attackers gain access by including scripts in a file that an unsuspecting user then opens. The challenge, then, is how to recognize and balance the need for users to be able to include automation within their files with the need to prevent malicious scripts inflicting damage to the site.
When opening a file, the default Attachments behavior is to prompt the user to download. This removes native-browser file types from being opened in the session context. It also gives the user more control over when to open the file and, in the case of where the file is suspect, which viewer to use.
The new "Manage Attachment File Formats" page provides a site with additional options for managing the behavior of Attachments based on the file format. Since all file formats are downloaded by default, no file formats are shipped. Sites can use the management page to add file formats, identified by their mime type, either by entering their mime-type directly or by using the option to supply a sample file to source the mime-type. See About Integrating Attachments Task Flows into for more information about task flows.
File formats are set to have a state of either Deny, Download, or Open. If you do not want a file format in use on your site, you would add and set a file format to the Deny state using the management page. Subsequently, any attempt to upload a file of that type will be rejected. Any existing files of that file type will still appear in the Attachments UI, but they cannot be downloaded. Instead, an explanatory message will appear when clicking on the file link.
Setting the state to Open will open any file of a specific format when a link is clicked. Clicking on the link for these files will open based on the browser's settings.
If a file format is in a state of flux, setting the state of that file format to Download will revert it to its default behavior. This eliminates the need of having to delete the file format and re-add at a later time.
Files whose file types are not on the Open state list can still be treated individually as Open when uploaded by users who have been granted the FND_Attachment_File_Trusted_Status (ADFMethodResourceType) permission with the Invoke action. A user with this permission is able to verify that the contents of the file can be opened safely.
19.9 Understanding How to Use Attachments (Runtime)
This section discusses how to use Attachments file-level security, update attachments, use the Attachments update functions, and how to check file attachments out and in.
19.9.1 About Using Attachments File-Level Security
With Oracle Fusion Applications attachments, users have the ability to set attachments to be either Shared or Not Shared using the Shared option, as shown in Figure 19-28.
Figure 19-28 Attachment Table with Shared Column
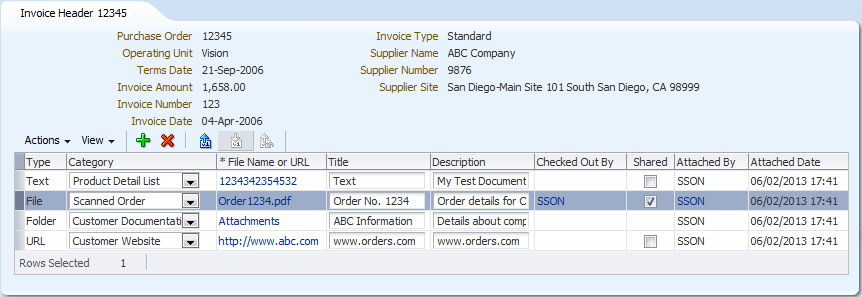
The Shared column is only shown in the Attachments table when the repositoryMode property is set to true. The default state for this option is Not Shared for both Text and File type attachments.
Note:
The option is not available for all URL and Folder type attachments, as shown in Figure 19-28. By default, all Folder type attachments are shared, and all URL type attachments are not shared. Therefore, the check box is hidden because these default values cannot be changed by the user.
All repository File or Folder attachments are shared by default. This is because only shared files are visible in the Document Picker, which is used to select the Repository Files or Folders.
If the user hovers the mouse pointer over the Shared check box, the following hint displays: Checking this box will make this file available to other users.
If the user attempts to change a File type attachment from Shared to Not Shared, the system checks to see if the file is attached to any other business object instances. If the file is attached to other business object instances, the following message is displayed and the file attachment remains shared: This change cannot be made as this file is attached to other business objects.
19.9.2 About Updating Attachments
Users have the ability to update attachments within the Attachments table or popup.
As well as being able to update the category, title, and description of an attachment, users can update existing URL and Text attachments and replace the file of existing File attachments with a new version of the file.
Note:
Only one attachment can be updated at any one time.
| Icon | Function | File | Property |
|---|---|---|---|
|
|
Check Out |
versioncheckout_ena.png |
repositoryMode = true |
|
|
Check In |
versioncheckin_ena.png |
repositoryMode = true |
|
|
Cancel Check Out |
versionrollback_ena.png |
repositoryMode = true |
The updateAllowed and repositoryMode properties on the Attachments component, and the Checked Out status of the Content Repository files, control how the update functionality works for a particular user.
19.9.2.1 About Attachments Update Functions
The Attachments update functions are available in the Attachments table toolbar and Actions menu.
The rendering of the update buttons in the Attachments table toolbar and the corresponding actions in the Actions menu are controlled in the following way using the updateAllowed property on the Attachments component:
updateAllowed = true:
-
The Category, Title, and Description columns in the Attachments table are updateable.
The title and description values are kept in sync with the corresponding values stored in the Content Server. When a user updates the title or description, the values are updated in the Content server when the changes are saved.
-
If
repositoryMode= true:-
The Check In, Check Out, and Cancel Check Out buttons are rendered in the Attachments table toolbar, as shown in Figure 19-29.
These buttons are enabled or disabled based on the type of attachment and the checked out status of File and Text type attachments.
Figure 19-29 Attachment Table with Update Functions set to True
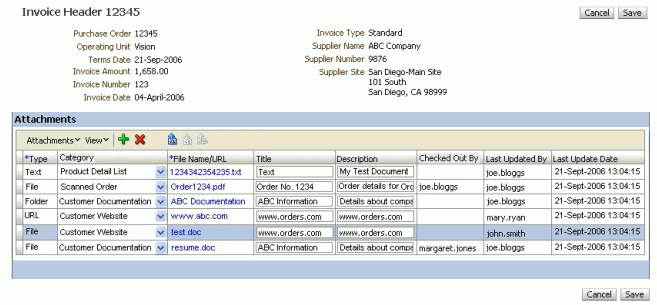
-
-
If
repositoryMode= false:-
The Check In, Check Out, and Cancel Check Out buttons are not rendered in the Attachments table toolbar.
Figure 19-30 Attachment Table with Update Functions set to False
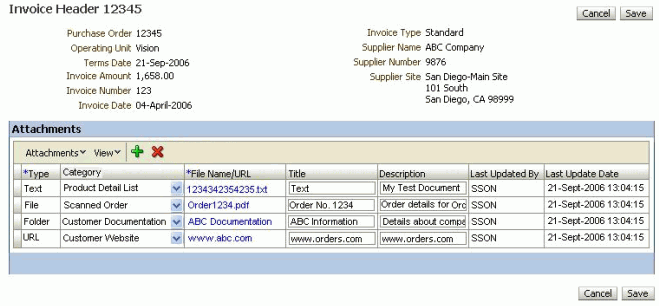
-
updateAllowed = false:
-
None of the fields in the table are updateable when this property is set to false.
-
If
repositoryMode= true:-
The Check In, Check Out, and Cancel Check Out buttons are rendered and disabled in the Attachments Table toolbar.
-
-
If
repositoryMode= false:-
The Check In, Check Out, and Cancel Check Out buttons are not rendered in the Attachments table toolbar.
-
19.9.2.2 Understanding How to Determine the Checked Out Status of File and Text-Type Attachments
The Checked Out By column indicates the checked-out status in the Attachments table. this column is only rendered when the repositoryMode is set to true.
This column is always empty for URL and Folder type attachments.
For File and Text attachments, this column is either:
-
Empty, indicating that the file is not checked out.
-
Displays the Oracle Fusion Applications username of the user who currently has the file checked out.
The user name is derived from the Checked Out By value that is stored against the file in the Content server. The stored Content Server username is mapped to the appropriate Oracle Fusion Applications username. If the value cannot be mapped, the Content server username is displayed in the column. This value is never stored in the Attachments Table.
19.9.2.3 About Enabling or Disabling Attachments Update Functions
The update functions apply to a single selected row in the Attachments table. If no rows are selected or more than one row is selected in the Attachments table, all of the update buttons and the corresponding actions in the Actions menu are disabled.
When a single row is selected in the Attachments table, the enabling or disabling of the update buttons in the Attachments table toolbar and the corresponding actions in the Actions menu are controlled using the following rules when the updateAllowed property is set to true:
URL attachments
The following rules apply regardless of the repositoryMode value:
-
The Category, Title, and Description fields are updateable.
-
The Check Out, Check In, and Cancel Check Out functions are always disabled.
Folder attachments
If repostoryMode = true:
-
The Category, Title, and Description fields are updateable.
-
All of the update functions are disabled.
Text and File attachments
If repositoryMode = true:
-
The Category, Title, and Description fields are updateable.
-
All of the update functions are disabled when the file is checked out by a user other than the current user.
-
The Check Out function is disabled, and the Check In, and Cancel Check Out functions are enabled when the file is checked out by the current user.
-
The Check Out function is enabled, and the Check In and Cancel Check Out functions are disabled when the file is not checked out.
