8 Run Post-Upgrade Tasks
This section describes the tasks that must be performed after completing the steps in Upgrade to Oracle Fusion Applications Release 12. The following topics are discussed:
8.1 Confirm Database Artifact Deployments Were Successful
Confirm that the deployment of artifacts updated during the Load Database Components configuration assistant was successful by reviewing the diagnostics report and log files. For more information, see Diagnostics Report in the Oracle Fusion Applications Patching Guide.
8.2 Review the Post RUP Installer Report
To check for any errors or warnings that require attention, review the Post RUP Installer report as it provides an overview of the tasks that Upgrade Orchestrator ran when it called RUP Installer. This report is generated in HTML and XML files and includes links to log files.
The Post RUP Installer report displays the following information:
-
Configuration Assistant: The name of the configuration assistant.
-
Attempts: The number of times the configuration assistant ran.
-
Time Taken: The duration of the configuration assistant in minutes and seconds.
-
Result: The result of the configuration assistant, such as PASSED or FAILED.
-
Errors: Any errors that were reported during the configuration assistant.
-
Log Files: Link to log files for the configuration assistant.
For Release 12, the Post RUP Installer report files can be found in the following location:
APPLICATIONS_CONFIG/lcm/logs/11.12.x.0.0/RUP:

PostRUPInstallerReport_timestamp.html
PostRUPInstallerReport_timestamp.log
PostRUPInstallerReport_timestamp.xml
For information about resolving errors, see Monitor and Troubleshoot the Upgrade.
8.3 Review the Orchestration Report
To check for any errors or warnings that require attention and to confirm whether the upgrade completed successfully, review the Oracle Fusion Applications Orchestration Report. If there were previous failures during the upgrade, this report would have been generated each time there was a failure. The report name is FAOrchestrationReport_release_hosttype_hostname_timestamp.html.
The Orchestration report is generated for each pod and its location is defined in the mandatory ORCH_REPORT_LOCATION property in the pod.properties file. Previous reports are archived and available for troubleshooting purposes. For more information, see Oracle Fusion Applications Orchestration Report.
8.4 Review Policy Store (JAZN) Analysis Reports
Review the JAZN Analysis reports for potential conflicts and deletions that are not patched automatically during the upgrade. The reports are located in the following directory:
APPLICATIONS_CONFIG/lcm/admin/11.12.x.0.0/fapatch/JAZN/stripe/report/report.txt
The stripe is: appsdiag, crm, hcm, obi, soa-infra, b2bui, fscm, IDCCS, or OracleBPMComposerRolesApp
Review the Modification section of the report to see the roles that were not updated during the upgrade. For each conflict that displays in this report, evaluate and manually patch the role by using Oracle Authorization Policy Manager (APM).
The following example shows a typical Application Role conflict that has been modified by both the patch and production, therefore it is not applied during the upgrade:
MODIFICATION CONFLICTS
Artifact type: Application Role
Artifact Name: OBIA_PARTNER_CHANNEL_ADMINISTRATIVE_ANALYSIS_DUTY
Description: This artifact is modified at attribute level in patch version and also in production.
Note the location of the following files for reference when using APM:
-
Location of baseline files for each stripe is under:
APPLICATIONS_CONFIG/lcm/admin/11.12.x.0.0/fapatch/JAZN/stripe/stage/baseline
-
Location of patch files for each stripe is under:
APPLICATIONS_CONFIG/lcm/admin/11.12.x.0.0/fapatch/JAZN/stripe/stage/current
8.5 Disable Oracle Java Virtual Machine Support
The process for disabling Oracle Java Virtual Machine (OJVM) support has already been partially completed during pre-upgrade. In particular, patch 23341410 has already been downloaded and unzipped into a stage directory.
STAGE_DIR:8.6 Reload Custom Templates in BI Publisher
If BI Publisher reports have been customized, reload custom templates for BI Publisher reports on Oracle-delivered BI Publisher reports by following the steps in "Retaining customized templates while upgrading or applying patches (Doc ID 1909819.1)" from My Oracle Support. If there is a plan to create payments with a format created in Release 8 or earlier and attached with a predefined BI Publisher template name, refer to "Custom formats created by attaching seeded BI Publisher template in Release 8 or earlier will not generate the correct payment file in Release 10 (Doc ID 1910233.1)".
8.7 Perform Steps in Technical Known Issues
Follow any post-upgrade steps mentioned in the Post-Upgrade Known Issues section of the Technical Known Issues found on My Oracle Support.
8.8 Allocate Memory for HCM Workforce Reputation Management
This section is applicable only if there is a plan to use the Human Capital Management (HCM) Workforce Reputation Management product packaged with the Workforce Deployment, or Workforce Development product offerings. To allocate memory for HCM Workforce Reputation Management, perform the following steps:
8.9 Apply Oracle Fusion Applications Patches
If any Oracle Fusion Applications patches were downloaded in Download and Unzip Mandatory Post-Release 12 Patches, apply these patches now. For more information, see the Apply Technical Patch Bundles: P4FA, Apply Functional Patch Bundle, Apply One-Off Patches, or Apply Identity Management (IDM) Patches in the Oracle Fusion Applications Patching Guide.
8.10 Confirm Inbound Refinery (IBR) is Registered
This step relates to environments that contain local domain deployment in the domain topology. To determine there is a need to perform this step, review the following file:
$UCM_DOMAIN_PATH/CommonDomain/ucm/cs/data/providers/providers.hda
-
If this file contains the string,
"IbrProvider", then IBR is registered and this step can be skipped. -
If this file does not contain
"IbrProvider", perform the following steps:
8.11 Apply the Resource Manager Plan (Oracle VM Only)
On Oracle VM environments only, apply the Resource Manager Plan (FUSIONAPPS_PLAN) using the SQL script provided in Resource Manager Plan - SQL Script. Run this script as the privileged database user (SYSTEM/SYS).
8.12 Ensure Update Bundles Were Applied
Ensure that the latest update bundles were applied on the current environment:
-
Oracle Fusion Middleware Update Bundles (P4FA) for Fusion Applications.
-
Oracle Fusion Applications Update Bundles. See the Oracle Fusion Applications Update Bundle Readme (Doc ID 1603154.1) on My Oracle Support.
For information about how to install update bundles, review the update bundle readme file. Contact Oracle Support to obtain more information about update bundles.
8.13 Update Credential Store Password
When performing a direct upgrade and if Release 11 and Release 12 are in the upgrade path, the FUSION_APPS_HCM_IIP_APPID credential is seeded with different passwords causing a password mismatch between OID and the credential store.
-
Log in to Enterprise Manager (EM) for any Fusion Applications (FA) domain. For example, HcmDomain with read/write user permissions.
-
Follow the path Farm_HCMDomain, then WebLogic Domain, and then HCMDomain.
-
On the right pane open the WebLogic Domain menu, then go to Security, and then Credentials.
-
In the Credential Store Provider search for the
oracle.apps.securitymenu. -
Select
FUSION_APPS_HCM_IIP_APPID-KEYfrom the credential list, and click Edit. -
Ensure the User Name is as follows:
'cn=FUSION_APPS_HCM_IIP_APPID,cn=AppIDUsers,cn=Users,dc=us,dc=oracle,dc=com'
-
Update the password in the credential store to a known one, for example,
password. -
Use Oracle Directory Services Manager (ODSM) to query the
FUSION_APPS_HCM_IIP_APPIDuser. -
Reset the password for the
APPIDto the same password you entered in Step 7. -
Bounce the FA FMW tier (all domains).
8.14 Rerun the fmwDS.py Script
When performing a direct upgrade to Release 12 and the fusion_aq prefix is missing in the JRFWSAsyncJmsModuleAQDOO-jms.xml file, you must rerun the fmwDS.py script.
fmwDS.py script, perform the following steps:
-
Validate if the
fusion_aqprefix is present in theJRFWSAsyncJmsModuleAQDOO-jms.xmlfile (if the file exists) by using vi editor as shown in the following example path:/u01/<APPLTOP>/instance/domains/admin-apps.oracleoutsourcing.com/<SCM domain hostname>/config/jms/JRFWSAsyncJmsModuleAQDOO-jms.xml
The correctremote-jndi-nameshould contain thefusion_aqprefix as shown in the following examples:<remote-jndi-name>Queues/fusion_aq.SCM_DOO_AsyncWS_Request</remote-jndi-name>
<remote-jndi-name>Queues/fusion_aq.SCM_DOO_AsyncWS_Response</remote-jndi-name>
If thefusion_aqprefix is present, no further actions are needed.If the
fusion_aqprefix is not present, proceed to the following steps. -
If the
<SCM domain hostname>is online, shut it down before proceeding to the next step. -
Navigate to the
wlst.shlocation as follows:cd /u01/<APPLTOP>/fusionapps/oracle_common/common/bin/
-
Rerun the
fmwDS.pyscript. The script takes the following 3 parameters as inputs:-
Domain Name:
<SCM domain hostname> -
Domain Path
-
Override Flag: "
Y"
./wlst.sh /u01/<APPLTOP>/fusionapps/atgpf/atgpf/bin/fmwDS.py <SCM domain hostname> /u01/APPLTOP/instance/domains/admin-apps.oracleoutsourcing.com/<SCM domain hostname> Y
-
-
Ensure the
fusion_aqprefix is present by reviewing theJRFWSAsyncJmsModuleAQDOO-jms.xmlfile again. -
Start the
<SCM domain hostname>servers.
8.15 Correct ODI Agent Connections
In non-scaled out environments where the loadbalancer is not setup, you must update the ODI agents port to the OHS port.
-
Sign in to the ODI console and select Master Repository.
-
From the topology navigator, select one of the following applicable physical agents:
-
FusionCrmOdiAgent
-
FusionHcmOdiAgent
-
FusionIcOdiAgent
-
FusionScmOdiAgent
-
-
Right-click the agent and click Edit.
-
Update the host name and port number in the agent configuration with the OHS host and port for the respective domain, and then click Save.
8.16 Update the BISoapConnection Attribute 'WSDLContext' for CRM Domain
In post release 12 upgrade, the 'WSDLContext' attribute value for BISoapConnection in the CRM Domain is incorrect.
WSDLContext' attribute by performing the following steps:
-
Log in to the CRM Domain Enterprise manager Console as follows:
http(s)://hostname:<CRMDomainPort>/em
-
Reach the CRMDomain node within Weblogic Domain.
-
Right-click on CRMDomain and open System MBean Browser.
-
Under the Application Defined MBeans node, find the following:
oracle.adf.share.connections
-
Open this node and subsequently open the Sales Server node.
-
Navigate to the SalesApp node, then to ADFConnections, and then to BISoapConnection.
-
Click MarketingServerExternal and see the information in the right hand pane.
-
Change the value for WSDLContext attribute to analytics-ws.
-
Click Apply on the top right of the page to save the changes.
-
Restart the SalesServer in the CRMDomain.
8.17 Set Up AD Sync
Perform this step only if you used OVD to proxy AD in split profile and you performed the steps in Prepare for Upgrade. Otherwise, skip this step.
Set up AD sync post-upgrade to ensure that new users added to AD will be replicated into the bundled OID. You can set this up by using the AD-Bridge solution provided by Oracle.
8.18 Verify If Resource Is Protected
Note:
Perform this post-upgrade task only if you enabled federation and performed the steps as listed in Enable Federation for AD OVD Split-Profile. Otherwise, skip this task.IAMSuiteAgent:/welcome_webcenter.html resource is protected, perform the following steps:
-
Go to
https://sso_lbr server: PORT URL/welcome_webcenter.html.-
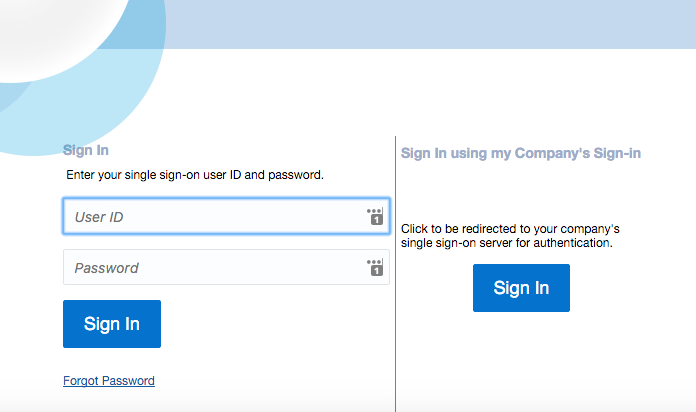
If you configured your Single Sign-on (SSO) with federation as described in Configure OIF with an Identity Provider, Step 4, then the login page shows two login options as shown in the following figure. One login option is a local FA and the other one is an IdP login.

-
Click Sign In in the "Sing In using my Company’s Sign-in" section.
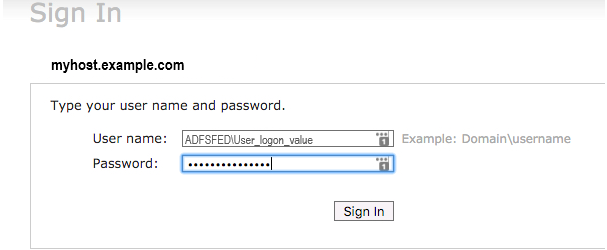
You are redirected to the IdP login page.
-
Log in using the Domain\Username and your password.
-
-
If you did not configure your SSO with federation, then the login page shows only the IdP login option.

-
Log in using your Domain/username and your password.
-
-
-
Perform SSO and Single Logout (SLO).
8.19 Change the Lock File Location on OHS Server (Optional)
-
For APP OHS:
/dev/shm/ohs_ohs1_http_lock -
For OSN OHS:
/dev/shm/osn_ohs1_http_lock -
For bare metal environments: use the default lock file location