7 Manage Oracle Enterprise Scheduler Service and Jobs
The following topics are discussed:
7.1 Introduction to Managing Oracle Enterprise Scheduler
Oracle Enterprise Scheduler provides the ability to define, schedule, and run different types of jobs, including Java, PL/SQL and binary scripts. It is possible to run jobs on demand, or schedule them to run in the future.
Oracle Enterprise Scheduler provides scheduling services for the following purposes:
-
Distributing job-request processing across a grid of application servers
-
Running Java, PL/SQL, and binary script jobs
-
Processing multiple jobs concurrently
Oracle Enterprise Manager Cloud Control (Cloud Control) makes possible to start, stop, monitor, configure, and manage Oracle Enterprise Scheduler services, components, and job requests.
The following table lists some sample jobs that are pre-seeded with Oracle Fusion Applications product families.
Table 7-1 Pre-Seeded Jobs
| Product | Job Name | Description |
|---|---|---|
|
Oracle Fusion CRM |
Appointment Assignee |
An internal resource participant on an appointment, such as John Jones or Mary Smith |
|
Oracle Fusion CRM |
Customer Custom Business Object |
A service used to create, update, get, or find custom Oracle Fusion Customer Center business objects. Some examples of custom objects could be a customer trouble ticket to track customer complaints or a customer tracking event to keep track of customer participation in marketing events. |
|
Oracle Fusion Financials |
Business Unit |
A unit of an enterprise that performs one or many business functions that can be rolled up in a management hierarchy. A business unit can process transactions on behalf of many legal entities. Typically, it will have a manager, strategic objectives, a level of autonomy, and responsibility for its profit and loss. |
|
Oracle Fusion Financials |
General Ledger Storage Parameter |
The amount of storage space allocated to general ledger interim tables and indexes |
|
Oracle Fusion HCM |
Calculate Payroll |
Creates payroll run results and costing entries for those results |
|
Oracle Fusion HCM |
Start Workforce Compensation Cycle |
Builds manager worksheets with eligible workers for a new plan and initiates the compensation cycle |
|
Oracle Fusion Supply Chain Management |
Item Import |
Imports item definitions, structures, and packs into the Oracle Fusion Applications Product Information Management (PIM) repository |
|
Oracle Fusion Supply Chain Management |
Item Publication |
Extracts items, structures and pack definitions from the Oracle Fusion Applications PIM repository, delivered in XML format in Oracle WebCenter Content |
|
Oracle Fusion Incentive Compensation |
Collect Transactions for Incentive Compensation |
Imports transactions used to credit and calculate incentives |
|
Oracle Fusion Incentive Compensation |
Import Compensation Plan |
Imports an incentive compensation plan from a previously exported XML file |
|
Oracle Fusion Procurement |
Import Orders |
Imports purchase orders from external systems into Oracle Fusion Purchasing |
|
Oracle Fusion Procurement |
Reassign Purchasing Documents |
Reassigns purchasing documents including purchase orders, purchase agreements, and contract agreements from one buyer to another |
|
Oracle Fusion Project |
Import and Process Cost Transactions |
Creates expenditure items and cost distributions for the transactions in the Project Costing open interface table. Processes transactions in online mode when called from page-level actions and is not enabled for parallel processing. |
|
Oracle Fusion Project |
Generate Revenue |
Recognizes project contract revenue according to contractual terms by creating revenue distributions, which are the source of revenue accounting entries. |
The main Oracle Enterprise Scheduler page provides an overview of the status of the scheduler components, the top-running and completed scheduled job requests, and a performance summary of scheduled job requests. It is also possible to monitor activity and diagnose problems by examining Oracle Enterprise Scheduler logs and comparing current to historical performance data.
Drilling down to the main components of Oracle Enterprise Scheduler, job request processors and dispatchers can be configured. A job request processor is bound to a particular Oracle Enterprise Scheduler server and is responsible for allocating threads for job requests. A job request dispatcher polls for job requests.
After the Oracle Enterprise Scheduler components are configured, work allocation and purge policies can be defined. Work allocation definitions can help to define the resources available and the maximum concurrency for specific jobs in specific time windows (workshifts), and rules that govern their execution and bindings to a particular server and request processor (work assignments). Purge policies help to define retention periods for completed job data in the database. A window of time for work allocations and a schedule for purge policies can be defined.
7.2 Understand the Scheduler Administration Pages
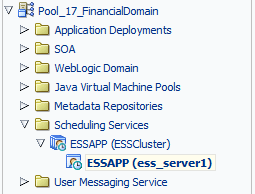
To view the Oracle Enterprise Scheduler administrative tasks in Cloud Control:
7.2.1 Understand the Scheduling Service Home Page
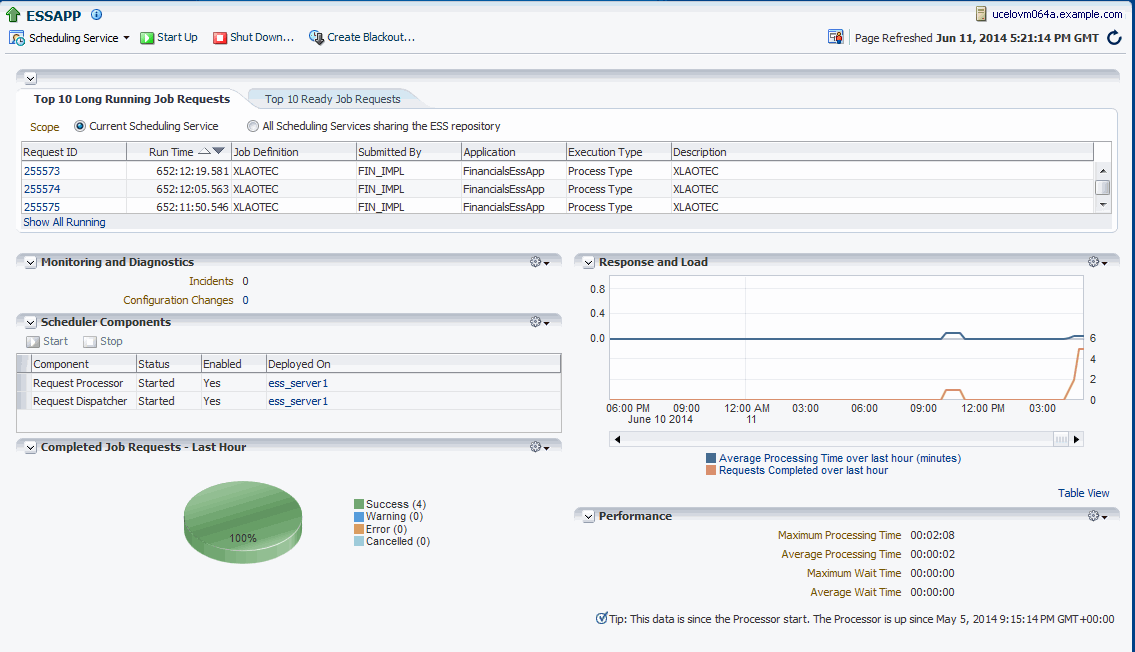
The Scheduling Service home page provides an overview of the performance of Oracle Enterprise Scheduler components and jobs, including the component status, the number of completed job requests in the last hour, and the processing times for running jobs.
This page can be used as a starting point for monitoring and administering Oracle Enterprise Scheduler. Figure 7-2 shows a portion of the Scheduling Service home page.
7.2.2 Understand the Regions on the Page
The Scheduling Service Home Page contains the following regions:
-
Top 10 Long Running Requests and Top 10 Ready Job Requests
-
Scheduler Components Region
-
Completed Job Requests Region
-
Response and Load Region
-
Performance Region
7.2.2.1 Top 10 Long Running Requests and Top 10 Ready Job Requests Regions
The Top 10 Long Running Requests region displays the top 10 long running scheduled job requests, including request ID, job runtime, job definition used, executing application, job execution type, and description. The scope of the top 10 long running requests displayed can be set to the current scheduling service only or all scheduling services that share the Oracle Enterprise Scheduler repository.
The Top 10 Ready Job Requests tab displays the top 10 scheduled job requests that are waiting to be executed. The tab displays the same information as the Top 10 Long Running Requests tab, except the wait time is shown for each job rather than the runtime.
7.2.2.2 Scheduler Components Region
The Scheduler Components region displays the components of Oracle Enterprise Scheduler, including the job request processor and dispatcher. The tab shows the status of each component, the name of the server to which it is deployed, and whether the component is enabled. It is possible to start and stop each component, as required.
7.2.2.3 Completed Job Requests Region
The Completed Job Requests region displays the scheduled jobs completed within the last hour.
7.2.2.4 Response and Load Region
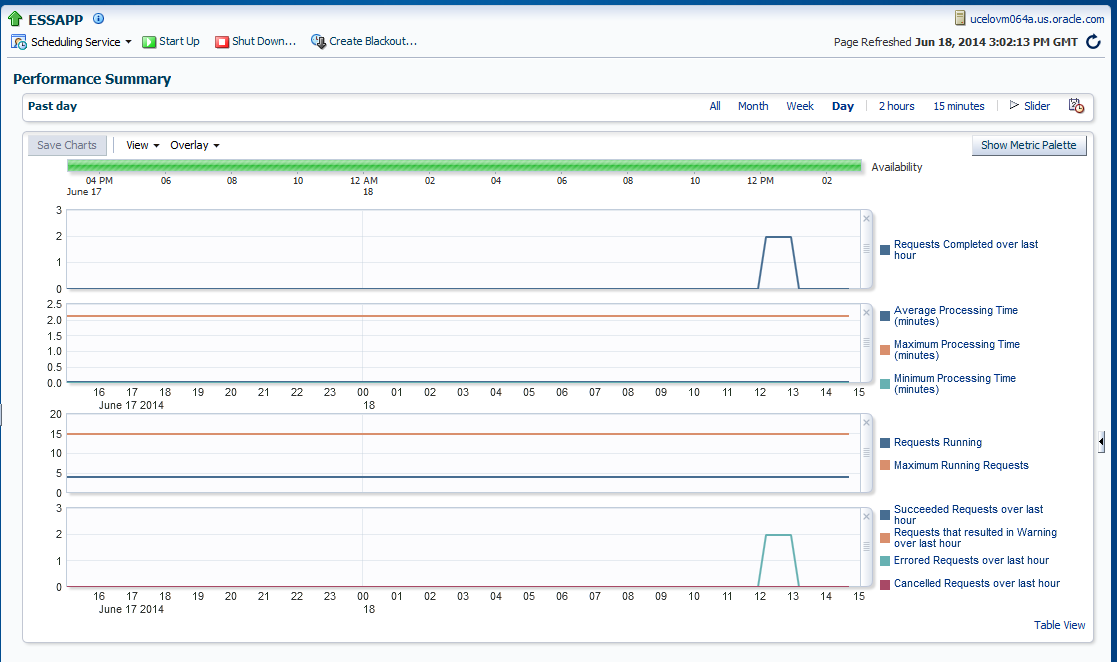
The Response and Load region displays performance monitoring statistics regarding the time required to process job requests.
Table 7-3 describes the performance monitoring statistics in the Response and Load region.
Table 7-3 Response and Load Statistics
| Statistic | Description |
|---|---|
|
Average processing Time over last hour (minutes) |
This metric specifies the average time required to process jobs during the last hour. |
|
Requests completed over last hour |
This metric specifies the number of scheduled job requests completed within the last hour. |
7.2.2.5 Performance Region
The Performance region displays performance data for job requests, such as processing times and wait times.
Table 7-4 describes the performance monitoring statistics in the Performance region.
Table 7-4 Performance Statistics
| Statistic | Description |
|---|---|
|
Maximum processing time |
This metric specifies the maximum amount of time required to process a scheduled job. |
|
Average processing time |
This metric specifies the average amount of time required to process a scheduled job. |
|
Maximum wait time |
This metric specifies the maximum amount of time during which a scheduled job waits before running. |
|
Average wait time |
This metric specifies the average amount of time during which a scheduled job waits before running. |
7.2.3 View General Oracle Enterprise Scheduler Instance Information
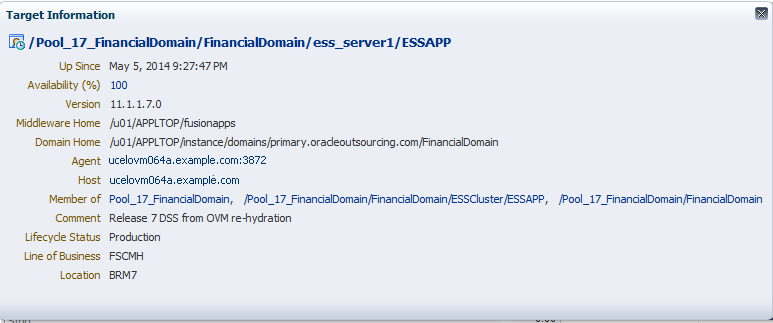
Oracle Enterprise Manager Cloud Control enables viewing information regarding the particular instance of Oracle Enterprise Scheduler. The general information window displays the locations of Oracle Fusion Middleware, the domain, and the target application; the version of Oracle Fusion Middleware currently running; and the URI of the hosting server.
To view general information about Oracle Enterprise Scheduler, from the Scheduling Service menu select Target Information.
In addition to the target name and location of the target application, information includes the following:
-
Up Since: Date the target first became available
-
Availability: The percentage of target-availability time
-
Version: The version number of Oracle Fusion Middleware
-
Middleware Home: The location of the Oracle Fusion Middleware directory
-
Domain Home: The full path of the domain
-
Agent: The Oracle Enterprise Manager agent monitoring the target
-
Host: The URI of the hosting server
-
Member of: The Oracle Enterprise Manager targets of which this target application is a member
-
Comment: The user-entered description of the target
-
Lifecycle Status: The current status of the target in the development lifecycle
-
Line of Business: The user-entered LOB value for the target
-
Location: The user-entered value for the location of the target
7.3 Monitor the Scheduler
Monitoring and tuning Oracle Enterprise Scheduler Service includes the following tasks:
-
Monitoring job activity
-
Setting metric thresholds and monitoring alerts
Consider that many administrative tasks require to be logged in to Oracle WebLogic Server Administration Console prior to performing them.
7.3.2 Monitor Oracle Enterprise Scheduler Service Activity
The main Oracle Enterprise Scheduler page displays information regarding the top 10 long running scheduled jobs and the top 10 job requests awaiting execution in two different tabs. By default, only the job requests within the current scheduling service appear. However, the scope can be changed such that all relevant scheduled jobs running on all scheduling services sharing the Oracle Enterprise Scheduler repository appear in the tabs.
Each of the Oracle Enterprise Scheduler tabs includes a table that displays a short list of top 10 long running and waiting job requests, respectively. The Show All Ready or Show All Running link at the bottom of the region goes to a search page in which it is possible to search for a more comprehensive list of relevant job requests.
Each tab displays the following information about scheduled job requests:
-
Request ID: The ID associated with the job request.
-
Run Time/Wait Time: The period during which the job request has been running or awaiting execution, respectively.
-
Job Definition: The job definition associated with the job request.
-
Submitted by: The name of the user who submitted the job request.
-
Application: The name of the application with which the job request is associated.
-
Execution Type: The category of job being executed—Java, SQL, or process job.
-
Description: An optional description of the scheduled job request.
Oracle Enterprise Scheduler can also monitor job requests related to a product. For more information about viewing the top scheduled job requests related to a product, see Check Key Performance Indicators.
7.3.2.1 View the Top 10 Long Running Oracle Enterprise Scheduler Requests
Use the Top 10 Long Running Job Requests tab to view the job requests that have been running for the longest period on the Oracle Enterprise Scheduler service. Alternatively the scope of the region can be changed to display the top 10 long running job requests on all scheduling services sharing the same repository.
The job requests that are displayed will all have a status of RUNNING.
To view the top 10 long running requests:
- From the navigation pane, expand Scheduling Services and select the Oracle Enterprise Scheduler application.
- At the top of the Oracle Enterprise Scheduler page, click the Top 10 Long Running Requests tab to display the 10 job requests that have been running the longest.
- To display all running job requests, click Show All Running at the bottom of the chart. This displays a search form that searches for all requests that are currently running. Click Search to display the requests.
7.3.2.2 View the Top 10 Oracle Enterprise Scheduler Jobs Ready to Be Executed
Use the Top 10 Ready Job Requests tab to view the job requests that are awaiting execution on the Oracle Enterprise Scheduler service. It is possible to alternatively change the scope of the region to display the top 10 ready job requests on all scheduling services sharing the same repository.
The job requests that are displayed will have a status of READY.
To view the top 10 ready job requests:
- From the navigation pane, expand Scheduling Services and select the Oracle Enterprise Scheduler application.
- At the top of the Oracle Enterprise Scheduler page, click the Top 10 Ready Requests tab to display the 10 job requests with the status
READY. - To display all ready job requests, click Show All Ready at the bottom of the chart. This displays a search form that searches for all requests with the status
READY. Click Search to display the requests.
7.3.3 Set Metric Thresholds and Monitor Alerts
Alerts are based on performance metrics for Oracle Enterprise Scheduler. Each metric includes named objects with upper and lower thresholds that indicate warning or critical states for that particular metric. For example, an alert can be configured for all job requests that have entered a state of error, such that 10 errors constitute a warning state, and 20 errors are a critical state. After configuring alerts, any existing alerts and any configuration changes made within a specified period can be viewed.
Metrics are specific to the target type. The following table lists the alerts available for Oracle Enterprise Scheduler.
Table 7-5 Oracle Enterprise Scheduler Alerts
| Alert | Scope | Collected Data | Alert Automatically Cleared? |
|---|---|---|---|
|
Alert for job requests in the ready state and the average wait time for job requests in the ready state. |
Work assignment |
The number of job requests in the ready state and the average wait time of the ready job requests, by work assignment. |
No. The alert is only cleared when the number of ready job requests is smaller than the threshold. The same is true for alerts pertaining to the average wait time of a ready job request. |
|
Alert for job requests that are in an error state. |
Work assignment |
The number of job requests that are in an error state following the last collection. |
Yes. The alert is automatically cleared if the change in value of the subsequent collection is below the threshold. |
|
Alert for long running job requests. |
Job definition |
The longest running time of a job request listed by job definition. The data is queried for only those job definitions for which a threshold is specified. |
No. The alert is only cleared when a job request runs for the job definition beyond the threshold value. |
|
Alert for job requests that are in the |
Scheduling service |
The number of job requests in the |
No. An administrator must recover the job request to clear the alert. |
|
Alert for timed out job requests. |
Scheduling service |
The number of timed out job requests. |
No. An administrator must cancel or recover the job request to clear the alert. |
|
Alert for job requests that are in the |
Scheduling service |
The number of job requests that are in the |
Yes. The alert automatically clears if the change in value in the subsequent collection is below the threshold. |
|
Alert for blocked job requests. |
Scheduling service |
The number of job requests in the |
No. An administrator must cancel the job request, or the job request must be selected for processing to clear the alert. |
The thresholds can be configured for each object monitored by the metric, along with alert rules for a metric as follows:
-
Select an object that the metric monitors, such as job requests in a state of error.
-
Configure the values at which the object reaches warning and critical states, including an operator value such as greater than (>) or less than (<).
-
Enter a corrective action to be taken when the alert criteria are fulfilled.
-
Arrange the alert rules in the desired order.
There are two types of metrics:
-
Single component (single Edit pencil): The metric is comprised of only one component, or measure
-
Composite (multiple Edit pencils): The metric is comprised of multiple individual metrics
Figure 7-5 Edit Icons

7.3.3.1 Set Metric Thresholds
To set metric thresholds for Oracle Enterprise Scheduler, do the following:
-
Go to the scheduling service.
-
From the Targets menu, select Fusion Applications.
-
In the table on the Fusion Applications page, click the relevant Oracle Fusion Applications instance with Oracle Enterprise Scheduler deployed.
-
In the Target Navigation pane, click the name of the domain where Oracle Enterprise Scheduler is deployed, and then click Scheduling Services.
-
-
Click the Oracle Enterprise Scheduler cluster or an individual Oracle Enterprise Scheduler server.
-
From the Scheduling Service or Scheduling Service Group menu, select Monitoring, and then click Metric and Collection Settings.
-
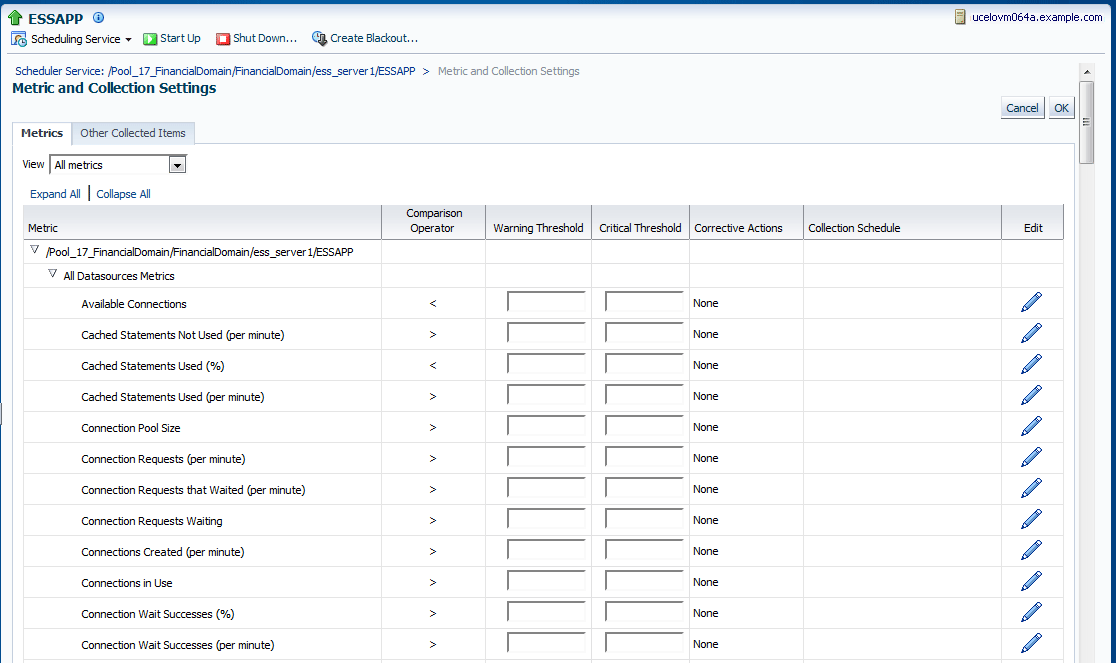
To view all metrics, from the View drop-down list, select All metrics.
A list of metrics appears.
Figure 7-6 Metric and Collection Settings Page
-
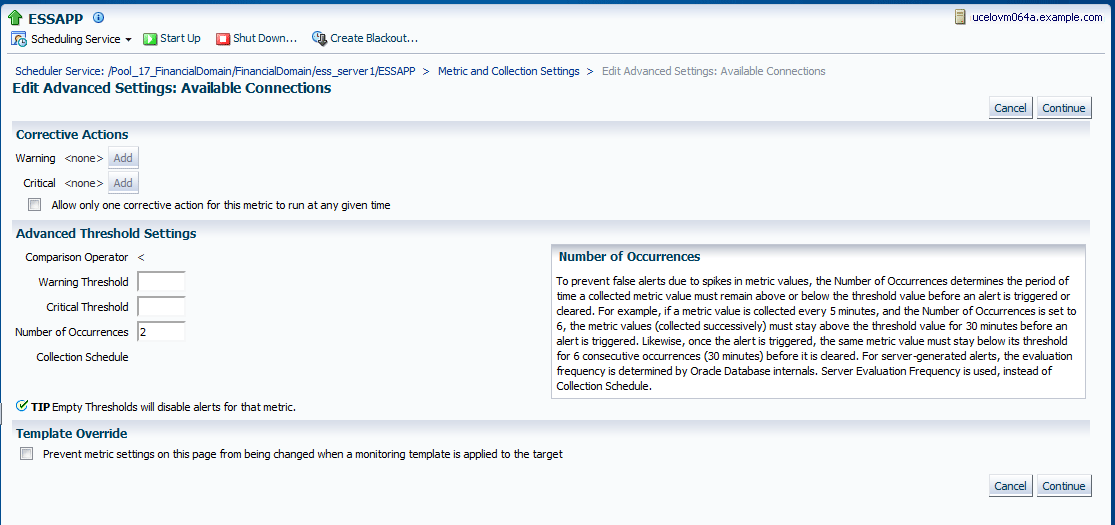
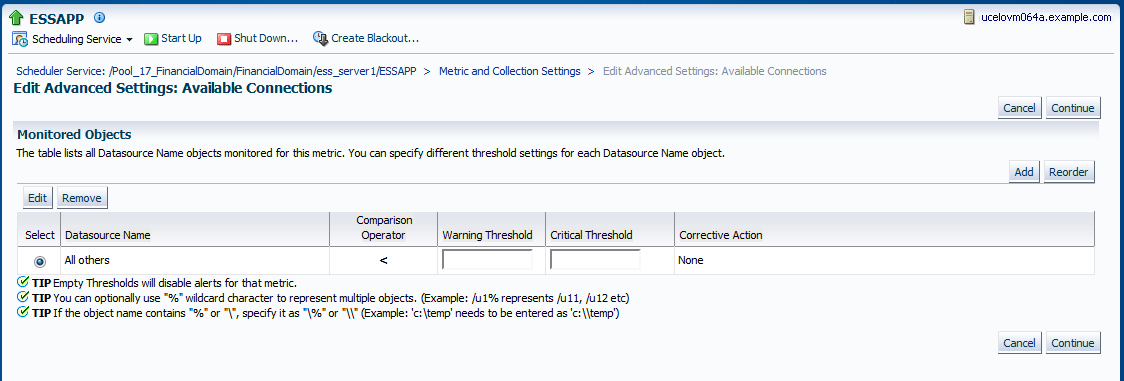
Click a metric's Edit icon to configure alert thresholds for that metric. For example, the thresholds can be configured for the Available Connections metric.
Clicking the single-pencil icon displays the Edit Advanced Settings page for a single-component metric.
Clicking the multiple-pencil icon displays the Edit Advanced Settings page for a composite metric, which includes the Monitored Objects list.
For more information about setting metric thresholds, see Check Metrics and Change Metric Thresholds.
For more information about configuring alerts, see the following topics in the Cloud Control online help:
-
Incident Rules—Common Tasks
-
Incident Rules—Advanced Tasks
7.3.3.2 View Oracle Enterprise Scheduler Alerts
The Oracle Enterprise Scheduler Service home page displays a summary of alerts. Go to the Incident Manager page to view additional information about incidents by clicking the number of incidents that appear in the Monitoring and Diagnostics area.
To view alerts for Oracle Enterprise Scheduler with Cloud Control:
-
Go to the scheduling service.
-
From the Targets menu, select Fusion Applications.
-
In the table on the Fusion Applications page, click the relevant Oracle Fusion Applications instance with Oracle Enterprise Scheduler deployed.
-
In the Target Navigation pane, click the name of the domain where Oracle Enterprise Scheduler is deployed, and then click Scheduling Services.
-
-
Click the Oracle Enterprise Scheduler cluster or an individual Oracle Enterprise Scheduler server.
The Scheduling Service summary page appears. The Monitoring and Diagnostics pane displays the following information.
-
Incidents: The number of incidents that occurred in the scheduling service instance appears here. The number of incidents is determined by those incidents collected due to configuring job request alerts. If the number of incidents is greater than zero, click the number for more information about the incidents that have occurred.
-
To access the Incident Manager, from the Scheduling Service or Scheduling Service Group main menu, go to Monitoring, and then Incident Manage.
-
The Incident Manager displays incidents in a table, with the following information listed for each incident: severity, summary, target, priority, status, last updated, owner, acknowledged, escalated, type, and category.
-
Click an incident to display its details.
-
-
Descendant Target Incidents: The number of incidents that occurred anywhere in the scheduling service cluster appears here. If the number of incidents is greater than zero, click the number for more information about the incidents that have occurred.
-
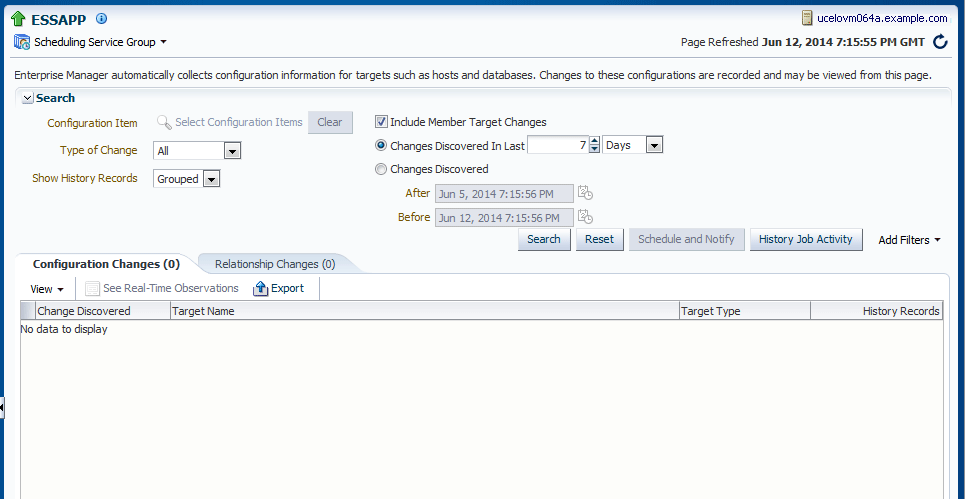
Configuration Changes: The number of changes that were made to alert configurations appears here. Click the number of configuration changes to search for the changes made within a particular period. The default period is 7 days.
For more information, see Search for Configuration Changes.
-
The following documents provide additional information:
-
For more information about using Incident Manager to view common tasks, see topic Incident Manager—Common Tasks in the Cloud Control online help.
-
For more information about using Incident Manager to view advanced tasks, see topic Incident Manager—Advanced Tasks in the Cloud Control online help.
7.4 Manage Oracle Enterprise Scheduler
The administrator may be required to perform any or all of the following tasks:
-
Stop and start Oracle Enterprise Scheduler processes.
-
Manage job traffic.
-
Manage purge policies.
-
Manage schedules.
-
Manage job incompatibilities.
-
Manage Oracle Enterprise Scheduler using Oracle WebLogic Scripting Tool (WLST) commands.
-
Expand an Oracle Enterprise Scheduler cluster.
-
Configure a request processer and a request dispatcher.
Consider that many administrative tasks require that you log in to Oracle WebLogic Server Administration Console before performing them.
7.4.1 Stop and Start Oracle Enterprise Scheduler Processes
Because it can interrupt any processes that are currently running, shutting down an Oracle Enterprise Scheduler instance or component is not recommended. However, if an Oracle Enterprise Scheduler instance or component must be shut down, do not use the Stop button in the Cloud Control Console. Instead, manually quiesce the server to bring it down gracefully.
Quiescing involves temporarily disabling any processes that are currently running. This ensures that no running job requests are interrupted or get stuck or accumulate in the queue.
To manually quiesce, do the following:
-
From the navigation pane, expand the Scheduling Services folder, and select the Oracle Enterprise Scheduler application.
-
From the Scheduling Services menu, first select Request Processor, and then select Stop.
-
At the confirmation prompt, click OK.
To manually unquiesce, do the following:
- From the navigation pane, expand the Scheduling Services folder, and select the Oracle Enterprise Scheduler application.
- From the Scheduling Services menu, select Request Processor, and then select Start.
7.4.2 Manage Job Traffic
When job traffic is managed in Cloud Control, it is possible to determine what kinds of Oracle Enterprise Scheduler job requests to process, when to process them, and how to allocate the resources they require to be processed. Performing these tasks is known as work allocation.
A work assignment consists of the rules, called specialization rules, that define restrictions on which jobs can be processed. A workshift defines when the jobs can be processed and what resources can be used during those periods. The resources defined in a workshift include threads, which are a local resource of the request processor, and asynchronous workers, a global resource. The number of asynchronous workers can be specified to balance the use of a shared global resource, such as database jobs.
By default, there are no automatic work assignments. Subsequently, the request processor accepts any ready job request. This behavior is similar to using a request processor with no specialization rules and a workshift of 24x7 duration. In addition, all configured threads are used and there are no limits on the number of asynchronous jobs.
Managing job traffic involves the following tasks:
-
Managing work assignments
-
Managing workshifts
Schedules for work allocations can also be created and managed. For more information, see Manage Schedules.
7.4.2.1 Manage Work Assignments
Work assignments provide the following controls to process job requests:
-
At runtime, work assignments can be bound to a request processor and can limit the period during which job requests of a certain type can be processed.
-
At runtime, the request processor can be configured to limit the threads that are available to process all job requests.
Determine Active Work Assignments
A bound work assignment is active if it is enabled, has an active workshift and the enabled flag is set on the work assignment definition. A workshift is active if it has an allocation greater than zero and includes a current schedule (where the current time is within a time window defined by the schedule and duration), or the workshift is a 24x7 workshift. If there are no bound work assignments on the server, then the default work assignment will be active using all threads and having no limits on asynchronous workers.
Only one workshift can be active for a given work assignment at any point. If a work assignment has more than one active workshift, then Oracle Enterprise Scheduler chooses the most specific of these to be the actual active workshift. The most specific workshift is the one that ends soonest, or, given two workshifts that ended at the same time, the workshift that started most recently.
Determine Work Assignment Thread Allocation
An active work assignment is assigned the thread allocation specified by the active workshift unless the total number of threads needed to satisfy the allocations of all active work assignments exceeds the configured thread count. In this case, Oracle Enterprise Scheduler weighs the thread allocation against the percentage of threads allotted to the workshift out of the total number of thread allocations for all work assignments.
For example, suppose work assignment 1 has a thread allocation of 70, work assignment 2 has a thread allocation of 30, and there are 20 processor threads configured. The total desired allocation is 100, so the weight for work assignment 1 is 70 percent while the weight for work assignment 2 is 30 percent. Oracle Enterprise Scheduler allocates 14 threads to work assignment 1 and 6 threads to work assignment 2.
If the default work assignment is active, the number of threads allocated to the work assignment is equal to the configured thread count.
Each active work assignment is assigned at least one thread.
Process Active Work Assignments
After determining work assignments and thread allocations, Oracle Enterprise Scheduler begins a thread pool for each active work assignment. The threads are responsible for processing job requests that are specialized to the work assignment, except for requests that are specialized to an exclusive work assignment. The exclusion is effective for all work assignments, including the default work assignment. If an exclusive work assignment is bound to any server in the group, no other work assignment can process job requests specialized to that exclusive work assignment.
All work assignments bound in exclusive mode are excluded, including disabled work assignments. Exclusive bindings apply even if the server to which they are bound is unavailable. An exclusive work assignment must be unbind if it will not be excluded.
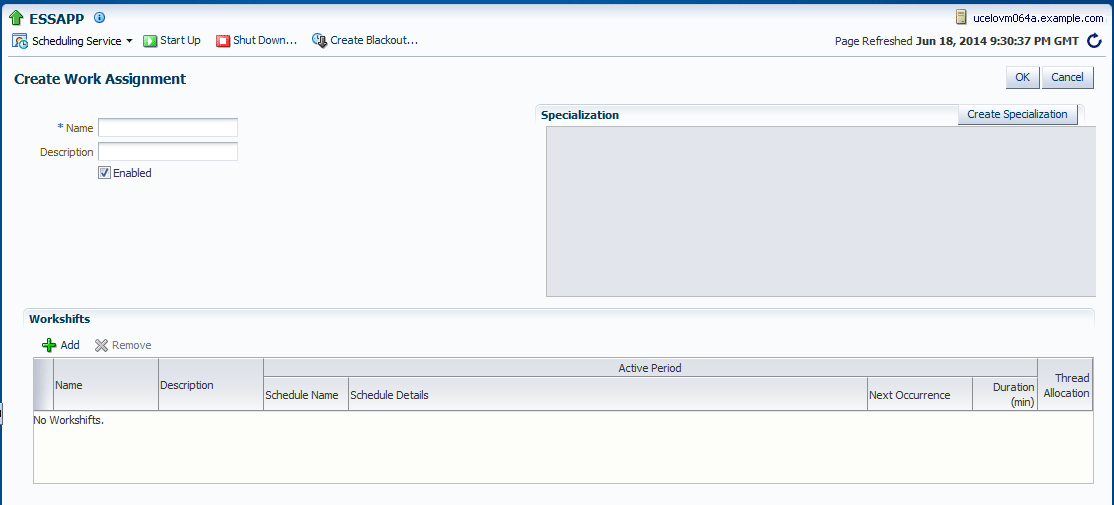
7.4.2.1.1 Create or Edit a Work Assignment
The combination of work assignment controls, including specialization rules and workshifts, gives the possibility to select the kinds of job requests to be processed and decide how to allocate the request processor resources. For example, two workshifts can be defined : a day shift and a night shift to allocate processing for these periods. The day shift could have more resources allocated for a peak usage period, while the night shift could provide a different mix for its resource allocation.
By default, no work assignments are bound to a request processor and the request processor processes any ready job request. The default behavior is similar to using a request processor with no specialization rules and a workshift of 24x7 duration, all configured threads are used, and there are no limits on the number of asynchronous jobs.
The following table shows the properties that can be defined for specialization rules.
Table 7-6 Specialization Properties Available for Specialization Rules
| Specialization Property | Description |
|---|---|
|
Application |
Specifies the name of the application associated with a job request |
|
Product |
Specifies the name of the product within an application |
|
Submitted By |
Specifies a user who submitted a job request |
|
Job Definition |
Specifies a specific job request name |
|
Request Category |
Specifies labels defined by the system administrator allowing administrators to group job requests for specific needs. Multiple labels separated by a delimiter can be included. |
The following operators can be used to join the conditions of a rule: AND, OR (both of type binary), CONTAINS and NOT (unary). The following are sample specialization rules that can be used in a work assignment.
application = 'EssDemoApp' AND (definition = 'JobDefinition://mypackage/
Job_essdemo1' OR definition = 'JobDefinition://mypackage/LongRunningJob')

requestCategory ='Priority'

user = 'sam'
(requestCategory ='LongRunning') AND NOT (definition = 'JobDefinition:
//mypackage/LongRunningJob')
If a job request is specialized to two different work assignments, then either of those work assignments can process the job request depending on resource availability. Similarly, if the same work assignment is bound to two different servers, then either server may process the job request. In fact, different stages of the same request can be processed on different servers, such as preprocessing on one server and job execution on another server.
Note that the requestCategory value can be several label terms separated by a comma. In this way labels that mimic the behavior of tags can be specified, with specializations based on combinations of labels.
For example, the following labels could be defined :
",NODE1,CRITICAL,"
",NODE1,STANDARD,"
",NODE1,IMPORTANT,"
Assuming the preceding labels, a requestCategory expression such as the following examples could be written:
(requestCategory contains ',NODE1,') AND (requestCategory contains ',CRITICAL,')

(requestCategory contains ',STANDARD,') OR (requestCategory contains
',IMPORTANT,') OR (requestCategory contains ',CRITICAL,')
If commas are used to delimit terms, every separate label term must be enclosed with the comma on both sides, as shown in the previous examples. The requestCategory expression must specify the full term including the commas to ensure that the expression does not select another term that contains the specified one.
To create or edit a work assignment, do the following:
When editing a work assignment, the following tasks can be performed:
-
Change the work assignment's description.
-
Change the specialization rules.
-
Add a workshift or remove an existing one.
7.4.2.2 Manage Workshifts
A workshift indicates the operating, active times for a request processor. Specifically, a workshift defines a sequence of temporal windows in which resources or threads are made available for processing job requests. When a work assignment is bound to a request processor, one or more workshifts are associated with the work assignment. At runtime, Oracle Enterprise Scheduler determines the resource allocation for the workshifts within the work assignment.
Different amounts of resources can be used during different periods of time by using multiple workshifts, each with a different time window and resource limits. For example, a daytime workshift that starts at 8 a.m. and has the daytime thread allocation and asynchronous job limits can be created; and a nighttime workshift that starts at 6 p.m. and has the nighttime thread allocation and asynchronous job limits can also be created.
Note that workshifts can overlap, but Oracle Enterprise Scheduler chooses one workshift as the current workshift.
While there is at most one active workshift for a given work assignment, there may still be active requests for a workshift that is no longer active. This can happen if a request runs beyond the defined operating window for the workshift it started running in, for example, if a request started running while the daytime workshift was active and that request is still running when the nighttime workshift starts. Oracle Enterprise Scheduler uses the limits of the active workshift and accounts for all active requests that started during any workshift in the work assignment. If the number of active requests exceeds the limit, no more requests are run until the number of active requests drops below the limit.
A workshift defines the following resources:
-
Thread allocation
-
Asynchronous job limits for asynchronous Java and PL/SQL jobs
Thread allocation specifies the number of threads that can be used by the request processor. These threads are used to perform local tasks, including processing synchronous jobs, initiating and finalizing asynchronous jobs, preprocessing and postprocessing of job requests and updating events. When the workshift in a work assignment is active, each request processor for the work assignment can use the specified number of threads. For example, suppose a work assignment includes a 24x7 workshift with a thread allocation of 15. If that work assignment were bound to three request processors, each request processor could use 15 threads, for a total of 45 threads across all three servers.
Asynchronous jobs, PL/SQL jobs, and asynchronous Java jobs use a global resource that must be shared across the entire system. The workshift can specify limits on the number of PL/SQL jobs and asynchronous Java jobs that can be active for the work assignment. This limit applies across all request processors for the work assignment in the entire system, for example, suppose a work assignment includes a 24x7 workshift with a PL/SQL job limit of 10. If that work assignment were bound to three request processors, all three request processors share the 10 PL/SQL asynchronous workers, for a maximum of 10 PL/SQL jobs active for that work assignment.
An asynchronous job reserves and holds an asynchronous worker before preprocessing starts and through finalization. In the case of preprocess delay, the asynchronous worker is released during the delay and reserved when the delay ends. A request that submits a subrequest and pauses, releases its asynchronous worker and the asynchronous worker is reserved when the request is resumed. A blocked request does not hold an asynchronous worker.
When deciding on thread allocation and asynchronous job limits for a workshift, take note of the types of jobs specialized to the work assignment where the workshift is to be used.
7.4.2.2.1 Create or Edit a Workshift
To create or edit a workshift, complete the following steps:
-
From the navigation pane, expand the Scheduling Services folder, and select the Oracle Enterprise Scheduler application.
-
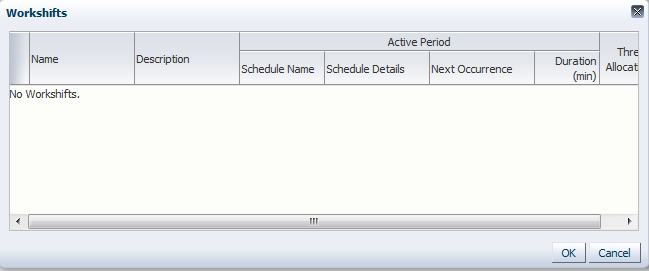
From the Scheduling Services menu, select Work Allocation, and then select Workshifts.
The Workshifts page displays.
-
Click Create (or highlight an existing workshift and click Edit).
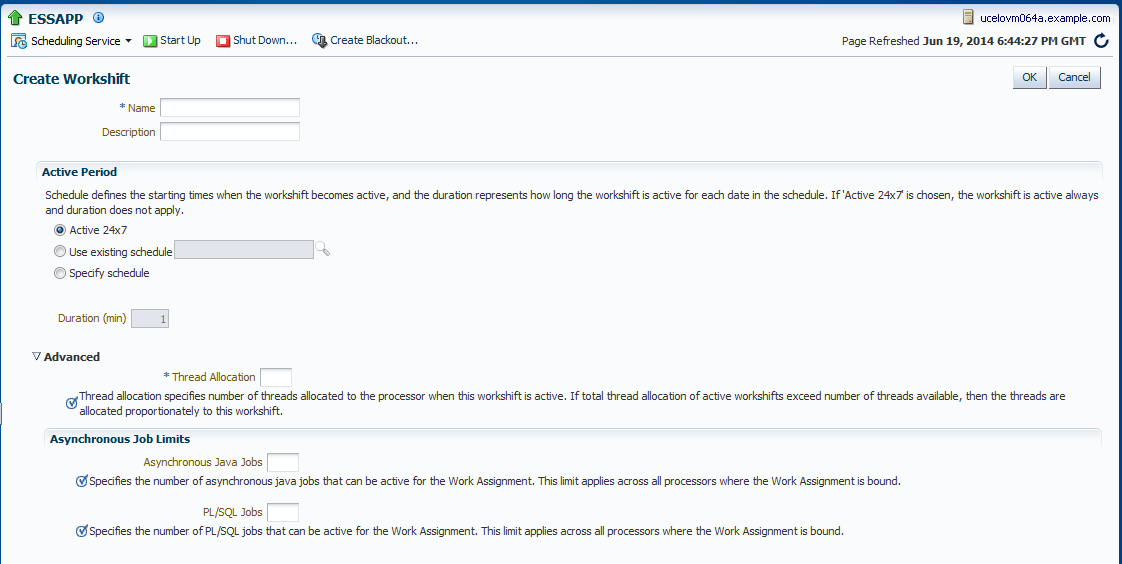
The Create (or Edit) Workshift page displays.
-
Enter the following information for the workshift.
-
Name: Enter a name for the workshift
-
Description: Enter a description for the workshift
-
-
In the Active Period section, select one of the following activation periods for the workshift.
-
Active 24x7: Select this option to always enable the workshift. Selecting this option disables the Duration text field.
-
Use existing schedule: Select this option to enable the workshift using a schedule previously created. Click the Browse button to display the Select Schedule window and search for the schedule using the Name and Package fields.
In the Duration text field, enter the duration of the workshift in minutes.
-
Specify schedule: Select this option to create a schedule for the workshift. Enter a name and description for the schedule in the text fields provided.
Choose a frequency from the Frequency drop-down list. Different options are presented based on which frequency item is chosen.
In the Start Date field, click the Calendar button to select a date and time.
From the Time Zone drop-down list, select a time zone for the schedule.
(Optional) Select Use End Date, and in the End Date field, click the Calendar button to select a date and time.
In the Duration text field, enter the duration of the workshift in minutes.
-
-
Expand the Advanced region. Specify the thread allocation and the asynchronous job limits.
-
In the Thread Allocation field, enter the number of threads to be allocated to the processor when the workshift is active. If the total thread allocation of the active workshifts exceeds the number of available threads, then the threads are allocated proportionately to this workshift.
-
In the Asynchronous Job Limits region, enter the number of asynchronous Java and PL/SQL jobs that can be active for the work assignment. This limit applies to all processors to which the work assignment is bound.
-
-
To save the workshift, click OK.
7.4.3 Manage Purge Policies
Purge policies enable the scheduling service to remove scheduled jobs according to specified criteria. For example, a purge policy might specify the retention of all Java job requests using a particular job definition submitted by an application for 3 days. Another purge policy might retain a particular type of job request, for example, all SQL job requests in a successful state, for only 1 day. The frequency at which the purge policy is to run can also be specified. For information about creating schedules for purge policies, see Manage Schedules.
7.4.3.1 View Purge Policies
All the purge policies defined for the scheduling service can be viewed.
To display the purge policies for the scheduling service:
- From the navigation pane, expand the Scheduling Services folder, and select the Oracle Enterprise Scheduler application.
- From the Scheduling Services menu, select Purge Policies.
7.4.3.2 Set Up a New Purge Policy
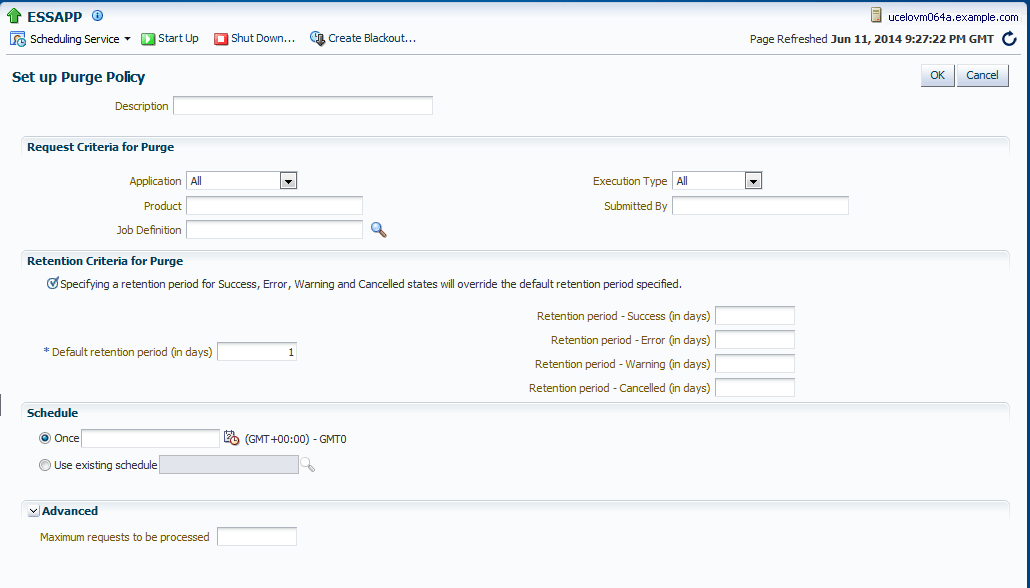
A purge policy determines which job requests are to be purged and which are to be retained. Defining a purge policy involves:
-
Selecting the jobs to be purged: Selection criteria include the related application or product, a particular job definition or job type, the job submitter, or a maximum number of requests.
-
Specifying retention criteria: Decide how long job requests are to be retained depending on their status.
-
Specifying purge frequency: Decide how often the purge policy will run.
After a purge policy has run, the purged job requests must be physically deleted from the database. For more information, see Purge Job Requests from the Database.
To set up a new purge policy, do the following:
7.4.3.3 Update a Purge Policy
The request or retention criteria of an existing purge policy can be edited, as well as the purge policy schedule.
To update a purge policy, complete the following steps:
- From the navigation pane, expand the Scheduling Services folder and select the Oracle Enterprise Scheduler application.
- From the Scheduling Service menu, select Purge Policies.
- From the Purge Policies table, select the policy to be updated and click Update.
- Edit the purge policy accordingly and click OK.
7.4.3.4 Delete a Purge Policy
A purge policy can be deleted.
To delete a purge policy:
- From the navigation pane, expand the Scheduling Services folder, and select the Oracle Enterprise Scheduler application.
- From the Scheduling Service menu, select Purge Policies.
- From the Purge Policies table, select the policy to be deleted and click Delete.
7.4.3.5 Purge Job Requests from the Database
Job request data is kept in the Oracle Enterprise Scheduler runtime store as records in the run-time store tables. These job request records are kept in the runtime store until they are physically purged by a database administrator using SQL purge scripts. A job request must be logically deleted before physically purging it.
Use the method esspurge.purge_requests on the Oracle Enterprise Scheduler schema to delete purged job requests from the database. In an Oracle Fusion Applications environment, the schema is typically called FUSION_ORA_ESS.
The ESSPURGE package contains a stored procedure that can be used to purge completed job requests. The package is usually loaded when the Oracle Enterprise Scheduler schema is created or updated. The stored procedure is shown in the following example.
Example 7-1 ESSPURGE Stored Procedure for Purging Completed Job Requests
--- Purges job requests that have completed.
---
--- p_older_than : Purge only job requests that have completed after this time.
--- p_max_count : The maximum number of job requests to purge.
--- p_max_runtime : The maximum time, in minutes, the purge should run.
---    If null (default), this defaults to one day which effectively means
---    there is no time limit.
---
procedure purge_requests
( p_older_than in timestamp,
  p_max_count in number,
  p_max_runtime integer default null );
The basic syntax of esspurge.purge_requests is shown in the following example, where FUSION_ORA_ESS is the name of the Oracle Enterprise Scheduler schema and password is the password.
Example 7-2 Purge Job Requests from the Database
sqlplus FUSION_ORA_ESS/password
set serveroutput on size unlimited
set timing on
execute esspurge.purge_requests(systimestamp, 1000000);
The following are additional examples:
-
To purge job requests completed earlier than the current time, at a maximum of 50,000 job requests, execute the following command:
execute esspurge.purge_requests(systimestamp, 50000);
-
To purge job requests completed 30 days earlier, at a maximum of 50,000 job requests, execute the following command:
execute esspurge.purge_requests(systimestamp - 30, 50000);
-
To purge job requests that completed before June 01, 2010 at 15:00:00 (UTC), at a maximum of 50,000 job requests, execute the following command:
execute esspurge.purge_requests(TIMESTAMP '2010-06-01 15:00:00 -00:00', 50000);
7.4.4 Manage Schedules
Schedules are used to configure the start times, end times, and frequency of work allocations, purge policies, and job submissions.
For example, a list of job-submission schedules from which business users can select the one that best suits them might need to be created. (Business users also can dynamically specify a schedule when submitting a job. They cannot, however, create and save schedules.)
7.4.4.1 Create a Schedule
A schedule specifies a predefined time or recurrence for execution. Work allocation and purge policy schedules are defined separately from job schedules. A job schedule can be associated with one or more jobs.
To create a schedule:
7.4.5 Manage Incompatibilities
An Oracle Enterprise Scheduler incompatibility specifies which job definitions are not compatible with other job definitions. At runtime, when job definitions are specified in an incompatibility, any job requests associated with the job definitions that are not compatible cannot run simultaneously.
As an example, a performance that resulted from job conflicts might be detected. This situation might arise if the same job was scheduled to run at the same time. The administrator, can create an incompatibility specifying that only one instance of this job can run at a time.
An incompatibility defines either a global incompatibility or a domain-specific, property-based incompatibility.
7.4.5.1 View Incompatibilities
The Incompatibilities page displays information about incompatibilities including the name, the Java package associated with an incompatibility, and a description of the incompatibility.
To view job incompatibilities, do the following:
7.4.5.2 Create or Edit an Incompatibility
An incompatibility consists of two or more job definitions configured as incompatible and the resource over which they need to be incompatible. A resource is not specified for a global incompatibility. This resource is represented by the property name that forms the incompatibility. The property name might be different across job definitions. For example, if two job definitions, JobA and JobB, are made incompatible, then the property identified for incompatibility might have different names in JobA and JobB.
-
Domain-specific
Two or more job definitions are marked as incompatible within the scope of a resource, where the resource is identified by a system property name or a user-defined parameter name. An incompatibility specifies two or more incompatible entities where each entity consists of a job definition, or a job set definition and a property name that represents the resource over which the entities are not compatible. Each entity can use the same property name or a different property name. A property-based incompatibility is used when the incompatible entities are incompatible over a property. For property-based incompatibility, a job definition or a job set and a property name must be specified for each entity. Oracle Enterprise Scheduler ensures that requests for the incompatible jobs or job sets, with a property that has the same property value, do not run at the same time.
-
Global
Two or more job definitions cannot run together at one time. A global incompatibility is used when the incompatible entities are not to be run at the same time regardless of any property. For global incompatibility, only the job definition or job set is specified for each entity. Oracle Enterprise Scheduler ensures that requests for the incompatible jobs or job sets do not run at the same time.
Defining an incompatibility involves the following:
-
Package and scope: Select a relevant Java package to use for the incompatibility and set the scope for the incompatibility (global or domain specific).
-
Jobs: Select the jobs that are incompatible.
-
Parameters and properties: Define parameters and properties as required.
-
Access control: Define access control, as required.
7.4.5.4 Delete an Incompatibility
Deleting an incompatibility causes the incompatible job requests or job sets to become compatible again.
To delete an incompatibility:
- Search for the relevant incompatibility, as described in View Incompatibilities.
- In the Results table, select the incompatibility to be deleted, and click the Delete icon.
7.4.6 Manage Job Metadata
Oracle Enterprise Scheduler job metadata refers to the components that form the basis of scheduled job requests.
These include the following:
-
Job definition: A job definition is the smallest unit of work performed in the context of the application that executes the job. A job definition is defined by a job type, such as a Java or SQL job type.
-
Job set: A job set is a sequential or parallel set of job steps; a job step can be a single job or another job set. A job set and each of its job set steps can have additional parameters, the values for which are provided when the job or job set is submitted as a job request.
-
Incompatibility: An incompatibility makes possible to specify job definitions and job sets that cannot run concurrently.
7.4.6.1 Manage Job Definitions
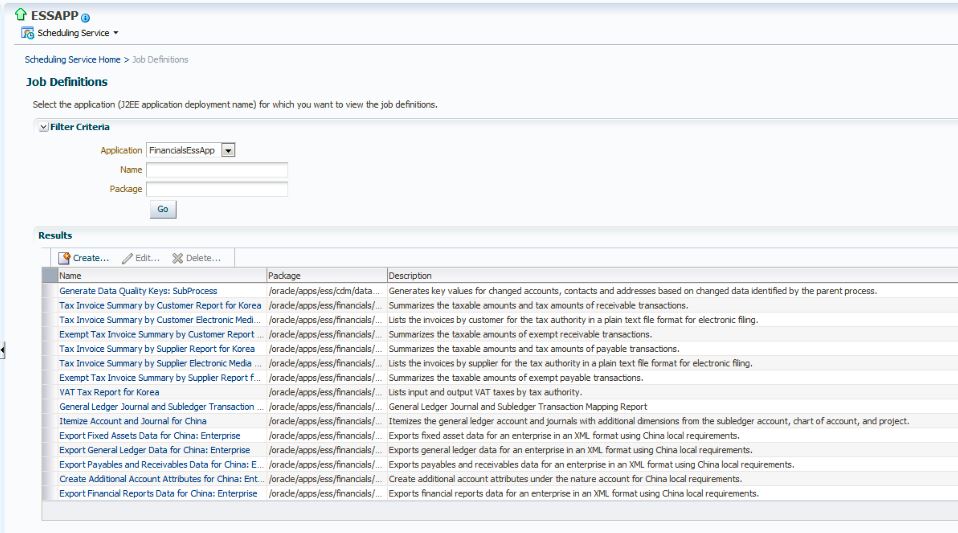
The Job Definitions page makes possible to view, create, edit, duplicate, delete, and search for job definitions.
7.4.6.1.1 View Job Definitions
The job definitions created for an application can be viewed. The table of job definitions displays information about the jobs related to an application such as the job definition name, the full path to which it is saved, the job type, and so on.
In the Job Definitions page, an asterisk appears next to those jobs in the list that were seeded, and are not custom jobs. The asterisk also appears next to seeded jobs that have been customized.
To display job definitions, complete the following steps:
7.4.6.1.2 Create Job Definitions
A new job definition can be created, which can then be used to create a job request for a particular application. The job definition includes the directory path of the job to be run, the name of the application with which the job definition is associated and the job type used for the job definition.
Additional properties can be defined for a job definition as follows:
-
System Properties: Editable or read-only parameters can be configured to be submitted to the job request.
-
Application Defined properties: Properties can be configured to be filled in by users at runtime, such as Boolean, number, and string values. Application defined properties associate parameter view objects and parameter taskflows with a particular job definition or job set. For example, an application defined property called
parameterVOcan be created and can be defined as its value the full name of the view object to be used in conjunction with the job definition. Alternatively, an application defined property calledParameterTaskFlowcan be created with the task flow ID as its value. When the job definition runs, the application defined property defined for the job definition connects the relevant view object or task flow to the job request.
To create a job definition, complete the following steps:
-
From the navigation pane, expand Scheduling Services and select the Oracle Enterprise Scheduler application.
-
From the Scheduling Services menu, select Job Metadata and then select Job Definitions.
The Job Definitions page displays.
-
From the Applications dropdown list, select the name of the UI application for which a job definition will be created.
If there are applications with similar names, be sure to select the UI application. For example, if there are applications called ProjectFinancialsApp and ProjectFinancialsESSApp. Select ProjectFinancialsApp as this is the UI application.
-
Click Create to create a new job definition.
-
For the new job definition, configure the following required properties:
-
Name: Enter a name for the job definition.
-
Display Name: Enter the name to be shown for the job definition.
-
Package: Enter the path of the job to be run.
-
Description (optional): Enter a description of the job definition.
-
Job Type: From the dropdown list, select the job type that will be used for the job definition.
-
-
(Optional). Configure parameters, application defined properties, system preferences, and access control.
-
Click Save and Close.
Configure Application-Defined Properties for a Job
If the job definition requires additional properties to be filled in by users at runtime, these properties can be added in the Application Defined Properties tab of the job definition creation user interface.
To configure application defined properties for a job definition, complete the following steps:
-
In the job definition creation user interface, click the Application Defined Properties tab.
-
Select Actions and then select New, or click the New icon.
The Create Application Defined Property dialog box appears.
-
In the Create Application Defined Property dialog box, enter the following information:
-
Name: Enter a name for the property.
-
Data Type: From the dropdown list, select a data type for the property. Data types include Boolean, Date, Number, and String.
-
Default Value: Enter a default value for the property.
-
Read Only: Select Read Only if the property will be shown only, not edited.
-
-
Click Save and Close.
Defining Parameters with Dependent Lists of Valued in Oracle Fusion Functional Setup Manager
In some cases, it is necessary to capture dependencies between interdependent parameter lists of values in the Oracle Enterprise Scheduler job definition. For example, suppose the job definition has three parameters, namely Country, State and City. In this job definition, the value of the Country parameter determines the values available in the State parameter, which in turn determines the values available in the City parameter. In this sense, the job parameters are dependent upon each other.
To define job parameters with dependent lists of values, complete the following steps:
-
Create a list of values view object with a data source and view criteria.
-
Define bind parameters for the view criteria and expose them.
-
Map the bind variable to the relevant job parameter value.
In the previous example, the City and State parameters defined in a job use the CityLovVO data source to display a list of cities in the UI. The CityLovVO data source includes a view criterion called filterByState with a bind variable called state_code. The bind variable state_code can be mapped to the value of the State parameter value such that the list of cities shown in the UI is restricted by the state selected before invoking the City list of values.
To define parameters with dependent lists of values, complete the following steps:
-
Create a job definition with parameters and a list of values view object with data source and bind variables. Be sure to mark as optional all the bind variables used for the dependent list of values view objects.
-
From the Administration menu in the global area of Oracle Fusion Applications, choose the Setup and Maintenance work area and click the All Tasks tab. Search for all tasks.
-
From the list of tasks that is displayed, select the relevant UI application that will be used to host the job definitions and parameter view objects. This Oracle Fusion application is the portlet producer application for the job.
Click the Go to Task button.
The Manage Job Definitions tab is displayed.
-
From the Manage Job Definitions tab, select the job definition to be edited and click the Edit button.
-
In the Edit Job Definition tab, click the Parameters tab and select the created parameter that is associated with a list of values.
-
Click the Manage Dependencies button to the right-hand side of the Delete button.
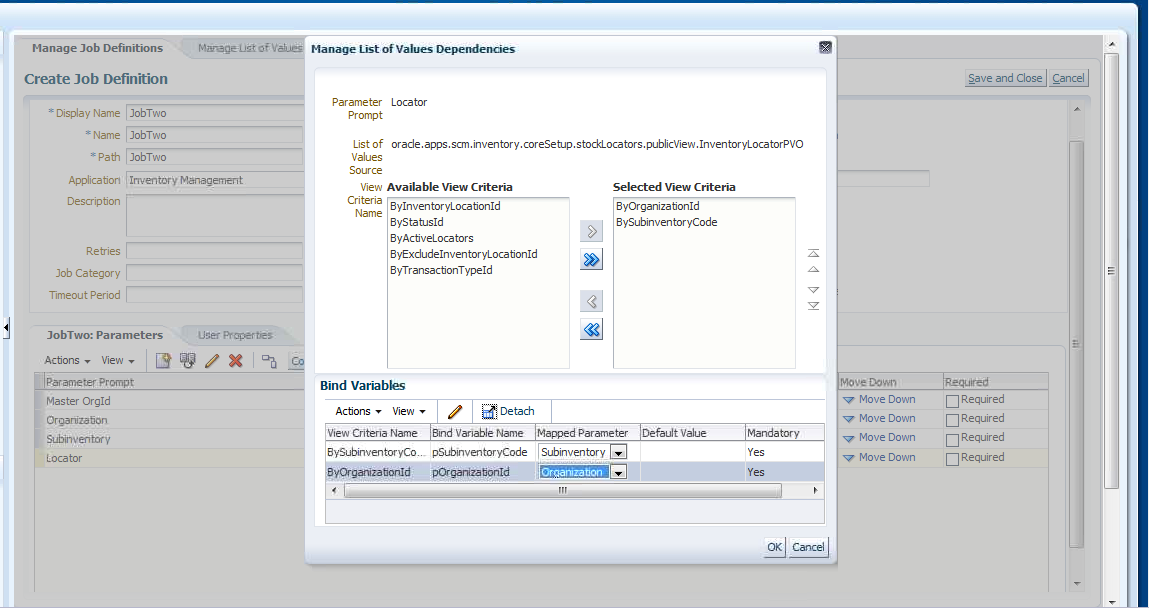
The Manage List of Values Dependencies dialog is displayed, as shown in the following figure.
Figure 7-17 Manage List of Values Dependencies Dialog
-
Bind the selected criteria to the relevant job parameters defined earlier.
-
From the Available View Criteria list, select the view criteria to be used and use the buttons to move them to the Selected View Criteria list.
-
In the Bind Variables area, for each criteria name, from the Mapped Parameter drop-down list, select the job definition parameter to which the criteria name will be mapped.
-
Click OK.
-
7.4.6.2 Manage Job Sets
The Job Sets page in Fusion Applications Control makes possible to view, create, edit, delete, and search for job sets.
A job set is a collection of job requests that can be grouped together to run as a unit. A job set can be nested, such that it may contain a collection of job requests or one or more child job sets. Each job request or job set included within a job set is called a job set step.
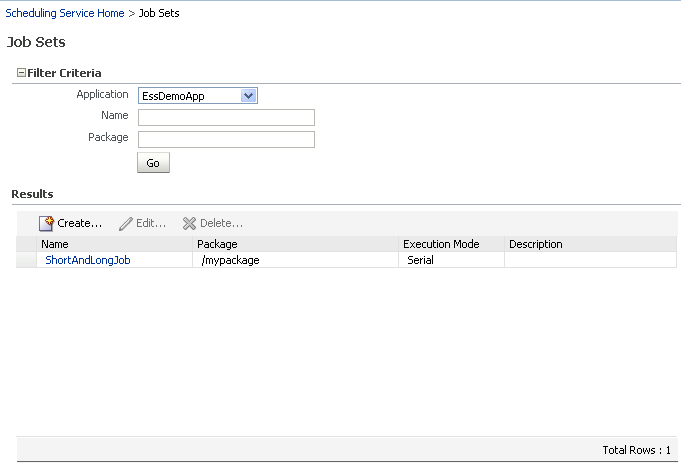
The figure that follows shows the Results table in the Job Sets page. The Results table displays job sets and their attributes, including name, package, execution mode, and description.
Figure 7-18 The Job Sets Page and Results Table
7.4.6.2.2 Create or Edit Job Sets
A job set is defined as either a serial or a parallel job set. At runtime, Oracle Enterprise Scheduler runs parallel job set steps simultaneously, in parallel. When a serial job set runs, Oracle Enterprise Scheduler runs the steps one after another in a specific sequence. Using a serial job set Oracle Enterprise Scheduler supports conditional branching between steps based on the execution status of a previous step.
For each step in a job set, an action to be taken upon completion of the step can be configured, depending on the state of the step. Parameters and system properties can also be configured for the job set, such as elevating access privileges to complete a particular job request or specifying the number of times a job can be retried in the event of a failure.
To create or edit a job set:
-
From the navigation pane, expand Scheduling Services and select the Oracle Enterprise Scheduler application.
-
From the Scheduling Services menu, select Job Metadata and then select Job Sets.
The Job Sets page appears.
-
Click Create to define a new job set, or click Edit to modify an existing job set.
-
In the Job Set field, enter the name of the job set in the field provided. A description in the Description field can be added, and the name of the relevant job set Java package in the Package field.
-
In the Job Set Steps field, select Serial or Parallel to create a serial or parallel job set.
-
Add steps as required by clicking the Add icon. Define each step.
-
In the Step tab, in the Step ID field, enter a meaningful ID for the step.
In the Job field, enter search text and click the browsing button. In the window that appears, select the job definition that to be used for this step.
-
In the Effective Application region, select Insert into main diagram or Add to list of available steps. If adding the step to the list of available steps is chosen, use the drop-down lists that appear to define an action for the possible job outcomes, namely On Success, On Error, and On Warning.
-
In the Application Defined Properties tab, click the Add icon to define any required properties and enter their initial values in the field provided. For more information about defining application defined properties, see Configure Application-Defined Properties for a Job.
-
In the System Properties tab, click the Add icon to define any system parameters required for the step.
From the Name dropdown list, select the system property to be specified. Possible system properties are shown in the table that follows.
In the Initial Value field, enter the value to be assigned to the system property.
Table 7-7 System Properties
System Property Name Description SYS_allowMultPendingThis property specifies whether multiple pending requests for the same job definition are allowed. This property has no meaning for a job set step. True or false.
SYS_applicationThis property specifies the logical name of the Scheduling Services folder application used for request processing. This property is automatically set by Oracle Enterprise Scheduler during request submission.
SYS_bizErrorExitCodeThis property specifies the process exit code for a process job request that denotes an execution business error. If this property is not specified, the system treats a process exit code of 4 as an execution business error.
This property is optional for a process job type. It is not used for other job types.
SYS_classNameThis property specifies the Java executable file for a Java job request. This is the name of a Java class that implements the
oracle.as.scheduler.Executableinterface. This property is required for a Java job type. It is not used for other job types.SYS_cmdLineThis property specifies the command line used to invoke an external program for a process job request.
This property is required for a Process job type. It is not used for other job types.
SYS_effectiveApplicationThis property specifies the logical name of the Scheduling Services folder application that will be the effective application used to process the request. A job definition, job type, or a job set step can be associated with a different application by defining the
EFFECTIVE_APPLICATIONsystem property. This property can only be specified through metadata and cannot be specified as a submission parameter.SYS_environmentVariablesThis property specifies the environment variables to be set for the spawned process of a process job request.The property value must be a comma-separated list of name value pairs (name=value) representing the environment variables to be set.
This property is optional for a Process job type. It is not used for other job types.
SYS_executePastThis property specifies whether instances of a repeating request with an execution time in the past is generated. Instances are never generated before the requested start time nor after the requested end time. To cause past instances to be generated, this property must be set to
TRUEand specify the requested start time as the initial time from which instances is generated. Note that a null requested start time defaults to the current time.Valid values for this property are:
-
TRUE: All instances specified by a schedule are generated regardless of the time of generation. -
FALSE: Instances with a scheduled execution time in the past (that is, before the time of generation) will not be generated.
Default: If this property is not specified, the system default is
TRUE.SYS_extensionListenerThis property is for internal use only.
SYS_external_idThis property specifies an identifier for an external portion of an asynchronous Java job. For example, an asynchronous Java job usually invokes a remote process and then returns control to Oracle Enterprise Scheduler. This property can be used to identify the remote process. This property is set by the job implementation of asynchronous Java jobs when the identifier is known. It is never set by Oracle Enterprise Scheduler.
SYS_groupNameThis property specifies the name of the Oracle Enterprise Scheduler isolation group to which this request is bound. This property is automatically set by Oracle Enterprise Scheduler during request submission.
SYS_inputListThis property specifies input to a job request. The input to a serial job set is forwarded as input to the first step only. The input to a parallel job set is forwarded as input to all the parallel steps.
Oracle Enterprise Scheduler imposes no format on the value of this property.
SYS_inputWorkDirectoryThis property specifies the working directory used during job request processing for input files. Oracle Enterprise Scheduler sets the value of this property during job request processing.
SYS_listenerThis property specifies the event listener class associated with the request. This is the name of a Java class that implements the
oracle.as.scheduler.EventListenerinterface.SYS_localeThis property specifies a language code to apply to the job.
SYS_logWorkDirectoryThis property specifies the logging working directory.
SYS_outputListThis property specifies output from a request.
The output of a serial job set is the
OUTPUT_LISTof the last step. The output of a parallel job set is the concatenation of theOUTPUT_LISTof all the steps, in no order, withoracle.as.scheduler.SystemProperty.OUTPUT_LIST_DELIMITERas a separator.SYS_outputWorkDirectoryThis property specifies the working directory used during job request processing for output files. Oracle Enterprise Scheduler sets the value of this property during job request processing.
SYS_postProcessThis property specifies the postprocess callout handler class. This is the name of a Java class that implements the
oracle.as.scheduler.PostProcessHandlerinterface.SYS_preProcessThis property specifies the preprocess callout handler class. This is the name of a Java class that implements the
oracle.as.scheduler.PreProcessHandlerinterface.SYS_priorityThis property specifies the request processing priority. The priority interval is [0...9] with 0 as the lowest priority and 9 as the highest.
Default: If this property is not specified, the system default value used is 4.
SYS_procedureNameThis property specifies the name of the PL/SQL stored procedure to be called for a SQL job request. The stored procedure is specified using the schema.name format.
The property is required for a SQL job type. It is not used for other job types.
SYS_productThis property specifies the product within the application that submitted the request.
SYS_redirectedOutputFileThis property specifies the file where standard output and error streams are redirected for a Process job request. This represents the full path of the log file where the standard output and error streams are redirected for the spawned process when the request is executed.
This property is optional for Process job types. It is not used for other job types.
SYS_reprocessDelayThis property specifies the callout handler processing delay time. This represents the time, in minutes, to delay request processing when a delay is requested by a callback handler.
Default: If this property is not specified, the system default used is 5. Integer type.
SYS_request_timeoutThis property enables the job request to time out.
SYS_requestCategoryThis property specifies an application-specific label for a request. The label, defined by an application or system administrator, enables administrators to group job requests according to their own specific needs.
SYS_requestedProcessorThis property specifies the request processor node on which the request is processed. This enables processor affinity to be specified for a job request. If this property is not specified, the request can run on any available request processor node. In general, this property should not be specified.
If this property is specified for a request, the request processor's work assignments
oracle.as.scheduler.WorkAssignment(specialization) must allow the execution of such requests; otherwise the request will never be executed. If the specified node is not running, the request will remain inREADYstate and will not be executed until the node is restarted.SYS_requestExpirationThis property specifies the expiration time for a request. This represents the time, in minutes, that a request will expire after its scheduled execution time. A expiration value of zero (0) means that the request never expires. If this property is not specified, the system default value used is 0.
Request expiration only applies to requests that are waiting to run. If a request waits longer than the specified expiration period, it does not run. After a request starts running, the request expiration no longer applies.
SYS_retriesThis property specifies the retry limit for a failed request. If request execution fails, the request will be retried up to the number of times specified by this property until the request succeeds. If the retry limit is zero (0), a failed request will not be retried.
If this property is not specified, the system default used is 0.
SYS_runasApplicationIDThis property enables elevating access privileges for completing a scheduled job.
Typically, a request runs as the submitting user. However, if this property is set in the metadata of the job associated with the request, then the request executes under the user identified by this property. This property can only be specified through metadata, and cannot be specified as a submission parameter.
SYS_selectStateThis property specifies whether the result state of a job set step affects the eventual state of its parent job set. For the state of a job set step to be considered when determining the state of the job set, the
SELECT_STATEmust be set totrue. IfSELECT_STATEis not specified on a job set step, the state of the step will be included in the determination of the state of the job set. The data type is Boolean.SYS_sqlJobClassThis property specifies an Oracle Enterprise Scheduler job class to be assigned to the Oracle Enterprise Scheduler job used to execute a SQL job request. This property need not be specified unless the job used for a job request is associated with a particular Oracle Database resource consumer group or has affinity to a database service.
If this property is not specified, a default Oracle Enterprise Scheduler job class is used for the job that executes the SQL request. That job class is associated with the default resource consumer group. It belongs to the default service, such that it has no service affinity and, in an Oracle RAC environment, any one of the database instances within the cluster might run the job. No additional privileges or grants are required for an Oracle Enterprise Scheduler SQL job request to use that default job class.
This property is optional for a SQL job type. It is not used for other job types.
SYS_submittingApplicationThis property specifies the logical name of the Scheduling Services folder application for the submitted (absolute parent) request. This property is automatically set by Oracle Enterprise Scheduler during request submission.
SYS_substitutionHandlersThis property has been deprecated.
SYS_successExitCodeThis property specifies the process exit code for a process job request that denotes an execution success. If this property is not specified, the system treats a process exit code of 0 as execution success.
This property is optional for a process job type. It is not used for other job types.
SYS_userFileDirThis property specifies a base directory in the file system where files, such as input and output files, may be stored for use by the request executable file.
Oracle Enterprise Scheduler supports a configuration parameter that specifies a file directory where requests can store files. At request submission, a
USER_FILE_DIRproperty is automatically added for the request if the configuration parameter is currently set andUSER_FILE_DIRproperty was not specified for the request. If the property is added, it will be initialized to the value of the configuration parameter. The property will not be added if the configuration parameter is not set at the time of the request submission.SYS_userNameThis property specifies the name of the user used to execute the request. Typically, this is the submitting user, unless the
RUNAS_APPLICATIONIDproperty was set in the job metadata. This property is automatically set by Oracle Enterprise Scheduler during the request submission.SYS_warningExitCodeThis property specifies the process exit code for a process job request that denotes an execution warning. If this property is not specified, the system treats a process exit code of 3 as an execution warning.
This property is optional for a Process job type. It is not used for other job types.
SYS_workDirectoryRootThis property specifies the working directory for the spawned process of a Process job request.
This property is optional for a Process job type. It is not used for other job types.
-
-
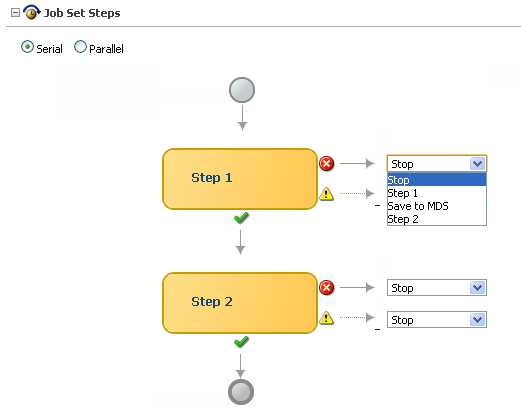
If the step was configured as a serial step, it appears in the job set flow diagram. Configure the action to be taken upon reaching the error and warning states, respectively. From the dropdown list for the error and warning icons, select Stop or the name of the job definition to run upon reaching an error or warning state.
-
-
Continue to define steps as required for the job set.
-
Define application defined properties and system properties as required towards the bottom of the job set window.
These properties apply to the job set as a whole, as opposed to the properties configured earlier on the page that apply to specific steps in the job set.
-
Configure access control for the job set.
-
In the Access Control section of the Create Job Set page, click the Add icon to add access control to the job set.
The Add Access Control dialog box appears.
-
From the Role drop-down list, select the name of the role to be applied to the job set. The role defines the users with sufficient permissions to access the job set.
-
Select the actions to allow role members to take: Read, Execute, Update and then, Delete.
-
-
Click OK to save the job set.
7.4.6.2.3 Delete Job Sets
To delete a job set, complete the following steps:
- Search for the relevant job set, as described in View Job Sets.
- In the Results table, select the job set to be deleted, and click the Delete icon.
7.4.7 Manage Oracle Application Development Framework Connections
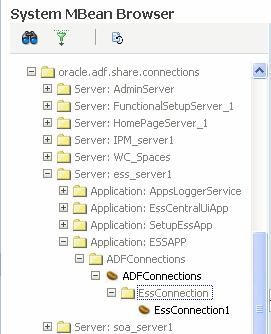
The ADF Connections Configuration page makes possible to create connections to services such as Oracle ADF Business Components services, Oracle Business Activity Monitoring, Oracle Enterprise Scheduler, URLs, and web services.
The figure that follows shows the ADF Connections Configuration page.
Figure 7-19 The ADF Connections Configuration Page
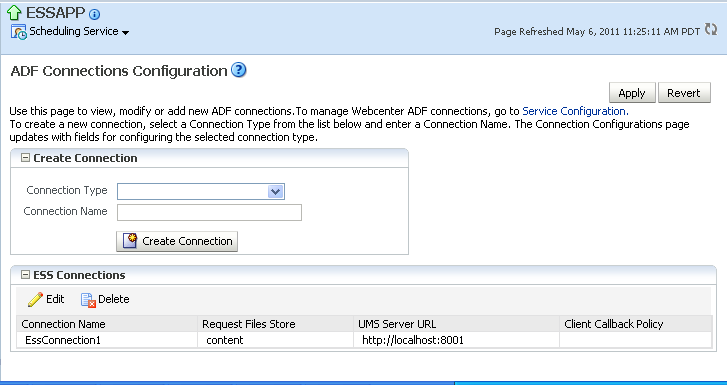
Use the ADF Connections Configuration page to configure the following properties for Oracle Enterprise Scheduler:
-
Request Files Store (RequestFileDirectory): From the drop-down list, select File System or Content Repository to store job request logs to the file system or a repository. This property is used for job requests submitted by Oracle ADF applications.
Ensure that the
requestFileDirectoryproperty is not configured to any location under the directory/tmpwhen running on a Linux server. When restarting the computer, the operating system may delete files from the/tmpdirectory, thus losing any related Oracle Enterprise Scheduler information stored there. -
Request Files Location: Configure this property to indicate the path of the folder to which job request logs are to be written. This property appears only when selecting File System from the Request Files Store drop-down list.
-
UMS Server URL (NotificationServiceURL): Configure this property when using the notification service with Oracle Enterprise Scheduler. Set the URL of this property to that of the UMS Server NotificationServiceURL.
-
SAML Token Policy (SAMLTokenPolicyURI): Set this property to the URI of the SAML policy used to secure job requests submitted by Oracle ADF applications.
-
Client Callback Policy (EssCallbackClientSecurityPolicyURI): Configure this property to enable the security policy used in the
WS-Securityheaders for web service invocations from Oracle Enterprise Scheduler for web service callbacks.
ADF connections can be managed in Fusion Applications Control only.
7.4.8 Manage Oracle Enterprise Scheduler Using Oracle WebLogic Scripting Tool Commands
Oracle Enterprise Scheduler applications, job requests, and parameters can be managed using customized Oracle WebLogic Scripting Tool commands.
For a list of commands, their syntax, and samples, see section Oracle Enterprise Scheduler Custom WLST Commands in WLST Command Reference for WebLogic Server.
7.4.9 Expand an Oracle Enterprise Scheduler Cluster
An Oracle Enterprise Scheduler cluster is created when the Oracle WebLogic Server domain is created. Expanding the cluster to handle a larger load may be required. New cluster nodes can be added to an Oracle Enterprise Scheduler cluster from the Oracle WebLogic Server Console.
When a new server is added to an existing cluster, the new server may not be needed to immediately start processing requests in the default work assignment. This could be the case if all other servers have work assignments bound in standard mode. If at least one of the running servers is using the default work assignment, however, this implies that the present work allocation is compatible with a server using the default work assignment.
Oracle Enterprise Scheduler provides protection for a new server so that work allocation can be performed before the server starts processing jobs. When a newly created server starts for the first time, Oracle Enterprise Scheduler determines whether using the default work assignment could be problematic, and if so, binds a pre-seeded internal work assignment (ESSInternalWA), which includes the health-check job. Health check can be used to check the server, and then unbind the internal work assignment and bind user-created work assignment, as needed.
When determining if the default work assignment can be used, Oracle Enterprise Scheduler considers all running servers in the group, and it is irrelevant which applications are deployed to the servers. Servers that are down are not taken into account.
7.4.10 Configure a Request Processor
The number of threads configured by default for the request processor may be inadequate to handle the workload. There is a single pool of threads for all the jobs running in the processor. There is one processor per managed server. The processor configuration is used to change the threads.
Since the request processor tells Oracle Enterprise Scheduler in which cluster nodes the job can run, it is included in the configuration of a work assignment. If no work assignment is bound to a request processor, the default work assignment processes job requests. The binding of work assignments provides control over what jobs run at what times and with what resources. A binding can be made in one of two modes: standard (the default) or exclusive.
Standard binding mode means that the request processor can process job requests as defined by the specialization rules when an active workshift is defined. If a job request is specialized to two different work assignments, then either of those work assignments or the default work assignment can process the job request.
When using the exclusive binding mode, job requests specialized to the work assignment are processed exclusively by that work assignment when it is active. These job requests are excluded from all other work assignments, including the default work assignment. If the work assignment does not have an active workshift, then the job request can be processed by another work assignment.
As an example, consider the following work assignments:
-
LongWA, specialization is (definition = 'JobDefinition://mypackage/LongRunningJob') -
SamWA, specialization is (definition = 'JobDefinition://mypackage/LongRunningJob' AND user = 'sam')
Suppose both LongWA and SamWA are bound in standard mode. When Sam submits LongRunningJob, either LongWA or SamWA can process the request.
Suppose LongWA is bound in standard mode and SamWA is bound in exclusive mode. When Sam submits LongRunningJob, only SamWA can process the request. The exclusive binding causes the specialization for LongWA to act as if it is:
(definition = 'JobDefinition://mypackage/LongRunningJob') AND NOT (definition 'JobDefinition://mypackage/LongRunningJob' AND user = 'sam')
Effectively, the previous definitions are the same as:
(definition = 'JobDefinition://mypackage/LongRunningJob') AND NOT (user = 'sam')
Be careful about using the exclusive binding mode when the specializations overlap. For example, if both LongWA and SamWA are bind in exclusive mode, then SamWA cannot run LongRunningJob at all. In this case, the specialization for SamWA becomes:
(definition = 'JobDefinition://mypackage/LongRunningJob' AND user = 'sam') AND NOT (definition = 'JobDefinition://mypackage/LongRunningJob')
Requirements for binding a work assignment are as follows:
-
The work assignment must be enabled, meaning its active flag must be set.
-
The work assignment must have at least one workshift.
-
Each workshift in the work assignment must have a thread allocation of at least one.
-
If the workshift includes a schedule, then the following must be true:
-
The schedule must be active; it is not expired.
-
The workshift duration must be at least one.
-
-
A work assignment can be bound to a particular server at most one time.
-
A work assignment can be bound to any number of servers in the group, but all the bindings must use the same mode. Within a group, a work assignment cannot be bound in standard mode on one server and exclusive mode on another server.
For more information about work assignments, see Manage Work Assignments.
7.4.11 Configure a Request Dispatcher
Requests remain in a waiting state in the Oracle Enterprise Scheduler repository until the request dispatcher polls the repository for requests that are ready to run. (The default maximum polling interval is 15 seconds.) After polling the repository, the dispatcher sets all requests to ready state. The request processor takes over control of the job requests after they have been placed in ready state.
For example, since the default polling interval is set at 15 seconds, the latency for Oracle Enterprise Scheduler to know there is a job due to run can be 15 seconds. If a job will be running repeatedly every 10 seconds, the polling interval must be changed.
Use the Configure Request Dispatcher page to configure the polling interval for the request dispatcher, or to enable or disable the job request dispatcher.
7.5 Troubleshoot Oracle Enterprise Scheduler
This section describes common problems that might be encountered when using Oracle Enterprise Scheduler and explains how to solve them.
7.5.1 Troubleshoot Jobs
The following are typical issues that can arise when running Oracle Enterprise Scheduler jobs.
-
Asynchronous jobs remain in running state indefinitely
-
An asynchronous job hangs or crashes
-
Oracle Enterprise Scheduler is down when the remote scheduled job completes or there are network problems such that Oracle Enterprise Scheduler does not receive the completion status from the remote job.
-
A scheduled job is ready to execute, but does not execute.
-
A scheduled job is placed in manual error recovery state where troubleshooting is needed.
-
Oracle Enterprise Scheduler is throwing errors.
-
A scheduled job ends in error.
For troubleshooting Oracle Enterprise Scheduler, use the standard Oracle WebLogic Server system log. For information about viewing job request logs, see Manage Logging for Oracle Enterprise Scheduler. For more information about troubleshooting Oracle Enterprise Scheduler, see the Troubleshooting Oracle Enterprise Scheduler section in the Administering Oracle Enterprise Scheduler.
Troubleshoot Asynchronous Oracle Business Intelligence Publisher Jobs
When viewed in Oracle Enterprise Manager Fusion Applications Control, a given Oracle Business Intelligence Publisher job includes a URL that points to the Oracle Business Intelligence Publisher server on the Job Details page. After the Oracle Business Intelligence Publisher job starts running on the Oracle Business Intelligence Publisher server, the scheduled job request gets the property value bip.status_url. This property value holds the URL of the Oracle Business Intelligence Publisher server that is used to diagnose Oracle Business Intelligence Publisher report execution. For more information about viewing job request details, see the Viewing Job Request Details section in the Administering Oracle Enterprise Scheduler.
Oracle Business Intelligence Publisher jobs are supported only in Oracle Fusion Applications.
7.5.2 Search for Job Requests
Searching for job requests helps to troubleshoot problems with scheduled jobs. For example, details about request-processing errors can be viewed.
To search for job requests:
7.5.3 Search for Configuration Changes
Changes made to configurations can be searched for using the search page in Cloud Control.
To search for changes to configurations to Oracle Enterprise Scheduler in Cloud Control:
7.5.4 Manage Logging for Oracle Enterprise Scheduler
Log data can be searched for and viewed for individual job requests, and log levels can be set for Oracle Enterprise Scheduler. Job request logs can be saved to a file, and trace job requests for additional troubleshooting information.
For more information about logging, see the Managing Logging for Oracle Enterprise Scheduling Service topic in the Monitoring Oracle Enterprise Scheduler section in the Administering Oracle Enterprise Scheduler. For more information about managing log files and diagnostic data, see the Managing Log Files and Diagnostic Data section in the Administering Oracle Fusion Middleware.
The Oracle WebLogic Server logger (logging.xml) only shows logs written by Oracle Enterprise Scheduler jobs running in Oracle WebLogic Server. After Oracle Enterprise Scheduler transfers control of running PL/SQL and C jobs to the PL/SQL or C processes, respectively, PL/SQL and C job logging data is not written to the Oracle Enterprise Scheduler logs as they run in separate processes.
7.5.4.1 Find Log Information for a Job Request
Job request logs can be written to different files. Log data regarding a job request can be found using its Execution Context Identifier (ECID), a unique identifier that enables finding log data for the job request.
For more information about finding the ECID for a job request, see the Correlating Log Messages Across Log Files and Components section in the Oracle Fusion Applications Administration Guide.
7.5.4.2 Set Oracle Enterprise Scheduler Log Levels
It is possible to configure Oracle Enterprise Scheduler server logging for an Oracle WebLogic Server by modifying the logging.xml file of that Oracle WebLogic Server. By default, there is no explicit logger entry for Oracle Enterprise Scheduler. Oracle Enterprise Scheduler inherits the logging level and log handlers configured for the parent logger, typically the oracle logger or the root logger.
By default, the log messages for the Oracle Enterprise Scheduler logger can be found in the Oracle WebLogic Server diagnostic log file for that Oracle WebLogic Server. The logging.xml file is located under DOMAIN_HOME/config/fmwconfig/servers/WebLogic_Server_Name, where DOMAIN_HOME is the domain home directory for the Oracle WebLogic Server domain and WebLogic_Server_Name is the name of the Oracle WebLogic Server that uses the logging.xml file.
The table that follows shows the Oracle Enterprise Scheduler logger names, log levels, and a description for each level.
Table 7-8 Loggers and Log Levels for Oracle Enterprise Scheduler
| Logger Name | Log Level | Description |
|---|---|---|
|
|
|
Problems encountered by Oracle Enterprise Scheduler runtime in the context of request processing that result in the request errors. Errors include exceptions thrown by the job code, unchecked exceptions when running the job code, and exceptions when running Oracle Enterprise Scheduler code. Problems encountered by Oracle Enterprise Scheduler runtime outside the context of request processing, such as dispatching, system event handling, and so on. |
|
|
|
Less severe problems encountered by Oracle Enterprise Scheduler runtime during or outside of request processing, which might not cause requests to enter an error state. |
|
|
|
Messages for request state transitions. Messages related to work assignment activities. Messages about batch deletion failures. Messages about the starting and stopping of the Oracle Enterprise Scheduler resource adapter. |
|
|
|
Application endpoint activation and deactivation for Oracle Enterprise Scheduler resource adapter. |
|
|
|
Any problems that occur during UI rendering to submission. |
|
|
|
Messages related to job fetch and submission API calls. |
|
|
|
Describes tracing messages for the scheduled job request submission UI. |
|
|
|
Any problems that occur during UI rendering to operations in the UI. |
|
|
|
Messages related to job request fetch and various API calls. |
|
|
|
Describes tracing messages for the job request monitoring UI. |
|
|
|
Records any errors that occurred when creating a session for Oracle Fusion Middleware Extensions for Applications, or when creating a file during preprocessing and postprocessing. |
|
|
|
Records messages related to terminating sessions and closing files during preprocessing and postprocessing |
|
|
|
Messages related to preprocessing and postprocessing execution activity. |
Two main types of logging can be used:
-
Application logging: Oracle Enterprise Scheduler job implementation can call standard Oracle Fusion Applications logging code. For proper operation, the
AFLOG_ENABLEDproperty must be set toY. For PL/SQL jobs, set theAFLOG_PLSQL_FILENAMEproperty toY. For C jobs, set theAFLOG_FILENAMEproperty toY. For more information about configuring log settings, see the Viewing Special Log Output for Oracle Fusion Incentive Compensation section in the Oracle Fusion Applications Administration Guide. For more information about setting theAFLOG_ENABLEDproperty, see topic Enabling JBO Logging in the Provisioned Environment in the Debugging Oracle ADF and Oracle SOA Suite section in the Oracle Fusion Applications Developer's Guide. -
Request logging: Oracle Enterprise Scheduler job implementation can write business-specific job request execution log information to the job request log file. This log file is specific to each request, and is automatically enabled by default. For more information about viewing the log file for a job request, see topic Viewing Job Request Logs in the Monitoring Oracle Enterprise Scheduler section in the Administering Oracle Enterprise Scheduler.
For information about setting the log levels for Oracle WebLogic Server, see topic Tracing Oracle Enterprise Scheduling Service Jobs in the Monitoring Oracle Enterprise Scheduler section in the Administering Oracle Enterprise Scheduler. For more information about Oracle Diagnostic Logging levels, see Standard Logging Levels.
Set the log levels for the Oracle WebLogic Server running Oracle Enterprise Scheduler as described in the Oracle WebLogic Server documentation.
7.5.4.3 Save Job Request Logs
By default, job request logs are written to the fnd_log API if Oracle Fusion Applications logging is set to FINER.
It is possible to save job request log data to the server log file. Job request logs are typically stored in Oracle WebCenter Content. However, when setting the log level to FINER, all job request logs are copied to the server log file.
To save job request logs to the server diagnostic file in Fusion Applications Control:
7.5.5 Resolve Common Oracle Enterprise Scheduler Problems
This section describes common problems and solutions for Oracle Enterprise Scheduler. It contains the following topics:
In addition to the recommended solutions, consider reviewing section Tuning Oracle Enterprise Scheduling System Performance in Administering Oracle Enterprise Scheduler for tuning tips.
7.5.5.1 Oracle BI Publisher Job States Mismatch with Oracle Enterprise Scheduler States
Problem:
Under normal circumstances, the Oracle BI Publisher server state should match the Oracle Enterprise Scheduler job state. However, in case of any BI Publisher job errors, server issues or other network issues, the Oracle BI Publisher server state may not match the Oracle Enterprise Scheduler job state.
Solution:
It is important to understand that the Oracle Enterprise Scheduler runtime invokes the Oracle BI Publisher web service asynchronously and then must wait for it to successfully complete to update the Oracle Enterprise Scheduler job status. Therefore, between the initial web service invocation, there could be various things that could go wrong. The following lists the typical job life cycle, the potential failure points, and the Oracle Enterprise Scheduler and Oracle BI Publisher state values seen at each of those states. Use the table below to debug any state mismatch between the Oracle Enterprise Scheduler job and the Oracle BI Publisher server:
| Processing Step/Error | Server | Expected ESS Request State | Expected Oracle BI Publisher State | Description |
|---|---|---|---|---|
|
1. Oracle Enterprise Scheduler request is in the |
Oracle Enterprise Scheduler |
|
None |
|
|
2. Oracle BI Publisher Oracle Enterprise Scheduler job begins to execute. |
Oracle Enterprise Scheduler |
|
None |
|
|
3. Oracle BI Publisher Oracle Enterprise Scheduler job invokes Oracle BI Publisher web service. |
|
None |
||
|
3a. Error calling the web service, for example, the Oracle BI Publisher server is down or fails while processing the web service. |
Oracle Enterprise Scheduler |
|
Could be |
An error message is seen in the Oracle Enterprise Scheduler server log and with Oracle Enterprise Scheduler request in Fusion Applications Control. Oracle BI Publisher job state depends on why the web service failed. This requires manual recovery. |
|
4. Oracle BI Publisher web service creates |
Oracle BI Publisher |
|
|
|
|
5. Oracle BI Publisher Oracle Enterprise Scheduler job finishes after web service processing. |
Oracle Enterprise Scheduler |
|
|
|
|
5a. Error in the Oracle Enterprise Schedulerjob before retuning. |
|
|
Error message seen in the Oracle Enterprise Scheduler server log and with Oracle Enterprise Scheduler request in Fusion Applications Control. Oracle BI Publisher job is running, but Oracle Enterprise Scheduler job that invoked it failed. This needs manual recovery because the Oracle Enterprise Scheduler job cannot be in a terminal |
|
|
5b. Oracle Enterprise Scheduler server failure anywhere during Oracle BI Publisher Oracle Enterprise Scheduler job execution (failure during Oracle BI Publisher Oracle Enterprise Scheduler job execution between Steps 2-5). |
|
Could be |
Error message seen in the Oracle Enterprise Scheduler server log and with Oracle Enterprise Scheduler request in Fusion Applications Control. It is not known if the web service has been invoked or not, so manual intervention is required. |
|
|
6. Oracle BI Publisher server begins processing the Oracle BI Publisher job. |
Oracle BI Publisher |
|
|
|
|
6a. Oracle BI Publisher server fails during processing and restarts |
|
|
||
|
6b. Job is taking a long time to run |
|
|
Oracle BI Publisher "request job history" UI should show which stage of processing the job is in. When Oracle BI Publisher server restarts, it will mark the Oracle BI Publisher state as |
|
|
Oracle BI Publisher report is successful. |
||||
|
7. Oracle BI Publisher job completes successfully. Oracle BI Publisher sets the Oracle BI Publisher job to |
Oracle BI Publisher |
|
|
|
|
8. Oracle BI Publisher invokes Oracle Enterprise Scheduler web service to notify Oracle Enterprise Scheduler of job completion. |
Oracle BI Publisher |
|
|
|
|
8a. Oracle Enterprise Scheduler server is down while Oracle BI Publisher makes web service call to notify Oracle Enterprise Scheduler of job completion,. Other Oracle Enterprise Scheduler servers in the cluster are running. |
Oracle BI Publisher |
See Steps 9 through 10. |
|
Fusion Applications Control should show that the Oracle Enterprise Scheduler server is down. Service invocation should be routed successfully to another Oracle Enterprise Scheduler server in the cluster. |
|
8b. All Oracle Enterprise Scheduler servers are down, while Oracle BI Publisher makes web service call to notify Oracle Enterprise Scheduler of job completion. |
Oracle BI Publisher |
|
|
Can detect this case after the Oracle Enterprise Scheduler servers are restarted and the Oracle BI Publisher request is |
|
9. Oracle Enterprise Scheduler calls job postprocessor. |
Oracle Enterprise Scheduler |
|
|
|
|
9a. Oracle Enterprise Scheduler job postprocessor has an error. |
Oracle Enterprise Scheduler |
|
|
Error message seen in the Oracle Enterprise Scheduler server log and with ESS request in Fusion Applications Control. |
|
10. Oracle Enterprise Scheduler completes the request after postprocessing finishes successfully. |
Oracle Enterprise Scheduler |
|
|
|
|
Oracle BI Publisher report has an error. |
Error message seen in the Oracle Enterprise Scheduler server log and with Oracle Enterprise Scheduler request in Fusion Applications Control as well as in Oracle BI Publisher console for the job. |
|||
|
11. Oracle BI Publisher job completes with error. Oracle BI Publisher sets the Oracle BI Publisher job to |
Oracle BI Publisher |
|
|
|
|
12. Oracle BI Publisher invokes Oracle Enterprise Scheduler web service to notify Oracle Enterprise Scheduler of job completion. |
Oracle BI Publisher |
|
|
|
|
12a. Oracle Enterprise Scheduler server is down while Oracle BI Publisher makes a web service call to notify Oracle Enterprise Scheduler of job completion. Other Oracle Enterprise Scheduler servers in the cluster are running. |
Oracle BI Publisher |
|
|
See Steps 8a and 8b. Oracle BI Publisher retries delivery of the status update in all cases if Oracle Enterprise Scheduler web service invocation fails |
|
13. Oracle Enterprise Scheduler updates request status in the Oracle Database to |
Oracle Enterprise Scheduler |
|
|
|
|
Request is cancelled.. |
Note: The timing refers to when the |
|||
|
14. Request in |
|
None |
Process phase before |
|
|
15. Request cancelled during Oracle BI Publisher Oracle Enterprise Scheduler job execution before Oracle BI Publisher job begins. |
|
None |
Oracle BI Publisher Oracle Enterprise Scheduler job should prevent Oracle BI Publisher job from being initiated by having checkpoints in the execute method. On return, request should transition to |
|
|
16. Request cancelled during Oracle BI Publisher Oracle Enterprise Scheduler job execution after Oracle BI Publisher job initiated. |
|
|
Oracle BI Publisher Oracle Enterprise Scheduler job execute method can ignore cancel. |
|
|
17. Request cancelled while Oracle BI Publisher job is running. |
|
|
|
|
|
18. Request cancelled after Oracle BI Publisher job, before callback received (when is Oracle BI Publisher state set to |
|
|
|
|
|
19. Request cancelled after callback received, before postprocessor. |
|
|
||
|
20. Request cancelled while postprocessor is running. |
|
|
After postprocessing has begun, the cancel operation has no effect. |
|
|
21. Request cancelled after postprocessing. |
|
|
7.5.5.2 Job Never Executes and Goes into ERROR State Immediately
Problem:
When the user submits a job that is spawned, it goes into ERROR state immediately.
Solution:
To resolve this problem, verify that the RequestFileDirectory directory is created and set up on the server. This directory can be located anywhere. The Oracle WebLogic Server writes and reads from it, so the Oracle Fusion Middleware administration account server can access this directory. If this directory does not exist, then all jobs will move to the ERROR state. The directory is a shared file system shared across the Oracle Enterprise Scheduler cluster.
To find the RequestFileDirectory value in the Fusion Applications Control:
-
Search the logs to diagnose any specific issues found. See the Viewing and Searching Log Files section in the Administering Oracle Fusion Middleware.
-
Verify that
RequestFileDirectorydirectory is created:-
From the navigation pane, expand the farm, WebLogic Domain, and select the Oracle Enterprise Scheduler server.
-
From the WebLogic Server menu, choose System MBean Browser.
-
In the System MBean Browser page, expand Application Defined MBeans.
-
Expand oracle.adf.share.connections, Server: ess_server_name, Application: ESSAPP, ADFConnections, ADFConnections, EssConnection.
-
Click EssConnection1.
-
In the Application Defined MBeans: EssConnection:EssConnection1 page, view the attribute value for RequestFileDirectory.
-
7.5.5.3 Job Completes, but Goes into a WARNING State
Problem:
Oracle Enterprise Scheduler tries to upload log files or output files to Oracle WebCenter Content. If the upload fails, then the request will be in the WARNING state.
Solution:
To resolve this problem, use Fusion Applications Control:
-
Check that the Oracle WebCenter Content Content Server is up and running.
Oracle WebCenter Content is located in the
CommonDomaindomain in the Oracle Fusion Setup product family.-
From the navigation pane, expand the farm, Content Management, and then Content Server.
-
Select the Oracle Universal Content Management - Content Server application for the appropriate Managed Server.
-
In the home page, in the Scheduler Components section, ensure the Request Processor has a status of Started.
If it is not running, start it. See section Starting and Stopping a Request Processor or Dispatcher in the Administering Oracle Enterprise Scheduler.
-
In the Scheduling Service home page, in the General section, ensure the Content Server has a state of Active.
-
If the state is not Active, from the UCM menu, choose Control and then Start.
-
-
Search and view log records for problems related to Oracle WebCenter Content or attachments. See section Viewing and Searching Log Files in the Administering Oracle Fusion Middleware.
-
Check the attachments configuration for the job hosting application is correct:
-
From the navigation pane, expand the farm, Application Deployments.
-
Expand domain_nameEssApp, and then select domain_nameEssApp.
The Application Deployment page displays.
-
From the Application Deployment menu, choose WebCenter and then Service Configuration.
The WebCenter Service Configuration page displays.
-
Click Content Repository.
-
In the Manage Content Repository Connection sections, click Edit to view and modify the entry for the FusionAppsContentRepository connection.
-
7.5.5.4 Metadata Access Denied Error When Accessing Job Metadata
Problem:
When accessing job metadata, users receive a metadata access denied error in the Standard Report Submission when there is an attempt to submit a job.
Solution:
To resolve this problem:
-
Determine the application role that is supposed to have metadata permissions for the job. See Mapping External Roles to an Application Role in the Secure Oracle Fusion Applications section.
-
From Fusion Applications Control, perform the following steps to verify the permissions:
-
In the navigation pane, expand the farm, and then WebLogic Server Domain.
-
Select the domain.
-
From the WebLogic Domain menu, choose Security and then Application Policies.
The Application Policies page displays.
-
In the Search section, choose the application or application stripe to search, enter the data to match (a principal name or a permission name or both), and click the blue Search application security grants icon. In the results table at the bottom of the page, search the grants for the application role and see if the permissions are granted.
-
Add the permissions, as described in section Managing Application Policies of the Oracle Fusion Middleware Applications Security Guide.
-
Determine the enterprise role that is supposed to map to the application role. See the Mapping External Roles to an Application Role section in the Oracle Fusion Applications Common Implementation Guide JA.
-
-
From the Oracle WebLogic Server Administration Console, perform the following to steps to determine the enterprise role of the user.
-
From the left pane, from Domain Structure, select Security Realms.
-
On the Summary of Security Realms page, select the name of the realm.
-
On the Settings for Real Name page, click the Users and Groups tab to check the user's group.
If the user is not found, add the user to the group, as described in Step 4.
-
-
Add the user to the group:
-
In the Users table, select the user to be added to a group.
-
On the Settings for User Name page select Groups.
-
Select a group or groups from the Available list box:
- To locate a group in a large list, type the first few characters of the name.
- To select multiple groups, Ctrl-click each group.
- To add a user to a group, click the right arrow to move the selection to the Chosen list box.
- To remove a user from a group, select the group in the Chosen list box and click the left arrow.
-
Click Save.
-
7.5.5.5 Insufficient Privilege Error on Request Error
Problem:
The following error is reported:
User name does not have sufficient privilege to do name operation on request number
Solution:
To resolve this problem:
Review the information given in the Security Console section within Oracle Help Center (OHS).
7.5.5.6 Empty Process List in Schedule New Process Dialog Box
Problem:
When an application user logs in to an Oracle Fusion application to schedule a new Oracle Enterprise Scheduler job by using the following procedure and finding no value for the process:
-
Click the Navigator link.
-
Select Tools and then Scheduled Processes.
-
In the Scheduled Processes page, in the Search Results section, click Schedule New Process.
-
In the Schedule New Process dialog box, click the arrow button next to the Process Name list and any values will not be found.
This problem is usually the result of a permissions problem.
Solution:
To resolve this problem:
Review the information given in the Security Console section within Oracle Help Center (OHS
7.5.5.7 Slow Display of Job Definition List of Values in Schedule New Process Dialog
Problem:
When an application user logs in to an Oracle Fusion application to schedule a new Oracle Enterprise Scheduler job by using the following procedure and finding slow performance in the list of values.
-
Click the Navigator link.
-
Select Tools and then Scheduled Processes.
-
In the Scheduled Processes page, in the Search Results section, click Schedule New Process.
-
In the Schedule New Process dialog box, click the arrow button next to the Process Name list and see that the performance is unacceptably slow.
Solution:
To resolve this problem, update the MDS table statistics for the query optimizer to use optimal query plans:
7.5.5.8 Job Status Notifications Are Not Sent
Problem:
The Oracle ADF user interface for submitting job requests provides the ability to notify users of the status of submitted jobs (using the Notification tab of the user interface). For example, users can request a notification to be sent to the originator of the job request.
A problem occurs if the notifications are not received.
Solution:
- Configure Oracle User Messaging Service. For more information, see Configuring Oracle User Messaging Service in the Configuring Oracle Business Activity Monitoring section of theAdministering Oracle SOA Suite and Oracle Business Process Management Suite.
- Deploy the drivers required for Oracle User Messaging Service. This can be done by using Oracle WebLogic Server Scripting Tool. For more information, see the Managing Oracle User Messaging Service section of the Administering Oracle SOA Suite and Oracle Business Process Management Suite.
