Release 8.0.4 for Windows NT
A55928-01
Library |
Product |
Contents |
Index |
| Oracle8 Enterprise Edition Getting Started Release 8.0.4 for Windows NT A55928-01 |
|
![]()
![]()
This chapter describes how to authenticate Oracle8 database users with Windows NT.
Specific topics discussed are:
The Oracle8 database can use information maintained by Windows NT to authenticate database users. The benefits of Windows NT authentication include:
The Windows NT Native Authentication Adapter (automatically installed with Net8 Server and Net8 Client) enables database user authentication through Windows NT. This enables client computers to make secure connections to an Oracle8 database on a Windows NT server. A secure connection is when a Windows NT client user name is retrieved on a Windows NT server through the Windows NT Native Authentication Adapter. The Windows NT server then permits the user name to perform the database actions on the server.
The Windows NT Native Authentication Adapter provides database users with the following privileges:
Each connection privilege is described in this chapter.
This section describes how to authenticate nonprivileged database users (nondatabase administrators) using Windows NT so that a password is not required when accessing the database. When you use Windows NT to authenticate nonprivileged database users, your database relies solely on Windows NT to restrict access to database user names. In the steps below, the following Windows NT user names are authenticated:
The local and domain user name FRANK and the domain SALES are used in the steps below. Substitute the appropriate local and domain user name and domain name for your environment.
Follow the steps below to connect without a password as a nonprivileged database user:
To perform authentication tasks on an Oracle8 database server:
The OS_AUTHENT_PREFIX value is prefixed to local or domain user names attempting to connect to the server with the user's operating system name and password. The prefixed user name is compared with the Oracle user names in the database when a connection request is attempted.
The parameter value XYZ is used in the steps below. Substitute XYZ with the value you set for OS_AUTHENT_PREFIX.
C:\> REGEDT32
The Add Value dialog box appears:
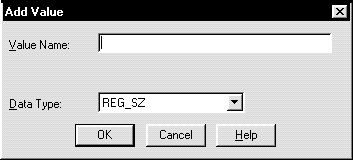
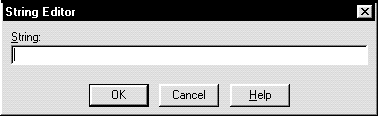
The String Editor dialog box appears:
TRUE enables the server to differentiate between multiple FRANK user names, whether they be local user FRANK, domain user FRANK on SALES, or domain user FRANK on another domain in your network. Entering FALSE causes the domain to be ignored and local user FRANK to become the default value of the operating system user returned to the server.
The Registry Editor adds the parameter.
The registry exits.
SQLNET.AUTHENTICATION_SERVICES = (NTS)
C:\> SVRMGR30
SVRMGR> CONNECT SYSTEM/PASSWORD
Unless you have changed it, the SYSTEM password is MANAGER by default.
| If Authenticating a... | Then Enter... |
|---|---|
|
Local user name |
SVRMGR> CREATE USER XYZFRANK IDENTIFIED EXTERNALLY; |
|
Domain user name |
SVRMGR> CREATE USER "XYZSALES\FRANK" IDENTIFIED EXTERNALLY; |
| If Authenticating a... | Then Enter... |
|---|---|
|
Local user name |
SVRMGR> GRANT RESOURCE TO XYZFRANK; |
|
|
SVRMGR> GRANT CONNECT TO XYZFRANK; |
|
Domain user name1 |
SVRMGR> GRANT RESOURCE TO "XYZSALES\FRANK"; |
|
|
SVRMGR> GRANT CONNECT TO "XYZSALES\FRANK"; |
|
1
Enter the syntax for domain users in uppercase and with double quotes around the domain user name. |
SVRMGR> CONNECT INTERNAL/PASSWORD
SVRMGR> SHUTDOWN
SVRMGR> STARTUP
This causes the change to the OS_AUTHENT_PREFIX parameter value to take effect.
To perform authentication tasks on the client computer:
SQLNET.AUTHENTICATION_SERVICES = (NTS)
C:\> SVRMGR30
SVRMGR> CONNECT /@SERVICE_NAME
where SERVICE_NAME is the Net8 service name for the Oracle8 database that you created in Step 3.
The Oracle8 database searches the data dictionary for an automatic login user name corresponding to the Windows NT local or domain user name, verifies it, and allows you to connect as XYZFRANK or XYZSALES\FRANK.
SVRMGR> SELECT * FROM USER_ROLE_PRIVS;
which outputs for local user FRANK:
USERNAME                       GRANTED_ROLE                   ADM DEF OS_
------------------------------ ------------------------------ --- --- ---
XYZFRANK                       CONNECT                        NO  YES NO
XYZFRANK                       RESOURCE                       NO  YES NO
2 rows selected.
or, for domain user FRANK:
USERNAME                       GRANTED_ROLE                   ADM DEF OS_
------------------------------ ------------------------------ --- --- ---
XYZSALES\FRANK                 CONNECT                        NO  YES NO
XYZSALES\FRANK                 RESOURCE                       NO  YES NO
2 rows selected.
As the Oracle8 user name is the whole name XYZFRANK or XYZSALES\FRANK, all objects created by XYZFRANK or XYZSALES\FRANK (that is tables, views, indexes, etc.) are prefixed by this name. For another user to reference the table SHARK owned by XYZFRANK, for example, the user must enter:
SVRMGR> SELECT * FROM XYZFRANK.SHARK
This section describes how to enable Windows NT to grant the SYSOPER and SYSDBA privileges to DBAs. This enables DBAs to issue the following commands from a client computer and connect to the Oracle8 database without entering a password:
To enable this feature, the Windows NT local or domain user name must belong to one of the following four Windows NT local groups:
The SYSOPER and SYSDBA privileges are mapped to the following Windows NT local groups:
| This Privilege... | Maps to the Local Group... |
|---|---|
|
SYSOPER |
ORA_SID_OPER, ORA_OPER |
|
SYSDBA |
ORA_SID_DBA, ORA_DBA, ORA_SID_OPER, ORA_OPER |
Follow the steps below to connect as SYSOPER or SYSDBA without a password:
To perform authentication tasks on the Oracle8 database server:
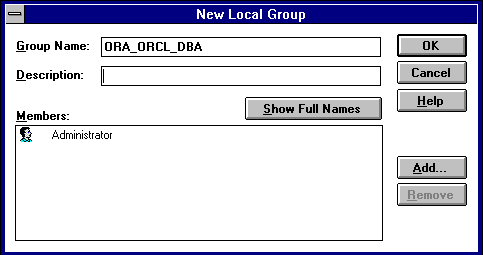
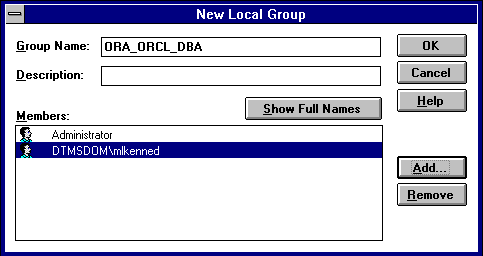
The New Local Group dialog box appears.
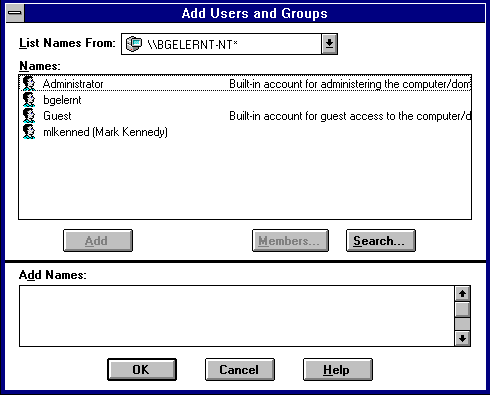
The Add Users and Groups dialog box appears:

Your selection is added to the Members field of the New Local Group dialog box:

SQLNET.AUTHENTICATION_SERVICES = (NTS)
To perform authentication tasks on the client computer:
SQLNET.AUTHENTICATION_SERVICES = (NTS)
C:\> SVRMGR30
SVRMGR> SET INSTANCE SERVICE_NAME
where SERVICE_NAME is the Net8 service name for the Oracle8 database that you created in Step 3.
| If The Local Group Is... | Then Enter... |
|---|---|
|
ORA_DBA or ORA_SID_DBA |
|
|
|
or |
|
|
|
|
ORA_OPER or ORA_SID_OPER |
|
You are connected to the Windows NT server. If you connect with SYSDBA, you are given DBA privileges.
This section describes how to connect as INTERNAL without a password. To do this, you must create one of the following new local Windows NT user groups and add a Windows NT operating system local or domain user to that group:
This enables you to log into a local computer or a Windows NT domain. In the domain, your Oracle8 database is just one of many resources to which you have access. Once you access this domain, you are automatically validated as an authorized DBA who can access the Oracle8 database without a password.
Follow the steps below to connect as INTERNAL without a password:
To perform authentication tasks on the Oracle8 database server:
SQLNET.AUTHENTICATION_SERVICES = (NTS)
The New Local Group dialog box appears.

The Add Users and Groups dialog box appears:
Your selection is added to the Members field of the New Local Group dialog box:
SVRMGR> CONNECT INTERNAL/PASSWORD
SVRMGR> SHUTDOWN
SVRMGR> STARTUP
To perform authentication tasks on the client computer:
SQLNET.AUTHENTICATION_SERVICES = (NTS)
C:\> SVRMGR30
SVRMGR> SET INSTANCE SERVICE_NAME
where SERVICE_NAME is the Net8 service name for the Oracle8 database that you created in Step 3.
SVRMGR> CONNECT INTERNAL
You are connected to the Windows NT server.
This section describes how to grant Oracle8 database roles to users directly through Windows NT. When you use Windows NT to authenticate users, Windows NT local groups can grant these users database roles. Through User Manager, you can create, grant, or revoke database roles to users.
Follow the steps below to grant database roles with Windows NT:
To perform authentication tasks on the Oracle8 database server:
The default setting for this parameter is FALSE.
SQLNET.AUTHENTICATION_SERVICES = (NTS)
SVRMGR> CREATE ROLE DBSALES3 IDENTIFIED EXTERNALLY;
where DBSALES3 is the name of the role for these steps. Substitute a role name appropriate to your database environment.
SVRMGR> GRANT DBA TO DBSALES3 WITH ADMIN OPTION;
SVRMGR> GRANT RESOURCE TO DBSALES3 WITH ADMIN OPTION;
SVRMGR> GRANT CONNECT TO DBSALES3 WITH ADMIN OPTION;
SVRMGR> CONNECT INTERNAL/PASSWORD
SVRMGR> SHUTDOWN
SVRMGR> STARTUP
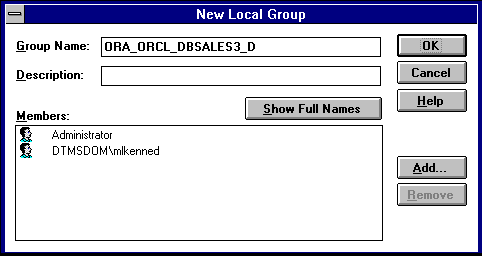
The New Local Group dialog box appears:

ORA_SID_ROLENAME [_D] [_A]
where:
For this example, ORA_ORCL_DBSALES3_D is entered.
The Add Users and Groups dialog box appears:

Your selection is added to the Members field of the New Local Group dialog box:
You can convert additional database roles to several possible Windows NT groups, as shown in the following table. Then, users connecting to the ORCL instance in this example and authenticated by Windows NT as members of these Windows NT local groups have the privileges associated with DBSALES3 and DBSALES4 by default (because of the _D option). DBSALES1 and DBSALES2 are available for use by the user if they first connect as members of DBSALES3 or DBSALES4 and use the SET ROLE command. If a user tries to connect with DBSALES1 or DBSALES2_A without first connecting with a default role, they are unable to connect. Additionally, users can grant DBSALES2 and DBSALES4 to other roles.
| Database Roles | Windows NT Groups |
|---|---|
|
DBSALES1 |
ORA_ORCL_DBSALES1 |
|
DBSALES2 |
ORA_ORCL_DBSALES2_A |
|
DBSALES3 |
ORA_ORCL_DBSALES3_D |
|
DBSALES4 |
ORA_ORCL_DBSALES4_DA |
|
Note: When the Oracle8 database converts the group name to a role name, it changes the name to uppercase. |
To perform authentication tasks on the client computer:
SQLNET.AUTHENTICATION_SERVICES = (NTS)
C:\> SVRMGR30
SVRMGR> SET INSTANCE SERVICE_NAME
where SERVICE_NAME is the Net8 service name for the Oracle8 database that you created in Step 3.
SVRMGR> CONNECT SCOTT/TIGER
You are connected to the Windows NT server over Net8 with the Oracle user name SCOTT/TIGER. The roles applied to the Oracle user name SCOTT consist of all roles defined for the Windows NT user name that were mapped to the database roles above (in this case, ORA_DBSALES3_D). All roles available under an authenticated connection are determined by the Windows NT user ID and the Oracle-specific Windows NT local groups to which the user belongs (for example, ORA_SID_DBSALES1 or ORA_SID_DBSALES4_DA).