Release 8.0.4 for Windows NT
A55928-01
Library |
Product |
Contents |
Index |
| Oracle8 Enterprise Edition Getting Started Release 8.0.4 for Windows NT A55928-01 |
|
![]()
![]()
This chapter describes the installation types you can choose when you have existing databases on your system. In particular, it describes how to migrate an Oracle7 database or upgrade an earlier Oracle8 database release to the current release of Oracle8 Enterprise Edition. This chapter also includes information on migrating a Microsoft Access database to an Oracle8 database.
Specific topics discussed are:
This chapter is necessary for anyone who has existing Oracle7 and Oracle8 databases on their system and wants to install Oracle8 Enterprise Edition release 8.0.4.
Consider the following installation types if you have existing Oracle7 database(s) and Oracle8 database(s) on your system and want to install Oracle8 Enterprise Edition(s) release 8.0.4.
All of these installation types are described in detail in this chapter.
|
Additional Information:
See Oracle8 Enterprise Edition Installation for Windows NT if you want to install Oracle8 Enterprise Edition on a system containing no existing databases. |
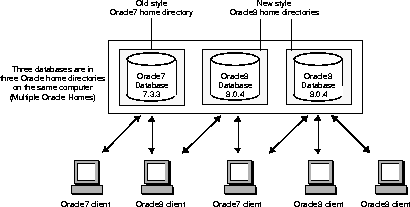
Releases of Oracle for Windows NT and Windows 95 prior to release 8.0.4 supported single Oracle homes, allowing you to install and run Oracle products in a single Oracle home. Different versions of Oracle products could be installed in the same Oracle home provided they had different second-digit release numbers. For example, you could install version 7.2 products and version 7.3 products in the same Oracle home (database coexistence). However, you could not install multiple third-digit releases of the same products. For example, you could not install release 7.3.2 and release 7.3.3 versions of the same Oracle products on the same computer; one installation would over-write the other.
This release includes the new multiple Oracle homes feature, which enables you to install one or more releases of Oracle products on the same computer in multiple Oracle homes. For example, with multiple Oracle homes, you can install version 8.0.3 products and 8.0.4 products in different Oracle homes on the same computer. You can still install different versions of Oracle products in the same Oracle home provided they have different second-digit release numbers. See Chapter 6, "Using Multiple Oracle Homes" for more information.
This section explains the difference between migrating and upgrading.
Migrating is the process of transforming one database version to a later database version. For example, transforming an Oracle7 database to an Oracle8 database is migrating the database system. The term migrating is also used in this manual to refer to the transformation of a Microsoft Access database to an Oracle8 database.
Upgrading is the process of transforming one database release to another database release of the same database version. For example, transforming an Oracle8 database release 8.0.3 to an Oracle8 database release 8.0.4 is upgrading the database system.
You can easily migrate or upgrade databases across multiple Oracle homes. If you use the graphical user interface (GUI) Oracle Data Migration Assistant, all database instances on your system are displayed in a drop-down list. You select the Oracle database instance you want to migrate or upgrade and the assistant takes care of any multiple Oracle homes issues.
If you use the command line tools, the Migration Utility (MIG80) to migrate, or the CAT8004.SQL script to upgrade, you need to copy files from one Oracle home directory to another. You also must ensure the PATH variable is set correctly so that any Oracle database tools you run are started from the correct Oracle home directory.
If you have an existing Oracle7 database(s) and Oracle8 database(s) on your system and want to install Oracle8 Enterprise Edition(s) release 8.0.4, you must decide to:
Consider the following database coexistence issues before you decide which of the above installation types is most suitable for your requirements:
Can all my Oracle7 applications run on an Oracle8 database?
Most Oracle7 applications can run on an Oracle8 database. Some applications cannot run on an Oracle8 database unless you upgrade them to versions which support Oracle8 databases. If you have a combination of Oracle7 and Oracle8 applications, you may want to have an Oracle7 database and Oracle8 database coexist on the same system, until you have time to upgrade all your Oracle7 applications to version 8. Contact your application vendor to check if your third-party applications are supported with Oracle8 Enterprise Edition.
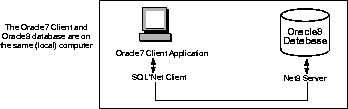
As this figure illustrates, an Oracle7 client requires SQL*Net Client, and an Oracle server requires Net8 Server. When the client and server are on the same computer, both SQL*Net Client and Net8 Server are required.
Consider the following questions for your own environment:
No. You must rebuild or upgrade applications to work with Net8 libraries.
Yes. If the Oracle7 client needs to connect to a local Oracle8 database, you must have SQL*Net Client version 2.x, Net8 Client, and Net8 Server in the Oracle7 client Oracle home. Note that Net8 Client and Net8 Server are already installed during the installation of Oracle8 Enterprise Edition.
If you are using Oracle7 release 7.3.4 and SQL*Net release 2.3.4, you can connect to the Oracle8 database without specifying a service name. Oracle7 client automatically uses the Bequeath Protocol Adapter when connecting to a local Oracle8 database.
If you are using Oracle7 release 7.3.3 (or lower) and SQL*Net release 2.3.3 (or lower), you need to create a service name using SQL*Net Easy Configuration or Oracle Network Manager in the SQL*Net Client version 2.x TNSNAMES.ORA file. Ensure you specify this service name in the connect string when connecting to the Oracle8 database. The Bequeath Protocol Adapter is not supported when connecting from an Oracle7 client (release 7.3.3 or lower) to an Oracle8 database.
No. If an Oracle7 client needs to connect to a remote Oracle8 database, only SQL*Net Client version 2.x has to be configured on the Oracle7 client. Net8 is backward compatible with SQL*Net version 2.x. The only limitation is that the new network features available with Net8 are unavailable with this connection type.
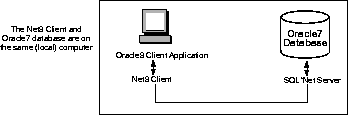
An Oracle8 client requires Net8 Client, and an Oracle7 server requires SQL*Net Server. When the client and server are on the same computer, both Net8 Client and SQL*Net Server are required.
Consider the following questions for your own environment:
Yes. If the Oracle8 client needs to connect to a local Oracle7 database, you need to have both SQL*Net Server version 2.x and Net8 Client in the Oracle8 client Oracle home. Note that the Oracle8 client uses the Bequeath protocol adapter by default to connect to an Oracle7 database.
No. If an Oracle8 client needs to connect to a remote Oracle7 database, only Net8 Client needs to be configured on the Oracle8 client. SQL*Net version 2.x is upward compatible with Net8. The only limitation is that the new network features available with Net8 are unavailable with this connection type.
Oracle7 and Oracle8 clients can communicate either with Oracle7 or Oracle8 databases. This functionality gives you maximum flexibility when designing your network and deciding when to:
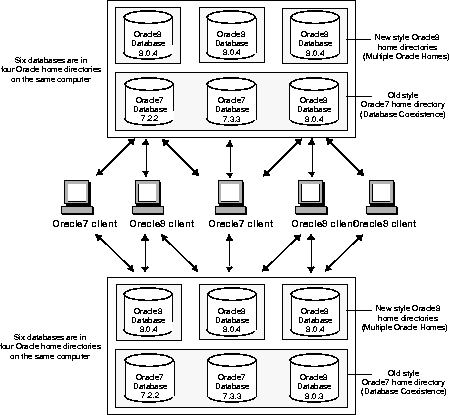
Install Oracle7 and Oracle8 databases in the same Oracle home directory and have both Oracle7 and Net8 clients connecting to Oracle7 and Oracle8 databases. The figure below gives an example of this network configuration:
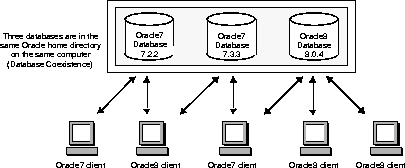
You can install different versions of Oracle databases in the same Oracle home provided they have different first or second-digit versions. For example, you can have release 7.2.x, 7.3.x, and 8.0.x databases in the same Oracle home. You cannot install multiple third-digit releases of the same products. For example, you cannot install release 7.3.2 and release 7.3.3, or release 8.0.3 and release 8.0.4 versions of the same Oracle databases in the same Oracle home; one installation overwrites the other.
Ensure that each database instance has a unique SID. In particular, be careful that you do not use the default SID ORCL for subsequent installations if you already have a starter database with the SID ORCL installed. If you do so, the services of the later installation overwrite the services of the earlier installation.
Install Oracle7 and Oracle8 databases in multiple (different) Oracle homes and have both Oracle7 and Net8 clients connecting to Oracle7 and Oracle8 databases. Multiple Oracle homes functionality currently only works with release 8.0.4. If you have, for example, release 7.3.3 products already installed, you cannot install any other release 7.x products in a different Oracle home. Also, if you have release 8.0.3 products already installed, you cannot install any other 8.0.3 products in a different Oracle home. The figure below gives an example of this network configuration:
Install Oracle7 and Oracle8 databases on separate computers and have both Oracle7 and Oracle8 clients connecting to both databases. The figure below shows two computers and a number of Oracle7 and Oracle8 clients. On each computer you can have a mix of databases and products in both single and multiple Oracle homes.
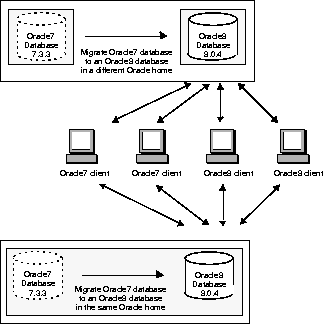
Migrate your Oracle7 database to an Oracle8 database and have both Oracle7 and Oracle8 clients connecting to the Oracle8 database. You can migrate your Oracle7 database to an Oracle8 database either in the same Oracle home or in a different Oracle home. See "Migrating an Oracle7 Database" for instructions. The figure below illustrates this network configuration:
Upgrade your Oracle8 database, for example, release 8.0.3, to release 8.0.4 and have both Oracle7 and Oracle8 clients connecting to the release 8.0.4 Oracle8 database. You can upgrade databases either in the same Oracle home or across different Oracle homes. See "Upgrading an Oracle8 Database" for instructions. The figure below illustrates this network configuration:

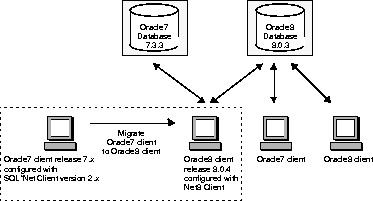
Migrate some or all of your Oracle7 clients to Oracle8 release 8.0.4 and migrate your Oracle7 database to an Oracle8 database or upgrade your Oracle8 database to the current Oracle8 release at a later date. See Net8 Getting Started for Windows NT and Windows 95 for instructions. The figure below illustrates this network configuration.
In the following example, an Oracle7 release 7.3.3 starter database named ORACLE with a SID of ORCL is already installed in C:\ORANT. Now, create an Oracle release 8.0.4 database named PROD with a SID of PROD in C:\ORANT.
To install an Oracle8 database and Oracle7 database into the same Oracle home:
The Oracle Installation Settings dialog box appears.
The Select Installation Settings dialog box appears.
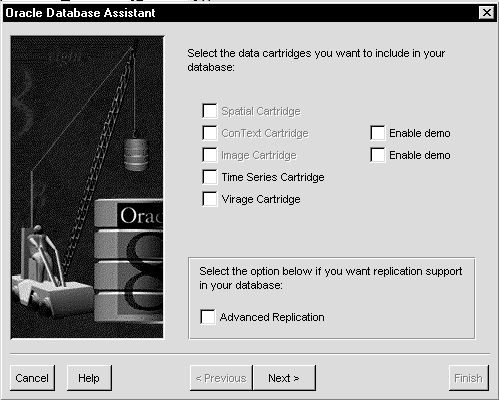
The Select Cartridges and Options dialog box appears.
The Previous Version of Oracle Database Detected dialog box appears indicating that Oracle Installer has detected an earlier version of the database. You are asked if you want to migrate your Oracle7 database to release 8.0.4 using Oracle Data Migration Assistant.
The Select a Starter Database Configuration dialog box appears.
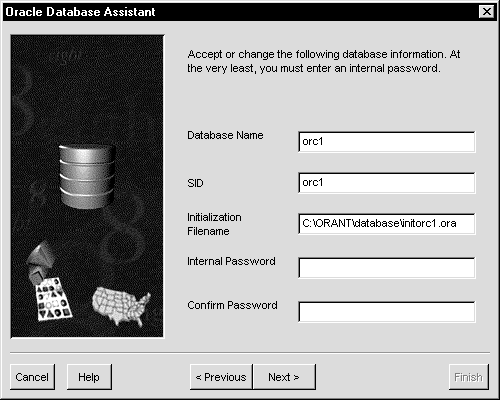
The following Oracle Database Assistant window appears:
When you get to the last window, click Finish to start the creation of the PROD database. More documentation on this assistant is included with the Help.
In the following example, an Oracle7 release 7.3.3 starter database called ORACLE with a SID of ORCL is already installed in C:\ORANT. Now, install the Oracle release 8.0.4 starter database ORCL in a different Oracle home directory called C:\ORANTv8 with an Oracle home name of TESTv8.
To install an Oracle8 database and Oracle7 database in multiple (different) Oracle homes:
The Oracle Installation Settings dialog box appears.
The Select Installation Settings dialog box appears.
The Select Cartridges and Options dialog box appears.
The Select a Starter Database Configuration dialog box appears.
During installation of the release 8.0.4 database, Oracle Installer detected the listener of the previously installed release 7.3.3 database. To avoid conflicts of listening addresses (for example, the Port number for TCP/IP), the new release 8.0.4 listener is not started and is set to Manual Startup mode. After installation is complete, modify the release 8.0.4 LISTENER.ORA file to resolve possible conflicts in listening addresses, and then start the listener. This is required to enable the release 8.0.4 database to accept connections from clients. See Net8 Getting Started for Windows NT and Windows 95 for information on how to modify the LISTENER.ORA file.
This section describes how to migrate an Oracle7 database to the current Oracle8 database release. You can choose either of the following database tools to perform a migration:
Oracle Corporation recommends that new users use Oracle Data Migration Assistant to migrate databases because it is the easiest method to perform a migration. If you want to perform a migration manually using command line tools, use the Migration Utility (MIG80).
If you perform a migration, the following networking issues may need to be resolved:
Although Oracle7 clients using SQL*Net Client version 2.x can connect to Oracle8 databases, they should be migrated to Oracle8 clients configured with Net8 when their applications are upgraded to version 8. Note that SQL*Net version 2.x can coexist with Net8 in the same Oracle home directory.
To use the Net8 listener, you may need to change your network configuration on either the SQL*Net version 2.x or Net8 configurations to prevent a conflict. For example, you may need to change:
You may also need to start the Net8 listener and change the status of the service to Automatic Startup, depending upon your network needs. If you make changes to the listener, you must make changes to client configuration files to reflect those listener changes.
SQL*Net version 2.x uses configuration files from ORACLE_HOME\NETWORK\ADMIN, while Net8 uses files from ORACLE_HOME\NET80\ADMIN by default. If you want SQL*Net version 2.x and Net8 to use configuration files from the same directory, you can set the registry variable TNS_ADMIN.
When migrating from Oracle7 Server release 7.3.x to Oracle8 release 8.0.4, install the appropriate version of SQL*Net for the server before using Oracle Data Migration Assistant or the Migration Utility (MIG80). Migration will be unsuccessful if you do not install the appropriate versions of SQL*Net.
| Migrating from... | Install... |
|---|---|
|
Oracle7 release 7.3.2.x to Oracle8 |
Note: If you do not have SQL*Net version 2.3.2.1.4 on your system, you must install it before installing SQL*Net version 2.3.2.1.12. SQL*Net version 2.3.2.1.4 is not available on the CD-ROM. To obtain it, you must contact Oracle Worldwide Customer Support. |
|
Oracle7 release 7.3.3.x to Oracle8 |
SQL*Net version 2.3.3.0.3 |
|
|
To install SQL*Net version 2.3.2.1.12 or 2.3.3.0.3
|
When you migrate from an Oracle7 database in one Oracle home to a release 8.0.4 Oracle8 database in a different Oracle home, the SID needs to be removed from the Oracle7 Oracle home's LISTENER.ORA file and added to the release 8.0.4 Oracle home's LISTENER.ORA file.
When you migrate from an Oracle7 database in one Oracle home to a release 8.0.4 Oracle8 database in a different Oracle home, Oracle Data Migration Assistant adds the appropriate SID value to the release 8.0.4 Oracle home's LISTENER.ORA file. However, the assistant does not remove the SID from the Oracle7 Oracle home's LISTENER.ORA file. To prevent a conflict when you start the Oracle7 listener, remove the SID entry from the Oracle7 Oracle home's LISTENER.ORA file.
Oracle Data Migration Assistant helps you migrate data from an Oracle7 database to an Oracle8 database. During installation of Oracle8 Enterprise Edition, you are prompted to migrate a database with this assistant if Oracle Installer detects that an earlier database release exists on your system. If you do not want to migrate a database during the installation process, you can choose install this assistant and use it later.
Before you use this assistant, ensure the Oracle7 database to be migrated meets these requirements:
To migrate a database using Oracle Data Migration Assistant:
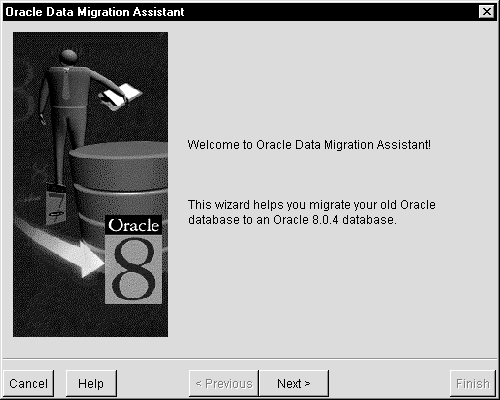
The Oracle Data Migration Assistant welcome window appears:

This section describes how to use the Migration Utility (MIG80) to migrate your Oracle7 database to an Oracle8 database.
Complete the following steps before you use the Migration Utility (MIG80):
If the character sets are different, before you run MIG80, you must set the NLS_LANG environment variable as follows:
AMERICAN_AMERICA.database character set
where database character set should be substituted with the character set of your Oracle7 database. For example, if the character set of your Oracle7 database is JA16EUC, set the NLS_LANG environment variable as follows:
C:\> SET NLS_LANG=AMERICAN_AMERICA.JA16EUC
Messages output from MIG80 will now be in English. After MIG80 finishes, reset the NLS_LANG environment variable to its original value.
| Use... | When Migrating From... |
|---|---|
|
SQLDBA71 |
Oracle7 release 7.1.x |
|
SQLDBA72 |
Oracle7 release 7.2.x |
|
SVRMGR23 |
Oracle7 release 7.3.x |
To migrate an Oracle7 database using MIG80:
Step 1: Shut Down the Oracle7 Database
Step 2: Back Up the Oracle7 Database
Step 3: Prepare the Oracle7 Database for Migration
Step 4: Install Oracle8 Enterprise Edition
Step 5: Run the Migration Utility (MIG80)
Step 6: Create Oracle8 Services and Database Files
Step 7: Remove Oracle7 Software (Optional)
| Using... | Enter at the MS-DOS Command Prompt... |
|---|---|
|
Oracle7 release 7.1.x |
|
|
Oracle7 release 7.2.x |
|
|
Oracle7 release 7.3.x |
|
| Using... | Enter at the SQLDBA or SVRMGR Command Prompt... |
|---|---|
|
Oracle7 release 7.1.x1 |
SQLDBA> CONNECT INTERNAL/PASSWORD SQLDBA> ALTER USER SYS DEFAULT TABLESPACE SYSTEM TEMPORARY TABLESPACE SYSTEM; SQLDBA> ALTER TABLESPACE SYSTEM ADD DATAFILE `ORACLE_HOME\RDBMS71\SYS2SID.ORA' SIZE 50 M; |
|
Oracle7 release 7.2.x |
SQLDBA> CONNECT INTERNAL/PASSWORD |
|
Oracle7 release 7.3.x |
SVRMGR> CONNECT INTERNAL/PASSWORD |
|
1
For Oracle7 release 7.1 only, edit the INITSID.ORA file and set the REMOTE_LOGIN_PASSWORDFILE parameter to EXCLUSIVE or SHARED. |
The message Connected. appears if you successfully connected to the database.
| Using... | Enter at the SQLDBA or SVRMGR Command Prompt... |
|---|---|
|
Oracle7 release 7.1.x |
|
|
Oracle7 release 7.2.x |
|
|
Oracle7 release 7.3.x |
|
|
WARNING: If anything goes wrong with the Oracle7 database during migration, you will need to restore the database from the backup. Back up your database now as a precaution! |
Ensure the database was cleanly shutdown before you back up. Ensure you back up the database files in the following list (and any other database files you may have created). Also, back up any scripts you may have created.
To obtain the list of database files you must back up:
| Using... | Enter at the SQLDBA or SVRMGR Command Prompt... |
|---|---|
|
Oracle7 release 7.1.x |
SQLDBA> SPOOL OFF |
|
Oracle7 release 7.2.x |
SQLDBA> SPOOL OFF |
|
Oracle7 release 7.3.x |
SVRMGR> SPOOL OFF |
See Chapter 13, "Backing Up and Recovering Database Files", Oracle8 Concepts, Oracle8 Backup and Recovery, and Oracle8 Administrator's Guide for information on how to back up a database.
You must perform the following tasks to prepare the Oracle7 database for migration.
See Appendix A "Version 8 INIT.ORA Changes" in Oracle8 Migration for other changes you may need to make to the initialization parameter file.
When the Oracle Installation Settings dialog box appears:
The Select Installation Options dialog box appears.
The Select Cartridges and Options dialog box appears.
The Previous Version of Oracle Database dialog box appears indicating that Oracle Installer has detected an earlier version of the database. You are asked if you want to migrate your Oracle7 database to release 8.0.4 using Oracle Data Migration Assistant.
The Select a Starter Database Configuration dialog box appears.
|
Note: MIG80 will not be able to connect to the Oracle7 database if SQL*Net version 2.x is not installed in the Oracle home directory. You will receive the error ORA-12203: TNS: Unable to connect to destination, if this is the case. If this product is not installed, install it from the Oracle8 Enterprise Edition CD-ROM. See "Installing Appropriate Versions of SQL*Net" in this chapter for more information. |
The Migration Utility (MIG80) was installed as part of Oracle8 Utilities when you installed Oracle8 Enterprise Edition in "Step 4: Install Oracle8 Enterprise Edition".
C:\> NET START OracleServiceSID
C:\> SET ORACLE_SID=ORCL
This command creates the MIGSID.ORA file which is required in a later step to create Oracle8 Enterprise Edition control files.
You can specify MIG80 HELP=YES at the MS-DOS command prompt for a complete list of parameters that can be included with the MIG80 command.
The prompt Oracle7 Password: appears.
MIG80 runs and displays the operations being performed. MIG80 can take considerable time to run. Please wait until it has finished running.
C:\> NET STOP OracleServiceSID
|
Note: If you need to return to the Oracle7 database after MIG80 has run please restore the Oracle7 database from the backup you made in "Step 2: Back Up the Oracle7 Database". |
C:\> ORADIM80 -NEW -STARTMODE AUTO -PFILE ORACLE_HOME\DATABASE\INITSID.ORA -SID SID -INTPWD PASSWORD -MAXUSERS USERS -STARTTYPE SRVC
where:
To delete the control files:
C:\ORACLE_HOME\DATABASE> DEL CTL1SID.ORA C:\ORACLE_HOME\DATABASE> DEL CTL2SID.ORA
If you use the default setting (8.0.0.0.0), you will not be able to use new features of release 8.0.4 such as Propagation in Advanced Queuing (AQ) and Improved SCN Generation. To use these new release 8.0.4 features, set the COMPATIBLE parameter to the following:
COMPATIBLE=8.0.4.0.0
See Appendix C "Version 8 INIT.ORA Changes" of Oracle8 Migration for more information on COMPATIBLE parameter values.
C:\> SVRMGR30
SVRMGR> CONNECT INTERNAL/PASSWORD
SVRMGR> STARTUP NOMOUNT
SVRMGR> ALTER DATABASE CONVERT;
All data files that are online are converted to Oracle8 Enterprise Edition format, and new control files are built. This command uses the MIGSID.ORA file which was created earlier when you ran the Migration Utility (MIG80).
|
Note: Successful execution of this command is the point of no return to Oracle7. If you need to return to the Oracle7 database, please restore it from the backup you made in "Step 2: Back Up the Oracle7 Database". If an error occurs during this step, you must correct the condition(s) that caused the error(s). See Oracle8 Migration and run the migration again by restarting at Step 1. of "Step 5: Run the Migration Utility (MIG80)". |
SVRMGR> ALTER DATABASE OPEN RESETLOGS;
All rollback segments that are online when the Oracle8 database is opened are also opened and converted to the Oracle8 database format.
SVRMGR> SPOOL CATOUT.LOG
Oracle Corporation supplies other scripts with Oracle8 Enterprise Edition that create additional structures you can use in managing your database and creating database applications. See Oracle8 Reference for a complete list and descriptions of available scripts.
SVRMGR> SPOOL OFF
SVRMGR> SHUTDOWN NORMAL
Performing a clean database shutdown flushes all caches, clears buffers, and performs other Object Relational Database Management System (ORDBMS) housekeeping activities. These measures are an important final step to ensure the integrity and consistency of the newly migrated release 8.0.4 database.
The Oracle7 database has now been migrated to the Oracle8 database and is ready for use.
You can remove Oracle7 software if you have successfully migrated to Oracle8 Enterprise Edition and have a backup of the Oracle7 software. Oracle Installer warns you of any product dependencies that might cause problems if particular products are removed, and prompts you to confirm the de-installation.
To remove Oracle7 software:
The Software Asset Manager window appears.
This section describes how to upgrade an Oracle8 database release 8.0.3 to release 8.0.4. You can choose either of the following database tools to upgrade:
Oracle Corporation recommends that new users use Oracle Data Migration Assistant to upgrade databases because it is the easiest and quickest method to perform an upgrade. If you already have upgrade scripts from a previous Oracle database release, you may want to edit them to include the CAT8004.SQL script.
Oracle Data Migration Assistant helps you upgrade data from an Oracle8 database release 8.0.3 to release 8.0.4. During installation of Oracle8 Enterprise Edition, you are prompted to upgrade a database with this assistant if Oracle Installer detects that a release 8.0.3.0.0 database exists on your system. If you do not want to upgrade during the installation process, you can choose to install this assistant and use it later. Although you are upgrading, the assistant text refers to this process as migrating.
Before you use this assistant, ensure the Oracle8 database to be migrated meets these requirements:
To upgrade a database using Oracle Data Migration Assistant:
The Oracle Data Migration Assistant welcome window appears:
You can run SQL scripts in Server Manager to upgrade an Oracle8 database release 8.0.3 to release 8.0.4.
Read Chapter 8, "Upgrading and Downgrading" in Oracle8 Migration for background information.
Upgrading consists of the following tasks:
Step 1: Shut Down the Release 8.0.3 Database
Step 2: Back Up the Release 8.0.3 Database
Step 3: Edit the COMPATIBLE Parameter in the Release 8.0.3 INITSID.ORA File
Step 4: Install Oracle8 Enterprise Edition Release 8.0.4
Step 5: Run the CAT8004.SQL Script
The message Connected. appears if you successfully connected to the database.
SVRMGR> SHUTDOWN
|
WARNING: If anything goes wrong with the release 8.0.3 database during upgrade, you will need to restore the database from the backup. Back up your database now as a precaution. |
Ensure the database is cleanly shutdown before you back up. Ensure you back up the database files in the following list (and any other database files you may have created). Also, back up any scripts you may have created.
|
SYS1SID.ORA, USR1SID.ORA, RBS1SID.ORA, TMP1SID.ORA |
|
|
INITSID.ORA |
|
|
LOG1SID.ORA, LOG2SID.ORA |
|
|
CTL1SID.ORA |
To obtain the list of database files you must back up:
SVRMGR> SPOOL V8DBFILES.LOG
SVRMGR> SELECT MEMBER FROM V$LOGFILE;
SVRMGR> SELECT NAME FROM V$DATAFILE;
SVRMGR> SELECT VALUE FROM V$PARAMETER WHERE NAME =
'control_files';
SVRMGR> SPOOL OFF
See Chapter 13, "Backing Up and Recovering Database Files", Oracle8 Concepts, Oracle8 Backup and Recovery, and Oracle8 Administrator's Guide for information on how to back up a database.
Change the value of the COMPATIBLE parameter in the INITSID.ORA file to the release of Oracle8 Enterprise Edition to which you are upgrading. The COMPATIBLE parameter is set to the following by default:
COMPATIBLE=8.0.0.0.0
However, if you use the default setting (8.0.0.0.0), you will not be able to use the following new features of release 8.0.4:
To use these new release 8.0.4 features, set the COMPATIBLE parameter to the following:
COMPATIBLE=8.0.4.0.0
See Appendix C "Version 8 INIT.ORA Changes" of Oracle8 Migration for more information on COMPATIBLE parameter values.
When the Oracle Installation Settings dialog box appears:
The Select Installation Options dialog box appears.
The Select Cartridges and Options dialog box appears.
The Previous Version of Oracle Database dialog box appears indicating that Oracle Installer has detected an earlier version of the database. You are asked if you want to upgrade your Oracle8 database to release 8.0.4 using Oracle Data Migration Assistant.
The Select a Starter Database Configuration dialog box appears.
C:\> NET START ORACLESERVICEORCL
C:\> SET ORACLE_SID=ORCL
C:\> SVRMGR30
SVRMGR> CONNECT INTERNAL/PASSWORD
SVRMGR> SPOOL UPGRADE.LOG
SVRMGR> SPOOL OFF
SVRMGR> EXIT
Oracle Corporation supplies other scripts with Oracle8 Enterprise Edition that create additional structures you can use in managing your database and creating database applications. See Oracle8 Reference for a complete list and descriptions of available scripts.
Oracle Migration Assistant for Microsoft Access helps you migrate data from a Microsoft Access database to an Oracle8 database. Specifically, Oracle Migration Assistant for Microsoft Access:
Oracle Migration Assistant for Microsoft Access can migrate several types of Microsoft Access databases, including:
Oracle Migration Assistant for Microsoft Access can be used to migrate both 16-bit Access 2.0 databases and 32-bit Microsoft Access 7.0 databases.
To prepare a Microsoft Access database for migration:
To migrate a database using Oracle Migration Assistant for Microsoft Access:
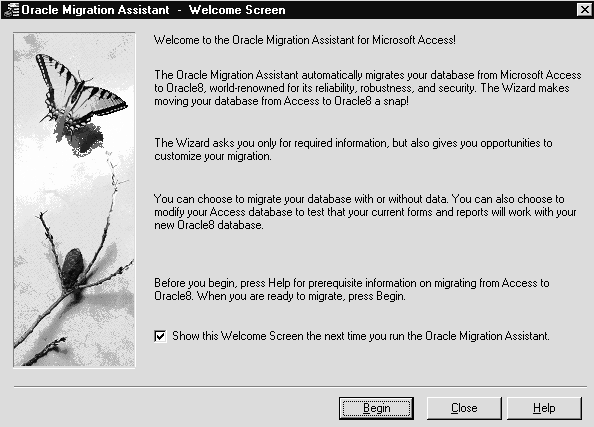
The Oracle Migration Assistant for Microsoft Access welcome window appears:
This section lists known issues and restrictions with Oracle Migration Assistant for Microsoft Access.