Release 8.0.4 for Windows NT
A55928-01
Library |
Product |
Contents |
Index |
| Oracle8 Enterprise Edition Getting Started Release 8.0.4 for Windows NT A55928-01 |
|
![]()
![]()
This chapter describes post-installation configuration tasks for Oracle8 Enterprise Edition.
Specific topics discussed are:
The configuration tasks that you must perform are determined by the products that you install and the network configuration files that you use. Some products such as Oracle Enterprise Manager must always be manually configured, while the configuration requirements for other products such as Oracle8 cartridges are determined by how you install the product and the network configuration files you use. The following table describes the circumstances under which Oracle products are automatically configured or must be manually configured:
Review the table below and the sections/documents referenced to identify the configuration responsibilities for your products.
| Product | Is Configuration Automatic? | See the Following for Instructions... |
|---|---|---|
|
Net8 network software |
For server configuration files, configuration is usually automatic. For client configuration files, configuration must typically be manually performed (unless you use the Host Adapter). |
"Net8" of this chapter |
|
Oracle Enterprise Manager |
No. |
"Oracle Enterprise Manager" of this chapter |
|
Oracle8 Options |
|
|
|
No. |
||
|
Yes. |
No manual configuration is required |
|
|
Yes |
No manual configuration is required |
|
|
PL/SQL External Procedures |
Depends upon network configuration files used. |
"Building External Procedures" of Chapter 15, "Developing Applications" |
|
Oracle8 Cartridges: |
|
|
|
Depends upon how product was installed. |
"Oracle8 Spatial Cartridge" of this chapter |
|
|
Depends upon how product was installed and whether you are upgrading or migrating from a previous release. |
"Oracle8 ConText Cartridge" of this chapter |
|
|
Depends upon how product was installed and network configuration files used. |
"Oracle8 Image Cartridge" of this chapter |
|
|
Depends upon how product was installed and network configuration files used. |
"Oracle8 Time Series Cartridge" of this chapter |
|
|
Depends upon how product was installed and network configuration files used. |
"Oracle8 Visual Information Retrieval Cartridge" of this chapter |
|
|
Advanced Replication Support |
Depends upon how support was installed. |
"Advanced Replication" of this chapter |
|
Multi-threaded External Callouts |
No. |
"Step 6: Enabling Multi-threaded Callout Support" of Chapter 15, "Developing Applications" |
Net8 is the Oracle network software that enables applications running on Windows NT and Windows 95 client workstations to access, modify, share, and store data on Oracle8 databases. An easy-to-use network configuration tool, Oracle Net8 Easy Config, enables you to configure Windows NT and Windows 95 clients to communicate with Oracle8 databases. Use Oracle Net8 Easy Config to create and modify server and client configuration files. See "Oracle Products for Windows NT and Windows 95" in Chapter 2, "Introducing Oracle8 Enterprise Edition" for information on how this product is installed. See also Net8 Getting Started for Windows NT and Windows 95 for instructions on using Oracle Net8 Easy Config.
Before describing how to configure Oracle Enterprise Manager, the key components are briefly described.
Oracle Enterprise Manager works with Oracle Intelligent Agent (installed in the Oracle8 database to be managed) to perform remote database management from a single console computer. Oracle Enterprise Manager is installed on a console computer, a Windows NT or Windows 95 client.
Oracle Intelligent Agent runs on the Oracle8 database to be managed. This Oracle8 database is the one you use for your production work. Oracle Intelligent Agent manages and completes tasks on the Oracle8 database that are requested from the Oracle Enterprise Manager Console computer. Oracle Intelligent Agent:
The Oracle Enterprise Manager Console uses an Oracle8 database as a repository for storing key configuration information. The Oracle8 repository database can be installed on:
The sole responsibility of the repository database is to act as the Oracle Enterprise Manager's storage resource. The Oracle8 repository database is:
Do not create a repository and a production database in the same Oracle8 database. If you do, you will not be able to perform many database administration tasks, such as starting or shutting down the database.
Set up your Oracle Enterprise Manager Console, managed Oracle8 database(s), and Oracle8 repository environment in either of two ways:
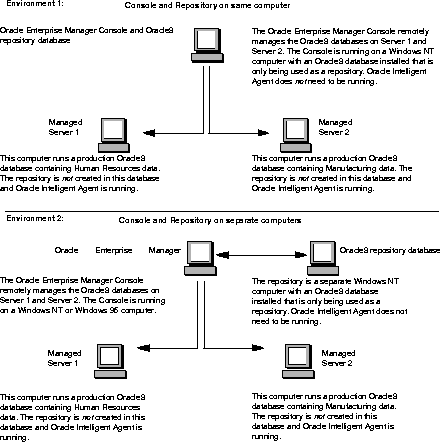
Oracle Enterprise Manager setup involves configuring the computers on which your Oracle Enterprise Manager, managed Oracle8 database(s), and Oracle8 repository database are installed. This table describes the tasks that must be performed to configure the two Oracle Enterprise Manager environments illustrated previously and the computers on which to perform these tasks. Each task is then fully described in the sections that follow. Use this table as a reference as you perform your configuration tasks.
| Perform This Task... | On Managed Oracle8 databases? | If Console and Repository are on same computer? | If Console and Repository are on separate computers? |
|---|---|---|---|
|
Yes |
No |
No |
|
|
No |
|
Yes, but only perform this task on the computer on which you create the repository |
|
|
Step 3: Create a Windows NT User Account on Managed Oracle8 Database Server |
Yes |
No |
No |
|
No |
No |
Yes |
|
|
No |
Yes |
Yes, but only perform this task on the computer on which you create the repository |
Ensure that the Oracle8 database services OracleServiceSID, OracleTNSListener80 (or OracleHOME_NAMETNSListener80 if using an Oracle home directory with a home name), and OracleAgent are started. Oracle Intelligent Agent automatically locates the services on the computer where it resides and passes this information to the Oracle Enterprise Manager Console.
To start Oracle Services:
C:\> NET START SERVICE_NAME
You need to have a user account with database administrator (DBA) privileges set up on the Oracle8 repository database. Oracle Enterprise Manager places the repository in the default tablespace of the user account to which you are connected when creating the repository. Because of this, Oracle Corporation recommends that you create a new user account so that the repository can be created in its own tablespace. It is also recommended that you create a new tablespace and the newly-created user be customized to use this tablespace as their default tablespace.
To create a repository user account on the Oracle8 repository database:
C:\> SVRMGR30
SVRMGR> CONNECT SYSTEM/PASSWORD
where PASSWORD is MANAGER for the SYSTEM user account by default. If you have changed this password, substitute MANAGER with the correct password.
SVRMGR> CREATE TABLESPACE REPOSIT_TABLESPACE DATAFILE
'ORACLE_HOME\DATABASE\DATAFILE' SIZE XM;
where:
SVRMGR> CREATE USER USERNAME IDENTIFIED BY PASSWORD DEFAULT TABLESPACE
REPOSIT_TABLESPACE;
SVRMGR> GRANT DBA TO USERNAME IDENTIFIED BY PASSWORD;
SVRMGR> EXIT
Exiting Server Manager closes the database connection.
After a repository user account is created, an NT user account must be created on the managed Oracle8 database server.
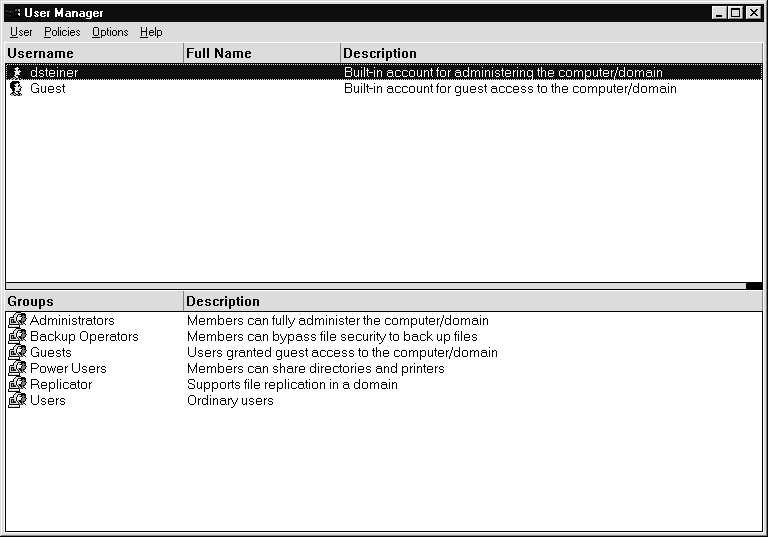
To create a user account on the managed Oracle8 database server:
The User Manager window appears:
The New User dialog box appears:
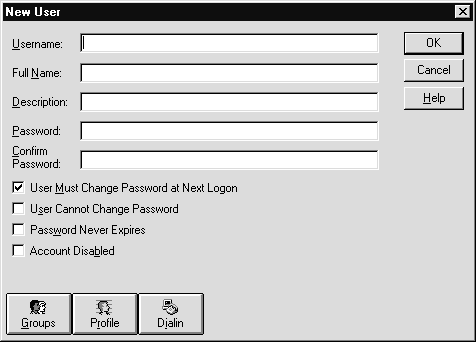
The user name and password that you enter here do not need to match those that you created in "Step 2: Create a Repository User Account".
The Group Memberships dialog box appears:
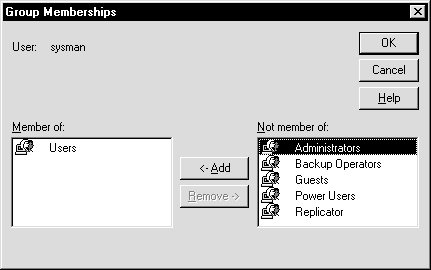
Administrators is added to the Member of list box.
The user is added and the User Manager window reappears.
The User Rights Policy dialog box appears:
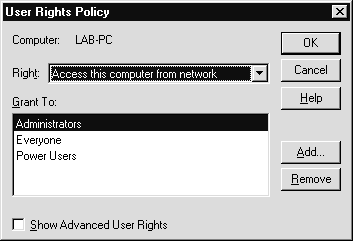
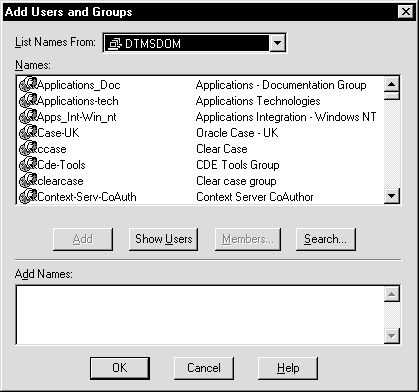
If Users does not exist, create it:
The Add Users and Groups dialog box appears:
Users appears in the Grant To list box.
The User Manager window reappears.
If Oracle Enterprise Manager is installed on the same computer as the repository database, you do not need to configure your network. If Oracle Enterprise Manager is installed on a Windows 95 or Windows NT client console separate from the computer on which the repository database is installed, you must configure the client computer so it can connect to the Oracle8 repository database:
To create network configuration files:
Before you can use Oracle Enterprise Manager, you need a repository on the console workstation where Oracle Enterprise Manager will run. The repository is a set of base tables in a database that contains status and environment information for your managed databases. A separate repository must be created for each user wanting to use Oracle Enterprise Manager.
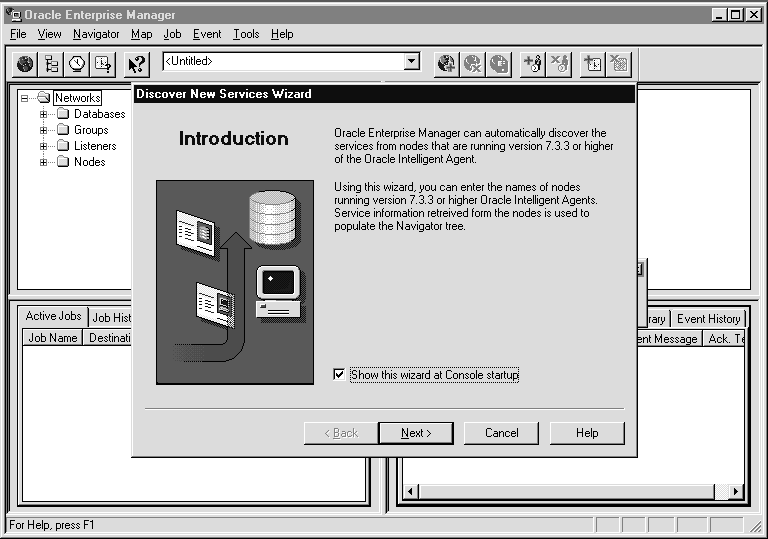
The Oracle Enterprise Manager Console workstation must also discover network services, such as databases, listeners, and nodes, to populate the Oracle Enterprise Manager Navigator tree. In addition to discovery, Oracle Enterprise Manager must also be able to manage these services for the Job Scheduling and Event Management systems. This can be achieved with the Discovery Wizard.
When the agent starts up and is explicitly requested by the Oracle Enterprise Manager with the Navigator Discovery feature, the agent passes information from the Oracle Enterprise Manager Console to populate the Navigator tree.
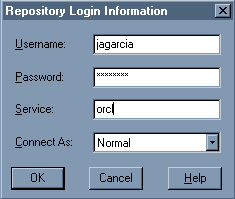
To create a repository:
The Oracle Enterprise Manager Repository Login Information dialog box appears:
The Oracle Repository Manager window appears, prompting you to build the repository:
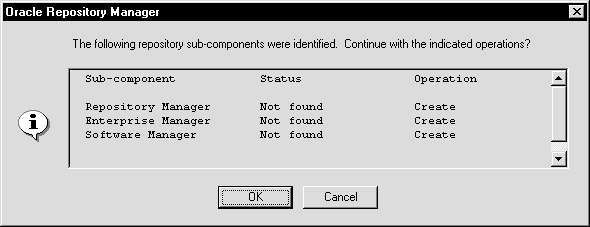
The repository is built. A dialog box asking if you want a quick tour of Oracle Enterprise Manger appears.
The Discover New Services Wizard appears:
Services are discovered when you see the dialog box below with a status of Discovered:
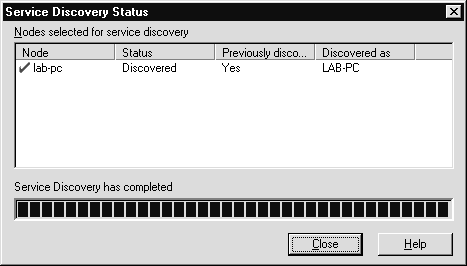
If the services are not discovered, click Help for troubleshooting hints. The wizard can be restarted by selecting Service Discovery under Navigator in the main menu.
The Oracle Enterprise Manager Console appears:
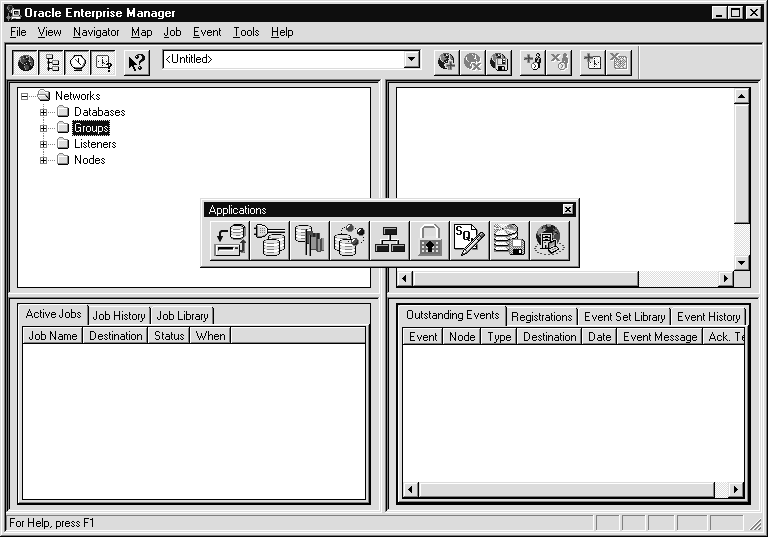
Configuration is complete. Oracle Enterprise Manager is now available for use.
Oracle8 Spatial Cartridge makes the storage, retrieval, and manipulation of spatial data easier and more intuitive to users. An example of spatial data is a road map. A road map is a 2-dimensional object containing points, lines, and polygons representing cities, roads, and political boundaries such as states. A road map represents geographic information. The locations of cities, roads, and political boundaries are projected onto a 2-dimensional display or piece of paper, preserving the relative positions and relative distances of the objects.
Review the table below to determine your configuration responsibilities:
| If You Installed... | Then... |
|---|---|
|
Oracle8 Spatial Cartridge during the same installation as Oracle8 Enterprise Edition |
No manual configuration is required. All tasks described in "Configuring Oracle8 Spatial Cartridge" were automatically performed. |
|
Oracle8 Spatial Cartridge during a separate installation from Oracle8 Enterprise Edition |
You must manually configure Oracle8 Spatial Cartridge by either:
|
To configure Oracle8 Spatial Cartridge:
C:\> SVRMGR30
SVRMGR> CONNECT INTERNAL/PASSWORD
SVRMGR> STARTUP
SVRMGR> CONNECT SYSTEM/PASSWORD
where PASSWORD is MANAGER for the SYSTEM user account by default. If you have changed this password, substitute MANAGER with the correct password.
SVRMGR> CREATE USER MDSYS IDENTIFIED BY MANAGER;
SVRMGR> GRANT ALL PRIVILEGES TO MDSYS IDENTIFIED BY MANAGER WITH ADMIN
OPTION;
SVRMGR> ALTER USER MDSYS QUOTA UNLIMITED ON SYSTEM;
SVRMGR> EXIT
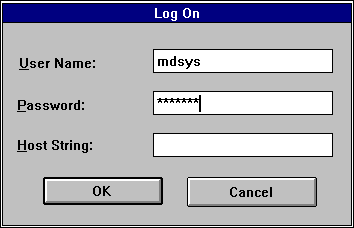
C:\> PLUS80W
The Host String field can be left blank as this is a local database connection. This field is for specifying a service name when connecting to a remote database.
SQL> @%ORACLE_HOME%\MD80\ADMIN\CATMD.SQL
This script creates the following:
For information on using Oracle8 Spatial Cartridge, See the Oracle8 Spatial Cartridge User's Guide and Reference.
|
Note: In order to develop applications that work with Oracle8 Spatial Cartridge, you must link with SDO80.LIB, which is located in the ORACLE_HOME\MD80 directory. |
Oracle8 ConText Cartridge provides search, retrieval, and viewing capabilities for text stored in an Oracle8 database. Oracle8 ConText Cartridge manages textual data in concert with traditional data types in an Oracle8 database. When text is inserted, updated, or deleted, Oracle8 ConText Cartridge automatically manages the change. Oracle8 ConText Cartridge enables text queries to be performed through SQL and PL/SQL from most Oracle interfaces, using tools such as SQL*Plus, Oracle Forms, and Pro*C.
Review the table below to determine your configuration responsibilities. All instructions assume that you have already installed Oracle8 ConText Cartridge release 2.3.6 from the Oracle8 Enterprise Edition for Windows NT CD-ROM:
This section describes how to upgrade from previous releases of Oracle ConText Option to Oracle8 ConText Cartridge release 2.3.6. The following table lists the release numbers of Oracle ConText with the corresponding Oracle Server releases:
You cannot migrate directly from release 1.1.2 to release 2.3.6. You need to first migrate to release 2.0.4, and then upgrade to release 2.3.6. You do not need to install Oracle ConText Option release 2.0.4 from your previous CD-ROM. Follow the instructions below appropriate to your situation:
To migrate from release 1.1.2 to release 2.0.4:
C:\> SVRMGR30
SVRMGR> CONNECT SYS/PASSWORD
SVRMGR> STARTUP [PFILE=PATH\FILENAME]
where PFILE is the option to specify the full path and file name of an initialization parameter file (INITSID.ORA) that exists in a location other than that for the default INITSID.ORA file.
SVRMGR> EXIT
| Start SQL*Plus... | By Doing This... |
|---|---|
|
From the MS-DOS command line |
Enter: C:\>PLUS80 |
|
From the Taskbar |
Choose Start > Programs > Oracle for Windows NT - [HOME_NAME] > SQL*Plus 8.0 |
SQL> CONNECT SYS/PASSWORD;
SQL> @SYS20000.SQL;
SQL> EXIT
SQL> @UPG20000.SQL;
SQL> EXIT
C:\ORACLE_HOME\CTX80\ADMIN>IMP80 CTXSYS/PASSWORD \FILE=CTXSET.DMP FULL=Y
IGNORE=Y
To upgrade from release 2.0.4 to release 2.3.6:
C:\> SVRMGR30
SVRMGR> CONNECT SYS/PASSWORD
SVRMGR> STARTUP [PFILE=PATH\FILENAME]
where PFILE is the option to specify the full path and file name of an initialization parameter file (INITSID.ORA) that exists in a location other than that for the default INITSID.ORA file.
SVRMGR> EXIT
| Start SQL*Plus... | By Doing This... |
|---|---|
|
From the MS-DOS command line |
Enter: C:\> PLUS80 |
|
From the Taskbar |
Choose Start > Programs > Oracle for Windows NT - [HOME_NAME] > SQL*Plus 8.0 |
SQL> CONNECT CTXSYS/PASSWORD;
SQL> @UPG23600.SQL;
SQL> EXIT
C:\ORACLE_HOME\BIN> CTXSRV80 -user CTXSYS/PASSWORD -personality DQM
C:\ORACLE_HOME\CTX80\ADMIN> PLUS80
SQL> CONNECT CTXSYS/PASSWORD
SQL> EXEC CTX_DDL.UPGRADE_INDEX(`DOC_POL1');
where DOC_POL1 is the name of the index to be upgraded.
To upgrade from release 2.0.6 to release 2.3.6:
C:\> SVRMGR30
SVRMGR> CONNECT SYS/PASSWORD
SVRMGR> STARTUP [PFILE=PATH\FILENAME]
where PFILE is the option to specify the full path and file name of an initialization parameter file (INITSID.ORA) that exists in a location other than that of the default INITSID.ORA file.
SVRMGR> EXIT
| Start SQL*Plus... | By Doing This... |
|---|---|
|
From the MS-DOS command line |
Enter: C:\> PLUS80 |
|
From the Taskbar |
Choose Start > Programs > Oracle for Windows NT - [HOME_NAME] > SQL*Plus 8.0 |
SQL> CONNECT CTXSYS/PASSWORD;
SQL> @UPG23600.SQL;
SQL> EXIT
C:\ORACLE_HOME\BIN> CTXSRV80 -user CTXSYS/PASSWORD -personality DQM
C:\ORACLE_HOME\CTX80\ADMIN> PLUS80
SQL> CONNECT CTXSYS/PASSWORD
SQL> EXEC CTX_DDL.UPGRADE_INDEX(`DOC_POL1');
where DOC_POL1 is the name of the index to be upgraded.
To upgrade from release 2.3.4 to release 2.3.6, you do not need to perform any upgrading tasks except loading lexical data. Go to "Load Lexical Data".
The CTXSRXversion executable, the ConText server without linguistics, has been obsoleted for release 2.3.6 of Oracle8 ConText Cartridge. All lexical information is now stored in the database. Therefore, if you have upgraded from a previous release of ConText, you need to load lexical data into the database.
To load lexical data into the database:
In this example, a rollback segment named ROLLBK_TEMP is created in a tablespace named DRSYS:
C:\ORACLE_HOME\BIN> SVRMGR30
SVRMGR> CONNECT SYSTEM/PASSWORD
SVRMGR> CREATE ROLLBACK SEGMENT ROLLBK_TEMP TABLESPACE DRSYS STORAGE
(INITIAL 5M NEXT 5M OPTIMAL 10M MINEXTENTS 2 MAXEXTENTS UNLIMITED);
SVRMGR> ALTER ROLLBACK SEGMENT ROLLBK_TEMP ONLINE;
SVRMGR> ALTER ROLLBACK SEGMENT ROLLBACK OFFLINE;
where ROLLBACK is the name of the rollback segment currently online.
C:\ORACLE_HOME\CTX80\ADMIN> IMP80 CTXSYS/PASSWORD FILE=CTXLEX.DMP FULL=Y
IGNORE=Y COMMIT=Y
SVRMGR> ALTER ROLLBACK SEGMENT ROLLBACK ONLINE;
SVRMGR> ALTER ROLLBACK SEGMENT ROLLBK_TEMP OFFLINE;
where ROLLBACK is the name of the rollback segment currently online.
SVRMGR> DROP ROLLBACK SEGMENT ROLLBK_TEMP;
The way you configure Oracle8 ConText Cartridge depends on how it was installed:
If you installed Oracle8 ConText Cartridge when you installed Oracle8 Enterprise Edition, then you can use Oracle Database Assistant to perform configuration tasks after installation.
To verify that the service is started:
If the service is not started, then select the service name, and click Start.
You can also select Enable Demo at this time if you want to use the ConText demos. A message appears showing the progress of the configuration. The configuration can take up to or more than 30 minutes, depending upon your specific environment.
A message appears informing you that configuration was successful.
Oracle Database Assistant closes, and your database is now ConText enabled.
If you upgraded or migrated from a previous release of ConText to release 2.3.6, then configure ConText using the instructions below.
To configure Oracle8 ConText Cartridge:
C:\> SVRMGR30
SVRMGR> CONNECT SYS/PASSWORD;
SVRMGR> STARTUP [PFILE=PATH/FILENAME]
where PFILE is the option to specify the full path and file name of an initialization parameter file (INITSID.ORA) that exists in a location other than that of the default INITSID.ORA file.
This section provides instructions for performing the initial setup required to use the samples. The samples are located in the directory ORACLE_HOME \CTX80\DEMO\.
The samples provided with Oracle8 ConText Cartridge are:
| Demonstration | Description |
|---|---|
|
CTXPLUS |
SQL*Plus text query scripts |
|
CTXLING |
SQL*Plus linguistic extraction sample |
To set up the CTXPLUS and CTXLING demos:
C:\ORACLE_HOME\BIN> CTXSRV80 -PERSONALITY DQL
Enter user: CTXSYS/PASSWORD
The ConText server is initialized, and the ConText session is opened. The prompt returns after the ConText server is started.
Choose Start > Programs > Oracle for Windows NT - [HOME_NAME] > Oracle Database Assistant.
Oracle8 ConText Cartridge Workbench consists of administrative tools and application development tools. Specific topics discussed in this section are:
To upgrade from previous releases of Workbench, install the current release of Oracle8 ConText Cartridge Workbench in the same Oracle home directory as the previous release using Oracle Installer. Oracle Installer automatically upgrades all Workbench files to the current release.
To configure Oracle8 ConText Cartridge Workbench:
Oracle Installer starts, and the Oracle8 ConText Cartridge Viewer Cartridge Setup dialog box appears:

| Field1 | Description |
|---|---|
|
Machine name |
Enter the machine name of the WebServer or Web Application Server. |
|
Admin listener port |
Enter the admin listener port of the WebServer or Web Application Server. |
|
Admin listener user and password |
Enter the admin listener user and password. |
|
Listener name |
Enter an existing listener name. |
|
User/Password |
Enter the CTXSYS user and password. The default password is CTXSYS. |
|
Connection alias |
Enter the database alias for the WebServer or Web Application Server to the Oracle8 database. Note: The alias that you enter here is not the alias that connects the client to the Oracle database. |
|
1
Ask your web server administrator for assistance with these values. |
If your web server is on the same computer as the Viewer Cartridge, then go to Step 5. Otherwise, the Remote Web Application Server dialog box appears.
Oracle Installer begins installing Viewer Cartridge files. This process may take several minutes.
After installation is complete, an information message appears with important post-installation instructions.
To configure Oracle8 ConText Cartridge Configuration Manager:
Oracle Installer starts, and the Oracle8 ConText Cartridge Configuration Manager Setup dialog box appears:
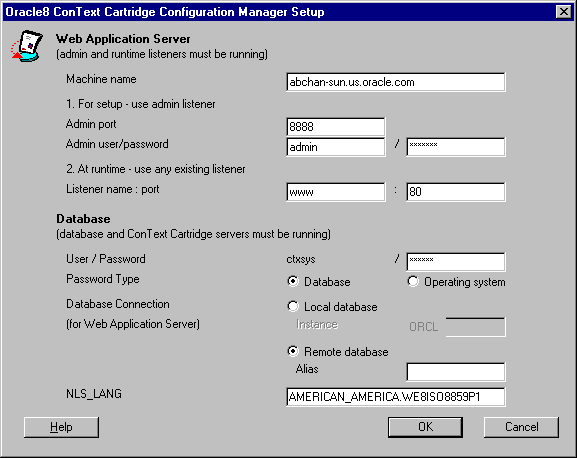
| Field1 | Description |
|---|---|
|
Machine name |
Enter the machine name of the WebServer or Web Application Server. |
|
Admin listener port |
Enter the admin listener port of the WebServer or Web Application Server. |
|
Admin listener user and password |
Enter the admin listener user and password. |
|
Listener name and port |
Enter an existing listener name and port number. |
|
User/Password |
Enter the CTXSYS user and password. The default password is CTXSYS. |
|
Connection alias |
Enter the database alias for the WebServer or Web Application Server to the Oracle8 database. The alias that you enter here is not the alias that connects the client to the Oracle database. |
|
1
Ask your web server administrator for assistance with these values. |
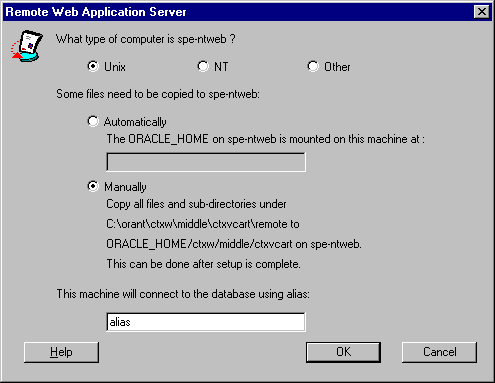
If your web server is on the same computer as the Configuration Manager, then go to Step 5. Otherwise, the Remote Web Application Server dialog box appears:
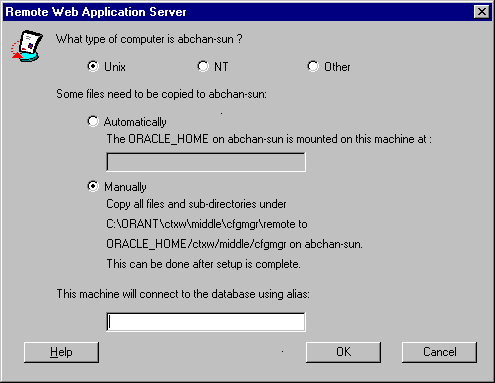
You can only select Automatically if the web server and Configuration Manager are installed on the same computer.
Enter the database alias of the client computer to the Oracle8 database. Also, note the directory information so that you can copy the files after the configuration process.
Oracle Installer begins installing Configuration Manager files. This process may take several minutes.
After installation is complete, an information message appears with important post-installation instructions.
This section provides instructions for performing the initial set up required to use the Oracle8 ConText Cartridge Workbench sample, CTXFORM.
To set up the CTXFORM demo:
The CTXDEMO user is provided with the Oracle8 ConText Cartridge. The CTXDEMO user has all of the required privileges to set up and use the demos. The initial password is CTXDEMO.
If you want to create a user, note that in addition to the standard privileges required for an Oracle user, the demo user must have CREATE privileges for the tables and views used in the demos. Also, the demo user must be assigned the CTXAPP role.
To create a demo user:
| Start SQL*Plus... | By Doing This... |
|---|---|
|
From the MS-DOS command line |
Enter: C:\> PLUS80 |
|
From the Taskbar |
Choose Start > Programs > Oracle for Windows NT - [HOME_NAME] > SQL*Plus 8.0 |
SQL> CONNECT CTXSYS/PASSWORD
SQL> GRANT CONNECT, RESOURCE TO MYDEMO IDENTIFIED BY MYDEMO;
SQL> GRANT CTXAPP TO MYDEMO;
where MYDEMO is the newly created user.
ORACLE_HOME\CTX80\DEMO\INSTALL> IMP80 CTXSYS/PASSWORD FILE=DEMO.DMP
IGNORE=Y TABLES=ARTICLES
Importing the DEMO.DMP file:
The DEMO.DMP file was originally exported for CTXDEMO. If you specified a user name other than CTXDEMO for your demonstration user, you must include the following parameters when running the Oracle Import utility:
For example:
IMP80 SYSTEM/PASSWORD FILE=DEMO.DMP FROMUSER=CTXDEMO TOUSER=MYDEMO
TABLES=ARTICLES
In the example above, a user named SYSTEM imports the ARTICLES table from the DEMO.DMP file created by CTXDEMO into the schema for a user named MYDEMO.
C:\ORACLE_HOME\CTX80\DEMO\INSTALL> CTXSRV80 -USER CTXSYS/CTXSYS -
PERSONALITY DDL
SQL> @DEMOINST.SQL
This script serves as an example of the tasks that you must perform to set up your tables for processing text queries using Oracle8 ConText Cartridge.
The script creates the policies, preferences, views, and results tables used by the demos and creates a text index for the ARTICLES table.
Oracle8 Image Cartridge provides image storage, retrieval, and format conversion capabilities through an object data type (ODT). Oracle8 Image Cartridge supports image storage using Binary Large Objects (BLOBS) and references to image data residing in external files (BFILEs).
Review the table below to determine your configuration responsibilities:
| If You... | Then... |
|---|---|
|
Installed Oracle8 Image Cartridge during the same installation as Oracle8 Enterprise Edition |
No manual configuration is required. All tasks described in "Configuring Oracle8 Image Cartridge" were automatically performed. |
|
Installed Oracle8 Image Cartridge during a separate installation from Oracle8 Enterprise Edition |
You must manually configure Oracle8 Image Cartridge by either:
|
|
Want to use the demos |
You must manually configure Oracle8 Image Cartridge Demos by either:
|
|
Manually copied your Oracle7 LISTENER.ORA and TNSNAMES.ORA files into your Oracle8 network directory |
You must modify the TNSNAMES.ORA and LISTENER.ORA network configuration files on your server to enable external procedure calls to work and Oracle8 Image Cartridge to function properly. Follow the tasks in "Configuring External Procedure Calls" in Chapter 8 of Net8 Getting Started for Windows NT and Windows 95. |
|
Want to use Oracle8 Visual Information Retrieval Cartridge with Oracle8 Image Cartridge |
Install Oracle8 Image Cartridge first. If you selected both cartridges for installation in the Select Cartridges and Options dialog box, Oracle8 Image Cartridge was installed first. |
|
Want to build the Oracle8 Image Cartridge sample application |
Install a C compiler. |
|
Did not install Oracle8 Objects Option |
Install Oracle8 Objects Option, which is required for Oracle8 Image Cartridge to function properly. |
|
Want multi-threaded external callout functionality |
Perform the tasks in "Step 6: Enabling Multi-threaded Callout Support" in Chapter 15, "Developing Applications". |
To configure Oracle8 Image Cartridge:
SVRMGR> CONNECT INTERNAL/PASSWORD
SVRMGR> STARTUP
SVRMGR> @%ORACLE_HOME%\ORD80\IMG\ADMIN\ORDIINST.SQL
Password: PASSWORD
SVRMGR> CONNECT INTERNAL/PASSWORD
SVRMGR> ALTER USER ORDSYS IDENTIFIED BY NEW_PASSWORD;
SVRMGR> EXIT
Oracle8 Image Cartridge Demos provide a sample demonstration showing how an image is extracted from an Oracle8 database.
To configure Oracle8 Image Cartridge Demos:
SVRMGR> CONNECT INTERNAL/PASSWORD
SVRMGR> @%ORACLE_HOME%\ORD80\IMG\ADMIN\IMGDEMO.SQL
Password: PASSWORD
SVRMGR> EXIT
C:> CD ORACLE_HOME\ORD80\IMG\DEMO
| If Using a... | Then Enter... |
|---|---|
|
Microsoft C compiler |
MAKE |
|
Borland C compiler |
BMAKE |
Oracle8 Time Series Cartridge stores and retrieves timestamped data through object data types (ODTs). Oracle8 Time Series Cartridge is a building block for applications, rather than being an end-user application. For example, applications can use this cartridge to process historical data derived from financial market transactions, such as trades of stocks, bonds, and mutual fund shares. From this you can find the opening, closing, low, and high prices for a stock on a specific date; calculate monthly volumes for a stock for a specific year; and derive the 30-day moving average for a stock over a year.
Review the table below to determine your configuration responsibilities:
| If You... | Then... |
|---|---|
|
Installed Oracle8 Time Series Cartridge during the same installation as Oracle8 Enterprise Edition |
No manual configuration is required. All tasks described in "Configuring Oracle8 Time Series Cartridge" were automatically performed. |
|
Installed Oracle8 Time Series Cartridge during a separate installation from Oracle8 Enterprise Edition |
You must manually configure Oracle8 Image Cartridge by either:
|
|
Want to use the demos |
Perform the tasks in "Configuring Oracle8 Time Series Cartridge Demos". |
|
Manually copied your Oracle7 LISTENER.ORA and TNSNAMES.ORA files into your Oracle8 network directory |
You must modify the TNSNAMES.ORA and LISTENER.ORA network configuration files on your server to enable external procedure calls to work and Oracle8 Time Series Cartridge to function properly. Follow the tasks in "Configuring External Procedure Calls" in Chapter 8 of Net8 Getting Started for Windows NT and Windows 95. |
|
Did not install Oracle8 Objects Option |
Install Oracle8 Objects Option, which is required for Oracle8 Time Series Cartridge to function properly. |
|
Want multi-threaded external callout functionality |
Perform the tasks in "Step 6: Enabling Multi-threaded Callout Support" in Chapter 15, "Developing Applications". |
To configure Oracle8 Time Series Cartridge:
SVRMGR> CONNECT INTERNAL/PASSWORD
SVRMGR> CREATE USER ORDSYS IDENTIFIED BY ORDSYS;
SVRMGR> GRANT CONNECT,RESOURCE,CREATE LIBRARY TO ORDSYS;
SVRMGR> GRANT GRANT ANY PRIVILEGE TO ORDSYS;
SVRMGR> CONNECT ORDSYS/PASSWORD
SVRMGR> @%ORACLE_HOME%\ORD80\TS\ADMIN\ORDTINST.SQL
This script:
SVRMGR> CONNECT INTERNAL/PASSWORD
SVRMGR> ALTER USER ORDSYS IDENTIFIED BY NEW_PASSWORD;
SVRMGR> EXIT
Five Oracle8 Time Series Cartridge Demos are provided:
To configure Oracle8 Time Series Cartridge Demos:
Oracle Visual Information Retrieval Cartridge stores, retrieves, and manipulates image data managed by an Oracle8 database. This cartridge supports image storage using BLOBS and references to image data residing in external files (BFILEs). This cartridge is a building block for various imaging applications, rather than being an end-user application. Some example applications for this cartridge are digital art galleries and museums, real estate marketing, document imaging, and stock photo collections (such as for fashion designers and architects).
Review the table below to determine your configuration responsibilities:
| If You... | Then... |
|---|---|
|
Installed Oracle8 Visual Information Retrieval Cartridge during the same installation as Oracle8 Enterprise Edition |
No manual configuration is required. All tasks described in "Configuring Oracle8 Visual Information Retrieval Cartridge" were automatically performed. |
|
Installed Oracle8 Visual Information Retrieval Cartridge during a separate installation from Oracle8 Enterprise Edition |
You must manually configure Oracle8 Visual Information Retrieval by either:
|
|
Want to use the demos |
Perform the tasks in "Configuring Oracle8 Visual Information Retrieval Cartridge Demos". |
|
Want to build an Oracle8 Visual Information Retrieval Cartridge sample application. |
Install a C compiler. |
|
Manually copied your Oracle7 LISTENER.ORA and TNSNAMES.ORA files into your Oracle8 network directory |
You must modify the TNSNAMES.ORA and LISTENER.ORA network configuration files on your server to enable external procedure calls to work and Oracle8 Visual Information Retrieval Cartridge to function properly. Follow the tasks in "Configuring External Procedure Calls" in Chapter 8 of Net8 Getting Started for Windows NT and Windows 95. |
|
Did not install Oracle8 Objects Option |
Install Oracle8 Objects Option, which is required for Oracle8 Visual Information Retrieval Cartridge to function properly. |
|
Want multi-threaded external callout functionality |
Perform the tasks in "Step 6: Enabling Multi-threaded Callout Support" in Chapter 15, "Developing Applications". |
To configure Oracle8 Visual Information Retrieval Cartridge:
C:\> SVRMGR30
SVRMGR> CONNECT INTERNAL/PASSWORD
SVRMGR> @%ORACLE_HOME%\ORD80\VIR\ADMIN\ORDRINST.SQL
Password: PASSWORD
SVRMGR> CONNECT INTERNAL/PASSWORD
SVRMGR> ALTER USER ORDSYS IDENTIFIED BY NEW_PASSWORD;
SVRMGR> EXIT
Oracle8 Visual Information Retrieval Demos provide a sample demonstration showing how an image is extracted from an Oracle8 database.
To configure Oracle8 Visual Information Retrieval Cartridge Demos:
SVRMGR> CONNECT INTERNAL/PASSWORD
SVRMGR> @%ORACLE_HOME%\ORD80\VIR\ADMIN\VIRDEMO.SQL
Password: PASSWORD
SVRMGR> EXIT
CD ORACLE_HOME\ORD80\VIR\DEMO
| If Using a... | Then Enter... |
|---|---|
|
Microsoft C compiler |
MAKE |
|
Borland C compiler |
BMAKE |
Review the table below to determine your configuration responsibilities:
| If You... | Then... |
|---|---|
|
Selected:
|
All configuration tasks described in "Configuring Advanced Replication Support" were automatically performed. No manual configuration is required. |
|
Decided to add replication support to a previously installed Oracle8 Enterprise Edition |
You must manually configure Advanced Replication support by following the procedures in "Configuring Advanced Replication Support". |
Follow the procedures described below:
See Oracle8 Enterprise Edition Installation for Windows NT for Advanced Replication installation requirements.
The following are recommended tablespace requirements for Advanced Replication:
Certain initialization parameter values must be set or added to the INITSID.ORA file (recommended values are included) if you use Advanced Replication.
Add these initialization parameters to the master site:
Add these initialization parameters for snapshot sites:
| Parameter Name | Recommended Value |
|---|---|
|
JOB_QUEUE_PROCESSES |
2 |
|
JOB_QUEUE_INTERVAL |
60 seconds |
|
SNAPSHOT_REFRESH_KEEP_CONNECTIONS |
FALSE |
After setting up the INITSID.ORA file with the initialization parameters for Advanced Replication, perform the following steps:
To configure Advanced Replication:
SVRMGR> CONNECT INTERNAL/PASSWORD
SVRMGR> STARTUP
The script is found in the ORACLE_HOME\RDBMS80\ADMIN directory. It takes approximately one hour to run. Spool output to a log file first before running CATREP.SQL.
SVRMGR> SPOOL OUTPUT.LOG
This creates a file called OUTPUT.LOG to which to output all on-screen activity while the SPOOL session is open.
SVRMGR> @%RDBMS80%\ADMIN\CATREP8M.SQL
SVRMGR> SPOOL OFF
OUTPUT.LOG is saved to your current directory.
SVRMGR> SELECT * FROM ALL_OBJECTS WHERE STATUS = 'INVALID';
If all package bodies compiled successfully, the following message displays:
0 rows selected.
If you find that any of the package bodies compiled incorrectly, recompile them manually. The syntax for running them manually is:
SVRMGR> ALTER PACKAGE PACKAGE NAME COMPILE BODY;
If CATREP.SQL ran successfully, a number of replication tables are created in the SYSTEM subdirectory. The database is now set up for Advanced Replication support.
SVRMGR> EXIT
The practical limit to the number of master sites an environment can have is 36. The processes SNP0 to SNP9 (total of 10) and SNPA to SNPZ (total of 26) each handle one destination master at a time.
If you use Advanced Replication and intend to set up a large number of replicated objects, monitor the following data dictionary tables with the SQL SELECT command:
|
SOURCE$ |
I_ARGUMENT1 |
|
IDL_UB1$ |
IDL_SB4$ |
|
IDL_UB2$ |
IDL_CHAR$ |
|
I_SOURCE1I$ |
TRIGGER$ |
|
ARGUMENT$ |
|
If necessary, increase the storage parameters to accommodate the storage requirements of large numbers of replicated objects.
If you are upgrading from a previous version of the Oracle8 database and want to use Advanced Replication, you must first complete the upgrade (see Chapter 7, "Migrating and Upgrading" in this guide). After upgrading, Advanced Replication is automatically installed with the Oracle8 database during Release 8.0 installation (see Oracle8 Enterprise Edition Installation for Windows NT).
Advanced Replication is an advanced feature. Please consult your Oracle8 Replication documentation for concepts and details before proceeding. For additional information, contact Oracle Education.