Release 8.0.4 for Windows NT
A55928-01
Library |
Product |
Contents |
Index |
| Oracle8 Enterprise Edition Getting Started Release 8.0.4 for Windows NT A55928-01 |
|
This chapter describes how to create a database.
Specific topics discussed are:
Before creating a database, it is important to understand that starting with Oracle8 Enterprise Edition, all mounted Oracle databases in a network must have unique database names. A database name is associated with a database at "CREATE DATABASE" time and stored in the control file(s) of the database. If the database keyword is provided in the CREATE DATABASE statement, then that value becomes the database name for that database. If not, then the value of the DB_NAME parameter in the INITSID.ORA file is used. If the DB_NAME parameter is not specified, then the default DB_NAME value is ORACLE.
If you attempt to mount two Oracle8 databases with the same database name, you receive the following error during the second mount:
ORA-01102: cannot mount database in EXCLUSIVE mode
If there are two or more Oracle8 databases on the same computer located in different Oracle homes:
To change the name of an existing database, you must use the CREATE CONTROLFILE statement to recreate your control file(s) and specify a new database name. This restriction is imposed only on Oracle8 instances. Any Oracle7 instances running simultaneously with an Oracle8 instance are not subject to this restriction.
This section describes how to create a new database. You can choose either of the following tools to create a database:
Use Oracle Database Assistant to create a database because it is the easiest method. If you want to create a database using command line tools, you can use the BUILD_DB.SQL script located in ORACLE_HOME\RDBMS80\ADMIN.
During installation of Oracle8 Enterprise Edition, you can select either the Typical Configuration option or Custom Configuration option to create a database with Oracle Database Assistant. If you already have a database, or do not want to create a database during the installation process, you can choose to use this assistant to create a database at a later date.
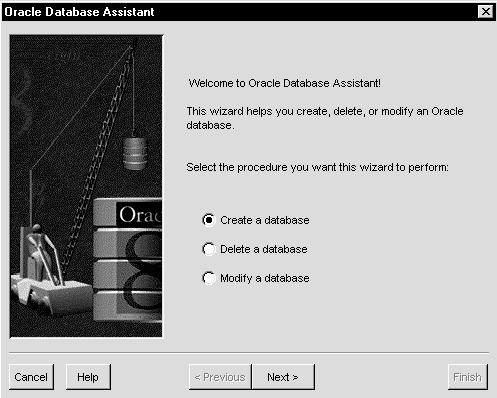
To create a database using Oracle Database Assistant:
The Oracle Database Assistant welcome window appears:

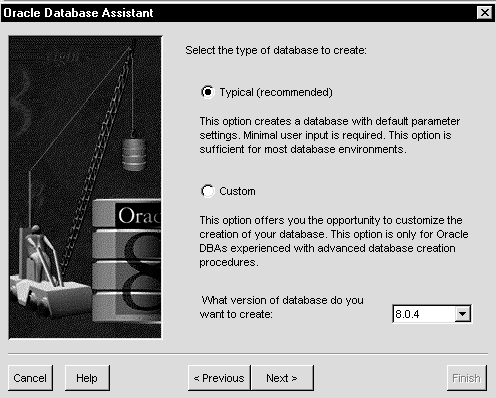
The following window appears:

You can modify a Custom Configuration Oracle8 database to support the following cartridges that you installed through the Custom installation option on your CD-ROM, but have not yet configured:
Cartridges installed through the Custom Installation option are not automatically configured during installation. The Modify option of Oracle Database Assistant automatically configures your cartridges. If you installed Oracle cartridges through the Oracle8 Enterprise Edition option on the CD-ROM, your cartridges were automatically configured for the starter database ORCL.
The Delete a Database option of Oracle Database Assistant lets you quickly and easily delete databases.
You can choose options in Oracle Database Assistant to enable or disable multi-threaded server support in your Oracle8 database. Multi-threaded server (MTS) support enables many client user processes to share a small number of server processes. Many client users can connect to a dispatcher process. The dispatcher process then routes client requests to the next available shared server process. There is no dedicated server process for each user process that remains associated with the client user process for the duration of the connection. Instead, inactive server processes are "recycled" and used as needed. This reduces system overhead and enables you to increase the number of supported users. See Net8 Administrator's Guide, Oracle8 Server Concepts, and Oracle8 Reference for more information.
This section describes the steps to create a database manually. There are a number of ways to create a database depending on if you want to:
The table below summarizes the steps to create a new database for each of the above database creation scenarios. Each step is explained in detail in the following sub-sections.
An example is used in the following sections to demonstrate the commands to create a database. In this example, you will copy an existing database (the starter database with a SID of ORCL located in the C:\ ORANT directory) to a new database with a SID of PROD located in the C:\MYDIR directory. You will delete the ORCL database after you have created the PROD database.
Create a directory, for example, C:\MYDIR in which to put the new database PROD.
It is only necessary to export if you want to copy the contents of an existing database to a new database. You must perform this task if you are going to remove the old database and put its data in the new database. If you are going to create an additional database, you only need to this if you want a copy of the data from the old database in the new database.
To export all data from an existing database to a new database:
C:\ORANT> SET ORACLE_SID=ORCL
C:\ORANT> EXP80 SYSTEM/PASSWORD FILE=MYEXP.DMP FULL=Y LOG=MYEXP.LOG
You now have a full database export of the starter database ORCL in the file MYEXP.DMP, with all messages from the Export utility logged in the MYEXP.LOG file.
It is only necessary to delete database files if you want to copy an existing database to a new database and then remove the old database.
To delete database files:
C:\ORANT> ORADIM80 -SHUTDOWN -SID ORCL -USRPWD PASSWORD -SHUTTYPE INST
-SHUTMODE I
LOG3ORCL.ORA AND LOG4ORCL.ORA database files are only available with release 7.3.4 and 8.0.4 databases. Do not delete the INITORCL.ORA file, as it will be the basis for the new initialization parameter file INITPROD.ORA in "Modify the INITSID.ORA File".
If you are using the starter database ORCL as the basis for your new database, copy C:\ORANT\DATABASE\INITORCL.ORA to C:\MYDIR\DATABASE\ INITPROD.ORA and modify the file.
If you do not have an existing database on your system, you cannot copy an initialization parameter file to use as the basis for your INITPROD.ORA file. You can use the sample initialization parameter file INITORCL.80 provided in the C:\ORANT\DATABASE directory as the basis for INITPROD.ORA.
You must modify the CONTROL_FILES and DB_NAME initialization parameters in the INITPROD.ORA file or you will not be able to start the PROD database. Modifying the initialization parameters GLOBAL_NAMES and DB_FILES is highly recommended to optimize performance.
| Initialization Parameter | How to Modify... |
|---|---|
|
CONTROL_FILES |
This parameter lists the control files of the database. You do not have the control files on your file system at this point, because the control files are created when you execute the CREATE DATABASE statement. Ensure you specify the complete path and file name, including drive letter. For example,
|
|
DB_NAME |
This parameter indicates the name of the database, and must match the name used in the CREATE DATABASE statement in "Using BUILD_DB.SQL" in this chapter. This name does not need to match the SID of the database service. You give a unique database name to each database. For example, You can use up to eight characters for the database name. |
|
GLOBAL_NAMES |
The default value of this parameter is FALSE; however, it is recommended to set this parameter to TRUE. See the Oracle8 Administrator's Guide to find out more about global names and how they relate to database links. |
|
DB_FILES |
Set this initialization parameter to the same number as the value of the MAXDATAFILES option of the CREATE DATABASE statement. The value of 100 is used for this example.
|
|
Additional Information:
See Appendix B, "Initialization Parameters" for information on other initialization parameters you may want to add to the INITPROD.ORA file. |
It is only necessary to create and start an Oracle8 service if you want to:
Before you create the database, first create a Windows NT service to run the database. This service is the Oracle8 database process, ORACLE80.EXE, installed in the form of a Windows NT service. Use ORADIM80 to create the service. Upon creation, the service starts automatically. See "Using ORADIM80" in Chapter 3, "Database Tools Overview", for information on how to use ORADIM80.
To create a Windows NT service:
C:\MYDIR> ORADIM80 -NEW -SID PROD -INTPWD PASSWORD -STARTMODE AUTO
-PFILE C:\MYDIR\DATABASE\INITPROD.ORA
Note that the previously created INITPROD.ORA file is specified, with complete path, including drive name. You do not receive a message indicating the success or failure of this command. You can check if the service is started in the services window of the Windows NT Control Panel.
C:\MYDIR> SET ORACLE_SID=PROD
The CREATE DATABASE statement is a sequence of SQL statements that creates the database. Create a script containing this statement that you can reuse anytime you want to create a database. Use the BUILD_DB.SQL script located in C:\ORANT\RDBMS80\ADMIN as a basis for your script.
To prepare the CREATE DATABASE script:
A sample script follows:
-- This file must be run out of the directory containing the
-- initialization file.
startup nomount pfile=C:\mydir\DATABASE\initprod.ora
--  Create database
create database prod
controlfile reuse
logfile 'C:\mydir\DATABASE\log1prod.ora' size 1M reuse,
	'C:\mydir\DATABASE\log2prod.ora' size 1M reuse,
	'C:\mydir\DATABASE\log3prod.ora' size 1M reuse,
	'C:\mydir\DATABASE\log4prod.ora' size 1M reuse,
datafile 'C:\mydir\DATABASE\sys1prod.ora' size 10M reuse autoextend on
next 10M maxsize 200M
character set WE8ISO8859P1;
create rollback segment rb_temp;
-- Create additioanal tablespaces ...
-- USER_DATA: Create user sets this as the default tablespace
-- TEMPORARY_DATA: Create user sets this as the temporary tablespace
-- ROLLBACK_DATA: For rollback segments
create tablespace user_data
	datafile 'C:\mydir\DATABASE\usr1prod.ora' size 3M reuse autoextend on
	next 5M maxsize 150M;
create tablespace rollback_data
	datafile 'C:\mydir\DATABASE\rbs1prod.ora' size 5M reuse autoextend on
	next 5M maxsize 150M;
create tablespace temporary_data
	datafile 'C:\mydir\DATABASE\tmp1prod.ora' size 2M reuse autoextend on
	next 5M maxsize 150M;
alter rollback segment rb_temp online;\x7f
-- Change the SYSTEM users' password, default tablespace and
-- temporary tablespace.
alter user system temporary tablespace temporary_data;
alter user system default tablespace user_data;
-- Create 16 rollback segments.  Allows 16 concurrent users with open
-- transactions updating the database. This should be enough.
create public rollback segment rb1 storage(initial 50K next 50K)
tablespace rollback_data;
create public rollback segment rb2 storage(initial 50K next 50K)
tablespace rollback_data;
create public rollback segment rb3 storage(initial 50K next 50K)
tablespace rollback_data;
create public rollback segment rb4 storage(initial 50K next 50K)
tablespace rollback_data;
create public rollback segment rb5 storage(initial 50K next 50K)
tablespace rollback_data;
create public rollback segment rb6 storage(initial 50K next 50K)
tablespace rollback_data;
create public rollback segment rb7 storage(initial 50K next 50K)
tablespace rollback_data;
create public rollback segment rb8 storage(initial 50K next 50K)
tablespace rollback_data;
create public rollback segment rb9 storage(initial 50K next 50K)
tablespace rollback_data;
create public rollback segment rb10 storage(initial 50K next 50K)
tablespace rollback_data;
create public rollback segment rb11 storage(initial 50K next 50K)
tablespace rollback_data;
create public rollback segment rb12 storage(initial 50K next 50K)
tablespace rollback_data;
create public rollback segment rb13 storage(initial 50K next 50K)
tablespace rollback_data;
create public rollback segment rb14 storage(initial 50K next 50K)
tablespace rollback_data;
create public rollback segment rb15 storage(initial 50K next 50K)
tablespace rollback_data;
create public rollback segment rb16 storage(initial 50K next 50K)
tablespace rollback_data;
You will run this script at the Server Manager prompt in the section, "Create a Database".
Before you run the BUILD_PROD.SQL script to create a database, you must perform the following tasks:
C:\MYDIR> NET START
A list of all Windows NT services currently running on the system appears. If OracleServicePROD is missing from the list, enter:
C:\MYDIR> NET START ORACLESERVICEPROD
C:\MYDIR> SET ORACLE_SID=PROD
C:\MYDIR> SVRMGR30
SVRMGR> CONNECT INTERNAL/PASSWORD
The password is the one you previously used to create the service, with the ORADIM80 -NEW command in "To create a Windows NT service:". You should see the message Connected.
SVRMGR> STARTUP NOMOUNT PFILE=C:\MYDIR\DATABASE\INITPROD.ORA
When the initialization parameter file INITPROD.ORA is located in the DATABASE subdirectory of your Oracle home directory, the PFILE specification is optional. Otherwise, you must specify the PFILE option with the complete path and file name of the initialization parameter file. Note that there is an equal sign (=) between the keyword PFILE and the path/filename. There are no space characters around the equal sign (=).
SVRMGR> SPOOL BUILD_PROD.SQL.LOGSVRMGR> @BUILD_PROD.SQL
This command assumes the script file is located in the directory from which Server Manager was invoked. If this is not the case, specify the complete path in front of the file name. If the database is created successfully, the message Statement processed appears. If you receive any errors, there are three possible causes:
From the MS-DOS command prompt, enter:
C:\> NET HELPMSG n
or
From the Server Manager prompt, enter:
SVRMGR> HOST NET HELPMSG n
where n is the operating system error number. See "Operating System Permission Issues" in Appendix F, "Troubleshooting" for more information.
You must correct these problems before attempting to recreate a database.
SVRMGR> @%RDBMS80%\ADMIN\CATALOG.SQL
SVRMGR> @%RDBMS80%\ADMIN\CATPROC.SQL
SVRMGR> @%RDBMS80%\ADMIN\CATREP8M.SQL
Note that CATREP8M.SQL requires at least an hour to run, depending on your system.
SVRMGR> SPOOL OFF
|
Note: You may see many messages such as object to be dropped does not exist and name already used by another object while the scripts are running. These are information messages and are intended to occur while creating a new database. If you see any unusual errors in the BUILD_PROD.SQL.LOG log file, see Oracle8 Server Messages for suggested actions. |
You can choose to import the full export created in the section "Export an Existing Database" into the new database.
C:\MYDIR> IMP80 SYSTEM/PASSWORD FILE=MYEXP.DMP FULL=Y LOG=MYIMP.LOG
If this is the first database on the system or if you want to make the new database the default database, you must make a change in the registry.
C:\MYDIR> REGEDT32
The registry editor window appears.
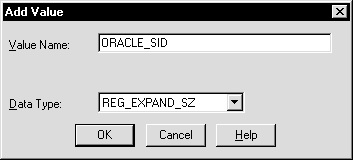
If you do not have ORACLE_SID because this is the first database on your system, you must create the ORACLE_SID parameter.
To create ORACLE_SID parameter:
C:\> REGEDT32
The registry editor window appears.
The Add Value dialog box appears:

A string editor dialog box appropriate for the data type appears:

The registry editor adds the ORACLE_SID parameter.
The registry exits.
To back up the new database:
C:\MYDIR> ORADIM80 -SHUTDOWN -SID PROD -USRPWD PASSWORD
-SHUTTYPE SRVC,INST -SHUTMODE I
|
WARNING: Although ORADIM80 returns the prompt immediately, you must wait for the database and the service to stop completely before continuing to Step 2. Wait until the Control Panel indicates the OracleServicePROD service has stopped. If you do not do this, the backup may be useless as it was taken while data was being written to the data files. |
You can now start the database again, create users and objects if necessary, make any other changes, and use the database. Ensure you make a database backup, if possible, after making any significant change to the database, such as switching the ARCHIVELOG mode or adding a tablespace or data file.
|
Additional Information:
See Chapter 13, "Backing Up and Recovering Database Files", Oracle8 Concepts, Oracle8 Backup and Recovery, and Oracle8 Administrator's Guide for more information on archiving and backup/recovery. |