Release 8.1.5 for Windows NT
A68694-01
Library |
Product |
Contents |
Index |
| Oracle8i
Enterprise Edition for Windows NT Getting Started
Release 8.1.5 for Windows NT A68694-01 |
|
![]()
![]()
This chapter describes the options available to you when
you have existing databases on your computer and want to install
the latest release of Oracle8i Enterprise Edition. In particular,
it describes how to coexist different database releases using multiple
Oracle homes on your computer, and how to migrate an Oracle7 database or
upgrade an earlier Oracle8 database release to the current release of Oracle8i
Enterprise Edition.
Specific topics discussed are:
Read this chapter if you have existing Oracle7 and/or
Oracle8 databases on your computer and you want to install Oracle8i
Enterprise Edition release 8.1.5. If you are installing Oracle8i
Enterprise Edition on a computer that has no other Oracle database
releases, you do not have to read this chapter.
| Additional
Information:
See Oracle8i Enterprise Edition Installation for Windows NT if you want to install Oracle8i Enterprise Edition on a computer containing no other databases. |
|
Note: The generic Oracle8i Migration guide is the primary source of migration and upgrading information in the Oracle documentation set. You are frequently referred to the generic guide throughout this chapter, in particular to obtain information on what you must do before and after migrating or upgrading. Information on how to run the various migration and upgrade utilities is also provided in the generic guide, but the focus is on UNIX. This chapter provides information on using these utilities on Windows NT. |
|
Note: The directory path examples in this chapter follow Optimal Flexible Architecture (OFA) guidelines (for example, ORACLE_BASE\ORACLE_HOME\RDBMS\ADMIN). If you specified non-OFA compliant directories during installation, your directory paths will differ. See section "OFA and Multiple Oracle Home Configurations" for information. |
If you already have Oracle7, and/or Oracle8 databases on your computer and want to install release 8.1.5, the following options are available to you.
|
Note: It is not possible to install release 8.1.5 products into an existing Oracle home created using the pre-8.1.5 Oracle Installer. |
If you are not sure what option is best for you, read the following overview sections:
An Oracle home is a directory location where you can install software. Multiple Oracle homes functionality enables you to preserve your previous release 7.x or 8.0.x databases in locations separate from where you will install release 8.1.5. Installing a new database release in a separate Oracle home allows you to test it before migrating or upgrading your production databases to the new release. There have been modifications to multiple Oracle home functionality since it was introduced in release 8.0.4. If you have multiple Oracle homes on your computer from previous releases, see "Multiple Oracle Home Functionality in Different Releases" to become familiar with the new Oracle home functionality for release 8.1.5. In particular, note:
This section explains the difference between migrating, upgrading,
and downgrading, and lists the Oracle database versions that can be migrated
or upgraded.
Migrating is the process of transforming an installed
version of an Oracle database into a later version. For example, transforming
an Oracle7 database to an Oracle8i database is migrating the database
system.
| Additional Information: |
Upgrading is the process of transforming an installed
version of an Oracle database release into another release of the same
version. For example, transforming an Oracle8 database release 8.0.4
to release 8.1.5 is upgrading the database system.
| Additional Information: |
Downgrading is the process of transforming an installed
version of an Oracle database from a later release back into an earlier
release. For example, transforming an Oracle database from release
8.1.5 back into release 8.0.3 is downgrading, and transforming an Oracle
database from version 8 back into version 7 is downgrading.
| Additional
Information:
Chapter 10, "Downgrading to an Older Version 8 Release" for
information about downgrading to release 8.0, or Chapter 11, "Downgrading
to Version 7" for information about downgrading to version 7 of Oracle8i
Migration.
|
You can easily migrate or upgrade databases across multiple
Oracle homes. If you use the graphical user interface (GUI) Oracle Data
Migration Assistant, all database instances on your system are displayed
in a drop-down list. You select the Oracle database instance you want to
migrate or upgrade and the assistant takes care of any multiple Oracle
homes issues.
If you use the command line tool MIG to migrate, or a U*.SQL
script to upgrade, you need to copy files from one Oracle home directory
to another. You must also ensure the PATH variable is set correctly so
that any Oracle database tools you run are started from the correct Oracle
home directory.
| Additional
Information:
See "You can change the value of
PATH by using one of the following methods:".
|
Check that your Oracle database release can be migrated or
upgraded directly to Oracle8i Enterprise Edition. This table provides
a list of the database releases you can migrate or upgrade and the tools
you can use to perform these tasks:
An alternative method of migrating or upgrading is to:
The Export Utility puts all of the data in one large binary
file that can require large amounts of disk space.
| Additional
Information:
See "Choose a Migration Method" in Chapter 2, "Preparing to Migrate" of Oracle8i Migration for information on when to use the Export/Import utilities for migrating a database. See "Export Utility (EXP)" and "Import Utility (IMP)" for information on how to start these utilities. See "Exporting an Existing Database" and "Importing a Database" for information on using these tools on Windows NT. |
Oracle7 and Oracle8i clients can communicate either with Oracle7 or Oracle8i databases. This functionality gives you maximum flexibility when designing your network and deciding when to:
|
Note: It is not possible to install release 8.1.5 products into an existing Oracle home created using the pre-8.1.4 Oracle Installer. |
Consider the following database coexistence issues before you decide which of the above options is most suitable for your requirements:
Can all my Oracle7 applications run on an Oracle8i
database?
Most Oracle7 applications can run on an Oracle8i database.
Some applications cannot run on an Oracle8i database unless you
upgrade them to versions that support Oracle8i databases. If you
have a combination of Oracle7 and Oracle8i applications, you may
want to have an Oracle7 database and Oracle8i database exist on
the same computer, until you have time to upgrade all your Oracle7 applications
to Oracle8i. Contact your application vendor to check if your third-party
applications are supported with Oracle8i Enterprise Edition.
| Additional
Information:
See Chapter 8, "Upgrading Your Applications" of Oracle8i Migration |
Consider the following client to database connection issues before you decide if upgrading or migrating is appropriate for your environment:
As the following diagram depicts, an Oracle8i Client
release 8.1 requires Net8 Client release 8.1, and Oracle8i release
8.1 database requires Net8 Server release 8.1.
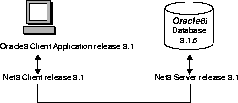
The Oracle8 Client release 8.1 and clients must be configured
with a service name, as described in "Using the Local Naming Method" in
Chapter 5, "Configuring the Network" of Net8
Administrator's Guide.
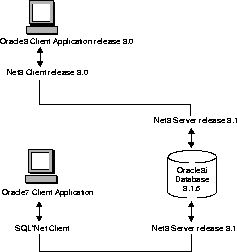
As the following diagram depicts, an Oracle8 Client release
8.0 requires a compatible release of Net8 Client, an Oracle7 Client requires
SQL*Net Client, and an Oracle8 database release 8.1 requires Net8 Server
release 8.1 to connect successfully to an Oracle8i database release
8.1.
While it is not necessary to reconfigure release 8.0 and release 7.x clients with a service name, Oracle Corporation recommends doing so to take advantage of new functionality. For example, in the TNSNAMES.ORA file:
net_service_name =
(DESCRIPTION=
  (ADDRESS =...)
  (ADDRESS =...)
  )
  (CONNECT_DATA=
   (SERVICE_NAME=SALES)
  )
This effect may be accomplished by manually replacing SID=SID
with SERVICE_NAME=SERVICE_NAME or using the Net8 Assistant's compatibility
mode. See "Using the Release 8.0/2.x Compatibility Mode" in Chapter
3 "Upgrading and Migrating" of Net8 Administrator's Guide.
Consider the following questions for an environment with Oracle7 clients connecting to an Oracle8 release 8.1 database:
If you are using Oracle7 release 7.3.3 (or lower) and SQL*Net release 2.3.3 (or lower), you need to create a service name using SQL*Net Easy Configuration or Oracle Network Manager in SQL*Net Client version 2.x.
An Oracle8 Client release 8.1 requires Net8 Client release
8.1, an Oracle7 Server requires SQL*Net Server, and an Oracle8 Server release
8.0 requires Net8 Server release 8.0.
The release 8.1 clients must be configured with the SID of the database. For example, the TNSNAMES.ORA would have the following effect:
net_service_name =
(DESCRIPTION=
  (ADDRESS =...)
  (ADDRESS =...)
  )
  (CONNECT_DATA=
   (SID=SALES)
  )
This effect may be accomplished by manually editing the TNSNAMES.ORA
file or using the Net8 Assistant's compatibility mode. See "Using Release
8.0/7.x Features and Connecting To a Release 8.0/7.x Service"
in Chapter 3, "Upgrading and Migrating" of Net8 Administrator's Guide.
Additionally, the LISTENER.ORA on the database server must
still be configured with the description of the SID, as described in "Statically
Configuring a Listener" in Chapter 5, "Configuring the Network" of Net8
Administrator's Guide.
Consider the following questions for an environment with Oracle8 clients release 8.1 connecting to an Oracle7 database.
| Additional
Information:
For more detailed information on installing, migrating, and upgrading SQL*Net and Net8, see: Chapter 4, "Installing, Upgrading, and Migrating Net8" in Oracle Net8 Administrator's Guide. |
You can run different versions of Oracle databases on the
same computer system at the same time. However, each version can only access
a database that is consistent with its version. For example, if you have
version 7 and version 8 of Oracle installed on the same computer system,
the version 7 server can access version 7 databases, but not version 8
databases, and the version 8 server can access version 8 databases but
not version 7 databases. The only way for a version 8 database to read
version 7 database files is to perform a migration. You should be aware
that after migration, the version 7 database will no longer be able to
read the files.
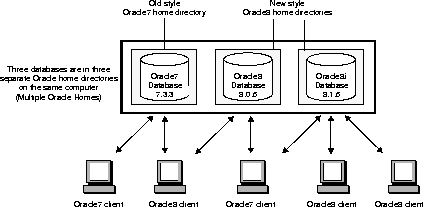
You can install Oracle7 and Oracle8i databases in
multiple (separate) Oracle homes and have both Oracle7 and Oracle8i
clients connecting to Oracle7 and Oracle8i databases. Multiple
Oracle homes functionality currently only works with releases 8.0.4 and
later releases. If you have, for example, release 7.3.3 products already
installed, you cannot install any other release 7.x products in
a separate Oracle home. Also, if you have release 8.0.3 or earlier 8.0.x
products already installed, you cannot install any other of these products
in a separate Oracle home. The following figure gives an example of this
network configuration:
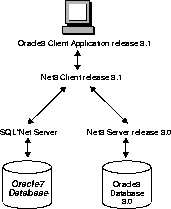
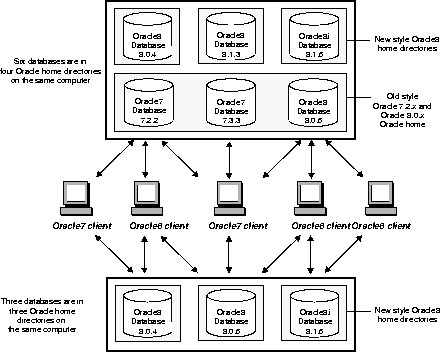
You can install Oracle7 and Oracle8i databases on
separate computers and have both Oracle7 and Oracle8 clients connecting
to both databases. The figure below shows two computers and a number of
Oracle7 and Oracle8 clients. On each computer you can have a mix of databases
and products in Oracle homes.
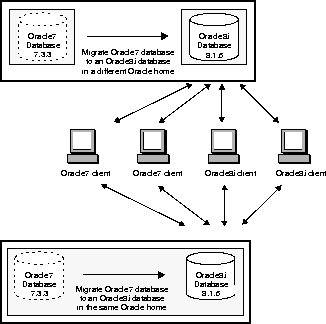
You can migrate your Oracle7 database to an Oracle8i
database and have both Oracle7 and Oracle8i clients connecting to
the Oracle8i database. You can not migrate your Oracle7 database
to an Oracle8i database in the same Oracle home. See "Migrating
an Oracle7 Database to Oracle8i" for instructions. The following figure
illustrates this network configuration:
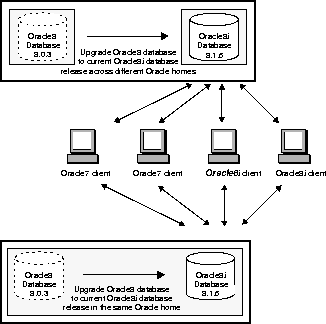
You can upgrade your Oracle8 database, for example, release
8.0.4, to release 8.1.5 and have both Oracle7 and Oracle8 clients connecting
to the release 8.1.5 Oracle8i database. You can upgrade databases
either in the same Oracle home or across different Oracle homes. See "Upgrading
an Oracle8 Database Release 8.0.x to 8.1.5" for instructions. The following
figure illustrates this network configuration:
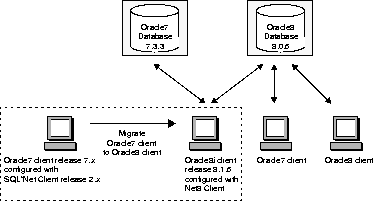
You can migrate some or all of your Oracle7 clients to Oracle8i
Enterprise Edition release 8.1.5. You can also migrate your Oracle7 database
to an Oracle8i database or upgrade your Oracle8 release to the current
Oracle8i database at a later date.
| Additional
Information:
For detailed information on migrating SQL*Net and upgrading Net8, see: |
The following figure illustrates this network configuration.
In the following example, an Oracle7 release 7.3.3 starter
database called ORACLE with a SID of ORCL is already installed in C:\ORANT.
Now, install the Oracle release 8.1.5 starter database in a separate Oracle
home directory called TEST81 in the C:\ORACLE\ORA81 directory. In this
example, ORCL is the first and only database on the computer. The second
database you install will be called ORCL0 by default.
| Additional
Information:
See "Starter and Custom Database Overview" for more information on conventions used for database naming. |
To install an Oracle8i database and Oracle7 database in multiple (separate) Oracle homes:
The Available Products dialog box appears.
The Starter Database dialog box appears and prompts you to create a starter database.
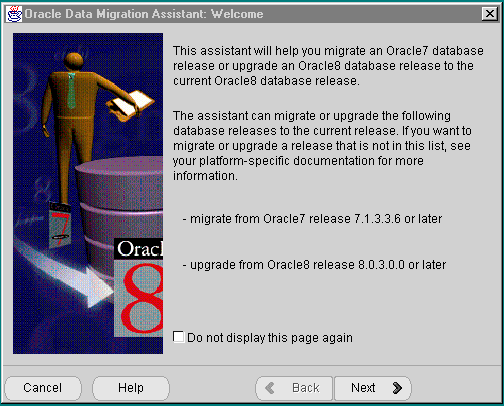
Note that if you decided to invoke Oracle Data Migration
Assistant at Step 11. and migrated the Oracle7
database to release 8.1.5, you only have one Oracle8 database on your computer.
After installation is complete, modify the release 8.1.5 LISTENER.ORA file to resolve possible conflicts in listening addresses, and then restart the listener. This is required to enable the release 8.1.5 database to accept connections from clients. See Migration Issues for Net8 and SQL*Net and Net8 Administrator's Guide for information on how to modify the LISTENER.ORA file.
This section describes how to migrate an Oracle7 database to the current Oracle8i database release. You can choose either of the following tools to perform a migration:
Oracle Corporation recommends that new users use Oracle Data
Migration Assistant to migrate databases because it is the easiest method
to perform a migration. If you want to perform a migration manually using
command line tools, use MIG.
Before you start a migration using the assistant or MIG,
read the following sections:
The following table lists and describes the ten issues you
should be aware of that can affect Oracle7 to Oracle8i migration.
| Issues That Affect Migration | Description |
|---|---|
|
|
|
The time it takes to migrate is not dependent on the size of the database, but on the number of objects in the data dictionary. For example, actual migration for a 3 1/2 GB database with 25,473 objects on a Sun E6000 with 20 CPUs, with datafiles stripped on the file system on 128 KB slices can take 1 1/2 hours. Remember to allow extra time for backing up and restoring database in case of problems. |
|
|
|
|
Make sure that all Oracle product versions, operating system versions, and third-party software versions are certified against Oracle8i. See "Supported Operating Systems" for the list of supported Windows operating systems and versions. See "List of Oracle8i Enterprise Edition Products" for a list of supported Oracle product versions for this release. |
|
|
Migration leaves all objects (packages, triggers, views, and so on) invalid except for tables. All other objects must be made valid again by recompilation. This can either be done manually (preferably by building a dependency tree before migration from dependency), otherwise this is done automatically as the objects are first accessed. The latter will of course slow down initial access. All estimated or calculated statistics are lost during migration. These need to be recalculated to ensure proper functionality of the Cost Based Optimizer. Some bitmapped indexes will get invalidated. Check all bitmapped indexes in the DBA_INDEXES table and recreate any that are marked as status unusable. |
|
|
If you edit the registry for any reason during the migration process, you need to reboot your computer. |
|
|
Oracle7 read-only tablespaces are readable by Oracle8i and do not require any conversion. But to prevent Oracle8i rowid conversions to take place every time a table is accessed, the tablespaces in read-only mode should be made read-write. Perform full table scans on all tables in the tablespace. After the full table scans are complete, you can put the tablespaces in read-only mode again. |
|
|
You can return the database to an Oracle7 version up until the ALTER DATABASE CONVERT command is run. If a failure occurs during ALTER DATABASE CONVERT (when it is converting the physical file headers of the datafiles), you must restore the database from backup and rerun the migration. Do not open the database between running the migration and executing the ALTER DATABASE CONVERT command. |
|
|
To avoid restoring the entire database due to any failures during the ALTER DATABASE CONVERT, put all tablespaces, except SYSTEM and ROLLBACK into read-only or offline normal mode. This causes the ALTER DATABASE CONVERT command to only convert the datafile headers for SYSTEM and ROLLBACK. If any errors occur, you need only restore the datafiles for the SYSTEM and ROLLBACK and rerun the migration. If the migration is successful, the headers for the rest of the datafiles will be converted when they are read-write or online. |
|
|
Most migration problems can be avoided if a test migration is performed first. Performing a test migration helps raise any problems that can occur as well as letting you see the amount of time it takes to migrate. See "Test the Migration Process" in Chapter 2, "Preparing to Migrate" in Oracle8i Migration. |
When migrating from Oracle7 Server release 7.3.x to
Oracle8i release 8.1.5, install the appropriate version of SQL*Net
in the 7.3.x Oracle home before using Oracle Data Migration
Assistant or MIG. Migration will be unsuccessful if you do not install
the appropriate versions of SQL*Net.
| Migrating from... | Install... |
|---|---|
|
Oracle7 release 7.3.2.x to Oracle8i |
SQL*Net release 2.3.2.1.4 and SQL*Net release 2.3.2.1.12 Note: If you do not have SQL*Net release 2.3.2.1.4 on your system, you must install it before installing SQL*Net release 2.3.2.1.12. SQL*Net release 2.3.2.1.4 is not available on the release 8.1.5 CD-ROM. It is only available on the release 7.3.2.2.0 CD-ROM. |
|
Oracle7 release 7.3.3.x to Oracle8i |
SQL*Net release 2.3.3.0.3 |
|
|
To install SQL*Net release 2.3.2.1.12 or 2.3.3.0.3:
|
Oracle Data Migration Assistant helps you migrate data from
an Oracle7 database to an Oracle8i database. During installation
of Oracle8i Enterprise Edition, you are prompted to migrate a database
with this assistant if Oracle Universal Installer detects that an earlier
database release exists on your computer. If you do not want to migrate
a database during the installation process, you can just install the assistant
and use it later.
Complete the following steps before you use this assistant:
To migrate a database using Oracle Data Migration Assistant:
This section describes how to use MIG to migrate your Oracle7 database to an Oracle8i database.
|
Note: Information on how to run MIG (sometimes referred to as the Migration Utility) is provided in Oracle8i Migration, but the focus is on UNIX. This section provides information on using MIG on Windows NT. |
To migrate an Oracle7 database using MIG:
Step 1: What To Do Before Using
MIG
Step 2: Shut Down the Oracle7 Database
Step 3: Back Up the Oracle7 Database
Step 4: Install MIG From Oracle8i
Enterprise Edition CD-ROM
Step 6: Create Oracle8i Services
and Database Files
Step 7: Remove Oracle7 Software
(Optional)
Complete the following steps before you use MIG:
When you are asked to enter commands at the SQL*DBA or SQL*Plus
prompt, remember to use the appropriate version of the tool for the version
of Oracle7 Server you are migrating:
| Use... | When Migrating From... |
|---|---|
|
SQLDBA71 |
Oracle7 release 7.1.x |
|
SQLDBA72 |
Oracle7 release 7.2.x |
|
SVRMGR23 |
Oracle7 release 7.3.x |
Check that your database release can be directly migrated
to Oracle8i Enterprise Edition. MIG only migrates databases that
are Oracle7, release 7.1.x or later. If the database is an earlier
version (for example, version 6), migrate it to at least Oracle7 release
7.1.3.3.6 before migrating it to an Oracle8i database.
| Oracle7 Release... | Enter at the MS-DOS Command Prompt... |
|---|---|
|
7.1.x |
C:\> SQLDBA71 MODE=LINE |
|
7.2.x |
C:\> SQLDBA72 MODE=LINE |
|
7.3.x |
C:\> SVRMGR23 |
| Oracle7 Release... | Enter at the SQLDBA or SQLPLUS Command Prompt... |
|---|---|
|
7.1.x |
SQLDBA> CONNECT INTERNAL/PASSWORD |
|
7.2.x |
SQLDBA> CONNECT INTERNAL/PASSWORD |
|
7.3.x |
SQL> CONNECT INTERNAL/PASSWORD |
The character set value is returned by the database. If
the character sets are identical, then you can proceed to run MIG.
If the character sets are different, before you run MIG,
you must set the NLS_LANG environment variable at the MS-DOS command prompt
as follows:
AMERICAN_AMERICA.database character set
where database character set is substituted with the character set of your Oracle7 database. For example, if the character set of your Oracle7 database is JA16EUC, set the NLS_LANG environment variable as follows:
C:\> SET NLS_LANG=AMERICAN_AMERICA.JA16EUC
Messages output from MIG will now be in English. After MIG finishes, reset the NLS_LANG environment variable to its original value.
Shut down the database. Do not use SHUTDOWN IMMEDIATE or SHUTDOWN ABORT. If the database is not shut down before you start the migration, MIG stops and issues an error message. Also, if the database is not cleanly shutdown, any backup you make may be useless as it was taken while data was being written to the data files.
| Oracle7 Release... | Enter at the MS-DOS Command Prompt... |
|---|---|
|
7.1.x |
C:\> SQLDBA71 MODE=LINE |
|
7.2.x |
C:\> SQLDBA72 MODE=LINE |
|
7.3.x |
C:\> SQLPLUS |
| Oracle7 Release... | Enter at the SQLDBA or SQLPLUS Command Prompt... |
|---|---|
|
7.1.x1 |
SQLDBA> CONNECT INTERNAL/PASSWORD SQLDBA> ALTER USER SYS DEFAULT TABLESPACE SYSTEM TEMPORARY TABLESPACE SYSTEM; SQLDBA> ALTER TABLESPACE SYSTEM ADD DATAFILE `ORACLE_HOME\RDBMS71\SYS2SID.ORA' SIZE 50 M; SQLDBA> ALTER TABLESPACE ROLLBACK_DATA ADD DATAFILE `ORACLE_HOME\RDBMS71\RBSMIGSID.ORA' SIZE 20 M; |
|
7.2.x |
SQLDBA> CONNECT INTERNAL/PASSWORD |
|
7.3.x |
SQL> CONNECT INTERNAL/PASSWORD |
| 1
For Oracle7 release 7.1 only, edit the INITSID.ORA file and set the REMOTE_LOGIN_PASSWORDFILE parameter to EXCLUSIVE or SHARED. |
| Oracle7 Release... | Enter at the SQLDBA or SQLPLUS Command Prompt... |
|---|---|
|
7.1.x |
SQLDBA> SHUTDOWN |
|
7.2.x |
SQLDBA> SHUTDOWN |
|
7.3.x |
SQL> SHUTDOWN |
|
WARNING: If anything goes wrong with the Oracle7 database during migration, you will need to restore the database from the backup. Back up your database now as a precaution! |
To obtain the list of database files you must back up:
| Oracle7 Release... | Enter at the SQLDBA or SQLPLUS Command Prompt... |
|---|---|
|
7.1.x |
SQLDBA> SPOOL V7DBFILES.LOG |
|
7.2.x |
SQLDBA> SPOOL V7DBFILES.LOG |
|
7.3.x |
SQL> SPOOL V7DBFILES.LOG |
| Oracle7 Release... | Enter at the SQLDBA or SQLPLUS Command Prompt... |
|---|---|
|
7.1.x |
SQLDBA> SPOOL OFF |
|
7.2.x |
SQLDBA> SPOOL OFF |
|
7.3.x |
SQL> SPOOL OFF |
See "Backing Up and Recovering Database Files", Oracle8i Concepts, Oracle8i Backup and Recovery Guide, and Oracle8i Administrator's Guide for information on how to back up a database.
You can install MIG in either of two ways depending if you
want to install the release 8.1.5 software that includes MIG or just MIG.
|
Note: The following installation steps are a shorter version of the complete installation instructions you can find in Oracle8i Enterprise Edition Installation for Windows NT. |
To install the Oracle8i Enterprise Edition including MIG:
If you just want to install MIG, perform the following steps:
The Available Products dialog box appears.
Click Oracle Utilities, of which MIG is a component.
There are some tasks that you may have to perform before you run MIG.
C:\> NET START OracleServiceSID
C:\> SET ORACLE_SID=ORCL
C:\> MIG PFILE=ORACLE_HOME\DATABASE\INITSID.ORA SPOOL=C:\MIG.LOG
Check the results after running MIG. If there are error messages, see Appendix A, "Troubleshooting Migration Problems" of Oracle8i Migration for more information before going to Step 9.
C:\> NET STOP OracleServiceSID
| Oracle7 Release... | Enter at the MS-DOS Command Prompt... |
|---|---|
|
7.1.x |
C:\> ORADIM71 -DELETE -SID SID |
|
7.2.x |
C:\> ORADIM72 -DELETE -SID SID |
|
7.3.x |
C:\> ORADIM73 -DELETE -SID SID |
|
Note: You can receive the error "failed to open service", when attempting to delete services. To avoid this error, reboot your Windows NT computer. |
The default location of the convert file is ORACLE_BASE\ORACLE_HOME\RDBMS
where ORACLE_HOME is the version 8 Oracle home. The default filename
is CONVERT.ORA.
After successfully running MIG, perform a cold backup of the Oracle7 database. This backup serves the following purposes:
| Additional
Information:
See Chapter 12, "Backing Up and Recovering Database Files", Oracle8i Concepts, Oracle8i Backup and Recovery Guide, and Oracle8i Administrator's Guide for information on how to back up a database. |
C:\> ORADIM -NEW -SID SID -INTPWD PASSWORD -MAXUSERS USERS -STARTMODE AUTO
-PFILE ORACLE_HOME\DATABASE\INITSID.ORA
|
is the same SID name as the SID of the version 7 database you migrated. |
|
|
is the password for the new release 8.1.5 database instance. The -INTPWD option is not required. If you do not specify it, operating system authentication is used, and no password is required. See "Automatically Enabling Operating System Authentication During Installation" for a description of features. |
|
|
is the maximum number of users who can be granted SYSDBA and SYSOPER privileges. |
|
|
is the release 8.1.5 Oracle home directory. Ensure you specify the full pathname with the -PFILE option, including drive letter of the Oracle home directory. |
COMPATIBLE=8.0.5.0.0
| Additional
Information:
Some new features of Oracle8i release 8.1.x require a compatibility setting of 8.1.0 or higher. See Chapter 8, "Compatibility and Interoperability" of Oracle8i Migration for more information. |
C:\> SQLPLUS
SQL> CONNECT INTERNAL/PASSWORD
SQL> STARTUP NOMOUNT PFILE=ORACLE_HOME\DATABASE\INITSID.ORA
|
Warning: Starting in any other mode will corrupt the database! |
SQL> ALTER DATABASE CONVERT;
SQL> SPOOL CATOUT.LOG
SQL> SPOOL OFF
SQL> SHUTDOWN
You can remove Oracle7 software if you have successfully
migrated to Oracle8i Enterprise Edition and have a backup of the
Oracle7 software. Oracle Installer warns you of any product dependencies
that might cause problems if particular products are removed, and prompts
you to confirm the deinstallation.
To remove Oracle7 software:
This section describes how to upgrade an Oracle8 database release 8.0.x to release 8.1.5. You can choose either of the following database tools to upgrade:
Oracle Corporation recommends that new users use Oracle Data
Migration Assistant to upgrade databases because it is the easiest and
quickest method to perform an upgrade. If you already have upgrade scripts
from a previous Oracle database release, you can edit them to include the
new upgrading scripts.
Oracle Data Migration Assistant helps you upgrade data from
an Oracle8 database release 8.0.x to release 8.1.5. During installation
of Oracle8i Enterprise Edition, you are prompted to upgrade a database
with this assistant if Oracle Universal Installer detects that a release
8.0.x database exists on your system. If you do not want to upgrade
during the installation process, you can just install this assistant and
use it later.
Before you use this assistant, ensure the Oracle8 database to be upgraded meets these requirements:
To upgrade a database using Oracle Data Migration Assistant:
You can run SQL scripts in SQL*Plus to upgrade an Oracle8i
database release 8.0.x to release 8.1.5.
Upgrading consists of the following tasks:
Step 1: Shut Down the Release 8.0.x
Database
Step 2: Back Up the Release 8.0.x
Database
Step 3: Edit the COMPATIBLE Parameter
in the 8.0.x INITSID.ORA File
Step 4: Install Oracle8i Enterprise
Edition Release 8.1.5
SQL> CONNECT INTERNAL/PASSWORD
SQL> SHUTDOWN
Perform a full offline backup of the database.
|
Warning: If anything goes wrong with the release 8.0.x database during upgrade, you will need to restore the database from the backup. Back up your database now as a precaution! |
|
SYS1SID.ORA, USR1SID.ORA, RBS1SID.ORA, TMP1SID.ORA |
|
|
INITSID.ORA |
|
|
LOG1SID.ORA, LOG2SID.ORA |
|
|
CTL1SID.ORA |
To obtain the list of database files you must back up:
SQL> SPOOL V8DBFILES.LOG
SQL> SELECT MEMBER FROM V$LOGFILE;

SQL> SELECT NAME FROM V$DATAFILE;

SQL> SELECT VALUE FROM V$PARAMETER WHERE NAME = 'control_files';
SQL> SPOOL OFF
See Chapter 13, "Developing Applications", Oracle8i Concepts, Oracle8i Backup and Recovery Guide, and Oracle8i Administrator's Guide for information on how to back up a database.
Ensure the COMPATIBLE parameter is left unset if it has not been set in the INITSID.ORA file. Leave the COMPATIBLE parameter unchanged if it has been previously set.
| Additional
Information:
Some new features of Oracle8i release 8.1.x require a compatibility setting of 8.1.0. See Chapter 7 "Compatibility and Interoperability" of Oracle8i Migration for more information. |
The Available Products dialog box appears.
C:\> NET START ORACLESERVICEORCL
C:\> SET ORACLE_SID=ORCL
C:\> SQLPLUS
SQL> CONNECT INTERNAL/PASSWORD
SQL> STARTUP RESTRICT
SQL> SPOOL UPGRADE.LOG
| To Upgrade... | Run Script1 | Enter at the SQL*Plus Prompt... |
|---|---|---|
|
8.0.1.0 |
Not supported |
|
|
8.0.2.0 |
Not supported |
|
|
8.0.3.0 to 8.1.5 |
U0800030.SQL |
SQL> @%ORACLE_HOME%\RDBMS\ADMIN\U0800030.SQL where %ORACLE_HOME% represents your drive letter and release 8.1.5 Oracle home directory. |
|
8.0.4.0 or 8.0.4.1 to 8.1.5 |
U0800040.SQL |
SQL> @%ORACLE_HOME%\RDBMS\ADMIN\U0800040.SQL where %ORACLE_HOME% represents your drive letter and release 8.1.5 Oracle home directory. |
|
8.0.5 |
U0800050.SQL |
SQL> @%ORACLE_HOME%\RDBMS\ADMIN\U0800050.SQL where %ORACLE_HOME% represents your drive letter and release 8.1.5 Oracle home directory. |
|
8.1.3 |
U0801030.SQL |
SQL> @%ORACLE_HOME%\RDBMS\ADMIN\U0801030.SQL where %ORACLE_HOME% represents your drive letter and release 8.1.5 Oracle home directory.
|
|
8.1.4 |
U0801040.SQL |
SQL> @%ORACLE_HOME%\RDBMS\ADMIN\U0801040.SQL where %ORACLE_HOME% represents your drive letter and release 8.1.5 Oracle home directory.
|
| 1 When you run any of these U*.SQL scripts, the CATALOG.SQL and CATPROC.SQL scripts, which create the system catalog views and all the necessary packages for using PL/SQL, are also run. |
SQL> @%ORACLE_HOME%\RDBMS\ADMIN\UTLRP.SQL
SQL> SPOOL OFF
SQL> ALTER SYSTEM DISABLE RESTRICTED SESSION
SQL> SPOOL UTLRESULT.LOG
SQL> @%ORACLE_HOME%\RDBMS\ADMIN\UTLCONST.SQL
SQL> SPOOL OFF
SQL> EXIT
| Additional
Information:
Some new features of Oracle8 release 8.1.x require a compatibility setting of 8.1.0. See Chapter 7 "Compatibility and Interoperability" of Oracle8i Migration for more information. |
During migration from Oracle 7.x or Oracle 8.0.x to Oracle 8i, the following issues need to be addressed:
SQL*Net and Net8 8.1 use configuration files from ORACLE_HOME\network\admin by default, while Net8 8.0 uses configuration files from ORACLE_HOME\net80\admin by default. If you want all the Oracle products to use configuration files from the same location, you can set the registry variable TNS_ADMIN.
|
Additional Information: Please refer to Appendix D. Net8 Configuration Parameters, Services and Port Numbers for more information. |
Before installing an Oracle8i server ensure that any existing
Net8 or SQL*Net listeners on the same computer are stopped. An existing
listener may prevent the Net8 8.1 listener from starting during the Oracle8i
install due to listener endpoint conflicts with an existing listener.
Once Oracle8i is installed, Oracle recommends that you use
the new Net8 8.1 listener for all of your Oracle databases of Oracle8i
release 8.1 and previous releases (such as an Oracle8 8.0 database). Even
if you install Oracle 8i on multiple Oracle Homes on the same computer,
you should only use one listener for all your databases on the same computer.
If you want to continue to use multiple listeners (such as
a Net8 8.0 listener and Net8 8.1 listener) on the same computer, verify
that there are no listener endpoint conflicts between the two listeners
before starting both listeners. For information on listener endpoint configuration
please refer to the Net8 Administrators guide included in the online Oracle8i
documentation.
Additionally, on Windows NT platforms, the new Net8 8.1 listener
will be set to start automatically at system reboot. If you intend to use
only the Net8 8.1 listener for all of your databases you should ensure
that only the Windows NT service for the Net8 8.1 listener, as listed in
the Windows NT services control panel, is set to start automatically.
If you want to use multiple listeners on the same computer, you need to reconfigure one of the listeners to make sure that you use different listening endpoints for all protocols. To resolve conflicts, you may need to make the following changes in listener configuration:
If you need to change the IPC key used by External Procedure,
you also need to change the KEY for the alias EXPROC_CONNECTION_DATA in
tnsnames.ora to match the KEY value in listener.ora.
If Net8 8.1 listener service is not created during Oracle
8i installation due to conflicts in listening endpoints, you can start
your Net8 8.1 listener by using the listener control program:
where <listener_name> is LISTENER for typical install
or the name given during custom install.
This command also creates the NT service for the listener
if the service does not already exist.
When you migrate Oracle 7 or Oracle 8.0 database to an Oracle8i
database, the SID of the database needs to be removed from the Oracle 7/8.0
homeís listener.ora and added to Oracle 8i homeís listener.ora
file.
In Oracle 8i, when the LISTENER.ORA or CMAN.ORA contains
the TCP/IP system name in ADDRESS, the Listener or Connection Manager listens
on all addresses for the system. Therefore, even if a system has multiple
interface cards with different TCP/IP host names, listening using any of
the host names ensures that the Listener or Connection Manager will listen
on all interface cards. It is an error to configure multiple addresses
for the same port in LISTENER.ORA.
For Oracle 7 or Oracle 8.0, the Listener or Connection Manager only listened for the TCP/IP host name specified in LISTENER.ORA or CMAN.ORA and you had to specify listening addresses for multiple TCP/IP host names of a system. The default LISTENER.ORA created for Oracle 7/Oracle 8.0 contained multiple addresses, e.g.
LISTENER = (ADDRESS_LIST=
        (ADDRESS=(PROTOCOL=TCP)(HOST=system1)(PORT=1521))
        (ADDRESS=(PROTOCOL=TCP)(HOST=127.0.0.1)(PORT=1521))
)
The above addresses are invalid for Oracle 8i and the ADDRESS
line containing 127.0.0.1 must be removed.
For Oracle 7 and Oracle 8.0 default installation, NT native authentication is turned off. In order to allow Oracle client to use NT native authentication, the parameter sqlnet.authentication_services must be set to NTS in sqlnet.ora for Oracle client and Oracle server, i.e.
sqlnet.authentication_services = (NTS)
This can be done using Net8 Assistant or through manual editing.
For Oracle 8i, Database Configuration Assistant sets the
parameter OS_AUTHENT_PREFIX="" in init.ora during database creation. Therefore,
Oracle users in the database should be created without the prefix OPS$
for Oracle 8i. The prefix OPS$ is needed for Oracle 7 or Oracle 8.0 default
installation, where OS_AUTHENT_PREFIX parameter is not set in init.ora
by default.
In Oracle 7.3.3, Oracle 7.3.4 and Oracle 8.0.x, the external
users created in the database were not prefixed with the domain name. For
example, the Oracle user in the database was NTUSER1 for an NT user DOMAIN1\NTUSER1
(assuming that init.ora parameter OS_AUTHENT_PREFIX=""). If you wished
to create the Oracle user prefixed with domain name, you needed to set
the registry value OSAUTH_PREFIX_DOMAIN in HKEY_LOCAL_MACHINE\SOFTWARE\ORACLE\HOME_ID
to TRUE.
For better security in a domain environment, we have changed the default for Oracle 8i so that external users created in the database are prefixed with domain name. For example, for an NT user DOMAIN1\NTUSER1, the Oracle user created in the database should be DOMAIN1\NTUSER1. But you can set the registry value OSAUTH_PREFIX_DOMAIN in HKEY_LOCAL_MACHINE\SOFTWARE\ORACLE\HOME_ID to FALSE if you do not want to prefix the domain name. Please note that it is less secure if you do not prefix the domain name. Therefore, if you migrate a database with external users to Oracle 8i, you have two options:
For Oracle 8i, if the database is configured for multi-threaded
server mode, it is recommended that you specify the service name of the
database in the Net Service Name to ensure that the connection is in multi-threaded
server mode. If the Net Service Name contains the SID of the database,
the client will connect to the database in dedicated server mode if listener.ora
contains the statically configured SID of the database but not the GLOBAL_DBNAME
of the database.
This behavior is different from Oracle 8.0. In Oracle 8.0,
if the database is configured for multi-threaded server mode, the clients
connected to the database in multi-threaded server mode even if the Net
Service Name contained the SID of the database.
If Net Service Names of your clients contain the SID of the database and you want them to connect to the Oracle 8i database in multi-threaded server mode, you should configure the GLOBAL_DBNAME of the database in listener.ora. For example, for a database with SID as orcl, DB_NAME as orcl and DB_DOMAIN as us.oracle.com, the listener entry for Oracle 8i should be:
SID_LIST_LISTENER =  (SID_LIST =
       (SID_DESC=(SID_NAME=orcl)(GLOBAL_DBNAME=orcl.us.oracle.com))
)
When migrating from Oracle7 Server release 7.3.x to
Oracle8i release 8.1.5, install the appropriate version of SQL*Net
in the 7.3.x Oracle home before using Oracle Data Migration
Assistant or MIG. Migration will be unsuccessful if you do not install
the appropriate versions of SQL*Net.
| Migrating from... | Install... |
|---|---|
|
Oracle7 release 7.3.2.x to Oracle8i |
SQL*Net release 2.3.2.1.4 and SQL*Net release 2.3.2.1.12 Note: If you do not have SQL*Net release 2.3.2.1.4 on your system, you must install it before installing SQL*Net release 2.3.2.1.12. SQL*Net release 2.3.2.1.4 is not available on the release 8.1.5 CD-ROM. It is only available on the release 7.3.2.2.0 CD-ROM. |
|
Oracle7 release 7.3.3.x to Oracle8i |
SQL*Net release 2.3.3.0.3 |
|
|
To install SQL*Net release 2.3.2.1.12 or 2.3.3.0.3:
|
During installation of Oracle Names in Oracle 8i, the NT
service for the default Names Server is not created. You need to invoke
Net8 Assistant to create the Names Server.
The Oracle Optimal Flexible Architecture (OFA) is a feature
of Oracle8i Enterprise Edition for Windows NT release 8.1.5. It
has been available for Oracle on UNIX for some years. OFA is a set of file
naming and placement guidelines recommended by Oracle Corporation for Oracle
software and databases. It can also be thought of as a set of "good habits"
to adopt when organizing Oracle directories and files on your computer.
All Oracle products on the Oracle8i Enterprise Edition for Windows
NT are OFA-compliant; that is, Oracle Universal Installer places Oracle
products in directory locations that follow the OFA guidelines.
One of the many benefits of OFA is that you can separate Oracle software executables from database files. Previously, database files were placed in ORACLE_HOME\DATABASE, (for example, C:\ORANT\DATABASE) a subdirectory of the Oracle home directory that also contained Oracle software. Using OFA, you can put Oracle software in X:\ORACLE_BASE\ORACLE_HOME and database files in X:\ORACLE_BASE\ORADATA\DB_NAME.
| Additional
Information:
For more information on OFA and the type of directory structure where you should place your database files after migration or upgrade, see "Optimal Flexible Architecture Overview". |