Release 2.1
A75683-01
Library |
Product |
Contents |
Index |
| Oracle Enterprise Manager Administrator's Guide Release 2.1 A75683-01 |
|
This chapter introduces the Oracle Enterprise Manager Console and provides an overview of its components. The following topics are included in this chapter:
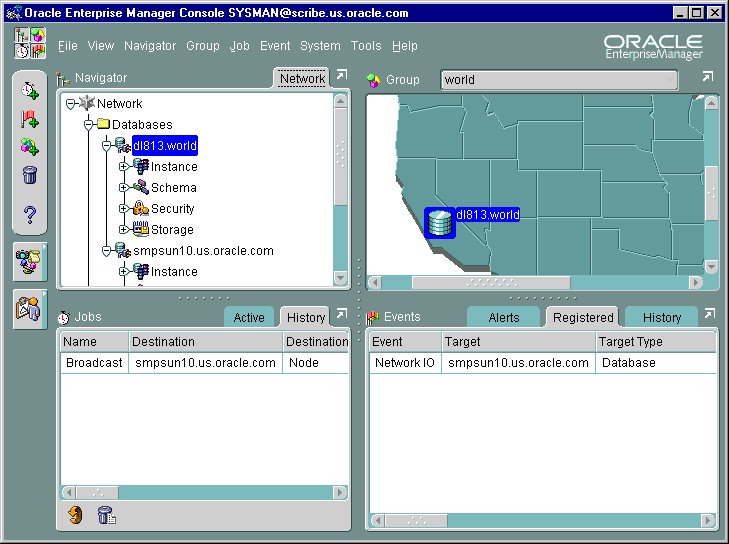
The Console is the primary interface used for all Oracle Enterprise Manager operations. It provides menus, toolbars, and the framework to access Oracle tools and utilities available through other vendors. The graphical configuration of the Console and the tools available are determined by the optional products purchased and user preferences. See Figure 1-2, "Enterprise Manager Console" for an illustration of a Console screen.
The Console includes viewing panes for the Navigator, Group, Jobs, and Events systems. Other integral Enterprise Manager components are the repository, the Management Server, and Oracle Intelligent Agent.
Objects that administrators create, such as events and jobs, can be shared among Enterprise Manager administrators by assigning permissions. See "Permissions" on page 1-16 for more information.
The Navigator displays a hierarchical list of all the services in a network, providing a direct view of services such as databases, groups, listeners, and nodes, plus the objects that they contain. The Navigator shows all the network services with their relationships to other objects.
Through the Navigator, you can also launch administration tools for managing objects such as administrators and tablespaces. You can also perform many administration tasks in the Navigator, such as creating, editing, or dropping database users. See Chapter 2, "Navigator" for information.
The Group system allows you to organize managed services into logical groups that you can then manage collectively with a graphical display. With the Group system, you can create, save, modify, and view groups. To create a group of services, drag and drop objects from the Navigator into the Group view. See Chapter 3, "Groups" for information.
Jobs are standard tasks, such as executing a SQL script or backing up a database, that can be automated through Oracle Enterprise Manager. The Job system allows you to manage and schedule jobs and remote operations for the services of your network. Jobs can be scheduled at various times, such as daily or weekly, and at single or multiple destinations. See Chapter 4, "Jobs" for more information.
The Event system allows you to monitor and display the status of events--such as a loss of service--occurring on the managed services in your network system. See Chapter 5, "Events" for more information.
The Console menu bar provides access to the following menus:

The File, View, System, Tools, and Help menus are described in this section.
When using the Console menus, note that:
You can click the right mouse button on objects in some windows of the Console to display a context-sensitive, or short-cut, menu. This menu usually contains a subset of the options that are available through a menu in the main menu bar. For example, if you click the right mouse button on a group in the Navigator pane, a menu appears with the menu options from the Group menu.
|
Note: See "Discovering Services" on page 2-7 for information on context-sensitive menu options in the Navigator. |
The File menu items allow you to exit the system.
The View menu customizes the Console layout, allowing you to show or hide toolbars or windows. At least one window must be visible in the Console.
Hides or shows the Navigator pane.
Hides or shows the Job Scheduling pane.
Hides or shows the Event Management pane.
Hides or shows the Group pane.
Hides or shows the Oracle Enterprise Manager toolbar.
The System menu provides options to set up administrator and system configurations.
Displays the Administrator Preferences property sheet, which allows the current administrator to change preferences, including permissions and login credentials. See "Preferred Credentials" on page 1-18 for more information.
Displays the Administrator Manager property sheets for adding, modifying, and removing administrators. This option is only available to Super Administrators. See "Managing Enterprise Manager Administrators" on page 1-7 for more information.
The System menu contains the Configure SMTP Gateway option. Use the Configure SMTP Gateway option in the Console System menu to specify the SMTP gateway that is used for the SMTP email system.
Updates the local network configuration file (tnsnames.ora) with discovered services information. You should run this after a Discovery operation so that any Value-Added Applications you may have can access the discovered services.
The Tools menu allows you to execute database applications and other utilities that have been installed on your system. The menu options in the Tools menu depend on your installed Oracle Enterprise Manager configuration.
This menu option lists the database administration tools and utilities that you can execute from the Console. See "DBA Management Pack" on page 1-8 for more information.
This menu option lists integrated applications such as the Oracle Application Server Manager.
Other optional applications may also be available from this menu.
From the Help menu, you can access the Enterprise Manager online help system. See "Online Help" on page 1-9 for more information about the online help system.
Enterprise Manager, Release 2.1 is a multi-administrator system: every person who is administering systems using Enterprise Manager has his or her own administrator account which he or she uses to log into the Console or stand-alone application.
The installation of Enterprise Manager creates a single super administrator. This super administrator account name is sysman, and the initial password is oem_temp.
The super administrator sysman creates administrators using the Manage Administrators item in the System menu. In addition to an administrator name and password, each account can be tagged as a "Super Administrator" account or a "regular" account.
Super administrators can bypass all security in the system and automatically have full privileges for all objects. Most Super Administrators also have a separate account for daily operations but use their Super Administrator account for special operations only available to Super Administrators, such as starting and stopping the Management Server, creating new Enterprise Manager Administrators, or checking other administrator's schedules. Using the sysman account for daily administration work is not recommended.
Regular administrators can have full access to all other Console operations but they will only see or be able to modify those jobs, events, or groups to which they have access.
Administrators share a single Enterprise Manager, Release 2.1 repository. Administrative data stored in the repository is filtered based on administrator permissions.
Preferred Credentials must be set up for each administrator account. When an administrator connects through the Navigator or stand-alone application, the preferred credentials used are those defined explicitly for that administrator.
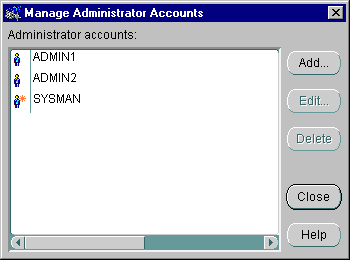
Enterprise Manager administrators are created, edited, and deleted with the Manage Administrators option of the Console System menu. The Manage Administrators option displays the Manage Administrator Accounts dialog (Figure 1-3, "Manage Administrator Accounts"). The Manage Administrators option is only available to Super Administrators. Super Administrators have full privileges for all objects and can create, edit, and delete other administrators. The Super Administrator sets up the administrator name and initial password and determines whether an administrator is a Super Administrator or regular administrator. The Super Administrator also determines whether the administrator has access to the job and event systems.
In this dialog, you can:
In the Manage Administrators dialog, enter a unique administrator name and password for the Enterprise Manager administrator. Note that the administrator names is not the same as a database username.
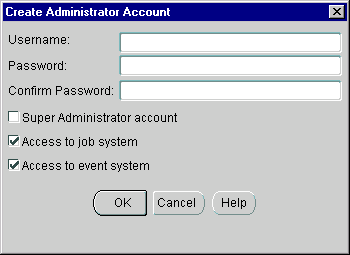
Check the access available to the administrator:
Allows the administrator to add other administrators, as well as access to all created jobs and events.
Allows the administrator access to the Job system component, but does not automatically give access privileges for specific jobs.
Allows the administrator access to the Event system component.
After an administrator has been created, the administrator can log in to the Enterprise Manager Console and set up administrator preferences.
If you select the Edit button, you will get the Preferences window, as described in "Administrator Preferences" on page 1-10. You can then edit the preferences for the selected administrator.
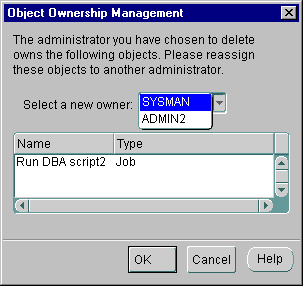
If you delete an administrator who owns any object, the Object Ownership Management dialog in appears. See Figure 1-6. The dialog allows you to reassign the objects to another Enterprise Manager administrator. If you do not reassign the objects, the objects are deleted.
If the administrator has active objects, submitted jobs and events, those objects must be made inactive before they can be reassigned.
The Administrator Preferences property is displayed with the Preferences option of the System menu. This property sheet allows you to configure the preferences for an Enterprise Manager administrator. The pages in the property sheet are:
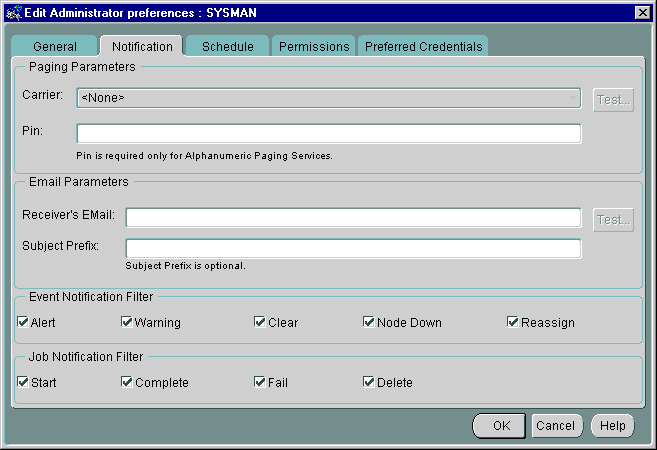
The General Preferences page allows a Super Administrator to change an administrator's password.
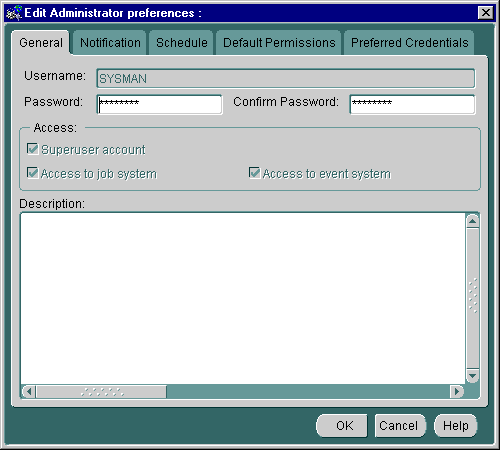
Complete this property sheet page to set up paging and email notification methods for the administrator. You can also send a test page or email with the Test options on this page.
|
Note: If you plan to use a paging service for notification, you need to configure the paging and modem settings for your system before you set up administrators. For information on paging setup, see the Oracle Enterprise Manager Configuration Guide. See "System Menu" on page 1-5 for information on email setup. |
After a node containing paging services has been discovered, select the name of the paging carrier service from the pull-down list.
Enter the paging personal identification number (PIN) for your page. A PIN is only required for alphanumeric pagers, and not for numeric pagers. This entry is required for the FLEX-TD, GSM and TAP protocols for alphanumeric pagers. For GSM, the PIN is the actual phone number of the administrator.
To test the validity of the paging information, select the paging service from the pull-down menu, enter the PIN number (if needed), and click the Test button. A message appears informing you of the status of the page.
If the test fails, check the paging services configuration file (paging.cfg). Refer to the Enterprise Manager Configuration Guide for explicit instructions on paging setup and configuration. If tracing is enabled for paging, you can also view the paging trace log file in the ORACLE_HOME\sysman\log directory on the machine which has the Intelligent Agent Paging Extensions.
Enter the email address of the administrator to whom email notification will be sent.
Click the Test button to check the validity of the mail information. A message displays to inform you of the status of the test email.
If the test fails, check the email configuration. If tracing has been enabled for the Management Server, you can also view the mail trace log file in the ORACLE_HOME\sysman\log directory.
Enter an optional prefix that is added to the email notifications. This allows you to further differentiate notifications from the Enterprise Manager Console that are sent to administrators.
The Event Notification Filter allows you to filter email/pages sent to administrators according to the event's level of severity. Filtering is set at the user level through Administrator Preferences dialog. You can select any combination of the following levels of event severity. Selecting all levels of severity provides no filtering.
The Job Notification Filter allows you to filter email/pages sent to administrators according to job status. As with the Event Notification Filter, filtering is set at the user level through the Administrator Preferences dialog. Selecting all job statuses provides no filtering.
Use this property sheet page to indicate when you want to be paged and/or e-mailed. Determine the day, hour, and the method of notification. You will receive notifications only on the objects you have permission to access.
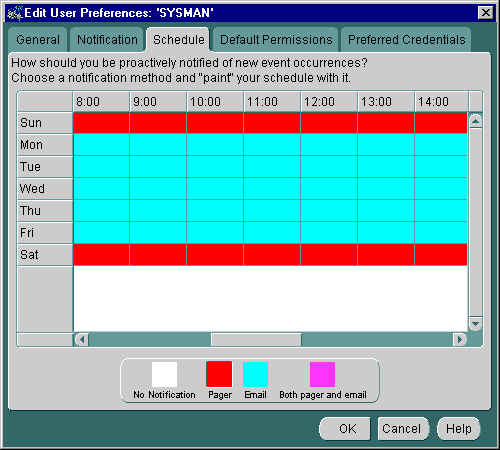
An administrator can be notified by email, paging, or both email and paging. Paging is recommended for urgent jobs, events, or critical systems.
To determine notifications:
If you want to set the same notification an entire day or an hour of the day, click on the heading for that row or column. For example, if you want to set up paging notification for Saturday, click on the Sat heading after you have selected Pager at the bottom of the screen. You can also drag the cursor to "paint" across multiple cells.
Use this property sheet page to determine the default permissions you want to assign to other administrators for the objects you create. This allows other Enterprise Manager administrators to share objects, such as events and jobs, that you have created. If you work on a team, this page lets you assign access privileges to all the members of the team at one time. When an object is created by an administrator, that administrator is the owner and automatically has full permissions. The owner's permissions cannot be modified.
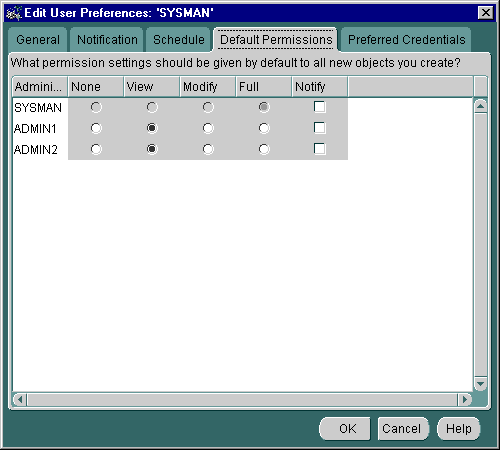
Access-control permissions apply to event, group, and job objects. When these objects are created, the default permissions are assigned to other Enterprise Manager administrators according to the selections in this page. These initial permissions can be overridden with the Permissions page of the object's property sheet.
For more information, see the following sections:
|
Note: Changing your default permissions does not retroactively change permissions on existing objects. |
The levels of permission that you can assign to an Enterprise Manager administrator are:
This permission does not allow the administrator to view this object anywhere.
This permission allows the administrator to view the object, inspect object properties, view job/event status and outputs, and receive notifications if the object is an event.
This permission allows the administrator to edit the object's properties except those reserved for Full permission.
This permission allows the administrator to delete the object, modify permissions for other administrators, and change the ownership of the object.
This permission allows the administrator to receive enhanced notifications on the objects. Notify permission cannot be assigned if the administrator's permission level is set to None.
The Administrator Preferred Credentials property sheet page displays a list of services in the network, along with the service type and the administrator name for accessing the service. The property sheet page is accessed with the Administrator Preferences option of the System menu. Each row in the list of the property sheet includes:
You can click on a column heading to sort on that column. See Figure 1-10, "Administrator Preferred Credentials" for an illustration of the property sheet.
|
Note: Individual instances of an Oracle Parallel Server are listed. Oracle recommends that all instances of a Parallel server use the same preferred credentials as the Oracle Parallel Server. |
Also, the Intelligent Agent authenticates the user name and password for all jobs and many events that it runs. These credentials are used when you access a network service in the Navigator or Group, and when running jobs and registering events. If you do not set the preferred credentials correctly, jobs and events may fail. See "Job Credentials" on page 4-4 and "Registering Events" on page 5-3 for more information.
Oracle recommends that if some services of a particular type require the same credentials, use the <DEFAULT> credentials selection for that service type to have those credentials used by all services of that type.
For example, if Administrator_1 has a username and password of foo/bar on all the databases that he manages, the administrator needs to enter foo/bar as his credentials in the <DEFAULT> database entry. All database administration tasks will use these <DEFAULT> credentials.
Furthermore, if the administrator has just one database which requires different credentials from foo/bar, he can enter different credentials for that database by selecting that specific database.
For NT users, you must set the preferred credentials for the node (where the NT Intelligent Agent resides) to be the same as the user that is set up to "Logon as a batch job."
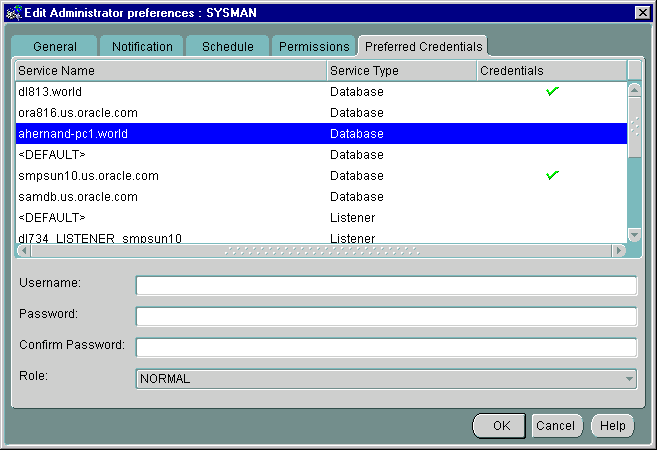
Select any row to update the credential fields for the object identified in the row.
Enter the username. This field is required if a password needs to be entered.
Enter the password associated with the username.
Confirm the password.
Select the role from the pull-down list. You need to login with the SYSDBA or SYSOPER role to start up or shut down a database.
Changes to the credentials are recorded when you move to another line. Use the mouse to select other lines on the page. When you are finished, save all your updates by clicking the OK button at the bottom of the property sheet.
Another convenient way to specify Preferred Credentials for discovered services is to select the Save as Preferred Credential option when manually connecting to a service from the Console or integrated application. For example, you attempt to access a newly discovered database from the Console Navigator. Enterprise Manager displays the Connect Information dialog so that you can log in to the database. You type in the requisite information and check the Save as Preferred Credential option. Click OK to log on to the database and save the logon information as a Preferred Credential for this service.
Save list allows you to extract information from a multi-column list (such as the Job or Event History panes) and save it in a variety of formats (text, HTML, or Comma-Separated-Values). For example, you can select one or more entries in the Event History list. By selecting the Save Event History from the Events Menu, you can save the list information (Event, Target, Target Type, Severity, Date/Time, Assigned To, Owner) to an HTML file. The dialog consists of the following elements:
The name and directory to which you want to save the file information.
Displays the File Save to dialog. Choose the desire location and file name.
Select HTML (table), Text row, or comma-separated-values (used by spreadsheets or other applications).
Active only when HTML is selected as the file format, allows you to view the generated HTML table through the default browser for your system.
|
|
 Copyright © 2000 Oracle Corporation. All Rights Reserved. |
|