Release 8.1.6
A76932-01
Library |
Product |
Contents |
Index |
| Oracle Advanced Security Administrator's Guide Release 8.1.6 A76932-01 |
|
![]()
![]()
This chapter contains information on how to configure Oracle for use with CyberSafe, as well as a brief overview of the steps to configure CyberSafe to authenticate Oracle users.
This chapter covers the following topics:
Enable CyberSafe authentication by performing the following tasks.
Task 1: Install the CyberSafe Server
Task 2: Install the CyberSafe TrustBroker Client
Task 3: Install the CyberSafe Application Security Toolkit
Task 4: Configure a Service Principal for an Oracle Server
Task 5: Extract the Service Table from CyberSafe
Task 6: Install an Oracle Server
Task 7: Install Oracle Advanced Security With CyberSafe
Task 8: Configure Net8 and Oracle on the Server and Client
Task 9: Configure CyberSafe Authentication
Task 10: Create a CyberSafe User on the Authentication Server
Task 11: Create an Externally Authenticated Oracle User on the Oracle Server
Task 12: Get the Initial Ticket for the CyberSafe/Oracle User
Task 13: Connect to an Oracle Server Authenticated by CyberSafe
Perform this task on the machine that functions as the authentication server.
|
More Information:
See the CyberSafe documentation listed in the "Related Publications" in the Preface. |
Perform this task on the machine that runs the Oracle server and the client.
Perform this task on the client and on the server.
For the Oracle server to validate the identity of clients, configure a service principal for an Oracle server on the machine running the CyberSafe TrustBroker Master Server. If required, also configure a realm.
The name of the principal should have the following format:
kservice/kinstance@REALM
For example, if the Oracle service is oracle, the fully-qualified name of the machine on which Oracle is running is dbserver.someco.com, and the realm is SOMECO.COM, the principal name is as follows:
oracle/dbserver.someco.com@SOMECO.COM
Run kdb5_edit as root to create the service principal as follows:
# cd /krb5/admin
# ./kdb5_edit
To add a principal named oracle/dbserver.someco.com@SOMECO.COM to the list of server principals known by CyberSafe, enter the following in kdb5_edit:
kdb5_edit: ark oracle/dbserver.someco.com@SOMECO.COM
Extract a service table from CyberSafe and copy it to both the Oracle server and CyberSafe TrustBroker client machines.
For example, to extract a service table for dbserver.someco.com, perform the following steps.
kdb5_edit:
kdb5_edit:  xst dbserver.someco.com oracle
'oracle/dbserver.someco.com@SOMECO.COM' added to keytab
'WRFILE:dbserver.someco.com-new-srvtab'
kdb5_edit:  exit
# /krb5/bin/klist -k -t dbserver.someco.com-new-srvtab
# mv dbserver.someco.com-new-srvtab /krb5/v5srvtab
If the service table is on a different machine from the CyberSafe TrustBroker client, transfer the file with a program such as FTP. If using FTP, transfer the file in binary mode.
/krb5/v5srvtab). Set the file owner to the Oracle user or make the file readable by the group to which Oracle belongs. Do not make the file readable to all users, since this can allow a security breach.
Install an Oracle server on the same machine that is running the CyberSafe TrustBroker client.
Install CyberSafe, along with Oracle Advanced Security, during a custom installation of Oracle8i. The Oracle Universal Installer guides you through the entire installation process.
Perform the following tasks to set parameters in the Oracle server and client sqlnet.ora files to configure CyberSafe:
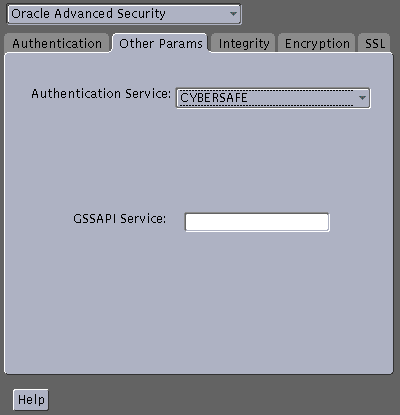
To configure CyberSafe authentication service parameters on the client and on the server:
The Oracle Advanced Security tabbed pages appear.

oracle/dbserver.someco.com @SOMECO.COM
|
Note: You must insert the principal name, using the format described in Task 4: Configure a Service Principal for an Oracle Server. |
The sqlnet.ora file updates with the following entries:
SQLNET.AUTHENTICATION_SERVICES=(CYBERSAFE)
SQLNET.AUTHENTICATION_GSSAPI_SERVICE=KSERVICE/KINSTANCE@REALM
Add the following parameter to the initialization parameter file:
REMOTE_OS_AUTHENT=FALSE
Because CyberSafe user names can be long, and Oracle user names are limited to 30 characters, Oracle Corporation recommends using null for the value of
OS_AUTHENT_PREFIX as follows:
OS_AUTHENT_PREFIX=""
Restart the Oracle server after modifying the configuration files to enable the changes.
In order for CyberSafe to authenticate Oracle users, you must create them on the CyberSafe authentication server where the administration tools are installed. The following steps assume that the realm already exists.
Run /krb5/admin/kdb5_edit as root on the authentication server to create the new CyberSafe user, such as cyberuser.
The command prompts and responses that you enter are as follows:
#
kdb5_edit
kdb5_edit:
ank cyberuser
Enter password:
password
Re-enter password for verification:
password
kdb5_edit:
quit
Run SQL*Plus to create the Oracle user and enter the following commands on the Oracle server machine:
SQL> CONNECT INTERNAL;
SQL> CREATE USER "USNERNAME" IDENTIFIED EXTERNALLY;
SQL> GRANT CREATE SESSION TO "USERNAME";
In this example, OS_AUTHENT_PREFIX is set to null ("").
In the following example, OS_AUTHENT_PREFIX is set to ("").
SQL> CREATE USER "JDOE" IDENTIFIED EXTERNALLY
SQL> GRANT CREATE SESSION TO "JDOE"
Before users can connect to the database, they need to run kinit on the clients for an initial ticket:
% kinit user_name
% klist
The system displays the following information:
Creation Date         Expiration Date       Service
11-Aug-99 16:29:51    12-Aug-99 00:29:21    krbtgt/SOMECO.COM@SOMECO.COM
11-Aug-99 16:29:51    12-Aug-99 00:29:21    oracledbserver.someco.com@SOMECO.COM
After running kinit to get an initial ticket, users can connect to an Oracle server without using a user name or password. Enter a command similar to the following:
% sqlplus /@net_service_name
where net_service_name is a Net8 service name.
For example:
% sqlplus /@npddoc_db
|
More Information:
See Chapter 1, "Introduction to Oracle Advanced Security" and Oracle8i Distributed Database Systems. |
This section lists some common configuration problems and explains how to resolve them:
|
|
 Copyright © 1999 Oracle Corporation. All Rights Reserved. |
|