Release 9.0.1
Part Number A88784-01
Home |
Book List |
Contents |
Index | Master Index | Feedback |
| Oracle interMedia Annotator User's Guide Release 9.0.1 Part Number A88784-01 |
|
![]()
![]()
interMedia Annotator can upload media data and an associated annotation into an Oracle database where Oracle interMedia has been installed. It does so through an Oracle PL/SQL Upload Template, which contains both PL/SQL calls and Annotator-specific keywords.
You create your own PL/SQL Upload Templates. Novice users can use the PL/SQL Template Wizard, which is a graphical user interface that progresses through each step of PL/SQL Upload Template creation.
Before proceeding, read Steps 1 and 2 of Section 2.2.1 in order to configure the preferences for your database connection.
Users with limited PL/SQL experience should use the PL/SQL Template Wizard to generate a PL/SQL Upload Template. The PL/SQL Template Wizard takes you through a step-by-step process to create a PL/SQL Upload Template using a graphical user interface; you do not need to understand the Annotator-specific keywords involved.
To start the PL/SQL Template Wizard, perform one of the following operations:
The following sections go through each window of the PL/SQL Template Wizard.
The Connection Panel window (Figure 4-1) asks you to specify your database parameters.
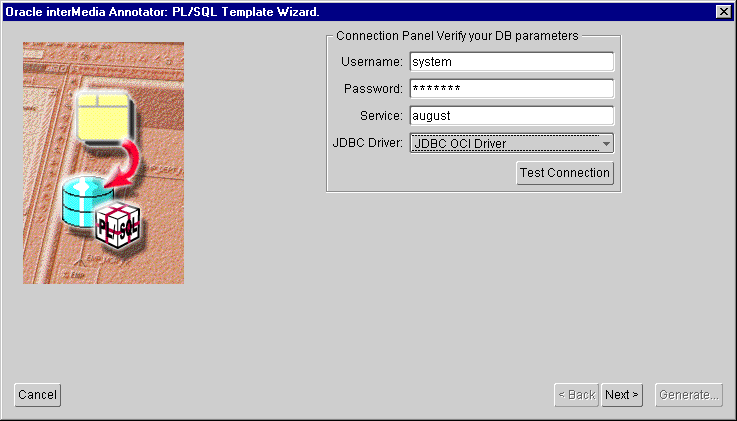
This window contains the fields and values from the Database tab of the Preferences window. Set the database parameters of the database to which you will upload your annotation if you have not already done so.
The Upload Method window (Figure 4-2) asks you to specify a method to upload the media source.
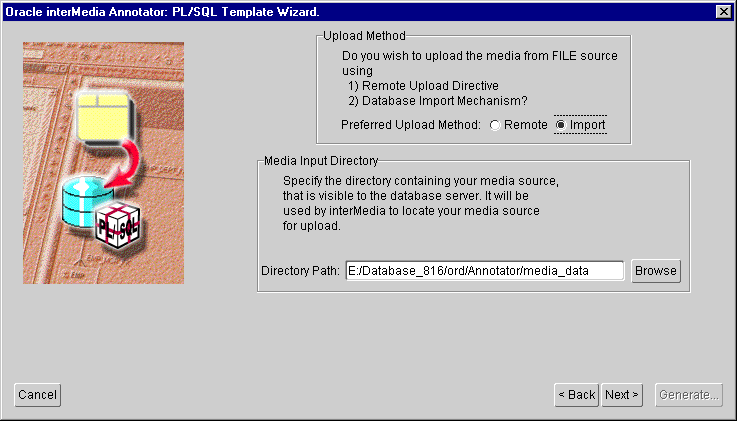
There are two different methods that Annotator can use to upload the media source and annotation to your database: import and remote. In the import upload method, the media source must be visible to the database server (either in a file system or through an HTTP stream), and the media source will be loaded directly from the file system to the database. In the remote upload method, the media source does not have to be visible to the database; the file is loaded into Annotator, and Annotator loads the file into the database through JDBC calls.
The import upload method uses the Oracle interMedia import( ) method, while the remote upload method uses the ${MANN_UPLOAD_SRC} Annotator-specific keyword.
If you select Import and the media source is in a file system, you must specify the path to the directory where the media file resides. The directory path should be specified from the point of view of the Oracle database server to which you are uploading. For example, if you are running interMedia Annotator on Windows NT and you want to upload data to an Oracle database that is running on a UNIX platform, the media data must reside in a directory that can be accessed by both machines. You can do this by mounting a UNIX directory on the server into a Windows NT network drive. Prior to entering the PL/SQL Template Wizard, you would refer to the media file using the mapped Windows drive/directory name. In the PL/SQL Template Wizard, however, you must specify the directory using the UNIX directory name that Oracle will use to access the media.
If you select Import and the media source is an HTTP stream, you can choose either to import the media data into the database, or to store the URL in the database.
If you select Remote and you are using the JDBC Thin driver, your upload performance may be poor, especially if you are uploading large files.
The Table Selection window (Figure 4-3) asks you to choose the table into which the interMedia object will be uploaded.
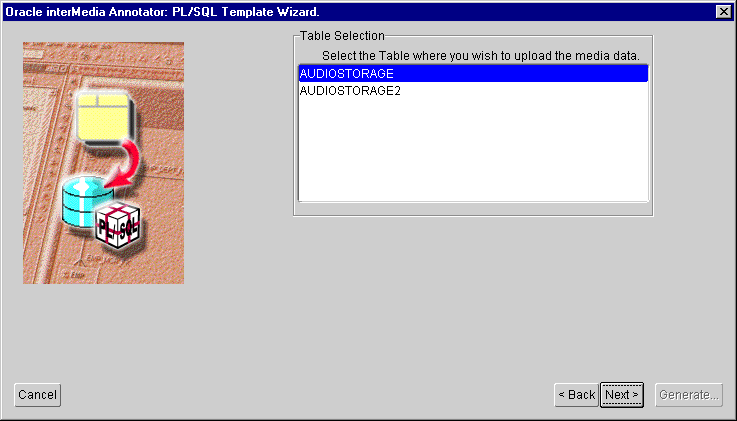
This table must have at least one column of the appropriate interMedia object type (ORDSYS.ORDAudio for annotations for audio files or songs from a CD, ORDSYS.ORDImage for annotations for image files, or ORDSYS.ORDVideo for annotations for video files) in order to proceed. The PL/SQL Template Wizard will check for this condition and notify you if it is not met.
The Upload Details window (Figure 4-4) asks if you want to upload the object into an existing row of the table or into a new row.
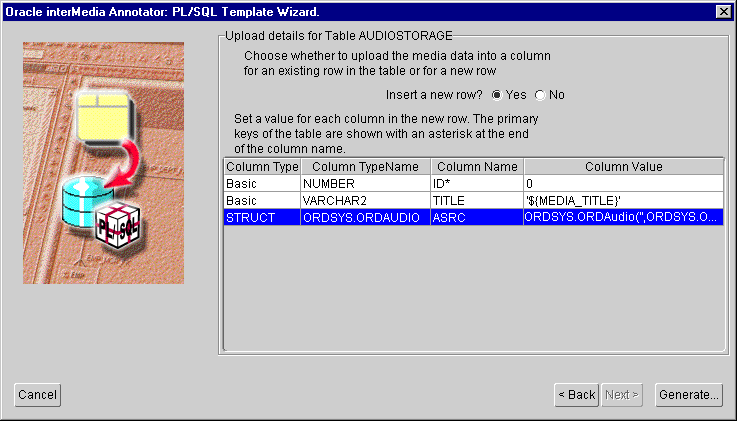
If you choose No (that is, not to insert a new row), you will be taken to the Row Selection window. See Section 4.1.6 for more information.
If you choose Yes (that is, to insert a new row), you have to specify a value for each table column. This is necessary for the primary keys, which will be marked with an asterisk. For the remaining columns, you are given several possible input methods:
Figure 4-4 shows the ID column (primary key) having its value manually typed in, the ASRC column (ORDSYS.ORDAudio) using the default value provided by
interMedia Annotator, and the TITLE column being mapped to the annotation's MEDIA_TITLE attribute.
If your table has multiple columns containing interMedia objects, clicking the Next button will take you to the Column Selection window. See Section 4.1.5 for more information.
If you are uploading to an existing row, clicking the Next button will take you to the Row Selection window. See Section 4.1.6 for more information.
If your table has only one column of interMedia objects and you are uploading to a new row, the Generate button will be enabled. See Section 4.1.7 for more information.
The media data and the annotation in XML form will be uploaded only to a table that contains an interMedia object whose type can be mapped to the annotation. If your table contains two or more such columns, the Column Selection window (Figure 4-5) will prompt you to select the column into which the interMedia object will be uploaded.
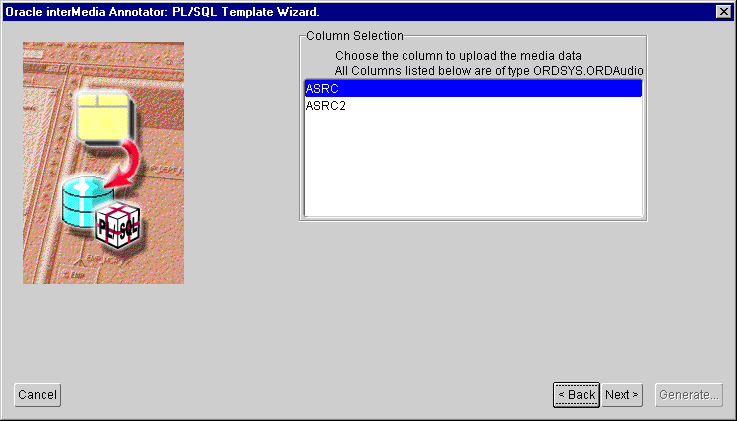
If you previously chose to insert a new row, the Generate button is enabled after you select a column. See Section 4.1.7 for more information.
If you previously chose to upload to an existing row, the Next button will take you to the Row Selection window. See Section 4.1.6 for more information.
The Row Selection window (Figure 4-6) asks you to enter the criteria to be used for querying a row that contains the column into which the interMedia object will be uploaded.
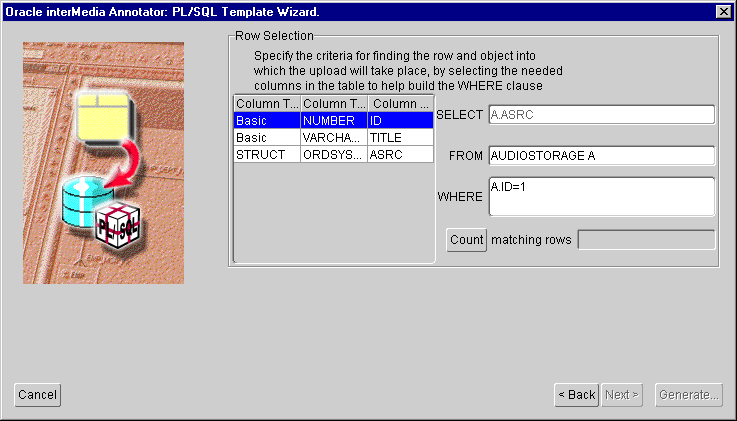
The table name was specified earlier, so you need to specify the WHERE clause of a SQL SELECT statement that will return the interMedia destination object. You can use the Count button to ensure that only one row is returned.
Once you complete this step, the Generate button is enabled. See Section 4.1.7 for more information.
When you have entered all the necessary information, the Generate button will become active. Click the Generate button to close the PL/SQL Template Wizard and generate your PL/SQL Upload Template. Possible SQL errors will be reported through the Console window.
Your PL/SQL Upload Template will be saved to a default directory that is defined in the Preferences window. Initially, the directory is set to <ORACLE_HOME>\ord\Annotator\ofm. To change this directory, perform the following operations:
See Section 4.2 for information on how to run a PL/SQL Upload Template.
If you use the PL/SQL Template Wizard or a text editor to create a new PL/SQL Upload Template, or if you use one of the files provided with interMedia Annotator, you have to run the PL/SQL Upload Template from within interMedia Annotator in order to actually upload your media source and annotation to your database.
To run a PL/SQL Upload Template, perform the following operations:
The Make a Selection window opens (Figure 4-7).
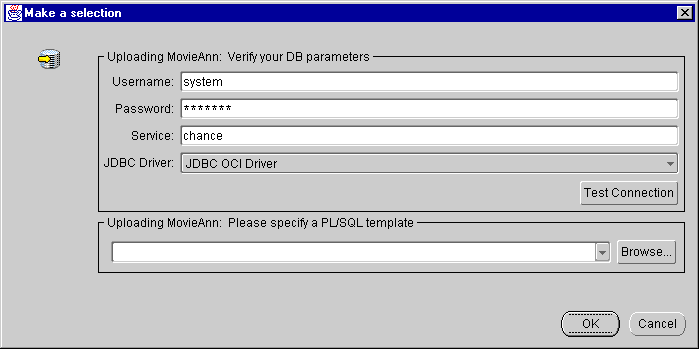
Errors encountered during the upload process will appear in the Console window.
You cannot use the PL/SQL Template Wizard to edit an existing PL/SQL Upload Template; it can create only new PL/SQL Upload Templates. To edit a PL/SQL Upload Template that you created with the PL/SQL Template Wizard, you must use a text editor. See Chapter 7 for more information on writing and editing PL/SQL Upload Templates.
|
|
 Copyright © 1996-2001, Oracle Corporation. All Rights Reserved. |
|