Release 9.0.1
Part Number A88784-01
Home |
Book List |
Contents |
Index | Master Index | Feedback |
| Oracle interMedia Annotator User's Guide Release 9.0.1 Part Number A88784-01 |
|
![]()
![]()
This chapter provides an overview of the Oracle interMedia Annotator GUI. This chapter also provides instructions on the configuration of Annotator and the installation and configuration of additional helper applications.
After you install and configure interMedia Annotator, run interMedia Annotator by opening either Annotator.bat (on Windows NT systems), or Annotator.sh (on Unix and Linux systems). The Oracle interMedia Annotator window appears (Figure 2-1).
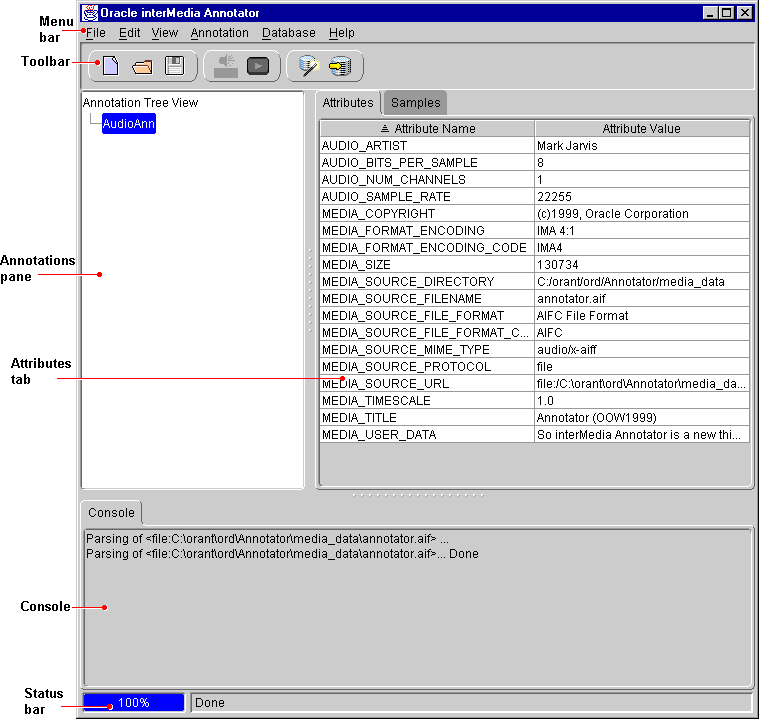
The main features of the Oracle interMedia Annotator window are the following:
The File menu contains commands to create a new annotation, open an annotation, close an annotation, save an annotation, save the contents of the Console window, and exit interMedia Annotator.
For more information on saving annotations, see Section 3.6.
The Edit menu contains a command to open the Preferences window.
For more information on the interMedia Annotator Preferences window, see Section 2.2.1 and Section 3.5.3.
The View menu contains check boxes that let you choose whether or not to view the three toolbars or the Console.
The Annotation menu contains commands to extract samples from the media source, play the media source in the appropriate media player, insert or delete an attribute, and insert or delete an annotation. For more information on extracting samples, see Section 3.5. For more information on playing media files and samples, see Section 3.8. For more information on defining helper applications, see Section 2.2.5.
The Database menu contains commands to create and run PL/SQL Upload Templates. See Chapter 4 for more information.
The Help menu contains a command to show more information about interMedia Annotator.

The Standard toolbar contains three buttons: New Annotation, Open Annotation, and Save Annotation.
Clicking the New Annotation button opens a dialog box in which you choose the media source to parse. interMedia Annotator then parses the media source and creates a new annotation. See Section 3.1 for more information.
Clicking the Open Annotation button opens a previously extracted annotation.
Clicking the Save Annotation button saves your annotation as an XML file.

The Annotation toolbar contains two buttons: Extract Samples and Play Source.
The Extract Samples button extracts samples from the media source. See Section 3.5 for more information.
The Play Source button plays the media source in the appropriate media player. For more information on playing media files and samples, see Section 3.8. For more information on defining helper applications, see Section 2.2.5.
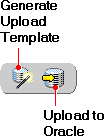
The Oracle toolbar contains two buttons: Generate Upload Template and Upload to Oracle.
The Generate Upload Template button starts the PL/SQL Template Wizard, which takes you through a step-by-step process to define a PL/SQL Upload Template.
The Upload to Oracle button opens a dialog box in which you select a PL/SQL Upload Template, which uploads your media source and annotation to a selected Oracle database.
See Chapter 4 for more information.
For more information, see Section 3.1.
View the Attributes tab by clicking the gray Attributes box when the Samples tab is visible.
For more information on the Attributes tab, see Section 3.2 and Section 3.3.
View the Samples tab by clicking the gray Samples box when the Attributes tab is visible.
The Samples tab is not shown in Figure 2-1. See Figure 3-8 for an illustration of the Samples tab.
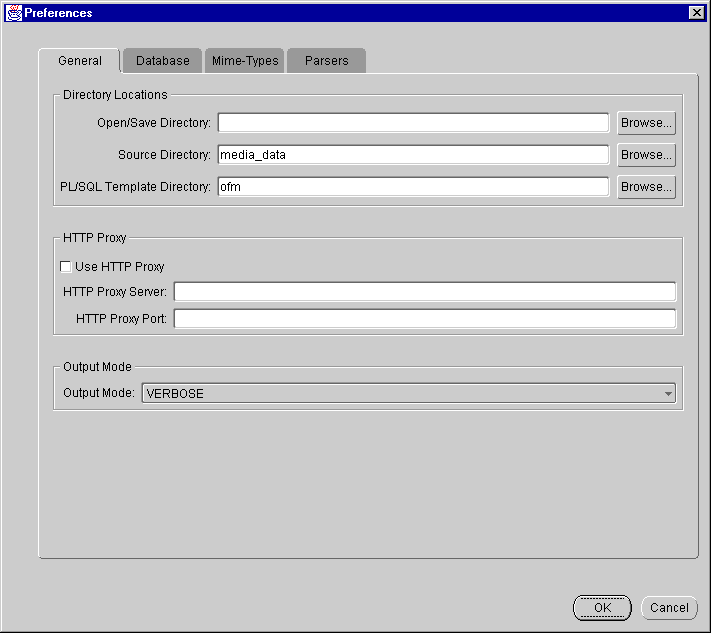
To configure the interMedia Annotator GUI to best use its features, perform the steps listed in Section 2.2.1 through Section 2.2.5.
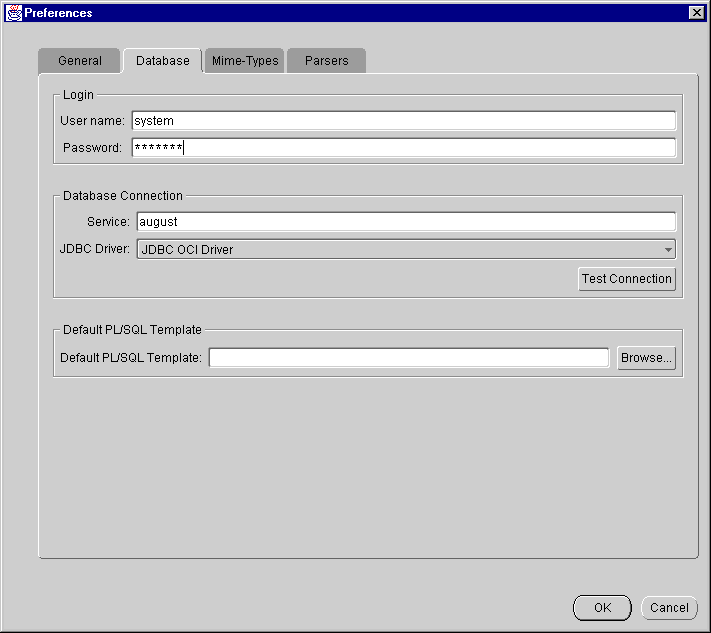
One of the most useful and powerful features of interMedia Annotator is the ability to upload media sources and annotations to an Oracle database. To connect to an Oracle database, you must correctly specify the database connection parameters by performing the following operations:
Before you can upload annotations and media files, your database must contain tables that can be used for the storage of audio and video data. If it does not, you will need to create these tables.
The following SQL statements will create two sample tables, one for the storage of the video data and one for the storage of the audio data. These statements will create the tables that are used in the example in Chapter 4:
CREATE TYPE VideoType AS OBJECT (ID    NUMBER,
                                 title VARCHAR2(256),
                                 vsrc  ORDSYS.ORDVIDEO);
CREATE TABLE VideoStorage OF VideoType (ID PRIMARY KEY)
             LOB(vsrc.source.localdata) STORE AS (NOCACHE NOLOGGING);

CREATE TYPE AudioType AS OBJECT (ID    NUMBER,
                                 title VARCHAR2(256),
                                 asrc ORDSYS.ORDAUDIO);
CREATE TABLE AudioStorage OF AudioType (ID PRIMARY KEY)
             LOB(asrc.source.localdata) STORE AS (NOCACHE NOLOGGING);
Although object types and object tables are used in the examples, any relational tables with interMedia Audio or Video types can be used for the storage of audio or video data.
interMedia Annotator can annotate media sources that are available remotely over the Internet through the HTTP protocol.
If you are running in a secure environment, you will need to configure interMedia Annotator to use your proxy server before you can access the Internet. Configure the proxy server by performing the following operations:
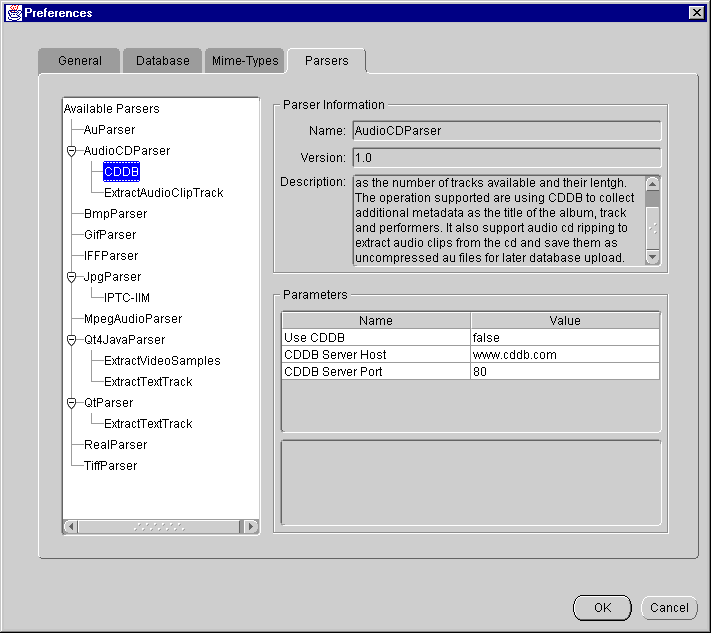
interMedia Annotator can connect to a CDDB to add information to audio CD annotations. However, you must contact the administrators of the CDDB in order to obtain a license before using CDDB functions; contact them for a license at:
http://www.cddb.com/developers.html
To change the CDDB URL that Annotator queries for information, perform the following operations:
The Parsers tab of the Preferences window appears (Figure 2-7).
interMedia Annotator is capable of playing media sources and extracted media samples. However, in order to play them, you may need to install some additional helper applications.
Recommended Windows NT applications are:
Recommended Macintosh applications are:
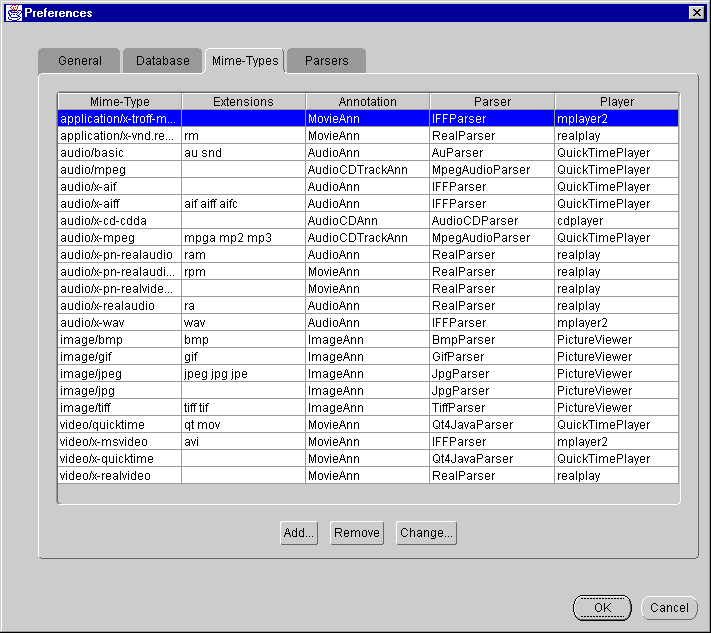
Make sure that each MIME type is paired up with the correct file extension and player by performing the following operations:
The Mime-Types tab of the Preferences window appears (Figure 2-8).
The Change: Mime-type Settings window appears (Figure 2-9).
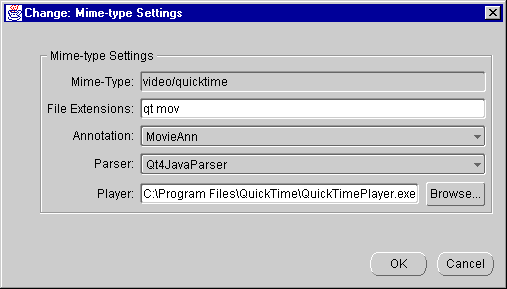
The Change: Mime-type Settings window closes.
|
|
 Copyright © 1996-2001, Oracle Corporation. All Rights Reserved. |
|