Release 1 (9.0.1)
Part Number A90191-02
Home |
Book List |
Contents |
Index | Master Index | Feedback |
| Oracle9i Database Migration Release 1 (9.0.1) Part Number A90191-02 |
|
![]()
![]()
This chapter guides you through the process of migrating an Oracle7 database to Oracle9i using the Migration utility. This chapter covers the following topics:
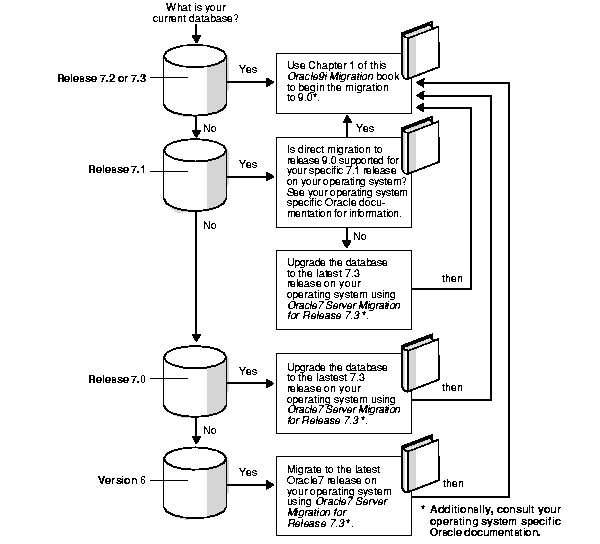
Figure 4-1 is a roadmap that specifies the documentation you should use to migrate your database to release 9.0.1 based on your current release of Oracle.
The Migration utility converts the data dictionary and structures of an Oracle7 database into Oracle9i format. To migrate the database, you first install the Oracle9i software and run the Migration utility on the Oracle7 database. Then, you execute a series of ALTER DATABASE statements on the new Oracle9i database and run the u0703040.sql conversion script.
The completion of these procedures results in the conversion of the following Oracle7 structures into structures that can be used by Oracle9i:
The following sections provide an outline of the migration process:
You can run the Oracle9i Migration utility multiple times (without opening the database in Oracle9i) and still be able to return to the Oracle7 database. However, running the Migration utility automatically eliminates the Oracle7 database catalog views (see "Abandoning the Migration").
Note:
ALTER DATABASE CONVERT statement, which creates a new control file based on the convert file generated by the Migration utility, converts all online datafile headers to Oracle9i format, and mounts the Oracle9i database.
The file headers of offline datafiles and read-only tablespaces are not updated during migration. The file headers of offline datafiles are converted later when they are brought online, and the file headers of read-only tablespaces are converted if and when they are made read-write sometime after migration; however, they never have to be made read-write.
ALTER DATABASE OPEN RESETLOGS statement, which automatically converts all objects and users defined in the new dictionary to Oracle9i specifications, and converts all rollback segments to Oracle9i format.
If a source database rollback segment is in a tablespace that is offline when the Oracle9i database is opened, then the rollback segment is not converted immediately to Oracle9i database format. Instead, the rollback segment is converted the first time the tablespace is brought online in Oracle9i.
u0703040.sql script. This script creates and alters certain system tables and drops the MIGRATE user. It also runs the catalog.sql and catproc.sql scripts, which create the system catalog views and all the necessary packages for using PL/SQL.
Other conversion scripts perform the necessary operations to convert specific components to the current release. For example, the catrep.sql script is one of the conversion scripts for Oracle Replication.
This section contains important considerations for using the Migration utility.
In general, the Migration utility supports migrations of the last 7.3 release and higher databases on your operating system. The exact maintenance release number of the last 7.3 release varies from operating system to operating system.
For example, on some operating systems, the Migration utility can migrate only release 7.3.4 and higher databases, and cannot migrate a release lower than release 7.3.4 (such as release 7.0, 7.1, and 7.2). If your database release number is lower than the release supported by the Migration utility on your operating system, then upgrade or migrate the database to the required release.
Downgrading is the process of transforming an existing Oracle database into a previous version or release. The Migration utility cannot transform an Oracle9i database back into Oracle7. In some situations, you can use another facility to downgrade, such as using Export/Import, restoring from backups, and possibly using other functions.
The following sections discuss system considerations and requirements for using the Migration utility.
Oracle9i binaries may require as much as three times the disk space required by Oracle7 binaries. This requirement may cause you to run out of disk space during migration. If you are installing Oracle9i onto a computer system that already has Oracle7 installed, then ensure that you have enough hard disk space and RAM for both databases. You need to add the system requirements for Oracle9i server and Oracle7 server to determine the total system requirements.
The Migration utility requires relatively little temporary space. It needs only enough extra room in the SYSTEM tablespace to hold the new Oracle9i data dictionary simultaneously with the existing Oracle7 data dictionary.
The space required to hold an Oracle data dictionary depends on how many objects are in the database. Typically, a new Oracle9i data dictionary requires double the space that its Oracle7 source data dictionary required. If necessary, add space to the SYSTEM tablespace.
In addition, running the conversion scripts (such as the u0703040.sql script) to complete the migration may require more space in the SYSTEM tablespace and in the rollback segments. Insufficient space results in an "unable to extend" warning when you run a conversion script. The exact amount of space required to run the conversion scripts varies depending on the number of objects in the database. If you encounter "unable to extend" warnings when you run a conversion script, then try increasing the SYSTEM tablespace and the rollback segments; then, rerun the script.
If you need to add more space to the SYSTEM tablespace, then issue a statement similar to the following, substituting the appropriate directory path and name for the new datafile and the amount of space you need to add:
ALTER TABLESPACE system ADD DATAFILE '/home/user1/mountpoint/oradata/db1/system02.dbf' SIZE 50M AUTOEXTEND ON NEXT 10M MAXSIZE UNLIMITED;ALTER ROLLBACK SEGMENT rb STORAGE (MAXEXTENTS UNLIMITED);
The value of DB_BLOCK_SIZE (an initialization parameter in the initialization parameter file) in the Oracle7 database and in the migrated Oracle9i database must be the same. Oracle9i requires a minimum block size of 2048 bytes (2 KB). Above this amount, integer multiples of your operating system's physical block size are acceptable. However, multiples of 2 KB, especially powers of 2--that is, 2 KB, 4 KB, 8 KB, 16 KB--provide for the most robust operation.
Make sure the Oracle9i block size setting meets the following criteria:
There are many issues relating to SQL*Net that you must consider when you migrate your database to Oracle9i, not the least of which is deciding whether you will migrate to Oracle Net Services.
|
See Also:
Appendix F, "Migration and Compatibility for Oracle Net Services" for information about these issues and for instructions on migrating from SQL*Net to Oracle Net. |
You can migrate an Oracle7 replication environment to Oracle9i. Oracle7 sites can coexist and run successfully with version 8 and Oracle9i sites within the replication environment. However, take special care to accommodate the various replication features implemented on each system.
|
See Also:
Appendix G, "Migration and Compatibility for Replication Environments" for detailed instructions about migrating systems using replication features |
If you are migrating a system with Oracle Parallel Server installed, then most of the actions described in this chapter should be performed on only one node of the system. So, perform the actions described in this chapter on only one node unless instructed otherwise in a particular step. Support for coexistence of different versions of the database is operating system-specific for Oracle Parallel Server.
See Oracle Text Application Developer's Guide for information about migrating from ConText to Oracle Text.
The Migration utility cannot migrate a database to a computer system that has a different operating system. For example, it cannot migrate a database from Oracle7 on Solaris to Oracle9i on Windows NT. However, you normally can use Export/Import to migrate a database to a different operating system.
|
Note: Starting with release 8.1, a change in word-size is supported during the migration process. A change in word size involves switching between 32-bit and 64-bit architecture within the same operating system. See "Changing Word-Size" for more information. |
In Oracle9i, the SQL NCHAR datatypes (NCHAR, NVARCHAR, and NCLOB) will be limited to the Unicode character set encoding (UTF8 and AL16UTF16) only. When you migrate to Oracle9i, the value of the National Character Set of the migrated database is set to AL16UTF16.
The AL24UTFFSS Unicode character set has been desupported in Oracle9i. AL24UTFFSS was introduced in Oracle7 as the Unicode character set supporting the UTF-8 encoding scheme based on the Unicode 1.1 standard, which is now obsolete. In Oracle9i, The Unicode database character sets AL32UTF8 and UTF8, include the Unicode enhancements based on the Unicode 3.1 standard.
The migration path for existing AL24UTFFSS databases is to upgrade your database character set to UTF8 prior to upgrading to Oracle9i. As with all migrations to a new database character set, Oracle Corporation recommends you use the Character Set Scanner for data analysis before attempting to migrate your existing database character set to UTF8.
When migrating from Oracle7 in a distributed database configuration, make sure that no pending transactions are in the DBA_2PC_PENDING data dictionary view before migrating the database. Otherwise, when you open the database after migration using the ALTER DATABASE RESET LOGS statement and a transaction is pending, you will encounter an error.
If there are any pending transactions, then resolve them before you migrate using the SQL commands COMMIT FORCE or ROLLBACK FORCE.
Complete the following steps before you migrate your Oracle7 database to Oracle9i:
If you are not sure whether the Procedural Option is installed, then you can check by starting Server Manager.
The following is an example of the messages you will see when Server Manager starts:
Oracle Server Manager Release 2.3.3.0.0 - Production

Copyright (c) Oracle Corporation 1994, 1995. All rights reserved.

Oracle7 Server Release 7.3.4.0.0 - Production
With the distributed, replication, parallel query, Parallel Server
and Spatial Data options
PL/SQL Release 2.3.4.0.0 - Production
The messages you see may be slightly different, based on the options you have installed and their release numbers. If you see "PL/SQL" in the messages, as in the last line in the preceding example, then the Procedural Option is installed. Otherwise, it is not installed.
To determine whether any datafiles require recovery, issue the following SQL statement:
SELECT * FROM v$recover_file;
You should see a "0 rows selected" message, which indicates that all datafiles are either online or offline normal. If any datafiles are listed, then you must restore the datafiles before you migrate the database. You can use the V$DATAFILE dynamic performance view to find the datafile name based on the datafile number. The Oracle9i Migration utility will not proceed, and will display an error, if any datafiles require media recovery.
Tablespaces that are not taken offline cleanly must be dropped or brought online before migration. Otherwise, these tablespaces will not be available under Oracle9i after the migration. Typically, tablespaces that are taken offline by using an ALTER TABLESPACE OFFLINE IMMEDIATE or ALTER TABLESPACE OFFLINE TEMPORARY statement require media recovery.
After migration, tablespaces that are offline when you open the Oracle9i database remain in Oracle7 database file format. The offline tablespaces can be brought online at any time after migration, and the file headers are converted to Oracle9i format at that time. In addition, if you want to avoid large restores in the event of a failure, then you can make all tablespaces except SYSTEM and ROLLBACK offline normal; then, you can restore only the datafiles for SYSTEM and ROLLBACK if you need to run another migration.
OUTLN, because this schema is created automatically when you install Oracle9i. If you have a user or role named OUTLN, then you must drop the user or role and recreate it with a different name.
To check for a user with the name OUTLN, issue the following SQL statement:
SELECT username FROM dba_users WHERE username = 'OUTLN';
If you do not have a user named OUTLN, then zero rows are selected.
To check for a role with the name OUTLN, issue the following SQL statement:
SELECT role FROM dba_roles WHERE role = 'OUTLN';
If you do not have a role named OUTLN, then zero rows are selected.
MIGRATE, because the Oracle9i Migration utility creates this schema and uses it to replace any pre-existing user or role with this name, and finally drops it from the system.
To check for a user with the name MIGRATE, issue the following SQL statement:
SELECT username FROM dba_users WHERE username = 'MIGRATE';
If you do not have a user named MIGRATE, then zero rows are selected.
To check for a role with the name MIGRATE, issue the following SQL statement:
SELECT role FROM dba_roles WHERE role = 'MIGRATE';
If you do not have a role named MIGRATE, then zero rows are selected.
SYSTEM rollback segment does not have an OPTIMAL setting. An OPTIMAL setting may cause errors during migration.
To check the OPTIMAL setting for the SYSTEM rollback segment, issue the following SQL statement:
SELECT a.usn, a.name, b.optsize
    FROM v$rollname a, v$rollstat b
    WHERE a.usn = b.usn AND name = 'SYSTEM';
Your output should be similar to the following:
USN        NAME                           OPTSIZE
---------- ------------------------------ ----------
         0 SYSTEM
1 row selected.
If there is a value in the OPTSIZE column, then issue the following SQL statement to set optimal to NULL:
ALTER ROLLBACK SEGMENT SYSTEM STORAGE (OPTIMAL NULL);
You can reset OPTIMAL when migration is complete.
MAXEXTENTS parameter in the STORAGE clause of the ALTER ROLLBACK SEGMENT statement (optional).
The following is an example of the ALTER ROLLBACK SEGMENT statement:
ALTER ROLLBACK SEGMENT system
   STORAGE (NEXT 500K MAXEXTENTS 121);
You may need more space in the SYSTEM rollback segment to complete the migration successfully. If there is not enough space in your SYSTEM rollback segment, then you may encounter errors when you run the Migration utility in the Oracle7 environment.
SHUTDOWN NORMAL or SHUTDOWN IMMEDIATE statement; do not use SHUTDOWN ABORT.
SHUTDOWN IMMEDIATE
If you are using Oracle Parallel Server, then shut down all instances.
In addition to the steps described in the previous section, "Prepare the Oracle7 Source Database for Migration", complete the following steps if you are migrating your database on a Windows platform:
If the required release of SQL*Net is not installed, complete the following steps to install it:
If you are installing SQL*Net release 2.3.2.1.12, navigate to the following directory on the CD-ROM:
\patches\sqlnet\232112\nt_x86\install
If you are installing SQL*Net release 2.3.3.0.3, navigate to the following directory on the CD-ROM:
\patches\sqlnet\23303\nt_x86\install
nt.prd file.
Complete the following steps to install the release 9.0.1 software:
If you are migrating a system with Oracle Parallel Server installed, then see Oracle9i Real Application Clusters Installation and Configuration for additional installation instructions.
If you need help at any screen or want to consult more documentation about the Oracle Universal Installer, then click the Help button to open the online help.
The Available Products screen appears.
After you make your selection, click Next.
If you chose Custom, the Available Product Components screen appears. Complete the following steps:
Make sure you install Oracle Utilities to install the Migration utility.
Make sure you install all of the options you installed with the Oracle7 database, assuming you do not want to discontinue use of a particular option. For example, if you installed Oracle Replication in Oracle7, then you should install it in Oracle9i.
If you select the Upgrade or Migrate an Existing Database check box, then the Oracle Data Migration Assistant is started automatically after installation. Because you are following the instructions for migrating the database using the Migration utility, you should not start the Oracle Data Migration Assistant.
Complete any remaining screens until you reach the Summary screen. Click the Help button if you need help for a certain screen.
When installation has completed successfully, click the Exit button to close the Oracle Universal Installer.
After you successfully install Oracle9i on a Windows platform, complete the following steps. If your operating system is UNIX, then skip the rest of this section and go to "Review Migration Utility Command-Line Options".
C:\> NET START OracleServiceORCL
ORACLE_SID to the SID of the database you are migrating. For example, if the SID of the database you are migrating is ORCL, then enter the following at an MS-DOS prompt:
C:\> SET ORACLE_SID=ORCL
The next task in the migration process is running the Oracle9i Migration utility. Before you begin that task, review the following command-line options for the Migration utility because you may want to use some of them in your migration. In addition, your operating system-specific Oracle documentation may contain more information about Migration utility command-line options.
Complete the steps in the following sections to migrate an Oracle7 source database to Oracle9i using the Migration utility.
You only need to complete the steps described in this section if you are migrating your Oracle database on a UNIX operating system. If your operating system is Windows, then skip the rest of this section and go to "Perform Migration Steps in the Oracle7 Environment".
On UNIX operating systems, the migprep utility prepares the Oracle7 environment for migration by copying required migration files from the Oracle9i Oracle home to the Oracle7 Oracle home. With your environment variables pointing to the new release 9.0.1 Oracle home, run migprep in the following way:
migprep new_oracle_home old_oracle_home
Where new_oracle_home is the complete path of the new Oracle9i Oracle home directory and old_oracle_home is the complete path of the old Oracle7 Oracle home directory.
For example, if your new Oracle9i Oracle home is /oracle/product/9.0 and your old Oracle7 Oracle home is /oracle/product/7.3, then complete the following steps:
ORACLE_HOME/bin directory in your release 9.0.1 installation.
migprep:
migprep /oracle/product/9.0 /oracle/product/7.3
ORA_NLS33 environment variable to the following directory in your Oracle7 environment:
$ORACLE_HOME/migrate/nls/admin/data
Complete the following migration steps in the Oracle7 environment. These steps apply to both UNIX systems and Windows platforms.
SYSDBA privileges.
STARTUP
NLS_LANG environment variable is set to the character set you are using for your database.
To check your character set, issue the following SQL statement:
SELECT * FROM v$nls_parameters
   WHERE parameter = 'NLS_LANGUAGE'
      OR parameter = 'NLS_TERRITORY'
      OR parameter = 'NLS_CHARACTERSET';
You use all three values returned by this query to set NLS_LANG. For example, suppose your output for the query above is the following:
PARAMETER                   VALUE
---------------------  ---------------------------
NLS_LANGUAGE               AMERICAN
NLS_TERRITORY              AMERICA
NLS_CHARACTERSET          US7ASCII
In this case, set NLS_LANG to the following at a command prompt:
AMERICAN_AMERICA.US7ASCII
To check if you have DBA privileges, query the DBA_ROLE_PRIVS static data dictionary view. For example, if you are connected as user SYSTEM, then enter the following SQL statement:
SELECT * FROM dba_role_privs WHERE grantee = 'SYSTEM';
You have DBA privileges if 'DBA' is listed in the GRANTED_ROLE column for the user. If you do not have DBA privileges, then connect as a user who does.
RESTRICTED SESSION privilege connects to the database while the Migration utility is running. Also, "Normal" users should not connect to the database during migration.
SPOOL v7files.log
SELECT member FROM v$logfile;

SELECT name FROM v$datafile;

SELECT value FROM v$parameter WHERE name = 'control_files';
SPOOL OFF
The v7files.log spool file lists all of the files that you must back up in Step 9.
SHUTDOWN NORMAL or SHUTDOWN IMMEDIATE statement; do not use SHUTDOWN ABORT. The Oracle7 source database must be shut down cleanly; therefore, no redo information or uncommitted transactions can remain.
SHUTDOWN IMMEDIATE
If you are using Oracle Parallel Server, then shutdown all instances.
v7files.log spool file that you generated in Step 7.
The steps required to run the Migration utility on UNIX are different than the steps required to run the Migration utility on Windows platforms. Complete the steps in the appropriate section:
Complete the following steps to run the Migration utility on a UNIX operating system:
Step 3 in the section "Prepare the Oracle7 Environment for Migration on UNIX Operating Systems" for detailed information about the environment variables to check.
See Also:
SYSTEM tablespace (optional).
A common migration problem is running out of space in the SYSTEM tablespace during migration. The Migration utility will not complete the migration unless sufficient space is allocated in the SYSTEM tablespace. To determine disk space requirements for a successful migration, run the Oracle9i Migration utility with the CHECK_ONLY command-line option set to true by entering the following at a system prompt:
mig CHECK_ONLY = true
The CHECK_ONLY command-line option causes the Migration utility to assess the amount of disk space required for migration, check the amount of space available, and issue an informational message about the disk space requirements. When the CHECK_ONLY command-line option is set to true, the Migration utility does not build the Oracle9i data dictionary or perform any other migration processing.
If the CHECK_ONLY command-line option shows that you need to add more space to the SYSTEM tablespace, then you should add the amount specified by the CHECK_ONLY option plus an additional 25 megabytes. The additional 25 megabytes approximates the amount of space required by the migration scripts that you will run later in the migration process.
To add space to the SYSTEM tablespace, issue a statement similar to the following, substituting the appropriate directory path and name for the new datafile and the amount of space you need to add:
ALTER TABLESPACE system
   ADD DATAFILE '/home/user1/mountpoint/oradata/db1/system02.dbf'
   SIZE 50M
AUTOEXTEND ON NEXT 10M MAXSIZE UNLIMITED;
If you add space to the SYSTEM tablespace, then remember to shut down the database when you are finished.
mig
The command is mig unless stated otherwise in your operating system-specific Oracle documentation. Enter mig alone to run the Migration utility with a default set of options, or enter mig followed by one or more selected options.
|
See Also:
"Review Migration Utility Command-Line Options" for information about command-line options. Oracle Corporation recommends using the |
If ORACLE_HOME points to the Oracle7 executables, then an ORA-00223 error is displayed when you run the ALTER DATABASE CONVERT statement later in the migration process, stating "conversion data file is invalid or incorrect version".
Complete the following steps to run the Migration utility on a Windows platform:
PFILE option included:
C:\> mig PFILE=ORACLE7_HOME\DATABASE\INIT_PARAM_FILE
Replace the ORACLE7_HOME variable with the complete path to the Oracle7 Oracle home directory. Also, replace the INIT_PARAM_FILE variable with the full name of the initialization parameter file for the Oracle7 database.
For example, if ORACLE7_HOME is C:\ORANT and INIT_PARAM_FILE is INITORCL.ORA, then enter the following:
C:\> mig PFILE=C:\ORANT\DATABASE\INITORCL.ORA
You can enter mig with the PFILE option only to run the Migration utility with a default set of options, or you can enter mig followed by more selected options.
|
See Also:
"Review Migration Utility Command-Line Options" for information about command-line options. Oracle Corporation recommends using the |
SYSDBA privileges on the Oracle7 database. This prompt appears because the DBA_AUTHORIZATION registry parameter is set improperly or is not set at all.
C:\> NET STOP OracleServiceORCL
| Oracle7 Release... | Enter at the MS-DOS Command Prompt... |
|---|---|
|
7.1 |
|
|
7.2 |
|
|
7.3 |
|
For example, if your Oracle7 release is release 7.3.4 and your SID is ORCL, then enter the following MS-DOS command:
C:\> ORADIM73 -DELETE -SID ORCL
C:\> ORADIM -NEW -SID SID -INTPWD PASSWORD -MAXUSERS USERS -STARTMODE AUTO
     -PFILE ORACLE_HOME\DATABASE\INITSID.ORA
This syntax includes the following variables:
For example, if your SID is ORCL, your PASSWORD is TWxy579, the maximum number of USERS is 10, and the ORACLE_HOME directory is C:\ORA90, then enter the following command:
C:\> ORADIM -NEW -SID ORCL -INTPWD TWxy579 -MAXUSERS 10 -STARTMODE AUTO
     -PFILE C:\ORA90\DATABASE\INITORCL.ORA
Check the results after running the Migration utility. The Migration utility generates informational messages and echoes its progress as it runs the migrate.bsq script. If the Migration utility exits with an ORA- error, then check Appendix A, "Troubleshooting Migration Problems", for information about the error and the actions to perform to resolve the problem.
The Migration utility creates a convert file that contains the information of the Oracle7 control file. Later in the migration process, the convert file is used by ALTER DATABASE CONVERT to create a new control file in Oracle9i.
The name and location of the convert file are operating system-specific. For example, on a UNIX operating system, the default location is ORACLE_HOME/dbs in the Oracle7 environment, and the default filename in this directory is convsid.dbf, where sid is your Oracle7 instance ID. On Windows platforms, the default location is ORACLE_HOME\rdbms in the Oracle9i environment, and the default filename in this directory is convert.ora.
|
Caution: Do not open the Oracle7 database, which was shut down by the Oracle9i Migration utility. To ensure datafile version integrity, the SCNs in the dictionary, the convert file, and file header must all be consistent when the database is converted to Oracle9i. If the Oracle7 database is opened after running the Migration utility, then the SCN check will fail when the database is converted to Oracle9i, and an ORA-01211 error will be displayed, stating "Oracle7 datafile is not from migration to Oracle8". Therefore, if the Oracle7 database is opened, then you must rerun the Migration utility, starting at Step 8. |
After you successfully run the Migration utility, perform a cold backup of the Oracle7 database. This backup serves the following purposes:
ALTER DATABASE CONVERT statement on Oracle9i, then you can restore the backup, start the Oracle7 database, and complete the procedure in "Abandoning the Migration".
ALTER DATABASE CONVERT or ALTER DATABASE OPEN RESETLOGS), then you can restore this backup, fix the problems, and continue the conversion process. However, if you restore a backup that was performed before you ran the Migration utility, then you must rerun the Migration utility.
In addition, perform a backup of the entire Oracle7 software distribution, including the Oracle7 home directory. Make sure the backup includes the following:
Complete the following migration steps in the Oracle9i environment:
CONTROL_FILES initialization parameter to specify new control file names. The CONTROL_FILES initialization parameter is typically set in the initialization parameter file, but, if you are using Oracle9i Real Application Clusters, then it may be set in the initdb_name.ora file instead.
You will issue the ALTER DATABASE CONVERT statement in Step 10. This statement automatically creates new control files. If you do not use the CONTROL_FILES parameter, then this statement uses the control file names of your pre-migration database (derived from the CONVERT file) and returns an error if the control files already exist. Therefore, in this case, you must remove or rename the control files.
However, if you use the CONTROL_FILES initialization parameter to specify new control file names, then the ALTER DATABASE CONVERT statement creates the new control files with the names you specify, and you do not need to remove the old control files. For a complete list of your existing control files, check the v7files.log spool file you created in Step 9.
Control files are considerably larger in Oracle9i than in Oracle7. For example, Oracle7 control files in the hundreds of kilobytes may expand into tens of megabytes in Oracle9i. The larger size in Oracle9i results from the storage of more information in the control file, such as backup and tablespace records. This size increase could be important if a control file is on a raw device or if its available disk space is restricted.
|
Note:
The |
convsid.dbf (where sid is the Oracle9i database name), should reside in ORACLE_HOME/dbs in both the Oracle7 and the Oracle9i environment.
On Windows platforms, the convert file, convert.ora, should reside in ORACLE_HOME\rdbms in the Oracle9i environment. It is automatically placed in this directory by the Migration utility, and you do not need to move it.
The name and location of the password file are operating system-specific; for example, on UNIX operating systems, the default password file is ORACLE_HOME/dbs/orapwsid, but on Windows platforms, the default password file is ORACLE_HOME\database\pwdsid.ora. In both cases, sid is your Oracle instance ID.
ORACLE_HOME/dbs on UNIX platforms and in ORACLE_HOME\database on Windows platforms. The initialization parameter file can reside anywhere you wish, but it should not reside in the Oracle7 Oracle home after you migrate to Oracle9i.
initdb_name.ora file resides within the Oracle7 Oracle home, then move or copy the initdb_name.ora file to a location outside of the Oracle7 Oracle home.
COMPATIBLE initialization parameter in your initialization parameter file to a valid Oracle9i setting, such as 8.1.0 or 9.0.0. Make sure the COMPATIBLE parameter is not set to any Oracle7 or 8.0 release, because if it is, then you will not be able to start the Oracle9i database. See "Setting the COMPATIBLE Initialization Parameter" for more information.
Also, if you are using Oracle9i Real Application Clusters, then see Oracle9i Real Application Clusters Installation and Configuration for more information about obsolete Oracle9i Real Application Clusters initialization parameters.
JOB_QUEUE_PROCESSES initialization parameter, then set this parameter to 0 (zero) in the initialization parameter file. After migrating your database, you can change the setting for this parameter back to its normal setting.
OPTIMIZER_MODE initialization parameter is set to choose. After migrating your database, you can change the setting for this parameter back to its normal setting.
PARALLEL_SERVER initialization parameter to false. You can change it back to true after migration is complete.
LM_LOCKS, LM_RESS, and LM_PROCS initialization parameters equal to the lock, resource, and process parameters for the DLM used in Oracle7.
DB_DOMAIN initialization parameter is set properly.
"The DB_DOMAIN Parameter" for more information about setting this initialization parameter.
See Also:
BACKGROUND_DUMP_DEST and USER_DUMP_DEST initialization parameters that point to RDBMS71, RDBMS72, or RDBMS73 to point to the following directories instead (optional):
| Initialization Parameter | Change Setting To |
|---|---|
|
|
|
|
|
|
In the settings, substitute the complete ORACLE_BASE path for ORACLE_BASE and substitute the database name for DB_NAME.
initdb_name.ora file in the same way that you modified the initialization parameter file in steps a to i.
Make sure you save all of the files you modified after making these adjustments.
convsid.dbf file to match the Oracle9i DB_NAME. For example, if the Oracle7 DB_NAME is DBMS7 and the Oracle9i DB_NAME is DBMS9, then rename the convert file from convDBMS7.dbs to convDBMS9.dbs. This action is not necessary on Windows platforms.
DB_NAME initialization parameter in the initialization parameter file to the Oracle9i database name.
ORACLE_HOME/rdbms/admin directory. You should be in the Oracle9i Oracle home.
SYSDBA privileges.
SQL> STARTUP RESTRICT NOMOUNT
You may need to use the PFILE option to specify the location of your initialization parameter file.
You may see error messages listing obsolete initialization parameters. If so, then make a note of the obsolete initialization parameters and continue with the migration normally. Then, remove the obsolete initialization parameters the next time you shut down the database (Step 17).
SQL> ALTER DATABASE CONVERT;
Successful execution of this statement is the "point of no return" to Oracle7 for this database. However, if necessary, you can restore the Oracle7 database from backups.
If errors occur during this step, then correct the conditions that caused the errors and rerun the Migration utility. Restart at Step 3. Otherwise restore the backup you performed after you ran the Migration utility.
|
See Also:
"Problems at the ALTER DATABASE CONVERT Statement" for information about common errors encountered at this step and the actions required to resolve them. |
SQL> ALTER DATABASE OPEN RESETLOGS;
When the Oracle9i database is opened, all rollback segments that are online are converted to the new Oracle9i format.
If you encounter errors when you issue this statement, then start the migration process over from the beginning, ensuring the database is not opened in the Oracle7 environment after the Migration utility completes. Start from the beginning of this chapter, Chapter 4, but make sure you completed all of the pre-migration steps described in Chapter 3.
SQL> SPOOL catoutm.log
If you want to see the output of the scripts you will run on your screen, then you can also issue a SET ECHO ON statement:
SQL> SET ECHO ON
u0703040.sql:
SQL> @u0703040.sql
The u0703040.sql script is the database conversion script for all Oracle7 releases supported by the Migration utility on your operating system. The u0703040.sql script creates and alters certain system tables and drops the MIGRATE user. It also runs the catalog.sql and catproc.sql scripts, which create the system catalog views and all the necessary packages for using PL/SQL.
If you encounter any problems when you run this script, or any of the scripts in the remaining steps, then correct the causes of the problems and rerun the script. You can rerun any of the scripts described in this chapter as many times as necessary.
|
See Also:
"Running Scripts" for information about the types of errors to look for when you run a script. |
catclust.sql:
SQL> @catclust.sql
utlrp.sql (optional):
SQL> @utlrp.sql
The utlrp.sql script recompiles all existing PL/SQL modules that were previously in an INVALID state, such as packages, procedures, types, and so on. These actions are optional; however, they ensure that the cost of recompilation is incurred during installation rather than in the future.
Oracle Corporation highly recommends performing this optional step.
SQL> SPOOL OFF
Then, check the spool file and verify that the packages and procedures compiled successfully. You named the spool file in Step 12; the suggested name was catoutm.log.
You should look for errors that alert you to insufficient space, and for errors that alert you that a script failed to run. If you see these types of errors, then your migration may not be completely successful. However, you typically can ignore errors about the failure to alter or drop an object that does not exist.
If you specified SET ECHO ON, then you may want to SET ECHO OFF now:
SQL> SET ECHO OFF
SHUTDOWN on the Oracle9i database:
SQL> SHUTDOWN IMMEDIATE
Executing this clean shutdown flushes all caches, clears buffers, and performs other DBMS housekeeping activities. These measures are an important final step to ensure the integrity and consistency of the newly migrated Oracle9i database.
The COMPATIBLE initialization parameter controls the compatibility level of your database. Set the COMPATIBLE initialization parameter in your initialization parameter file based on the compatibility level you want for your migrated database.
If you encountered a message listing obsolete initialization parameters when you started the database in Step 9, then remove the obsolete initialization parameters from the initialization parameter file now.
If you retain the old Oracle7 software, then never start the migrated database with the old Oracle7 software. Only start the database with the executables in the new Oracle9i installation. Also, before you remove the old Oracle7 environment, make sure you relocate any datafiles in that environment to the Oracle9i environment. See the Oracle9i Database Administrator's Guide for information about relocating datafiles.
Caution:
Errors may be caused by the following actions or omissions:
Appendix A, "Troubleshooting Migration Problems" and Oracle9i Database Error Messages for information about errors during migration and about corrective action for each error.
See Also:
If you backed up your Oracle7 database before you ran the Migration utility, then the easiest way to abandon a migration is to restore that backup. However, if you do not have a backup, or if you took the backup after running the Migration utility, then you must complete the procedure described in this section to abandon the migration.
You can run the Oracle9i Migration utility multiple times and still return to the Oracle7 database. However, running the Migration utility automatically eliminates the Oracle7 database catalog views. Therefore, to return to the Oracle7 database after running the Migration utility, you must run the Oracle7 catalog.sql script to restore the Oracle7 database catalog views.
|
Note:
You cannot use the procedure below to abandon the migration if you already executed the |
To abandon the migration, you generally must restore the Oracle7 database by completing the following steps in the Oracle7 environment:
MIGRATE user:
SQL> DROP USER MIGRATE CASCADE;
catalog.sql and catproc.sql:
SQL> @catalog.sql
SQL> @catproc.sql
catsvrmg.sql:
SQL> @catsvrmg.sql
catparr.sql:
SQL> @catparr.sql
catrep.sql:
SQL> @catrep.sql
|
|
 Copyright © 1996-2001, Oracle Corporation. All Rights Reserved. |
|